
Introduction
Cisco IQ™ provides customers with enhancements and features designed to improve asset visibility, deliver smarter insights across their environments, and streamline case management. In addition, AI features such as the Cisco IQ AI Assistant optimize operational outcomes and the Cisco IQ user experience by providing contextual understanding that empowers users to make proactive, informed decisions and streamlines processes for customer engagement and success.
Cisco IQ Link securely collects and transmits asset telemetry from your on-premises network to Cisco IQ, enabling AI-powered predictive insights that help you improve network visibility, anticipate issues, and drive operational efficiency.
Local Authentication
Administrators should use the following credentials to log in to Cisco IQ Link:
-
Default Username: admin
-
Default Password: password that is set during the Cisco IQ Link installation process; see the Cisco IQ Link Getting Started Guide for more information
Upon login, the default user, “admin”, and the account name, “Default-Customer”, displays on the home page.
Setting Local Admin Security
You can change your password and set up security questions through the Local Admin Security menu in System Configuration.
You have three (3) attempts to enter the correct password within a ten (10) minute period. If all three (3) attempts are unsuccessful, your account temporarily locks for 60 minutes to protect your security.
You cannot attempt to log in during the lockout period. The system displays the message: “Account locked due to too many failed attempts. Please try again later.”, including the time the lockout expires.
Your account automatically unlocks after 60 minutes, at which point you may attempt to log in or reset your password.
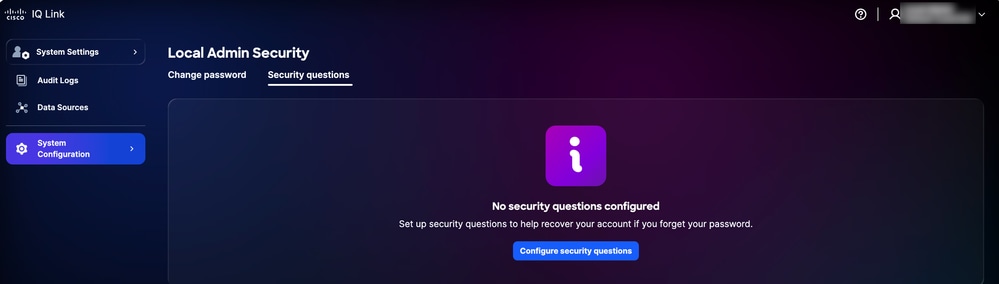
Setting Up Security Questions and Answers
Security questions help verify your identity if you forget your password. Administrators must set up answers to five (5) security questions to enable the password reset feature. This is a one-time setup.
To set up security questions:
-
From System Settings, choose System Configuration > Local Admin Security > Security Questions.
 Security Questions
 -
Click Configure security questions.
 Security Questions
-
Choose any five (5) security questions from the drop-down lists.
-
Enter your response for each question.
-
Click Save.
Managing Passwords
Only local Administrators can manage the password for Cisco IQ.
Prerequisites
To manage passwords, the following conditions must be met:
-
You are a local Administrator
-
You are using a local Administrator account (not Single Sign-On (SSO) or external authentication)
-
You are logged in to Cisco IQ
-
You know the current password
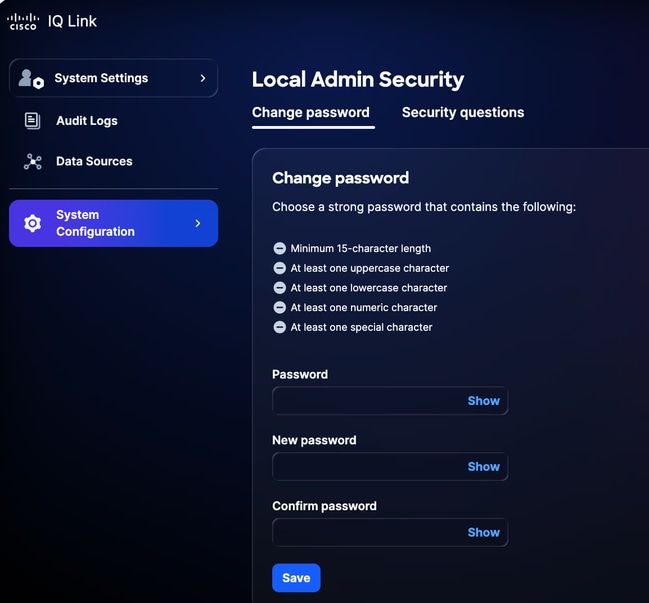
Changing Passwords
To change the password:
-
From System Settings, navigate to System Configuration > Local Admin Security > Change Password.
 Change Password
-
Enter the current Password.
-
Enter the New password.
-
Enter the new password again to confirm.
-
Click Save.
The password is updated in the Cisco IQ system, including the Cisco IQ Virtual Machine (VM).
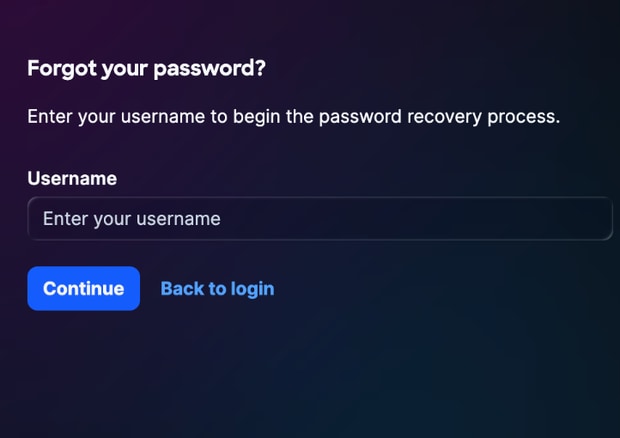
Resetting a Forgotten Password
You can reset a forgotten password using the security question verification process, if you have set up the security questions earlier. See Setting Up Security Questions and Answers for more details.
To reset a forgotten password:
-
Navigate to the Cisco IQ Link login page.
-
Click Forgot Password.
 Forgot Password
-
Enter the Username.
-
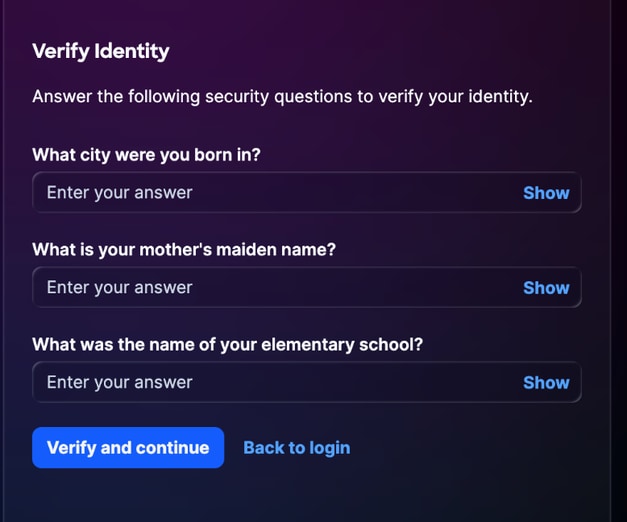
Click Continue. The Verify Identity page displays three (3) random security questions out of the five (5) questions that were previously configured.
 Verify Identity
-
Enter the responses for all three (3) displayed questions.
-
Click Verify and continue. If the submitted response matches your previously saved responses, you are prompted to enter a new password.
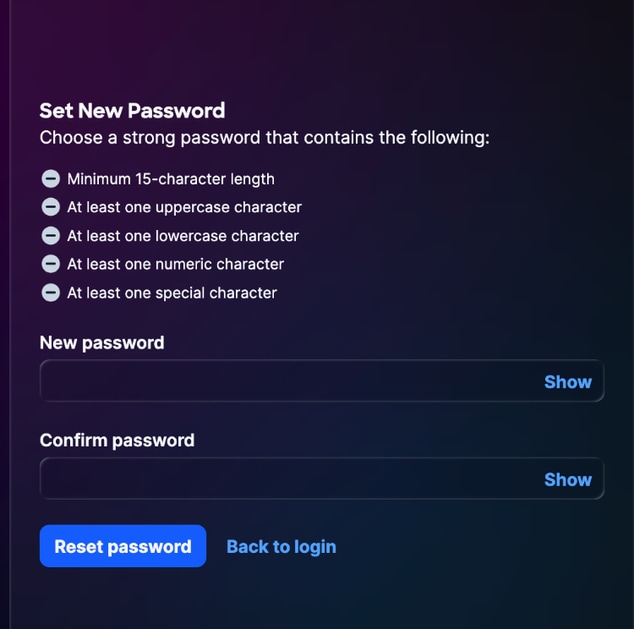 Reset Password
-
Enter the New password.
-
Enter the password again to confirm.
-
Click Submit.
Configuring Identity Provider
Once logged in to Cisco IQ Link, Administrators can configure various settings. Administrators can log in to Cisco IQ Link using local administration or Identity Provider (IDP) configuration.
Okta IDP SAML Configuration for SSO
Prerequisites to Configure IDP SAML
-
Local Administrator access to Cisco IQ Link
-
Access to IDP portal
IDP SAML Configuration for SSO
To configure IDP Security Assertion Markup Language (SAML) for SSO:
-
Navigate to your IDP portal.
-
Set the following attributes for the Cisco IQ Link instance.
Cisco IQ Link Attributes
| Field |
Value |
| Application Name |
<Application Name> |
| Environment |
ESP Business Application |
| Application Owner Groups |
Owner of the IDP settings |
| Team Mailer |
Mailer for the team |
| Audience |
Non-Workforce |
| Onboarding Category |
Select "New Onboarding" |
SAML Configuration Parameters
| Parameter |
Configuration |
Example |
| Audience (Entity ID) |
FQDN name |
mymanagementhost.mydomain.com |
| Single Sign-On URL |
SAML ACS endpoint |
https://mymanagementhost.mydomain.com/saml/acs |
| Name ID Format |
Email Address |
NA |
| Application Username |
Username |
NA |
- Configure the following mandatory attribute statements.
-
First Entry
-
Name: Username
-
Value: user.login
-
-
Second Entry
-
Name: Primary email
-
Value: user.email
-
-
Group Attribute Statements
-
Name: groups
-
Filter: REGEX
-
Value: .*
-
- Configure the Single Logout (SLO) settings in the application.
SLO Configuration Settings
| Field |
Value |
| Signature Certificate |
For Okta, this certificate is required only if you choose to enable SLO. Download the Signature Certificate using the Download SP Certificate in Identity Providers. Save the file as sp-public-key.crt. See Single Logout Configuration for more details. |
| SP metadata |
The SP metadata is required for ADFS IDP only (and not for Okta). |
| Do you want to enable Single Logout |
Yes or No |
| Single Logout URL |
https://mymanagementhost.mydomain.com/saml/logout |
| SP Issuer (Audience/Entity ID or ACS URL) |
https://mymanagementhost.mydomain.com |
-
Click the Download icon to download the “SP Metadata” file.
-
Provision or create the application as required by the provider.
Adding IDP
To add an IDP in Cisco IQ Link:
-
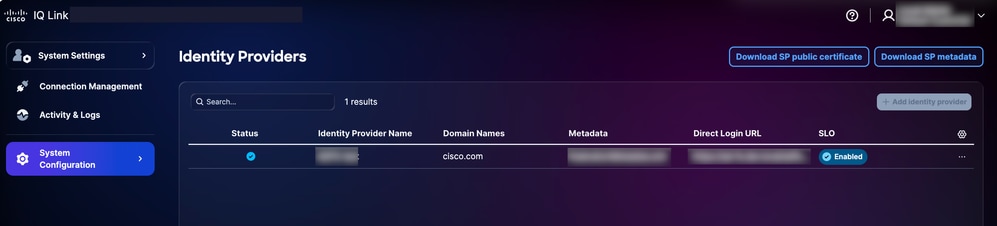
From System Settings, choose System Configuration > Identity Providers. The Identity Providers page displays.
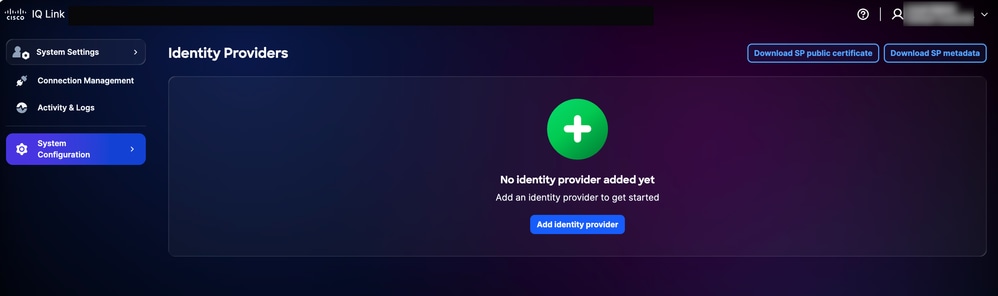 IDP Home page
-
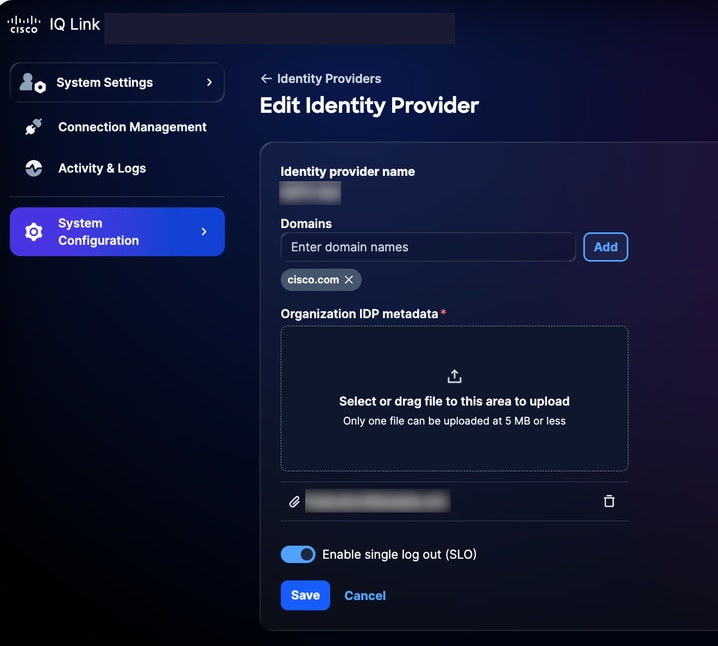
Click Add Identity Provider. The Add Identity Provider page displays.
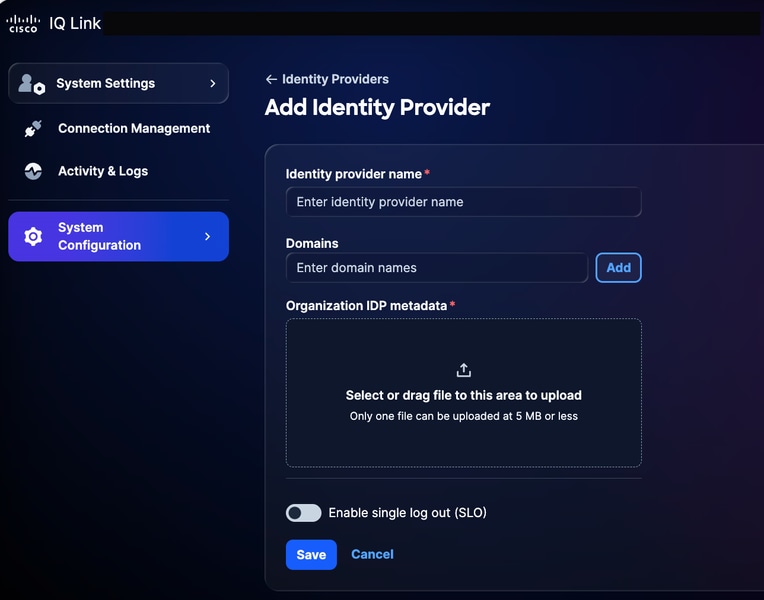 Add Identity Provider
-
Enter the Identity provider name.
-
Click Add to add a Cisco IQ Link configured domain name to the Domains field.
-
Drag-and-drop or upload the SAML metadata file obtained from the IDP application in the Organization IDP metadata field. This file contains certificate details and Service Provider (SP) entity details.
-
(Optionally) Turn on the Enable single logout toggle button. You can enable the SLO later as well.
-
Click Save.
-
Once configured, the login page displays an option to log in with SSO (via IDP).
 Cisco IQ Link Login
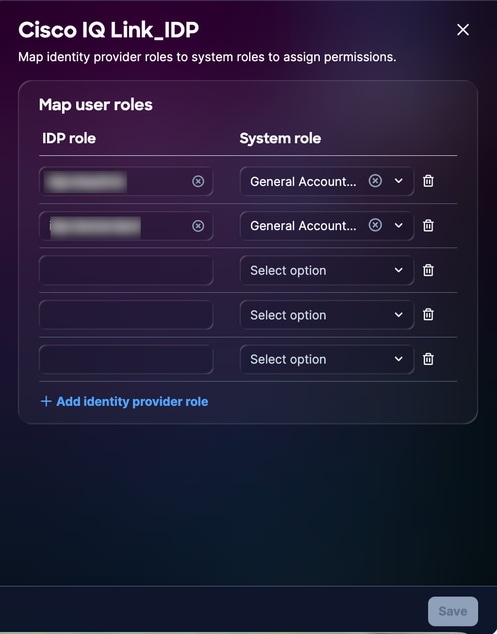
Role Mapping Configuration
-
From the added IDP, select the More Options icon > Map Roles. The Map user roles page displays.
 User Role Mapping
-
Enter an IDP role for the selected System role. The following system roles are supported:
- general_account _administrator: The general account administrator has full permissions to perform all the actions in the product
- general_account _viewer: The general account viewer has read only access
 Role Mapping Reference
-
Map additional roles as required by clicking Add identity provider role.
-
Click Save.
Single Logout Configuration
If you choose to enable SLO, you must upload metadata that includes the SLO URL. You can configure this by editing your Identity Provider settings and turning the toggle on for Enable Single Log Out. To complete SLO configuration:
-
From the Identity Providers page, click Download SP public certificate.
 Download Public Certificate
-
Save the download file as sp-public-key.crt.
-
Navigate to your IDP portal.
-
Upload the signature certificate file generated in the IDP SAML Configuration for SSO section.
-
Download the IDP metadata file again.
-
On the Identity Providers page, choose the added IDP’s More Options icon > Edit.
 Edit Identity Provider
-
Turn on the Enable single log out (SLO) toggle button.
-
Upload the newly downloaded meta data file.
-
Use the following checklist to verify SSO and SLO functionality:
Verification Checklist:
-
Local administrator login is successful
-
IDP portal is configured and provisioned
-
IDP is added to Cisco IQ with a “Success” status
-
Role mappings are configured and tested
-
SP metadata is downloaded and the certificate is extracted
-
If SLO is enabled, SLO configuration is complete with the real signature certificate
-
End-to-end SSO/SLO flow is tested successfully
Troubleshooting IDP Issues
The following list outlines common issues and possible solutions to help quickly identify and resolve problems related to IDP status, certificate errors, SSO login failures, and SLO configuration:
Troubleshooting
| Issue |
Solution |
| IDP status shows as “Incomplete” |
Verify the role mapping configurations |
| Certificate errors |
Verify certificate format and validity |
| SSO login failures |
Validate attribute mapping and group assignments |
| SLO not working as expected |
Ensure the certificate is properly uploaded and SLO URLs are configured |
ADFS IDP SAML Configuration for SSO
This section provides guidance to configure Microsoft Active Directory Federation Services (ADFS) as the SAML IDP for Cisco IQ.
Prerequisites to Configure ADFS IDP SAML for SSO
-
ADFS 6.0+ is recommended
-
Windows Server 2012 R2+
-
Configured Active Directory integration
-
SSL/TLS certificates on ADFS
-
Administrator access to Cisco IQ
-
Administrative access to ADFS server (Windows Server)
-
PowerShell access on ADFS server
-
Network connectivity between ADFS and Cisco IQ
-
ADFS server configuration details (as listed in the table below)
ADFS Server Configuration
| Item |
Description |
Example |
| Cisco IQ FQDN |
User deployment hostname |
devxx-23.cx-xxx-xxx.cisco.com |
| ADFS Server URL |
User ADFS server address |
https://ad-fs.dev.local |
| Company Domain |
Email domain |
company.com |
| AD Groups |
Active Directory group Domain Names (DN) |
CN=Role - CXIQ Developers |
Configuring ADFS Servers
To configure ADFS:
-
From System Settings, choose System Configuration > Identity Providers. The Identity Providers page displays.
 Download Options
-
Click Download SP public certificate and Download SP metadata to download these files.
-
Copy and save the service-provider-metadata.xml and service-provider-certificate.crt files to the ADFS directory (for example, C:-certificate.crt).
-
Log in to the ADFS server.
-
From the ADFS Management menu, click Relying Party Trusts.
-
From the Relying Party Trusts menu, click Add Relying Party Trusts. The new wizard opens.
-
Click the Claims Aware radio button.
-
Click Start to proceed with the configuration.
-
Click Import data about the relying party from a file.
-
Click Browse to select the service provider metadata file and complete the file upload.
-
Click Next.
-
Enter a display name (for example, “CIQ-Stage”), add any relevant notes, and click Next.
-
On the Choose Access Control Policy page, click Permit everyone (or the policy required by your organization’s security configuration).
-
Click Next through the remaining screens.
-
Click Close to complete the Relying Party Trust configuration.
Configuring ADFS Claim Rules
To configure ADFS Claim rules, perform the steps listed in the following sections.
Required Claims
Refer to the following table for required claims.
Required Claims
| Claim |
Purpose |
Source |
| |
User identifier |
AD Mail |
| Display Name |
User’s full name |
AD Display Name |
| NameID |
SAML subject |
Transformed from email |
| Groups |
Role-based access |
AD Group Membership (memberOf) |
Applying Claim Rules
- Define the name of your Relying Party Trust (for example, “Cisco IQ - Stage”).
$relyingPartyName = “Cisco IQ - Stage”- Define claim rules to send user information and group membership to Cisco IQ.
$claimRules = @’

@RuleTemplate = “LdapClaims”

@RuleName = “Send Email and Name”

c:[Type == “http://schemas.microsoft.com/ws/2008/06/identity/claims/windowsaccountname”, Issuer == “AD AUTHORITY”]
=> issue(store = “Active Directory”, types = (“http://schemas.xmlsoap.org/ws/2005/05/identity/claims/emailaddress”, “http://schemas.xmlsoap.org/ws/2005/05/identity/claims/name”), query = “;mail,displayName;{0}”, param = c.Value);

@RuleName = “Transform Email to NameID”
c:[Type == “http://schemas.xmlsoap.org/ws/2005/05/identity/claims/emailaddress”]
=> issue(Type = “http://schemas.xmlsoap.org/ws/2005/05/identity/claims/nameidentifier”, Issuer = c.Issuer, OriginalIssuer = c.OriginalIssuer, Value = c.Value, ValueType = c.ValueType, Properties[“http://schemas.xmlsoap.org/ws/2005/05/identity/claimproperties/format”] = “urn:oasis:names:tc:SAML:1.1:nameid-format:emailAddress”);

@RuleName = “Send Group Membership”
c:[Type == “http://schemas.microsoft.com/ws/2008/06/identity/claims/windowsaccountname”, Issuer == “AD AUTHORITY”]
=> issue(store = “Active Directory”, types = (“http://schemas.xmlsoap.org/claims/Group”), query = “;memberOf;{0}”, param = c.Value);
’@@- Apply the claim rules by running the following command:
Set-AdfsRelyingPartyTrust -TargetName $relyingPartyName -IssuanceTransformRules $claimRulesVerifying User Groups
- Set the username to check user’s group membership.
$username = “testuser”- Run the following commands to find the user’s account:
$searcher = [adsisearcher]“(samaccountname=$username)”

$user = $searcher.FindOne()- Display the groups the user belongs to.
$user.Properties.memberofExample Output:
CN=Role - CXIQ Developers,OU=Role Groups,DC=dev,DC=localConfigure ADFS to Trust the SP Signing Certificate
- In the ADFS server, import the SP certificate into the TrustedPeople store.
Import-Certificate -FilePath “C:-provider-certificate.crt” -CertStoreLocation “Cert:”- Choose one of the following options:
- Disable chain validation globally for this relying party
Set-AdfsRelyingPartyTrust `

    -TargetIdentifier “<sp_entity_id>” `

    -SigningCertificateRevocationCheck None `

    -EncryptionCertificateRevocationCheck None
OR
- Import the issuing CA certificate into the Trusted Root Certification Authorities store
Import-Certificate -FilePath “C:-iq-onprem-ca.cer” -CertStoreLocation “Cert:”- Apply the changes by restarting the ADFS service.
Restart-Service adfssrvExporting ADFS Metadata
You can download your ADFS metadata using either PowerShell or your web browser.
PowerShell
To export ADFS metadata using PowerShell:
-
Open PowerShell on your ADFS server.
-
Run the following commands to download the metadata file.
$metadataUrl = (Get-AdfsEndpoint | Where-Object {$_.Protocol -eq “Federation Metadata”}).FullUrl

Invoke-WebRequest -Uri $metadataUrl.AbsoluteUri -OutFile “C:-metadata.xml”

Write-Host “ADFS metadata exported to C:-metadata.xml” -ForegroundColor Green
After running the commands, the metadata file is saved to C:-metadata.xml.
Web Browser
To export ADFS metadata using a web browser:
-
Navigate to https://<your-adfs-server>/FederationMetadata/2007-06/FederationMetadata.xml.
-
Replace <your-adfs-server> with the hostname of your ADFS server.
-
Save the metadata XML file to your computer when prompted.
Adding ADFS IDP
-
On the Identity Providers page, click Add identity provider.
-
Enter the Identity provider name.
-
Enter the Domain(s) (for example, company.com).
-
(Optionally) Turn on the Enable single logout toggle button, if required.
-
Drag-and-drop or upload the SAML metadata file obtained from the IDP application in the Upload IDP Metadata field.
-
Click Save.
Configuring Role Mapping
Before proceeding to configure role mapping, ensure you can find groups from Active Directory to use for mapping. To find groups from Active Directory, run the following PowerShell command.
$searcher = New-Object DirectoryServices.DirectorySearcher

$searcher.Filter = “(&(objectClass=group)(cn=Role - CXIQ*))”

$searcher.PropertiesToLoad.Add(“distinguishedName”) | Out-Null

$searcher.PropertiesToLoad.Add(“cn”) | Out-Null

$searcher.FindAll() | ForEach-Object { $_.Properties[“distinguishedname”] }
The system queries Active Directory directly via LDAP, requiring no additional modules. Group information is returned in full Distinguished Name (DN) format, for example:
CN=Role - CXIQ Developers,OU=Groups,DC=dev,DC=example,DC=com CN=Role - CXIQ Viewers,OU=Groups,DC=dev,DC=example,DC=com
If the required groups are not listed, they must be created in Active Directory by an Administrator before you can complete the ADFS role mapping.
To configure role mapping:
-
From the added IDP, choose the More Options icon > Map Roles. The Map user roles page displays.
 Role Mapping
-
Enter an IDP role for the selected System role. The following system roles are supported:
-
general_account _administrator: The general account administrator has full permissions to perform all actions in the product. The IDP Role (parsed name) is CXIQ Admins.
-
general_account__viewer: The general account viewer has read-only access. The IDP Role (parsed name) is CXIQ Developers and CXIQ Viewers.
-
- Click Save. The status updates to Success.
Verification and Testing
Testing Authentication
-
In an Incognito or Private mode browser, navigate to https://your-cisco-iq-domain.com/login.
-
Log in using your Active Directory credentials in domain\username or user@domain.local format.
-
Verify that you are redirected to the Cisco IQ Home page (after successful authentication).
-
Confirm that the assigned roles display the correct parsed group names (for example, CXIQ Developers) in your user profile.
Testing Logout
To test logout, click Log out from Cisco IQ. The “Logging out, please wait…” message displays and you are redirected to the Cisco IQ Login page. The system also terminates the ADFS session. If you try to access ADFS directly, you are prompted to log in again.
Troubleshooting ADFS Issues
The following list outlines common issues and possible solutions to help quickly identify and resolve problems related to ADFS status, certificate errors, SSO login failures, and SLO configuration.
ADFS Issues
| Issue |
Symptoms / Description |
Causes / Checks / Workarounds and Fixes |
| Groups Not Extracted |
No roles after login |
● Missing claim rule: Re-run the instructions in Configuring ADFS Claim Rules ● Wrong group attribute: Must be http://schemas.xmlsoap.org/claims/Group ● User is not in AD groups |
| Decryption Failed |
"Failed to decrypt assertion" in logs |
Check configuration on ADFS certificate configuration |
| Login Loop |
Stuck in authentication or login loop |
● Invalid ACS URL: Verify: https://your-fqdn/saml/acs ● Cookie mismatch: Check browser cookies for the correct domain |
Diagnostics Commands to Troubleshoot
To ensure a successful integration between your ADFS environment and Cisco IQ, use the following diagnostic commands. These commands help verify metadata accessibility, certificate configurations, and endpoint settings.
- Verify ADFS metadata accessibility: Confirms that the ADFS Federation Metadata is reachable and publicly accessible; this is a critical step for establishing the initial trust
curl -k https://<your-adfs-domain>/FederationMetadata/2007-06/FederationMetadata.xml- Validate the encryption certificate: Ensures that the correct encryption certificate is associated with the Cisco IQ Relying Party Trust
Get-AdfsRelyingPartyTrust -Name “Cisco IQ - Stage” | Select-Object EncryptionCertificate | Format-List- Review SAML Endpoint Configuration: Verifies the SAML endpoints for the Cisco IQ trust are correctly configured and that authentication requests and assertions are routed to the expected URLs
Get-AdfsRelyingPartyTrust -Name “Cisco IQ - Stage” | Select-Object SamlEndpointsAdding SCP Servers
This Secure Copy Protocol (SCP) server is a prerequisite for importing upgrade files that are essential for adding, upgrading, or fixing the Cisco IQ installation.
To add a SCP Server:
-
From System Settings, choose System Configuration > SCP Server. The SCP Server page displays.
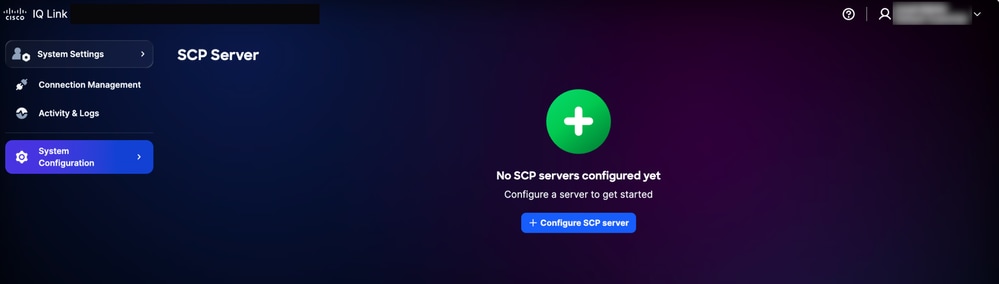 SCP Server Home page
-
Click Configure SCP Server.
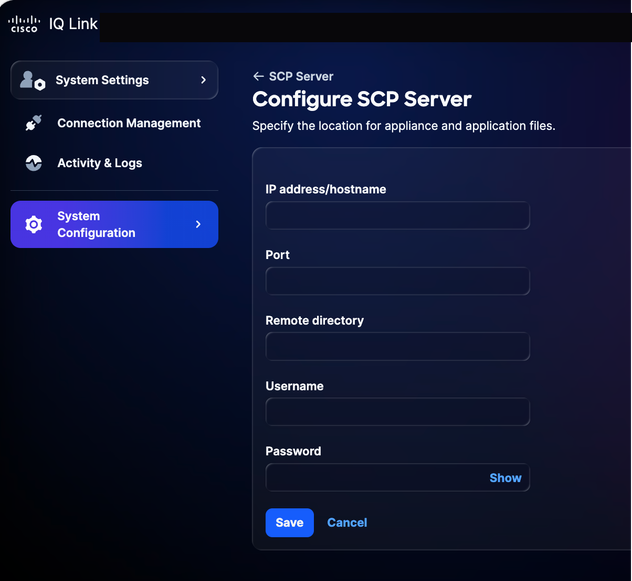 Configure SCP Server
-
Enter the IP address/hostname.
-
Enter a Port number.
-
Enter the Remote directory.
-
Enter a Username.
-
Enter a Password.
-
Click Save. A confirmation displays.
Editing Existing SCP Servers
To edit an existing SCP server:
-
Navigate to the SCP Server page.
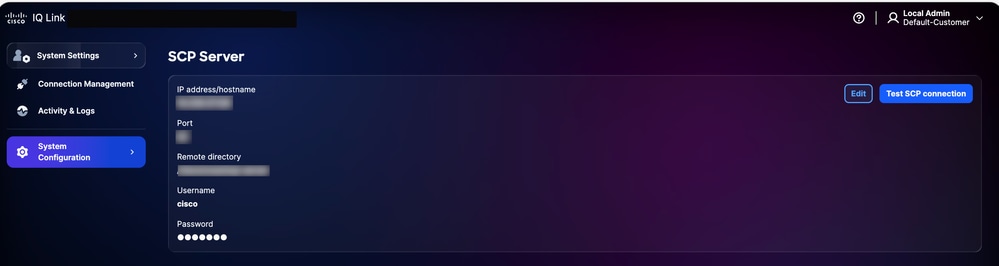 SCP Server
-
Click Edit for the desired existing SCP server.
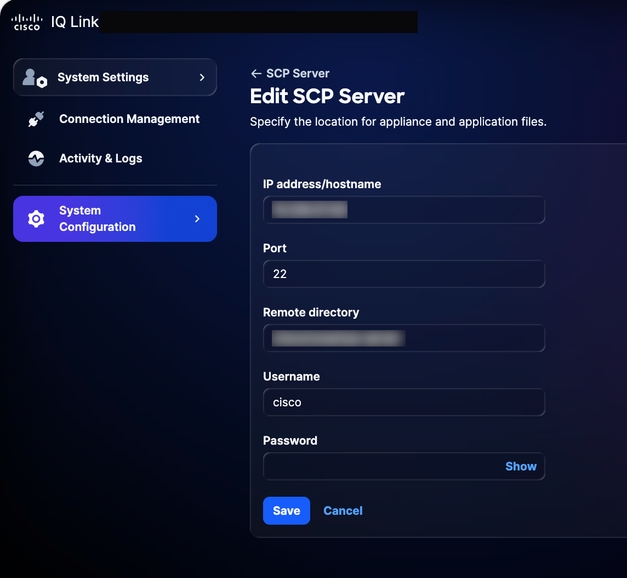 Editing SCP Server
-
Modify details as required.
-
Click Save.
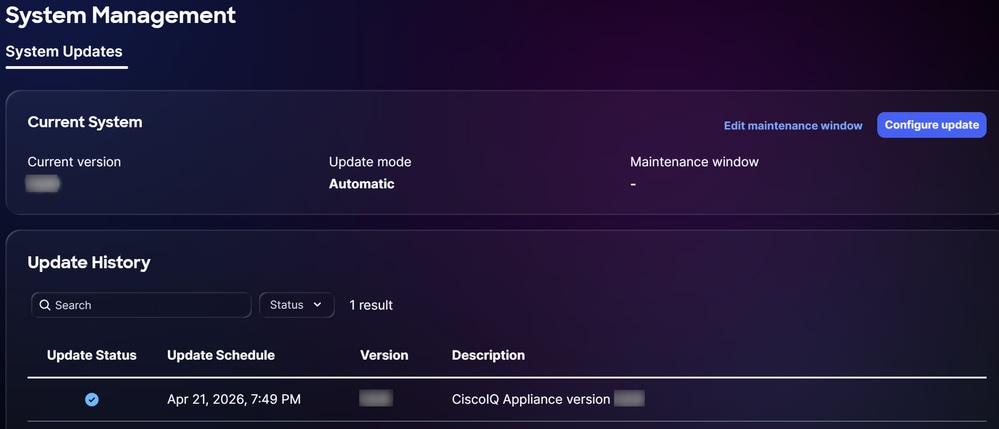
System Management
Customers can upgrade to latest Cisco IQ Link version through the UI. You can also verify from the Cisco IQ Data Connectors page.
To reschedule the system update:
-
From Administration, choose System Configuration > System Management. The System Management page displays. This page displays the system version that is currently running; if no updates have been configured, the Update History section is empty.
 System Upgrade
-
Click Reschedule update.
 Reschedule Upgrade
-
Click Update Now for immediate rescheduling or Update Later to schedule another time.
-
Click Save. A confirmation displays and you are redirected to the System Update Home page.
 Successful Upgrade
SSL Certificates Configuration
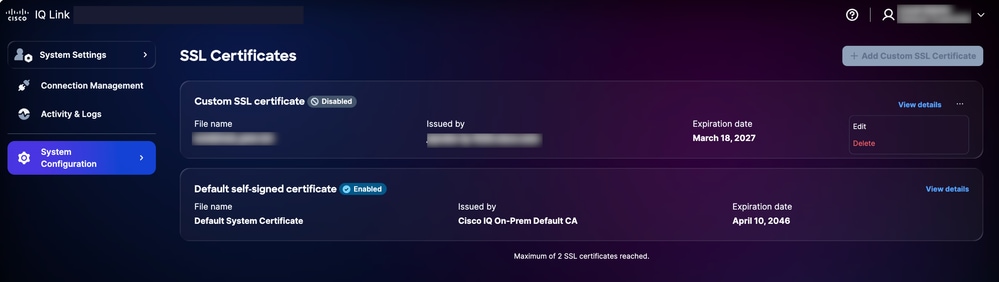
A default self-signed certificate is pre-installed and enabled in Cisco IQ, but users can upload custom SSL certificates. When a custom SSL certificate is enabled, it is used for HTTPS connections; if the certificate is disabled or deleted, the system automatically reverts to the default certificate.
Note: The certificate must have at least 90 days of validity remaining. A certificate is considered "nearing expiry" when it has less than 90 days remaining until expiration. After adding, editing, or deleting an SSL certificate, the customer must upload the new SSL as outlined in the Completing SLO Configuration section for the Okta IDP or the ADFS IDP.
Adding Custom SSL Certificate
To add a custom SSL certificate:
-
From System Settings, choose System Configuration > SSL Certificates. The SSL Certificates page displays, listing all SSL certificates for your system.
 Adding SSL Certificate
-
Click Add Custom SSL Certificate.
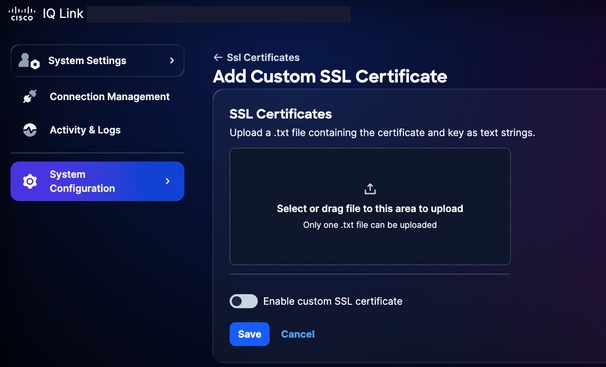 Upload SSL Certificates
-
Drag-and-drop or upload the custom SSL certificate into the SSL Certificate field.
-
Turn on the Enable custom SSL certificate toggle button.
 Enable Certificate
-
Click Enable certificate.
-
Click Save.
The custom SSL certificate is enabled and active. The default system certificate is automatically deactivated.
Editing Custom SSL Certificates
You can edit the custom SSL certificate to upload a new certificate or to disable the currently enabled certificate. To edit:
-
Navigate to the desired custom SSL certificate.
 Edit SSL Certificate
-
Choose the More Options icon > Edit. The Edit SSL Certificate page displays.
-
Edit the certificate details as required.
-
Click Save.
Deleting Custom SSL Certificates
To delete:
-
Navigate to the desired personal SSL certificate.
 Delete SSL Certificate
-
Choose the More Options icon > Delete.
-
Click Delete Certificate. The custom certificate is deleted, and the default certificate is automatically reactivated.
Syslog Server Configuration
Users with the Administrator role can configure external syslog servers to export system logs. Up to two (2) syslog servers can be configured.
Adding Syslog Servers
To add a syslog server:
-
From System Settings, choose System Configuration > Syslog Server. The Syslog Server page displays.
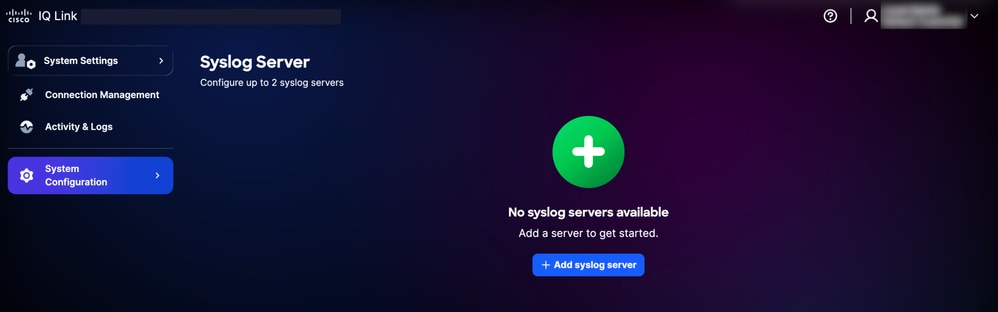 Add Syslog Server
-
Click Add syslog server. The Create Syslog Server page displays.
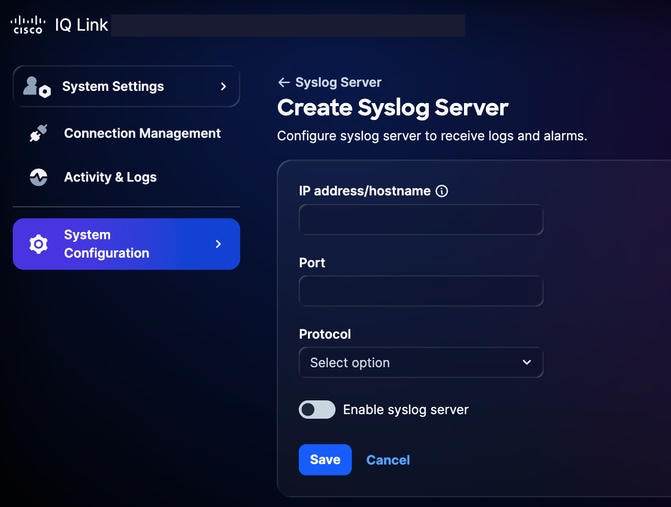 Create Syslog Server
-
Enter the IP address/hostname.
-
Enter a Port number.
-
Select the applicable protocol from the Protocol drop-down list (for example, UDP or TCP).
-
Turn on the Enable syslog server toggle button.
-
Click Save. A confirmation displays and the newly added syslog server displays on the Syslog Server home page.
Editing Configured Syslog Servers
To edit a configured syslog server:
-
Navigate to the desired syslog server.
-
Choose the More Options icon > Edit. The Edit Syslog Server page displays.
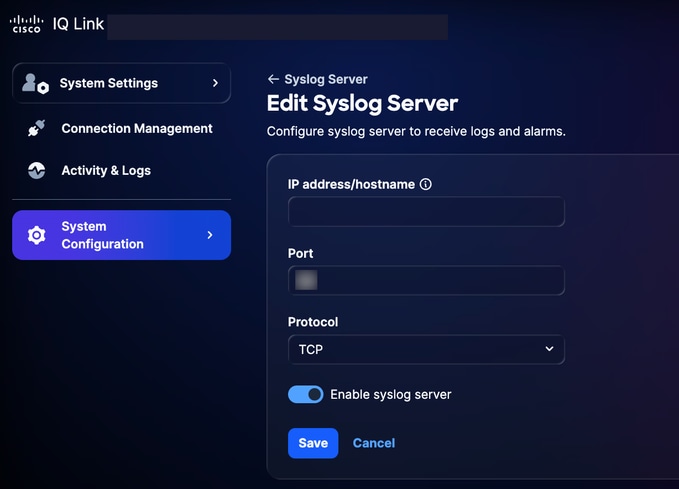 Edit Syslog Server
-
Edit details or turn off the Enable syslog server toggle, as required.
-
Click Save.
Deleting Configured Syslog Servers
To delete a configured syslog server:
-
Navigate to the desired syslog server.
-
Choose the More Options icon > Delete. A confirmation displays.
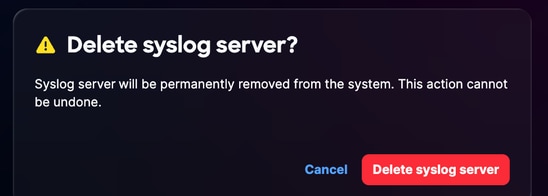 Confirmation
-
Click Delete syslog server.
Activity & Logs
Activity & Logs provide a detailed record of user actions and changes in Cisco IQ, allowing Administrators to track user activities and maintain transparency.
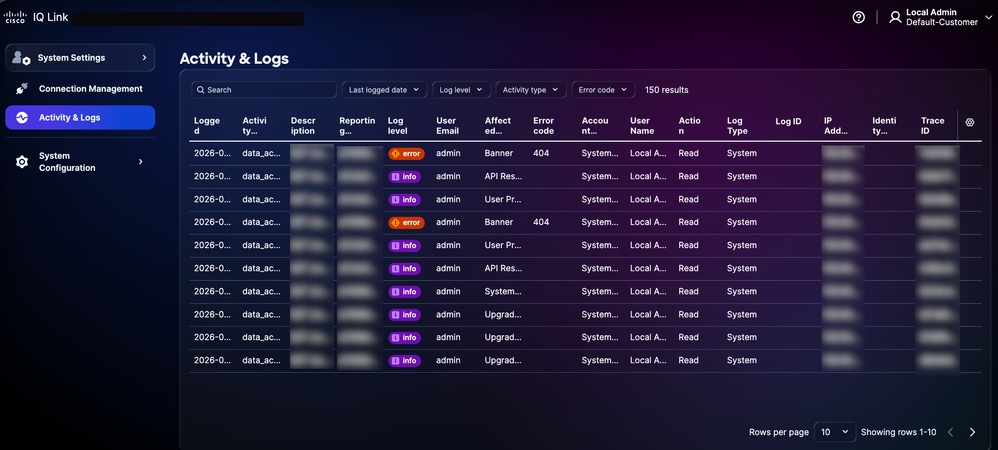 Activity and Logs
To view activity and logs, select Activity & Logs from the System Settings menu.
Activity and Logs:
-
Support filters, pagination, and search capabilities to help easily find and manage information
-
Record all API operations at the gateway level
The following filter options are available:
-
Date: Filters logs to a specific time range
-
Log Level: Filters logs by severity (for example, error, warning, and info)
-
Activity Type: Filters logs by the type of system activity
-
Error Code: Filters logs for a specific error code
IQ Connectivity
To view and manage your device connectivity settings and configuration details:
-
From System Settings, choose System Configuration > IQ Connectivity. The IQ Connectivity page displays.
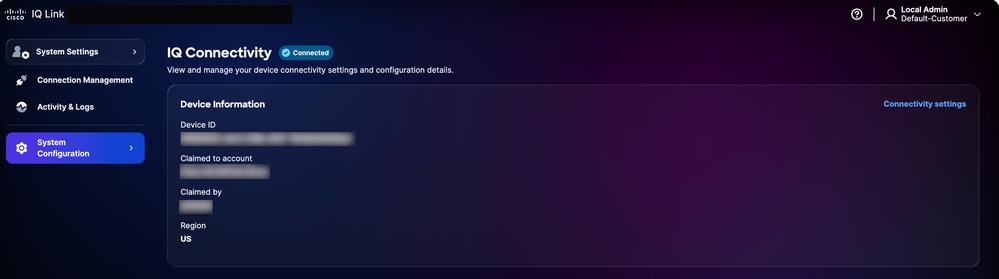 IQ Connectivity
-
Click Connectivity settings.
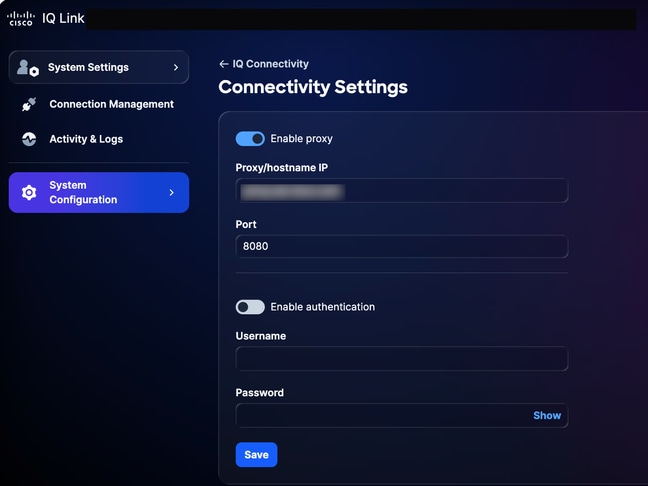 Connectivity Settings
-
Update details as required.
-
Click Save.
Connection Management (Data Collection)
Cisco IQ Link is an on premises deployed solution for network data collection, designed to provide deep visibility into your infrastructure. It collects data through Catalyst Center and Direct Connection. It simplifies how you manage network authentication and device discovery. Configuring Data collection can be summarized as shared below:
- Creating Credential Sets: Establish the authentication protocols (for example, SNMP v1/v2c/v3) to communicate with your network devices. Centralizing credentials by security zone or location (for example, “SanJose-SNMPv3”) allows you to update passwords in one location, with changes automatically propagating to all associated devices.
- Mapping credentials to Inventory: Map your Credential Sets with your Inventory Assets to automate the authentication process. By creating rules that link specific IP ranges to defined Credential Sets, the system automatically applies the correct authentication during data collection. This eliminates manual entry errors and ensures your configuration remains accurate as your network grows.
Adding Credentials
You must first add credentials to perform data collection. To add credentials:
-
From System Settings, choose Connection Management. The Connection Management page displays.
-
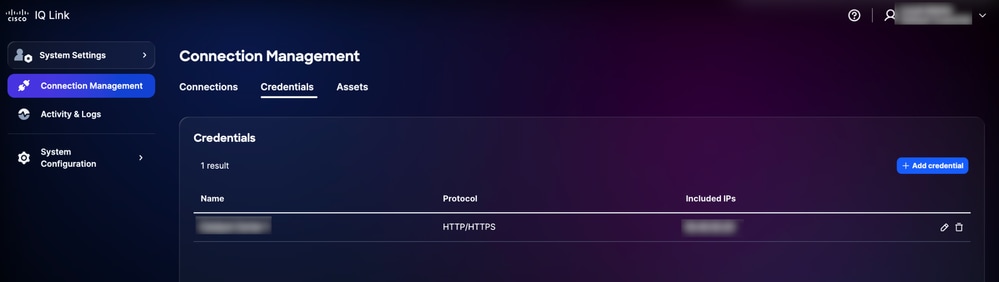
Click the Credentials tab.
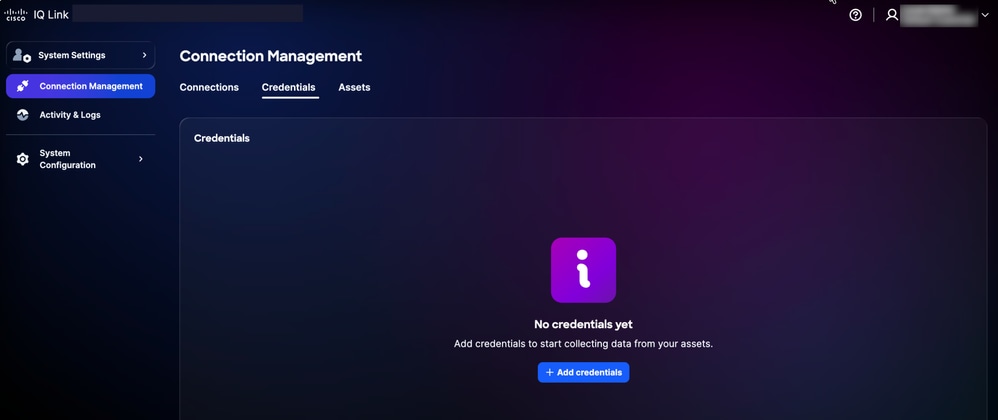 Credentials Tab
-
Click Add credentials.
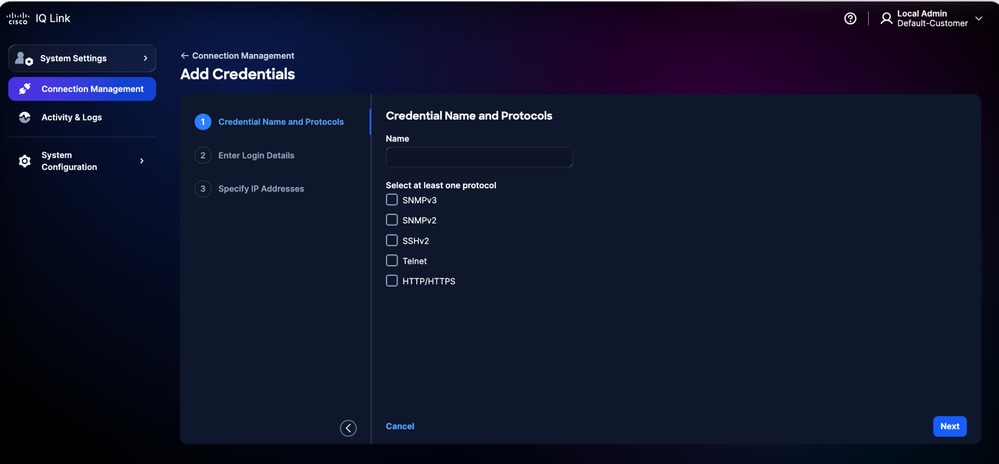 Add Credentials
-
Enter Name.
-
Check all applicable protocol check boxes.
-
Click Next.
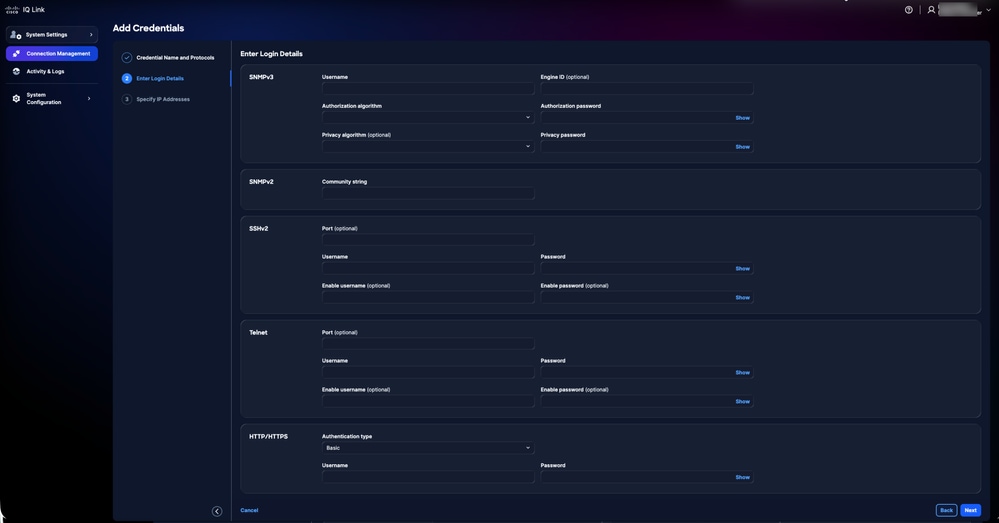 Add Credentials Details
-
Enter the login details for each protocol that was selected.
-
Click Next.
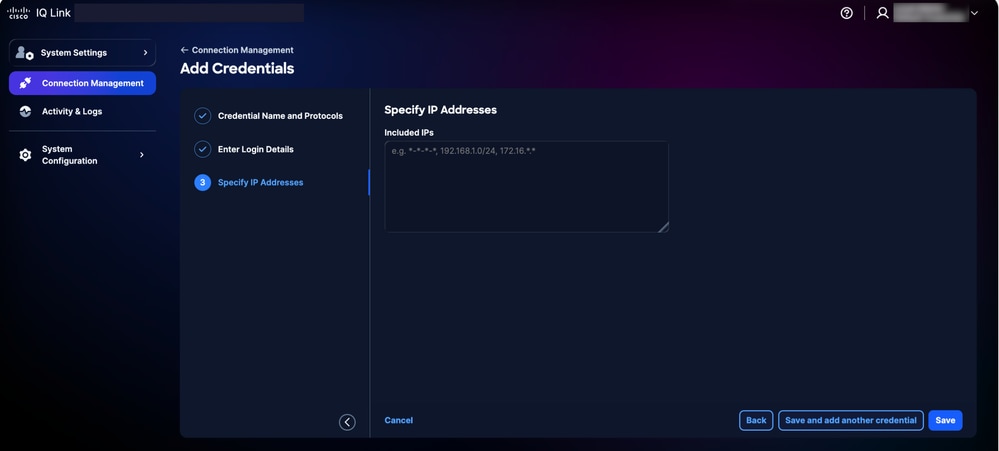 Specify IP Addresses
-
Enter the Included IPs.
- Click Save. A confirmation displays and you are redirected to the Credentials tab.
 Credentials Added
You can edit the credentials by clicking the Edit icon and delete them by clicking the Delete icon.
Credential Selection and Matching Logic
The telemetry engine employs a priority-based matching logic to determine which credentials to apply during discovery and collection. Understanding this hierarchy ensures that the correct credentials are used for the intended devices.
-
Priority Ranking: When multiple credential sets apply to a device, Cisco IQ evaluates them based on how specifically they match the device; the system applies the following priority, with more specific matches taking precedence:
-
Exact IP match: Highest priority
-
Trailing Wildcard Match:** **Priority depends on the number of trailing stars; fewer stars indicate a more specific match and therefore higher priority
-
-
Wildcard Formatting Rules: Wildcards (*) are only supported as trailing characters in an IP address; they must be applied from right to left.
-
Supported Formats:
1.2.3.* (Highest priority among wildcards)
1.2.*.*
1.*.*.*
*.*.*.* (Lowest priority)
-
Unsupported Formats:
Leading wildcards (for example., *.1.2.3)
Wildcards between octets (for example., 10.10.*.20)
Use of dashes or other non-standard delimiters
-
Credential Selection Example:
The following table illustrates how the telemetry engine selects the most appropriate credential set when a device matches multiple defined patterns.
Credential Selection Example
| Device IP |
Available Credential Sets |
Selected Credential Set |
| 10.10.1.5 |
10.10.1.5, 10.10.1., 10.10..* |
10.10.1.5 (Exact Match) |
| 10.10.2.15 |
10.10.2., 10.10..* |
10.10.2.* (More specific) |
| 10.10.5.50 |
10.10.., ... |
10.10.. (More specific) |
Data Collection Using Catalyst Center
For data collection using Catalyst Center:
-
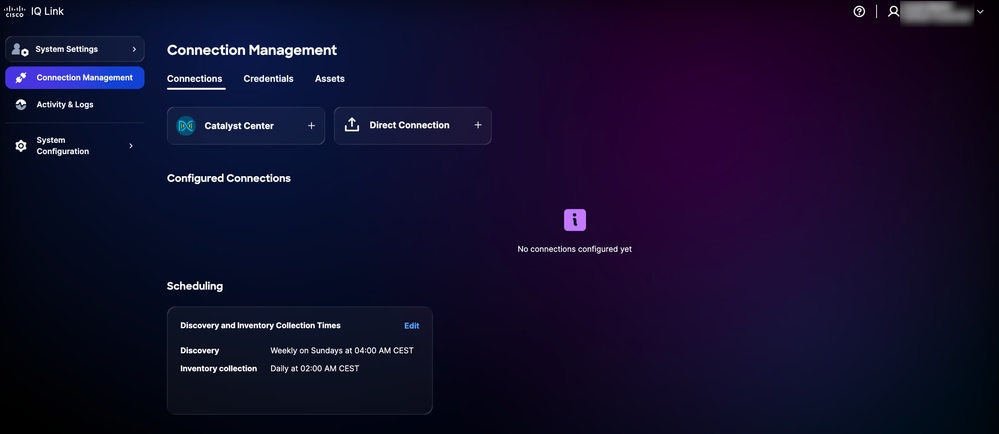
From System Settings, choose Connection Management. The Connection Management page displays.
 Connection Management
-
Click the Catalyst Center option.
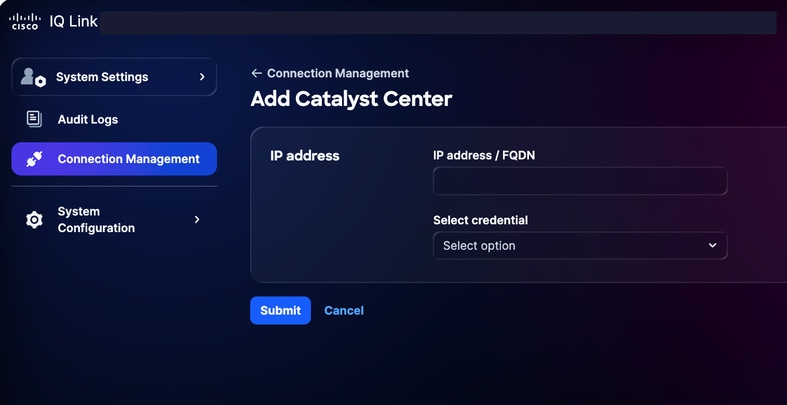 Add Catalyst Center
-
Enter the IP Address or FQDN.
-
Choose a configured HTTP/HTTPS credential from the drop-down list.
-
Click Submit. A confirmation displays (it may take up to 75 minutes). You can view the newly added Catalyst Center under Configured Connections.
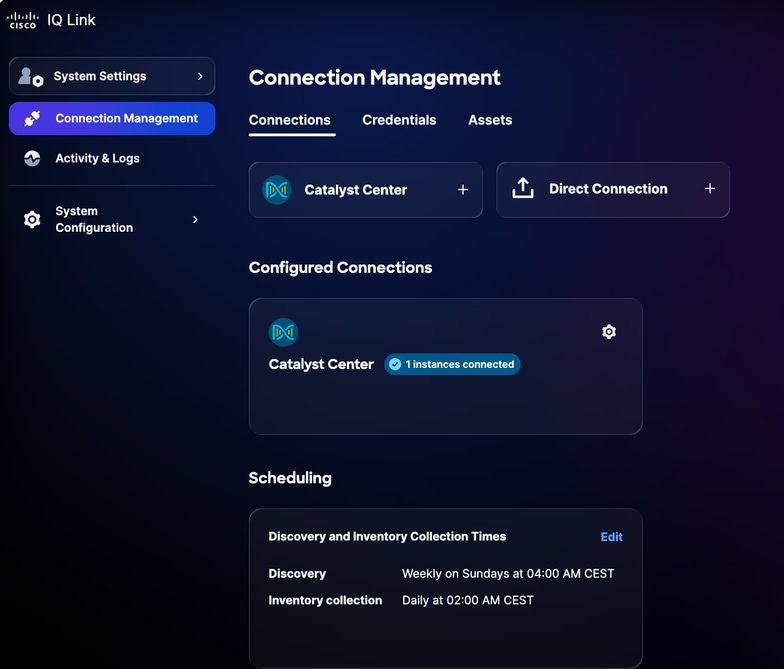 Catalyst Center Added Successfully
-
Schedule a collection. See Scheduling for more details.
Direct Connection
To add devices for direct connection:
-
From System Settings, choose Connection Management. The Connection Management page displays.
 Connection Management
-
Click Direct Connection. The Direct Connection page displays with two (2) options to collect data.
 Upload File
-
Click the preferred option for Choose a Method of Entry and submit your devices using one of the following methods:
 Upload a File
-
Upload a file: Click or drag-and-drop the file and click Submit
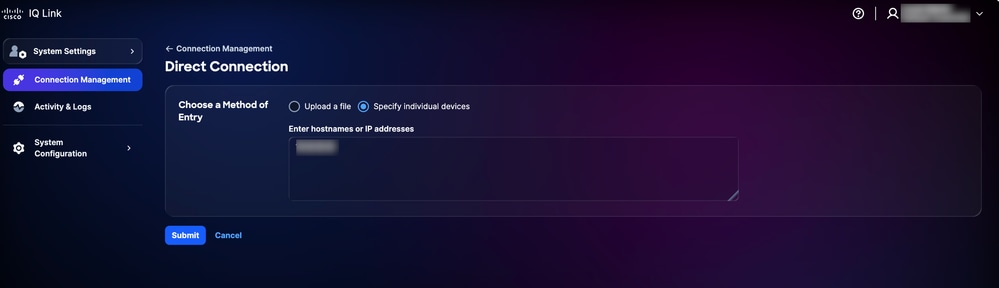 Specify individual devices
-
Specify individual devices: Enter either a single hostname, IP addresses, or a comma-separated list of hostnames and/or IP addresses, then click Submit
You are redirected to the Assets tab after successful submission.
- Schedule a collection. See Scheduling for more details.
Scheduling
The Scheduling allows you to define when Cisco IQ Link performs automated data collection. To schedule collection:
-
In the Scheduling section on the Connection Management page, click Edit for the schedule you want to modify. The Edit Schedule page displays.
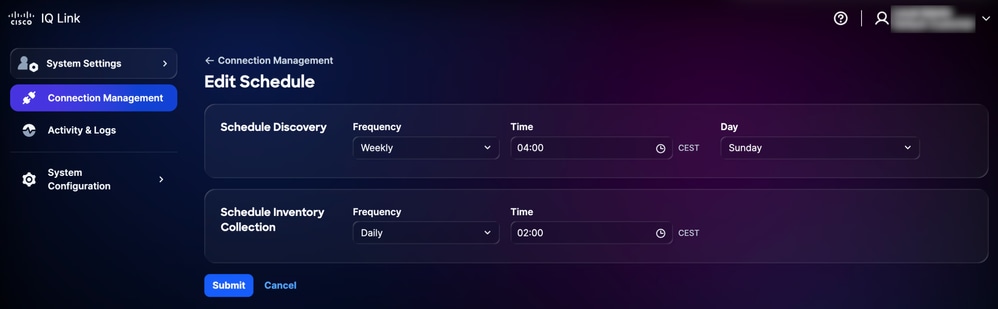 Edit Schedule
-
In the Schedule Discovery section, choose your preferred Frequency and Day from the drop-down lists and enter your desired start Time.
-
In the Schedule Inventory Collection section, choose your preferred Frequency from the drop-down lists and enter your desired start Time.
-
Click Submit.
Banners
Administrators can configure customized banners that display across the application.
Configuring Banners
To configure a banner:
-
From System Settings, choose System Configuration > Banners. The Banners page displays.
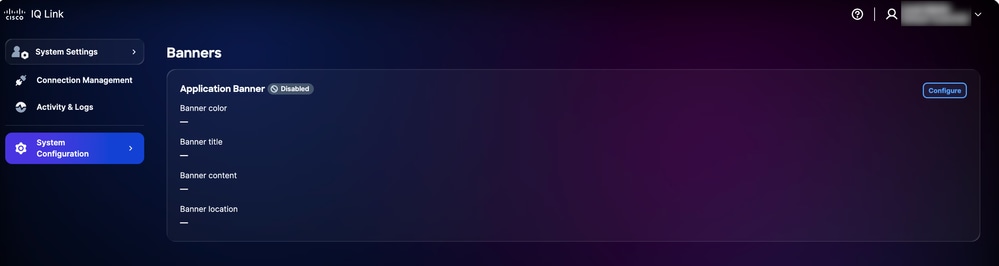 Configure Banner
-
Click Configure. The Edit Application Banner page displays.
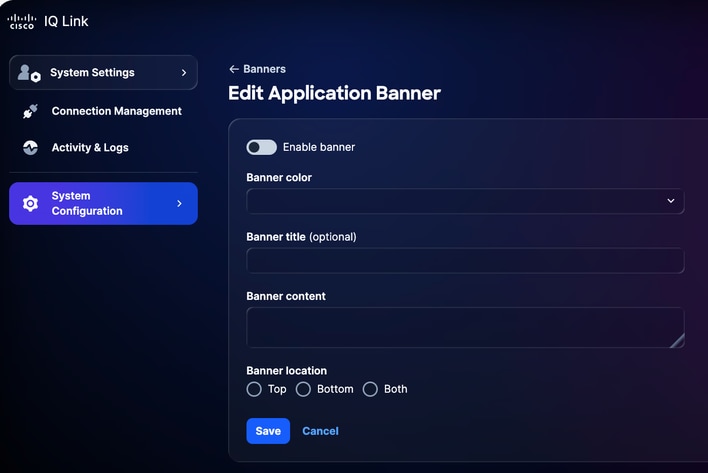 Edit Application Banner
-
Click the toggle to enable or disable the banner.
-
Select a Banner color.
-
Enter the Banner title.
-
Enter the Banner content.
-
Select a Banner location.
-
Click Save. The banner displays across the application.
Editing Banners
To edit a banner:
-
From System Settings, choose System Configuration > Banners. The Banners page displays.
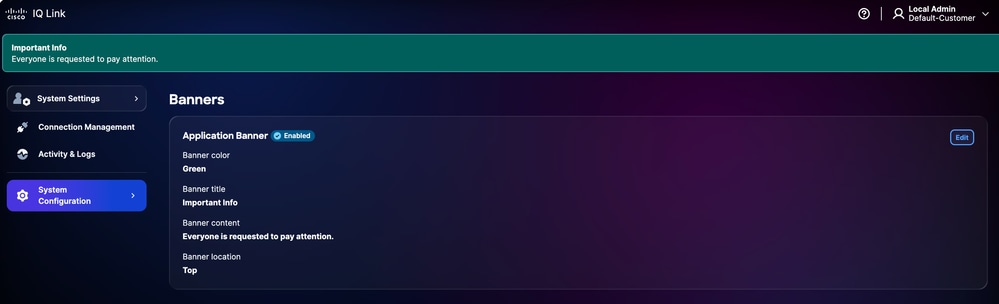 Edit Banners
-
Click Edit. The Edit Application Banner page displays.
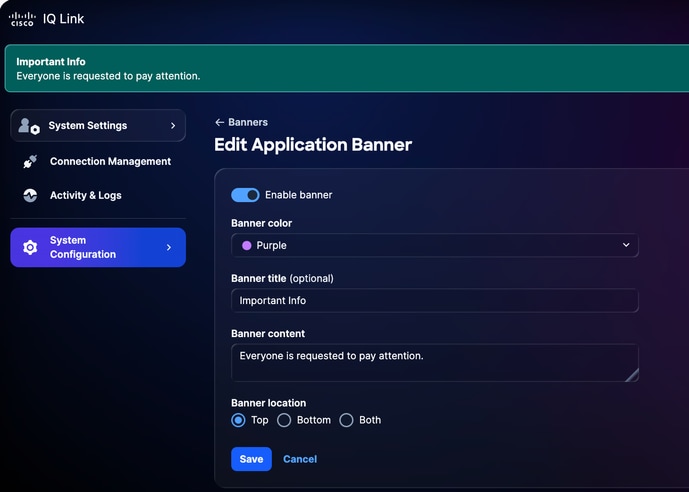 Edit Application Banner
-
Edit the desired details.
-
Click the toggle to enable or disable the banner.
-
Click Save.
Troubleshooting
Customers can collect diagnostic and log files from the Cisco IQ system and securely transfer them to a SCP server. These files can be shared with the Support Team when reporting issues to provide valuable context and assist with troubleshooting.
To collect diagnostic and log files:
-
Log in to Cisco IQ.
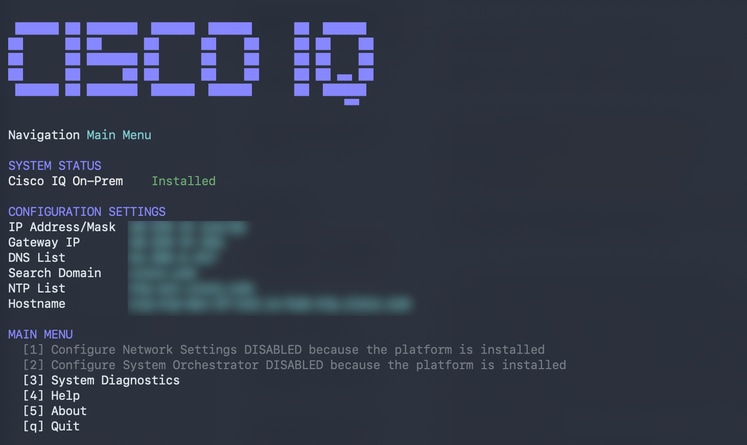 Main Menu
-
From the Cisco IQ Main Menu, enter “3” and press Enter to select System Diagnostics.
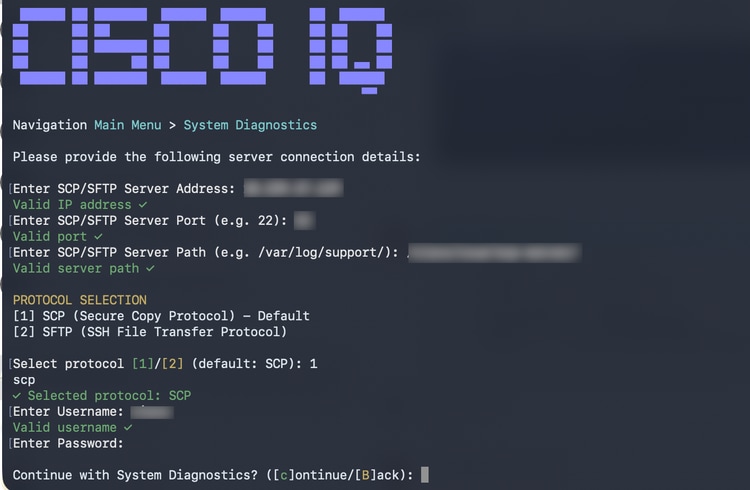 System Diagnostics
-
Enter the SCP/SFTP Server Address.
-
Enter the SCP/SFTP Server Port.
-
Enter the SCP/SFTP Server Path.
-
Select a protocol.
-
Enter the Username.
-
Enter the Password.
-
Enter “C” and press Enter to continue with system diagnostics.
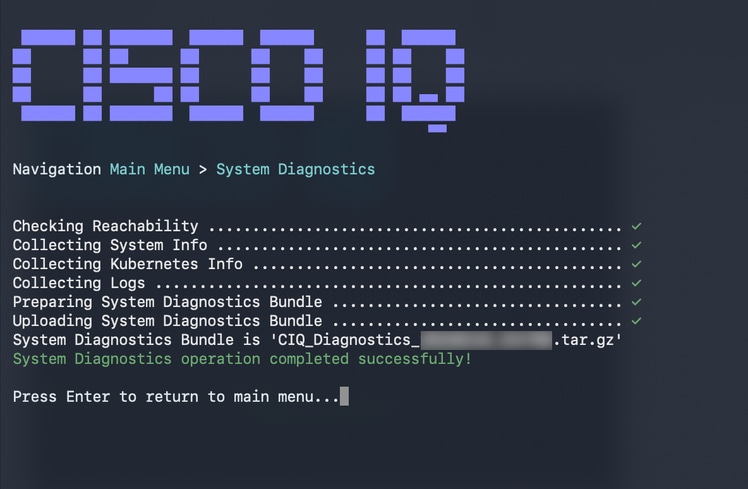 System Diagnostic Operation CoSystem Diagnostic Operation Completemplete
The system begins the diagnostic process and performs the following actions:
-
Checking Reachability
-
Collecting System Information
-
Collecting Kubernetes Information
-
Collecting Logs
-
Preparing System Diagnostics Bundle
-
Uploading System Diagnostics Bundle
Once complete, a confirmation message displays indicating the generated bundle name.
Revision History
| Revision | Publish Date | Comments |
|---|---|---|
1.0 |
June 17, 2026
|
Initial Release |