Introduction
This document describes how to troubleshoot Customer Voice Portal (CVP) not reachable status in OAMP after IP address change.
Prerequisites
Requirements
Cisco recommends that you have knowledge of these topics:
- CVP Server
- Cisco Unified Contact Center Enterprise (UCCE)
Problem Summary
The IP address of a Unified CVP server is changed and is now listed as Not Reachable.
Possible Causes
The IP address of a Unified CVP server was changed in local the configuration file.
Note: In order to change the IP address use the CVP Operations Console administration page.
Recomended Action
If you have already changed the IP address of the server in the local configuration file, you can delete the server from the Operations Console, but the configuration properties files remain on the server. This is because the Operations Console cannot access the server with the original IP address. When you add the server with the new IP address to the Operations Console new property entries are created. The original configuration property files are not cleaned up and must be removed manually. Contact your Cisco Partner or Cisco Technical Support for assistance in order to remove the property files.
This is the correct procedure in order to change the server IP address:
Step 1. Stop all CVP services. Take back up of C:\Cisco\CVP\conf folder.
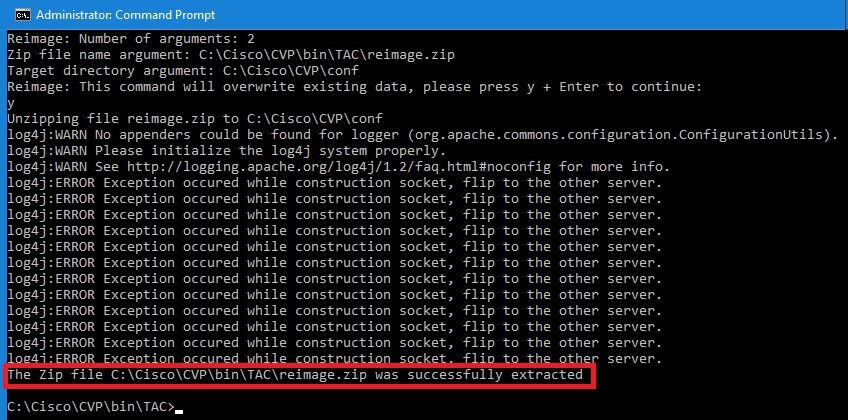
Step 2. From the command prompt on CVP Server, navigate to C:\Cisco\CVP\bin\TAC\ and run reimage.bat.

Type y and press Enter to continue.

Wait until you see The Zip file C:\Cisco\CVP\bin\TAC\reimage.zip was successfully extracted. You can ignore the warnning and error messages displayed.
Step 3. Navigate to C:\Cisco\CVP\bin\UpdateRMIServerIP. Double-click updatermiserverip.bat to update the IP address in Windows Registry and wrapper.conf file.
Step 4. Delete the old license from the device, if you need to re-host a license (not applicable for 12.5 onwards with CVP Smart License).
Note: For more details about CVP Smart License you can watch this video.
Step 5. Restart all the CVP services from this device. The device is at the post installation state ready to receive the configuration changes from CVP Operation Administration Maintenance and Provisioning (OAMP).
Step 6. From the Operations Console, select Save and Deploy of the new device.
Step 7. Re-host the new license if required (not applicable for CVP Smart License).
 Feedback