Introduction
This document describes how to configure the Cisco Unified Contact Center Express (UCCX) for the use of self-signed and signed certificates.
Prerequisites
Requirements
Before you proceed with the configuration steps that are described in this document, ensure that you have access to the Operating System (OS) Administration page for these applications:
An administrator can also have access to the certificate store on the agent and supervisor client PCs.
FQDN, DNS, and Domains
It is required that all servers in the UCCX configuration be installed with Domain Name System (DNS) servers and domain names. It is also required that agents, supervisors, and administrators access the UCCX configuration applications via the Fully Qualified Domain Name (FQDN).
If the domain changes or is populated for the first time, the certificates can be regenerated. After you add the domain name to the server configuration, regenerate all of the Tomcat certificates before you install them on the other applications, in the client browsers, or upon generation of the Certificate Signing Request (CSR) for signing.
Components Used
The information described in this document is based on these hardware and software components:
- UCCX Web Services
- UCCX Notification Service
- UCCX Platform Tomcat
- Cisco Finesse Tomcat
- Cisco Unified Intelligence Center (CUIC) Tomcat
- SocialMiner/CCP Tomcat
The information in this document was created from the devices in a specific lab environment. All of the devices used in this document started with a cleared (default) configuration. If your network is live, ensure that you understand the potential impact of any command.
Background Information
With the introduction of co-resident Finesse and CUIC, the integration between UCCX and SocialMiner for email and chat, and the use of MediaSense in order to record, understand, and install certificates via Finesse, the ability to troubleshoot certificate issues is now critically important.
This document describes the use of both self-signed and signed certificates in the UCCX configuration environment that covers:
- UCCX Notification Services
- UCCX Web Services
- UCCX Scripts
- Co-Resident Finesse
- Co-Resident CUIC (live data and historical reporting)
- SocialMiner (chat)
Certificates, either signed or self-signed, must be installed on both the applications (servers) in the UCCX configuration, as well as the agent and supervisor client desktops.
Multi-SAN support was added in UCCX starting in version, 11.6.2.
Publically signed CA certs on SomicalMiner/CCP are required for external chat to function over the internet.
Configure
This section describes how to configure the UCCX for the use of self-signed and signed certificates.
Configuration Diagram
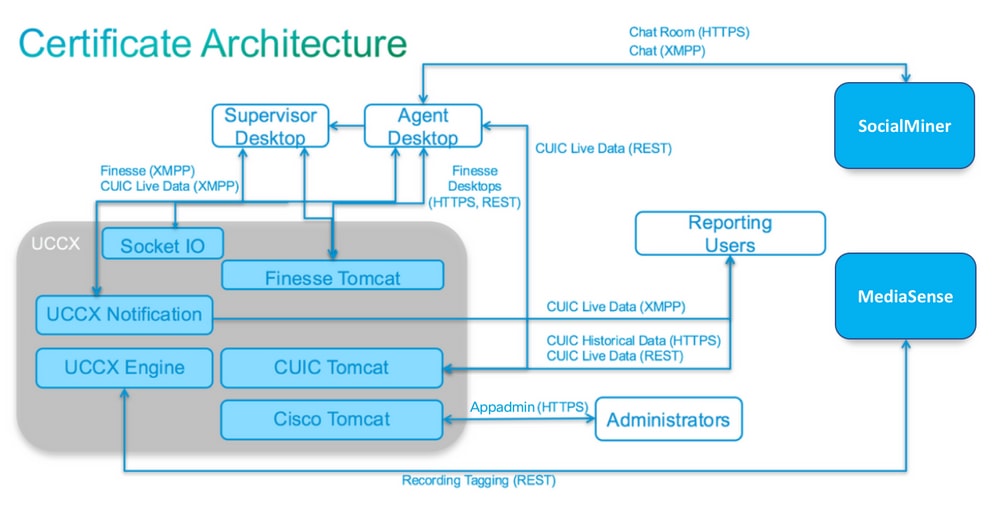
Signed Certificates
The recommended method of certificate management for the UCCX configuration is to leverage signed certificates. These certificates can either be signed by an internal Certificate Authority (CA) or a well-known third-party CA.
In major browsers, such as Mozilla Firefox and Microsoft Edge, root certificates for well-known third-party CAs are installed by default. The certificates for UCCX configuration applications that are signed by these CAs are trusted by default, as their certificate chain ends in a root certificate that is already installed in the browser.
The root certificate of an internal CA can also be preinstalled in the client browser through a Group Policy or other current configuration.
You can choose whether to have the UCCX configuration application certificates signed by a well-known third-party CA, or by an internal CA based on the availability and preinstallation of the root certificate for the CAs in the client browser.
Install Signed Tomcat Application Certificates
Complete these steps for each node of the UCCX Publisher and Subscriber, SocialMiner, and MediaSense Publisher and Subscriber Administration applications:
- Navigate to the OS Administration page and choose Security > Certificate Management.
- Click Generate CSR.
- From the Certificate List drop-down list, choose tomcat as the certificate name and click Generate CSR.
- Navigate to Security > Certificate Management and choose Download CSR.
- From the pop-up window, choose tomcat from the drop-down list and click Download CSR.
Send the new CSR to the third-party CA or sign it with an internal CA, as previously described. This process can produce these signed certificates:
- Root certificate for the CA
- UCCX Publisher Application Certificate
- UCCX Subscriber Application Certificate
- SocialMiner/CCP Application Certificate
Note: Leave the Distribution field in the CSR as the FQDN of the server.
Note: Multi-server (SAN) certificate is supported for UCCX from 11.6 release onwards. However, the SAN can include UCCX Node-1 and Node-2 only. Other servers, such as SocialMiner, cannot be included in the SAN of UCCX. See bottom of page for CUCM SAN example which is also valid for UCCX.
Note: UCCX only supports certificate key lengths of 1024 and 2048 bits.
Complete these steps on each application server in order to upload the root certificate and application certificate to the nodes:
Note: If you upload the root and intermediate certificates on a publisher (UCCX or MediaSense), it can automatically be replicated to the subscriber. There is no need to upload the root or intermediate certificates onto the other, non-publisher servers in the configuration if all of the application certificates are signed via the same certificate chain.
- Navigate to the OS Administration page and choose Security > Certificate Management.
- Click Upload Certificate.
- Upload the root certificate and choose tomcat-trust as the certificate type.
- Click Upload File.
- Click Upload Certificate.
- Upload the application certificate and choose tomcat as the certificate type.
- Click Upload File.
Note: If a subordinate CA signs the certificate, upload the root certificate of the subordinate CA as the tomcat-trust certificate instead of the root certificate. If an intermediate certificate is issued, upload this certificate to the tomcat-trust store in addition to the application certificate.
- Once complete, restart these applications:
- Cisco MediaSense Publisher and Subscriber
- Cisco SocialMiner
- Cisco UCCX Publisher and Subscriber
Note: When you use UCCX and SocialMiner 11.5, there is a new certificate called tomcat-ECDSA. When you upload a signed tomcat-ECDSA certificate to the server, upload the application certificate as a tomcat-ECDSA certificate-not a tomcat certificate. For further information on ECDSA, refer to the Related Information Section for the link to understand and configure ECDSA certificates. Starting from 11.6, use of ECDSA certificates has been removed from the UCCX solution completely. This includes UCCX, SM/CCP, CUIC and Finesse.
Self-Signed Certificates
Installing On Peripheral Servers
All certificates that are used in the UCCX configuration come preinstalled on the configuration applications and are self-signed. These self-signed certificates are not implicitly trusted when presented to either a client browser or another configuration application. Although it is recommended to sign all certificates in the UCCX configuration, you can use the preinstalled self-signed certificates.
For each application relationship, you must download the appropriate certificate and upload it to the application. Complete these steps in order to obtain and upload the certificates:
- Access the application OS Administration page and choose Security > Certificate Management.
- Click the appropriate certificate .pem file and choose Download:

- In order to upload a certificate on the appropriate application, navigate to the OS Administration page and choose Security > Certificate Management.
- Click Upload Certificate / Certificate Chain:

- Once complete, restart these servers:
- Cisco SocialMiner
- Cisco UCCX Publisher and Subscriber
In order to install self-signed certificates on the client machine, use a group policy or package manager, or install them individually in the browser of each agent PC.
For Microsoft Edge, install the client-side self-signed certificates into the Trusted Root Certification Authorities store.
For Mozilla Firefox, complete these steps:
- Navigate to Tools > Options.
- Click the Advanced tab.
- Click View Certificates.
- Navigate to the Servers tab.
- Click Add Exception.
Regenerating Self-Signed Certificates
In the case that self-signed certificates expire, they need to be regenerated, and the configuration steps from Installing On Peripheral Servers needs to be performed again.
- Access the application OS Administration page and choose Security > Certificate Management.
- Click the appropriate certificate and choose Regenerate.
- The server whose certificate was regenerated must be restarted.
- For each application relationship, you must download the appropriate certificate and upload it to the application from the configuration steps from Installing On Peripheral Servers.
Integration and Client Configuration
UCCX-to-SocialMiner
The UCCX consumes the SocialMiner REST and Notification APIs in order to manage email contacts and configuration. Both of the UCCX nodes must consume the SocialMiner REST API and be notified by the SocialMiner notification service, so install the SocialMiner Tomcat certificate on both of the UCCX nodes.
Upload the signed or self-signed certificate chain of the SocialMiner server to the UCCX tomcat-trust keystore.
Upload the UCCX tomcat certificate from Publisher and Subscriber nodes to the SocialMiner server as tomcat-trust keystore.
UCCX AppAdmin Client Certificate
The UCCX AppAdmin client certificate is used for administration of the UCCX system. In order to install the UCCX AppAdmin certificate for UCCX administrators, on the client PC, navigate to https://<UCCX FQDN>/appadmin/main for each of the UCCX nodes and install the certificate through the browser.
UCCX Platform Client Certificate
The UCCX web services are used for delivery of chat contacts to client browsers. In order to install the UCCX Platform certificate for UCCX agents and supervisors, on the client PC, navigate to https://<UCCX FQDN>/appadmin/main for each of the UCCX nodes and install the certificate through the browser.
Notification Service Client Certificate
The CCX Notification Service is used by Finesse, UCCX, and CUIC in order to send real-time information to the client desktop via Extensible Messaging and Presence Protocol (XMPP). This is used for real-time Finesse communication as well as CUIC Live Data.
In order to install the Notification Service client certificate on the PC of the agents and supervisors or reporting users that use Live Data, navigate to https://<UCCX FQDN>:7443/ for each of the UCCX nodes and install the certificate through the browser.
Finesse Client Certificate
The Finesse client certificate is used by the Finesse desktops in order to connect to the Finesse Tomcat instance for the purposes of REST API communication between the desktop and the co-resident Finesse server.
In order to install the Finesse certificate for:
- Agents and supervisors, on the client PC, navigate to https://<UCCX FQDN>:8445/ for each of the UCCX nodes and install the certificate through the browser prompts.
- Finesse administrators, on the client PC, navigate to https://<UCCX FQDN>:8445/cfadmin for each of the UCCX nodes and install the certificate through the browser prompts.
SocialMiner/CCP Client Certificate
The SocialMiner Tomcat certificate must be installed on the client machine. Once an agent accepts a chat request, the Chat gadget is redirected to a URL that represents the chat room. This chat room is hosted by the SocialMiner server and contains the user or chat contact.
In order to install the SocialMiner certificate in the browser, on the client PC, navigate to https://<SocialMiner FQDN>/ and install the certificate through the browser prompts.
CUIC Client Certificate
The CUIC Tomcat certificate can be installed on the client machine for agents, supervisors, and reporting users who use the CUIC web interface for historical reports or Live Data reports either within the CUIC web page or within the gadgets in the desktop.
In order to install the CUIC Tomcat certificate in the browser, on the client PC, navigate to https://<UCCX FQDN>:8444/ and install the certificate through the browser prompts.
CUIC Live Data Certificate (Since 11.x)
The CUIC uses the Socket IO Service for the backend Live data. This certificate can be installed on the client machine for agents, supervisors, and reporting users who use the CUIC web interface for Live Data, or who use the Live Data gadgets within Finesse.
In order to install the Socket IO certificate in the browser, on the client PC, navigate to https://<UCCX FQDN>:12015/ and install the certificate through the browser prompts.
Third-Party Applications Accessible from Scripts
If a UCCX script is designed in order to access a secure location on a third-party server (for example, Get URL Document step to an HTTPS URL or a Make Rest Call to an HTTPS REST URL), upload the signed or self-signed certificate chain of the third-party service to the UCCX tomcat-trust keystore. In order to obtain this certificate, access the UCCX OS Administration page and choose Upload Certificate.
The UCCX Engine is configured in order to search the platform Tomcat keystore for third-party certificate chains when presented with these certificates by third-party applications when they access secure locations via script steps.
The entire certificate chain must be uploaded to the platform Tomcat keystore, accessible via the OS Administration page, as the Tomcat keystore contains no root certificates by default.
After you complete these actions, restart the Cisco UCCX Engine.
Verify
In order to verify that all of the certificates are installed correctly, you can test the features that are described in this section. If no certificate errors appear and all features function properly, the certificates are installed correctly.
- Configure Agent Web Chat through SocialMiner/CCP. Inject a chat contact via the web form. Verify that the agent receives the banner to accept the chat contact and also verify that once chat contact is accepted, the chat form loads properly and the agent can both receive and send chat messages.
- Attempt to log in an agent via Finesse. Verify that no certificate warnings appear and that the web page does not prompt for installation of certificates into the browser. Verify that the agent can change states properly and a new call into UCCX is correctly presented to the agent.
- After you configure the Live Data gadgets in the agent and supervisor Finesse desktop layout, log in an agent, a supervisor, and a reporting user. Verify that the Live Data gadgets load properly, that the initial data is populated into the gadget, and that the data refreshes when the underlying data changes.
- Attempt to connect from a browser to the AppAdmin URL on both UCCX nodes. Verify that no certificate warnings appear when prompted with the log in page.
Troubleshoot
Problem - Invalid User ID/Password
UCCX Finesse Agents are unable to log in with error "Invalid User ID/Password".
Causes
Unified CCX throws an exception “SSLHandshakeException“ and fails to establish a connection with Unified CM.
Solution
- Verify that the Unified CM Tomcat certificate is not expired.
- Ensure that any certificate you uploaded in Unified CM has any one of these extensions marked as critical:
X509v3 Key Usage (OID - 2.5.29.15)
X509v3 Basic Constraints (OID - 2.5.29.19)
If you mark any other extensions as critical, the communication fails between Unified CCX and Unified CM due to the failure of Unified CM certificate verification.
Problem - CSR SAN and Certificate SAN Does Not Match
The upload of a CA signed certificate displays error "CSR SAN and Certificate SAN does not match".
Causes
The CA can have added another parent domain in the certificate Subject Alternative Names (SAN) field. By default, the CSR can have these SANs:
SubjectAltName [
example.com (dNSName)
hostname.example.com (dNSName)
]
The CAs can return a certificate with another SAN added to the certificate: Host Name Example. The certificate can have an extra SAN in this case:
SubjectAltName [
example.com (dNSName)
hostname.example.com (dNSName)
www.hostname.example.com (dNSName)
]
This causes the SAN mismatch error.
Solution
In the Subject Alternate Name (SANs) section of the UCCX Generate Certificate Signing Request page, generate the CSR with an empty Parent Domain field. This way the CSR is not generated with a SAN attribute, the CA can format the SANs, and there cannot be a SAN attribute mismatch when you upload the certificate to UCCX. Notice that the Parent Domain field defaults to the domain of the UCCX server, so the value must explicitly be removed while the settings for the CSR are configured.
Problem - NET::ERR_CERT_COMMON_NAME_INVALID
When you access any UCCX, MediaSense, or SocialMiner web page, you receive an error message.
"Your connection is not private. Attackers can be trying to steal your information from <Server_FQDN> (for example, passwords, messages, or credit cards). NET::ERR_CERT_COMMON_NAME_INVALID. This server could not prove that it is <Server_FQDN>; its security certificate is from [missing_subjectAltName]. This can be caused by a misconfiguration or an attacker intercepting your connection."
Causes
Chrome version 58 introduced a new security feature where it reports that a website certificate is not secure if its common name (CN) is not also included as a SAN.
Solution
- You can navigate to Advanced > Proceed to <Server_FQDN> (unsafe) in order to continue to the site and accept the certificate error.
- You can avoid the error altogether with CA signed certificates. When you generate a CSR, the FQDN of the server is included as a SAN. The CA can sign the CSR, and after you upload the signed certificate back to the server, the server certificate have the FQDN in the SAN field so that the error cannot be presented.
More Information
See the section Remove support for commonName matching in certificates in Deprecations and Removals in Chrome 58.
Certificate Defects
- Cisco bug ID CSCvb46250 - UCCX: Tomcat ECDSA certificate impact on Finesse Live Data
- Cisco bug ID CSCvb58580 - Unable to log in to SocialMiner with both tomcat and tomcat-ECDSA signed by RSA CA
- Cisco bug ID CSCvd56174 - UCCX: Finesse Agent Login Failure due to SSLHandshakeException
- Cisco bug ID CSCuv89545 - Finesse Logjam Vulnerability
Related Information
 Feedback