Introduction
This document describes configuration process on how to install CA signed certificate for Unified Contact Center Enterprise (UCCE) Diagnostic Framework Portico tool.
Prerequisites
Requirements
Cisco recommends that you have knowledge of these topics:
- Active Directory
- Domain Name System (DNS) server
- CA infrastructure deployed and working for all servers and client
- Diagnostic Framework Portico
Accessing Diagnostic Framework Portico tool by typing the IP address in the browser without receiving certificate warning is out of scope of this article.
Components Used
The information in this document is based on these software and hardware versions:
- Cisco UCCE 11.0.1
- Microsoft Windows Server 2012 R2
- Microsoft Windows Server 2012 R2 Certificate Authority
- Microsoft Windows 7 SP1 OS
The information in this document was created from the devices in a specific lab environment. All of the devices used in this document started with a cleared (default) configuration. If your network is live, make sure that you understand the potential impact of any command.
Configure
Generate Certificate Signed Request
Open Internet Information Services (IIS) Manager, select your site, Peripheral Gateway A (PGA) in the example, and Server Certificates.
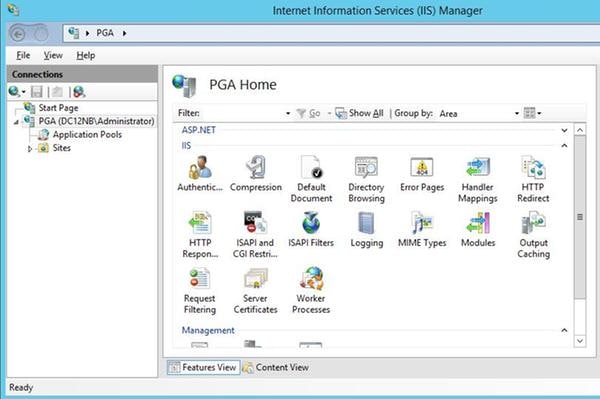
Select Create Certificate Request in the actions panel.

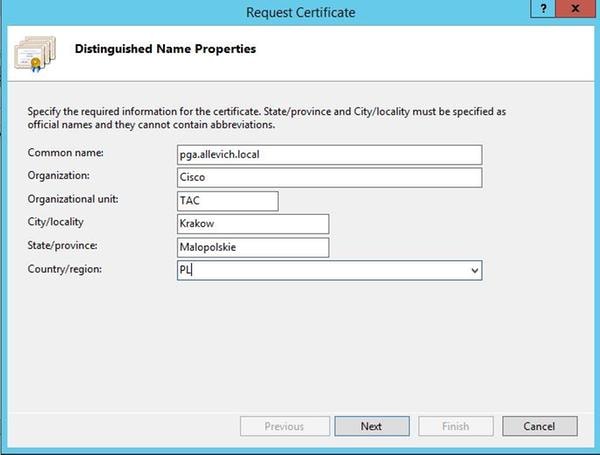
Enter Common name (CN), Organization (O), Organization unit (OU), Locality (L), State (ST), Country (C) fields. Common name must be the same as your Fully Qualified Domain Name (FQDN) hostname + domain name.
Leave default settings for cryptographic service provider and specify bit length: 2048.
Select path where to store. For example on the desktop with pga.csr name.
Open newly created request in the notepad.
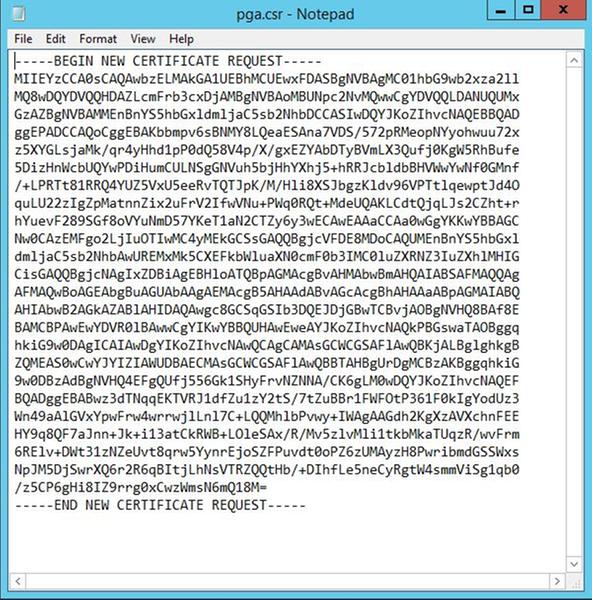
Copy the certificate into the buffer with CTRL+C.
Sign the Certificate on the Certificate Authority
Note: If you are using external certificate authority (like GoDaddy) you need to contact them after having CSR file generated.
Sign in to your CA server certificate enroll page.
https://<CA-server-address>/certsrv
Select Request Certificate, Advanced Certificate Request and paste the Certificate Signing Request (CSR) content to the buffer. Then select Certificate Template as Web Server.
Download Base 64 encoded certificate.
Open the certificate and copy the content of the thumbprint field for later usage. Remove spaces from the thumbprint.
Install the Certificate
Copy the certificate
Copy the newly generated certificate file into UCCE VM where Portico tool is located.
Import the Certificate into the Local Computer Store
On the same UCCE server launch Microsoft Management Console (MMC) console by selecting start menu, type run and mmc .
Click
Add/Remove snap-in and in the dialog box click
Add.
Then select Certificates menu and add.
In the Certificates snap-in dialog box, click Computer Account > Local Computer > Finish.
Navigate to the personal certificates folder.

In the actions pane select More Actions > All Tasks > Import.
Click Next, Browse and select the certificate that was generated previously and in the next menu ensure that certificate store was set to personal. On the last screen verify Certificate Store and Certificate File selected and click Finish.
Bind IIS Certificate
Open CMD application.
Navigate to Diagnostic Portico home folder.
cd c:\icm\serviceability\diagnostics\bin
Remove the current certificate binding for Portico tool.
DiagFwCertMgr /task:UnbindCert
Bind CA signed certificate.
Tip: Use some text editor (notepad++) to remove spaces in the hash.
Use the hash saved before with spaces removed.
DiagFwCertMgr /task:BindCertFromStore /certhash:bc6bbe23b8b3a26d8446c252400f9264c5c30a29
In case the certificate is bound successfully you should see the similar line in the output.
Ensure that the certificate binding was successful using this command.
DiagFwCertMgr /task:ValidateCertBinding
Again similar message should be displayed in the output.
"The certificate binding is VALID"
Note: DiagFwCertMgr by default will use port 7890.
Restart the Diagnostic Framework service.
sc stop "diagfwsvc"
sc start "diagfwsvc"
 Feedback