Configure Secure Communication Between Finesse and CTI Server
Available Languages
Download Options
Bias-Free Language
The documentation set for this product strives to use bias-free language. For the purposes of this documentation set, bias-free is defined as language that does not imply discrimination based on age, disability, gender, racial identity, ethnic identity, sexual orientation, socioeconomic status, and intersectionality. Exceptions may be present in the documentation due to language that is hardcoded in the user interfaces of the product software, language used based on RFP documentation, or language that is used by a referenced third-party product. Learn more about how Cisco is using Inclusive Language.
Contents
Introduction
This document describes how to implement Certificate Authority (CA) signed certificates between Cisco Finesse and Computer Telephony Integration (CTI) Server in Cisco Contact Center Enterprise (CCE) solution.
Prerequisites
Requirements
Cisco recommends that you have knowledge of these topics:
- CCE Release 12.0(1)
- Finesse Release 12.0(1)
- CTI Server
Components Used
The information in this document is based on these software versions:
- Packaged CCE (PCCE) 12.0(1)
- Finesse 12.0(1)
The information in this document was created from the devices in a specific lab environment. All of the devices used in this document started with a cleared (default) configuration. If your network is live, ensure that you understand the potential impact of any command.
Background Information
In CCE version 11.5 Cisco started the support of Transport Layer Security (TLS) version 1.2, which allows Session Initiation Protocol (SIP) and Real-time Transport Protocol (RTP) messages to be transported securely via TLS 1.2. From CCE 12.0 and as part of securing the data in motion, Cisco started the support of TLS 1.2 on most of the contact centre call flows: Inbound and Outbound voice, Multi-channel, and External database dip. The focus of this document is inbound voice, especially the communication between Finesse and CTI Server.
The CTI Server supports these modes of connections:
- Secured-Only Connection: Allows secured connection between the CTI Server and the CTI clients (Finesse, dialer, CTIOS and ctitest).
- Secured and Non-Secured Connection (Mixed-mode): Allows secured, as well as the non-secure connection between the CTI Server and the CTI clients. This is the default connection mode. This mode will be configured when you upgrade previous releases to CCE 12.0(1).
Note: Non-secured only mode is not supported.
Configure
CCE CTI Server Secure
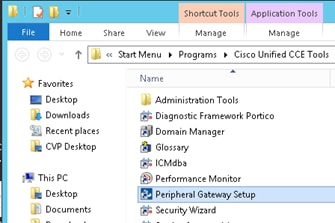
Step 1. On the PCCE Administrative Workstation (AW), open the Unified CCE Tools folder and double-click on Peripheral Gateway Setup.
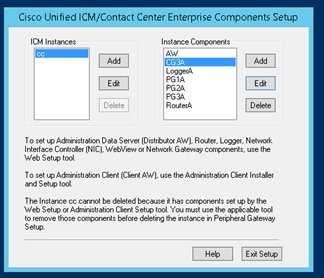
Step 2. Select CG3A and click on Edit.
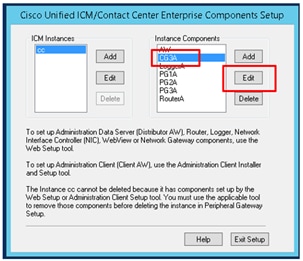
Step 3. On the CTI server properties, click Next. On the question about setup stopping the CG3A service, select Yes.
Step 4. On the CTI Server Components Properties, select Enable Secured-only mode. Note the Secured Connection Port (46030), since you have to configure the same port in Finesse in the next exercise. Click Next.
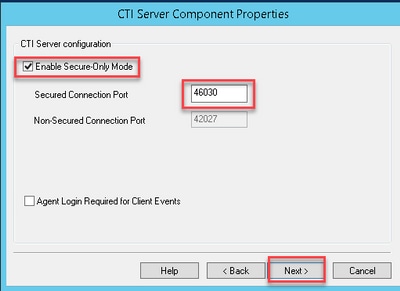
Note: The default secure communication is 42030, however, the lab used for this document is 40630. The port number is part of a formula that includes the ICM system ID. When the system id is 1 (CG1a) the default port number, in general, is 42030. Since the system id in the lab is 3 (CG3a) the default port number is 46030.
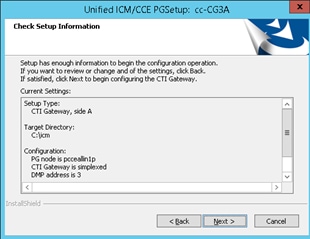
Step 5. On the CTI Network Interface Properties, click Next. Check the Setup Information and click Next.
Step 6. Click on Finish as shown in the image.
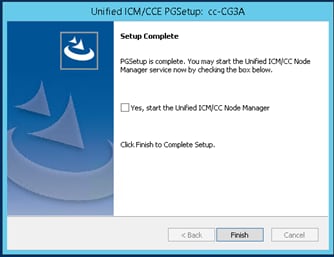
Step 7. Click on Exit Setup and wait until the setup window closes as shown in the image.
Step 8. On the PCCEAllin1 desktop, double-click on Unified CCE service Control.
Step 9. Select Cisco ICM cc CG3A and click on Start.
Finesse Secure Configuration
Step 1. Open a web browser and Navigate to Finesse Administration.
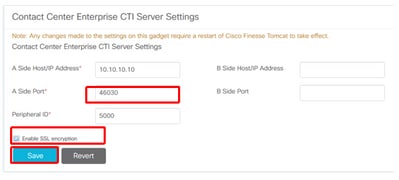
Step 2. Scroll down to the section Contact Center Enterprise CTI Server Settings as shown in the image.

Step 3. Change the A side port for the secure communication port configured on CG3A in the previous exercise: 46030. Check Enable SSL encryption and click Save.
Note: In order to test the connection, you need to restart Finesse Tomcat Service first or restart the Finesse server.
Step 4. Sign out from the Finesse Administration page.
Step 5. Open an SSH session with Finesse.
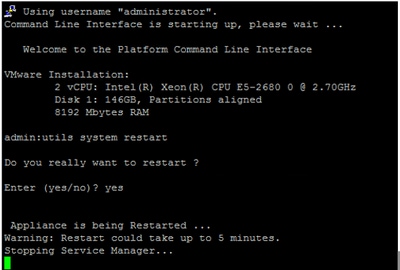
Step 6. On the FINESSEA SSH session, execute the command:
utils system restart
Enter yes when asked if you want to restart the system.
Generate Agent PG Certificate (CTI Server)
The CiscoCertUtils is a new tool released on CCE Version 12. You use this tool to manage all CCE certificates for inbound voice. In this document, you use these CiscoCertUtils in order to generate the Peripheral Gateways (PGs) Certificate Signing Requests (CSRs).
Step 1. Execute this command to generate a CSR certificate: CiscocertUtil /generateCSR
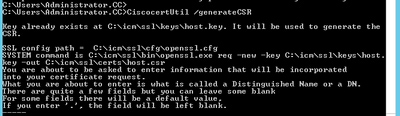
Provide the information requested, like for example:
Country Name: US
State or Province Name: MA
Locality Name: BXB
Organization Name: Cisco
Organizational Unit: CX
Common Name: PCCEAllin1.cc.lab
Email: jdoe@cc.lab
A Challenge password: Train1ng!
An optional company name: Cisco
The host certificate and key are stored in C:\icm\ssl\certs and C:\icm\ssl\keys.
Step 2. Navigate to C:\icm\ssl\certs folder and ensure that the file host.csr has been generated.
Get the CSR Certificate Signed by a CA
After the CSR certificates are generated, they need to be signed by a third-party CA. In this exercise, Microsoft CA installed in the Domain Controller is used as the third-party CA.
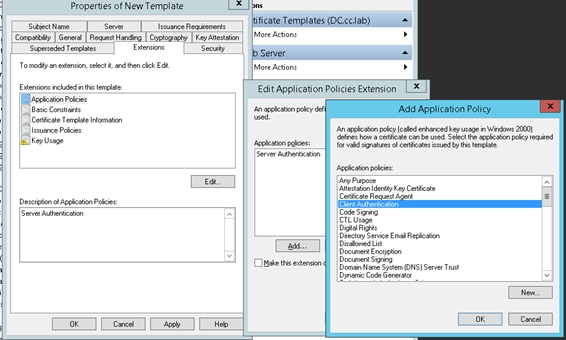
Ensure that the certificate template used by the CA includes client and server authentication as shown in the image when Microsoft CA is used.
Step 1. Open a web browser and navigate to the CA.
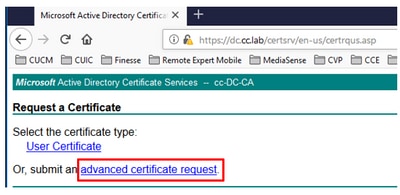
Step 2. On the Microsoft Active Directory Certificate Services, select Request a certificate.

Step 3. Select the advanced certificate request option.
Step 4. On the advanced certificate request, copy and paste the content of the PG Agent CSR certificate in the Saved Request box.
Step 5. Select the Web Server template with client and server authentication. In the lab, the CC Web Server template was created with client and server authentication.

Step 6. Click on Submit.
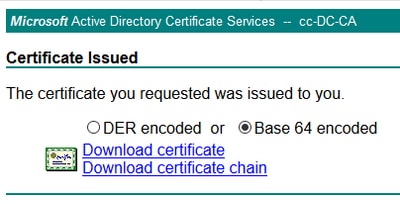
Step 7. Select Base 64 encoded and click on Download Certificate as shown in the image.

Step 8. Save the file and click OK. The file is saved in the Downloads folder.
Step 9. Rename the file to host.cer (optional).
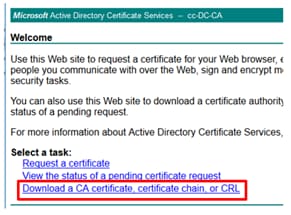
Step 10. You also need to generate a root certificate. Go back to the CA certificate page and then select Download a CA certificate, certificate chain, or CRL. You just need to do this step once, since the root certificate will be the same for all the servers (PG Agent and Finesse).
Step 11. Click on Base 64 and select Download CA certificate.

Step 12. Click on Save File and select OK. The file will be saved in the default location, Downloads.
Import the CCE PGs CA Signed Certificates
Step 1. On the PG Agent navigate to C:\icm\ssl\certs and paste the root and the PG Agent signed files here.
Step 2. Rename the host.pem certificate on c:\icm\ssl\certs as selfhost.pem.
Step 3. Rename host.cer to host.pem on c:\icm\ssl\certs folder.
Step 4. Install the root certificate. On the command prompt, issue this command: CiscoCertUtil /install C:\icm\ssl\certs\rootAll.cer
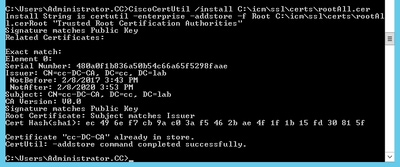
Step 5. Install the application signed certificate running the same command: CiscoCertUtil /install C:\icm\ssl\certs\host.pem

Step 6. Cycle the PG. Open the Unified CCE Service Control, and cycle the Cisco ICM Agent PG.
Generate Finesse Certificate
Step 1. Open the web browser and navigate to Finesse OS Admin.
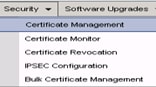
Step 2. Log in with OS Admin credentials and navigate to Security > Certificate Management as shown in the image.
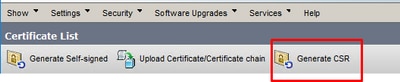
Step 3. Click on Generate CSR as shown in the image.
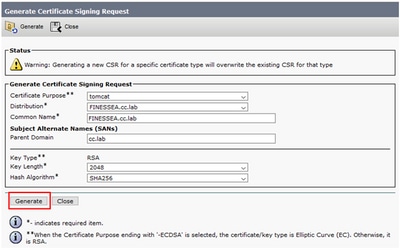
Step 4. On the Generate Certificate Signing Request, use the default values, and click on Generate.
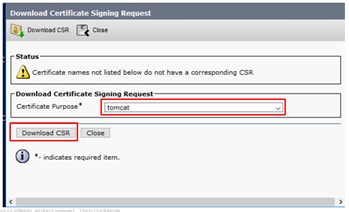
Step 5. Close the Generate Certificate Signing Request window and select Download CSR.

Step 6. On the Certificate Purpose, select tomcat and click on Download CSR.
Step 7. Select Save File and click on OK as shown in the image.
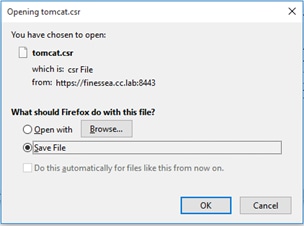
Step 8. Close the Download Certificate Signing Request window. The certificate is saved in the default location (This PC > Downloads).
Step 9. Open Windows Explorer and navigate to that folder. Right-click on this certificate and rename it: finessetomcat.csr
Sign Finesse Certificate by a CA
In this section, the same Microsoft CA used in the previous step is used as the third-party CA.
Note: Ensure that the certificate template used by the CA includes client and server authentication.
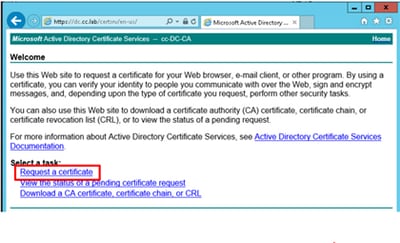
Step 1. Open a web browser and navigate to the CA.
Step 2. On the Microsoft Active Directory Certificate Services, select Request a certificate.
Step 3. Select the advanced certificate request option as shown in the image.

Step 4. On the advanced certificate request, copy and paste the content of the Finesse CSR certificate in the Saved Request box.
Step 5. Select the Web server template with client and server authentication. In this lab, the CC Web Server template was created with client and server authentication.
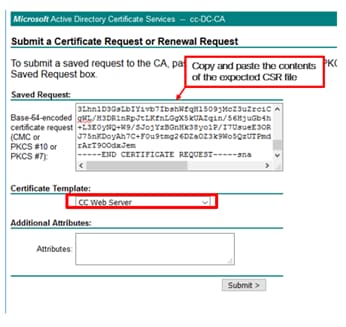
Step 6. Click on Submit.
Step 7. Select Base 64 encoded and click on Download certificate as shown in the image.
Step 8. Save the file and click OK. The file is saved in the Downloads folder.
Step 9. Rename the file to finesse.cer.
Import Finesse Application and Root Signed Certificates
Step 1. On a web proser open Finesse OS Admin page and navigate to Security > Certificate Management.
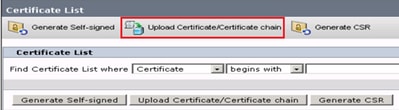
Step 2. Click on the Upload Certificate/Certificate chain button as shown in the image.
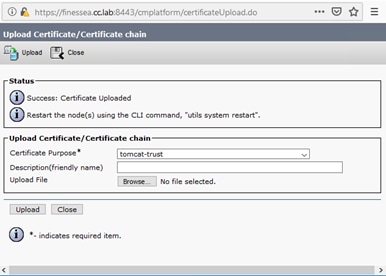
Step 3. In the pop-up window select tomcat-trust for Certificate Purpose.
Step 4. Click on the Browse… button and select the root certificate file to import. Then, click the Open button.
Step 5. In the description write something like tomcatrootcert and click on Upload button as shown in the image.

Step 6. Wait until you see the Success: Certificate Uploaded message to close the window.
You will be requested to restart the system, but first, continue with uploading the Finesse application signed certificate, and then you can restart the system.
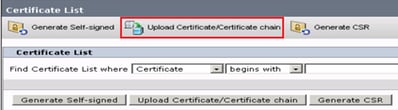
Step 7. Click on more time on Upload Certificate/Certificate chain button in order to import the Finesse application certificate.
Step 8. In the pop-up window select tomcat for Certificate Purpose.
Step 9. Click on the Browse… button and select the Finesse CA signed file, finesse.cer. Then, click the Open button.
Step 10. Click on the Upload button.
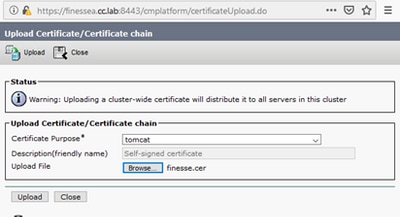
Step 11. Wait until you see the Success: Certificate Uploaded message.
Again, you are requested to restart the system. Close the window and continue to restart the system.
Verify
There is currently no verification procedure available for this configuration.
Troubleshoot
There is currently no specific troubleshooting information available for this configuration.
Contributed by Cisco Engineers
- John PetrykanynCisco TAC Engineer
- Robert RogierCisco TAC Engineer
- Ramiro AmayaCisco TAC Engineer
 Feedback
Contact Cisco
- Open a Support Case

- (Requires a Cisco Service Contract)