Introduction
This documet describes an overview of Local Aarea Network (LAN) Automation to help you diagnose problems when LAN Automation does not work as expected in Digital Network Architecture (DNA) Center.
Contributed by Alexandro Carrasquedo, Cisco TAC Engineer.
Glosary
Plug and Play (PnP) Agent:New device that you just powered on with no config and no certificates that will be automatically configured by DNA Center.
Seed device: Device that DNA Center has already provisioned and that acts as the Dynamic Host Configuration Protocol (DHCP) server.
Prerequisites
Requierments
Cisco strongly recommends that you have a general knowledge of LAN Automation and the Plug and Play Solution. gives an overview of LAN Automation although it is based on DNA Center 1.0, the same concept apply to DNA Center 1.1 and above.
Background information
LAN automation is a near zero-touch deployment solution that enables you to configure and provision your network devices with the use of ISIS as the underlay routing protocol.
Before you begin
Before you run LAN Automation, make sure your PnP Agent doesn't have any certificates loaded in NVRAM.
Edge1#dir nvram:*.cer
Directory of nvram:/*.cer

Directory of nvram:/

    4  -rw-         820                    <no date>  IOS-Self-Sig#1.cer
    6  -rw-         763                    <no date>  kube-ca#468ACA.cer
    7  -rw-         882                    <no date>  sdn-network-#616F.cer
    8  -rw-         807                    <no date>  sdn-network-#4E13CA.cer
2097152 bytes total (2033494 bytes free)
Edge1#delete nvram:*.cer
Ensure you don't have any unclaimed devices in the Provisioning > Devices > Device Inventory page:

Because of CSCvh68847  , some stacks might not leave the unclaimed state, and you might get an ERROR_STACK_UNSUPPORTED error message. This message happens when LAN automation tries to claim the device to provision as if it were a single switch. However, because the device is a Catalyst 9300 switch stack, LAN automation cannot claim the device, and the device shows up as unclaimed. Similarly, PnP does not claim the device because it is a stack, so the device is not provisioned.
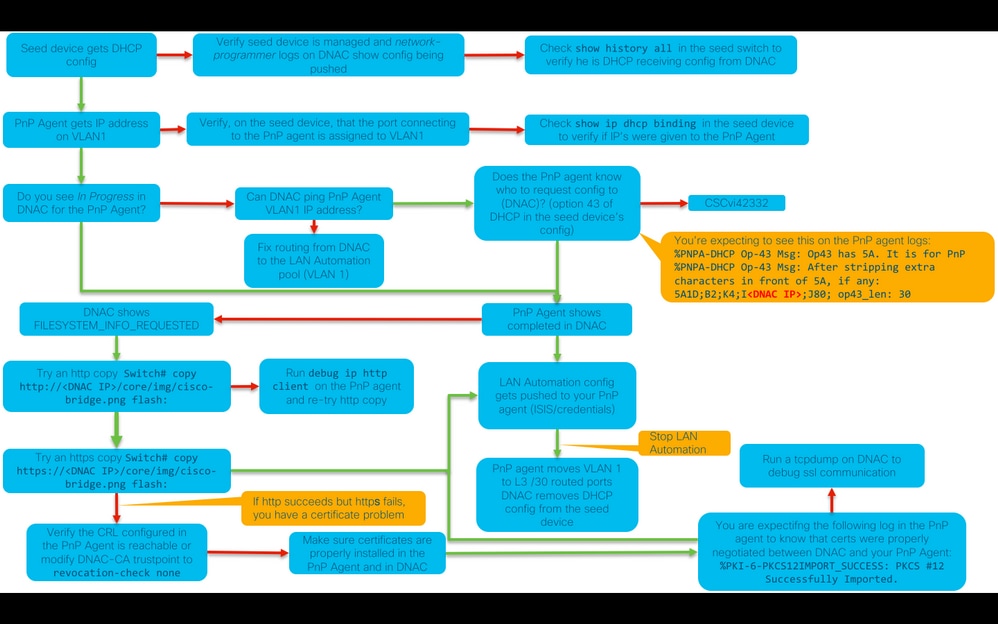
What are the steps LAN Automation goes through while it runs?
DNA Center provisions the seed device with DHCP configuration. The scope of IP addresses that seed device gets is a segment of the initial pool you defined when you reserved the IP address pool for your site. Note that this pool must be at least /25.
Note: This pool is divided into 3 segments:
1. The IP addresses that are pushed to VLAN 1 on your PnP agents.
2. The IP addresses that are pushed to Loopbac0 on your PnP agents.
3. The /30 IP addresses that are pushed to your PnP agents on the link that connects to your seed or other fabric devices.
For DNA Center to provision your PnP agents, the DHCP configuration that the seed device receives must have option 43 defined with the IP address of the DNA Center enterprise-facing Network Interface Card (NIC) or the Virtual IP (VIP) address, if you have a n-node cluster.
When PnP agents boot up, they have no configuration. Therefore, all of their ports are part of VLAN 1. Consequently, the devices send DHCP discover messages to the seed device. The seed device answers with an offer of the IP addresses within the LAN automation pool.
Now that you understand the initial sequence of LAN automation, you can troubleshoot the process if it is not working as expected.
Troubleshooting diagram
DNA Center 1.1 LAN Automation relevant logs
- network-orchestration-service
- pnp-service
DNA Center 1.2 LAN Automation relevant logs
In release 1.2 there is no longer a pnp-service so you need to look for the following services when you're troubleshooting LAN Automation:
- network-orchestration
- network-design
- connection-manager-service
- onboarding-service (this is the old pnp-service equivalent from 1.1)
DNA Center 1.x Public Key Infrastructure (PKI) relevant logs
- apic-em-pki-broker-service
- apic-em-jboss-ejbca
How to run the tcpdump that is shown in the flowchart?
sudo tcpdump -i <DNA Center fabric's interface> host <PnP Agent ip address> -w /data/tmp/pnp_capture.pcap
*To stop this use CTRL+C
This stores the pnp_capture.pcap file in /data/tmp/. You need to copy the file from DNA Center using the secure copy (SCP) command or read the file from DNA Center using the following command:
$ sudo tcpdump -ttttnnr /data/tmp/pnp_capture.pcap
[sudo] password for maglev:
reading from file capture.pcap, link-type EN10MB (Ethernet)
2018-03-08 20:09:27.369544 IP 192.168.31.1 > 192.168.31.10: ICMP host 192.168.1.2 unreachable, length 36
2018-03-08 20:09:39.369175 IP 192.168.31.1 > 192.168.31.10: ICMP host 192.168.1.2 unreachable, length 36
2018-03-08 20:09:44.373056 ARP, Request who-has 192.168.31.1 tell 192.168.31.10, length 28
2018-03-08 20:09:44.374834 ARP, Reply 192.168.31.1 is-at 2c:31:24:cf:d0:62, length 46
2018-03-08 20:09:50.628539 IP 192.168.31.10.57234 > 192.168.31.1.22: Flags [S], seq 1113323684, win 29200, options [mss 1460,sackOK,TS val 274921400 ecr 0,nop,wscale 7], length 0
2018-03-08 20:09:50.630523 IP 192.168.31.1.22 > 192.168.31.10.57234: Flags [S.], seq 2270495802, ack 1113323685, win 4128, options [mss 1460], length 0
2018-03-08 20:09:50.630604 IP 192.168.31.10.57234 > 192.168.31.1.22: Flags [.], ack 1, win 29200, length 0
2018-03-08 20:09:50.631712 IP 192.168.31.10.57234 > 192.168.31.1.22: Flags [P.], seq 1:25, ack 1, win 29200, length 24
What's that bridge.png file you're trying to copy?
It is a 191 byte image file that is loctated in DNA Center that you want to copy using HTTP (without using certificates) or HTTPS (using certificates) to test communication between DNA Center and your PnP Agent.
Sample captures when Secure Sockets Layer (SSL) communication is not working as expected (complete .pcap files attached to this article)
Bad certificate
Possible cause:
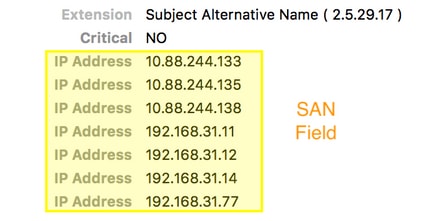
- DNA Center's certificate doesn't have the right IP address in the Subject Alternative Name (SAN) field.
To check the SAN fields in your certificate, you can do the following:
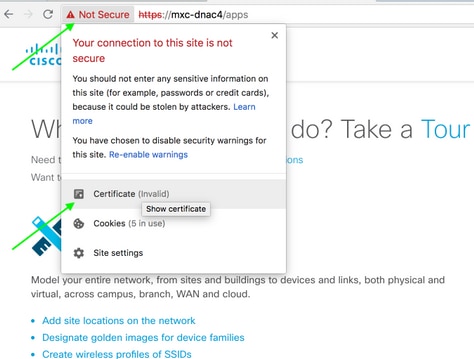
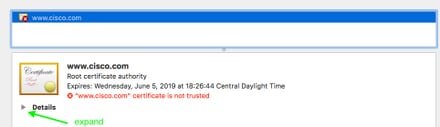
Verify the certificate using a browser
Sample capture
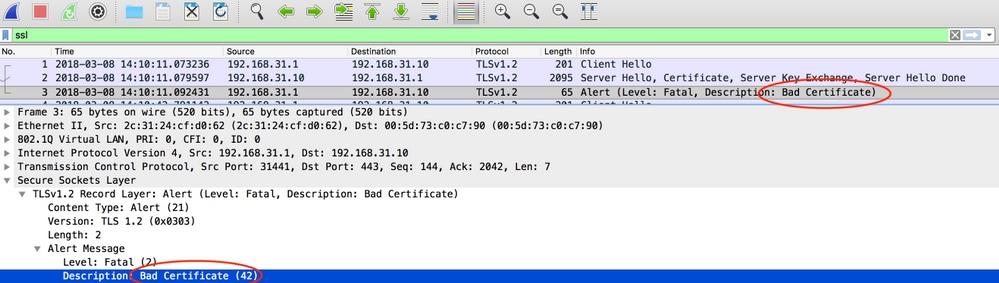
Resolution.
If you have a 3rd party CA (Certificate Authority), make sure they give you a certificate with the IP addresses of DNA Center and the VIP in it. If you don't have a 3rd party CA, DNA Center can generate a certificate for you. Please contact Cisco TAC to guide you through this process.
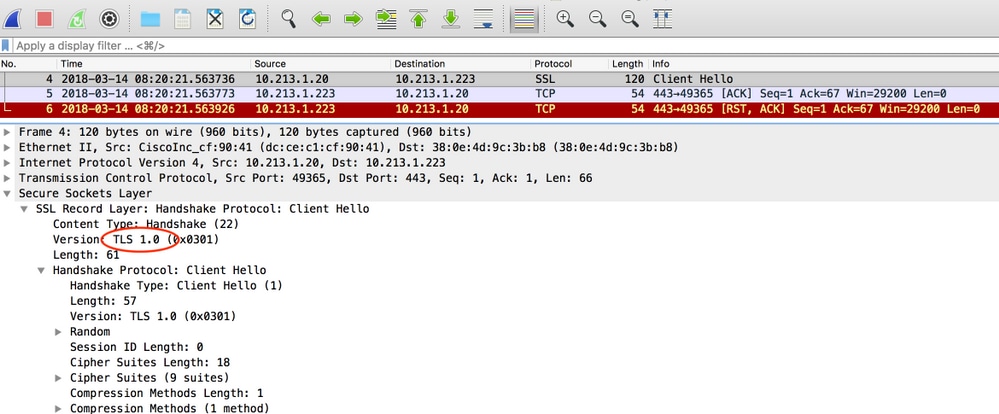
DNA Center resets the connection
Possible cause:
DNA Center only supports TLS v1.2 by default.
To workaround this, enable DNA Center to use TLS v1 following this guide
Sample Capture
Useful debug commands on the PnP Agent for certificate related problems
- debug crypto pki transactions
- debug ssl openssl
- debug ssl openssl errores
- debug ssl openssl errors
- debug crypto pki API
- debug crypto pki transactions
- debug ssl openssl msg
Response is missing previously established authenticated session key
In theory, you should not have unclaimed devices in the Provisioning > Devices > Device Inventory page, but there have been problems where, after deleting the unclaimed devices from this page, the devices were still showing in https://<DNA Center ip>/mypnp. If you encounter this scenario and you see a log similar to the following in the PnP logs or an indication of the same in the GUI, make sure that the device does not appear as unclaimed in PnP:
ERROR | qtp604107971-170 | | c.c.e.z.impl.ZtdHistoryServiceImpl | Device authentication status has changed to Error(PNP response com.cisco.enc.pnp.messages.PnpBackoffResponse is missing previously established authenticated session key) | address=192.168.31.10, sn=FCW212XXXXX
Gotchas of LAN Automation and stacking
- In DNA Center 1.2 the stack needs to be full ring (one stack cable for a 2-member stack may not work).
- Stack device needs to be claimed by LAN automation promptly, approximately less than 10 minutes.
- Once it is connected to DNA Center shows up as Unclaimed in PnP. PnP uses the 10 minute time window for stack determination and once it expires that it will stay in the unclaimed section of the LAN Automation.
If you have the RCA or PnP logs, you can look for unclaimed device messages:
more pnp.log | egrep "(Received unclaimed notification|ZtdDeviceUnclaimedMessage)"
If there are no messages, then the unclaimed devices notifications are not reaching DNA Center and PnP cannot claim it.
How to do LAN Automation on a stack
- Shutdown the uplinks to the seed device(s).
- Start LAN Automation on DNA Center.
- Delete the startup config from the stack. # write erase
- Remove all certificates from NVRAM. # delete nvram:*.cer
- Remove the vlan.dat file. # delete flash:vlan.dat
- From the Primary switch, delete the certificates on the standby switch. # delete stby-nvram:*.cer
a. Disconnect the stack cables.
b. Log into the console of each member switch.
c. Delete the certificates. # delete nvram:*.cer
d. Delete the flas vlan database. # delete flash:vlan.dat
e. Reconnect the stack cables.
7. Reboot.
8. Wait for the switch to register as stack, bring up all members, and try to start the initial configuration dialog.
%INIT: waited 0 seconds for NVRAM to be available


         --- System Configuration Dialog ---

Would you like to enter the initial configuration dialog? [yes/no]:
9. Enable the uplinks to the seed device(s). # no shutdown
Format of the hostname map file that I can import to my LAN Automation task?
DNA Center expects a CSV file with the hostname and serial number (hostname,serial number) as shown in the following example:

For stack LAN Automation, the CSV file allows you to enter one host name and multiple serial numbers per row. The serial numbers need to be separated by commas. See attached CSV file for reference.
Where did /mypnp go in 1.2?
Access PnP in one of the following ways:
- From your web browser, enter https://<DNA Center IP>/networkpnp
- From the DNA Center home page, select the following Network Plug and Play tool:

Or by going to https://<DNA Center IP>/networkpnp
Inventory Error
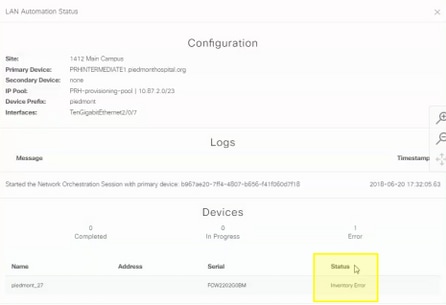
The inventory error means that the device, after being claimed by LAN automation and receiving its configuration failed, to be added to inventory. This error usually occurs because of either the config, some routing, or CLI credentials problems.
To verify that you are trying to bring up the correct device through LAN Automation, remotely access the IP address of the loopback 0 interface on the device using preferred connection protocol (SSH or Telnet).
Connectivity exists but PKI certificates are not pushed succesfully to the PnP Agents
There are some times where the devices in the middle may turn on the Do not Fragment (DF) bitof the packets between DNAC and the PnP Agents. This may cause that packets larger than 1500 bytes, commonly packets containing the certificate, are discarded and therefore LAN Automation may not complete. Some of the common logs that are seen in DNA Center's onboarding logs are:
errorMessage=Failed to format the url for trustpoint
The suggested action in this case is to ensure that the path between DNA Center and the PnP Agents allow jumbo frames to go through using the command system mtu 9100.
Switch(config)# system mtu 9100
 Feedback