Introduction
This document describes configuring Pre-auth URL Filter in SDA Wireless Fabric for permitting specific URLs during the Web Auth Pending phase.
Prerequisites
Requirements
Cisco recommends that you have knowledge of these topics:
- SDA Wireless Fabric architecture and authentication modes
- Wireless LAN Controller (WLC) configuration
- URL Filtering concepts and implementation
- FlexConnect/Fabric Enabled Wireless deployment models
Components Used
The information in this document is based on these software and hardware versions:
- Cisco DNA 2.3.7.7
- C9800-40 running Cisco IOS-XE® 17.6.5 with C9150/C9120 Access Points
The information in this document was created from the devices in a specific lab environment. All of the devices used in this document started with a cleared (default) configuration. If your network is live, ensure that you understand the potential impact of any command.
Background Information
This document provides detailed steps for configuring Pre-auth URL Filters within Cisco SDA Wireless Fabric environments.
In the SDA Wireless EWA (External Web Authentication) authentication mode, customers require access to specific URLs before authentication is complete, typically to permit access to authentication portals or organizational resources. This feature is equivalent to the Pre-auth URL Filter in traditional wireless architectures. Configuring Pre-auth URL Filters ensures that clients in the Web Auth Pending state can reach designated URLs, improving user experience and supporting necessary authentication workflows.
Configure
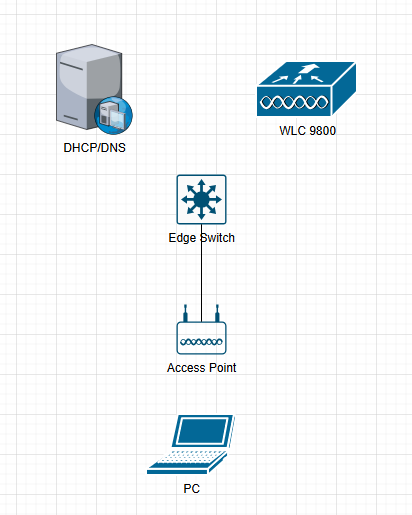
Network Diagram
Configurations
Use these steps to configure Pre-auth URL Filter in SDA Wireless Fabric.
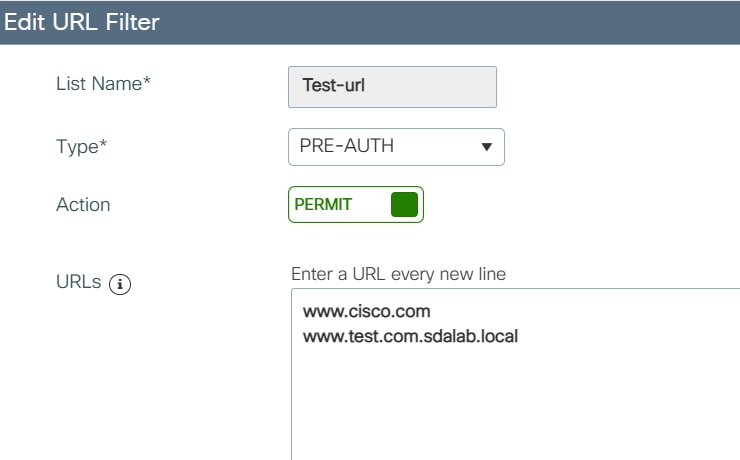
Step 1. Add Permit URLs in URL Filter
Navigate to the URL Filter configuration section and add the URLs you want to permit during the pre-authentication phase.
Configuration > Security > URL Filters > Add permit URLs
Step 2. Enable Web Auth on the SSID
Configure the SSID to enable Web Authentication. This ensures that wireless clients are placed into the correct authentication workflow.
Configuration > Tags & Profiles > WLANs > Security=Web Auth

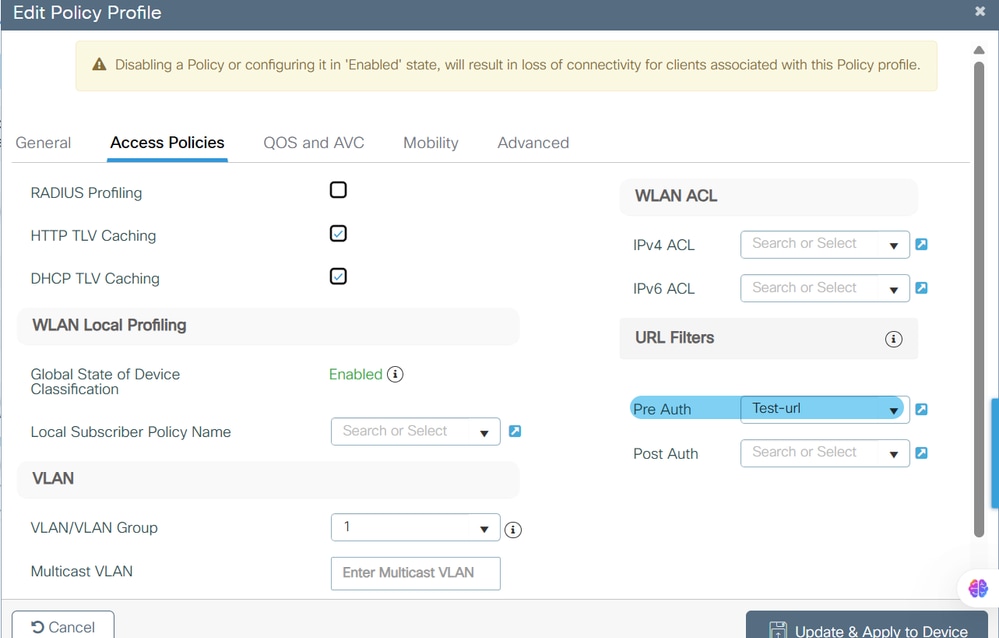
Step 3. Configure the URL Filter in the Policy Profile
Apply the URL Filter list to the desired Policy Profile. This associates the pre-auth URL filter with the appropriate client policy.
Configuration > Tags & Profiles > Policy
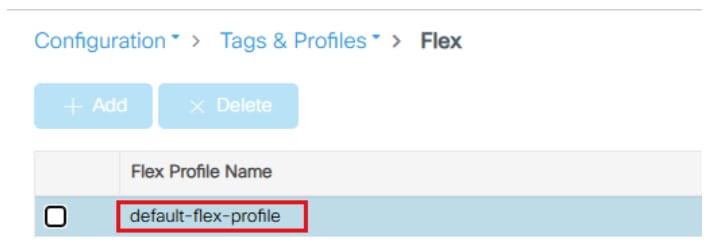
Step 4. Configure the URL Filter in the Flex Profile
Assign the URL Filter list to the default Flex Profile. In Fabric Enabled Wireless, APs perform local switching similar to FlexConnect. All ACLs and URL Filters must be configured on the default flex profile to ensure APs inherit and enforce these filters locally.
Configuration > Tags & Profiles > Flex
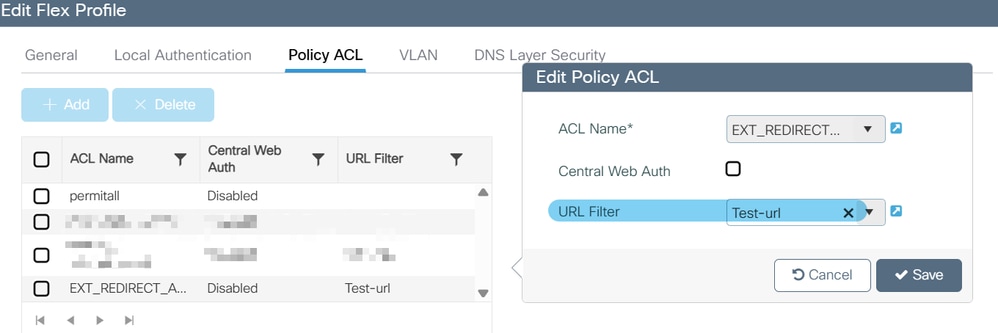

Note: In Fabric Enabled Wireless, APs do local switching. All ACLs/URL Filters must be configured on the default flex profile. This approach allows APs to inherit and enforce these filters, which is required for both CWA (Central Web Authentication) and EWA (External Web Authentication) modes.
Verify
Verify Configuration
Use these steps and CLI commands to verify the configuration.
Step 1. Verify WLC configuration for URL Filters
Use the CLI to verify that the URL filter is correctly applied on Flex and Policy Profiles, and that the correct URLs are listed in the filter.
Example configuration on the WLC:
wireless profile flex default-flex-profile
 acl-policy EXT_REDIRECT_ACL_X.X.X.X
 urlfilter list Test-url                             <<<<<

wireless profile policy "Inspire Creativity-Guest_profile"
 urlfilter list pre-auth-filter Test-url             <<<<<

urlfilter list Test-url
 action permit
 url www.cisco.com                                   <<<<<
 url www.test.com.sdalab.local                       <<<<<
In this output, the URL Filter Test-url is applied both to the Flex and Policy Profiles, and the specified URL (www.test.com.sdalab.local) is included with permit action.
Step 2. Verify Wireless Client Access to URL Filtered URLs
Ensure that a wireless client connected to the SSID can access the permitted URLs listed in the URL Filter during the Web Auth Pending phase.
There is no specific CLI output for this step, but clients must be able to reach URLs such as www.test.com.sdalab.local prior to completing authentication.
Troubleshoot
Troubleshooting Steps
If a client obtains the pre-auth URL filter but cannot access the permitted URLs, use these troubleshooting steps.
Step 1. Verify the Client has Obtained the URL Filter List
Check if the client has correctly obtained the URL filter list using this command:
device# show wireless client mac-address <xxxx.xxxx.xxxx> detail
This command provides detailed information about the client session, including any URL filter lists applied.
Step 2. Verify DNS Resolution for the Permitted URL
Ensure that the client can resolve the DNS name of the permitted URL. If DNS resolves but ping fails, there can be an issue with network routing or access control.
Step 3. Confirm Client Access to the Permitted URL
If the client cannot access the URL, verify that the URL filter is correctly configured in the flex profile. Failure to configure the filter in the flex profile is a common reason for this issue.
Reason: URL Filter is not configured in the flex profile. Refer to Configuration Step 4 to resolve this issue.
Related Information
 Feedback