Introduction
This document describes the Cisco Catalyst Center Support Assistant (CSA) Extension, the features available, the versions supported, and their use.
Background Information
The article provides a detailed step by step guide to using the new features, opening a Cisco Support case from the UI, uploading files directly from the Catalyst Center UI, recording the screen activities (both audio and video) and capturing and uploading the HAR files. Cisco customers can get support closer to their Cisco products and portals instantly.
Download and Install the Extension in Chrome
Cisco Support Assistant (CSA) Extension is the first Cisco Secure Development Lifecycle (CSDL) approved extension publicly available in the Chrome store. CSA Extension (CSAE) aims to bring Cisco Support closer to the Cisco product and portals and extend Cisco Technical Assistance Center (TAC) Intellectual Capital directly inside the Cisco product portals to create a frictionless self-support experience for our customers. More details on downloading and installing the extension are available in the link Cisco Support Assistant Extension - Getting Started.
Chrome store Download link.
Supported Versions for Catalyst Center Extension
The extension has been optimized for the versions 2.3.5.5, 2.3.5.6, 2.3.7.5, 2.3.7.6 and 2.3.7.7. With the other Catalyst Center versions, the extension works on a best effort basis. It is supported on the Chrome and Edge browser only.

Note: If an element is injected in a page by CSAE, the title includes an info button indicating the injected element.

For the UI elements injected into the UI by CSAE, this message shows up when hovered over:

Enable the Catalyst Center Extension
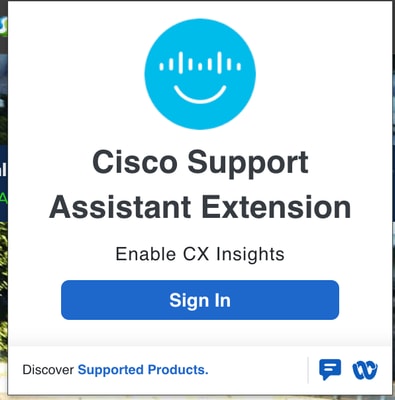
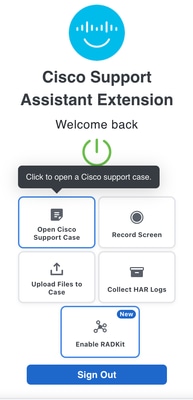
Step 1. Once the extension is installed, Chrome detects the Catalyst Center automatically and this pop-up appears. Clicking this activates the Chrome extension for the Catalyst Center:

If your Catalyst Center is not detected, kindly follow the instructions in Cisco Support Assistant Extension - Getting Started to enable the extension. The extension can be easily disabled at any time in the extensions pop up menu or in the extensions page - Chrome Extensions Homepage.
Step 2. When you click the Activate Cisco Support Assistant Extension pop-up (image) or the Sign in button on the extension pop-up (image), a seamless login process initiates. By integrating with Duo Single Sign-On (SSO), the extension offers you a secure and efficient way to access your account without the need for multiple login credentials:
Step 3. Once signed in successfully, the extension is ready to be used and Enabled on this URL shows up on the extension pop-up window:
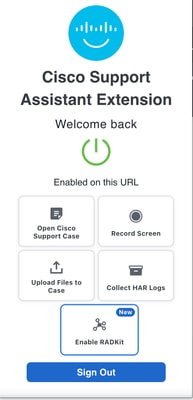
Step 4. The CSA Extension is enabled for all supported URLs, list of the same can be found in Supported Products. For pages that are not supported, the extension clearly indicates that it is not supported:

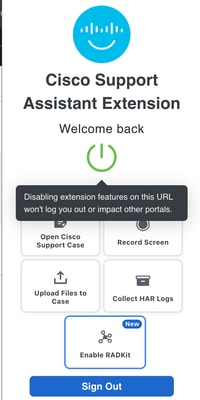
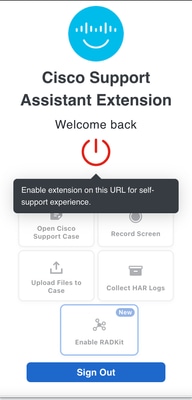
Step 5. The CSA Extension can be disabled for a URL by clicking the power on button in the center of the pop-up and can be enabled again by clicking the same button again:
Step 6. The CSA Extension can be disabled at any time by signing out of the extension or by disabling it via Manage extension in your Chrome browser.
Use Cases Enabled for the Catalyst Center
Multiple use cases have been enabled for the Catalyst Center with many more use cases currently in development. The use cases enhance the overall support experience and simplify the troubleshooting experience.
Use Case 1: Open a new Cisco Support Case
Step 1. A new Cisco Support case can be created by clicking Open Cisco Support Case from the extension pop-up as highlighted in the image:
Step 2. A new pop-up appears requesting additional information that would be added to the new Cisco Support case.
These are the inputs that can be provided:
- Case Title (mandatory)
- Case Description (mandatory)
- Session history (optional) - An option to include the session history of the browser tab, as part of the case description.
- Validation Tool (optional) - The output PDF of a fresh validation run (including all the health checks) can be added to the case which would be very useful for the Cisco TAC engineer to get a quick understanding of the deployment and any issues that can be found by the checks.
- RCA Bundle (optional from 2.3.7.6 and beyond) - The RCA/Support bundle generated from the UI (new in 2.3.7.6) can be uploaded to the case. Please note that only an existing generated RCA bundle can be selected for upload.
Note: Additional data from the Catalyst Center is automatically added to the Cisco Support case, which includes the serial number, member-id and the software version. Ensure that the pop-up blocker is disabled to ensure the new case is created seamlessly.
2.3.5.x and earlier:

2.3.7.6 and beyond:

If Upload RCA bundle is selected, the user is provided an option to select an existing bundle or generate a new RCA bundle which can take up to 90 minutes:

Step 3. A new tab is opened redirecting to the Cisco Support Manager to complete the case creation process:

Use Case 2: Record Screen
Step 1. Using this feature, the steps to reproduce an issue can be captured along with audio. Also, this feature is useful to record a message for the TAC engineer. By clicking Record Screen from the extension pop-up (highlighted in the image below), a video recording of a chosen screen or only a chosen tab can be recorded as a video along with audio and uploaded to the Cisco Support case:

Step 2. A pop-up requesting permission to continue appears. Click OK to start the screen record:

Step 3. Choose whether you want to record a tab or a window or select a particular an entire screen in the next new pop-up:

Step 4. The video is now being recorded along with the audio. A bar is present at the top of the tab with an option to stop the recording:

Step 5. As soon as the recording stops, a new pop-up opens up with the option to either upload the recorded file to an existing Cisco Support case or to a new one:

Use Case 3: Collecting HAR Logs
Step 1. Collecting HAR logs is required to troubleshoot UI related issues. The HAR logs are captured by clicking Collect HAR Logs from the extension pop-up as highlighted in the image below:

Step 2. A new pop-up requesting permission to continue appears. Click OK to start the HAR log collection:

Step 3. The HAR logs are being collected until the Stop collecting button in this pop-up is clicked.

Step 4. As soon as the collection stops, a new pop-up opens up with the option to either upload the HAR file to an existing Cisco Support case or to a new one.

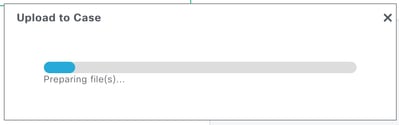
Use Case 4: Uploading Troubleshooting Data to a Support Case (Existing files)
Any file on your computer can now be uploaded directly to a support case from the CSA Extension, either to an existing support case or a new support case can be created with the file. This can be achieved by a simple click of the button Upload files to Case from the extension pop-up as shown in the image below. There is a limit of uploading only one file at a time and the size of this file cannot exceed 5GB:

Use Case 5: Automated RADKit Authorization Workflow (New)
A RADKit authorization can now be enabled by a single click. For more information on RADKit, please visit the RADKit support site. Please ensure the optional application package 'Support Services' is installed and this can be installed from the Software Management page.
Step 1. An automated workflow is triggered by clicking the button 'Enable RADKit' as shown in the image below. The workflow would create a new authorization for a TAC engineer (existing Support Case owner) to access the Catalyst Center via RADKit. By default, access to the Catalyst Center UI, Catalyst Center CLI and all the devices is enabled. The service number are shared with the TAC engineer and added to the case notes. Please note that, the authorization is enabled for 24 hours and a Read-Only access is provided.

Step 2. Choose the Support Case for which the RADKit Authorization is required:

Step 3. The CSAE builds out a new authorization by going through the various steps in the UI and the changes being made are visible. Finally, the authoization is created and here is a sample of an authorization created by the CSAE:

Use Case 6: Upload Troubleshooting Data to a Support Case (New Buttons Injected into the UI)
Steps to Upload to Support Case
Relevant troubleshooting logs can now be uploaded directly from the Catalyst Center to the Cisco Support Case. At multiple pages, the Upload to Case button has been injected to ensure the required troubleshooting files of different types are pushed to the case hassle free.
Step 1. When clicking Upload to Case, this pop-up shows up requesting whether the file needs to be uploaded to an existing case or to open a new case with the files attached:

Step 2. On choosing Exisitng Case, the files are uploaded to an existing Support case as an attachment. These screenshots highlight the file upload process including the validation:


Note: The case number is validated prior to the upload, if a wrong case number is chosen or if the case is in a closed state, this error pops up. Also, closing the pop-up during the file upload stops the upload process.

The Upload to Case button has been enabled at these points in the Catalyst Center.
Command Runner
The command runner provides the option to capture commands from the devices managed by the Catalyst Center. The captured outputs from all the devices can now be uploaded directly to the case by clicking Upload to Case in the top right corner:

The direct link to access the command runner tool is https://<CatC_IP_Address>/dna/tools/command-runner.
Reports
Reports that are ready for download can now be uploaded directly to the case, by clicking the Upload to Case button next to the available report.

Validation Tool
Validation tool performs multiple health, scale and upgrade readiness checks. A set of checks are selected and executed on demand. The output for these checks is a PDF file listing all the executed checks and the results of these checks. The PDF file can now be uploaded directly to a Support case by clicking the Upload to Case button:

System Analyzer
The System Analyzer tool generates a tar file of logs required for troubleshooting a specific feature of the Catalyst Center. The tar file can now be uploaded directly to a Support case by clicking the Upload to Case button:

Network Reasoner - Wireless AP Data Collection
The Wireless AP Data Collection is one of the multiple workflows in the network reasoner or MRE. This workflow collects data required to troubleshoot wireless AP issues in the network. There are multiple files collected and each file can be uploaded one by one directly to a Support case using the Upload to Case button present next to each file.

Network Reasoner - Wireless Client Data Collection
The Wireless Client Data Collection is one of the multiple workflows in the network reasoner or MRE. This workflow collects data required to troubleshoot wireless client issues in the network. There are multiple files collected and these files can be uploaded directly to a Support case using the Upload to Case button.
Device Certificates
The device certificates can be downloaded from the settings page. These certificates can be uploaded directly to a Support case using the Upload to Case button.

Service Logs
The logs for the various Kubernetes Services can now be uploaded directly to a Support case using the Upload to Case button. The button is available at two different points on the Catalyst Center.
The System 360 can be reached via the hamburger menu or via the link below. Click View <x> Services to open a new pop-up with the list of the Services. The Services health, metrics, logs and the new Upload to Case button are now visible.

https://<CatC_IP_Address>//dna/systemSettings/system360/system360
The System 360 can be reached via the hamburger menu or via the link below. Click View <x> Services to open a new pop-up with the list of the Services. Click the Logs link against any Service to open the Service logs in Kibana. The new Upload to Case button is added to this Kibana page.

https://<CatC_IP_Address>//dna/systemSettings/system360/system360
Support Bundle from UI (New Feature from 2.3.7.6)
Support Bundles generated from the UI can now be uploaded to the Support case directly by clicking the upward facing arrow in the Actions column, next to the file:

Support/Feedback
Please reach out to csae_support@cisco.com for any queries or concerns.
 Feedback