Configure SNMP in ACI
Available Languages
Contents
Introduction
This document describes the configuration of Simple Network Management Protocol (SNMP) and SNMP traps in ACI.
Prerequisites
Requirements
Cisco recommends that you have knowledge of these topics:
- Fabric discovery completed.
- In-Band/Out-of-Band connectivity to your Application Policy Infrastructure Controller (APIC) and fabric switches.
- In-Band/Out-of-Band contracts configured to allow SNMP traffic (UDP Ports 161 and 162),
- Static node management addresses configured for your APICs and fabric switches under the default management tenant (without this, pulling SNMP information from an APIC fails),
- Understand the SNMP Protocol Workflow,
Components Used
The information in this document is based on these software and hardware versions:
- APIC
- Browser
- Application Centric Infrastructure (ACI) running 5.2 (8e)
- Snmpwalk command
The information in this document was created from the devices in a specific lab environment. All of the devices used in this document started with a cleared (default) configuration. If your network is live, ensure that you understand the potential impact of any command.
Configure
Cisco ACI provides SNMPv1, v2c, and v3 support, including Management Information Bases (MIBs) and notifications (traps). The SNMP standard allows any third-party application that supports the different MIBs to manage and monitor the ACI leaf & spine switches and APIC controllers. However, SNMP write commands (Set) are notsupported in ACI.
The SNMP policy is applied and runs independently on the leaf & spine switches and to APIC controllers. Because each ACI device has its own SNMP entity, (that is Multiple APICs in an APIC Cluster) it must be monitored separately as well as the switches. However, the SNMP policy source is created as amonitoring policyfor the entire ACI fabric.
By default, SNMP uses UDPport 161for polling and port 162for TRAPs.
Understanding SNMP Scopes
One quick fundamental concept of SNMP in ACI is that there are two scopes SNMP information can be pulled from:
1. Global
2. Virtual Routing and Forwarding (VRF) Context
The Global Scope is to pull chassis MIBs such as the number of interfaces, interface indexes, interface names, interface status, and so on of a leaf/spine node.
VRF Context Scope specific to MIBs pull VRF-specific information such as IP addresses and routing protocol information.
There is a full list of supported APIC and fabric switch Global and VRF Context MIBs in the Cisco ACI MIB Support List.

Note: An MIB with a Global scope has only one instance in the system. The data in a Global MIB relates to the overall system. An MIB with VRF-Specific scope can have per-VRF instances in the system. The data in a VRF-specific MIB relates only to that VRF.
Configuration Steps (For Both Global and VRF Context Scopes)
Step 1. Configure SNMP Fabric Policy
Note: In this image, the SNMP settings are specified as SNMP community policies and SNMP Client Group policies.
The first step in configuring SNMP is to create the necessary SNMP Fabric Policies. To create the SNMP Fabric Policies, navigate to the APIC web GUI path; Fabric > Fabric Policies > Policies > Pod > SNMP.
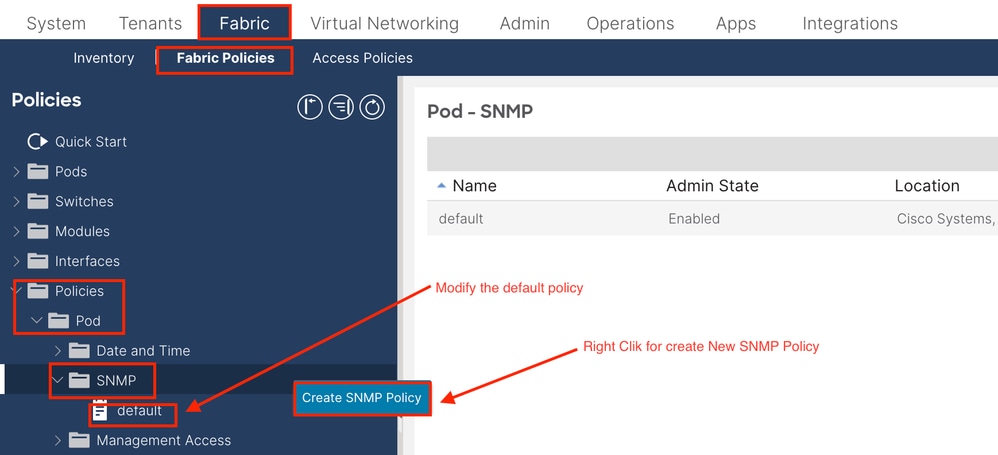
You can create a new SNMP Policy or modify the default SNMP policy.
In the document, the SNMP Policy is called New-SNMP and uses SNMP version v2c, the only fields required are the Community Policies and Client Group Policies.
The Community Policy Name field defines the SNMP community string to be used. In this case, New-1 and you can see where these two community strings come in later.
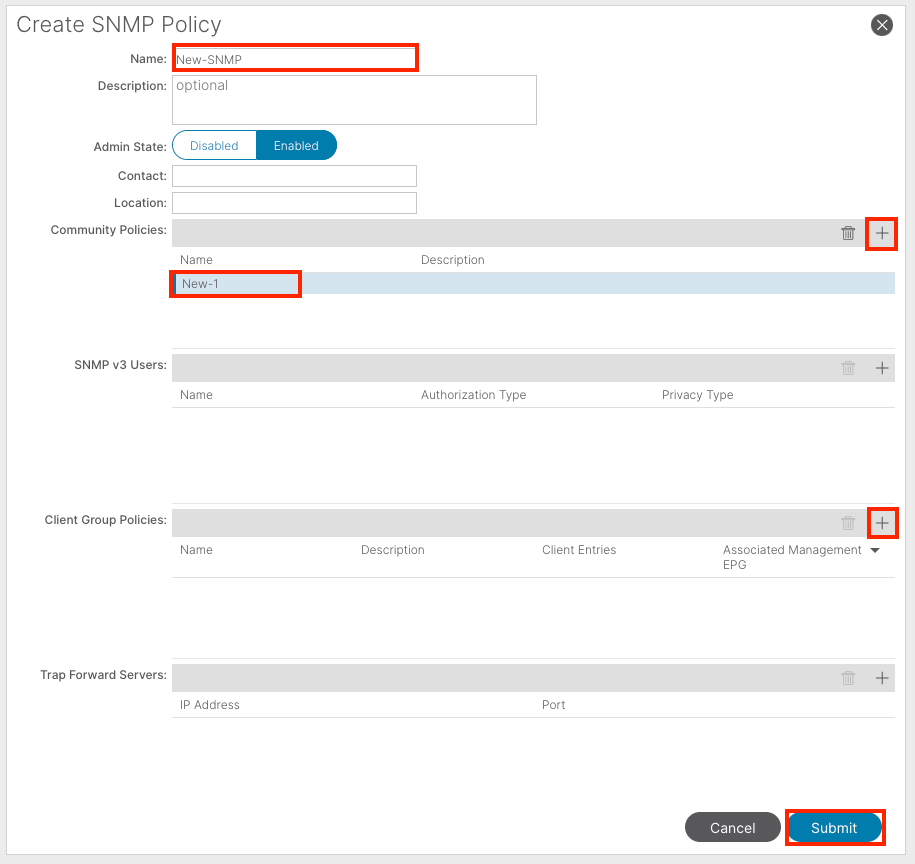
Name: The name of the SNMP policy (this name can be between 1 and 64 alphanumeric characters).
Description: The description of the SNMP policy (the description can be 0 to 128 alphanumeric characters).
Admin State: The administrative state of the SNMP policy (the State can be enabled or disabled and the states are:
-
Enabled: The admin state is enabled.
-
Disabled: The admin state is disabled.
- The default is disabled.
Contact: The contact information for the SNMP policy.
Location: The location for the SNMP policy.
SNMP v3 Users: The SNMP user profile is used to associate users with SNMP policies for monitoring devices in a network.
Community Policies:The SNMP community profile enables access to the router or switch statistics for monitoring.
Client Group Policies:
The next step is to add the Client Group Policy/Profile. The purpose of the Client Group Policy/Profile is to define what IPs/subnets can pull SNMP data from APICs and fabric switches:
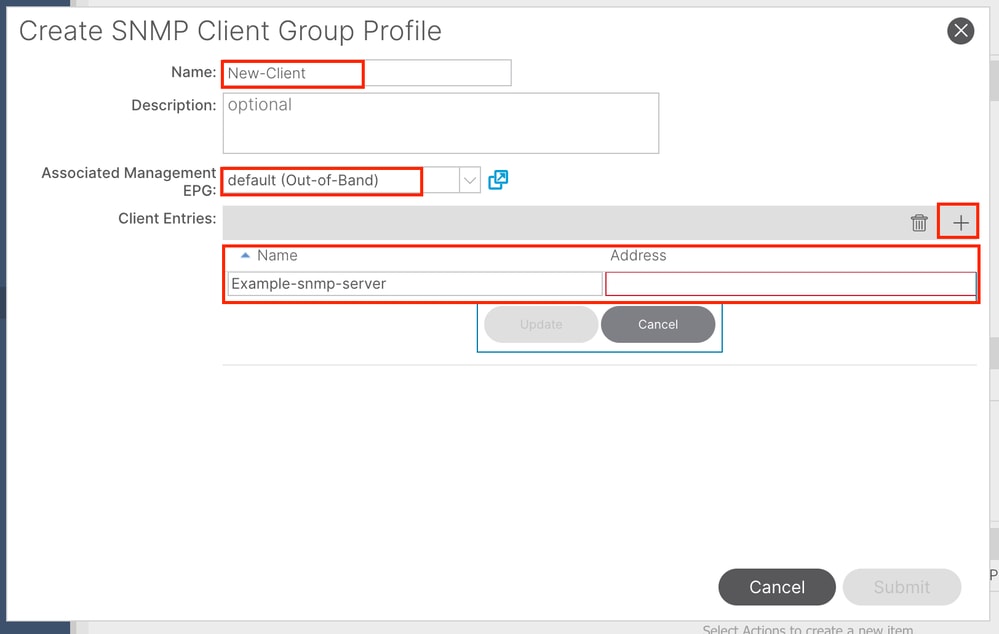
Name: The name of the client group profile (this name can be between 1 and 64 alphanumeric characters).
Description: The description of the client group profile (the description can be 0 to 128 alphanumeric characters).
Associated Management End Point Group (EPG): The distinguished name of an endpoint group through which the VRF is accessible.
- The maximum supported string length is 255 ASCII characters. The default is the management tenant Out-of-Band management access EPG.
Client Entries: The SNMP client profile IP address.
In the document, the Client Group Policy/Profile is calledNew-Client.
In the Client Group Policy/Profile you must associate the preferred Management EPG. You must ensure the Management EPG you choose has the necessary contracts to allow SNMP traffic (UDP ports 161 and 162).
- Thedefault Out-of-Band Management EPG is used in the document for demonstration purposes.
The last step is to define your Client Entriesto allow specific IPs or entire subnets access to pull ACI SNMP data. There is a syntax for defining a specific IP or an entire subnet:
- Specific Host IP: 192.168.1.5
- Entire Subnet: 192.168.1.0/24
Note: You cannot use 0.0.0.0 in the client entry to allow all subnets (if you want to allow all subnets to access SNMP MIB, just leave the client entries empty).
Step 2. Apply SNMP Policy to the Pod Policy Group (Fabric Policy Group)
To apply this configuration, navigate to the APIC web GUI path; Fabric > Fabric Policies > Pods > Policy Groups > POD_POLICY_GROUP (default in the document).

On the right pane, you can see a field for SNMP Policy. From the drop-down menu, choose your newly created SNMP Policy and submit your changes.
Step 3. Associate the Pod Policy Group with the Pod Profile
In this document, use the default pod profile for simplicity. To do so, navigate to the APIC web GUI path; Fabric > Fabric Policies > Pods > Profiles > POD_PROFILE (default in the document).

At this stage, configure the basic SNMP for global MIBs.
Note: At this point, all necessary steps (Steps 1-3) for SNMP configurations are completed, and the global MIB scope have been implicitly used. This allows for an SNMP walk to be conducted for any ACI node or APIC.
Step 4. Configure VRF Context Scopes
Once you associate a community string to a VRF Context, that specific community string cannot be used to pull Global scope SNMP data. It is required to create two SNMP community strings if you are looking to pull both Global scope and VRF Context SNMP data.
In this case, the previously created community strings (in Step 1.), namely (New-1), use New-1 for VRF context scope andVRF-1custom VRF in Examplecustom tenant. Navigate to the APIC web GUI path; Tenants > Example > Networking > VRFs > VRF-1(right click) > Create SNMP Context.


After submitting the configuration, verify the SNMP Context configuration you applied by left-clicking your VRF, navigating to the Policy tab on the VRF, and scrolling down toward the bottom of the pane:
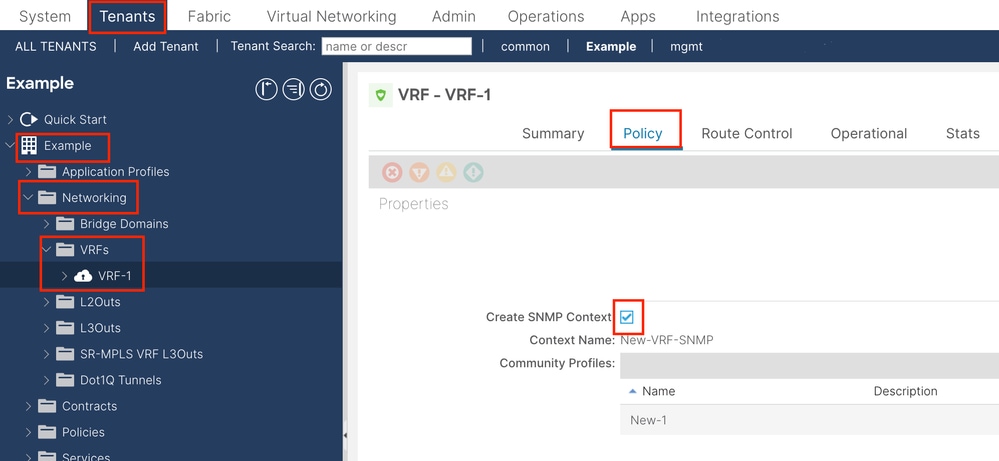
To disable an SNMP Context on a VRF, deselect the Create SNMP Context checkbox (seen in the screenshot), or right-click the VRF and choose Delete SNMP Context.
SNMP TRAPs Configuration using GUI
SNMP TRAPs are sent to the SNMP server (SNMP Destination/Network Management Systems (NMS)) without polling, and the ACI node/APIC sends the SNMP TRAP once the fault/event (defined condition) happens.
SNMP Traps are enabled based on the policy scope under Access/Fabric/Tenant monitoring policies. ACI supports a maximum of 10 Trap receivers.
Note: Without Steps 1-3 from the previous section, SNMP TRAP configurations are not enough. Step 2 in SNMP TRAP configurations are related to Monitoring Policies for (Access/Fabric/Tenant).
To configure SNMP TRAPs in ACI, you must use the two stepsin addition to steps 1, 2, and 3 in the previous section.
Step 1. Configure SNMP TRAP Server
Navigate to the APIC web GUI path; Admin > Eternal Data Collectors > Monitoring Destinations > SNMP.


Host Name/IP: The host for the SNMP trap destination.
Port: The service port of the SNMP trap destination (the range is 0 (unspecified) to 65535; the default is 162).
Version: The supported CDP version for the SNMP trap destination. The version can be:
-
v1: Uses a community string match for user authentication.
-
v2c: Uses a community string match for user authentication.
-
v3: An interoperable standards-based protocol for network management that provides secure access to devices by a combination of authenticating and encrypting frames over the network.
The default isv2c.
Security Name: The SNMP trap destination security name (community name; and it cannot contain the @ symbol).
v.3 Security Level: The SNMPv3 security level for the SNMP destination path. The level can be:
-
auth
-
noauth
-
priv
The default is noauth.
Management EPG: The name of the management endpoint group for the SNMP destination through which the remote host is reachable.
Step 2. Configure SNMP TRAP Source under (Access/Fabric/Tenant) Monitoring Policy
You can create monitoring policies with the three scopes:
- Access: Access ports, FEX, VM controllers.
- Fabric: Fabric ports, cards, chassis, fans.
- Tenant: - EPGs, application profiles, services.
Note: You can choose any one or any combination of them to configure according to your needs.
Option 1. Define the SNMP Source Under Access Policies
Navigate to the APIC web GUI path; Fabric > Access Polices > Polices > Monitoring > Default > Callhome/Smart Callhome/SNMP/Syslog/TACACS.

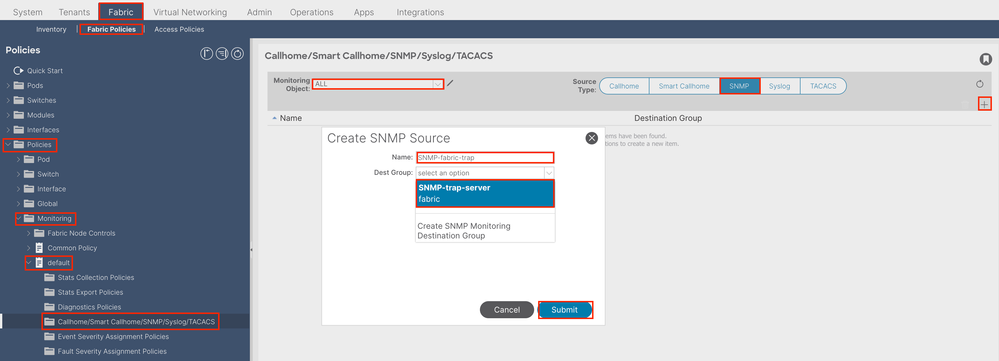
Note: You can use a custom-defined Monitoring policy (if configured) instead of the default one. Use the default one shown in the image. You can specify which monitoring object to monitor; all were used in the example.
Option 2. Define SNMP Source under Fabric Policies
Navigate to the APIC web GUI path; Fabric > Fabric Polices > Polices > Monitoring > Default > Callhome/Smart Callhome/SNMP/Syslog/TACACS.
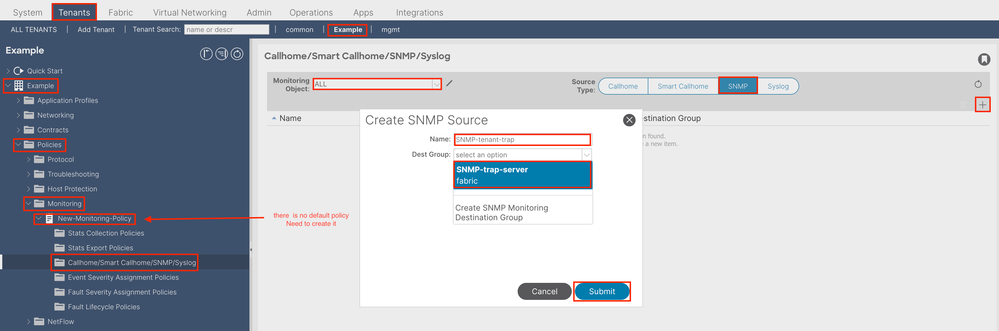
Option 3. Define SNMP Source under Tenant Policies
Navigate to the APIC web GUI path; Tenant > (Tenant Name) > Polices > Monitoring > (Custom monitoring policy) > Callhome/Smart Callhome/SNMP/Syslog/TACACS.
Verify
Use snmpwalk Command to Verify
First, look at pulling SNMP data from the Global scope of a leaf switch. Running the snmpwalk command can do just that; snmpwalk -v 2c -c New-1 x.x.x.x
snmpwalk = The snmpwalk executable installed on MacOS/Linux/Windows
-v = Specifies the version of SNMP want to use
2c= Specifies that are using SNMP version 2c
-c= Specifies that a particular community string
New-1= The community string is used for pulling Global scope SNMP data
x.x.x.x= The out-of-band management IP address of my leaf switch
Command Result:
$ snmpwalk -v 2c -c New-1 x.x.x.x
SNMPv2-MIB::sysDescr.0 = STRING: Cisco NX-OS(tm) aci, Software (aci-n9000-system), Version 15.2(8e), RELEASE SOFTWARE Copyright (c) 2002-2015 by Cisco Systems, Inc. Compiled 2018/07/26 09:34:42
SNMPv2-MIB::sysObjectID.0 = OID: SNMPv2-SMI::enterprises.9.12.3.1.3.1626
DISMAN-EVENT-MIB::sysUpTimeInstance = Timeticks: (45013216) 5 days, 5:02:12.16
SNMPv2-MIB::sysContact.0 = STRING:
SNMPv2-MIB::sysName.0 = STRING: leaf1
SNMPv2-MIB::sysLocation.0 = STRING:
SNMPv2-MIB::sysServices.0 = INTEGER: 70
SNMPv2-MIB::sysORLastChange.0 = Timeticks: (3) 0:00:00.03
SNMPv2-MIB::sysORID.1 = OID: SNMPv2-MIB::snmpMIB
SNMPv2-MIB::sysORID.2 = OID: SNMP-VIEW-BASED-ACM-MIB::vacmBasicGroup
SNMPv2-MIB::sysORID.3 = OID: SNMP-FRAMEWORK-MIB::snmpFrameworkMIBCompliance
SNMPv2-MIB::sysORID.4 = OID: SNMP-MPD-MIB::snmpMPDCompliance
SNMPv2-MIB::sysORID.5 = OID: SNMP-USER-BASED-SM-MIB::usmMIBCompliance
SNMPv2-MIB::sysORDescr.1 = STRING: The MIB module for SNMPv2 entities
SNMPv2-MIB::sysORDescr.2 = STRING: View-based Access Control Model for SNMP.
SNMPv2-MIB::sysORDescr.3 = STRING: The SNMP Management Architecture MIB.
SNMPv2-MIB::sysORDescr.4 = STRING: The MIB for Message Processing and Dispatching.
SNMPv2-MIB::sysORDescr.5 = STRING: The management information definitions for the SNMP User-based Security Model.
In the snipped command output, the snmpwalk is successful and the hardware-specific information was pulled. If you let the snmpwalk proceed, you see the hardware interface names, descriptions, and so on.
Now, proceed to retrieve VRF Context SNMP data, previously created SNMP contexts, New-VRF-SNMP for VRFs utilizing the SNMP community string, New-1. Because the same community string is used,New-1 across two different SNMP Contexts, you must specify which SNMP Context you want the SNMP data pulled from. There is the snmpwalk syntax you must use to specify a particular SNMP Context; snmpwalk -v 2c -c New-1@New-VrF-SNMP 10.x.x.x
You can see that to pull from a specific SNMP Context, you use the format: COMMUNITY_NAME_HERE@SNMP_CONTEXT_NAME_HERE
Using CLI Show Commands
On APIC:
show snmp
show snmp policy <SNMP_policy_name>
show snmp summary
show snmp clientgroups
show snmp community
show snmp hosts
show snmp engineid
On Switch:
show snmp
show snmp | grep "SNMP packets"
show snmp summary
show snmp community
show snmp host
show snmp engineID
show snmp context
show snmp user
show snmp internal dump-internal-log
show snmp internal globals
show snmp internal trace log
Using CLI Moquery Commands
On APIC/Switch:
moquery -c snmpGroup         #The SNMP destination group, which contains information needed to send traps or informs to a set of destinations.
moquery -c snmpTrapDest      #A destination to which traps and informs are sent.
moquery -c snmpRtDestGroup   #A target relation to SNMP destination group. This group contains information needed to send traps or informs to a set of destinations.
moquery -c snmpPol           #The SNMP policy, which enables you to monitor client group, v3 user, and/or community SNMP policies.
moquery -c snmpClientGrpP    #A client group, which is a group of client IP addresses that allows SNMP access to routers or switches.
moquery -c snmpCommunityP    #The SNMP community profile, which enables access to the router or switch statistics for monitoring.
moquery -c snmpRtSnmpPol     #A target relation to an SNMP policy that contains site information and general protocol configuration parameters. Note that this relation is an internal object.
moquery -c snmpClientP       #The client profile information.
moquery -c snmpRsEpg         #A source relation to the endpoint group VRF through which the clients can connect. The VRF is an in-band or out of-band management endpoint.
moquery -c snmpSrc           #The SNMP source profile, which determines the fault information, severity level, and destination for sending messages to the SNMP destination.
moquery -c snmpCtxP          #The SNMP context profile, which enables you to specify a context to monitor with a community profile.
Using CLI Cat Commands
On APIC:
cat /aci/tenants/mgmt/security-policies/out-of-band-contracts/summary
cat /aci/tenants/mgmt/security-policies/filters/summary
cat /aci/tenants/mgmt/node-management-epgs/default/out-of-band/default/summary
cat /aci/admin/external-data-collectors/monitoring-destinations/snmp/*/snmp-trap-destinations/summary
cat /aci/fabric/fabric-policies/pod-policies/policies/snmp/summary
cat /aci/fabric/fabric-policies/pod-policies/policies/snmp/*/summary
cat /aci/fabric/fabric-policies/pod-policies/policies/snmp/*/client-group-policies/*/*/summary
cat /aci/fabric/fabric-policies/pod-policies/policy-groups/summary
cat /aci/fabric/fabric-policies/pod-policies/pod-selector-default-all/summary
cat /aci/fabric/fabric-policies/monitoring-policies/monitoring-policy-default/callhome-snmp-syslog/all/snmp*/summary
cat /aci/fabric/fabric-policies/monitoring-policies/common-policy/callhome-snmp-syslog/snmp/*/summary
cat /aci/fabric/access-policies/monitoring-policies/default/callhome-snmp-syslog/all/snmp*/summary
Troubleshoot
Check the snmpd Process
On Switch:
ps aux | grep snmp
pidof snmpd
On APIC:
ps aux | grep snmpIf the process is normal, contact Cisco TAC for more assistance.
Revision History
| Revision | Publish Date | Comments |
|---|---|---|
3.0 |
22-Jun-2026
|
Updated spelling, grammar, spacing, added 1 tag (user_written). |
2.0 |
10-Apr-2024
|
Initial Release |
1.0 |
05-Apr-2024
|
Initial Release |
 Feedback
Contact Cisco
- Open a Support Case

- (Requires a Cisco Service Contract)