Secure Cloud for GCP (IaaS) Design Guide
Available Languages
Bias-Free Language
The documentation set for this product strives to use bias-free language. For the purposes of this documentation set, bias-free is defined as language that does not imply discrimination based on age, disability, gender, racial identity, ethnic identity, sexual orientation, socioeconomic status, and intersectionality. Exceptions may be present in the documentation due to language that is hardcoded in the user interfaces of the product software, language used based on RFP documentation, or language that is used by a referenced third-party product. Learn more about how Cisco is using Inclusive Language.
This design guide aligns with the Cisco® Secure Cloud Architecture guide. The Secure Cloud Architecture guide explains the secure architecture for cloud applications, critical business flows; attack surfaces and corresponding security controls required for the cloud environment. This guide proposes a Cisco Validated Design (CVD) for security in a tiered application architecture. The solution proposed in this guide leverages Cisco security controls along with Cloud-Native security controls to achieve the desired security posture for applications in GCP.
This document illustrates the design and security aspects of an application hosted in GCP. Along with the design and security specifications, this document also delves into the details of implementation and validation steps for the proposed architecture.
This guide covers the following security controls:
● Cisco Secure Workload (formerly Tetration)
● Cisco Secure Endpoint (formerly AMP for Endpoint)
● Cisco Secure Cloud Analytics (formerly Stealthwatch Cloud)
● Cisco Duo
● Cisco SecureX
● Cisco Umbrella
This design guide does not cover the following components or topics:
● Cisco Firepower Next-Generation Firewalls Virtual (NGFWv)
● Cisco Adaptive Virtual Security Appliance (ASAv)
● Cisco Defense Orchestrator (CDO)
● Radware Cloud Web Application Firewall (WAF) and DDOS prevention
For setting up the web application, we used the following GCP cloud components and services.
◦ Disks
◦ Images
◦ Firewall
◦ Routes
Cisco’s security approach for the modern cloud applications allows companies to achieve:
● Improved resiliency to enable cloud availability and secure services
● Operational efficiency from automated provisioning and flexible, integrated security
● Advanced threat protection from Cisco TALOS – industry-leading threat intelligence to stay up to date, informed, and secure
What is our security approach?
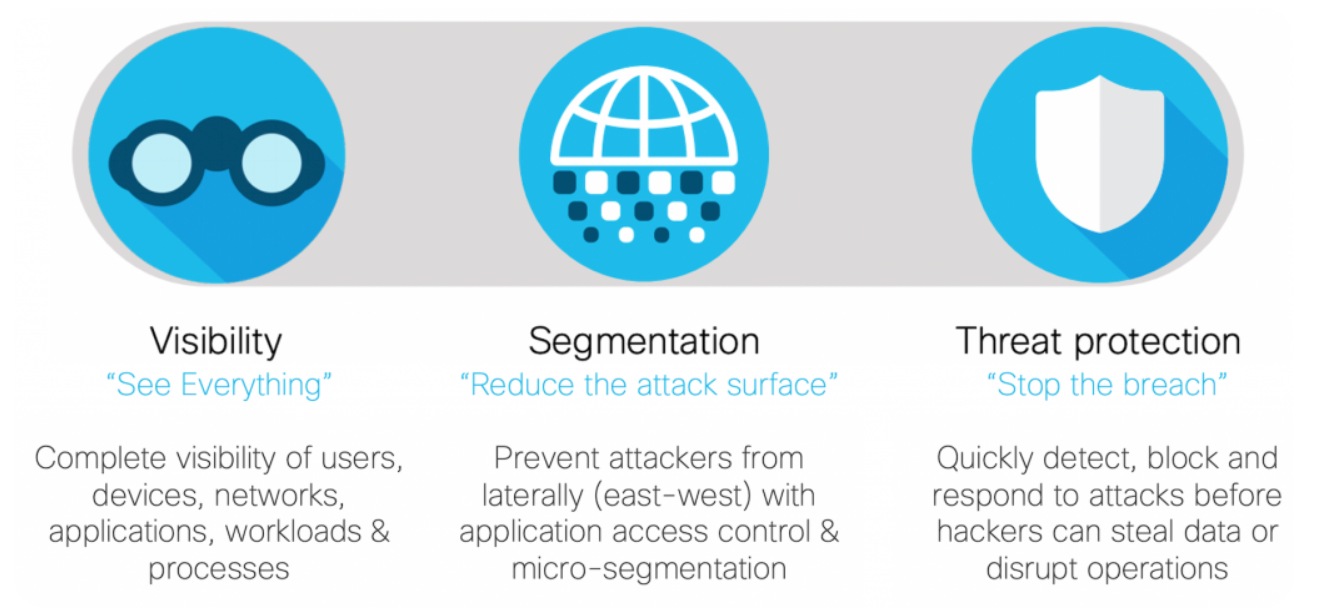
Specific capabilities are necessary to protect the public cloud and build the appropriate layers of defense. These capabilities work together to create several layers of defense protecting the cloud applications. The top priorities or the three pillars that we keep in mind while designing the secure public cloud solutions are:
● Visibility - Complete visibility of users, devices, networks, applications, workloads, and processes
● Segmentation - Reduce the attack surface by preventing attackers from moving laterally, with consistent security policy enforcement, application access control and micro-segmentation
● Threat Protection - Stop the breach by deploying multi-layered threat sensors strategically in the public cloud to quickly detect, block, and dynamically respond to threats
As your data flows from an increasing number of devices to your data center or private/public cloud, you must understand your data flow, to be able to protect it. Cisco SAFE is an architectural approach that helps you visualize this transit of the data in terms of business flows, understand the attack surface associated with these flows and hence, devise appropriate capabilities to secure them. This framework provides complete guidance from the initial identification of business flows in a given architecture to securing it and then deploying and validating the solution.
These validated designs provide guidance that is complete with configuration steps that ensure secure deployments for your organization. Cisco Validated Designs (CVDs) for various SAFE PINs can be found at SAFE home page.
Cisco SAFE simplifies network security by providing solution guidance using the concept of ‘Places in the Network’ (PINs). This design guide is a recommended threat defense architecture for the Cloud PIN (see figure 1). Within the Cloud PIN, this design guide specifically covers the GCP cloud.
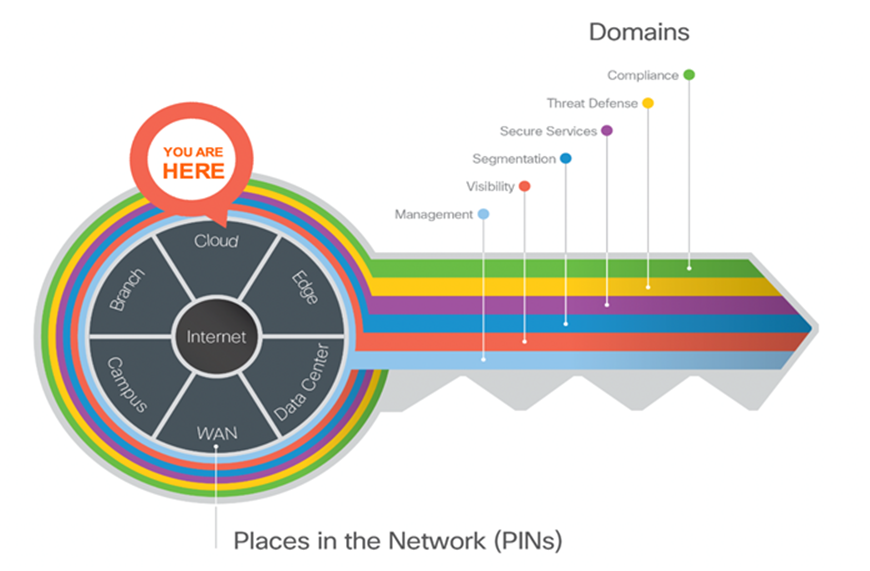
Key to SAFE framework
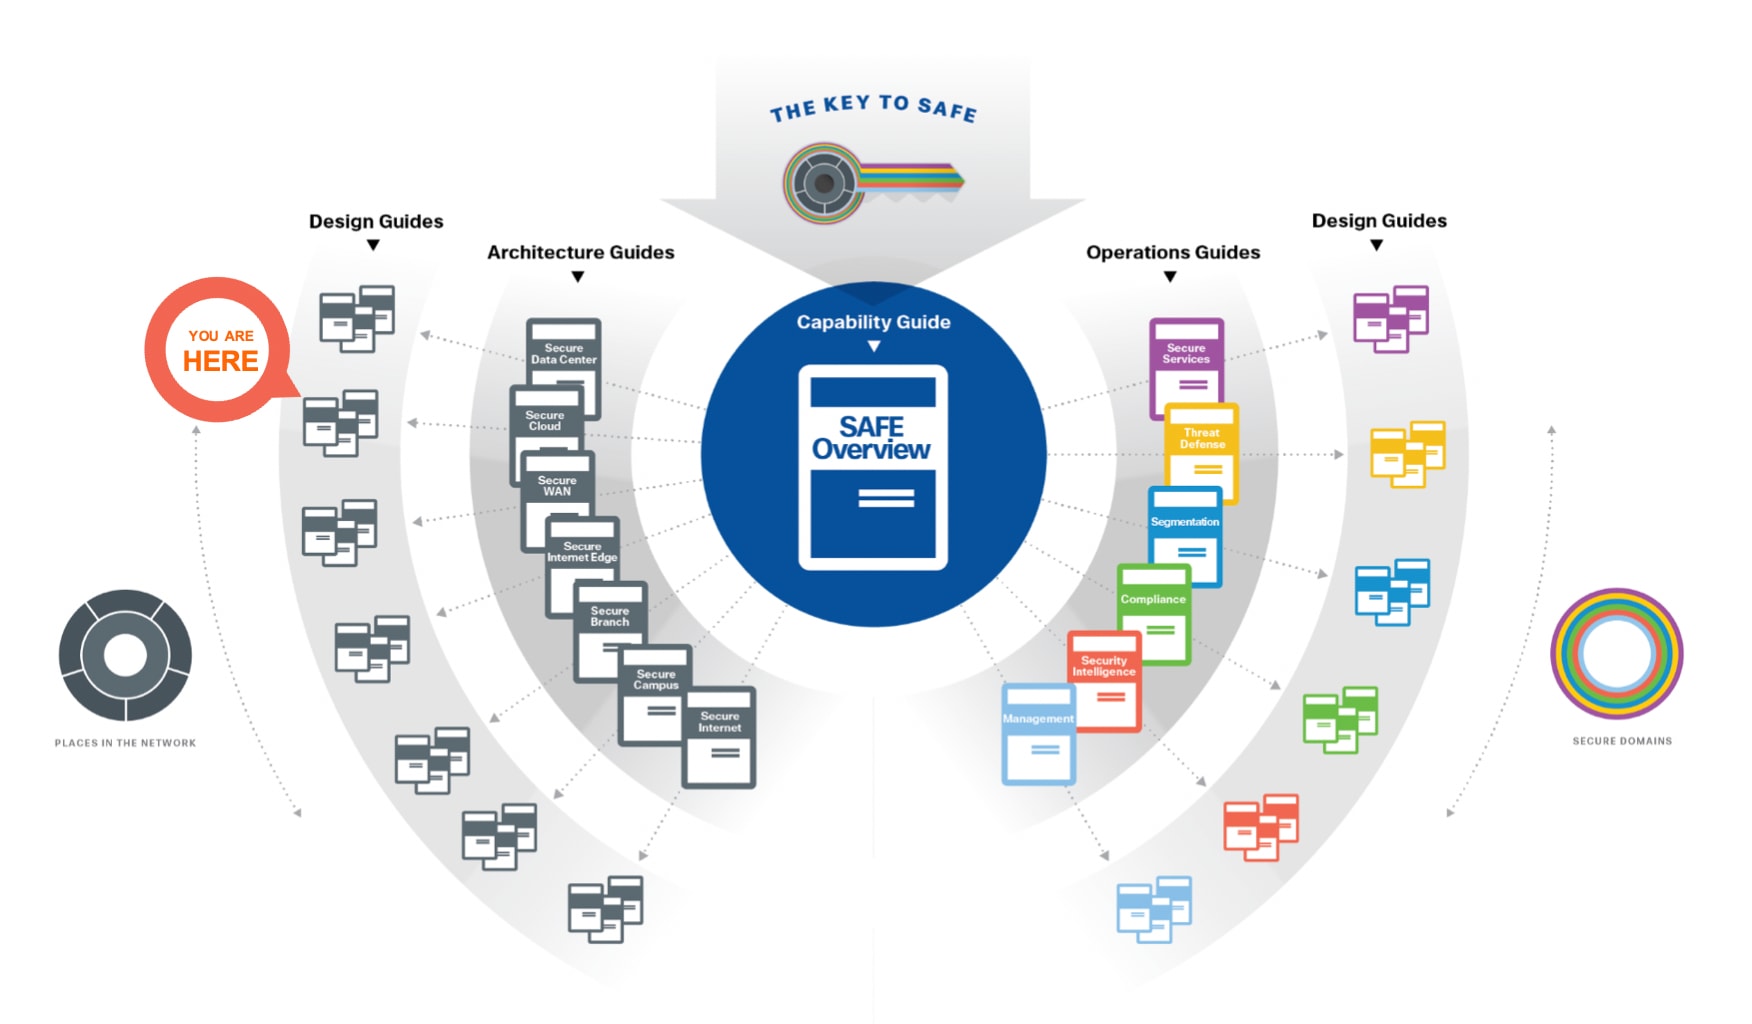
SAFE Guidance Hierarchy
For more information on SAFE framework and architecture/design guides, check out the SAFE documentation (select architecture/design tab).
SAFE uses the concept of business flows to simplify the identification of threats. This enables the selection of very specific capabilities necessary to secure them.
This solution addresses the following business flows for a typical tiered web application hosted in GCP.
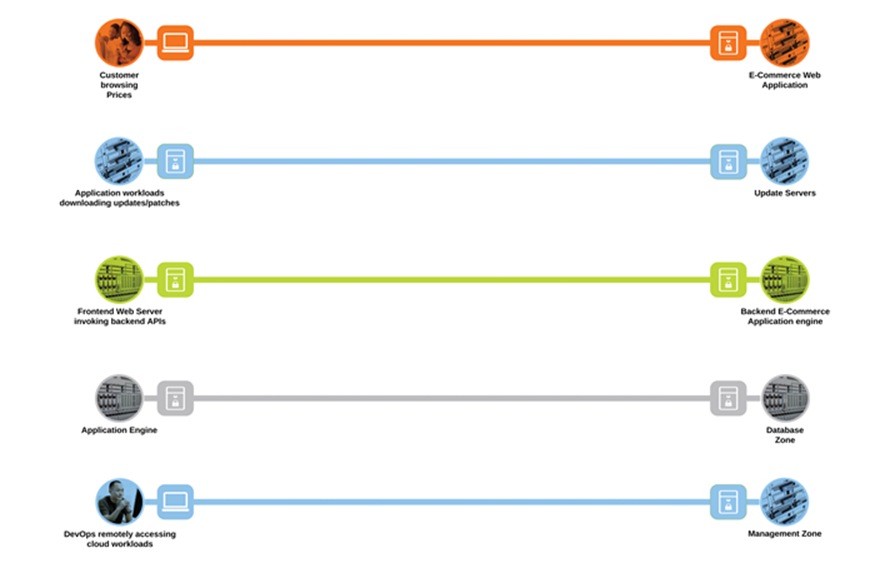
Public Cloud business flows
● Customer browsing an e-commerce web application. The customer, sitting somewhere out on the Internet, browses the e-commerce web application hosted in the GCP cloud
● Application workloads downloading updates/patches from update servers outside the cloud (Internet). Application workloads sitting in the cloud need to reach out to various update servers to fetch the updates and patches at regular intervals
● Systems communicating east/west within the GCP cloud. For example- the frontend web servers will make HTTP requests to a backend application, or the application workloads will make API calls among themselves
● Application workloads transacting data with the database server within the cloud
● DevOps remotely accessing the management zone for workload management/update/patching purposes
The secure cloud design protects systems by applying security controls to the attack surface found in the public cloud. The attack surface in public cloud spans the business flows used by humans, devices, and the network.
Threats include rogue identity, DDoS, web vulnerabilities, infections, and advanced persistent threats allowing hackers the ability to take control of your devices and networks.
Considering the business flows elaborated in the last section (Figure 3), a deep dive into the attack surface for each of those business flows is shown below.
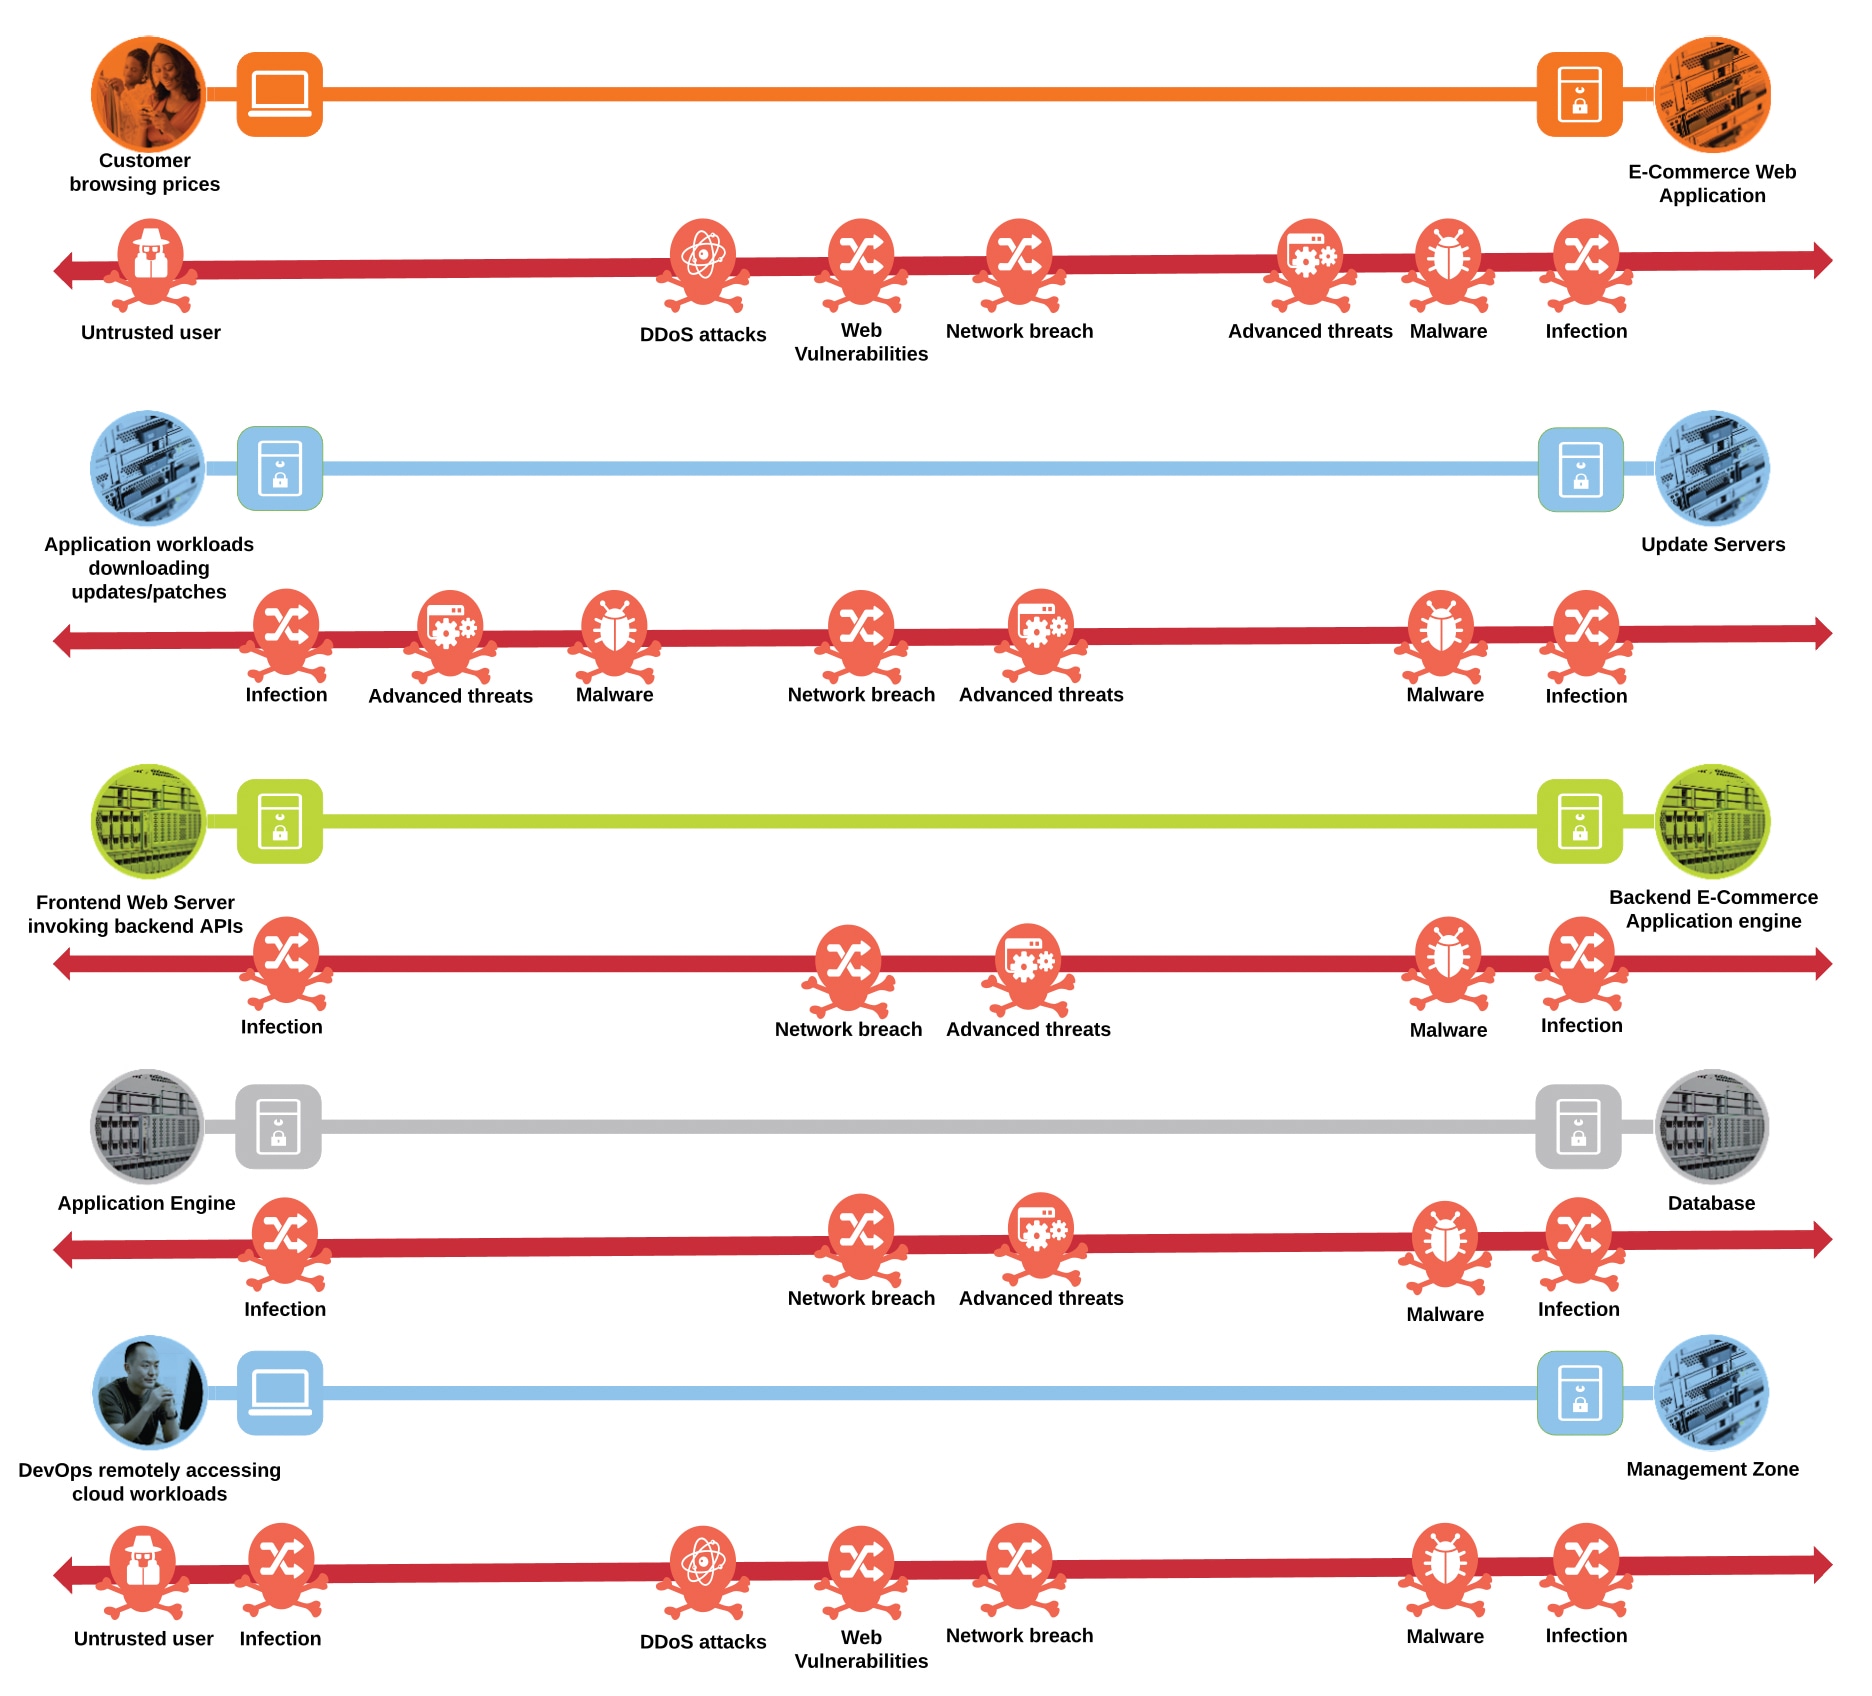
Public Cloud attack surface
● An untrusted/compromised user, out on the Internet, may try to exploit the cloud application or flood it with fake traffic to render it incapable of serving the genuine users
● The workloads need to communicate with update servers out on the untrusted public network. An attacker might compromise workloads to download malware to the application environment or upload crucial data to malicious servers
● Systems communicating east/west within the GCP cloud may spread the infection from one workload to another within the cloud, eventually compromising the whole application
● An attacker may compromise the application workloads to steal or corrupt data stored on the database servers
● A malicious user may try to gain the same privileged access as DevOps to compromise the complete application environment in GCP
The table below is a sample of the threats that exist for the Public Cloud business flows.
| Threat Icon |
Threat Name |
Threat Description |
|
|
Rogue Actor |
Attackers can easily steal or compromise passwords via phishing emails sent to users. With stolen credentials, they can log in to work applications or systems undetected and access data. Brute-force attacks involve programmatically trying different credential pairs until they work, another attack that can be launched remotely. Once inside, attackers can move laterally to get access to more sensitive applications and data. |
|
|
Malicious Device |
Devices running older versions of software – such as operating systems, browsers, plugins, etc. – can be susceptible to vulnerabilities not patched by software vendors. Without those security patches, devices that access work applications and data can introduce risks by increasing the overall attack surface. |
|
|
Insecure unmanaged device (BYOD) |
Often, devices that are not owned or managed by your IT team can have out-of-date software and lax security. Devices that do not have certain security features enabled – such as encryption, firewalls, passwords, etc. – are considered riskier or potentially out of compliance with data regulation standards that require encryption, like healthcare industry compliance standards. |
|
|
Advanced Threats |
For example, a malicious actor, on the public network, exploits a PHP Code Injection vulnerability on the web application and gains access to the details of the underlying operating system and installed packages. The attacker then exploits a known vulnerability in the underlying operating system or the installed package to perform privilege escalation and then goes on to establish a command-and-control channel to a malicious server running on attacker’s network by remotely executing a piece of code. The attacker then starts profiling the application environment and exfiltrates sensitive data out through the established command-and-control channel over an outbound UDP 53 port (DNS protocol). |
|
|
Malware |
Zero-day malware attacks, poorly developed applications or unpatched applications are all attack vectors that can be exploited by threat actors. If not protected, the attacker can push malicious code in the source repository resulting in infected software and potential propagation. |
|
|
Malicious Insider |
Without appropriate network visibility and segmentation policies, unknown users / applications may exist in the network or known applications may deviate from characteristic behavior. Malicious actors can take advantage of a flat network with little to no visibility and infiltrate the network without triggering suspicion. |
|
|
Data Exfiltration |
Suspect data loss occurs when an abnormal amount of data has been transferred out of the network. Suspect data hoarding occurs when an inside host is found downloading an abnormal amount of data from other inside hosts. |
|
|
Exploitation |
Hosts attempting to compromise each other, such as through worm propagation and brute force password cracking. |
Public Cloud Business Flows with Capabilities
Developing a defense-in-depth architecture requires identifying existing threats and applying appropriate security capabilities to thwart them. Business flows and the corresponding attack surface and threat patterns that we defined earlier (Figures 3 and 4) are mapped to their corresponding security controls as below.
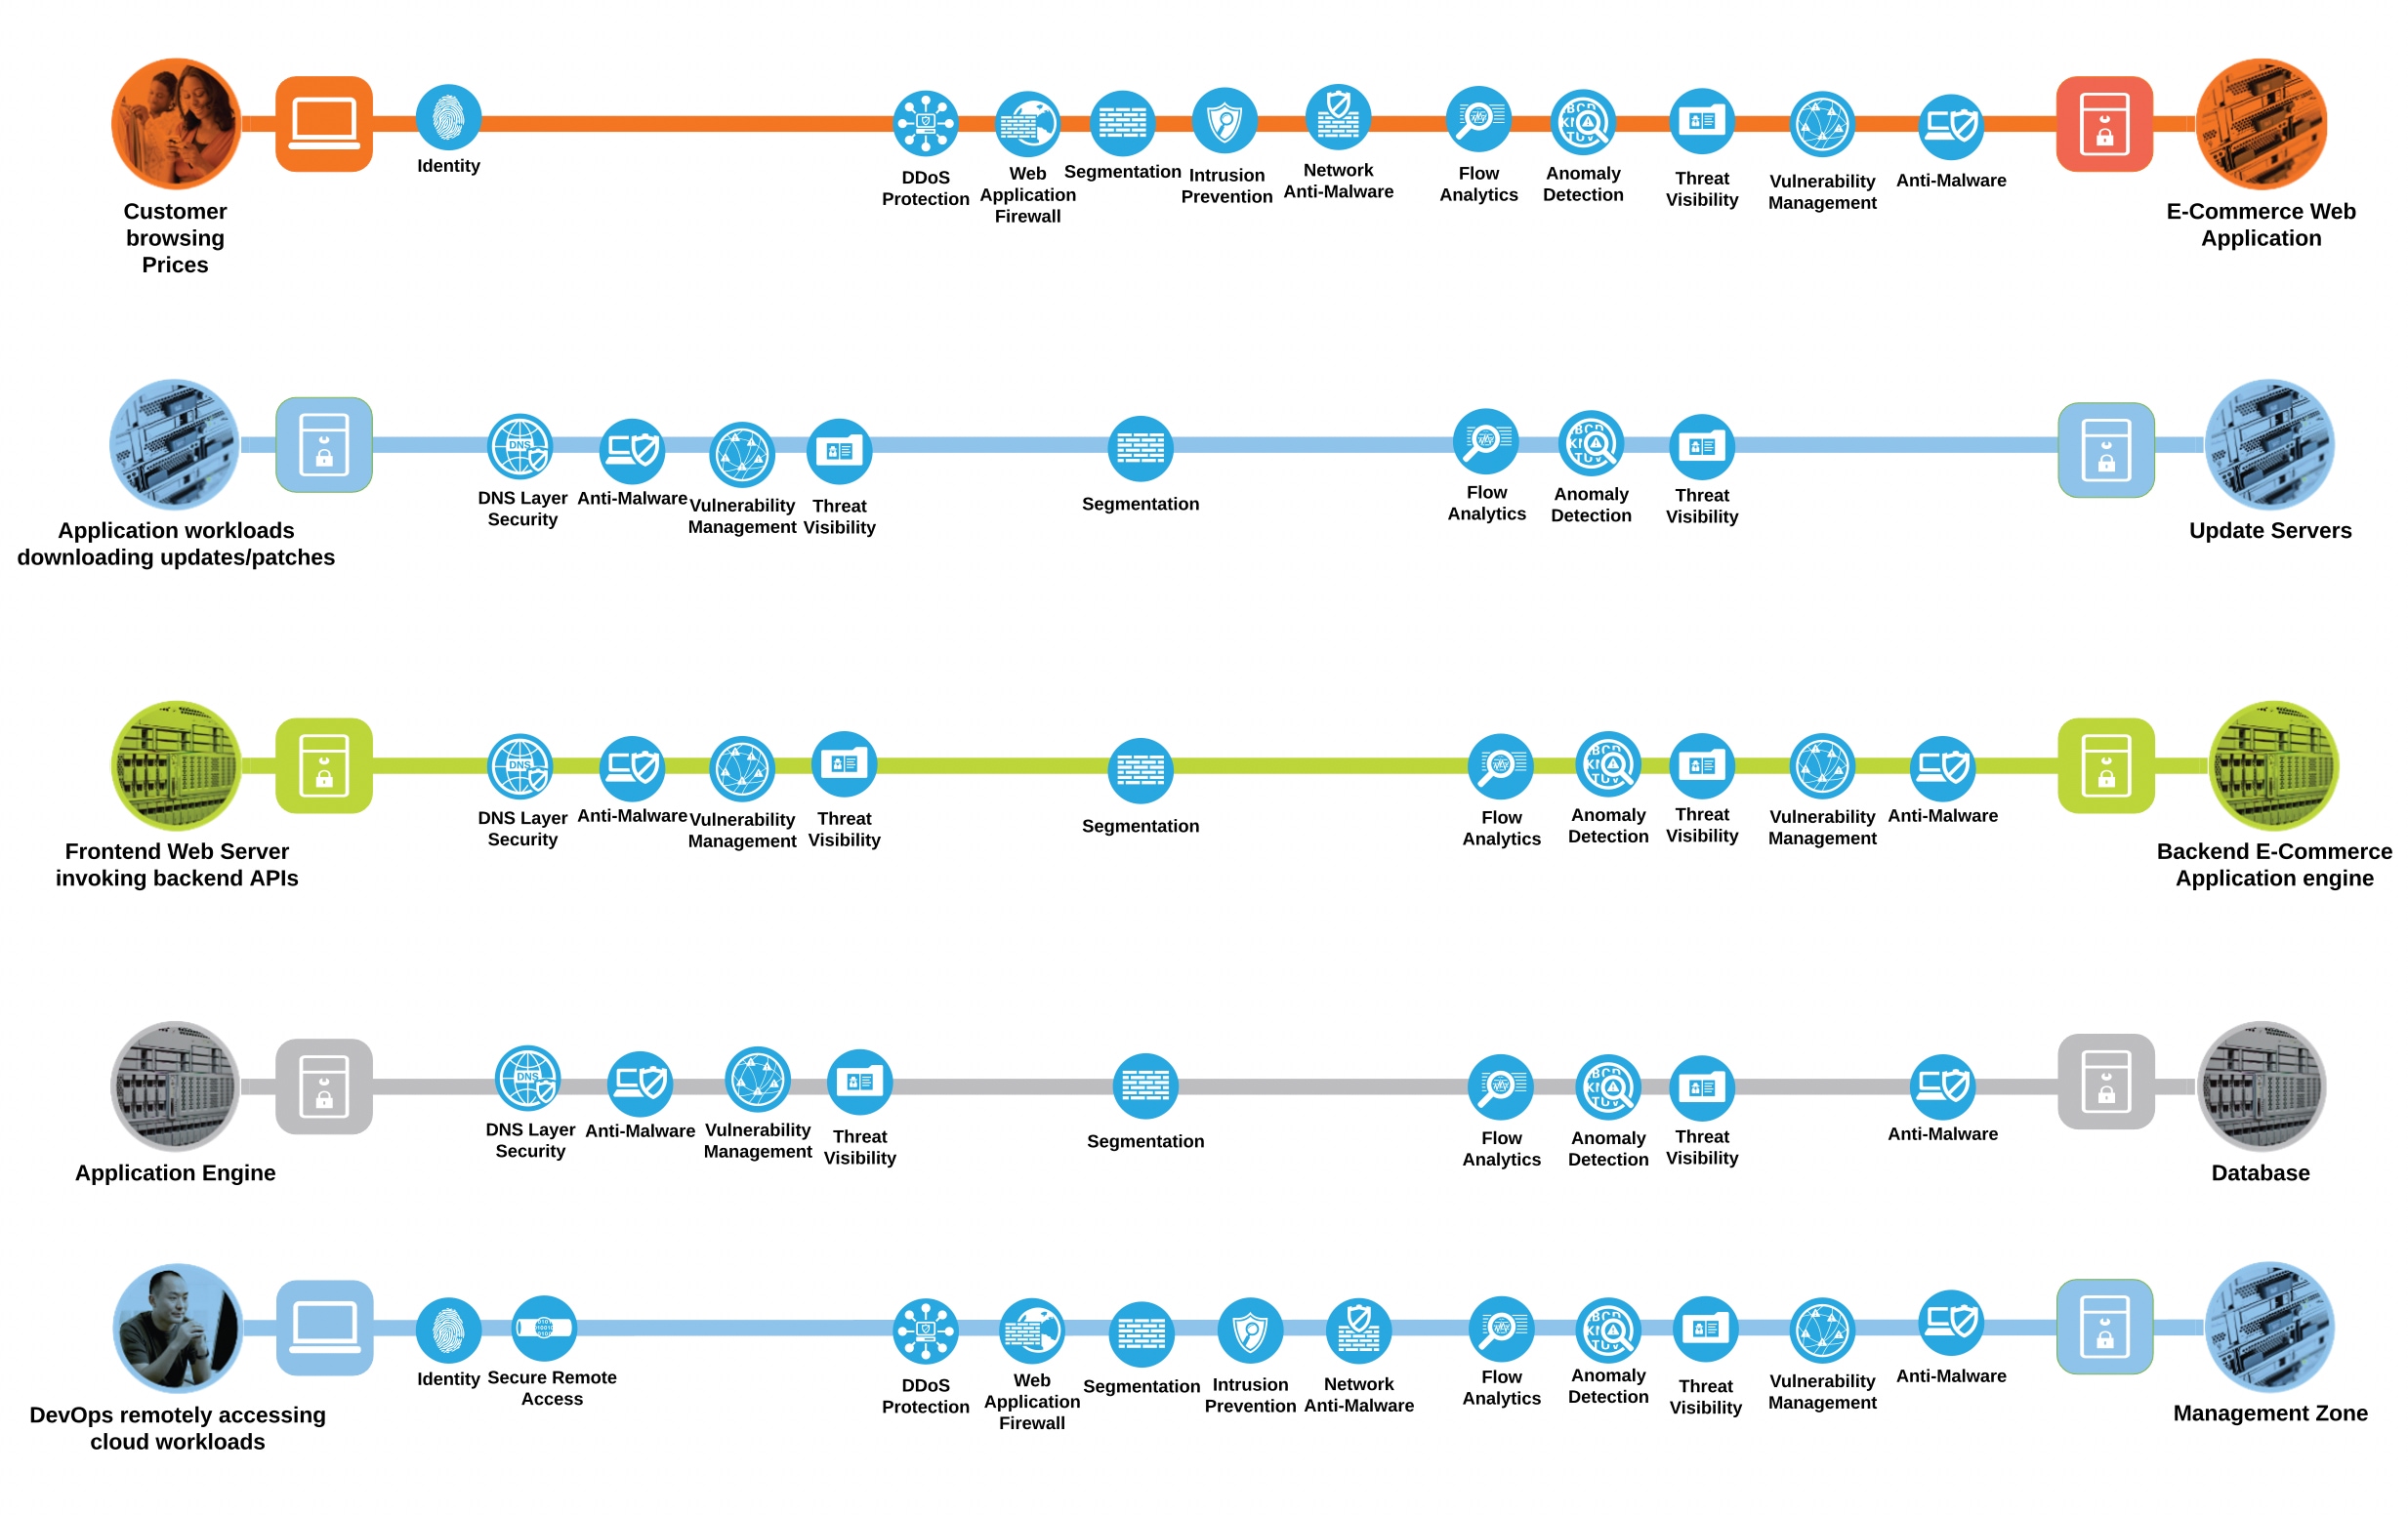
Public Cloud Business Flows with Capabilities
The following table represents the security capabilities that are recommended for securing the public cloud business flows in GCP.
| Capability Icon |
Capability Name |
Security Solution |
|
|
Anomaly Detection |
Cisco Secure Cloud Analytics Cisco Secure Access by Duo |
|
|
Anti-Virus |
Cisco Secure Endpoint |
|
|
Anti-Malware |
Cisco Secure Endpoint Cisco Secure Malware Analytics |
|
|
Application Dependency Mapping |
Cisco Secure Workload |
|
|
Application Visibility & Control |
Cisco Umbrella Cisco Secure Workload |
|
|
Continuous Vulnerability Scanning |
Cisco Secure Workload |
|
|
Endpoint Security |
Cisco Secure Endpoint Cisco Secure Access by Duo Device Health Application |
|
|
Data Loss Prevention |
Cisco Umbrella |
|
|
Device Health Connector |
Cisco Duo Device Health |
|
|
Device Posture Assessment |
Cisco Secure Access by Duo |
|
|
DNS Security |
Cisco Umbrella |
|
|
DNS Security Connector |
Cisco Umbrella Virtual Appliance |
|
|
Firewall |
GCP VPC Firewall Rules |
|
|
Flow Analytics |
Cisco Secure Cloud Analytics Cisco Secure Workload |
|
|
Identity Authorization |
Cisco Secure Access by Duo |
|
|
Malware Sandbox |
Cisco Secure Malware Analytics |
|
|
Micro-Segmentation |
Cisco Secure Workload |
|
|
Multi-Factor Authentication |
Cisco Secure Access by Duo |
|
|
Policy Generation, Audit and Change Management |
Cisco Secure Workload |
|
|
Process Anomaly Detection & Forensics |
Cisco Secure Workload |
|
|
Remote Browser Isolation |
Cisco Umbrella |
|
|
Security Assertion Markup Language (SAML) & Single Sign on (SSO) |
Cisco Secure Access by Duo |
|
|
Security Orchestration Automation and Response (SOAR) |
Cisco SecureX |
|
|
Tagging |
Cisco Secure Workload |
|
|
Threat Intelligence |
Cisco Talos |
|
|
TLS/SSL Decryption |
Cisco Umbrella |
|
|
Web Reputation Filtering |
Cisco Umbrella |
|
|
Web Security |
Cisco Umbrella |
|
|
Web Security Connector |
Cisco Secure Client (AnyConnect) |
Cisco Secure Cloud Reference Design in GCP
The tiered application architecture has been a popular underlying principle for web application deployment for over a decade now and it remains equally relevant to date.
The multi-tier architecture provides a general framework to ensure decoupled and independently scalable application components. Each tier is separately developed, scaled, maintained and secured.
In the simplest tiered architecture form, the web applications would have the following layers:
Web tier: The end-user directly interacts with this layer. This tier has all the static web content.
Application tier: This tier is responsible for translating the user actions to application functionality. This tier carries the core application code components. For example, application code performing the read/write database operations.
Database tier: Storage tier or the database tier holds the data relevant to the application.
In this design, we are securing a tiered web application in the GCP cloud. We add various security capabilities and controls, that we established in the previous sections, to a tiered web application model to make it much more robust, secure and transparent in its security posture.
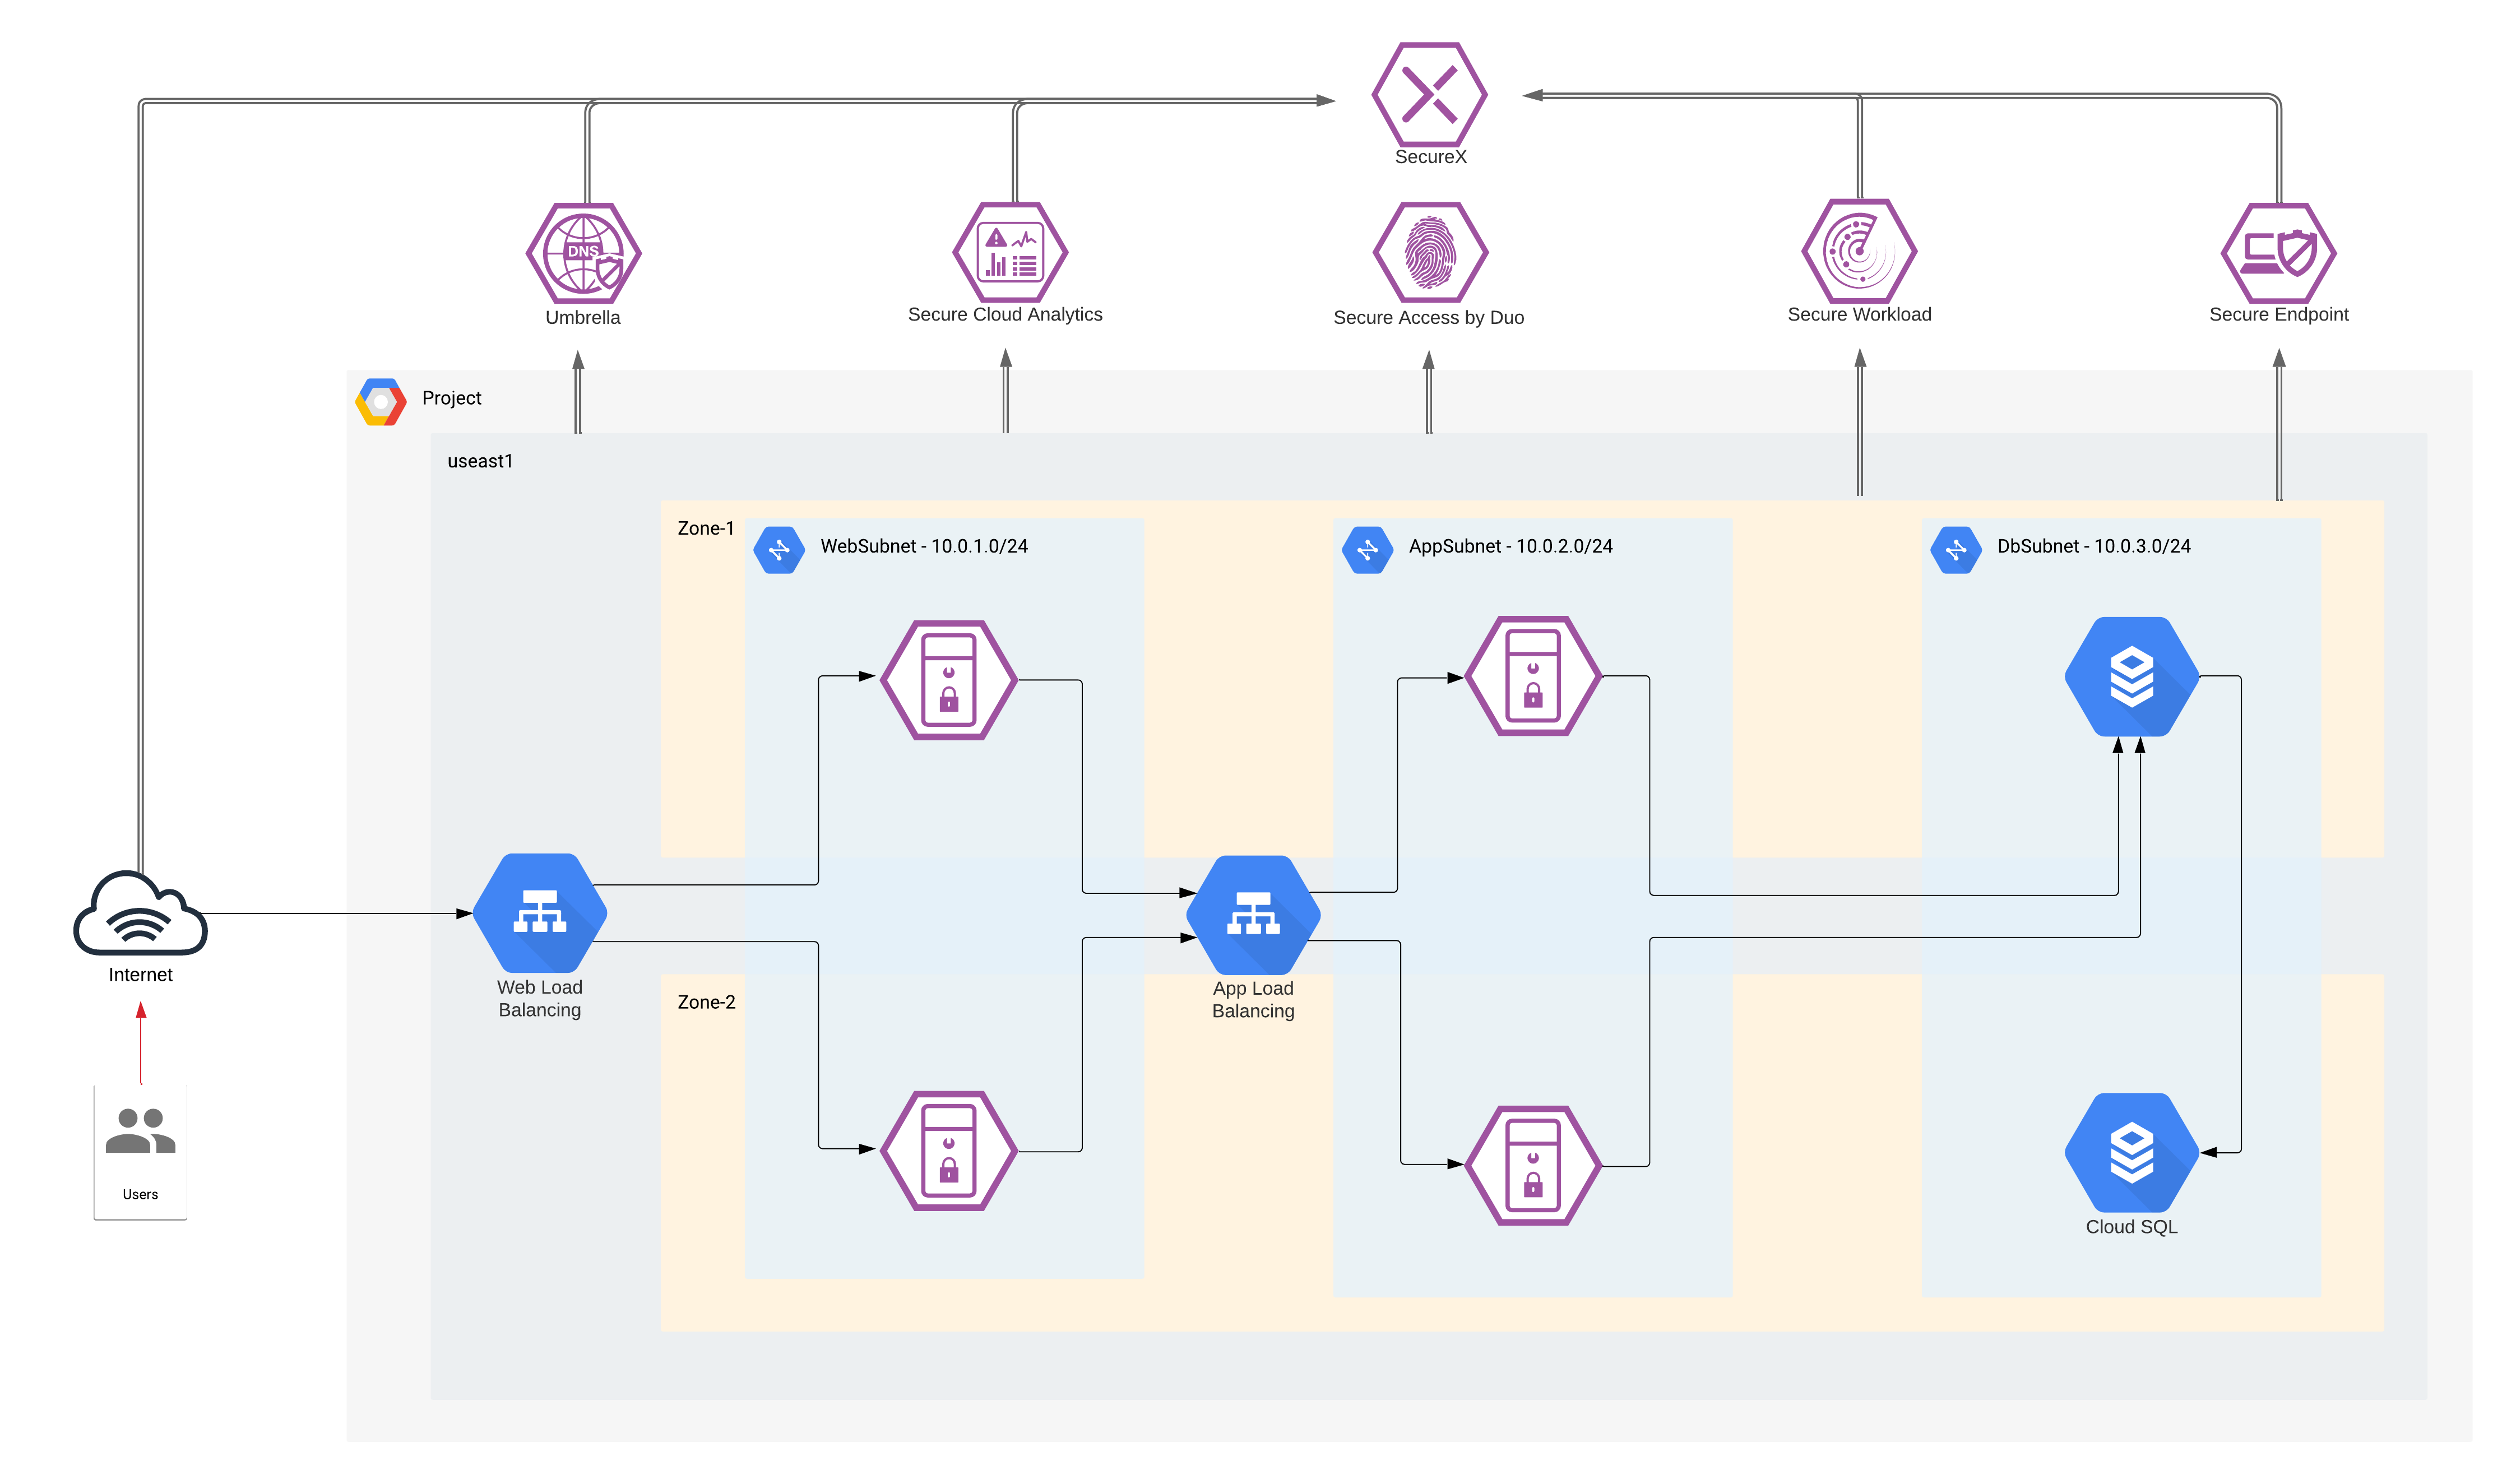
Cisco Secure Cloud Reference Design in GCP
At this point, we have established the attack surface and, the capabilities and security solutions that we needed to secure the business flows mentioned previously.
● Customer browsing an e-commerce web application
◦ Access to the web application is secured using Duo – Multi-Factor Authentication (MFA)
◦ Micro-segmentation of workloads is done using the Tetration policy enforcement agents. This would prevent any malware or malicious movement within the pool of workloads in a specific tier
◦ Secure Cloud Analytics provides enhanced threat visibility into workload activity and the GCP cloud. It looks for any anomalous activity within the application environment. It also facilitates the flow analytics
◦ Secure Workload agents allow us to gain a deep visibility into vulnerable packages and processes on the workloads that an attacker may leverage. It also provides a very robust network flow analytics for workload communications
◦ Secure Endpoint detects and quarantines any malware that may infect the workloads
● Workloads downloading updates/patches from update servers
◦ Workloads are segmented into App and Web tier using Secure Workload Enforcement agents. No direct inbound public access is allowed to the App and Web servers, management access is allowed only from the management tier (also controlled via Secure Workload)
◦ DNS layer security is achieved using Cisco Umbrella. This prevents any accidental or deliberate exposure to a malicious domain
◦ Secure Cloud Analytics and Secure Workload provide enhanced threat visibility and flow analytics
◦ Secure Endpoint detects and quarantines any malware that may get downloaded to application workloads
● Systems communicating east/west within the GCP cloud
◦ Workloads are micro-segmented using Secure Workload Enforcement agents. Web, App, Database and Inside tier has no direct inbound public access/addresses. Only Management and the Outside tier is allowed Public IP addressing, hence exposing them to untrusted public network/internet
◦ Micro-segmentation within Web and App tier is done using the Secure Workload enforcement agents. This restricts any internal movement among the workloads
◦ DNS layer security using Umbrella provides visibility into workload activity
◦ Secure Cloud Analytics and Secure Workload provide enhanced threat visibility and flow analytics for this flow. They also look for any anomalous movement within the application environment or among the workloads within a tier. Secure Workload agents provide deep visibility into the workloads
◦ Secure Endpoint protects against malware spread
● Application engine transacting data with database server within the cloud
◦ GCP VPC Firewall rules restrict access to the database. Only App tier is allowed to communicate with database tier
◦ DNS layer security using Umbrella
◦ Secure Cloud Analytics and Secure Workload provide enhanced threat visibility and flow analytics. They also look for any anomalous movement within the application environment or among the workloads within a tier. Tetration agents provide deep visibility into the workloads
◦ Secure Endpoint protects the application workloads against any malware infection
● DevOps remotely accessing the management zone for workload management/update/patching purposes
◦ Management zone is segmented using Secure Workload enforcement agents. This provides the control knob for restricting access to workloads or the various other tiers
◦ Secure Cloud Analytics and Secure Workload provide enhanced threat visibility and flow analytics. They also look for any anomalous movement or activity within the application environment or from the management tier. Secure Workload agents provide deep visibility into the workloads
◦ Secure Endpoint protects the jump servers and workloads against any malware infection
Let’s look at each of the security integrations in this secure design in more depth, we will start from the security controls on the workload itself and go all the way to the edge of our public cloud web application.

We start by looking at workload security using Secure Workload and Secure Endpoint, followed by an agentless deployment of Secure Cloud Analytics for greater visibility into the GCP environment and workload activity. Then, we will investigate Umbrella DNS layer security at the GCP VPC level.
Lastly, we will secure the access to our cloud application using Duo Multi-Factor Authentication.
To connect all these security controls to a single pane of glass, we will look at Cisco SecureX integrations.
Secure Workload has a SaaS offering that provides the capability to do micro-segmentation in a highly flexible manner along with an in-depth visibility into the workloads.
Secure Workload offers visibility and enforcement agents that are installed on the workloads. The enforcement agents provide an additional capability to enforce policies.
Secure Workload can dynamically learn various ongoing changes in the cloud workload environment and enforce an adaptive micro-segmentation. The Secure Workload dashboard allows us to create workspaces and graphical views for applications and enforce security from the web application point of view unlike the traditional network perspective.
The Secure Workload platform supports multi-cloud and hybrid environments and hence, make the whole process of security operations seamless across the board.
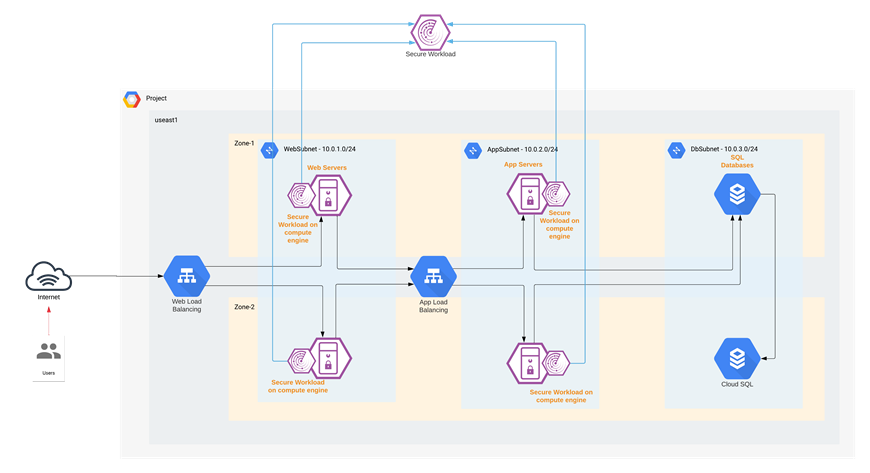
Cisco Secure Workload
In this specific architecture, Web and Application tier has workloads in Instance Groups. To enable the auto-provisioning of Secure Workload agents, we used the startup-script option provided for the Instances. When the Instance Group deploys a new workload, the shell script will install the Secure Workload agent on it as part of the initialization process. Refer to the implementation section of this guide for more details.
Once the Secure Workload agent is installed, the new workload is registered with the Secure Workload cloud (SaaS), it starts exporting the network flow and process information to the Secure Workload cloud engine for analysis. Secure Workload ensures Cisco's Zero Trust model by offering key features like:
● Policy enforcement (Micro-segmentation)
● Visibility into workload process activity
● Network flow visibility
● Software vulnerability reports
● Forensic analysis
● Behavior deviations
Based on all these features and more, the Secure Workload dashboard provides us with a very convenient and flexible scoring mechanism to monitor the security compliance of cloud applications. Secure Workload considers six parameters to calculate this score (Figure 8), and these parameters can be adjusted based on one’s preference or requirements.

Secure Workload Dashboard - Weighted Score

Secure Workload Dashboard - Compliance Score Board
Refer to the Cisco Secure Workload documentation for more detailed information on cloud workload protection.
The Secure Endpoint agents installed on the cloud workloads provide us protection against zero-day attacks. Powered by Cisco TALOS, Secure Endpoint not only relies on antivirus, but also uses machine learning and file reputation to block both file-based and file-less attacks. It also enables you to isolate the infected host before the malware is spread onto the others in the network. Secure Endpoint also supports taking forensic snapshots that help immensely with the security investigations.
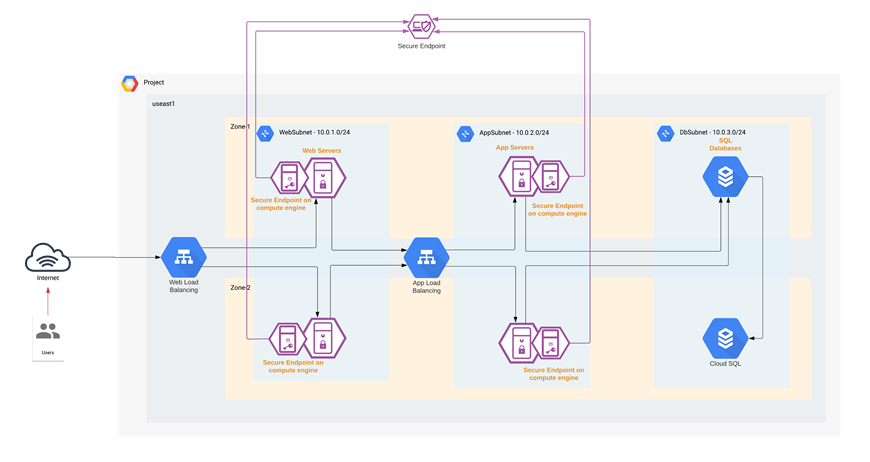
Cisco Secure Endpoint
In this specific architecture, just like the Secure Workload agent, the web and application workloads that are in Instance Groups are auto-provisioned with Secure Endpoint agents using the startup-script option available under the Instance Group configuration. When the Instance Group deploys a new workload, a shell script will install the Secure Endpoint agent on the workload as part of the initialization process.
As soon as the Secure Endpoint agent on the new workload registers with the Secure Endpoint cloud, the workload is continuously monitored and reported for any malicious activity. Secure Endpoint’s host isolation feature comes in handy to contain any spread of malware in the cloud workloads.
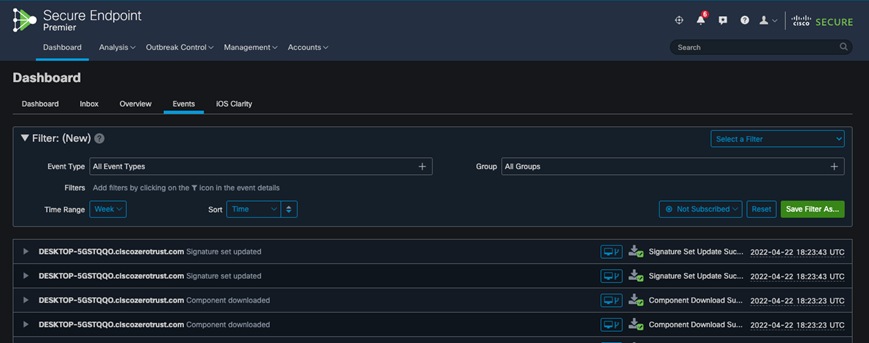
Secure Endpoint Dashboard - Events
Secure Cloud Analytics helps overcome the visibility challenge, especially in public cloud environments. It provides an agentless deployment in the GCP cloud.
Secure Cloud Analytics pulls the VPC flow logs from the GCP Logging service. It learns the GCP environment and baselines the resources. VPC flow logs have the flow information associated with various GCP resources, even for those that are not strictly tied to a static IP address. SCA can correlate the IPs and then tying them back to their origin GCP service. In other words, SCA performs dynamic entity modeling and organizes all the GCP resources based on the functions that they’re performing. For example, the entity could be categorized as a firewall, an application server or a load balancer and so on. This type of resource profiling and modeling is extremely important to look for any suspicious activity within the cloud application environments.
In addition to VPC flow logs, Secure Cloud Analytics also consumes other telemetry sources for additional context and alerting.
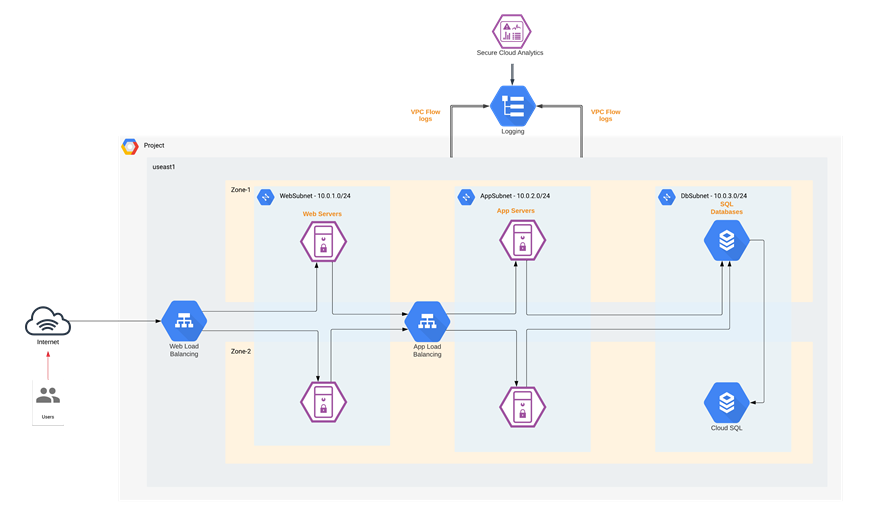
Cisco Secure Cloud Analytics
Once Secure Cloud Analytics finishes identifying the entities, it baselines their behavior over a fixed period of time. As soon as the baselining is completed, any unexpected behavioral change of the entities and the way different cloud services communicate with each other is alerted on. This helps to maintain deep visibility into the cloud environment and hence, track and prevent any unauthorized transfer of data or resource access.
Some of the common Secure Cloud Analytics alerts related to the GCP services include:
● GCP Pub/Sub – Subscriptions to events in the GCP account
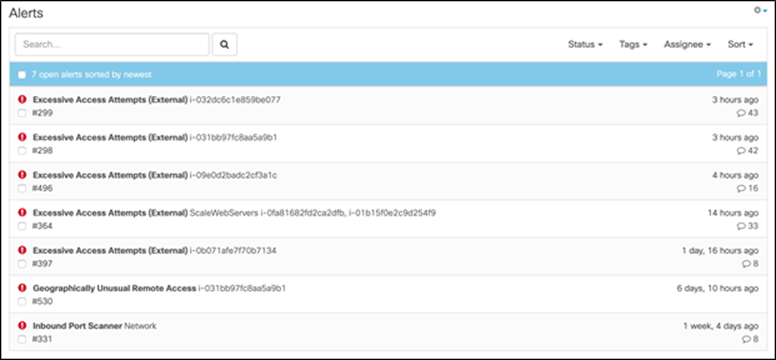
Secure Cloud Analytics - Alerts
Cisco Umbrella offers flexible cloud-delivered security. It combines multiple security functions into one solution. Cisco Umbrella solutions provide DNS-layer security, secure web gateway, cloud-delivered firewall, cloud access security broker (CASB), and interactive threat intel. This document covers Umbrella DNS-layer protection for the workloads in the GCP Virtual Private Cloud (VPC).
The Umbrella DNS policies allow you to dictate block policy for a variety of pre-defined web categories. More details on web categories can be found in Umbrella documentation. It also gives you the flexibility to apply the policies to specific identities. For example, you could have one set of rules for your GCP cloud application and another set for a different site.
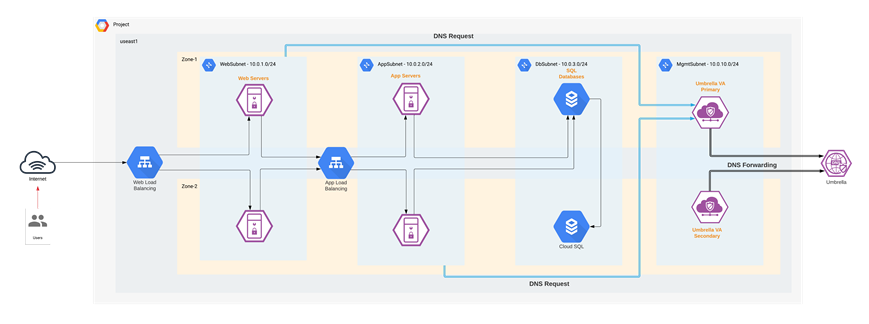
Cisco Umbrella - DNS layer Security
We deploy Umbrella Virtual Appliances (VA) in the Management tier of the GCP VPC. These VAs act as DNS forwarders to Umbrella. The VPC offers the option to configure custom DNS using a DNS Policy; allowing us to point the cloud resources in each VPC to Umbrella VAs instead of the local DNS. Every resource, that is launched into the VPC, will use these Umbrella DNS forwarders, to provide a control knob for the DNS layer security.
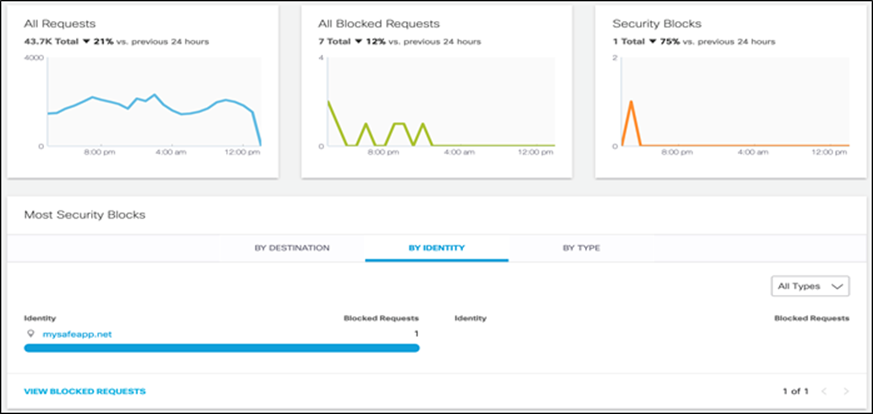
Umbrella - DNS Traffic Monitoring
Cisco Duo provides secure access to applications and data, no matter where the users are, on any device, and from anywhere. Cisco Duo’s secure access solution creates trust in users, devices, and the applications they access. Cisco Duo provides the following functions:
● Multi-Factor Authentication: Verify the identity of all users with Duo's strong multi-factor authentication
● Single Sign-on: Seamless, single dashboard access to all applications
● Remote Access: Secure access to cloud and on-premises applications and servers, with or without VPN
● Device Trust: Check that user devices meet security standards before granting them access
● Adaptive Access Policies: Set policies to allow or block access attempts by a user or a device, based on contextual factors
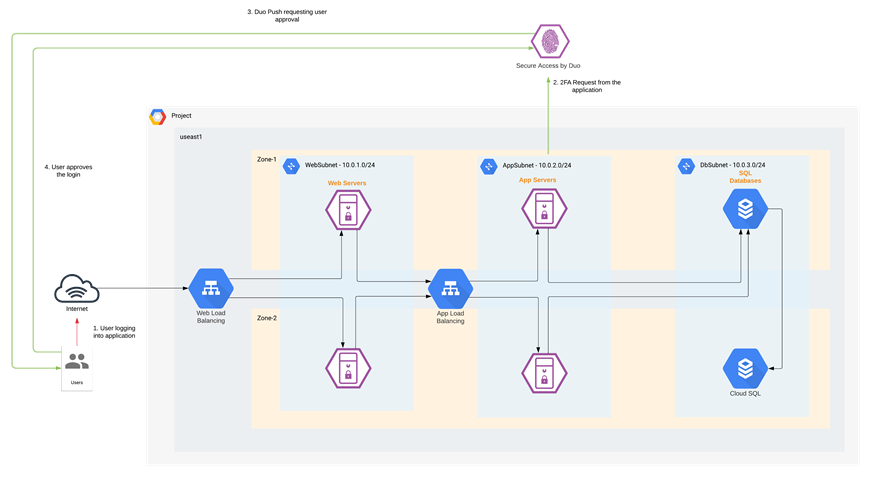
Cisco Secure Access by Duo
In this design, we used Duo’s Multi-Factor Authentication (MFA) for our GCP cloud application. Multi-factor authentication from Duo protects the cloud applications by using a second source of validation, like a phone or token, to verify user identity before granting access. MFA allows you to build a zero-trust framework but is also essential for compliance purposes. Duo provides native integration for any application. Refer to the implementation section of this guide for more details.
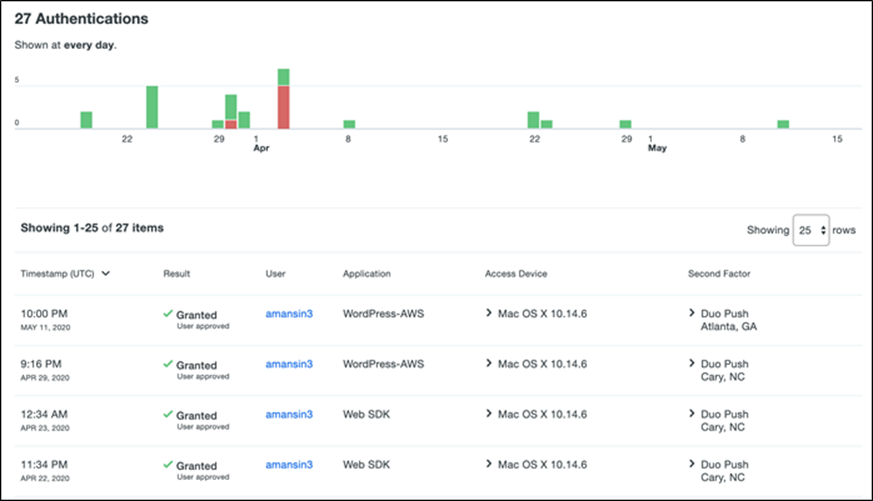
Admins have several options when it comes to enrolling new users in Duo, such as self-enrollment, Active Directory sync, and OpenLDAP sync. Duo admin portal allows a highly convenient way to track any user activity.
![]()
![]()
Duo - User Activity
Cisco SecureX leverages the integrated security architecture to accelerate investigations by automating and aggregating threat intelligence and data across your security infrastructure in one unified view. Some of the key features are:
● Aggregated threat intelligence: Integrates threat intelligence from Cisco TALOS and third-party sources to automatically research indicators of compromise (IOCs) and confirms threats quickly
● Automated enrichment: Automatically adds context from integrated Cisco Security products, so that you instantly know which of your systems was targeted and how
● Incident tracking: Provides the capability you need to collect and store key investigation information, and to manage and document your progress and findings
● Interactive visualizations - Shows your results on intuitive, configurable graphs for better situational awareness and quick conclusions
● Seamless drill down - Makes deeper investigations easy using integrated Cisco Security products. A single click takes you inside Cisco Secure Endpoint
● Direct remediation - Lets you take corrective action directly from its interface. Block suspicious files, domains, and more without having to log in to another product
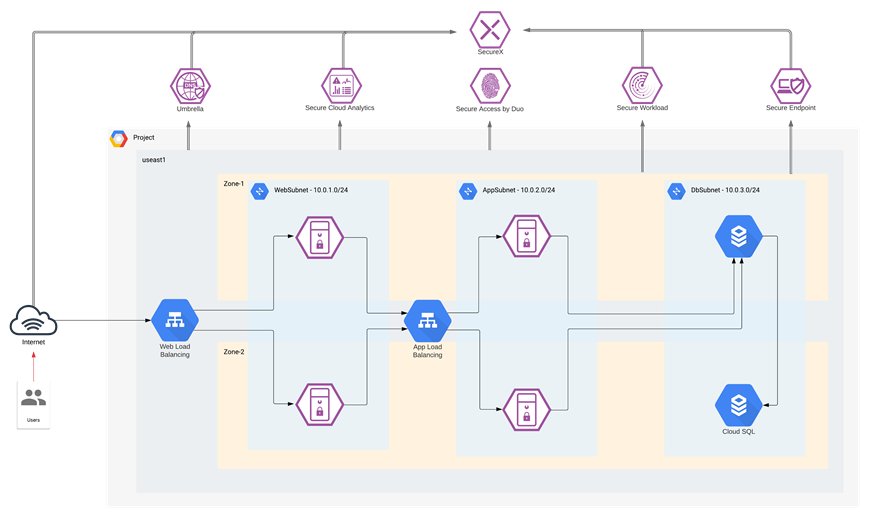
Cisco SecureX
In this architecture, we are receiving information from Secure Cloud Analytics, Umbrella, Secure Endpoint and Secure Workload to provide threat intelligence, contextual approach, and threat hunting capabilities. Refer to the Cisco SecureX documentation for more details on available Cisco and third-party integrations.
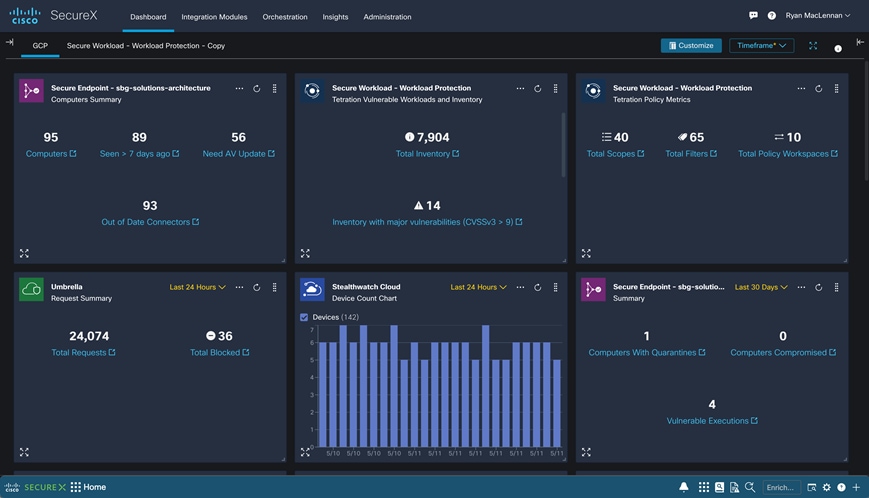
Cisco SecureX Dashboard
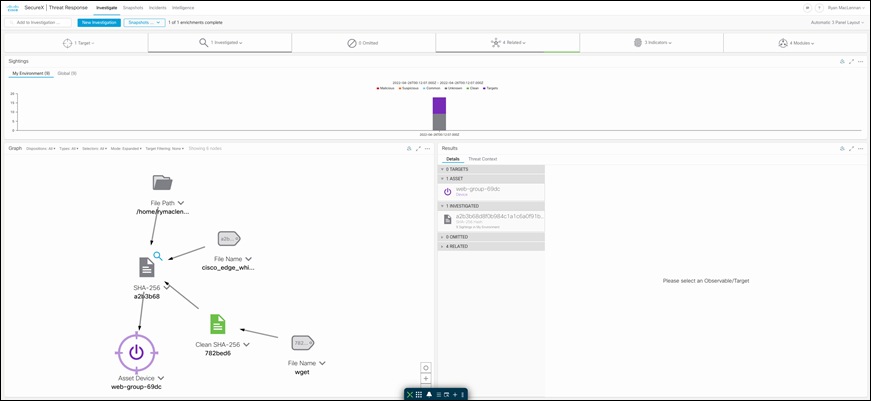
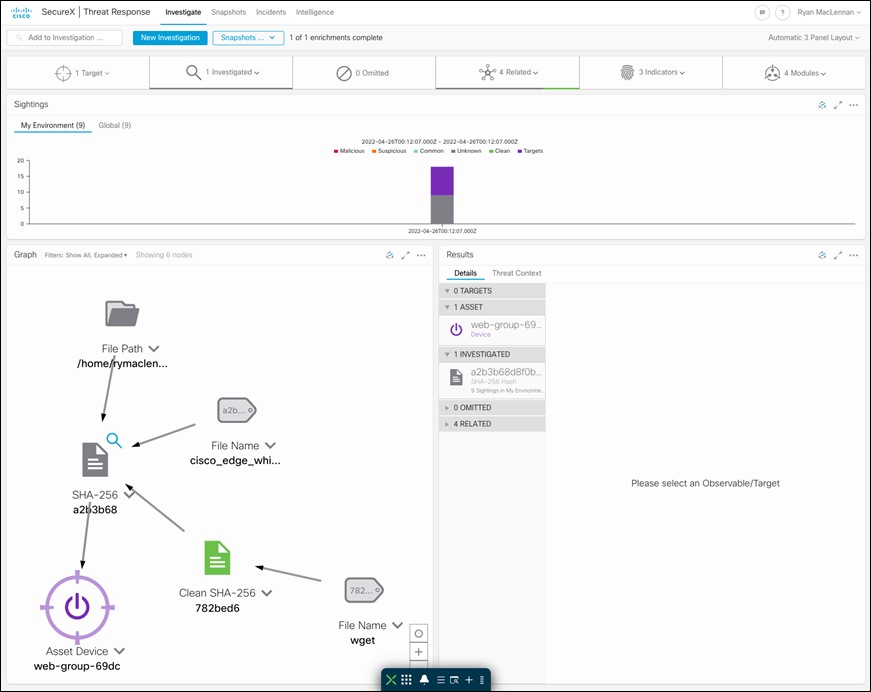
Cisco SecureX threat response - Threat Hunting
Now that we have established the design specifics of our tiered application in GCP, we will begin implementing and setting up the secure application.
We will start by setting up the VPC (Virtual Private Cloud) as per the tiered architecture specifications. We will then integrate Secure Cloud Analytics. After that, we will set up the Umbrella VAs in the management tier and update the DNS policy settings for the VPC.
Once the VPC and related integrations are finished, we will configure a SQL database instance and bring up the Instance Groups for the Application and Web workloads (with Tetration, AMP4E agents and Duo MFA plugin). We will then set up the Load Balancers for Web and Application Instance Groups. At this point we will have a fully functional application running in GCP.
We will conclude our set up with Cisco SecureX integration.
Note: Secure Workload, Secure Endpoint, Cisco SecureX, Secure Cloud Analytics, Umbrella, and Secure Access by Duo offer EU based locations for customers having to follow EU rules.

● Set up the GCP components
◦ VPC
◦ Subnets
◦ NAT gateway
◦ Cloud router
◦ SQL instance
● Integrate Secure Cloud Analytics for VPC monitoring
● Set up Umbrella DNS Security
● Set up the Auto Scaled Application and Web Workloads (Tetration, AMP4E agent and Duo MFA plugin installation) with App and Web NLBs
● Set up Cisco SecureX
Note: Before you begin, make sure you have the appropriate privileges to create all the VPC components. Follow the GCP Documentation for more information on IAM service.
Set up GCP infrastructure components
This section of the guide will focus on setting up the components that can be created without any additional setup or external files. Anything component that has not been setup in this section will be done when they are ready to be setup.
Implementation procedure:
● Create the VPC and subnets
● Create NAT gateway
● Create SQL Instance
● Create Bastion Host
● Create Firewall Rules
Create the VPC
The VPC is where all the GPC products and components come together so that can make this solution possible. It is the most important component of the whole guide to setup.
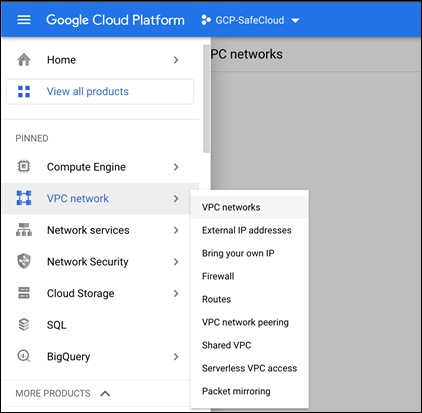
Step 1. Log on to the GCP console and select VPC networks in the VPC network product
Step 2. Select CREATE VPC NETWORK

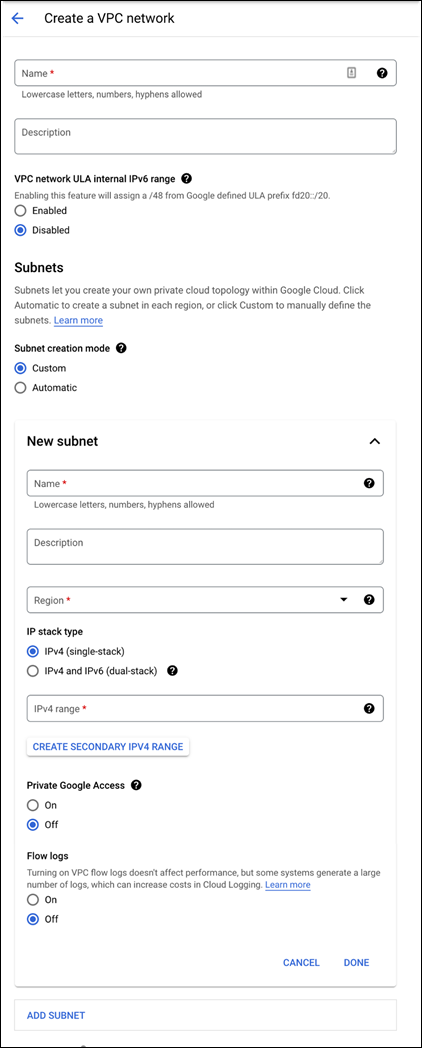
Step 3. The CREATE VPC NETWORK page looks like so:
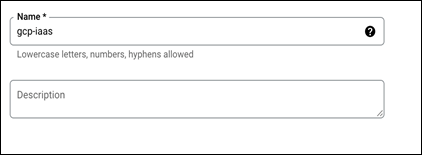
Step 4. Give the new VPC a meaningful name. This guide will use gcp-iaas
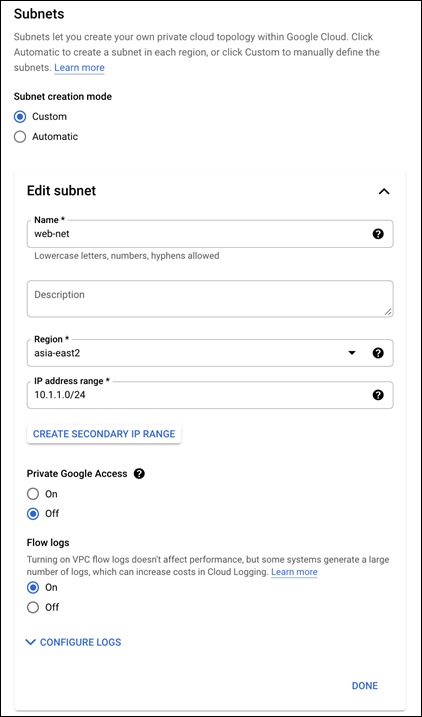
Step 5. Create a subnet for the web application tier.
● Give it a meaningful name. This guide will name the subnet web-net
● Select the region that is best for this setup. The region for this guide will be us-east1
● Set the internal subnet that will be used. This guide will use the 10.0.1.0/24 subnet range
● Set Flow logs to On
● Leave everything else as their default and click on Done
Step 6. There should now be the web-net and an ADD SUBNET option. Add two more subnets, one for the application tier and management network. Each will use the following the name, region, and subnet in this guide.
| Name |
Region |
Subnet |
| web-net |
us-east1 |
10.0.1.0/24 |
| app-net |
us-east1 |
10.0.2.0/24 |
| mgmt-net |
us-east1 |
10.0.10.0/24 |

Step 7. After there are four subnets like in the above figure, leave the rest of the fields as their defaults and click on CREATE at the bottom of the page

Step 8. Validate the VPC has been created with the four subnets
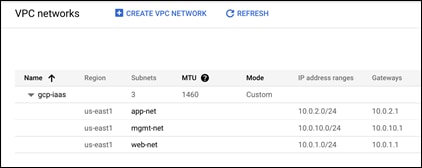
Step 9. Select the new VPC by clicking on its name
Step 10. Select the app-net subnet by clicking on its name
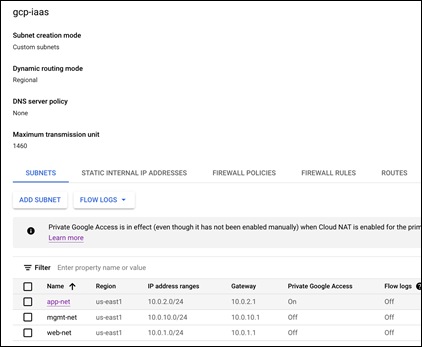
Step 11. Click on EDIT for this subnet
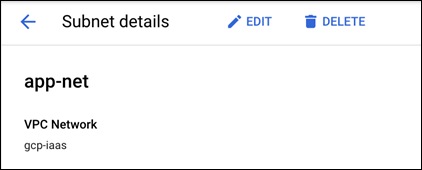
Step 12. Change the Private Google Access to On and SAVE
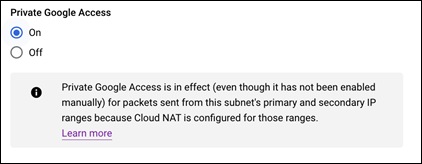
Create a NAT Gateway
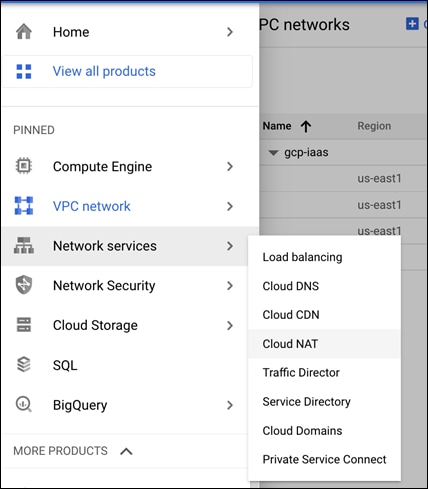
The NAT gateway is used so that the internal compute instances may access the internet for updates and downloading initial configs without being directly exposed to the internet.
Step 1. Go to Network services and then select Cloud NAT
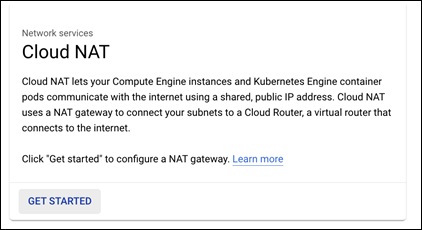
Step 2. Click on GET STARTED
Step 3. Give the NAT gateway a meaningful name and select the Network and Region that is being used for this guide. This guide will name the NAT gateway gcp-iaas-nat
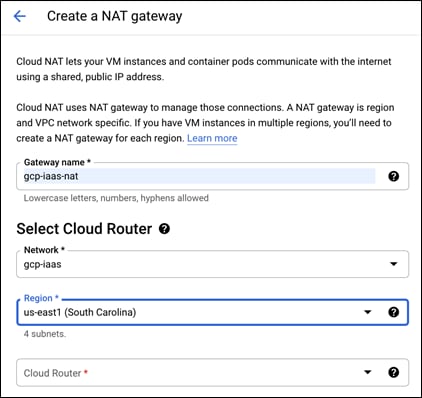
Step 4. In the Cloud Router dropdown, select Create new router

Step 5. Give the new router a meaningful name and click on Create. This guide will name it gcp-iaas-router
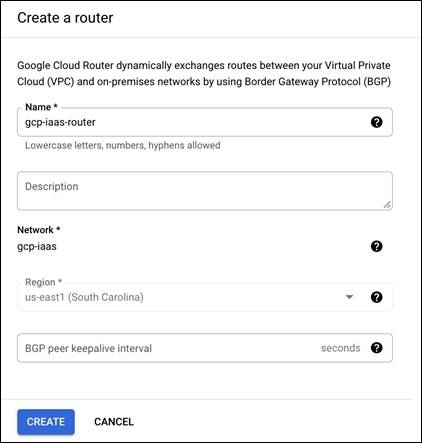
Step 6. After the router has been created, leave the rest as their defaults and click on Create
Step 7. Validate the new NAT gateway has been made

Create SQL Instance
The SQL instance needs to be created for the web application to be able to store data. This can be setup any time before the web application is installed. But this is a good point to do it since it can take a while for it to come up.
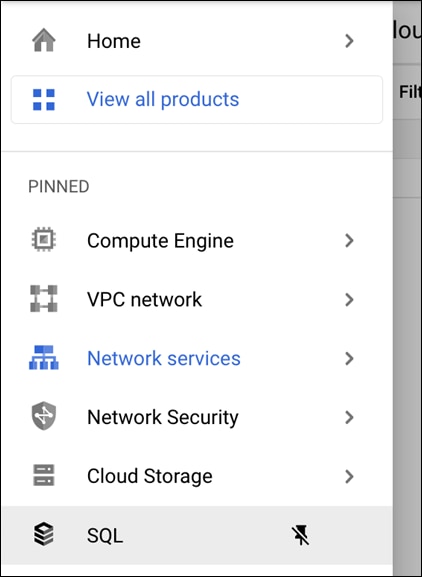
Step 1. Go to the SQL product in GCP
Step 2. Click on CREATE INSTANCE
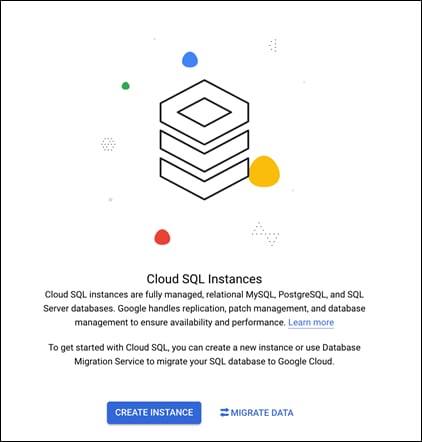
Step 3. Select Choose MySQL out of the three options available

Step 4. Give the MySQL instance a meaningful name and password that conforms with company requirements. This guide will use the name gcp-iaas-mysql
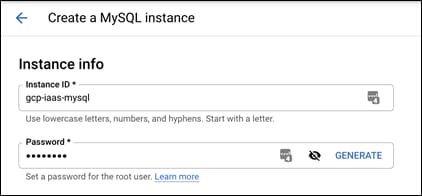
Step 5. Leave the Database version as the default (5.7)

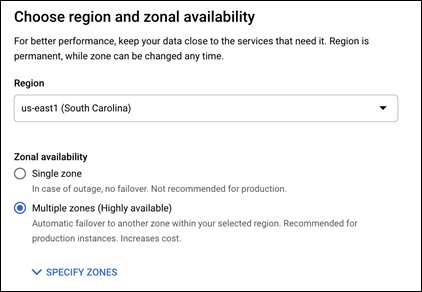
Step 6. Change the region to the region of the VPC and leave the availability to the default of Multiple zones. This guide is using the us-east1 region
Step 7. Select the dropdown SHOW CONFIGURATION OPTIONS under Customize your instance

Step 8. In the Instance IP assignment section, change the type from Public IP to Private IP and select the created VPC in the Network dropdown
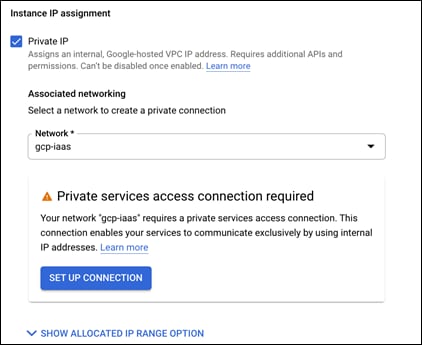
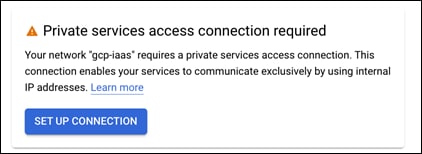
Step 9. A Private services box should appear. Click on SET UP CONNECTION
Step 10. Select the radio button to create a new IP range and give it a meaningful name. This guide will use db-net. Then allocate a new IP range to it. This guide is using 10.0.3.0/24
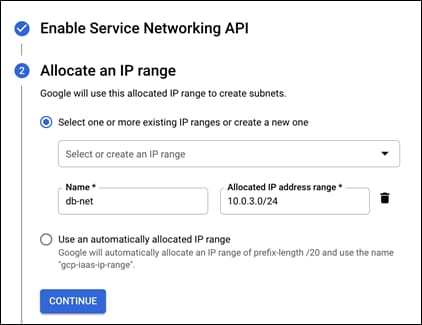
Step 11. Click on Continue and then Create Connection
Step 12. Everything else will left as their default, click on CREATE INSTANCE

Step 13. Validate the Instance has been created
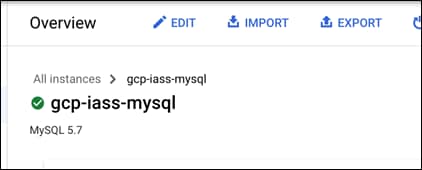
Step 14. Save the Private IP Address for later use
Step 15. Go to Users and click on ADD USER ACCOUNT
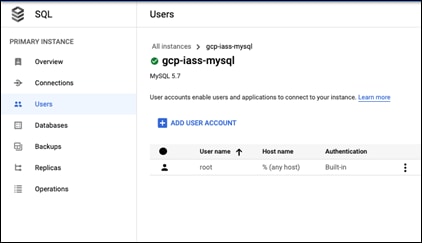
Step 16. Create a new user called wpuser and give it a meaningful password
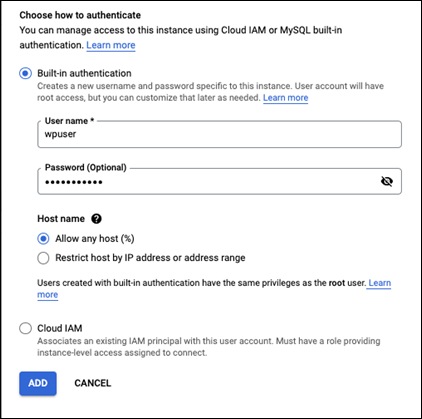
Step 17. Click on ADD and save this username and password for later
Create a Bastion host
Creating a bastion host is important for keeping our devices secure and not allowing them to be visible out on the internet. This host will allow us to connect to internal instances without needing to have them publicly exposed.
Step 1. Go to Compute Engine -> VM Instances
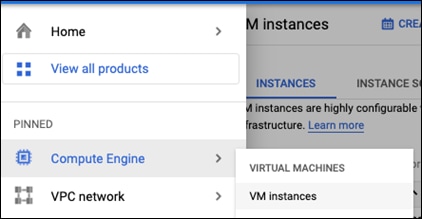
Step 2. Click on CREATE INSTANCE at the top of this page
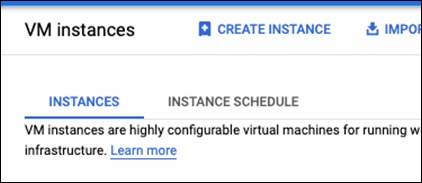
Step 3. Give this host a meaningful name. This guide will call is bastion-host
Step 4. Change the region to be the same region as where the VPC was created and the zone to be the same zone as well.
Step 5. Make the Machine type an e2-micro. The instance should look like so after these steps:
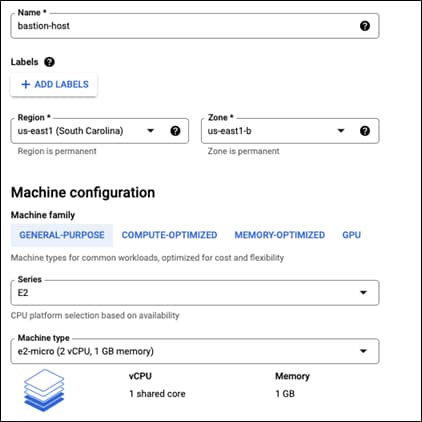
Step 6. Go down to NETWORKING, DISKS, SECURITY, MANAGEMENT, SOLE-TENANCY and expand the dropdown
Step 7. In the Networking section, give the instance a tag of iap
Step 8. Change the network interface to be in the mgmt-net
Step 9. Change the External IP to None and click on Done
Step 10. The network should be configured like the image below:
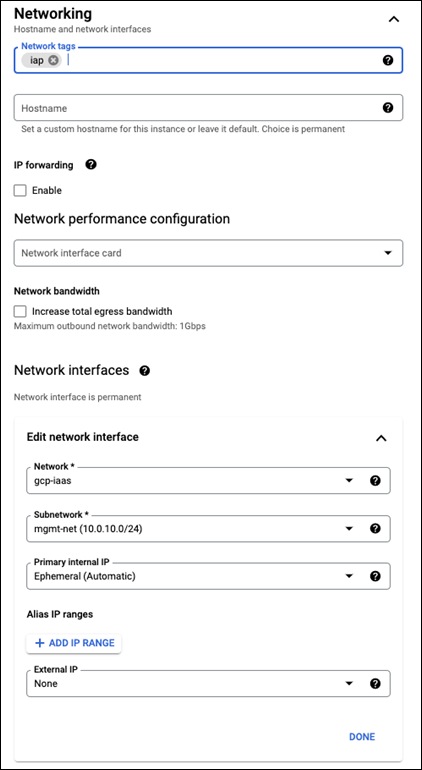
Step 11. Go to the Management section and then find Metadata
Step 12. Click on ADD ITEM
Step 13. Make the key be enable-oslogin and the value to TRUE
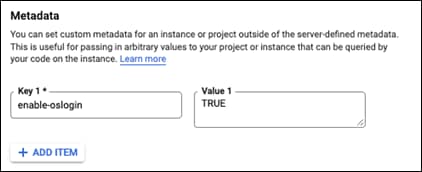
Step 14. The instance has been setup, click on CREATE
Setup Firewall Rules
These firewall rules will allow the bastion host to connect to umbrella hosts later in this guide and allow ssh access from the GCP IAP tunnel. First will be the tunnel rule, then the host-to-host rule
IAP Rule
Step 1. Go to VPC network -> Firewall
Step 2. Click on CREATE A FIREWALL RULE
Step 3. Give this rule a meaningful name. This guide will use iap-allow-ingress-bastion
Step 4. In the Targets section, add a tag of iap
Step 5. In the Source filter section, add this IP range 35.235.240.0/20
Step 6. In Protocols and ports, check TCP and add port 22 to it
Step 7. Click on CREATE
Step 8. The rule should look like this:
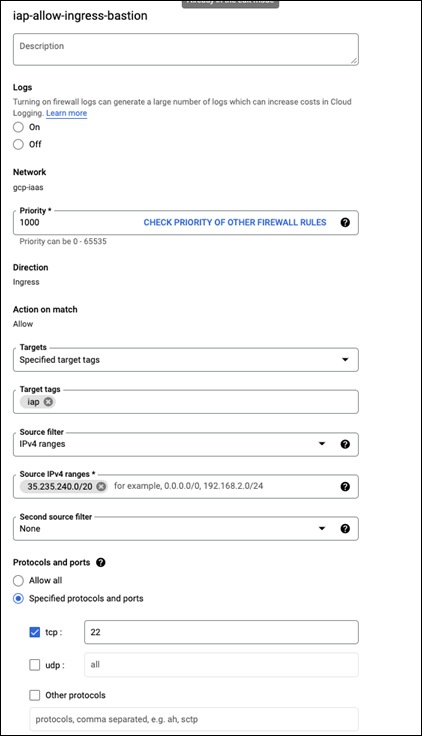
Host to Host Rule
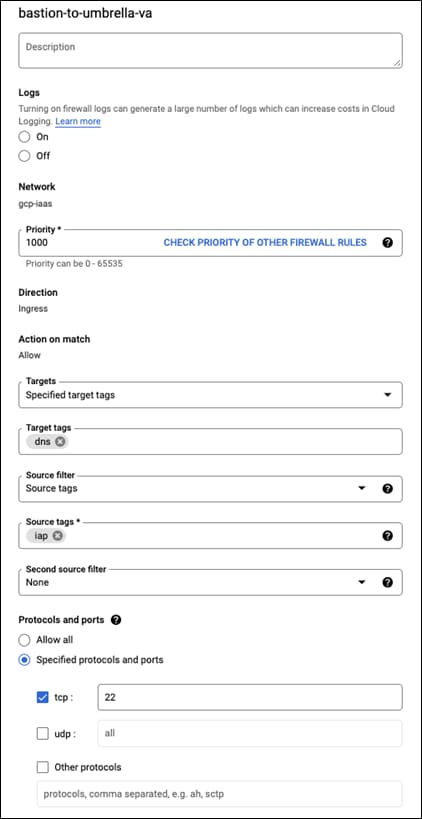
Step 1. Create a new rule and give it a meaningful name, this guide will use bastion-to-umbrella-va
Step 2. Add the tag dns to the Target tags
Step 3. Change Source filter to Source tags
Step 4. Add iap to the Source tags
Step 5. Check the TCP box and add port 22 to it
Step 6. It should look similar to what is below:
Setup IAP and connect to host
IAP needs to be enabled and configured to access the bastion host without giving it an external IP address. The simplest way to do this is to use the troubleshoot ssh command. To do this, do as follows:
Step 1. Select the dropdown next to the SSH button and select View gcloud command
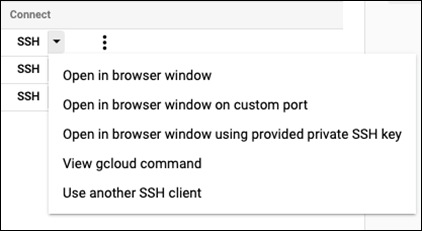
Step 2. In the window that popped up, click on RUN IN CLOUD SHELL

Step 3. It will then put the command into the cloud shell, add this flag to the command before continuing: --troubleshoot. After this flag has been added, the command should look like so:
gcloud compute ssh --zone "us-east1-b" "bastion-host" --tunnel-through-iap --project "your-project-here" –troubleshoot
Step 4. Press enter and accept all the prompts in the troubleshooting process. This will give the proper IAP and network permissions to the user that is logged in
Step 5. The console should now connect to the bastion host
Integrate Secure Cloud Analytics
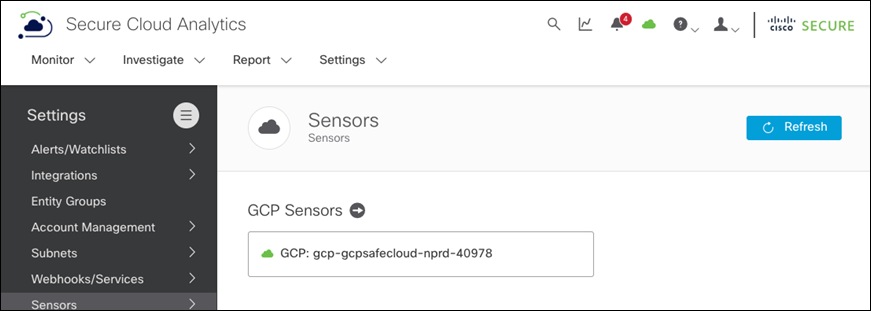
Step 1. Follow the steps illustrated in the Secure Cloud Analytics Dashboard in Settings -> Integrations -> GCP -> About to get Secure Cloud Analytics integrated into GCP
Step 2. After the integration is done, click on the cloud icon on the top right-hand side of the portal and you should see a GCP sensor with a green check mark against it, indicating a successful integration.
Set up Umbrella Virtual Appliances
Set up the Virtual Appliance (VA) image
Step 1. Follow the Umbrella guide on creating Umbrella VA images
Create the Umbrella VA Instance Templates
Step 1. Follow the Umbrella guide on creating the templates except for the networks section
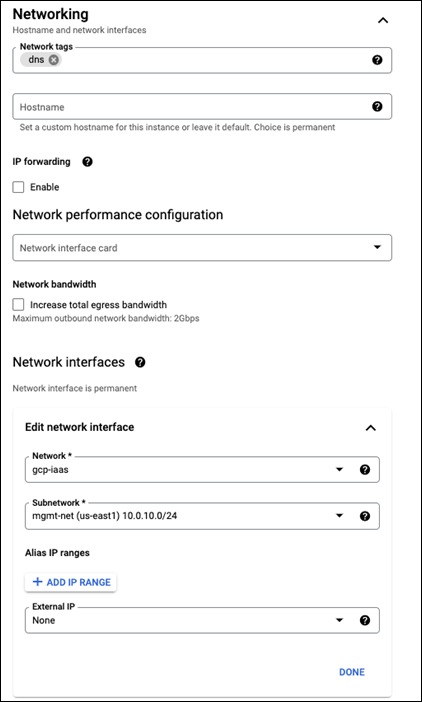
Step 2. In the Networking section of the template, add a dns tag
Step 3. In the Network interfaces section, change it to the VPC and make the subnetwork mgmt-net
Step 4. Change the External IP to None. Click on Done
Step 5. The network section should look as follows:
Create the Instance
Step 1. Follow the Umbrella guide on creating the instance until the Network section
Step 2. Once in the Networking section, edit the network interface
Step 3. Change the Primary internal IP to Ephemeral (Custom)
Step 4. Give it an IP of 10.0.10.253
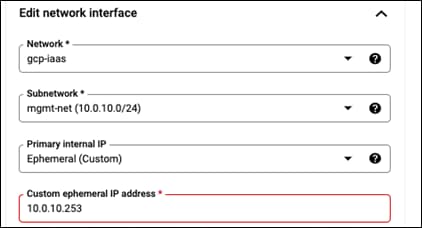
Step 5. Continue with the guides steps after this
Step 6. Repeat these steps for the second instance but use an IP of 10.0.10.252
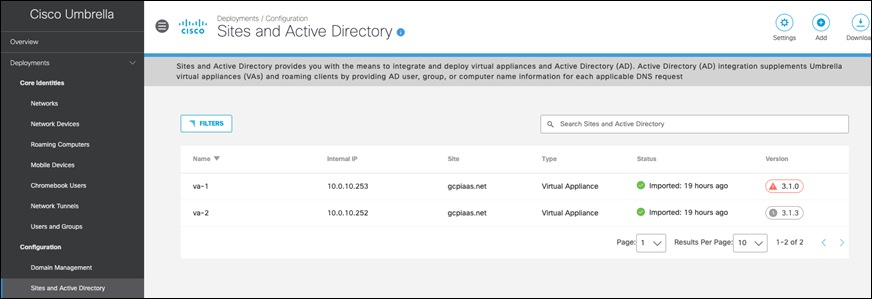
Validate that both VAs are running in GCP and that the Umbrella portal shows two appliances with the green status under Deployments > Configuration > Sites and Active Directory.
Configure the Umbrella VA instances
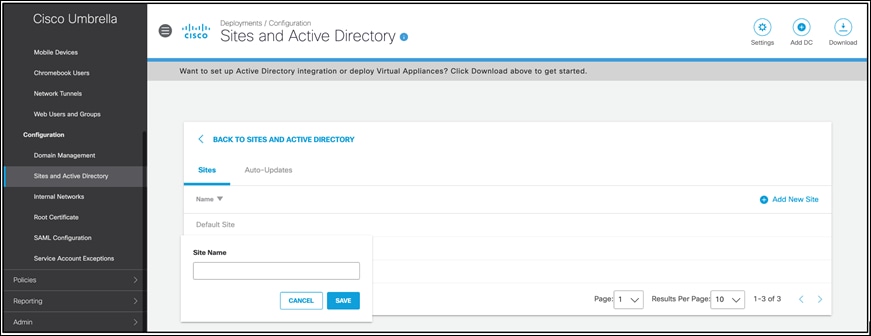
Optionally, you can create and assign a site name for your GCP VAs. This site name can be used as an identity to configure specific policies for GCP. Click on Settings on the same page to add site name and then update the VA entries above.
Step 1. Configure the local DNS on Umbrella Virtual Appliances - Follow the Umbrella documentation to configure local DNS on each VA. The local dns will be c.project-name.internal. Set this IP as local DNS on both Umbrella VAs.
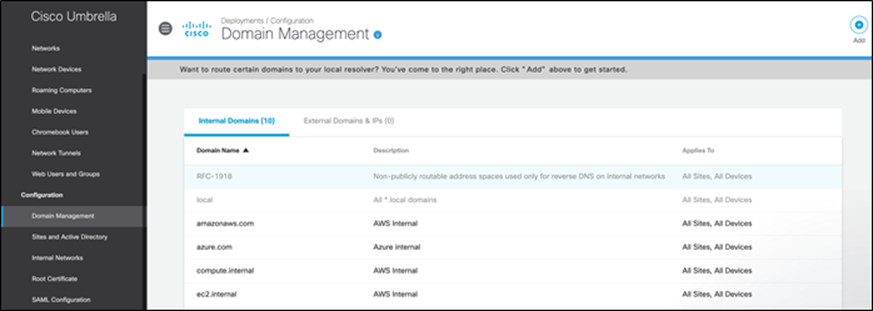
Step 2. Set up policies to exempt internal domains - Log on to the Umbrella portal, go to Deployments > Configuration > Domain Management and add the internal domains that should be routed to the local GCP resolver. Based on your set up, the list of internal domains will vary.
Step 3. Update the DNS server policy - Go to VPC network -> VPC Networks and edit the VPC for this setup.
Step 4. Under the DNS server policy click on Create a new server policy.
Step 5. Give this policy a meaningful name. This guide will use gcp-iass-dns
Step 6. Add the two Umbrella VA IP addresses to the Alternate DNS Servers
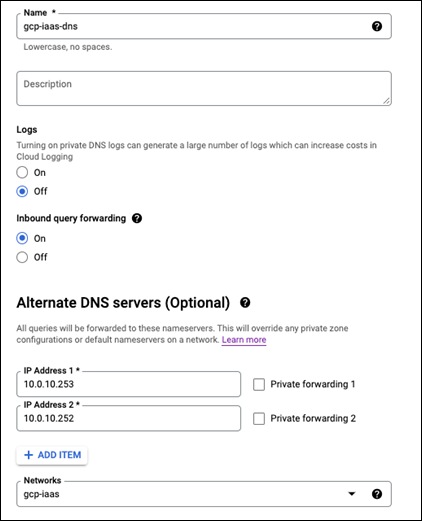
Step 7. Click on SAVE AND CONTINUE
Step 8. Click on SAVE
This VPC should now have a new DNS server policy in use
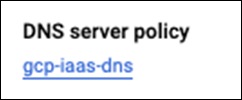
Create Instance Templates, Instance Groups, and Load Balancers
An instance template needs to be created before the instance groups or load balancer can be configured. This process will go from the app tier to the web tier. Doing the app template, instance group, firewall rule, and load balancer. Then the web template, group, and load balancer. Before this process can start, we must get the Secure Endpoint and Secure Workload files needed for the installation process.
Get Secure Endpoint URL
Step 1. Login into the Secure Endpoint portal and go to Management -> Groups
Step 2. Create a new group with a meaningful name and leave it all as the default for now. This guide will use GCP-IAAS as the group name
Step 3. Go to Management -> Download connector and show the URL for the Linux connector. Save this for later
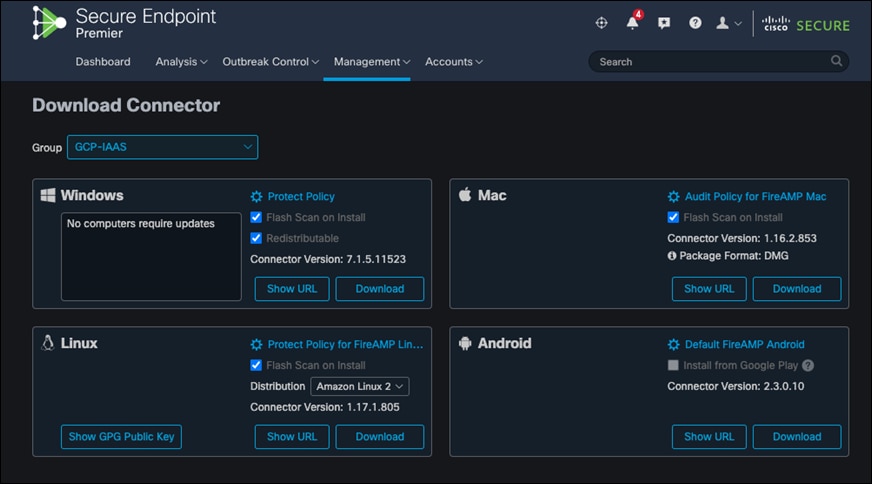
Host Secure Workload installer
Step 1. Login into the Secure Workload portal and go to Manage -> Agents -> Installer
Step 2. Select Auto-Install Agent using an installer. Then Next
Step 3. Select Linux for the platform and No for the HTTP Proxy
Step 4. Click on Download Installer and Next
Step 5. Create a Cloud Storage Bucket in GCP and upload the Secure Workload installer to it
App Instance Template
Now that the Secure Endpoint and Secure Workload files have been prepped. The app instance template can be created.
Step 1. Go to Compute Engine -> Instance Templates -> CREATE INSTANCE TEMPLATE
Step 2. Give the template a meaningful name. This guide will use app-template
Step 3. Change the Boot disk from Debian to CentOS
Step 4. In the Networking section, add a network tag of app
Step 5. Under Network interfaces, change subnetwork to app-net
Step 6. Remove the external IP
Step 7. Go to the Management section and in the Automation field, add the script that is below to it. Please modify the #{} fields to be the SQL database username, password, ip, and database.
Note: It would go from ${example} to example.com
#Pre-requisite packages
sudo yum -y install https://dl.fedoraproject.org/pub/epel/epel-release-latest-7.noarch.rpm
sudo yum -y install https://rpms.remirepo.net/enterprise/remi-release-7.rpm
sudo yum -y update
sudo yum install -y wget unzip lsof ipset httpd rsync yum-utils awk grep unzip sed dmidecode openssl curl libcurl rpm flock ipset iptables ip6tables
sudo yum-config-manager --enable remi-php74
sudo yum -y install php php-cli php-fpm php-mysqlnd php-zip php-devel php-gd php-mcrypt php-mbstring php-curl php-xml php-pear php-bcmath php-json
sudo systemctl start httpd
sudo systemctl enable httpd
sudo setsebool -P httpd_can_network_connect 1
#Wordpress install
sudo wget https://wordpress.org/latest.tar.gz
tar -xzf latest.tar.gz
cd wordpress
sudo cp wp-config-sample.php wp-config.php
#replace ${} with the info from the SQL instance
sudo sed -i -E 's/username_here/${user}/g' ./wp-config.php
sudo sed -i -E 's/password_here/${password}/g' ./wp-config.php
sudo sed -i -E 's/database_name_here/${database}/g' ./wp-config.php
sudo sed -i -E 's/localhost/${host_ip}/g' ./wp-config.php
sudo rsync -avP * /var/www/html/
sudo chown -R apache:apache /var/www/html/*
sudo systemctl restart httpd
#commands to install Secure Endpoint
sudo gsutil cp gs://${bucket_name_here}/tetration_installer_intgssopov_enforcer_linux_tuvok.sh .
sudo chmod u+x tetration_installer_intgssopov_enforcer_linux_tuvok.sh
./tetration_installer_intgssopov_enforcer_linux_tuvok.sh
#commands to get secure endpoint and install it
wget -O ampConnector.rpm ${secure_endpoint_url}
sudo yum localinstall ampConnector.rpm -y
Step 8. This template can now be created. Click on CREATE
Step 9. There should now be an app-template in the instance templates

App Instance Group
Step 1. Go to Instance Groups
Step 2. Click on CREATE INSTANCE GROUP
Step 3. Give it a meaningful name. This guide. Will app-group
Step 4. Change the Instance template to app-template

Step 5. Change the Location from Single zone to Multiple zones
Step 6. Change the Region to us-east1 if that is where the VPC is located

Step 7. Go to Autohealing, click on the drop down and select CREATE A HEALTH CHECK

Step 8. Give this health check a meaningful name. This guide will use app-health-check
Step 9. Change the Protocol to TCP and Port 80
Step 10. SAVE
Step 11. Click on CREATE
Step 12. There should now be a new instance group

Health Check Firewall Rule
A firewall rule needs to be created so that the health checks can reach the instances. The rule needs to allow the two IP ranges from Google that are set aside for health checks. They are 130.211.0.0/22 and 35.191.0.0/16.
Step 1. Go to VPC network -> Firewall
Step 2. Click on CREATE FIREWALL RULE
Step 3. Give the rule a meaningful name. This guide will use healthcheck-rule
Step 4. Change the Network to gcp-iaas
Step 5. Add web and app tags to the Target tags box
Step 6. In the Source IPv4 ranges box, add these two ip ranges
◦ 130.211.0.0/22
◦ 35.191.0.0/16
Step 7. Check the tcp port box and add ports 80,443
Step 8. The targets, addresses, and ports should like what is below
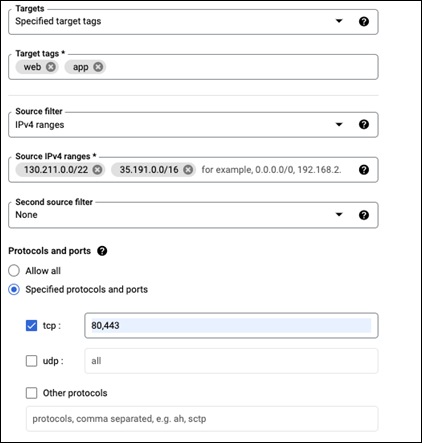
Step 9. Click CREATE
App Load Balancer
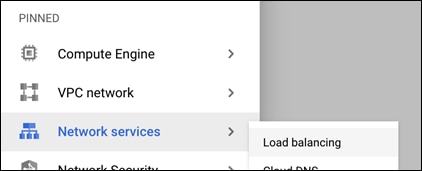
Step 1. Go to Network services -> Load balancing
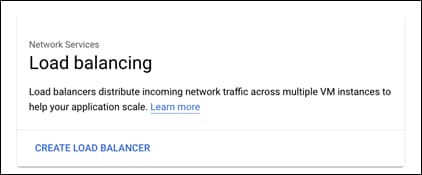
Step 2. Click on CREATE LOAD BALANCER
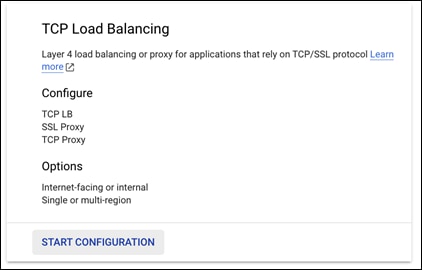
Step 3. Go to the TCP Load Balancing option and click on START CONFIGURATION
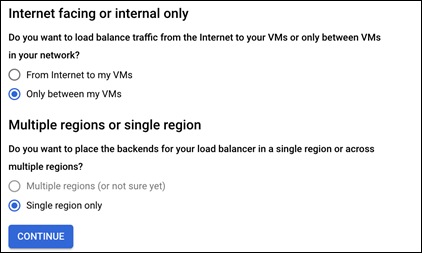
Step 4. For the Internet facing or internal only, select Only between my VMs
Step 5. For the Multiple regions or single region, it should have defaulted to Single region only. If it did not, please change it to Single region only
Step 6. Verify the settings should look like below:
Step 7. Click on CONTINUE
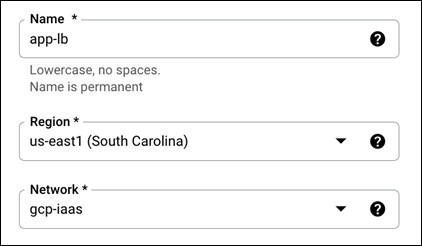
Step 8. Give the load balancer a meaningful name, this guide will use app-lb
Step 9. Change the Region to the region where the VMs are deployed, this guide is using us-east1
Step 10. Change the Network to the one created in this guide; this guide is using gcp-iaas.
Step 11. The configuration should look like the below photo:
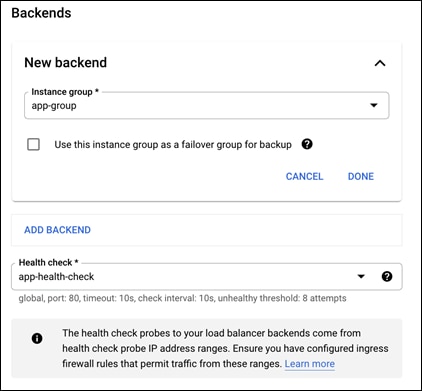
Step 12. In the Backends section, change the New Backend to the app instance group
Step 13. Change the Health check to the app-health-check that was created earlier in this guide
Step 14. The configuration should look like what is below:
Step 15. Go the Frontend configuration
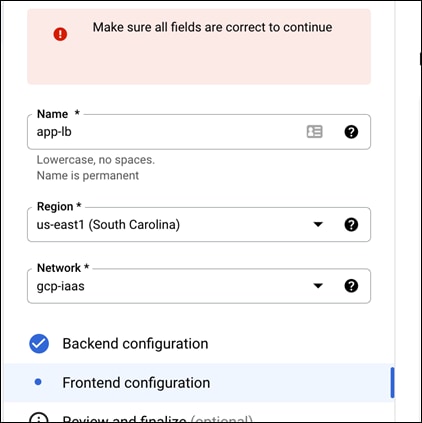
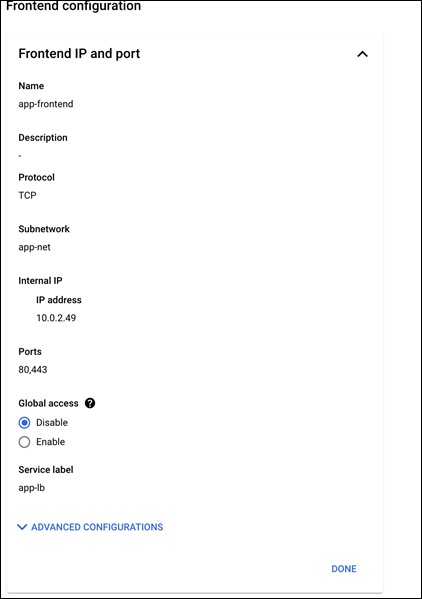
Step 16. Give it a meaningful name, this guide will use app-frontend
Step 17. Change the Subnetwork to the app-net
Step 18. Leave the Internal IP as its defaults (Non-shared, Ephemeral)
Step 19. Change the Ports section to Multiple
Step 20. Add ports 80,443 to the Port numbers box
Step 21. Add a meaningful Service label, this guide is using app-lb
Step 22. The configuration should like the below figure:
Step 23. Click on Done
Step 24. Click on CREATE
Step 25. Save the Internal IP for the Web instances.
Web Instance Template
Now that the App tier is finished, the web instance template can be created.
Upload Nginx configuration file
Step 1. Download the Nginx configuration file from the Validated Design GitHub.
Step 2. Change the proxy_pass IP to the IP address of the internal load balancer and Save it
Step 3. Upload the file to the bucket that is hosting the Umbrella and Tetration files
Create the Web Instance Template
Step 1. Go to Compute Engine -> Instance Templates -> CREATE INSTANCE TEMPLATE
Step 2. Give the template a meaningful name. This guide will use web-template
Step 3. Change the Boot disk from Debian to CentOS
Step 4. In the Networking section, add a network tag of web
Step 5. Under Network interfaces, change subnetwork to web-net
Step 6. Remove the external IP
Step 7. Go to the Management section and in the Automation field, add the script that is below to it. Please modify the #{} field to the bucket name hosting the nginx file.
Note: It would go from ${bucket_name_here} to gcp_bucket
#Pre-requisite packages
sudo yum -y install https://dl.fedoraproject.org/pub/epel/epel-release-latest-7.noarch.rpm
sudo yum -y install https://rpms.remirepo.net/enterprise/remi-release-7.rpm
sudo yum -y update
sudo yum install -y epel-release nginx wget unzip lsof ipset rsync yum-util
sudo yum install -y ipset httpd yum-utils awk grep unzip sed dmidecode openssl curl libcurl rpm flock iptables ip6tables
#Nginx config
cd /etc/nginx
sudo mv nginx.conf nginx.conf.backup
sudo gsutil cp gs://${bucket_name_here}/nginx.conf .
#Service Start
sudo systemctl restart nginx
sudo systemctl enable nginx
#commands to install tetration
sudo gsutil cp gs://${bucket_name_here}/tetration_installer_intgssopov_enforcer_linux_tuvok.sh .
chmod u+x tetration_installer_intgssopov_enforcer_linux_tuvok.sh
./tetration_installer_intgssopov_enforcer_linux_tuvok.sh
#commands to get secure endpoint and install it
wget -O ampConnector.rpm ${secure_endpoint_url}
sudo yum localinstall ampConnector.rpm -y
Step 8. This template can now be created. Click on CREATE
Step 9. There should now be a web-template in the instance templates
![]()
Web Instance Group
Step 1. Go to Instance Groups
Step 2. Click on CREATE INSTANCE GROUP
Step 3. Give it a meaningful name. This guide will web-group
Step 4. Change the Instance template to web-template
Step 5. Change the Location from Single zone to Multiple zones
Step 6. Change the Region to us-east1 if that is where the VPC is located
Step 7. Go to Autohealing, click on the drop down and select CREATE A HEALTH CHECK

Step 8. Give this health check a meaningful name. This guide will use web-health-check
Step 9. Change the Protocol to HTTP
Step 10. SAVE
Step 11. Click on CREATE
Step 12. There should now be a new instance group
![]()
Web Load Balancer
Step 1. Go to Network services -> Load balancing
Step 2. Click on CREATE LOAD BALANCER
Step 3. Go to the HTTP(S) Load Balancing option and click on START CONFIGURATION
Step 4. For the Internet facing or internal only, select From Internet to my VMs or serverless services
Step 5. For the Advanced traffic management, select Classic HTTP(S) Load Balancer
Step 6. Click on CONTINUE
Step 7. Give the load balancer a meaningful name, this guide will use web-lb
Step 8. In the Backend configuration section, click on the dropdown and select CREATE A BACKEND SERVICE
Step 9. Give this new backend a meaningful name, this guide will use web-backend
Step 10. In the Backends section, change the instance group to the web-group
Step 11. Add ports 80 and 443 to the Port numbers box
Step 12. Click on Done for this section
Step 13. Change the Health check to the web-health-check that was created earlier in this guide
Step 14. Click on CREATE
Step 15. Go the Frontend configuration
Step 16. Give it a meaningful name, this guide will use web-frontend
Step 17. Click on DONE
Step 18. Click on CREATE
Step 19. There should now be a new HTTP(S) (Classic) load balancer
![]()
Integration with Cisco SecureX
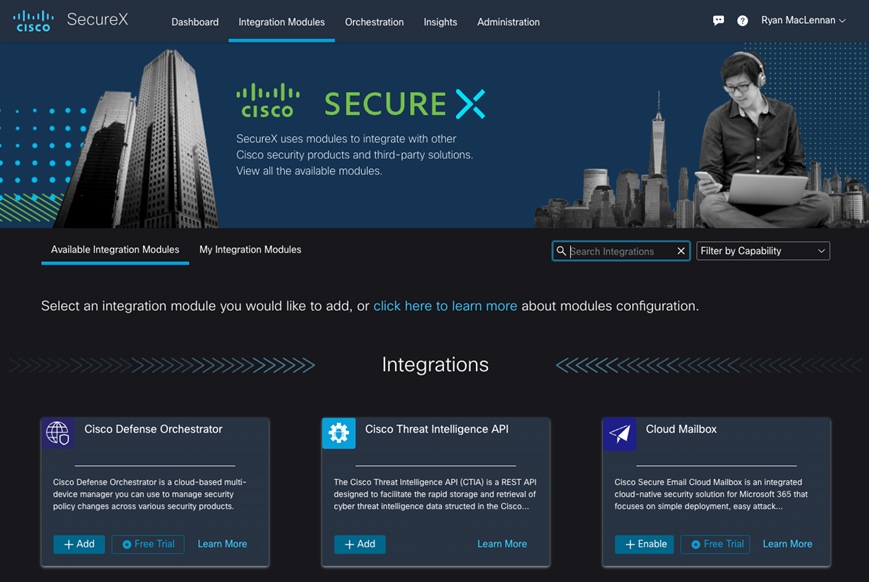
In this last deployment step, we will enable the Umbrella, Secure Cloud Analytics and Secure Workload and Secure Endpoint modules in the SecureX portal to get a unified view into the GCP environment. We create API keys in the product portals and then configure those keys in the threat response dashboard.
Implementation procedure:
● Add Integration modules
● Save the module
Step 1. Add Integration modules - Log on to the SecureX dashboard and go to Integration modules tab, click + Add to add the required modules from the Available Integration Modules .
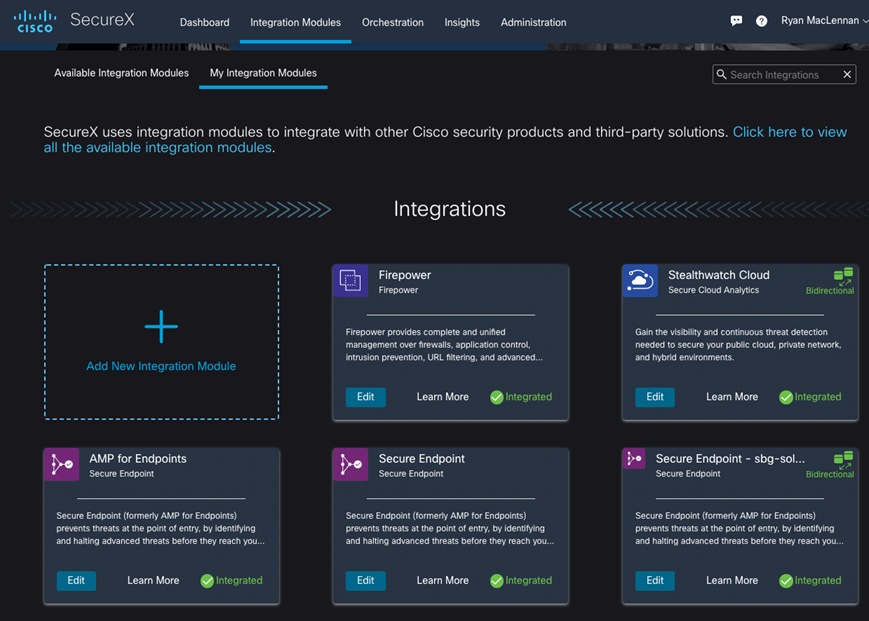
Step 2. Verify that the modules is now in the in the My Integration Modules
Validation procedure overview:
● Test Case 1 - Creating the workspace for GCP cloud application
● Test Case 2 - Using ADM to discover the policies for GCP workloads and setting up an app view
● Test Case 3 - Enforcing the policies on workloads
● Test Case 4 - Discovering the vulnerable packages on the GCP workloads
Test Case 1: Creating an application workspace for GCP cloud application
This test case involves defining annotations for the GCP environment. These annotated attributes are used later to segregate the tiers and segments within the GCP VPC and hence define a workspace for our tiered cloud application.
Validation procedure:
● Build an inventory
● Define scopes
● Create a workspace
Build an inventory
Define the attributes that would help you segregate your tiered application workloads in the cloud and hence construct policies for them. We will use a combination of two different methods to add user annotations - 1) Upload a CSV file 2) Auto generate annotations using external GCP orchestration.
Step 1. Based on the architecture of our tiered application (elaborated in the previous sections of this document), the following annotations were used (Table: GCP Cloud Inventory). Save this in a CSV file format.
Table 1. GCP Cloud Inventory
| IP |
Application |
Region |
Tier |
Type |
| 10.0.1.0/24 |
Safe3tierApp |
us-east-1 |
WebServers |
GCP-Cloud |
| 10.0.2.0/24 |
Safe3tierApp |
us-east-1 |
AppServers |
GCP-Cloud |
| 10.0.3.0/24 |
Safe3tierApp |
us-east-1 |
Database |
GCP-Cloud |
| 10.0.4.0/24 |
Safe3tierApp |
us-east-1 |
Management |
GCP-Cloud |
Step 2. Now, log into the Tetration cloud portal and go to Organize -> User Uploaded Labels
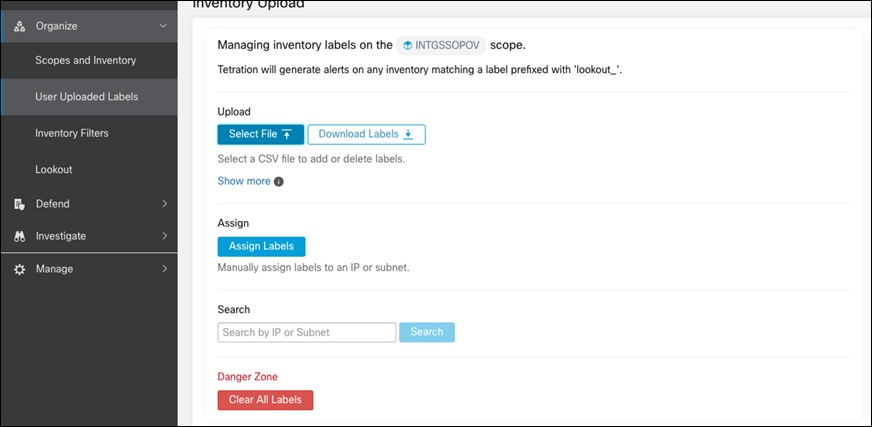
Step 3. Click on Select File
Step 4. Choose the CSV file created in the previous steps
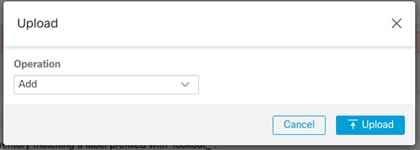
Step 5. Leave the Operation as Add
Step 6. Click on Upload
Step 7. Go to ‘Visibility > External Orchestrator’. Click on ‘Create New Configuration’ and fill in the required details as shown below.
Step 8. After a few minutes, you can go to Manage > Agents > Agent List and select one of the GCP VMs.

Step 9. After selecting one of the GCP VMs, there should labels assigned to the VM from the file that was imported before
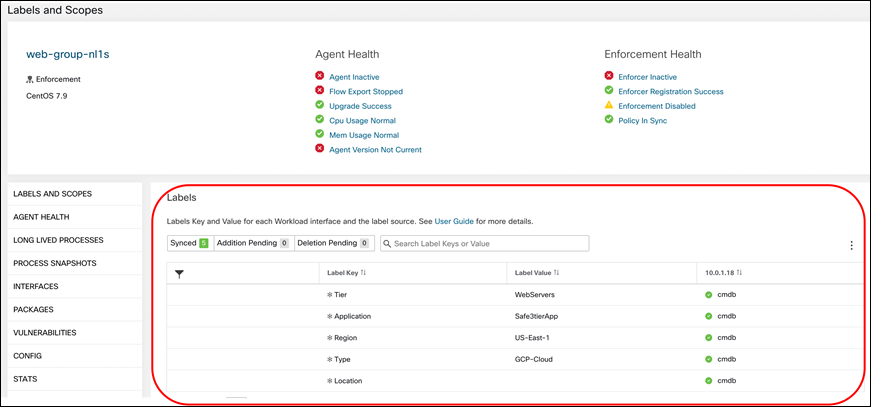
Define scopes
We will define a scope to group together all the workloads in our tiered application in the GCP cloud. We will make use of the annotations/labels that we constructed in Step 1. We will create the scope GCP, which includes all the workloads from our tiered app in the us-east-1 region.
Step 1. Click on Organize > Scopes and Inventory. Then click on the Add button on the right side of the screen
Step 2. Fill in the information like the below image. This will create a new scope with a name of GCP and filtering for the GCP VMs using the labels created previously
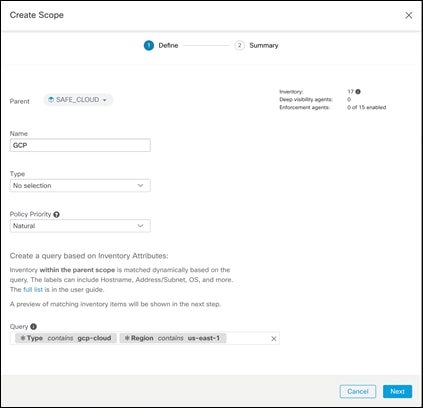
Step 3. Click Next
Step 4. This page should confirm that it detected workloads in the Google Cloud
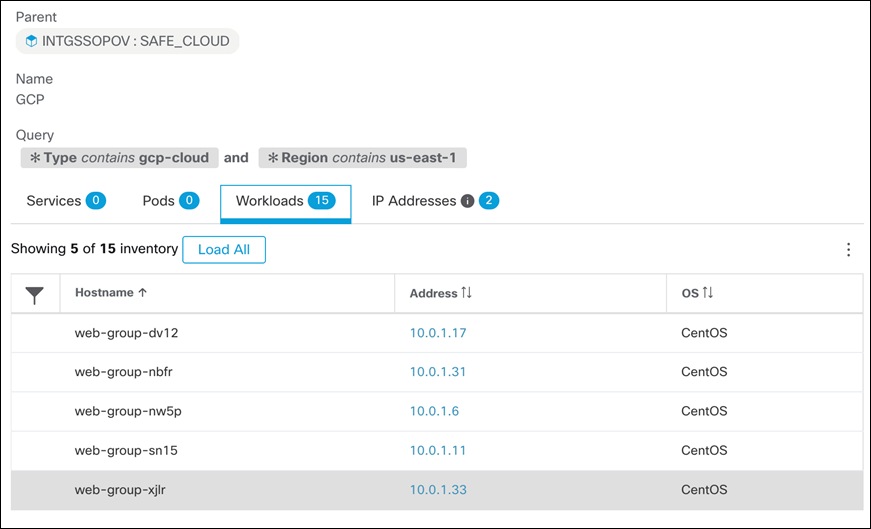
Step 5. Click Create
Create a workspace
Application workspaces are the containers for defining, analyzing and enforcing policies for a particular application. We will create a workspace for our tiered GCP cloud application in this step.
Step 1. Go to Defend > Segmentation and then click on Create New Workspace. Give the workspace a meaningful name and select the Scope that was created previously. This guide will use Safe3tierApp
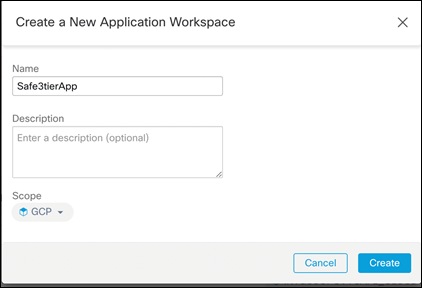
At this point, we have successfully built the inventory, created a scope and defined a workspace for our tiered cloud application.
Test Case 2: Using ADM to discover the policies for GCP workloads and setting up an app view
This test case validates the use of ADM to automatically discover the policies based on flow and other data received from workloads. We will refine the discovered workload clusters and update the inventory filters to eventually come up with a set of policies that can be enforced on our cloud workloads.
Validation procedure:
● Discover policies using ADM
● Refine inventory filters, clusters and policies
● Discover policies using ADM
Before running the ADM, ensure that all types of traffic flows are generated in the application environment. This would provide ADM the required data to generate an accurate policy set and hence ensure that we don’t miss any critical but less common traffic flows.
Step 1. Go to the newly created workspace and click on Start ADM Run on the top right corner, select a suitable time range to ensure that you cover all the traffic flows.
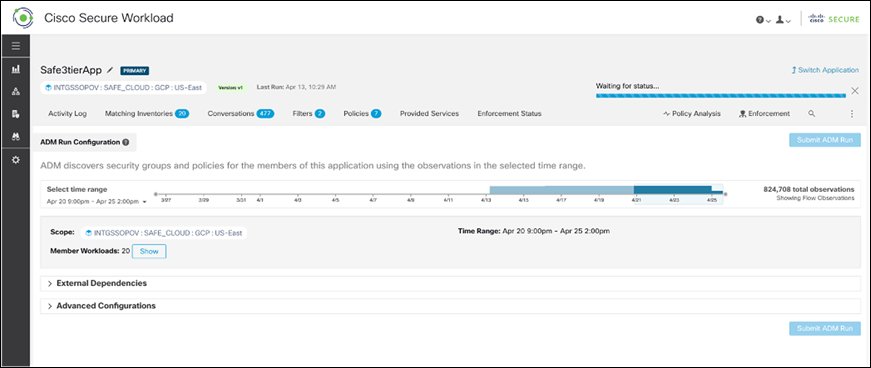
Step 2. After the ADM run has completed, policies and clusters would be generated.However, these should be defined by the inventory filters that were previously created
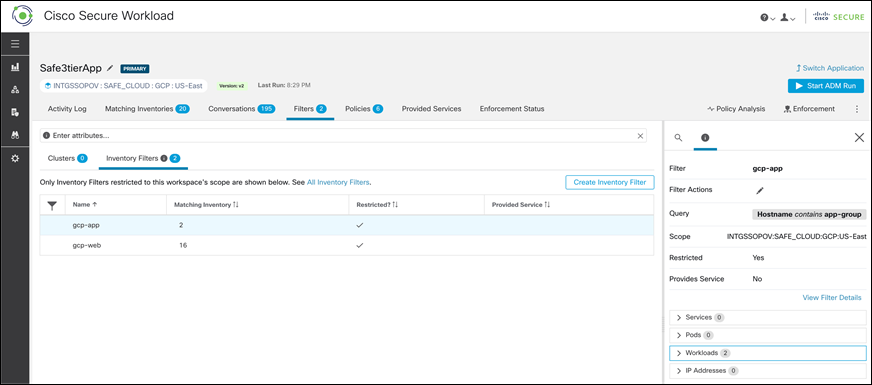
Step 3. Go to the Filters tab, click on Inventory Filters, and select one of the filters. The panel on the right-hand side will show the cluster details like name, description, query, and workloads
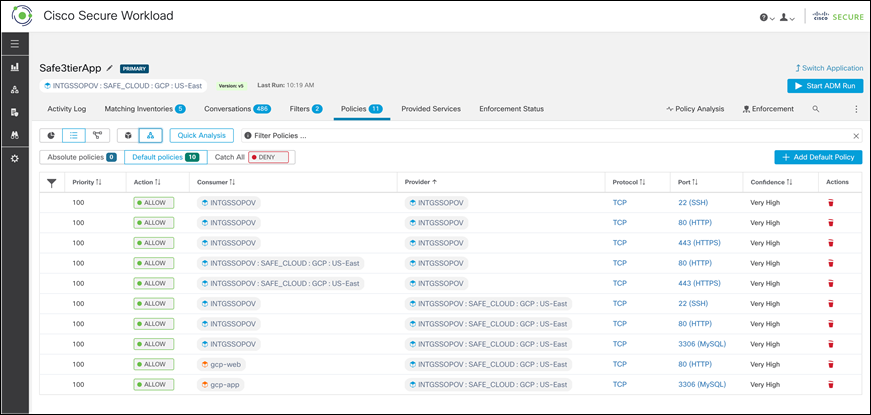
Step 4. Click on Policies tab, review the policies keeping the workload flows in mind. We considered the following flows for policies:
● User requests incoming to Web Servers via the Load Balancer
● Traffic between the workloads
◦ Web Servers to Network Load Balancer
◦ Network Load Balancer to App Servers
◦ App Servers to RDS Database instance
● Management tier to all the workloads
● Outbound internet access from all the workloads for updates/patches, DNS, DHCP, NTP
Test Case 3: Enforcing the policies on workloads.
This test case focuses on enforcing the policy set that we formulated in Test Case 2. We will publish the policies and verify if those are enforced as expected.
Validation procedure:
● Publish the policies
● Verify policy enforcement on workloads
Step 1. Publish the policies – Select the Enforcement tab on the Tetration portal within the application workspace and click on Enforce Policies
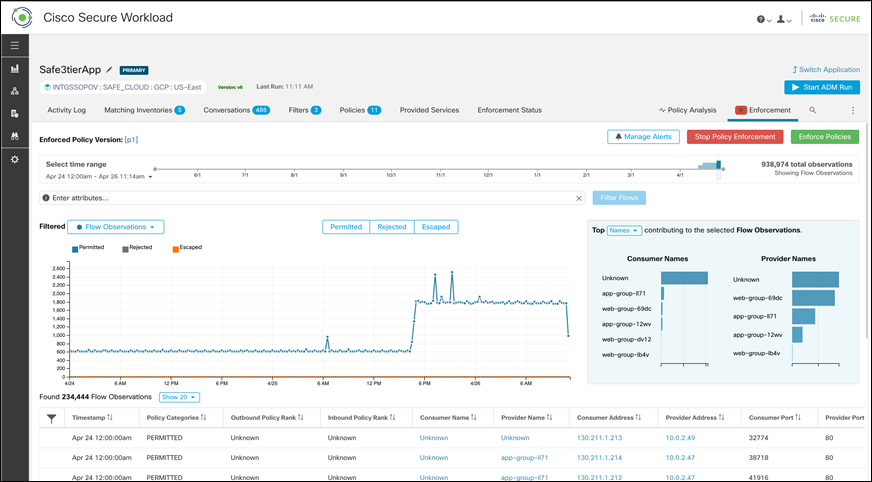
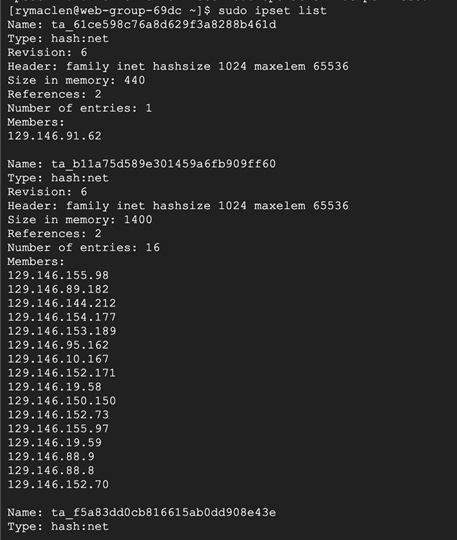
Step 2. Verify policy enforcement on workloads - Since we had CentOS based workloads, we monitored the ‘/usr/local/tet/log/tet-enforcer.log’ to see if policies are successfully enforced. A simple ping or telnet test can also be used to verify the lockdown of ports and protocols.

Use the CLI command ‘ipset list’ to view the ipset firewall settings enforced by Tetration agent on the CentOS workloads.
Test Case 4: Discovering the vulnerable packages on the GCP workloads.
This test case looks for vulnerable packages/software installed on various workloads in the GCP. We identify a vulnerable package/software on our workloads, patch those and then rerun the report.
Validation procedure:
● Check the vulnerability report
● Fix a vulnerability and rerun the report
Step 1. Check the vulnerability report – Go to Investigate > Vulnerabilities and change the Scope to the GCP scope
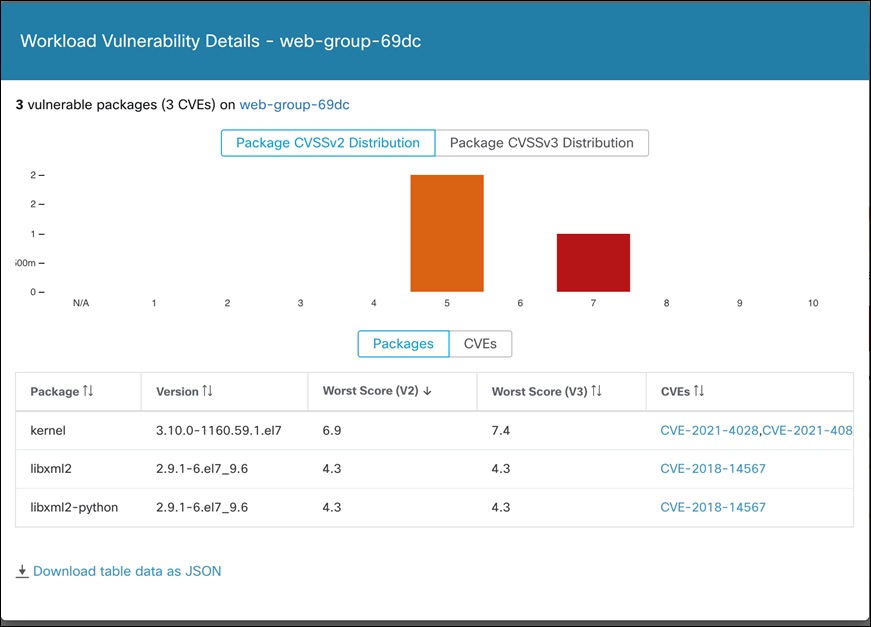
Step 2. Click on Packages tab to see all the vulnerable packages installed on various workloads in our three-tier application. For the sake of this test, let’s consider mokutil--15-8.el7 as shown below.

We see that the workloads app & web are affected by this CVE. Logon to this workload and verify the mokutil package.

Step 3. Fix the vulnerability and rerun the report – We remove the mokutil packge since there is no updated version
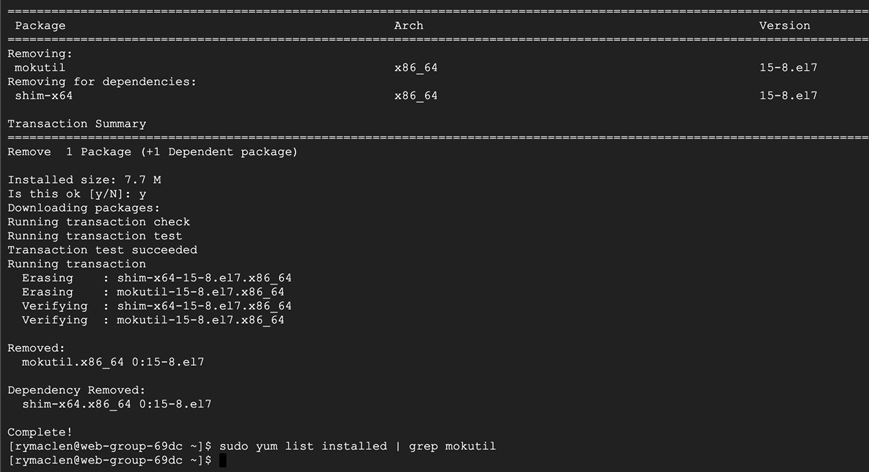
Wait for a few minutes after the uninstall, go back to Tetration portal and check the vulnerability report again. We can see that none of the CVEs related to mokutil show up anymore.
Test Case: Quarantine a suspicious file
This test case involves the detection of using AMP for endpoint ‘simple custom detections’ to quarantine a suspicious PDF file.
Validation procedure:
Step 1. Setting up Secure Endpoint policy to quarantine a suspicious file
Step 2. Verifying the deletion of a suspicious file
Step 3. Setting up AMP4E policy to quarantine a suspicious file – For the validation purpose, we consider a 1 MB PDF file that we will block list using AMP ‘Simple Custom Detections’. We will then try to download the same PDF file on a cloud workload and assert that our policy works as expected.
As per our initial Secure Endpoint setup, we had configured the group ‘Secure Cloud’ (Management > Groups) for our workloads in the GCP cloud.
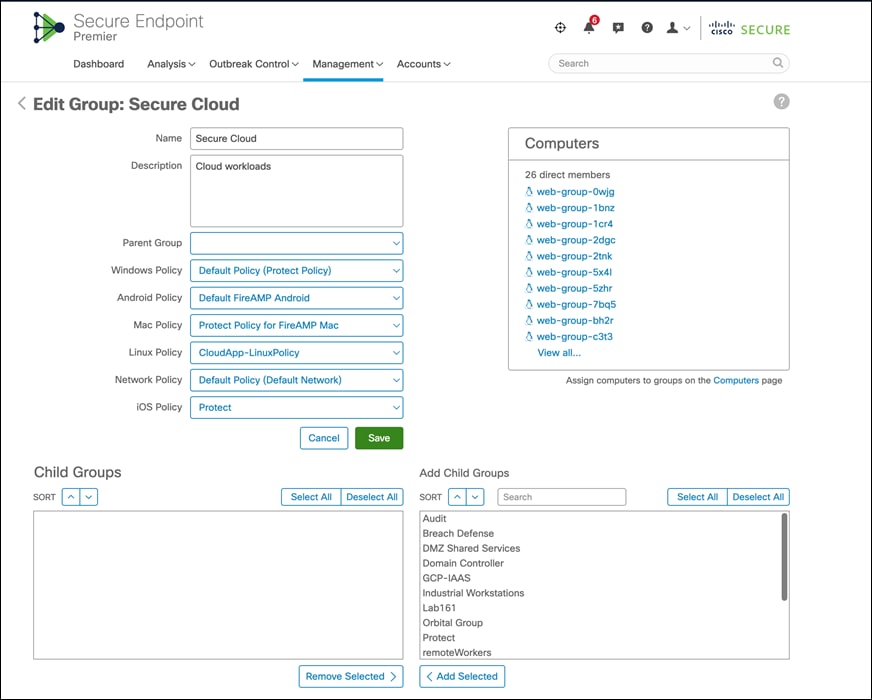
Note: During our implementation phase we had used the Secure Endpoint agent tied to this specific group Secure Cloud, which we had created as part of the initial Secure Endpoint set up (not elaborated in this guide, follow Secure Endpoint documentation for detailed steps on setting up Secure Endpoint policies). All the workloads in GCP VPC register with AMP Cloud under this specific group.
It can be seen in the snapshot above that we tied the specific group to Linux policy CloudApp-LinuxPolicy. Go to ‘Management > Policies and select the specific Linux policy.
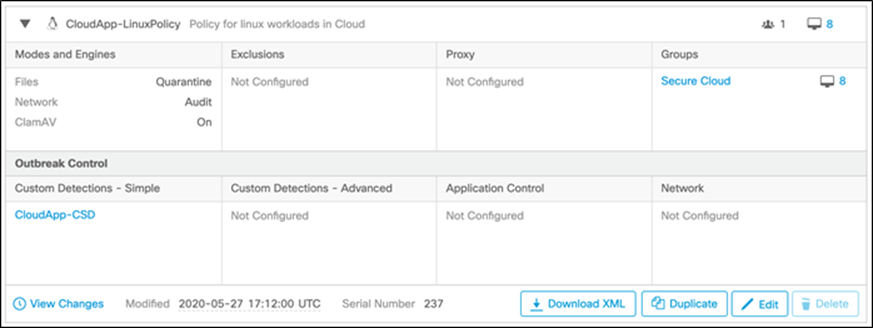
Note: We had preconfigured the Linux policy associated with Secure Endpoint group ‘Secure Cloud’. We also tied a new Simple Custom Detection CloudApp-CSD to the Linux policy. If there was no initial config on Secure Endpoint Dashboard, then you would see default policies here.
As we see in the snapshot, the Linux policy above is tied to Simple Custom Detections CloudApp-CSD (Outbreak Control > Simple).
Go to Outbreak Control > Simple Custom Detections and click on edit CloudApp-CSD to upload the PDF file that we want to block in the GCP cloud environment (this guide will use the Cisco Edge White Paper). Uploading the PDF file will add the SHA value to the SCD policy and quarantines the file associated with it from all the cloud workloads registered under the specific group.
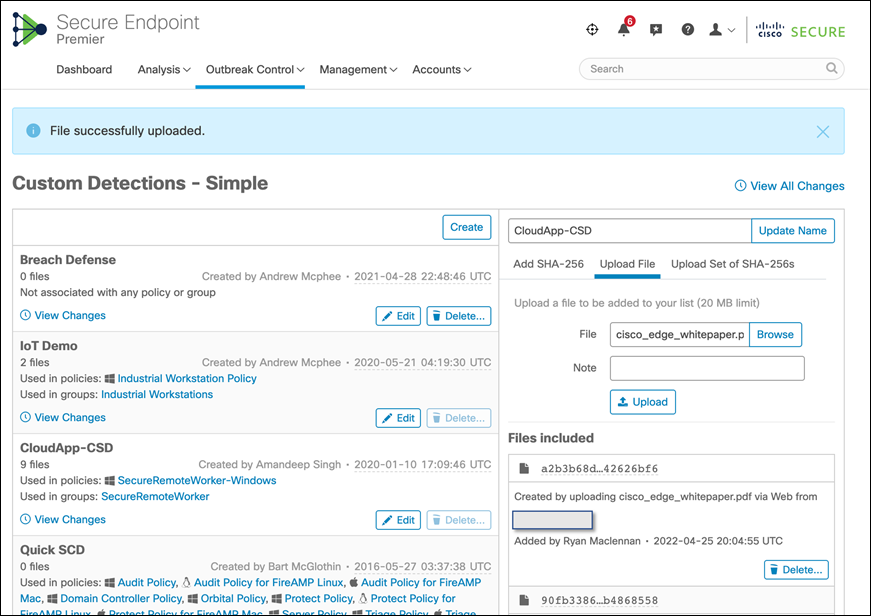
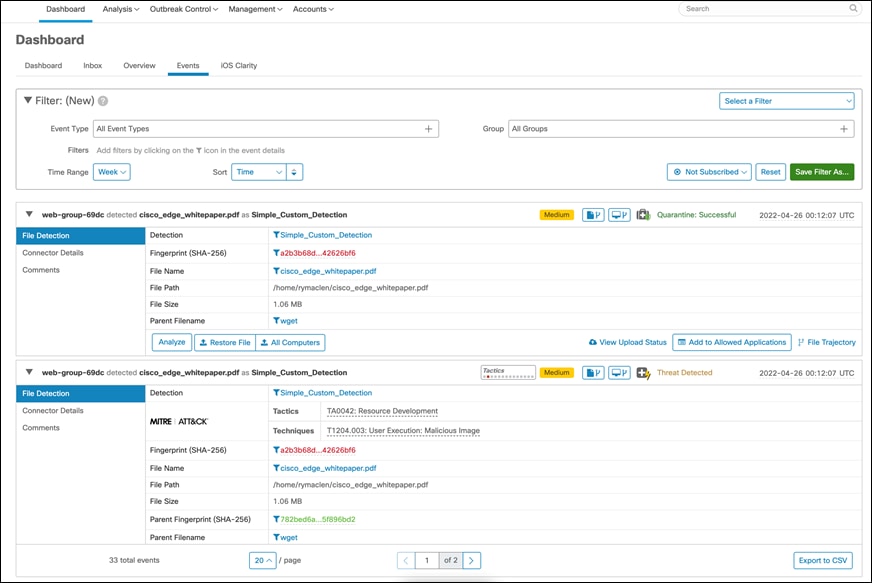
Step 4. Verify the deletion of the suspicious program – Log on to a cloud workload, we picked one of the web servers in Web Instance Group. We downloaded the PDF file that we block listed above. We can see that the file is immediately quarantined by the Secure Endpoint agent on the workload.

We also confirm the quarantine event from the event logs on the Secure Endpoint Dashboard. Log on to the Secure Endpoint Dashboard and go to Analysis > Event, we see a Quarantine successful event post our steps above.
Test Case: Monitor suspicious activity
This test case involves using Secure Cloud Analytics to monitor the activity within the GCP cloud environment.
Validation procedure:
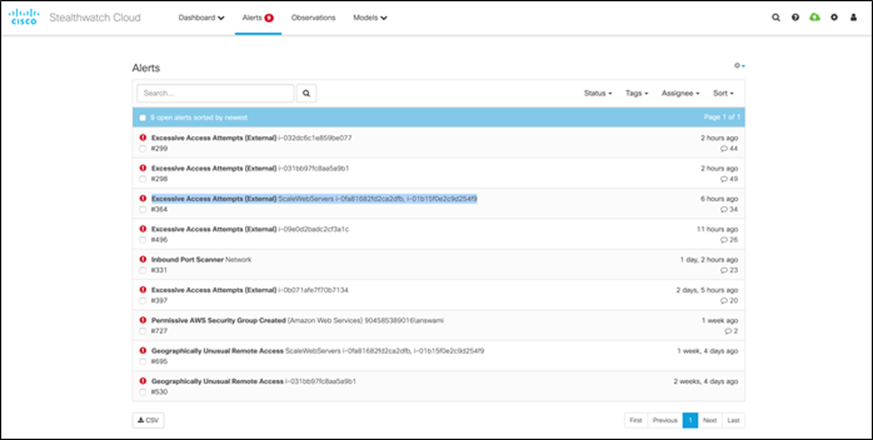
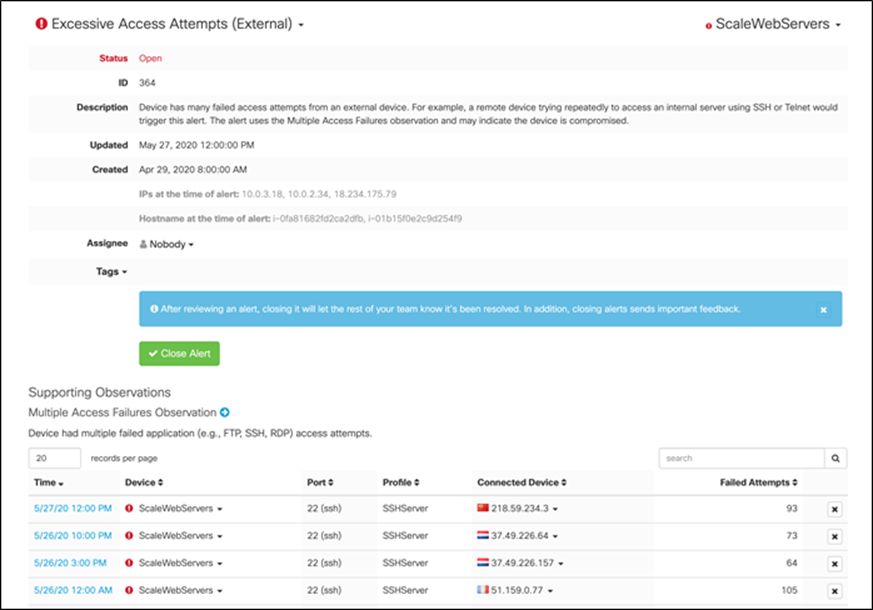
Step 1. Monitor suspicious activity in Secure Cloud Analytics - Login to the Stealthwatch cloud portal. Go to ‘alerts’, we see the alert ‘Excessive Access Attempts’ as shown below. This alert indicated that there were numerous attempts to get SSH access from an unexpected geo location, which is a suspicious behavior.
Test Case: DNS security
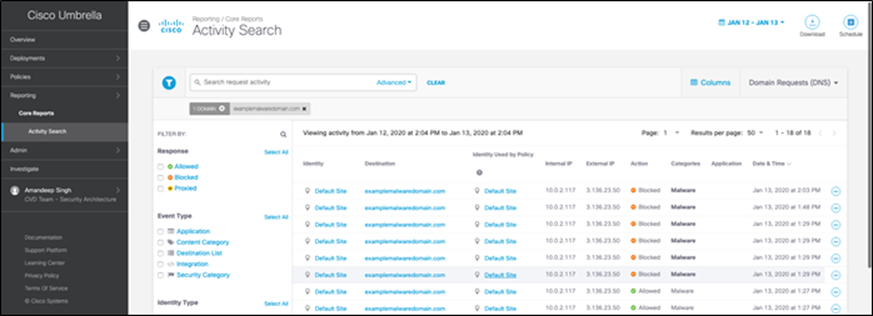
This test case involves adding DNS layer security to the GCP workloads. We created a DNS policy for our tiered application workloads to block malicious domains. To verify the blocks, we accessed a test domain ‘examplemalwaredomain.com’ and then confirmed the same from Umbrella reporting.
Validation procedure:
● Set up DNS policy for GCP workloads
● Confirm if malware domain is blocked
Step 1. Set up DNS policy for GCP workloads – Go to ‘Policies > Management > DNS Policies’, add a new policy and make sure ‘Malware’ is set to block under security settings. Save the change.
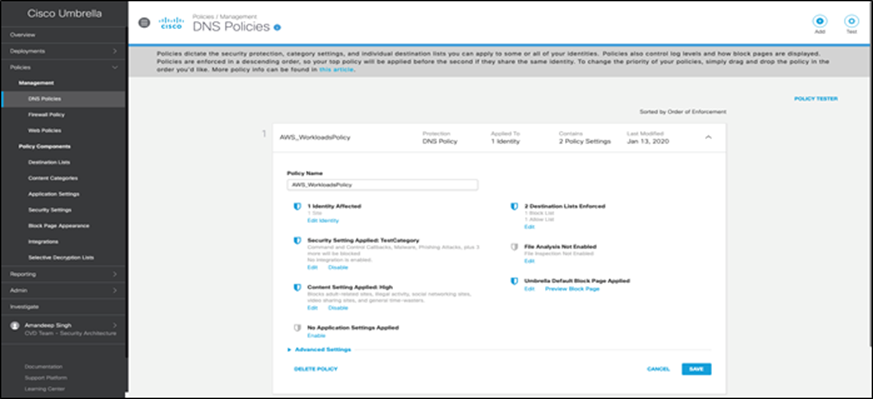
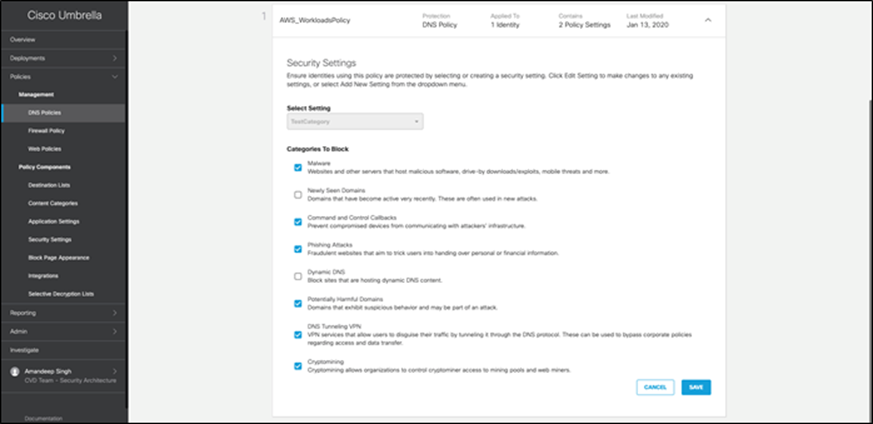
Step 2. Confirm if malware domain is blocked – Run ‘nslookup’ on a test malware domain as shown in snapshot below. Utility returns Umbrella block page IP address as below.

To further confirm the block action, select ‘Reporting > Activity Search’ and filter the accessed malware domain. Events show the action as ‘Blocked’.
Validation procedure overview:
● Test Case 1 - Set up the cloud application for Two-Factor Authentication (2FA)
● Test Case 2 - Monitor 2FA activity from Duo admin portal
Test Case 1: Set up the cloud application for Two-Factor Authentication (2FA)
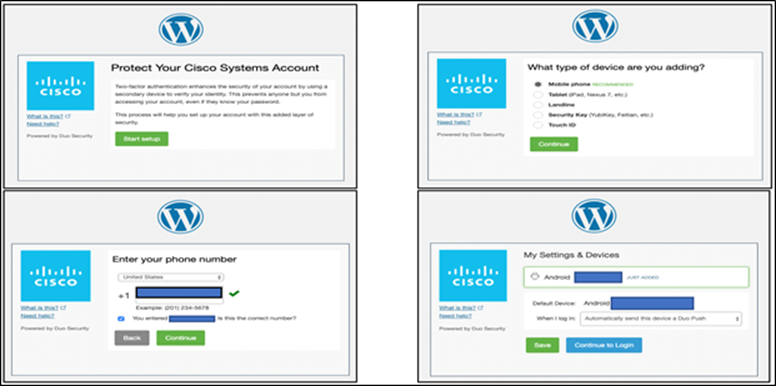
This test case involves logging into the application for the first time and activating the duo plugin. Previously, during the implementation phase, we had already downloaded the plugin to application workloads using GCP User Data option. Follow the Duo documentation (skip step 2 under ‘Install and Configure the Plugin’) to activate WordPress Duo plugin. After activating the plugin, log out and log in again. This time Duo will prompt the user to enroll their phone for 2FA. After successful enrollment, user gets the ability to approve subsequent login attempts.
Validation procedure:
● Set up Duo 2FA for a new user
● Log onto the cloud application
Step 1. Set up Duo 2FA for a new user - After the initial plugin activation, the Duo MFA kicks in and since this is the first authentication attempt, the user is prompted to enroll for MFA.
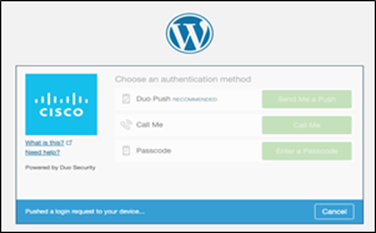
Step 2. Log onto the cloud application - After the enrollment, we continue to log onto the application, this time the user is presented with Duo authentication methods instead of ‘setup’. Once the user approves the authentication request, they are allowed to login.
Test Case 2: Monitor 2FA activity from Duo admin portal
This test case involves monitoring the 2FA enrollment and login activity in the Duo admin portal.
Validation procedure:
● Verify the 2FA enrolled devices
● Track the user logins in authentication logs
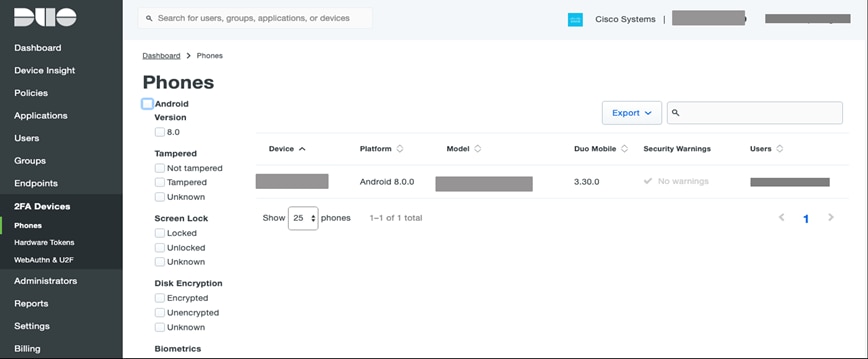
Step 1. Verify the 2FA enrolled devices - Logon to the Duo admin portal and select ‘2FA Devices’, the portal shows the list of enrolled devices along with other details like platform, hardware model and usernames.

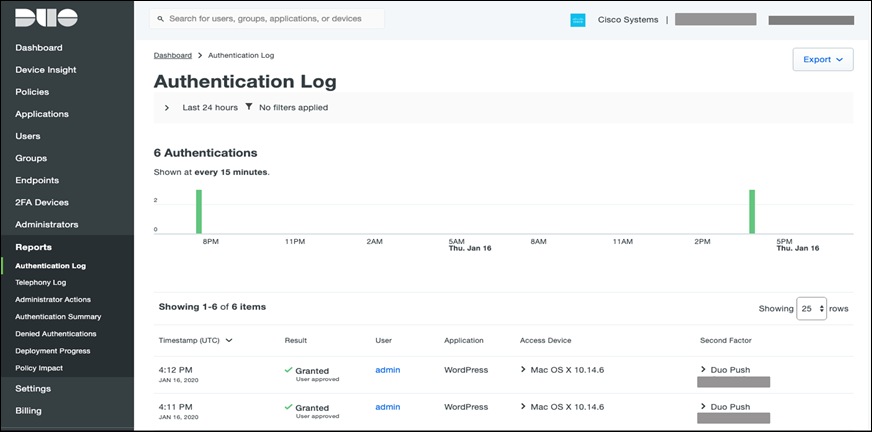
Step 2. Track the user logins in authentication logs – Go to ’Dashboard > Authentication log’, to track user 2FA login activity as shown in the snapshot below.
![]()
Test Case: Track Malicious Activity on threat response
In this test case, we track the life cycle of the malicious PDF that we quarantined using AMP4E in previous steps. We will use the same SHA value and see what threat response offers in terms of visibility in our environment.
Implementation procedure:
● Investigate a malicious SHA value
● Track the file trajectory
Step 1. Investigate a malicious SHA value - Log on to the threat response portal and select Investigate. Add the SHA value in provided space and click on Investigate. Threat response pulls all the information about the associated file and what workloads the specific file had interacted with. Under the Investigated section, we can see that Secure Endpoint detected this SHA value as malicious based on our custom AMP policy, threat response displays the specific AMP4E policy name as well.
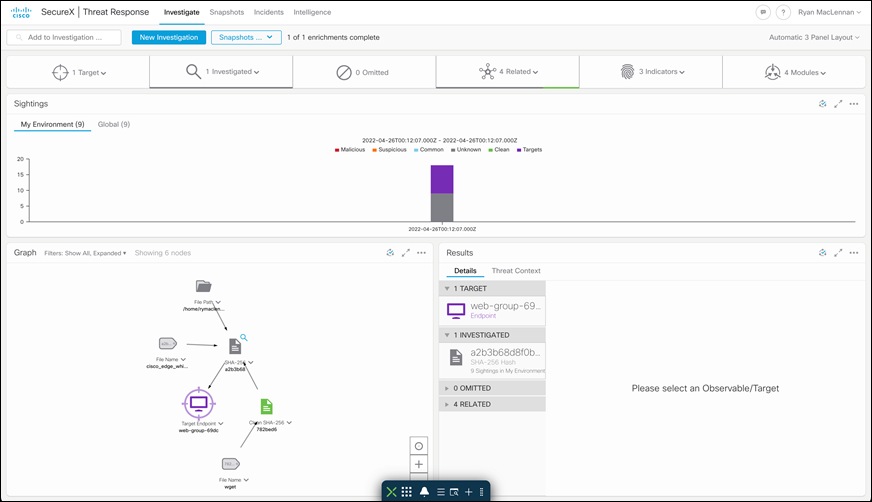
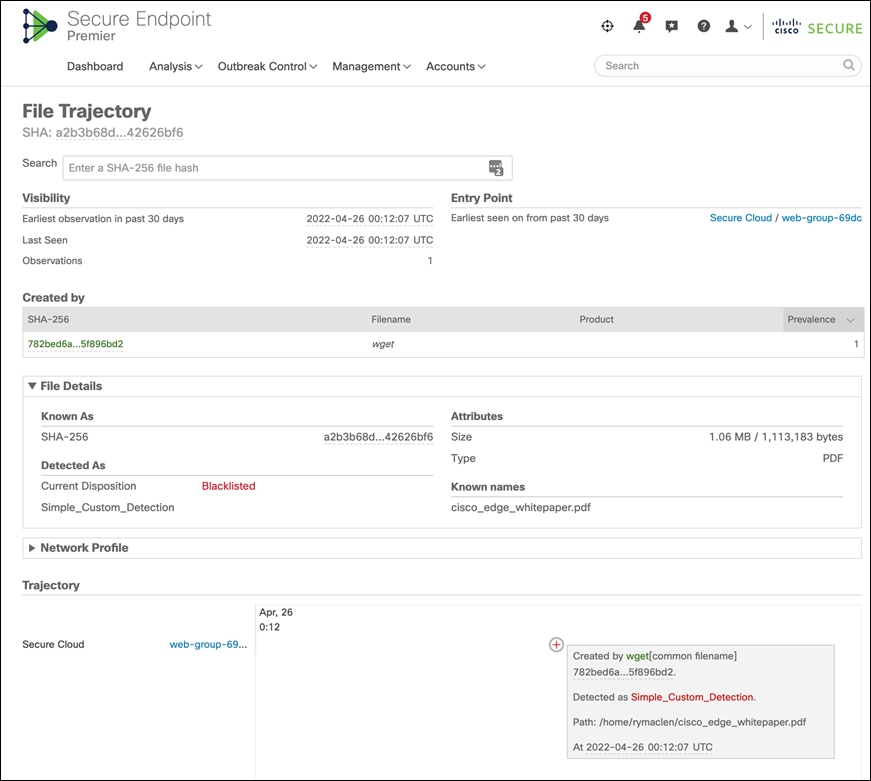
Step 2. Track the file trajectory - Click on the ‘SHA-256 Hash’ shown in the Graph box. Expand the drop-down menu and click on ‘File trajectory’.

Clicking on File trajectory should redirect you to the Secure Endpoint portal page which displays the trajectory of the malicious file on the specific workload. Clicking on a particular timestamp displays the related events. The event history shows all the events associated with the specific file.
| Acronym |
Definition |
| CVD |
Cisco Validated Design |
| IaaS |
Infrastructure as a Service |
| MFA |
Multi-Factor Authentication |
| PIN |
Places in Network |
| PaaS |
Platform as a Service |
| SaaS |
Software as a Service |
| SQL |
Structured Query Language |
| SSO |
Single Sign On |
| VA |
Virtual Applicance |
| VPC |
Virtual Private Cloud |
| 2FA |
Two Factor Authentication |
Appendix B- GCP Terraform Template
The GCP Terraform template used for the validation testing is located on the Cisco Security Validated Design GitHub. This template can be used to automate the deployment of the networking components, database, application, and web servers. For more information on the full deployment using Terraform, the readme in the GitHub repository goes over all the steps and how it works.
| Product |
Platform |
Version |
| Secure Workload |
Software agent |
3.3.2.35-enforcer |
| Secure Endpoint |
Software agent |
1.11.1.663 |
| Secure Cloud Analytics |
Cloud Offering |
SaaS |
| Umbrella VAs |
Appliance (Compute Engine) |
2.6.2 |
| Duo WordPress Plugin |
Software Plugin |
Version 2.5.5 |
| SecureX |
Cloud Offering |
SaaS |
| Workloads |
Linux |
CentOS 7.7 |
| SQL Database |
MySQL database |
mysql-5-7 |
This section lists all the references.
● Cisco Secure Cloud Analytics
● NGINX
● GCP VPC
If you have feedback on this design guide or any of the Cisco Security design guides, please send an email to ask-security-cvd@cisco.com.


