Cisco UCS C885A M8 Dense GPU Server Getting Started Guide
Available Languages
Bias-Free Language
The documentation set for this product strives to use bias-free language. For the purposes of this documentation set, bias-free is defined as language that does not imply discrimination based on age, disability, gender, racial identity, ethnic identity, sexual orientation, socioeconomic status, and intersectionality. Exceptions may be present in the documentation due to language that is hardcoded in the user interfaces of the product software, language used based on RFP documentation, or language that is used by a referenced third-party product. Learn more about how Cisco is using Inclusive Language.
- US/Canada 800-553-2447
- Worldwide Support Phone Numbers
- All Tools
 Feedback
 Feedback
This document serves as a "Getting Started" guide for the Cisco UCS® C885A M8 Rack Server, providing foundational technical instructions and procedures for initial setup and common maintenance tasks. It outlines processes for obtaining required software and firmware, performing updates for various server components, and configuring specific hardware elements.
Scope and assumptions
This guide covers the essential steps for bringing your Cisco UCS C885A M8 Rack Server into operation. Specifically, it addresses:
● Initial server preparation: performing firmware updates for server components (for example, BMC, BIOS, GPU, and FPGA) that can or must be done prior to installing an operating system.
● Host operating system installation: guidance on installing a supported host operating system.
● Post-OS host configurations: procedures for updating host-level components (for example, NVIDIA SuperNICs/DPUs and Intel® Ethernet Network Adapter X710 cards), configuring network interface modes, and installing necessary drivers and toolkits (for example, NVIDIA GPU drivers and NVIDIA CUDA Toolkit) from within the installed OS.
The procedures described require familiarity with the Linux command-line interface.
This guide primarily focuses on Ubuntu 22.04 Long Term Support (LTS) and 24.04 LTS as the supported host operating systems. Future versions are planned to cover additional supported operating systems.
Examples provided for firmware bundle names, driver versions, and utility file names are illustrative and subject to change as new versions are released.
Users must obtain the latest or specific required versions of software, firmware, and utilities from the official Cisco® software download site (software.cisco.com) and the respective component vendor websites (for example, Intel and NVIDIA). Consequently, commands and file paths shown in this guide may need to be adjusted by the user to match the actual filenames and versions they download.
Purpose
This guide offers practical steps and a foundational understanding for common operations to help users quickly get started with their Cisco UCS C885A M8 Rack Server.
Disclaimer
This document does not replace the product documentation available on Cisco.com.
For detailed configuration information, advanced procedures, troubleshooting, and the most current updates and release notes, always refer to the official Cisco UCS C885A M8 Rack Server configuration guides, user guides, and release notes published on software.cisco.com and Cisco.com.
2. Initial server setup and firmware updates (pre-OS deployment)
This section details the process for updating the foundational firmware components of your Cisco UCS C885A M8 Rack Server. These updates are crucial for optimal performance, stability, and compatibility, and they should be performed before installing any host operating system. This includes firmware for components such as the baseboard management controller (BMC), BIOS, GPU, and field-programmable gate array (FPGA).
Prerequisite: Before proceeding with the firmware updates, ensure that your server's baseboard management controller (BMC) has been initially set up, is networked, and is reachable. This includes assigning an IP address and configuring basic network connectivity. For detailed instructions on the physical installation and initial BMC configuration, please refer to the following official Cisco documentation:
● Cisco UCS C885A M8 Server Installation and Service Guide: https://www.cisco.com/c/en/us/td/docs/unified_computing/ucs/c/hw/c885A/install/b_c885a-m8-server-hig.html
● Cisco Baseboard Management Controller Configuration Guide for the Cisco UCS C885A M8 Rack Server, Release 1.1: https://www.cisco.com/c/en/us/td/docs/unified_computing/ucs/c/sw/gui/config/guide/1-1-0/b_openbmc-configuration-guide_1-1.html
2.1. Software download
To begin, download the necessary firmware bundles and updater scripts from the official Cisco software download site.
1. Navigate to software.cisco.com.
2. Search for "Cisco UCS C885A M8" or the specific firmware version you require.
3. Download the latest recommended firmware bundle (.tar.gz file) for your server.
Download firmware and updater script from software.cisco.com.
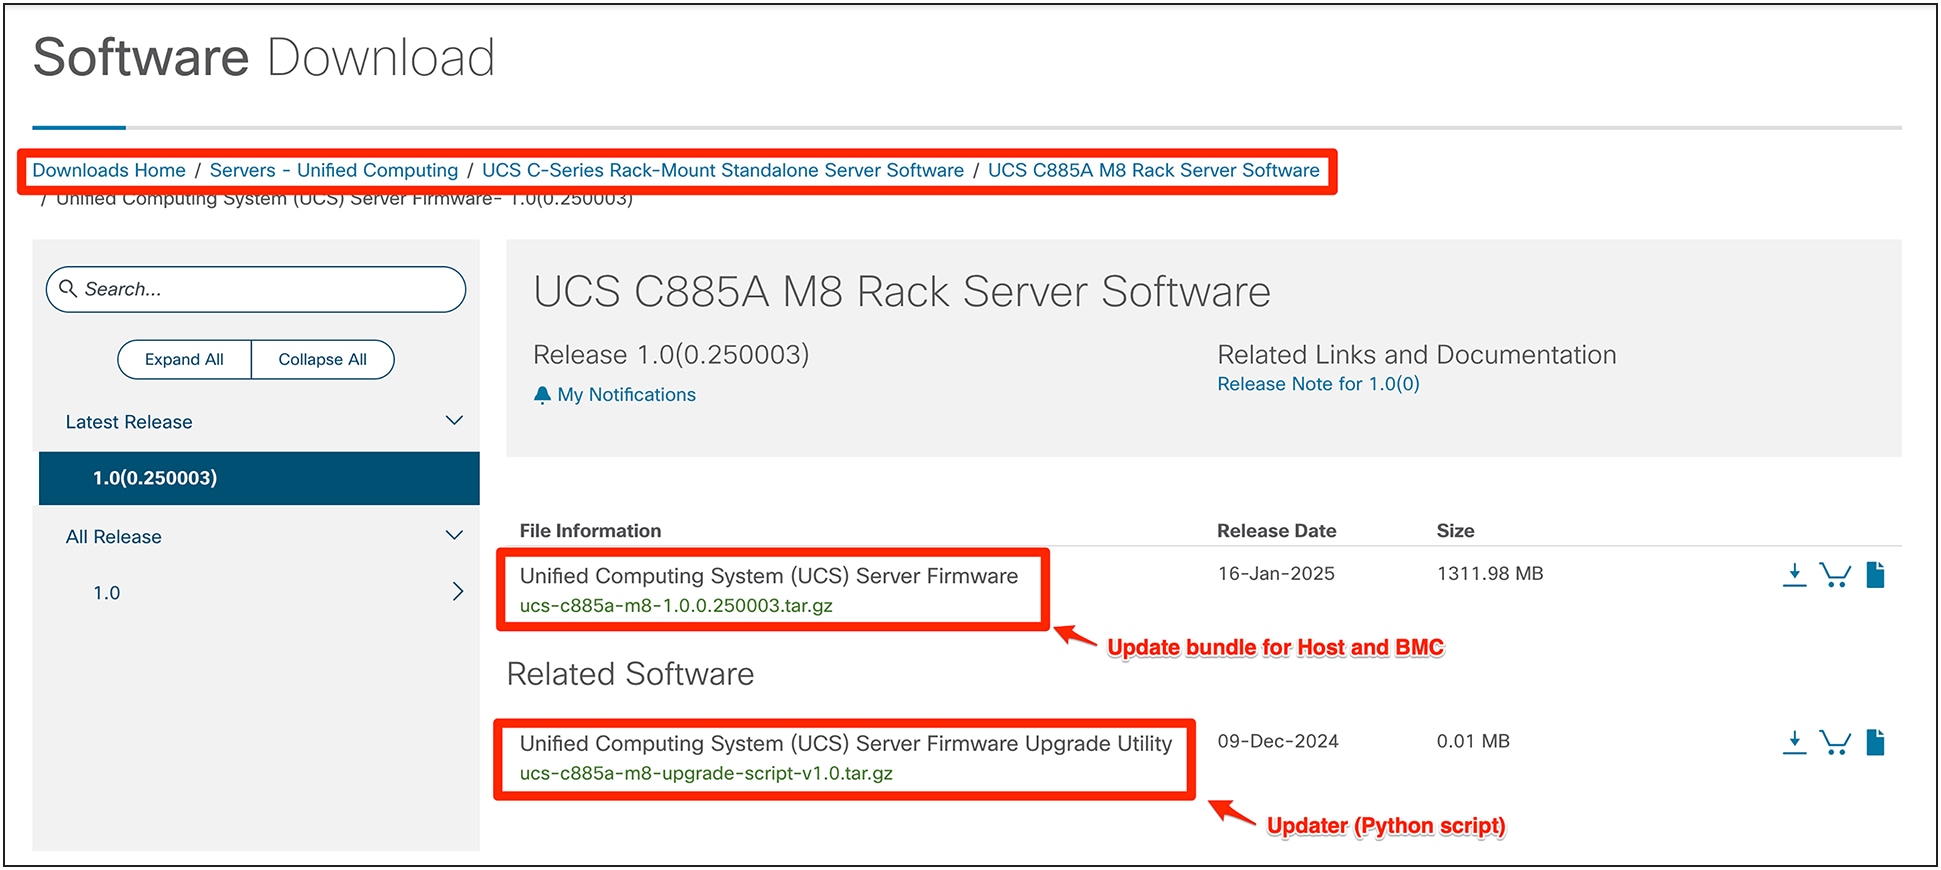
Firmware Download
2.2. Update bundle directory structure
Once downloaded, extract the firmware bundle. This bundle contains the necessary files for both out-of-band (OOB) and host-level component updates. Example:
$ tar xzvf ucs-c885a-m8-1.0.0.250003.tar.gz
Upon extraction, the bundle will typically have the directory structure shown in Figure 2, in which:
● host: contains networking drivers and firmware for components that are updated from within a host operating system (for example, NVMe drives and NVIDIA BlueField-3 cards). Each binary within this directory usually includes a README file with specific instructions.
● oob: contains firmware for out-of-band components such as the BIOS, BMC, and FPGA. This directory may contain different software versions based on specific hardware configurations.
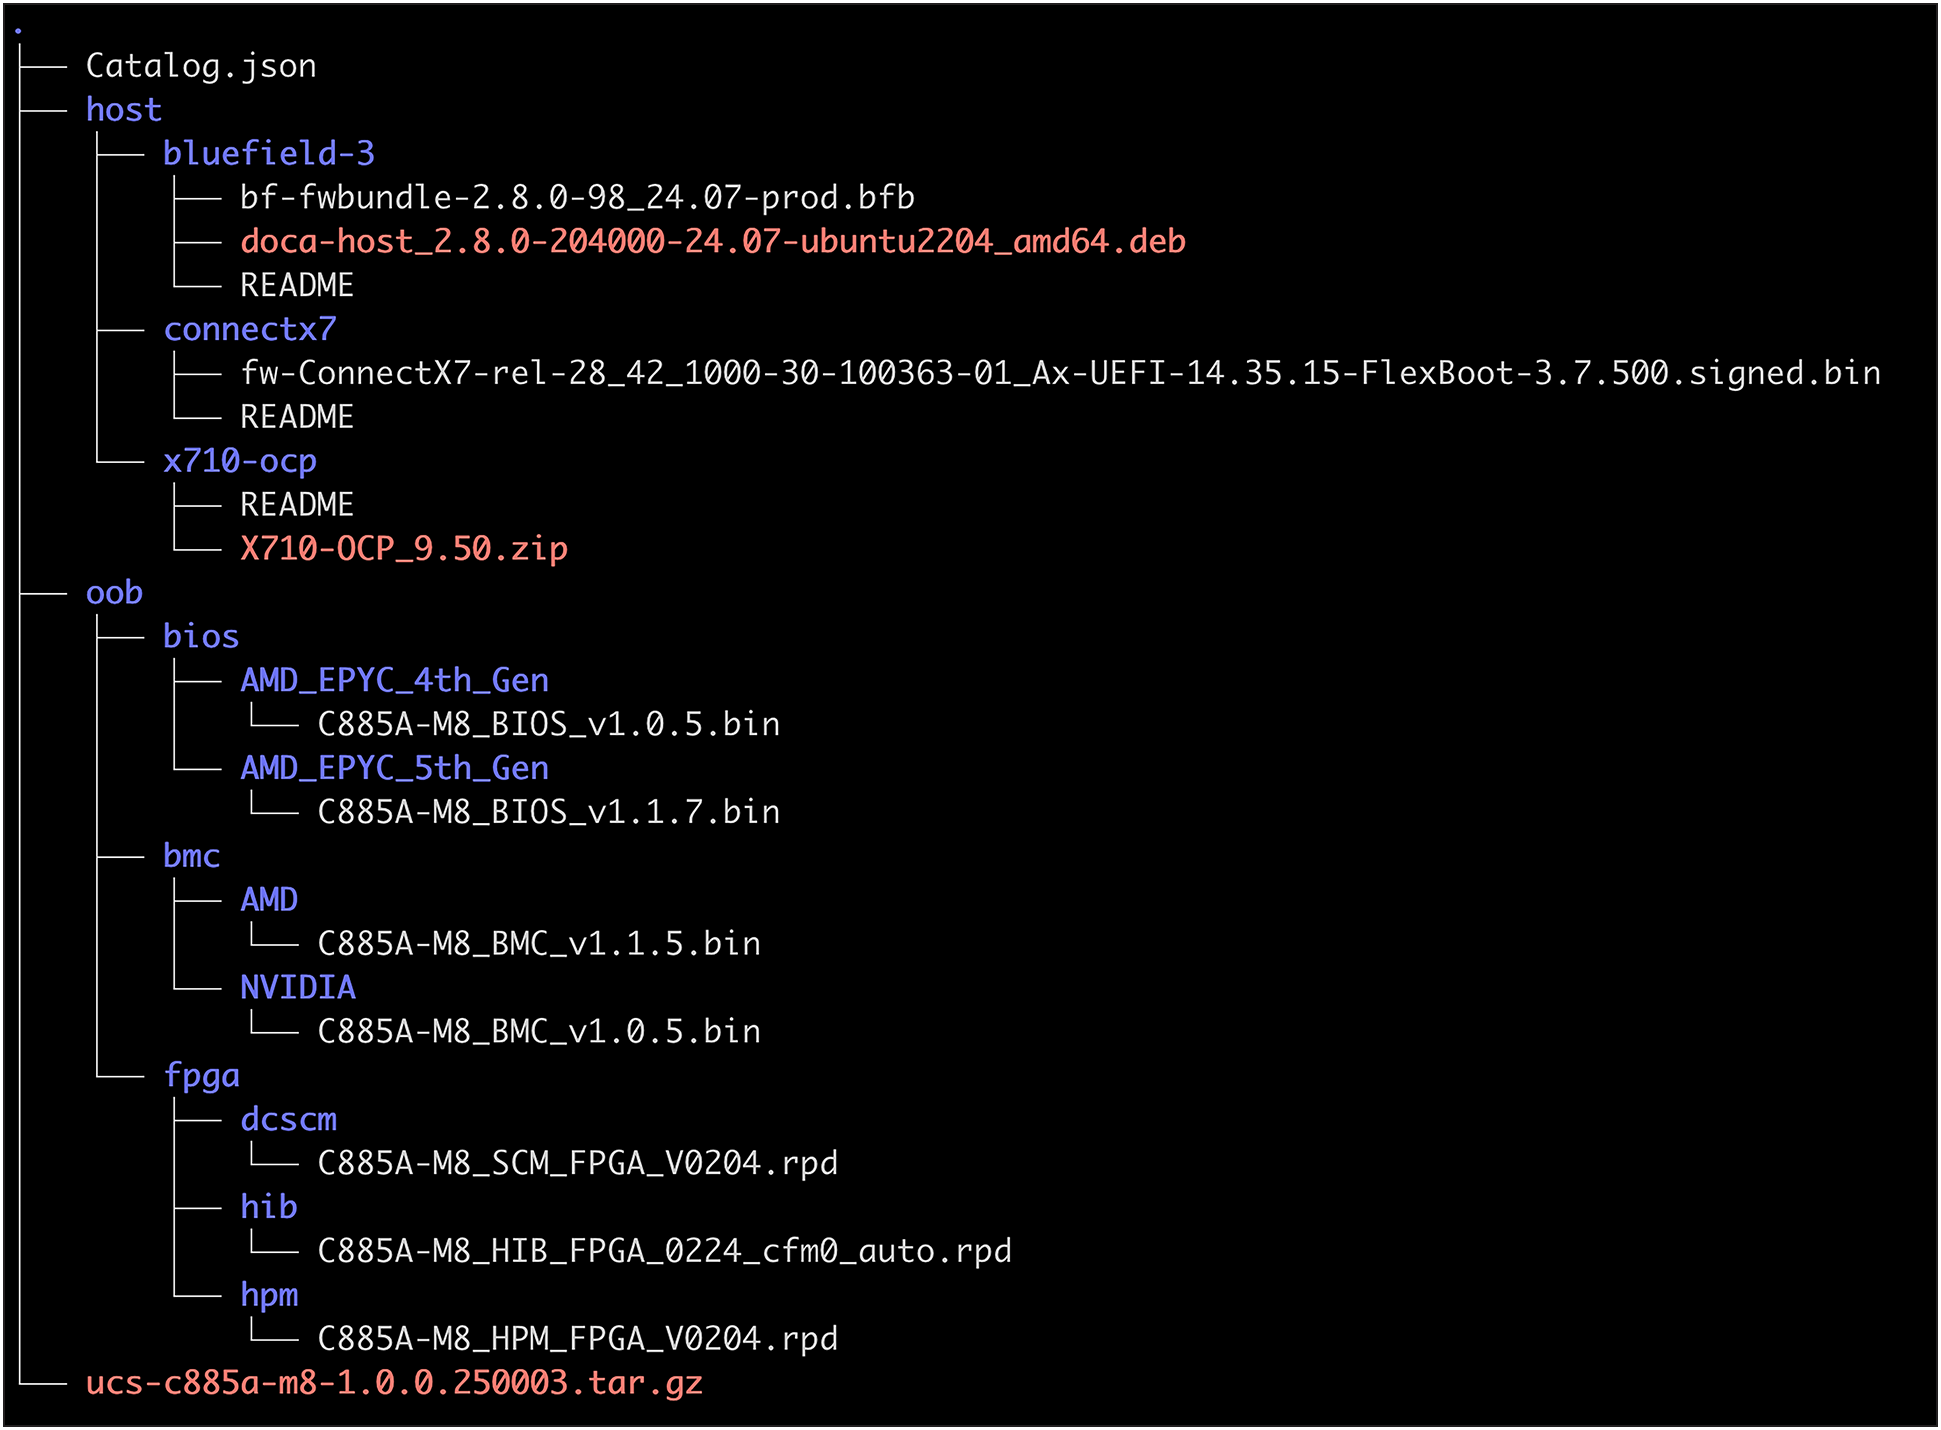
Firmware bundle structure
2.3. Upgrade script (out-of-band components)
The provided upgrade script is designed to update the out-of-band (OOB) components of the C885A M8 server, including the BMC, BIOS, GPU, and FPGA, using the Redfish API. This script is ideal for performing updates before an operating system is installed or when the host is powered off.
IMPORTANT CONSIDERATION: BIOS updates require the host to be powered down. This means you cannot launch the upgrade script from a host operating system that is running on the server you intend to upgrade. It must be run from a separate management workstation that has network access to the server's BMC IP address.
Prerequisites for the management workstation:
● Python: Version 3.1 or higher
● Python libraries: requests, beautifultable, urllib3. To install these, run:
◦ $ pip install requests beautifultable urllib3
Upgrade script: inventory test (optional, but recommended)
Before performing an update, you can run, optionally, an inventory test using the upgrade script. This test will identify which components require updates by comparing their currently running firmware versions with the versions included in the firmware bundle.
Command syntax:
$ python3 ucs-c885a-m8-upgrade-v1.2.py -U <BMC_USERNAME> -P <BMC_PASSWORD> -I <BMC_IP_ADDRESS> -B <FIRMWARE_BUNDLE_PATH>
Example:
$ python3 ucs-c885a-m8-upgrade-v1.2.py -U user -P password -I 10.0.0.1 -B ucs-c885a-m8-1.1.0.250022.tar.gz
Extracting firmware bundle... success
Validating BMC login details... success
Inventory started... success
Inventory Details
-----------------
IP : 10.0.0.1
Hostname : C885A-LLLYYWWSSSS
Board Serial : LLLYYWWSSSS
Product Name : C885A M8
Host Power State: Off
GPU Model :
+------+------------+--------------------+---------------------+-----------------+
| S.No | Component | Running FW version | Packaged FW Version | Update Required |
+------+------------+--------------------+---------------------+-----------------+
| 1 | BMC | 1.0.32 | 1.0.35 | Yes |
+------+------------+--------------------+---------------------+-----------------+
| 2 | BIOS | 1.0.32 | 1.0.35 | Yes |
+------+------------+--------------------+---------------------+-----------------+
| 3 | GPU | HGX-22.10-1-rc80 | HGX-22.10-1-rc80 | No |
+------+------------+--------------------+---------------------+-----------------+
| 4 | DCSCM-FPGA | 4.01 | 4.01 | No |
+------+------------+--------------------+---------------------+-----------------+
| 5 | MB-FPGA | 4.01 | 4.01 | No |
+------+------------+--------------------+---------------------+-----------------+
| 6 | HIB-FPGA | 6.0 | 6.0 | No |
+------+------------+--------------------+---------------------+-----------------+
Inventory completed successfully
Run the upgrade script
Once you have reviewed the inventory and are ready to proceed with the updates, run the upgrade script with the -F option to initiate the firmware flash process.
Command syntax:
$ python3 ucs-c885a-m8-upgrade-v1.2.py -U <BMC_USERNAME> -P <BMC_PASSWORD> -I <BMC_IP_ADDRESS> -B <FIRMWARE_BUNDLE_PATH> -F
Example:
$ python3 ucs-c885a-m8-upgrade-v1.2.py -U user -P password -I 10.0.0.1 -B ucs-c885a-m8-1.1.0.250022.tar.gz -F
Update Status
-------------
IP : 10.0.0.1
Hostname : C885A-LLLYYWWSSSS
Board Serial : LLLYYWWSSSS
Product Name : C885A M8
Host Power State: Off
GPU Model :
+------+------------+--------------------+---------------------+-----------------+---------------+-------------------+
| S.No | Component | Running FW version | Packaged FW Version | Update Required | Update Status | Update Percentage |
+------+------------+--------------------+---------------------+-----------------+---------------+-------------------+
| 1 | BMC | 1.0.32 | 1.0.35 | Yes | Triggered | 0 |
+------+------------+--------------------+---------------------+-----------------+---------------+-------------------+
| 2 | BIOS | 1.0.32 | 1.0.35 | Yes | Completed | 100 |
+------+------------+--------------------+---------------------+-----------------+---------------+-------------------+
| 3 | GPU | HGX-22.10-1-rc80 | HGX-22.10-1-rc80 | No | Skipped | - |
+------+------------+--------------------+---------------------+-----------------+---------------+-------------------+
| 4 | DCSCM-FPGA | 4.01 | 4.01 | No | Skipped | - |
+------+------------+--------------------+---------------------+-----------------+---------------+-------------------+
| 5 | MB-FPGA | 4.01 | 4.01 | No | Skipped | - |
+------+------------+--------------------+---------------------+-----------------+---------------+-------------------+
| 6 | HIB-FPGA | 6.0 | 6.0 | No | Skipped | - |
+------+------------+--------------------+---------------------+-----------------+---------------+-------------------+
Update completed successfully
The BIOS update has been completed successfully. Please power ON the host to activate.
The BMC update has been successfully triggered and will take approximately 15 minutes to complete. During this time, the HTTPS service will be unavailable.
Note: Please wait until the HTTPS service is restored.
Post-update actions
● BIOS update: If the BIOS was updated, the server will remain powered off. You must power on the host (using the BMC web UI or the Redfish API) to activate the new BIOS firmware.
● BMC update: The BMC update will proceed in the background. The BMC's web interface (HTTPS service) will be temporarily unavailable during this process (approximately 15 minutes). Wait for the service to be restored before attempting to access the BMC again.
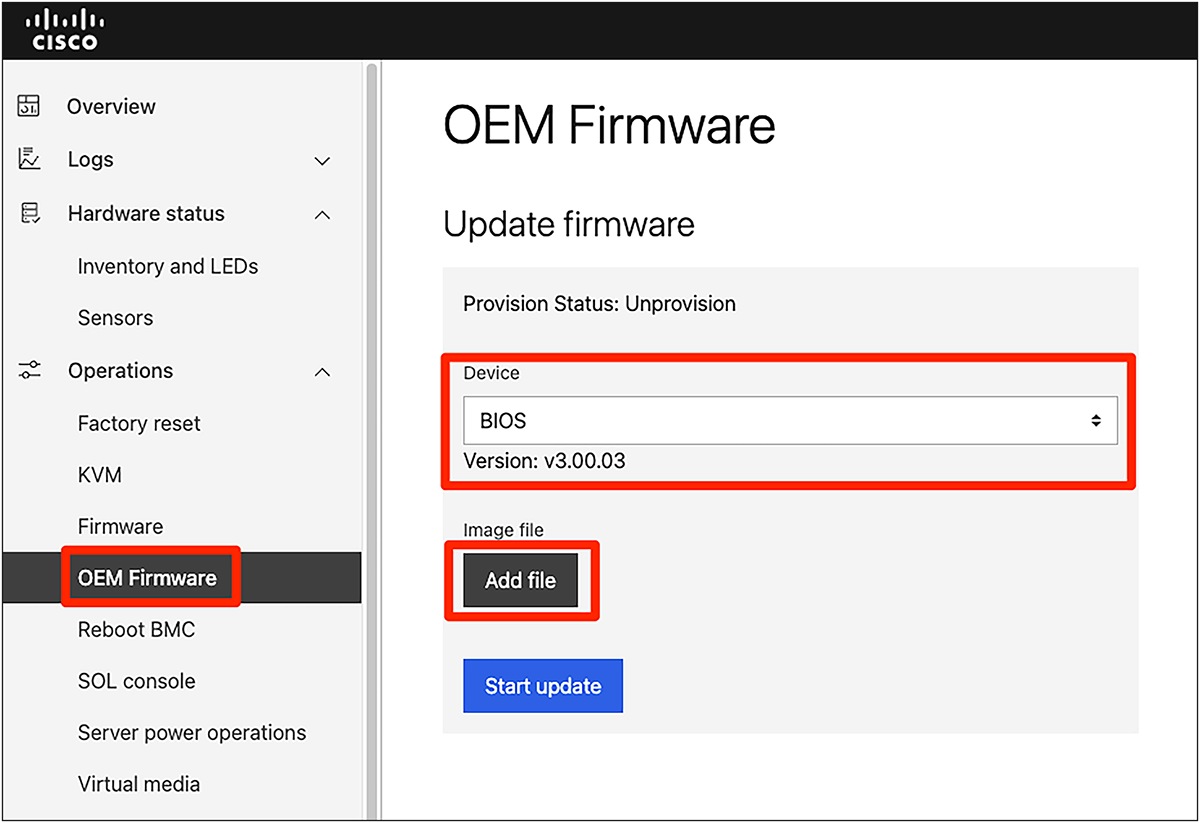
2.4. Manual update from the BMC web UI
In cases where a manual update is preferred or required, you can also update system components using the web user interface of the BMC.
Steps:
1. Access the BMC web interface by navigating to its IP address in your web browser.
2. Log in with your BMC credentials.
3. Navigate to the firmware update section. (The exact path may vary slightly depending on the BMC firmware version, but it is typically found under "Operations," "Firmware.")
4. Follow the on-screen instructions to upload the necessary firmware files (for example, for BMC, BIOS, or FPGA) from the extracted OOB directory of your firmware bundle.
Warning: The server needs to be power down to perform a BIOS update. Ensure that you are prepared for this interruption. If a host operating system were installed, you would perform a clean host shutdown before initiating a BIOS update through the BMC web UI.
BMC update

Firmware update from BMC
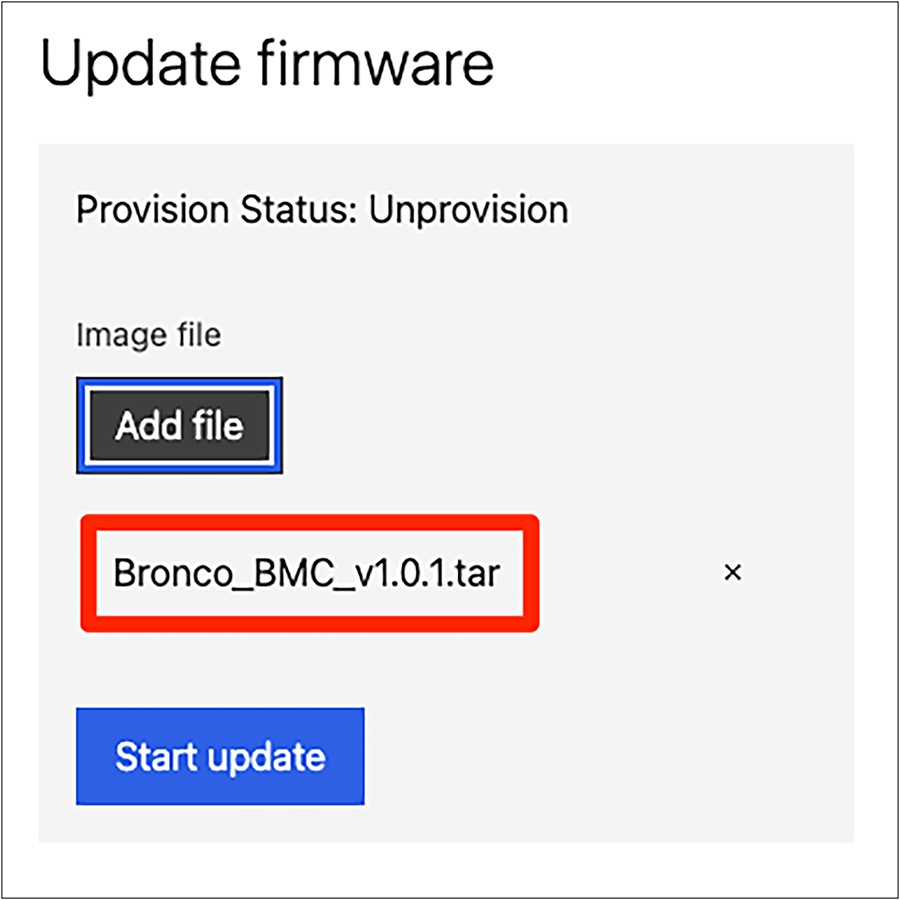
Firmware update image file selection
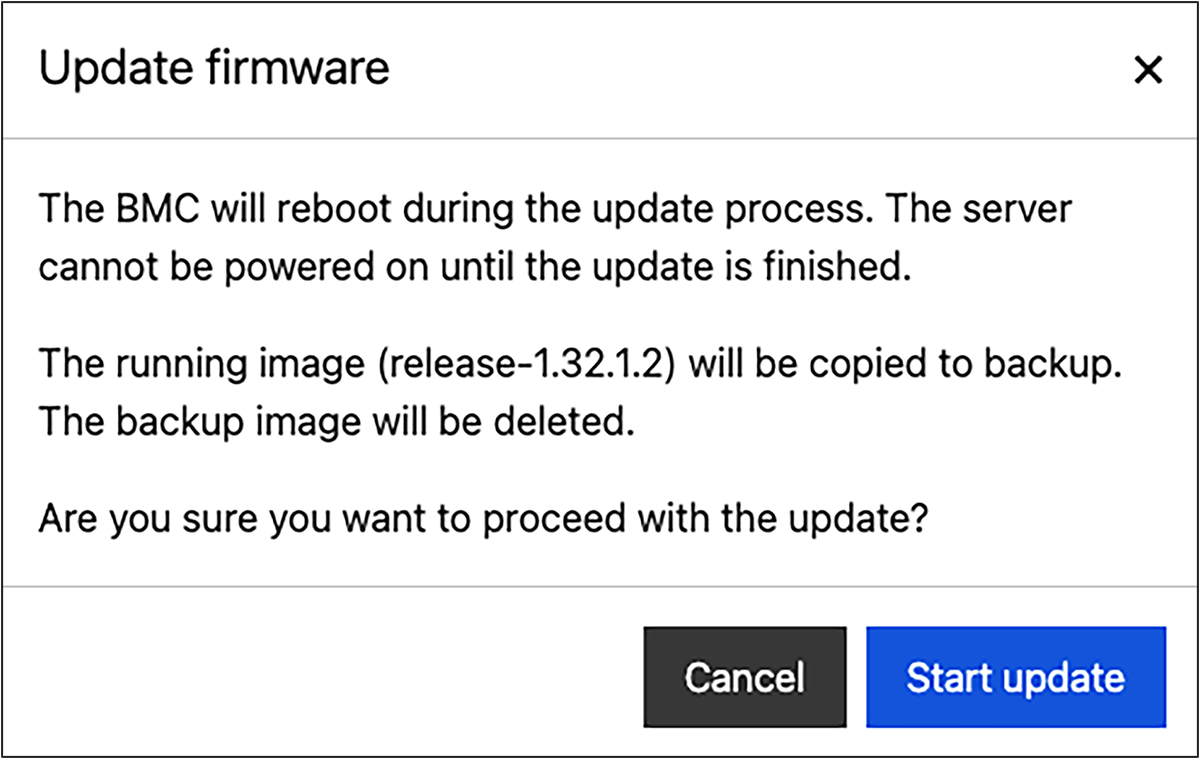
Update firmware confirm window
BIOS update
OEM firmware update from BM
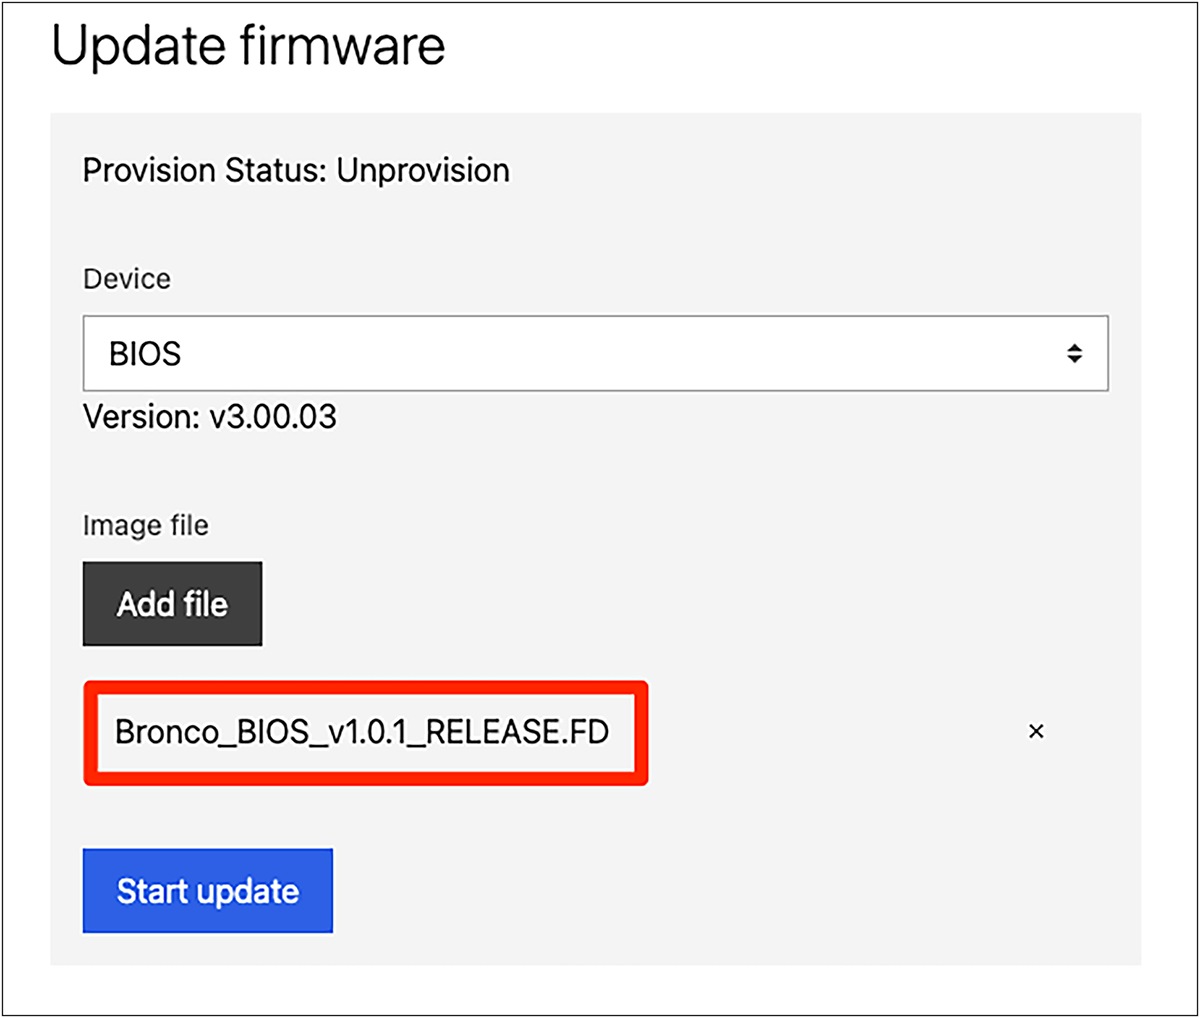
Device and image file selection screen
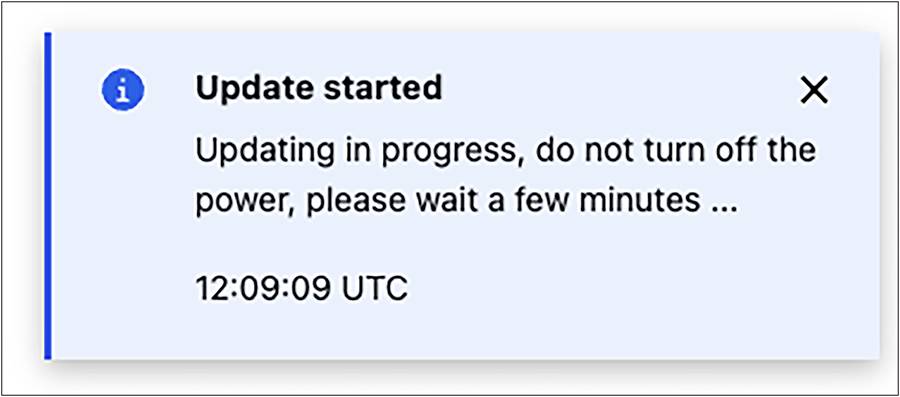
Firmware update status message

Firmware update status message
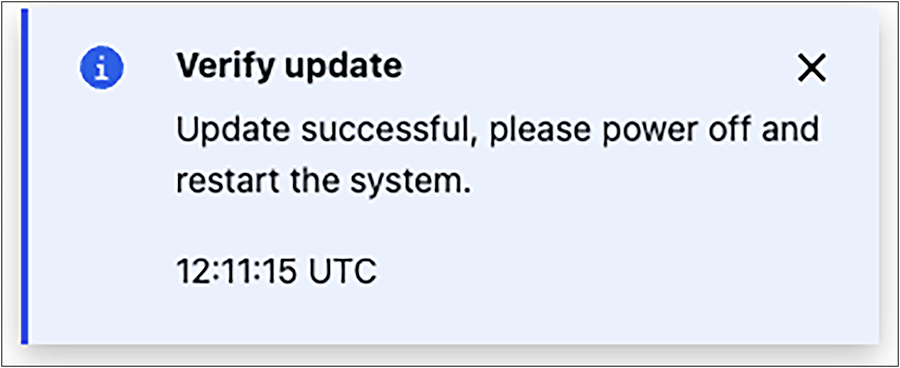
Firmware update status message

Server power operations
3. Host operating system installation
After successfully updating the server's foundational firmware components (BMC, BIOS, etc.) as described in Section 2, the next step is to install a supported host operating system (OS). This guide focuses on Ubuntu LTS versions, which are validated for the Cisco UCS C885A M8 Rack Server.
3.1. Supported operating systems
The Cisco UCS C885A M8 Rack Server is validated to support the following host operating systems, as of July 2025:
● Ubuntu Server 22.04 LTS
● Ubuntu Server 24.04 LTS
● Red Hat Enterprise Linux > 9.4
● Red Hat Enterprise Linux Core OS > 4.16
● VMware ESXi 8.0 U3
3.2. Prerequisites for OS installation
Before beginning the OS installation, ensure that you have the following:
● Operating system installation media: an ISO image of the desired operating system version
● BMC access: ensure that you have network access to the server's BMC IP address and login credentials, because the BMC KVM Console is the tool to use for remote OS installation.
● Network connectivity: basic network connectivity for the server, especially if performing a network-based installation or if the OS installer requires internet access for updates or package downloads.
3.3. Operating system install with BMC KVM
The BMC KVM (Keyboard, Video, Mouse) Console allows you to remotely view the server's console and interact with it as if you were physically present, including mounting virtual media for OS installation.
Steps:
1. Connect to the server BMC.
2. Go to "Operations," "Virtual Media."
3. Select a method to mount your ISO image:
◦ Load Image from a web browser: the image will be streamed from your workstation.
◦ Load image from external server: remotely mount the image from a CIFS or HTTPS location, reachable from the BMC.
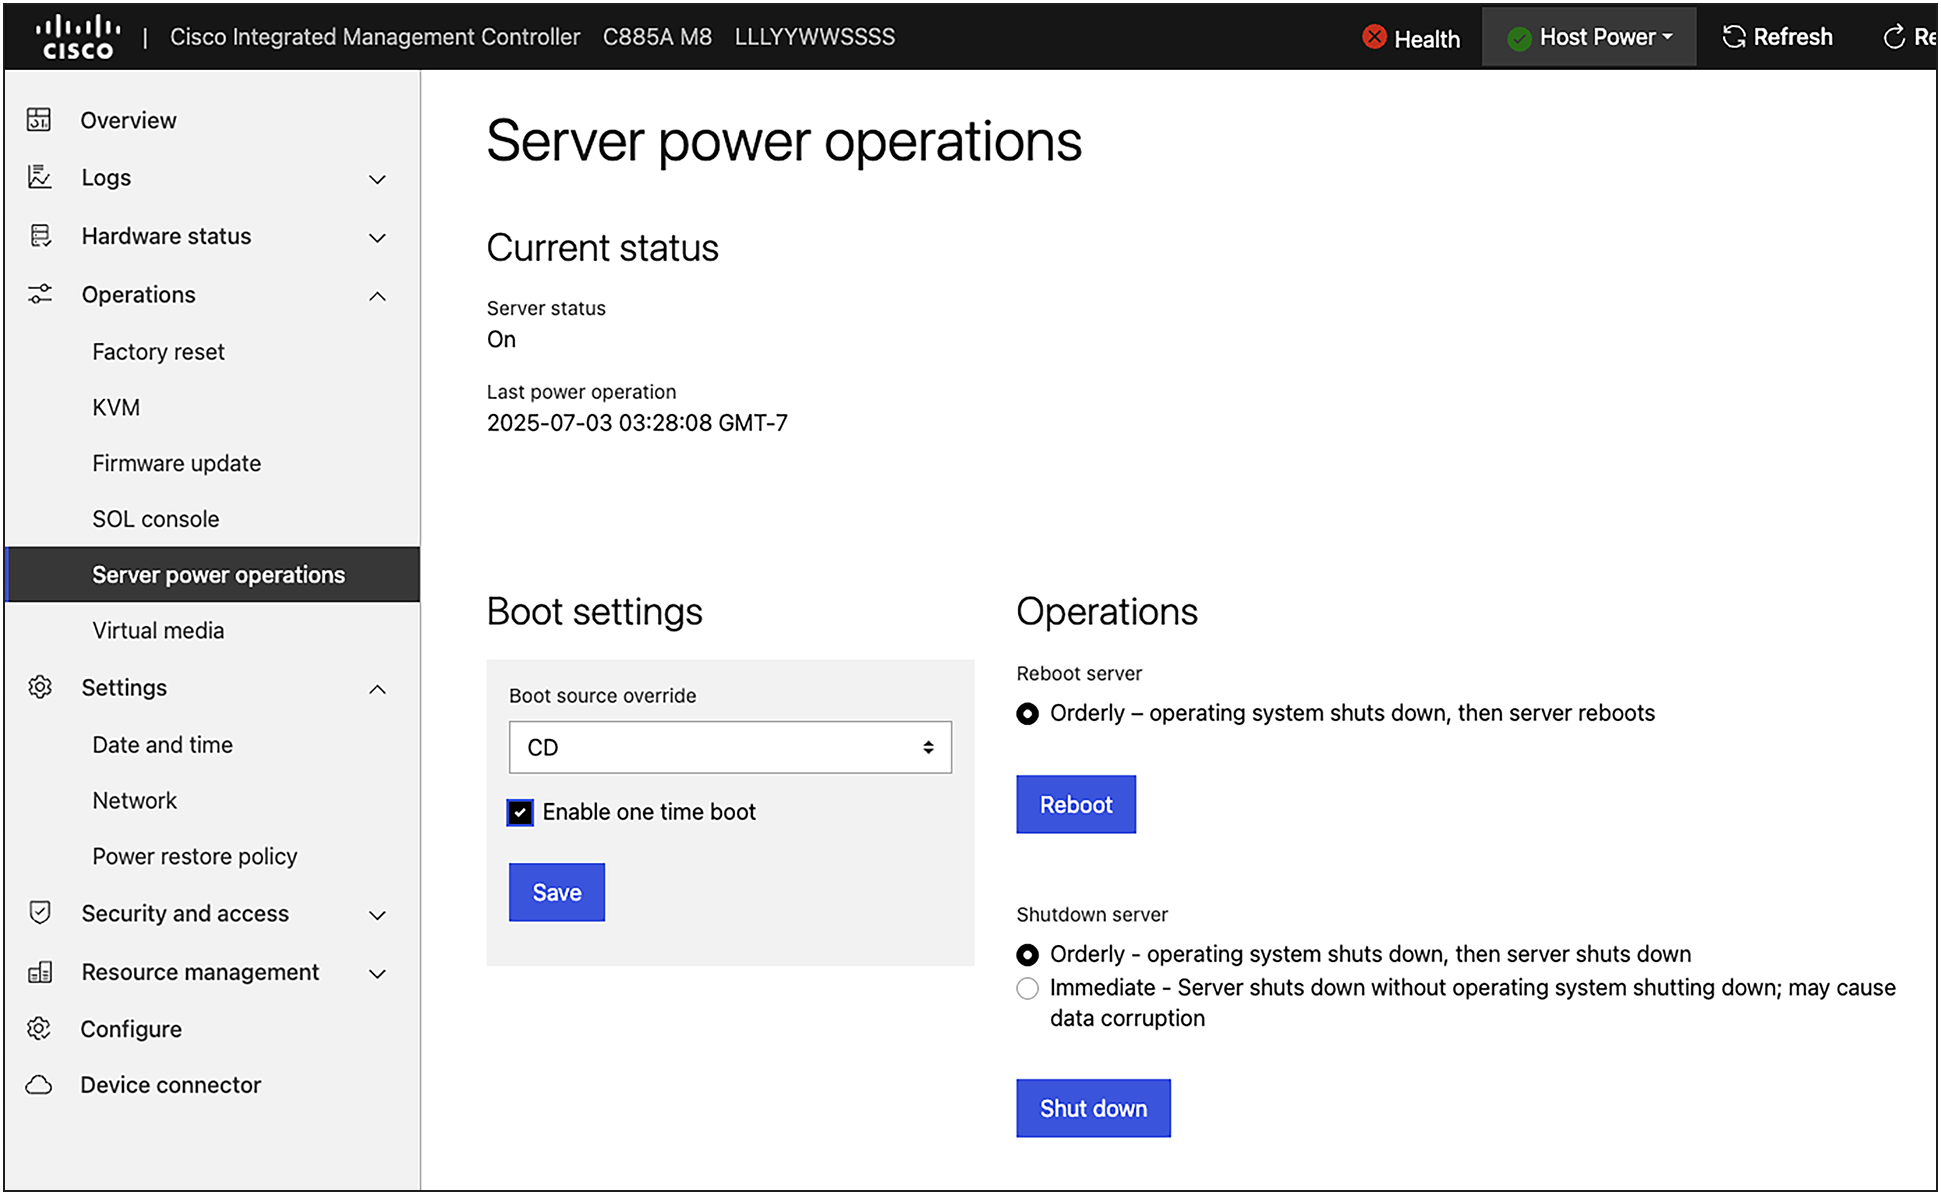
4. Under "Operations," "Server power operations," select "CD" as boot source override and check the "Enable one time boot" option. This will ensure the server will boot from the ISO image you have mapped
5. Reboot the server.
6. Under "Operations," "KVM," launch the KVM console and wait for the ISO image to boot.
7. Proceed normally with OS installation.
Note: It is recommended to host the image as close as possible to the server to avoid possible issues due to bandwidth constraints and/or high latency.
Server power operations, one time boot
3.4. Operating system install with PXE boot
For large-scale deployments or automated installations, you can leverage a PXE server to deploy the OS over the network. This method requires a preconfigured PXE environment on your network.
Steps:
1. Configure PXE server: ensure that your PXE environment is properly set up and ready to serve from the interface you want to boot from.
2. Configure server for network boot:
◦ Under "Operations," "KVM," launch the KVM console.
◦ Reboot the server and wait for the boot menu prompt instructions.
◦ Enter the boot menu by pressing ESC or F7.
◦ Select the interface you want to boot from.
3. Proceed normally with OS installation.
4. Software and driver downloads
This chapter provides a consolidated list of official sources for downloading the necessary software and drivers for your Cisco UCS C885A M8 Rack Server. Subsequent chapters will detail the installation procedures for these components.
4.1. Cisco host drivers image
Cisco provides comprehensive host driver images for the Cisco UCS C885A M8 Rack Server, consolidating necessary drivers and utilities for various operating systems. These images can be downloaded from the official Cisco® software download site (software.cisco.com).
To obtain and utilize these images:
1. Download the ISO: navigate to software.cisco.com and search for "Cisco UCS C885A M8" to find and download the appropriate host driver ISO image for your operating system (for example, Linux or VMware).
2. Mount the ISO: once downloaded, mount the ISO image onto your host operating system. For Linux, this can typically be done with a command such as:
$ sudo mkdir -p /mnt/drivers
$ sudo mount -o loop <downloaded_iso_file.iso> /mnt/drivers
3. Access drivers: navigate to the mounted directory to access the organized driver packages.
Important considerations:
● Content: the host driver images include drivers for Linux (supporting RHEL/CoreOS and Ubuntu distributions) and VMware.
● Third-party software: while the ISO provides a structured way to access drivers, not all third-party software binaries are directly included due to redistribution limitations. Some folders within the ISO contain README.html files or direct links to specific software versions that Cisco has tested and validated.
● Version support: these linked versions represent the configurations tested by Cisco. However, the system generally supports newer versions of drivers and software as they become available from the respective vendors. Users are encouraged to obtain the latest or specific required versions from official vendor websites if not directly provided in the ISO.
Example Linux driver directory structure:
The Linux host driver ISO typically presents a directory structure similar to this:
├── Network
│ └── nVIDIA
│ └── MCX7
│ ├── RHEL
│ │ ├── RHEL9.4
│ │ │ └── README.html
│ │ └── RHELcoreos
│ │ └── README.html
│ └── Ubuntu
│ ├── Ubuntu22.04LTS
│ │ └── README.html
│ └── Ubuntu24.04LTS
│ └── README.html
├── release.txt
├── Storage
│ ├── Broadcom
│ │ └── UCS-M2-NVRAID
│ │ ├── RHEL
│ │ │ ├── RHEL9.4
│ │ │ │ └── README.html
│ │ │ └── RHELcoreos
│ │ │ └── README.html
│ │ └── Ubuntu
│ │ ├── Ubuntu22.04LTS
│ │ │ └── README.html
│ │ └── Ubuntu24.04LTS
│ │ └── README.html
│ └── Kioxia
│ └── UCS-NVDxxxxxxxx
│ ├── RHEL
│ │ ├── RHEL9.4
│ │ │ └── README.html
│ │ └── RHELcoreos
│ │ └── README.html
│ └── Ubuntu
│ ├── Ubuntu22.04LTS
│ │ └── README.html
│ └── Ubuntu24.04LTS
│ └── README.html
├── tag.txt
└── Video
├── AMD
│ └── UCSC-GPU-MI210
│ ├── RHEL
│ │ ├── RHEL9.4
│ │ │ └── README.html
│ │ └── RHELcoreos
│ │ └── README.html
│ └── Ubuntu
│ ├── Ubuntu22.04LTS
│ │ └── README.html
│ └── Ubuntu24.04LTS
│ └── README.html
└── nVIDIA
└── Tesla_Hx
├── RHEL
│ ├── RHEL9.4
│ │ └── nvidia-driver-local-repo-rhel9-570.86.15-1.0-1.x86_64.rpm
│ └── RHELcoreos
│ └── nvidia-driver-local-repo-rhel9-570.86.15-1.0-1.x86_64.rpm
└── Ubuntu
├── Ubuntu22.04LTS
│ └── nvidia-driver-local-repo-ubuntu2204-570.86.15_1.0-1_arm64.deb
└── Ubuntu24.04LTS
└── nvidia-driver-local-repo-ubuntu2404-570.86.15_1.0-1_amd64.deb
These downloads are relevant for general host-level components:
● Intel Ethernet Network Adapter 700 Series NVM update utility:
◦ Source: Intel Support website
4.2. NVIDIA GPU stack downloads
These downloads are specific to NVIDIA GPU drivers and compute platforms.
● NVIDIA DOCA-Host Installer (for NVIDIA BlueField-3 DPUs/SuperNICs)
◦ Source: NVIDIA Developer website
◦ https://developer.nvidia.com/doca-downloads
◦ Note: MLNX_OFED last standalone release is October 2024 Long Term Support (3 years). Starting January 2025, all new features will only be included in DOCA-OFED.
● NVIDIA GPU drivers (NVIDIA Data Center Drivers):
◦ Source: NVIDIA Official Drivers website
◦ Example URL: www.nvidia.com/drivers (Search for your specific GPU model and OS.)
● NVIDIA CUDA Toolkit:
◦ Source: NVIDIA Developer website
◦ Example URL: developer.nvidia.com/cuda-toolkit (Select your specific OS and version.)
4.3. AMD GPU stack downloads
These downloads are specific to AMD GPU drivers and compute platforms (ROCm).
AMD ROCm platform:
● Source: AMD ROCm GitHub Repository and AMD Radeon APT Repository
● The installation process involves adding an APT repository, which pulls the necessary packages. No direct .deb download is typically required for the main stack.
● GPG Key URL: https://repo.radeon.com/rocm/rocm.gpg.key
● Driver and ROCm installation guide: https://instinct.docs.amd.com/projects/amdgpu-docs/en/latest/install/detailed-install/package-manager/package-manager-ubuntu.html
RCCL tests (source code for benchmarking):
● Source: ROCm GitHub Repository
● URL: https://github.com/ROCm/rccl-tests.git (This is the github repository which will be cloned and built from source)
5. Post-OS host component configuration and updates
With the host operating system successfully installed and basic network connectivity established, you can now proceed with configuring and updating the server's various host-level components.
This chapter covers the configuration and updates for various host-level components that are not directly part of the GPU software stack, such as network interface cards (Intel Ethernet Network Adapter X710 cards) and east/west / north/south networking.
5.1. Prerequisites
Before proceeding with the updates, ensure the following:
● Supported OS: Ubuntu 22.04 LTS or 24.04 LTS is installed and running.
● A sudo user (a user capable of running commands with root privileges) can be used.
● Required packages: package “nvme-cli,” “dracut” (or “initramfs-tools”), “unzip,” and “screen” (or “tmux”) are installed (not mandatory but highly recommended).
● Internet connectivity: the host OS is manageable and connected to the internet (with or without proxy) to download necessary packages and drivers.
● System up-to-date: all system packages are updated and repositories synchronized.
◦ apt update ; apt upgrade -y
● NICs and/or DPUs visibility: confirm that your network interface cards (NICs) and/or data-processing units (DPUs) are properly placed and visible from the host OS.
◦ $ lspci | grep -Ei "ethernet|infiniband"
5.2. Use of “screen” or "tmux" on Linux (optional, but recommended)
Since many firmware updates and software installations can be lengthy processes, it is highly recommended to perform these operations within a persistent terminal session provided by utilities such as screen or tmux. This prevents session loss due to network interruptions (for example, SSH disconnection) and allows you to detach from the session and reattach later.
Example for screen:
Start a screen session:
$ screen
Show all running sessions:
$ screen -ls
There is a screen on:
12572.pts-0.sephiroth (10/27/2024 07:45:13 PM) (Attached)
1 Socket in /run/screen/S-rtortori.
Resume a session:
$ screen -r 12572
Alternatively, to start a tmux session:
$ tmux
Refer to the respective documentation for more advanced screen or tmux commands.
5.3. Update Intel Ethernet Network Adapter X710 card
Update Intel Ethernet Network Adapter X710 card (downloaded from intel.com).
Open a screen session or a tmux session (optional):
$ screen
Or:
$ tmux
Navigate to the directory where you downloaded the Intel Ethernet NVM Update Tool.
Extract Intel Ethernet NVM Update Tool for Linux (change the zip file name as required).
$ unzip 700Series_NVMUpdatePackage_v9_53.zip
$ tar xzvf 700Series_NVMUpdatePackage_v9_53_Linux.tar.gz && cd 700Series/Linux_x64
Run the updater and confirm if the firmware is not up to date:
$ sudo ./nvmupdate64e
Intel(R) Ethernet NVM Update Tool
NVMUpdate version 1.42.24.2
Copyright(C) 2013 - 2024 Intel Corporation.
WARNING: To avoid damage to your device, do not stop the update or reboot or power off the system during this update.
Inventory in progress. Please wait [***|......]
Num Description Ver.(hex) DevId S:B Status
=== ================================== ============ ===== ====== ==============
01) Intel(R) Ethernet Network Adapter 9.80(9.50) 1572 00:210 Update
X710-2 for OCP NIC 3.0 available
Options: Adapter Index List (comma-separated), [A]ll, e[X]it
Update the Intel X710 card (using the utility from the firmware bundle):
Open a screen session or a tmux session (optional):
$ screen
Or:
$ tmux
Navigate to the directory where the firmware bundle is located, extract the .zip file, and initiate update:
$ sudo ./nvmupdate64e -a PCIe_X710-T2L-OCP3/ -u -l -c nvmupdate.cfg
Intel(R) Ethernet NVM Update Tool
NVMUpdate version 1.42.8.0
Copyright(C) 2013 - 2024 Intel Corporation.
Config file read.
[…]
Inventory
[00:210:00:00]: Intel(R) Ethernet Network Adapter X710-T2L for OCP 3.0
Flash inventory started.
[…]
OROM inventory finished.
[00:210:00:01]: Intel(R) Ethernet Network Adapter X710-TL
Device already inventoried.
Update
[00:210:00:00]: Intel(R) Ethernet Network Adapter X710-T2L for OCP 3.0
Flash update started.
|======================[ 90%]================>.....|
[…]
5.4. Installing prerequisites on host for NVIDIA BlueField-3 DPUs/SuperNICs (Cisco UCS C885A M8 Rack Server NVIDIA GPUs only)
To work with NVIDIA BlueField-3 DPUs, you need to install specific NVIDIA DOCA components and utilities.
Navigate to the directory where you downloaded the DOCA-Host Installer and unpack the docahost repo:
$ cd ~/drivers #replace with the right directory where the doca-host deb file is located
$ sudo dpkg -i doca-host_2.8.0-204000-24.07-ubuntu2204_amd64.deb
Install, start, and enable at boot rshim:
$ sudo apt update && sudo apt install -y rshim pv
$ sudo systemctl daemon-reload
$ sudo systemctl start rshim
$ sudo systemctl enable rshim
Install local doca repo package. Restart openibd and mst.
Note: This will attempt a firmware update on all supported interfaces. Use of screen/tmux is recommended.
$ sudo apt update && sudo apt install doca-all mlnx-fw-updater
$ sudo /etc/init.d/openibd restart
$ sudo mst restart
Reboot the system, then verify that rshim is running and can see the devices:
$ sudo reboot
After reboot, verify:
$ ls /dev/ | grep rshim
rshim0
[…]
5.5. Update SuperNICs/DPUs (NVIDIA B3220, B3140H, and Connect-X7)
You can update SuperNICs/DPUs using the mlxup utility or by leveraging the firmware bundle provided by Cisco.
Using mlxup:
● Download mlxup
◦ Navigate to: https://network.nvidia.com/support/firmware/mlxup-mft/ and download the mlxup version of your choice.
◦ Example: $ wget https://www.mellanox.com/downloads/firmware/mlxup/4.29.0/SFX/linux_x64/mlxup
● Change permissions and execute the mlxup firmware utility. If a new firmware is required, the user will be prompted for an action:
◦ $ chmod +x mlxup
◦ $ sudo ./mlxup
● By default, if needed, all cards will be updated. Please refer to the documentation for additional information on how to selectively update firmware or update pulling the latest version from NVIDIA. You can, optionally, use local files, which are within the firmware bundle downloaded from Cisco.com:
● https://docs.nvidia.com/networking/display/mlxupfwutility
● Note: Updating all of the cards can take a long time. Using tmux or screen is recommended because, in that case, the session won’t run in foreground.
Using a firmware bundle:
Alternatively, you can use the firmware files provided within the Cisco UCS C885A M8 Rack Server update bundle for NVIDIA BlueField-3 and NVIDIA ConnectX-7 devices.
Steps:
1. Navigate to ./host/bluefield-3 and ./host/connectx7 directories.
2. Follow the instructions in the README file.
3. IMPORTANT: As of July 2025, only Ubuntu 22.04 LTS and 24.04 LTS have been tested.
5.6. Query SuperNICs and DPUs
To quickly view the status of all SuperNICs/DPUs and their firmware versions against the latest available from NVIDIA, you can use a simple bash script.
In the same directory where you downloaded mlxup, create a file named mlxup_query.sh with the following content:
#!/bin/bash
# Execute the mlxup query command and store the output
output=$(sudo ./mlxup --query --online)
# Check if mlxup command returned any output
if [ -z "$output" ]; then
echo "Error: mlxup --query --online returned no output or an error occurred. Please check the mlxup utility and its permissions."
exit 1
fi
# Use awk to parse the output and format it into a table
echo "$output" | awk '
BEGIN {
# Print header
print "PCI Device Name\tDescription\tStatus";
print "---------------\t-----------\t------";
pci_device_name = "";
description = "";
status = "";
}
# Capture PCI Device Name
/PCI Device Name:/ {
# Remove "PCI Device Name:" and any leading/trailing whitespace
pci_device_name = $0;
sub(/^[ \t]*PCI Device Name:[ \t]*/, "", pci_device_name);
gsub(/^[ \t]+|[ \t]+$/, "", pci_device_name); # Trim any remaining leading/trailing whitespace
}
# Capture Description
/Description:/ {
# Remove "Description:" and any leading/trailing whitespace
description = $0;
sub(/^[ \t]*Description:[ \t]*/, "", description);
# Take only the part before the first semicolon, as in your original script
split(description, desc_parts, ";");
description = desc_parts[1];
gsub(/^[ \t]+|[ \t]+$/, "", description); # Trim any remaining leading/trailing whitespace
}
# Capture Status and print the collected data
/Status:/ {
# Remove "Status:" and any leading/trailing whitespace
status = $0;
sub(/^[ \t]*Status:[ \t]*/, "", status);
gsub(/^[ \t]+|[ \t]+$/, "", status); # Trim any remaining leading/trailing whitespace
# Print the collected data for the current device
print pci_device_name "\t" description "\t" status;
# Reset variables for the next device block
pci_device_name = "";
description = "";
status = "";
}
' | column -t -s $'\t'
Change permissions and execute to have a quick view of all SuperNICs/DPUs and their status. It will check against the latest version available from NVIDIA:
$ chmod +x mlxup_query.sh
$ ./mlxup_query.sh
PCI Device Name Description Status
--------------- ----------- ------
/dev/mst/mt41692_pciconf8 Nvidia BlueField-3 B3140H E-series HHHL SuperNIC Up to date
/dev/mst/mt41692_pciconf7 Nvidia BlueField-3 B3140H E-series HHHL SuperNIC Up to date
/dev/mst/mt41692_pciconf6 Nvidia BlueField-3 B3140H E-series HHHL SuperNIC Up to date
/dev/mst/mt41692_pciconf5 Nvidia BlueField-3 B3140H E-series HHHL SuperNIC Up to date
/dev/mst/mt41692_pciconf4 Nvidia BlueField-3 B3140H E-series HHHL SuperNIC Up to date
/dev/mst/mt41692_pciconf3 Nvidia BlueField-3 B3140H E-series HHHL SuperNIC Up to date
/dev/mst/mt41692_pciconf2 NVIDIA BlueField-3 B3240 P-Series Dual-slot FHHL DPU Up to date
/dev/mst/mt41692_pciconf1 Nvidia BlueField-3 B3140H E-series HHHL SuperNIC Up to date
/dev/mst/mt41692_pciconf0 Nvidia BlueField-3 B3140H E-series HHHL SuperNIC Up to date
5.7. Change interface mode to Infiniband or Ethernet
NVIDIA BlueField-3 DPUs can operate in either Infiniband or Ethernet mode. You can check and change the mode using mlxconfig.
Run the following command. (Interfaces starting with "ibs" are running in Infiniband mode, whereas interfaces starting with "ens" run in Ethernet mode.)
$ sudo lshw -C network -short
H/W path Device Class Description
=====================================================================
/0/100/1.1/0/1/0 ens204f0np0 network MT43244 BlueField-3 integrated ConnectX-7 network controller
/0/117/1.1/0/3/0 ens203f0np0 network MT43244 BlueField-3 integrated ConnectX-7 network controller
/0/11e/1.1/0/2/0 ibs211f0 network MT43244 BlueField-3 integrated ConnectX-7 network controller
/0/11e/1.1/0/2/0.1 ibs211f1 network MT43244 BlueField-3 integrated ConnectX-7 network controller
/0/11e/1.1/0/3/0 ens201f0np0 network MT43244 BlueField-3 integrated ConnectX-7 network controller
/0/125/1.1/0/1/0 ens202f0np0 network MT43244 BlueField-3 integrated ConnectX-7 network controller
/0/12c/1.1/0/5/0 ens207f0np0 network MT43244 BlueField-3 integrated ConnectX-7 network controller
/0/133/1.1/0/1/0 ens208f0np0 network MT43244 BlueField-3 integrated ConnectX-7 network controller
/0/13a/1.1/0/2/0 ens206f0np0 network MT43244 BlueField-3 integrated ConnectX-7 network controller
/0/13a/3.1/0 ens21f0 network Ethernet Controller X710 for 10GbE SFP+
/0/13a/3.1/0.1 ens21f1 network Ethernet Controller X710 for 10GbE SFP+
/0/141/1.1/0/4/0 ens205f0np0 network MT43244 BlueField-3 integrated ConnectX-7 network controller
/a enxc60fa3e9679a network Ethernet interface
Ensure mst is started:
$ sudo mst status
MST modules:
------------
MST PCI module is not loaded
MST PCI configuration module is not loaded
[…]
$ sudo mst start
Starting MST (Mellanox Software Tools) driver set
Loading MST PCI module - Success
Loading MST PCI configuration module - Success
Create devices
Unloading MST PCI module (unused) – Success
Identify the MST name for the interfaces you want to convert:
$ sudo mst status -v
MST modules:
------------
MST PCI module is not loaded
MST PCI configuration module loaded
PCI devices:
------------
DEVICE_TYPE MST PCI RDMA NET
[…]
BlueField3(rev:1) /dev/mst/mt41692_pciconf2.1 45:00.1 mlx5_2 net-ibs211f1
BlueField3(rev:1) /dev/mst/mt41692_pciconf2 45:00.0 mlx5_1 net-ibs211f0
BlueField3(rev:1) /dev/mst/mt41692_pciconf1 2b:00.0 mlx5_5 net-ens203f0np0
[…]
In this case, for a B3220 which has two interfaces, MST is /dev/mst/mt41692_pciconf2.
If you want to convert an interface to Ethernet mode, change the LINK_TYPE for both ports to “2” (Ethernet).
To convert an Ethernet interface to Infiniband mode, change the LINK_TYPE for both ports to “1” (Infiniband).
$ sudo mlxconfig -d /dev/mst/mt41692_pciconf2 set LINK_TYPE_P1=2 LINK_TYPE_P2=2
Device #1:
----------
Device type: BlueField3
Name: 900-9D3B6-00SN-A_Ax
Description: NVIDIA BlueField-3 B3240 P-Series Dual-slot FHHL DPU; 400GbE / NDR IB (default mode); Dual-port QSFP112; PCIe Gen5.0 x16 with x16 PCIe extension option; 16 Arm cores; 32GB on-board DDR; integrated BMC; Crypto Disabled
Device: /dev/mst/mt41692_pciconf2
Configurations: Next Boot New
LINK_TYPE_P1 IB(1) ETH(2)
LINK_TYPE_P2 IB(1) ETH(2)
Apply new Configuration? (y/n) [n] : y
Applying... Done!
-I- Please reboot machine to load new configurations.
While the output suggests rebooting the system, DPUs will NOT reset even if the host is rebooted. You have to perform a complete host power cycle; that is, shut it down and power it back on.
Alternatively, you can gracefully shut down Bluefield ARM cores following the procedure given below.
Gracefully shut down Bluefield ARM cores. (The following procedure will gracefully shutdown BF ARM cores without rebooting the host OS.)
$ sudo mlxfwreset -d /dev/mst/mt41692_pciconf2 -l 1 -t 4 r
The reset level for device, /dev/mst/mt41692_pciconf2 is:
1: Only ARM side will not remain up ("Immediate reset").
Please be aware that resetting the Bluefield may take several minutes. Exiting the process in the middle of the waiting period will not halt the reset.
The ARM side will be restarted, and it will be unavailable for a while.
Continue with reset?[y/N] y
-I- Sending Reset Command To Fw -Done
-I- FW was loaded successfully.
Warm reboot of the interface and host reboot:
The following procedure will perform a warm reboot of the interface, then send a reboot command to the host OS:
$ sudo mlxfwreset -d /dev/mst/mt41692_pciconf2 -l 4 r
The reset level for device, /dev/mst/mt41692_pciconf2 is:
4: Warm Reboot
Please be aware that resetting the Bluefield may take several minutes. Exiting the process in the middle of the waiting period will not halt the reset.
The ARM side will be restarted, and it will be unavailable for a while.
Continue with reset?[y/N] y
-I- Sending Reset Command To Fw -Done
-I- Sending reboot command to machine -
Check that the interfaces are now in the expected state after the necessary power cycle or reset:
$ sudo lshw -C network -short
H/W path Device Class Description
=====================================================================
/0/100/1.1/0/1/0 ens204f0np0 network MT43244 BlueField-3 integrated ConnectX-7 network controller
/0/117/1.1/0/3/0 ens203f0np0 network MT43244 BlueField-3 integrated ConnectX-7 network controller
/0/11e/1.1/0/2/0 ens211f0np0 network MT43244 BlueField-3 integrated ConnectX-7 network controller
/0/11e/1.1/0/2/0.1 ens211f1np1 network MT43244 BlueField-3 integrated ConnectX-7 network controller
/0/11e/1.1/0/3/0 ens201f0np0 network MT43244 BlueField-3 integrated ConnectX-7 network controller
/0/125/1.1/0/1/0 ens202f0np0 network MT43244 BlueField-3 integrated ConnectX-7 network controller
/0/12c/1.1/0/5/0 ens207f0np0 network MT43244 BlueField-3 integrated ConnectX-7 network controller
/0/133/1.1/0/1/0 ens208f0np0 network MT43244 BlueField-3 integrated ConnectX-7 network controller
/0/13a/1.1/0/2/0 ens206f0np0 network MT43244 BlueField-3 integrated ConnectX-7 network controller
/0/13a/3.1/0 ens21f0 network Ethernet Controller X710 for 10GbE SFP+
/0/13a/3.1/0.1 ens21f1 network Ethernet Controller X710 for 10GbE SFP+
/0/141/1.1/0/4/0 ens205f0np0 network MT43244 BlueField-3 integrated ConnectX-7 network controller
/a enxc60fa3e9679a network Ethernet interface
5.8. Configuring NIC mode on NVIDIA BlueField-3 DPUs
NVIDIA BlueField-3 (BF3) DPUs can operate in either DPU mode (with ARM cores active for offload) or NIC mode (where ARM cores are disabled, functioning purely as a network interface).
Identify BF3 cards and ensure that mst is started using the command: sudo mst start
Identify a card and its mode of operation (use the mlxup_query.sh script for convenience). In the following example, we target an NVIDIA BlueField-3 B3240 card:
$ ./mlxup_query.sh
PCI Device Name Description Status
--------------- ----------- ------
/dev/mst/mt41692_pciconf8 Nvidia BlueField-3 B3140H E-series HHHL SuperNIC Up to date
/dev/mst/mt41692_pciconf7 Nvidia BlueField-3 B3140H E-series HHHL SuperNIC Up to date
/dev/mst/mt41692_pciconf6 Nvidia BlueField-3 B3140H E-series HHHL SuperNIC Up to date
/dev/mst/mt41692_pciconf5 Nvidia BlueField-3 B3140H E-series HHHL SuperNIC Up to date
/dev/mst/mt41692_pciconf4 Nvidia BlueField-3 B3140H E-series HHHL SuperNIC Up to date
/dev/mst/mt41692_pciconf3 Nvidia BlueField-3 B3140H E-series HHHL SuperNIC Up to date
/dev/mst/mt41692_pciconf2 NVIDIA BlueField-3 B3240 P-Series Dual-slot FHHL DPU Up to date
/dev/mst/mt41692_pciconf1 Nvidia BlueField-3 B3140H E-series HHHL SuperNIC Up to date
/dev/mst/mt41692_pciconf0 Nvidia BlueField-3 B3140H E-series HHHL SuperNIC Up to date
Query the card to understand its current mode of operation:
$ sudo mlxconfig -d /dev/mst/mt41692_pciconf2 -e q | grep \ 'INTERNAL_CPU_MODEL\|EXP_ROM_UEFI_ARM_ENABLE\|INTERNAL_CPU_OFFLOAD_ENGINE'.
INTERNAL_CPU_MODEL EMBEDDED_CPU(1) EMBEDDED_CPU(1) EMBEDDED_CPU(1)
INTERNAL_CPU_OFFLOAD_ENGINE ENABLED(0) ENABLED(0) ENABLED(0)
EXP_ROM_UEFI_ARM_ENABLE True(1) True(1) True(1)
In the above example, INTERNAL_CPU_OFFLOAD_ENGINE is set to ENABLED(0). This means the card is running in DPU mode. To convert to NIC mode, we need to set it to DISABLED(1):
$ sudo mlxconfig -d /dev/mst/mt41692_pciconf2 s INTERNAL_CPU_OFFLOAD_ENGINE=1
Device #1:
----------
Device type: BlueField3
Name: 900-9D3B6-00SN-A_Ax
Description: NVIDIA BlueField-3 B3240 P-Series Dual-slot FHHL DPU; 400GbE / NDR IB (default mode); Dual-port QSFP112; PCIe Gen5.0 x16 with x16 PCIe extension option; 16 Arm cores; 32GB on-board DDR; integrated BMC; Crypto Disabled
Device: /dev/mst/mt41692_pciconf2
Configurations: Next Boot New
INTERNAL_CPU_OFFLOAD_ENGINE ENABLED(0) DISABLED(1)
Apply new Configuration? (y/n) [n] : y
Power off the server.
$ poweroff
Note: A simple reboot will restart only the host; it will NOT restart the DPUs. A full power cycle is required for the change to take effect.
Power on the server from the BMC using the WebUI or through Redfish APIs, then start the MST service:
$ sudo mst start
Check the BF3’s mode of operations:
$ sudo mlxconfig -d /dev/mst/mt41692_pciconf2 -e q | grep \ 'INTERNAL_CPU_MODEL\|EXP_ROM_UEFI_ARM_ENABLE\|INTERNAL_CPU_OFFLOAD_ENGINE'
INTERNAL_CPU_MODEL EMBEDDED_CPU(1) EMBEDDED_CPU(1) EMBEDDED_CPU(1)
INTERNAL_CPU_OFFLOAD_ENGINE ENABLED(0) DISABLED(1) DISABLED(1)
EXP_ROM_UEFI_ARM_ENABLE True(1) True(1) True(1)
6. NVIDIA GPU software stack installation and validation
This chapter details the installation and validation of the NVIDIA GPU software stack, including drivers, the NIVIDIA CUDA Toolkit, and NVIDIA Fabric Manager.
6.1. Install NVIDIA CUDA Toolkit without drivers
This section guides you through installing the NVIDIA CUDA Toolkit, which provides the development environment for GPU-accelerated applications. It is often installed separately from the GPU drivers.
Download the installer, update apt and install cuda-toolkit-12-6:
$ sudo dpkg -i cuda-keyring_1.1-1_all.deb
$ sudo apt update
$ sudo apt install –y cuda-toolkit-12-6
Blacklist the Nouveau driver. The open-source Nouveau driver can conflict with NVIDIA's proprietary drivers. Blacklist it to prevent issues; to do so, add a nouveau module to the modprobe blacklist:
Edit the /usr/lib/modprobe.d/blacklist-nouveau.conf file using an editor of your choice:
$ sudo vi /usr/lib/modprobe.d/blacklist-nouveau.conf
Append the following two lines and save:
blacklist nouveau
options nouveau modset=0
Apply the settings (if you are using dracut):
$ sudo dracut –force
Apply the settings (if you are using initramfs-tools):
$ sudo update-initramfs -u -k all
Modify environment variables.
Create a file under named /etc/profile.d/cuda.sh, and make the script executable. Remember to modify the PATH variable with the right cuda path, which might change depending on the version you installed:
$ sudo tee /etc/profile.d/cuda.sh > /dev/null << EOF
#!/bin/bash
# Set CUDA environment variables globally
export LD_LIBRARY_PATH=/usr/local/cuda-12.9/lib64:\$LD_LIBRARY_PATH
export PATH=$PATH:/usr/local/cuda-12.9/bin
EOF
Change permissions and apply:
$ sudo chmod +x /etc/profile.d/cuda.sh
$ source /etc/profile.d/cuda.sh
Check if CUDA is running:
$ nvcc -V
nvcc: NVIDIA (R) Cuda compiler driver
Copyright (c) 2005-2024 NVIDIA Corporation
Built on Thu_Sep_12_02:18:05_PDT_2024
Cuda compilation tools, release 12.6, V12.6.77
Build cuda_12.6.r12.6/compiler.34841621_0
6.2. Install NVIDIA GPU drivers and NVIDIA Fabric Manager
Install NVIDIA Data Center Drivers. Replace with the desired version (refer to Chapter 4. “Software and driver downloads,” for the software download):
$ sudo dpkg -i nvidia-driver-local-repo-ubuntu2204-560.35.03_1.0-1_amd64.deb
$ sudo cp /var/nvidia-driver-local-repo-ubuntu2204-560.35.03/nvidia-driver-local-73056A76-keyring.gpg /usr/share/keyrings/
$ sudo apt update && sudo apt install –y cuda-drivers-fabricmanager-560
NVIDIA Fabric Manager is a critical component for managing the NVIDIA GPU interconnect (NVLink or NVSwitch) in multi-GPU systems, ensuring optimal communication and performance.
Install Fabric Manager from apt and start it:
$ sudo apt install –y nvidia-fabricmanager-560
$ sudo systemctl start nvidia-fabricmanager
$ sudo systemctl enable nvidia-fabricmanager
Reboot the system:
$ sudo reboot
Verify Fabric Manager status:
$ sudo systemctl status nvidia-fabricmanager
6.3. NVIDIA GPU diagnostics and topology verification
● Follow the instructions to download NVIDIA DCGM (Data Center GPU Manager)
◦ https://developer.nvidia.com/dcgm
◦ Documentation:
◦ https://docs.nvidia.com/datacenter/dcgm/latest/user-guide/dcgm-diagnostics.html
◦ Start and enable DCGM
◦ $ sudo systemctl --now enable nvidia-dcgm
Verify GPU detection and status:
$ nvidia-smi
Thu Jul 31 14:18:14 2025
+-----------------------------------------------------------------------------------------+
| NVIDIA-SMI 575.57.08 Driver Version: 575.57.08 CUDA Version: 12.9 |
|-----------------------------------------+------------------------+----------------------+
| GPU Name Persistence-M | Bus-Id Disp.A | Volatile Uncorr. ECC |
| Fan Temp Perf Pwr:Usage/Cap | Memory-Usage | GPU-Util Compute M. |
| | | MIG M. |
|=========================================+========================+===============|
| 0 NVIDIA H200 On | 00000000:03:00.0 Off | 0 |
| N/A 38C P0 121W / 700W | 130733MiB / 143771MiB | 0% Default |
| | | Disabled |
+-----------------------------------------+------------------------+----------------------+
| 1 NVIDIA H200 On | 00000000:29:00.0 Off | 0 |
| N/A 30C P0 76W / 700W | 4MiB / 143771MiB | 0% Default |
| | | Disabled |
+-----------------------------------------+------------------------+----------------------+
| 2 NVIDIA H200 On | 00000000:59:00.0 Off | 0 |
| N/A 32C P0 77W / 700W | 4MiB / 143771MiB | 0% Default |
| | | Disabled |
+-----------------------------------------+------------------------+----------------------+
| 3 NVIDIA H200 On | 00000000:63:00.0 Off | 0 |
| N/A 36C P0 76W / 700W | 4MiB / 143771MiB | 0% Default |
| | | Disabled |
+-----------------------------------------+------------------------+----------------------+
| 4 NVIDIA H200 On | 00000000:7B:00.0 Off | 0 |
| N/A 37C P0 76W / 700W | 4MiB / 143771MiB | 0% Default |
| | | Disabled |
+-----------------------------------------+------------------------+----------------------+
| 5 NVIDIA H200 On | 00000000:A3:00.0 Off | 0 |
| N/A 32C P0 75W / 700W | 4MiB / 143771MiB | 0% Default |
| | | Disabled |
+-----------------------------------------+------------------------+----------------------+
| 6 NVIDIA H200 On | 00000000:D3:00.0 Off | 0 |
| N/A 35C P0 77W / 700W | 4MiB / 143771MiB | 0% Default |
| | | Disabled |
+-----------------------------------------+------------------------+----------------------+
| 7 NVIDIA H200 On | 00000000:E5:00.0 Off | 0 |
| N/A 30C P0 74W / 700W | 4MiB / 143771MiB | 0% Default |
| | | Disabled |
+-----------------------------------------+------------------------+----------------------+
+-----------------------------------------------------------------------------------------+
| Processes: |
| GPU GI CI PID Type Process name GPU Memory |
| ID ID Usage |
|==================================================================================|
| 0 N/A N/A 7602 C /usr/bin/python3 12971... |
| 0 N/A N/A 8683 C /usr/local/bin/python3 1002MiB |
+-----------------------------------------------------------------------------------------+
Verify interconnect topology (NVLink/NVSwitch):
$ nvidia-smi topo -m
Verify Fabric Manager status:
$ sudo systemctl status nvidia-fabricmanager
nvidia-fabricmanager.service - NVIDIA fabric manager service
Loaded: loaded (/lib/systemd/system/nvidia-fabricmanager.service; enabled; vendor preset: enabled)
Active: active (running) since Thu 2025-07-31 03:46:43 UTC; 10h ago
Main PID: 4321 (nv-fabricmanage)
Tasks: 18 (limit: 629145)
Memory: 20.7M
CPU: 12.643s
CGroup: /system.slice/nvidia-fabricmanager.service
└─4321 /usr/bin/nv-fabricmanager -c /usr/share/nvidia/nvswitch/fabricmanager.cfg
7. AMD GPU software stack installation and validation
This chapter details the installation and validation of the AMD GPU software stack (ROCm), including drivers, compute runtimes, and performance tests.
7.1. Key AMD technologies
● ROCm (Radeon Open Compute platform): AMD's open-source software platform for GPU computing
● HIP (Heterogeneous-Compute Interface for Portability): A C++ programming language that allows developers to write portable code for both AMD (ROCm) and NVIDIA (CUDA) GPUs
● Infinity Fabric: AMD's high-speed, low-latency interconnect technology for GPU-to-GPU and GPU-to-CPU communication
● RCCL (ROCm Communication Collectives Library): AMD's library for multi-GPU collective communication operations
7.2. Prerequisites
● Supported OS (in this case, Ubuntu 24.04 LTS) is installed and running.
● A sudo user (a user capable of running commands with root privileges)
● Internet connectivity: the host OS is manageable and connected to the internet to download necessary packages.
● Updated system: all system packages are updated and repositories synchronized (apt update ; apt upgrade -y)
● Follow instructions here: https://instinct.docs.amd.com/projects/amdgpu-docs/en/latest/install/detailed-install/prerequisites.html
● Install additional development packages:
◦ $ sudo apt install python3-setuptools python3-wheel environment-modules
● Kernel headers: ensure your kernel headers are installed, because they are required for building kernel modules:
◦ $ sudo apt update
◦ $ sudo apt install "linux-headers-$(uname -r)" "linux-modules-extra-$(uname -r)"
7.3. ROCm repository setup and installation
Note: The following applies to Ubuntu 24.04 LTS. For other operating systems please refer to the AMD documentation at: https://rocm.docs.amd.com/projects/install-on-linux/en/latest/install/detailed-install.html.
Download and convert the package signing key:
$ sudo mkdir --parents --mode=0755 /etc/apt/keyrings
$ wget https://repo.radeon.com/rocm/rocm.gpg.key -O - | \
gpg --dearmor | sudo tee /etc/apt/keyrings/rocm.gpg > /dev/null
Register kernel-mode driver:
$ echo "deb [arch=amd64,i386 signed-by=/etc/apt/keyrings/rocm.gpg] https://repo.radeon.com/amdgpu/6.4.2/ubuntu noble main" \
| sudo tee /etc/apt/sources.list.d/amdgpu.list
$ sudo apt update
Install Kernel Driver and reboot the system:
$ sudo apt install amdgpu-dkms
$ sudo reboot
After reboot, check the AMDGPU driver installation:
$ sudo dkms status
Expected output:
$ sudo dkms status
[...]
amdgpu/6.12.12-2187269.24.04, 6.8.0-71-generic, x86_64: installed
[...]
Register ROCm packages and update apt:
$ echo "deb [arch=amd64 signed-by=/etc/apt/keyrings/rocm.gpg] https://repo.radeon.com/rocm/apt/6.4.2 noble main" \
| sudo tee /etc/apt/sources.list.d/rocm.list
$ echo -e 'Package: *\nPin: release o=repo.radeon.com\nPin-Priority: 600' \
| sudo tee /etc/apt/preferences.d/rocm-pin-600
$ sudo apt update
Install ROCm:
$ sudo apt install rocm clinfo
7.4. Environment configuration
Set environment variables to ensure that ROCm binaries and libraries are found by the system.
Configure shared objects:
$ sudo tee --append /etc/ld.so.conf.d/rocm.conf <<EOF
/opt/rocm/lib
/opt/rocm/lib64
EOF
$ sudo ldconfig
Create a script to set environment variables persistently:
$ sudo tee /etc/profile.d/rocm.sh > /dev/null << EOF
#!/bin/bash
# Set ROCm environment variables globally
export PATH=/opt/rocm-6.4.2/bin:$PATH
export LD_LIBRARY_PATH=/opt/rocm-6.4.2/lib:$LD_LIBRARY_PATH
EOF
Make the script executable and apply it:
$ sudo chmod +x /etc/profile.d/rocm.sh
$ source /etc/profile.d/rocm.sh
Add the current user to the video, and render group to access GPUs (apply to any other required user):
$ sudo usermod -a -G video,render $LOGNAME
Create a new file /etc/udev/rules.d/70-amdgpu.rules with the following content:
KERNEL=="kfd", MODE="0666"
SUBSYSTEM=="drm", KERNEL=="renderD*", MODE="0666"LOGNAME
Apply rules. These udev rules ensure that the critical device files used by AMD GPUs for compute operations are accessible with read and write permissions by all users on the system. This provides a broad level of access to the GPU hardware, which can be necessary for certain ROCm configurations or if default group permissions are insufficient.
Note on MODE="0666": While 0666 grants universal read/write access and simplifies troubleshooting, for production environments a more restrictive permission, such as 0660 combined with proper group ownership (for example, GROUP="video"), might be preferred for enhanced security, assuming users are correctly added to the video or render groups.
$ sudo udevadm control --reload-rules && sudo udevadm trigger
To ensure all newly created users are automatically included in the render and video groups, configure the system's default user creation settings as follows:
$ echo 'ADD_EXTRA_GROUPS=1' | sudo tee -a /etc/adduser.conf
$ echo 'EXTRA_GROUPS=video' | sudo tee -a /etc/adduser.conf
$ echo 'EXTRA_GROUPS=render' | sudo tee -a /etc/adduser.conf
7.5. Kernel tunings for performance and stability
These kernel tunings are critical for optimal performance and stability in multi-GPU systems.
Note: After making changes to GRUB, a system reboot is required. It's best to apply both changes and then reboot once.
Disable NUMA Auto Balancing. While beneficial for general-purpose server workloads, automatic NUMA balancing can introduce undesirable overheads for high-performance computing (HPC) and artificial intelligence (AI) applications, especially those heavily utilizing GPUs. For instance, the continuous monitoring and migration of memory pages can consume CPU cycles and introduce latency.
Edit the sysctl configuration file using your favorite editor. For example, with vi:
$ sudo vi /etc/sysctl.conf
Add the following line to the end of the file, then save and close the file:
kernel.numa_balancing = 0
Apply the changes immediately:
$ sudo sysctl -p
Disable IOMMU for Optimal NCCL Performance. For optimal NCCL (NVIDIA Collective Communications Library) performance in AI/ML workloads, particularly in multi-GPU setups, it is recommended to disable IOMMU. This configuration, along with other parameters, can enhance communication efficiency and reduce overheads.
Edit the GRUB bootloader configuration with your favorite editor. For example, with vi:
$ sudo vi /etc/default/grub
Find the line that starts with GRUB_CMDLINE_LINUX_DEFAULT. Modify it to include the following parameters, ensuring that quiet splash is retained if present:
GRUB_CMDLINE_LINUX_DEFAULT="quiet splash amd_iommu=on rd.driver.blacklist=nouveau transparent_hugepage=madvise iommu=off pci=realloc=off"
Save and close the file.
Note on amd_iommu=on and iommu=off: While iommu=off explicitly disables the IOMMU for performance, amd_iommu=on is included as part of NVIDIA's recommended configuration for AMD CPUs. These parameters serve different purposes in the kernel's IOMMU handling for AMD platforms and are crucial for achieving optimal NCCL performance.
Update GRUB to apply the changes:
$ sudo update-grub
Reboot the system:
$ sudo reboot
After reboot, verify that the new GRUB parameters are applied:
$ cat /proc/cmdline
BOOT_IMAGE=/boot/vmlinuz-6.14.0-27-generic root=UUID=... ro quiet splash amd_iommu=on rd.driver.blacklist=nouveau transparent_hugepage=madvise iommu=off pci=realloc=off
7.6. Verification and testing
After installation and configuration, verify that the AMD GPUs are fully functional and performing optimally.
Hardware and driver configuration
Verify AMD GPU detection:
$ lspci -nn | grep -Ei "Processing accelerators"
Expected output (may change based on the GPU):
05:00.0 Processing accelerators [1200]: Advanced Micro Devices, Inc. [AMD/ATI] Aqua Vanjaram
[Instinct MI325X] [1002:74a5]
2b:00.0 Processing accelerators [1200]: Advanced Micro Devices, Inc. [AMD/ATI] Aqua Vanjaram
[Instinct MI325X] [1002:74a5]
5b:00.0 Processing accelerators [1200]: Advanced Micro Devices, Inc. [AMD/ATI] Aqua Vanjaram
[Instinct MI325X] [1002:74a5]
65:00.0 Processing accelerators [1200]: Advanced Micro Devices, Inc. [AMD/ATI] Aqua Vanjaram
[Instinct MI325X] [1002:74a5]
7d:00.0 Processing accelerators [1200]: Advanced Micro Devices, Inc. [AMD/ATI] Aqua Vanjaram
[Instinct MI325X] [1002:74a5]
a5:00.0 Processing accelerators [1200]: Advanced Micro Devices, Inc. [AMD/ATI] Aqua Vanjaram
[Instinct MI325X] [1002:74a5]
d5:00.0 Processing accelerators [1200]: Advanced Micro Devices, Inc. [AMD/ATI] Aqua Vanjaram
[Instinct MI325X] [1002:74a5]
e7:00.0 Processing accelerators [1200]: Advanced Micro Devices, Inc. [AMD/ATI] Aqua Vanjaram
[Instinct MI325X] [1002:74a5]
Verify that amdgpu Kernel Module is loaded:
$ lsmod | grep -i "amdgpu"
amdgpu 19718144 0
amddrm_ttm_helper 12288 1 amdgpu
amdttm 114688 2 amdgpu,amddrm_ttm_helper
amddrm_buddy 24576 1 amdgpu
amdxcp 12288 1 amdgpu
drm_exec 12288 1 amdgpu
drm_suballoc_helper 20480 1 amdgpu
amd_sched 61440 1 amdgpu
amdkcl 28672 3 amd_sched,amdttm,amdgpu
drm_display_helper 278528 1 amdgpu
cec 94208 2 drm_display_helper,amdgpu
video 77824 1 amdgpu
i2c_algo_bit 16384 2 ast,amdgpu
drm_ttm_helper 16384 1 amdgpu
Get basic GPU information with rocm-smi:
$ rocm-smi
================================ ROCm System Management Interface ==============================
=========================================== Concise Info ======================================
Device Node IDs Temp Power Partitions SCLK MCLK Fan Perf PwrCap VRAM% GPU%
(DID, GUID) (Junction) (Socket) (Mem, Compute, ID)
============================================================================================
0 3 0x74a5, 51110 50.0°C 131.0W NPS1, SPX, 0 132Mhz 900Mhz 0% auto 1000.0W 0% 0%
1 5 0x74a5, 31547 43.0°C 117.0W NPS1, SPX, 0 132Mhz 900Mhz 0% auto 1000.0W 0% 0%
2 4 0x74a5, 40734 43.0°C 127.0W NPS1, SPX, 0 131Mhz 900Mhz 0% auto 1000.0W 0% 0%
3 2 0x74a5, 61326 52.0°C 123.0W NPS1, SPX, 0 132Mhz 900Mhz 0% auto 1000.0W 0% 0%
4 7 0x74a5, 58756 48.0°C 119.0W NPS1, SPX, 0 132Mhz 900Mhz 0% auto 1000.0W 0% 0%
5 9 0x74a5, 49118 41.0°C 111.0W NPS1, SPX, 0 132Mhz 900Mhz 0% auto 1000.0W 0% 0%
6 8 0x74a5, 23547 53.0°C 129.0W NPS1, SPX, 0 132Mhz 900Mhz 0% auto 1000.0W 0% 0%
7 6 0x74a5, 11886 43.0°C 127.0W NPS1, SPX, 0 133Mhz 900Mhz 0% auto 1000.0W 0% 0%
============================================================================================
======================================= End of ROCm SMI Log ===================================
Detailed GPU Information with rocminfo (partial output, for one GPU agent):
$ rocminfo
[...]
*******
Agent 3
*******
Name: gfx942
Uuid: GPU-9747d7d125d4be59
Marketing Name: AMD Instinct MI325X
Vendor Name: AMD
Feature: KERNEL_DISPATCH
Profile: BASE_PROFILE
Float Round Mode: NEAR
Max Queue Number: 128(0x80)
Queue Min Size: 64(0x40)
Queue Max Size: 131072(0x20000)
Queue Type: MULTI
Node: 2
Device Type: GPU
Cache Info:
L1: 32(0x20) KB
L2: 4096(0x1000) KB
L3: 262144(0x40000) KB
Chip ID: 29861(0x74a5)
ASIC Revision: 1(0x1)
Cacheline Size: 128(0x80)
Max Clock Freq. (MHz): 2100
BDFID: 25856
Internal Node ID: 2
Compute Unit: 304
SIMDs per CU: 4
Shader Engines: 32
Shader Arrs. per Eng.: 1
WatchPts on Addr. Ranges:4
Coherent Host Access: FALSE
Memory Properties:
Features: KERNEL_DISPATCH
Fast F16 Operation: TRUE
Wavefront Size: 64(0x40)
Workgroup Max Size: 1024(0x400)
Workgroup Max Size per Dimension:
x 1024(0x400)
y 1024(0x400)
z 1024(0x400)
Max Waves Per CU: 32(0x20)
Max Work-item Per CU: 2048(0x800)
Grid Max Size: 4294967295(0xffffffff)
Grid Max Size per Dimension:
x 4294967295(0xffffffff)
y 4294967295(0xffffffff)
z 4294967295(0xffffffff)
Max fbarriers/Workgrp: 32
Packet Processor uCode:: 185
SDMA engine uCode:: 24
IOMMU Support:: None
Pool Info:
Pool 1
Segment: GLOBAL; FLAGS: COARSE GRAINED
Size: 268419072(0xfffc000) KB
Allocatable: TRUE
Alloc Granule: 4KB
Alloc Recommended Granule:2048KB
Alloc Alignment: 4KB
Accessible by all: FALSE
Pool 2
Segment: GLOBAL; FLAGS: EXTENDED FINE GRAINED
Size: 268419072(0xfffc000) KB
Allocatable: TRUE
[...]
HIP compiler and runtime validation
This test confirms that the HIP compiler (hipcc) and the ROCm runtime can successfully compile and execute code on your AMD GPUs.
Create a test file with your favorite editor (for example, hip_add.cpp):
#include <hip/hip_runtime.h>
#include <iostream>
// HIP kernel to add two arrays
__global__ void add(int *a, int *b, int *c, int n) {
int id = blockIdx.x * blockDim.x + threadIdx.x;
if (id < n) {
c[id] = a[id] + b[id];
}
}
int main() {
int N = 1000000; // Number of elements
int *h_a, *h_b, *h_c; // Host arrays
int *d_a, *d_b, *d_c; // Device arrays
// Allocate host memory
h_a = new int[N];
h_b = new int[N];
h_c = new int[N];
// Initialize host arrays
for (int i = 0; i < N; ++i) {
h_a[i] = i;
h_b[i] = i * 2;
}
// Allocate device memory
hipMalloc(&d_a, N * sizeof(int));
hipMalloc(&d_b, N * sizeof(int));
hipMalloc(&d_c, N * sizeof(int));
// Copy data from host to device
hipMemcpy(d_a, h_a, N * sizeof(int), hipMemcpyHostToDevice);
hipMemcpy(d_b, h_b, N * sizeof(int), hipMemcpyHostToDevice);
// Launch kernel
int blockSize = 256;
int numBlocks = (N + blockSize - 1) / blockSize;
hipLaunchKernelGGL(add, dim3(numBlocks), dim3(blockSize), 0, 0, d_a, d_b, d_c, N);
// Synchronize to ensure kernel completion
hipDeviceSynchronize();
// Copy result from device to host
hipMemcpy(h_c, d_c, N * sizeof(int), hipMemcpyDeviceToHost);
// Verify result
bool success = true;
for (int i = 0; i < 10; ++i) { // Check first 10 elements
if (h_c[i] != (h_a[i] + h_b[i])) {
success = false;
break;
}
}
if (success) {
std::cout << "HIP kernel execution successful! Result for first 10 elements:" << std::endl;
for (int i = 0; i < 10; ++i) {
std::cout << h_c[i] << " ";
}
std::cout << std::endl;
} else {
std::cout << "HIP kernel execution failed!" << std::endl;
}
// Free device memory
hipFree(d_a);
hipFree(d_b);
hipFree(d_c);
// Free host memory
delete[] h_a;
delete[] h_b;
delete[] h_c;
return 0;
}
Save the file and compile it:
$ hipcc hip_add.cpp -o hip_add
Note: You might see "nodiscard" warnings, which are harmless for this test.
Run the program:
$ ./hip_add
Expected output:
HIP kernel execution successful! Result for first 10 elements:
0 3 6 9 12 15 18 21 24 27
PyTorch integration and GPU detection
Validate that the PyTorch machine-learning framework can detect and utilize all your AMD GPUs.
Note: The following can be implemented within a Python virtual environment; it is, in fact, recommended. However, the use of Python virtual environments is out of scope for this document.
Install pip (if not already present), and upgrade it:
$ sudo apt install python3-pip
$ pip3 install --upgrade pip
Install PyTorch with ROCm 6.0/6.4. PyTorch often provides wheels for specific major/minor ROCm versions. For ROCm 6.4.2, the ROCm 6.0 PyTorch wheels are typically compatible:
$ pip3 install torch torchvision torchaudio --index-url https://download.pytorch.org/whl/rocm6.0
Create a Python verification script with your favorite editor (for example, test_gpu.py):
import torch
# Check if ROCm (CUDA for PyTorch) is available
print(f"ROCm (CUDA) available: {torch.cuda.is_available()}")
# Print the number of detected GPUs
print(f"Number of GPUs detected: {torch.cuda.device_count()}")
# Print the name of the first GPU
if torch.cuda.device_count() > 0:
print(f"Name of GPU 0: {torch.cuda.get_device_name(0)}")
else:
print("No GPUs found by PyTorch.")
# Optional: Perform a simple tensor operation on a GPU
if torch.cuda.is_available():
x = torch.rand(5, 5).to("cuda") # Create a random tensor on GPU
y = torch.rand(5, 5).to("cuda")
z = x + y
print(f"Result of GPU tensor operation (first row): {z[0]}")
Run the verification script:
$ python3 test_gpu.py
Expected output (may change based on the GPU model):
ROCm (CUDA) available: True
Number of GPUs detected: 8
Name of GPU 0: AMD Instinct MI325X
Result of GPU tensor operation (first row): tensor([1.2773, 0.0741, 1.0373, 0.7632, 0.4326], device='cuda:0')
Multi-GPU communication fabric validation (AMD Infinity Fabric / AMD xGMI)
For high-performance AI/ML and HPC, efficient communication between GPUs is paramount. This section validates the performance of the AMD Infinity Fabric (AMD xGMI) interconnect.
Show the interconnect topology:
$ rocm-smi --showtopo
========================== ROCm System Management Interface ===========================
============================== Weight between two GPUs ===============================
GPU0 GPU1 GPU2 GPU3 GPU4 GPU5 GPU6 GPU7
GPU0 0 15 15 15 15 15 15 15
GPU1 15 0 15 15 15 15 15 15
GPU2 15 15 0 15 15 15 15 15
GPU3 15 15 15 0 15 15 15 15
GPU4 15 15 15 15 0 15 15 15
GPU5 15 15 15 15 15 0 15 15
GPU6 15 15 15 15 15 15 0 15
GPU7 15 15 15 15 15 15 15 0
============ =============== Hops between two GPUs ==================================
GPU0 GPU1 GPU2 GPU3 GPU4 GPU5 GPU6 GPU7
GPU0 0 1 1 1 1 1 1 1
GPU1 1 0 1 1 1 1 1 1
GPU2 1 1 0 1 1 1 1 1
GPU3 1 1 1 0 1 1 1 1
GPU4 1 1 1 1 0 1 1 1
GPU5 1 1 1 1 1 0 1 1
GPU6 1 1 1 1 1 1 0 1
GPU7 1 1 1 1 1 1 1 0
============================ Link Type between two GPUs ===============================
GPU0 GPU1 GPU2 GPU3 GPU4 GPU5 GPU6 GPU7
GPU0 0 XGMI XGMI XGMI XGMI XGMI XGMI XGMI
GPU1 XGMI 0 XGMI XGMI XGMI XGMI XGMI XGMI
GPU2 XGMI XGMI 0 XGMI XGMI XGMI XGMI XGMI
GPU3 XGMI XGMI XGMI 0 XGMI XGMI XGMI XGMI
GPU4 XGMI XGMI XGMI XGMI 0 XGMI XGMI XGMI
GPU5 XGMI XGMI XGMI XGMI XGMI 0 XGMI XGMI
GPU6 XGMI XGMI XGMI XGMI XGMI XGMI 0 XGMI
GPU7 XGMI XGMI XGMI XGMI XGMI XGMI XGMI 0
================================= Numa Nodes =======================================
GPU[0] : (Topology) Numa Node: 0
GPU[0] : (Topology) Numa Affinity: 0
GPU[1] : (Topology) Numa Node: 0
GPU[1] : (Topology) Numa Affinity: 0
GPU[2] : (Topology) Numa Node: 0
GPU[2] : (Topology) Numa Affinity: 0
GPU[3] : (Topology) Numa Node: 0
GPU[3] : (Topology) Numa Affinity: 0
GPU[4] : (Topology) Numa Node: 1
GPU[4] : (Topology) Numa Affinity: 1
GPU[5] : (Topology) Numa Node: 1
GPU[5] : (Topology) Numa Affinity: 1
GPU[6] : (Topology) Numa Node: 1
GPU[6] : (Topology) Numa Affinity: 1
GPU[7] : (Topology) Numa Node: 1
GPU[7] : (Topology) Numa Affinity: 1
=============================== End of ROCm SMI Log =================================
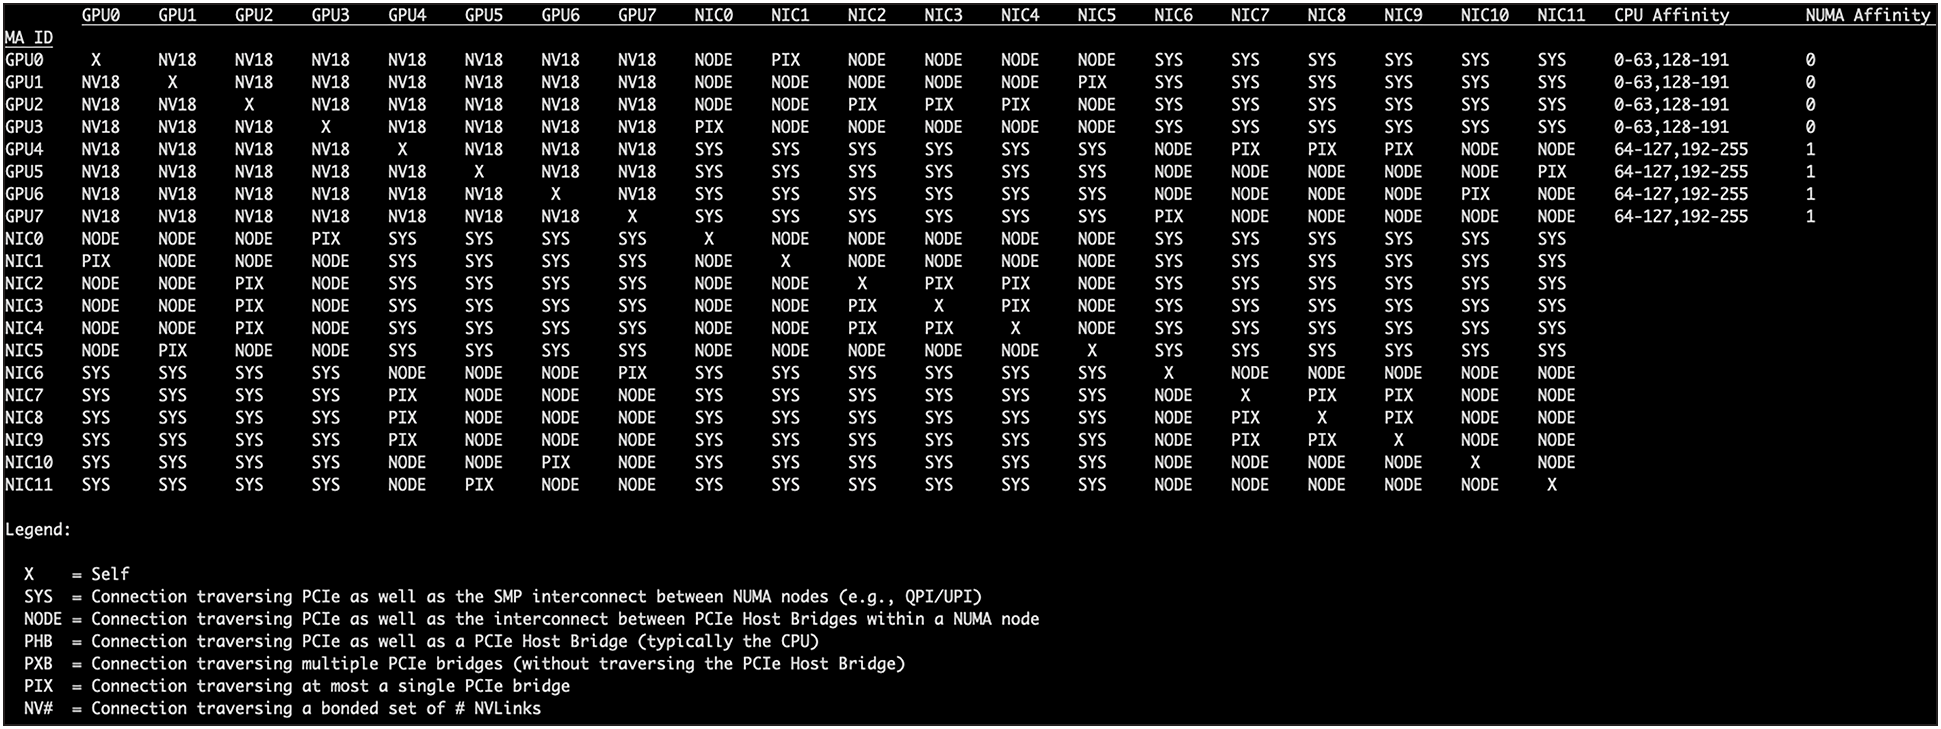
● Weight 15: indicates direct, high-bandwidth AMD xGMI (or AMD Infinity Fabric) connections between all GPUs
● 1 hop: confirms a full-mesh interconnect topology, where every GPU can directly reach every other GPU in a single hop
● Link type XGMI: explicitly states that all inter-GPU communication is through the high-speed AMD Infinity Fabric
● NUMA nodes: the GPUs are distributed across two NUMA nodes (four GPUs per node), which is an optimal configuration for dual-socket CPU systems.
$ rocm-smi --showtopoaccess
========================= ROCm System Management Interface ===========================
========================= Link accessibility between two GPUs ============================
GPU0 GPU1 GPU2 GPU3 GPU4 GPU5 GPU6 GPU7
GPU0 True True True True True True True True
GPU1 True True True True True True True True
GPU2 True True True True True True True True
GPU3 True True True True True True True True
GPU4 True True True True True True True True
GPU5 True True True True True True True True
GPU6 True True True True True True True True
GPU7 True True True True True True True True
============================== End of ROCm SMI Log ==================================
The table above confirms that full peer-to-peer (P2P) access is enabled between all GPUs. Combined with the AMD xGMI link types, this ensures high-speed, direct memory access between any two GPUs.
Measure collective communication performance (RCCL tests)
The RCCL tests are performance benchmarks that need to be built from source.
Install build dependencies:
$ sudo apt update
$ sudo apt install git cmake build-essential
Clone the rccl-tests repository:
$ git clone https://github.com/ROCm/rccl-tests.git
$ cd rccl-tests
Build the tests:
$ mkdir build
$ cd build
$ cmake -DROCM_PATH=/opt/rocm-6.4.2 ..
$ make -j$(nproc)
Run all_reduce_perf. This test measures the bandwidth and latency of the all-reduce collective operation across all GPUs:
$ ./all_reduce_perf -b 8 -e 128M -f 2 -g 8
Expected output (partial):
# nThread 1 nGpus 8 minBytes 8 maxBytes 134217728 step: 2(factor) warmup iters: 5 iters: 20 agg iters: 1 validation: 1 graph: 0
#
rccl-tests: Version develop:645be0e
# Using devices
# Rank 0 Group 0 Pid 3177763 on cpoc device 0 [0000:65:00] AMD Instinct MI325X
# Rank 1 Group 0 Pid 3177763 on cpoc device 1 [0000:05:00] AMD Instinct MI325X
# Rank 2 Group 0 Pid 3177763 on cpoc device 2 [0000:5b:00] AMD Instinct MI325X
# Rank 3 Group 0 Pid 3177763 on cpoc device 3 [0000:2b:00] AMD Instinct MI325X
# Rank 4 Group 0 Pid 3177763 on cpoc device 4 [0000:e7:00] AMD Instinct MI325X
# Rank 5 Group 0 Pid 3177763 on cpoc device 5 [0000:7d:00] AMD Instinct MI325X
# Rank 6 Group 0 Pid 3177763 on cpoc device 6 [0000:d5:00] AMD Instinct MI325X
# Rank 7 Group 0 Pid 3177763 on cpoc device 7 [0000:a5:00] AMD Instinct MI325X
#
# out-of-place in-place
# size count type redop root time algbw busbw #wrong time algbw busbw #wrong
# (B) (elements) (us) (GB/s) (GB/s) (us) (GB/s) (GB/s)
8 2 float sum -1 55.74 0.00 0.00 0 47.12 0.00 0.00 0
16 4 float sum -1 49.27 0.00 0.00 0 47.95 0.00 0.00 0
32 8 float sum -1 48.35 0.00 0.00 0 47.70 0.00 0.00 0
64 16 float sum -1 47.84 0.00 0.00 0 55.69 0.00 0.00 0
128 32 float sum -1 48.07 0.00 0.00 0 55.65 0.00 0.00 0
256 64 float sum -1 39.94 0.01 0.01 0 39.47 0.01 0.01 0
512 128 float sum -1 40.59 0.01 0.02 0 40.33 0.01 0.02 0
1024 256 float sum -1 39.69 0.03 0.05 0 49.94 0.02 0.04 0
2048 512 float sum -1 50.32 0.04 0.07 0 50.79 0.04 0.07 0
4096 1024 float sum -1 50.14 0.08 0.14 0 49.96 0.08 0.14 0
8192 2048 float sum -1 44.16 0.19 0.32 0 44.11 0.19 0.33 0
16384 4096 float sum -1 50.68 0.32 0.57 0 50.85 0.32 0.56 0
32768 8192 float sum -1 50.88 0.64 1.13 0 50.64 0.65 1.13 0
65536 16384 float sum -1 51.20 1.28 2.24 0 43.94 1.49 2.61 0
131072 32768 float sum -1 55.54 2.36 4.13 0 61.78 2.12 3.71 0
262144 65536 float sum -1 61.73 4.25 7.43 0 63.68 4.12 7.20 0
524288 131072 float sum -1 62.33 8.41 14.72 0 63.33 8.28 14.49 0
1048576 262144 float sum -1 55.97 18.73 32.78 0 55.99 18.73 32.77 0
2097152 524288 float sum -1 62.56 33.52 58.66 0 63.36 33.10 57.92 0
4194304 1048576 float sum -1 61.44 68.27 119.47 0 61.24 68.49 119.86 0
8388608 2097152 float sum -1 94.56 88.72 155.25 0 97.79 85.78 150.12 0
16777216 4194304 float sum -1 167.2 100.34 175.60 0 177.8 94.36 165.12 0
33554432 8388608 float sum -1 285.4 117.55 205.72 0 301.0 111.48 195.09 0
67108864 16777216 float sum -1 467.7 143.49 251.10 0 480.7 139.61 244.33 0
134217728 33554432 float sum -1 833.9 160.95 281.66 0 842.2 159.36 278.87 0
# Errors with asterisks indicate errors that have exceeded the maximum threshold.
# Out of bounds values : 0 OK
# Avg bus bandwidth : 51.71
#
Interpretation: This test successfully measured the collective communication performance across all 8 AMD GPUs. For the largest message size (128 MB), the achieved algorithm bandwidth (algbw) is approximately 161 GB/s, and the bus bandwidth (busbw) is approximately 282 GB/s (using out-of-place values). These high bandwidth figures confirm the efficient utilization of the AMD Infinity Fabric (AMD xGMI) interconnect for multi-GPU collective operations.
Measure point-to-point bidirectional bandwidth
The sendrecv_perf test measures the effective bandwidth of direct communication between a specified pair of GPUs.
Run the following command:
$ ./sendrecv_perf -b 128M -e 1G -f 2 -g 2 -d 0 1
Expected output (partial):
invalid type 0, defaulting to float ..
# nThread 1 nGpus 2 minBytes 134217728 maxBytes 1073741824 step: 2(factor) warmup iters: 5 iters: 20 agg iters: 1 validation: 1 graph: 0
#
rccl-tests: Version develop:645be0e
# Using devices
# Rank 0 Group 0 Pid 3189719 on cpoc device 0 [0000:65:00] AMD Instinct MI325X
# Rank 1 Group 0 Pid 3189719 on cpoc device 1 [0000:05:00] AMD Instinct MI325X
#
# out-of-place in-place
# size count type redop root time algbw busbw #wrong time algbw busbw #wrong
# (B) (elements) (us) (GB/s) (GB/s) (us) (GB/s) (GB/s)
134217728 33554432 float sum -1 2886.8 46.49 46.49 0 2897.0 46.33 46.33 N/A
268435456 67108864 float sum -1 5740.7 46.76 46.76 0 5741.7 46.75 46.75 N/A
536870912 134217728 float sum -1 11472 46.80 46.80 0 11414 47.04 47.04 N/A
1073741824 268435456 float sum -1 22763 47.17 47.17 0 22777 47.14 47.14 N/A
# Errors with asterisks indicate errors that have exceeded the maximum threshold.
# Out of bounds values : 0 OK
# Avg bus bandwidth : 46.8101
Interpretation: This test successfully measured the point-to-point bandwidth between two AMD GPUs. The algbw values show consistent performance across large message sizes, indicating saturation. The highest observed algbw is approximately 47.17 GB/s (from the 1GB message size, out-of-place). This represents the effective unidirectional bandwidth.
To calculate the maximum GPU-to-GPU bidirectional speed, we double this value (assuming simultaneous send and receive): 47.17 GB/s (unidirectional) * 2 = 94.34 GB/s
Result: The maximum GPU-to-GPU bidirectional speed between two directly connected AMD GPUs is approximately 94.3 GB/s. This result aligns closely with the theoretical bidirectional bandwidth of a single AMD xGMI link (~100 GB/s), demonstrating the effective utilization of the direct xGMI connection.
7.7. Install Mellanox drivers
Download MLNX_OFED driver:
$ wget "https://content.mellanox.com/ofed/MLNX_OFED-24.10-3.2.5.0/MLNX_OFED_LINUX-24.10-3.2.5.0-ubuntu24.04-x86_64.iso"
--2025-09-04 15:37:25-- https://content.mellanox.com/ofed/MLNX_OFED-24.10-3.2.5.0/MLNX_OFED_LINUX-24.10-3.2.5.0-ubuntu24.04-x86_64.iso
Resolving content.mellanox.com (content.mellanox.com)... 107.178.241.102
Connecting to content.mellanox.com (content.mellanox.com)|107.178.241.102|:443... connected.
HTTP request sent, awaiting response... 200 OK
Length: 304336896 (290M) [application/x-iso9660-image]
Saving to: ‘MLNX_OFED_LINUX-24.10-3.2.5.0-ubuntu24.04-x86_64.iso’
MLNX_OFED_LINUX-24.10-3.2.5.0-ubu 100%[========================================================>] 290.24M 21.7MB/s in 16s
2025-09-04 15:37:41 (18.1 MB/s) - ‘MLNX_OFED_LINUX-24.10-3.2.5.0-ubuntu24.04-x86_64.iso’ saved [304336896/304336896]
Create a temporary directory and mount the downloaded ISO:
$ sudo mkdir -p /mnt/mlnx
$ sudo mount ./MLNX_OFED_LINUX-24.10-3.2.5.0-ubuntu24.04-x86_64.iso /mnt/mlnx
$ cd /mnt/mlnx
Install drivers:
$ sudo ./mlnxofedinstall
● APT (Advanced Package Tool): a free software user interface that works with core libraries to handle the installation and removal of software on Debian-based Linux distributions such as Ubuntu
● BIOS (Basic Input/Output System): firmware used to perform hardware initialization during the booting process (power-on startup) and to provide runtime services for operating systems and programs
● BMC (Baseboard Management Controller): a specialized microcontroller that manages the interface between system management hardware and software. It provides out-of-band management capabilities for the server, allowing remote monitoring and control even when the main server OS is down or powered off.
● CUDA (Compute Unified Device Architecture): a parallel computing platform and programming model developed by NVIDIA for its GPUs. CUDA enables software developers to use a GPU for general-purpose processing.
● DCGM (Data Center GPU Manager): a suite of tools for managing and monitoring NVIDIA GPUs in data-center environments, providing health, diagnostics, and performance metrics
● DOCA (Data Center on a Chip Architecture): NVIDIA's software framework for BlueField DPUs, enabling developers to create high-performance, software-defined, hardware-accelerated applications for data centers
● DPU (Data Processing Unit): a new class of programmable processor that combines a CPU, network interface, and programmable acceleration engines to offload and accelerate data-center infrastructure tasks. NVIDIA BlueField is an example of a DPU.
● dracut: a tool used on Linux systems to create an initial RAM disk image (initramfs) that is loaded into memory during the boot process, containing necessary drivers and tools to mount the root filesystem
● dpkg: the package management system for Debian-based Linux distributions. It is used to install, remove, and provide information about .deb packages
● dnf/yum: package managers used on Red Hat–based Linux distributions (such as RHEL, CentOS, Fedora, and Rocky Linux) for installing, updating, and removing software packages
● FPGA (Field-Programmable Gate Array): an integrated circuit designed to be configured by a customer or a designer after manufacturing – hence "field-programmable."
● GPU (Graphics Processing Unit): a specialized electronic circuit designed to rapidly manipulate and alter memory to accelerate the creation of images in a frame buffer intended for output to a display device. In AI/HPC, they are used for parallel computations.
● HIP (Heterogeneous-Compute Interface for Portability): a C++ programming language and runtime API developed by AMD that allows developers to write portable code for both AMD (ROCm) and NVIDIA (CUDA) GPUs. It serves as AMD's primary programming interface for GPU computing.
● Infiniband: a networking technology designed for data interconnection, often employed in high-performance computing (HPC) environments and certain specialized data center applications
● Infinity Fabric: AMD's high-speed, low-latency interconnect technology used in AMD CPUs and GPUs for communication between chiplets, CPU sockets, and GPUs. It is AMD's equivalent to NVIDIA's NVLink, enabling direct peer-to-peer communication between GPUs.
● KVM Console (Keyboard, Video, Mouse Console): a feature typically provided by a BMC that allows remote access to the server's console, enabling users to interact with the server's BIOS, OS installation, and operating system as if they were directly connected with a physical keyboard, monitor, and mouse
● LTS (Long Term Support): a designation for software releases (such as Ubuntu) that receive extended periods of support, including security updates and bug fixes, making them suitable for production environments
● MST (Mellanox Software Tools): a set of utilities provided by NVIDIA (formerly Mellanox) for managing and configuring Mellanox/NVIDIA network adapters (such as ConnectX and BlueField) and their firmware
● OOB (Out-of-Band): refers to management capabilities that operate independently of the main server's operating system and network connection. BMC provides OOB management.
● PCIe (Peripheral Component Interconnect Express): a high-speed serial computer expansion bus standard. Used for connecting high-performance peripherals such as GPUs and network adapters.
● PXE (Preboot Execution Environment): a standardized client-server interface that allows a computer to boot from a network interface independently of data storage devices (such as hard disks) or installed operating systems
● RCCL (ROCm Communication Collectives Library): AMD's library for multi-GPU collective communication operations, providing high-performance primitives for parallel computing. It is AMD's equivalent to NVIDIA's NCCL.
● Redfish API: an open industry-standard specification and schema designed to meet the needs of IT administrators for scalable, secure, and interoperable management of modern hardware. Used by BMC for remote management.
● ROCm (Radeon Open Compute platform): AMD's open-source software platform for GPU computing. It includes drivers, libraries, and tools for high-performance computing and AI/ML workloads on AMD GPUs. It is AMD's comprehensive software ecosystem for GPU acceleration, analogous to NVIDIA's CUDA.
● screen / tmux: terminal multiplexers that allow users to manage multiple shell sessions within a single terminal window or remote SSH session. They enable sessions to be detached and reattached, preventing work loss from network disconnections.
● SuperNIC: a term used by NVIDIA to describe high-performance network interface cards, often with advanced capabilities beyond traditional NICs, such as acceleration for AI and HPC workloads