Configure Security Parameters
This section describes how to change security parameters for the control plane and the data plane in the Cisco Catalyst SD-WAN overlay network.
The documentation set for this product strives to use bias-free language. For the purposes of this documentation set, bias-free is defined as language that does not imply discrimination based on age, disability, gender, racial identity, ethnic identity, sexual orientation, socioeconomic status, and intersectionality. Exceptions may be present in the documentation due to language that is hardcoded in the user interfaces of the product software, language used based on RFP documentation, or language that is used by a referenced third-party product. Learn more about how Cisco is using Inclusive Language.
This section describes how to change security parameters for the control plane and the data plane in the Cisco Catalyst SD-WAN overlay network.
By default, the control plane uses DTLS as the protocol that provides privacy on all its tunnels. DTLS runs over UDP.
You can change the control plane security protocol to TLS, which runs over TCP. The primary reason to use TLS is that, if you consider the Cisco SD-WAN Controller to be a server, firewalls protect TCP servers better than UDP servers.
You configure the control plane tunnel protocol on a Cisco SD-WAN Controller:
vSmart(config)# security control protocol tlsWith this change, all control plane tunnels between the Cisco SD-WAN Controller and the routers and between the Cisco SD-WAN Controller and Cisco SD-WAN Manager use TLS. Control plane tunnels to Cisco Catalyst SD-WAN Validator always use DTLS, because these connections must be handled by UDP.
In a domain with multiple Cisco SD-WAN Controllers, when you configure TLS on one of the Cisco SD-WAN Controllers, all control plane tunnels from that controller to the other controllers use TLS. Said another way, TLS always takes precedence over DTLS. However, from the perspective of the other Cisco SD-WAN Controllers, if you have not configured TLS on them, they use TLS on the control plane tunnel only to that one Cisco SD-WAN Controller, and they use DTLS tunnels to all the other Cisco SD-WAN Controllers and to all their connected routers. To have all Cisco SD-WAN Controllers use TLS, configure it on all of them.
By default, the Cisco SD-WAN Controller listens on port 23456 for TLS requests. To change this:
vSmart(config)# security control tls-port numberThe port can be a number from 1025 through 65535.
To display control plane security information, use the show control connections command on the Cisco SD-WAN Controller. For example:
vSmart-2# show control connections

                                                            PEER                  PEER
PEER    PEER     PEER           SITE   DOMAIN  PEER         PRIVATE  PEER         PUBLIC
TYPE    PROTOCOL SYSTEM IP      ID     ID      PRIVATE IP   PORT     PUBLIC IP    PORT    REMOTE COLOR  STATE  UPTIME
--------------------------------------------------------------------------------------------------------------------------
vedge   dtls     172.16.255.11  100    1       10.0.5.11    12346    10.0.5.11    12346   lte            up    0:07:48:58
vedge   dtls     172.16.255.21  100    1       10.0.5.21    12346    10.0.5.21    12346   lte            up    0:07:48:51
vedge   dtls     172.16.255.14  400    1       10.1.14.14   12360    10.1.14.14   12360   lte            up    0:07:49:02
vedge   dtls     172.16.255.15  500    1       10.1.15.15   12346    10.1.15.15   12346   default        up    0:07:47:18
vedge   dtls     172.16.255.16  600    1       10.1.16.16   12346    10.1.16.16   12346   default        up    0:07:41:52
vsmart  tls      172.16.255.19  100    1       10.0.5.19    12345    10.0.5.19    12345   default        up    0:00:01:44
vbond   dtls     -              0      0       10.1.14.14   12346    10.1.14.14   12346   default        up    0:07:49:08

vSmart-2# control connections

                                                             PEER                  PEER
PEER     PEER     PEER           SITE   DOMAIN  PEER         PRIVATE  PEER         PUBLIC
TYPE     PROTOCOL SYSTEM IP      ID     ID      PRIVATE IP   PORT     PUBLIC IP    PORT    REMOTE COLOR  STATE   UPTIME
---------------------------------------------------------------------------------------------------------------------------
vedge    tls      172.16.255.11  100    1       10.0.5.11    12345    10.0.5.11    12345   lte            up     0:00:01:18
vedge    tls      172.16.255.21  100    1       10.0.5.21    12345    10.0.5.21    12345   lte            up     0:00:01:18
vedge    tls      172.16.255.14  400    1       10.1.14.14   12345    10.1.14.14   12345   lte            up     0:00:01:18
vedge    tls      172.16.255.15  500    1       10.1.15.15   12345    10.1.15.15   12345   default        up     0:00:01:18
vedge    tls      172.16.255.16  600    1       10.1.16.16   12345    10.1.16.16   12345   default        up     0:00:01:18
vsmart   tls      172.16.255.20  200    1       10.0.12.20   23456    10.0.12.20   23456   default        up     0:00:01:32
vbond dtls - 0 0 10.1.14.14 12346 10.1.14.14 12346 default up 0:00:01:33If you configure the Cisco SD-WAN Manager to use TLS as the control plane security protocol, you must enable port forwarding on your NAT. If you are using DTLS as the control plane security protocol, you do not need to do anything.
The number of ports forwarded depends on the number of vdaemon processes running on the Cisco SD-WAN Manager. To display information about these processes and about and the number of ports that are being forwarded, use the show control summary command shows that four vdaemon processes are running:
vManage# show control summary
          VBOND     VMANAGE    VSMART    VEDGE
INSTANCE  COUNTS    COUNTS     COUNTS    COUNTS
------------------------------------------------
0           2          0           2        7
1           2          0           0        5
2           2          0           0        5
3           2          0           0        4
To see the listening ports, use the show control local-properties command:
vManage# show control local-properties
organization-name Cisco SD-WAN Inc Test
certificate-status Installed
root-ca-chain-status Installed
certificate-validity Valid
certificate-not-valid-before May 20 00:00:00 2015 GMT
certificate-not-valid-after May 20 23:59:59 2016 GMT
dns-name vbond.cisco.com
site-id 5000
domain-id 0
protocol dtls
tls-port 23456
...
...
...
number-active-wan-interfaces 1
PUBLIC PUBLIC PRIVATE PRIVATE ADMIN OPERATION LAST
INDEX INTERFACE IP PORT IP PORT VSMARTS VMANAGES COLOR CARRIER STATE STATE CONNECTION
------------------------------------------------------------------------------------------------------------------------
0 eth0 72.28.108.37 12361 172.16.98.150 12361 2 0 silver default up up 0:00:00:08This output shows that the listening TCP port is 23456. If you are running Cisco SD-WAN Manager behind a NAT, you should open the following ports on the NAT device:
23456 (base - instance 0 port)
23456 + 100 (base + 100)
23456 + 200 (base + 200)
23456 + 300 (base + 300)
Note that the number of instances is the same as the number of cores you have assigned for the Cisco SD-WAN Manager, up to a maximum of 8.
|
Feature Name |
Release Information |
Description |
|---|---|---|
|
Rekey Time increase to match OMP graceful-restart timer increase |
Cisco IOS XE Catalyst SD-WAN Release 17.18.1a Cisco Catalyst SD-WAN Manager Release 20.18.1 |
This feature enables an increased IPsec Rekey timer support to 63113904 seconds (730 days) to match the change for the OMP graceful restart Timer increase to 604800 seconds (365 days). |
Use the Cisco Security feature template for all Cisco IOS XE Catalyst SD-WAN devices. On the edge routers and on Cisco SD-WAN Validator, use this template to configure IPsec for data plane security. On Cisco SD-WAN Manager and Cisco SD-WAN Controller, use the Security feature template to configure DTLS or TLS for control plane security.
From the Cisco SD-WAN Manager menu, choose .
Click Feature Templates and then click Add Template.
 Note |
In Cisco vManage Release 20.7.1 and earlier releases, Feature Templates is called Feature. |
From the Devices list in the left pane, choose a device.
The templates applicable to the selected device appear in the right pane.Click Cisco Security to open the template.
In the Template Name field, enter a name for the template. The name can be up to 128 characters and can contain only alphanumeric characters.
In the Template Description field, enter a description of the template. The description can be up to 2048 characters and can contain only alphanumeric characters.
When you first open a feature template, for each parameter that has a default value, the scope is set to Default (indicated by a check mark), and the default setting or value is shown. To change the default or to enter a value, click the scope drop-down menu to the left of the parameter field and choose one of the following:
|
Parameter Scope |
Scope Description |
|---|---|
|
Device Specific (indicated by a host icon) |
Use a device-specific value for the parameter. For device-specific parameters, you cannot enter a value in the feature template. You enter the value when you attach a Viptela device to a device template . When you click Device Specific, the Enter Key box opens. This box displays a key, which is a unique string that identifies the parameter in a CSV file that you create. This file is an Excel spreadsheet that contains one column for each key. The header row contains the key names (one key per column), and each row after that corresponds to a device and defines the values of the keys for that device. You upload the CSV file when you attach a Viptela device to a device template. For more information, see Create a Template Variables Spreadsheet . To change the default key, type a new string and move the cursor out of the Enter Key box. Examples of device-specific parameters are system IP address, hostname, GPS location, and site ID. |
|
Global (indicated by a globe icon) |
Enter a value for the parameter, and apply that value to all devices. Examples of parameters that you might apply globally to a group of devices are DNS server, syslog server, and interface MTUs. |
Note |
The Configure Control Plane Security section is applicable to Cisco SD-WAN Manager and Cisco SD-WAN Controller only. |
To configure the control plane connection protocol on a Cisco SD-WAN Manager instance or a Cisco SD-WAN Controller, choose the Basic Configuration area and configure the following parameters:
|
Parameter Name |
Description |
|---|---|
|
Protocol |
Choose the protocol to use on control plane connections to a Cisco SD-WAN Controller:
|
|
Control TLS Port |
If you selected TLS, configure the port number to use:Range: 1025 through 65535 Default: 23456 |
Click Save
Configure various data plane security parameters under the relevant areas of the template:
|
Parameter Name |
Description |
|---|---|
|
Rekey Time |
Specify how often a device changes the AES key used on its secure DTLS connection to the Cisco SD-WAN Controller. If OMP graceful restart is enabled, the rekeying time must be at least twice the value of the OMP graceful restart timer.Range: 10 through 63113904 seconds (730 days) Default: 86400 seconds (24 hours) |
|
Replay Window |
Specify the size of the sliding replay window. Values: 64, 128, 256, 512, 1024, 2048, 4096, 8192 packets. Default: 512 packets |
|
Extended Anti Replay |
This is turned off by default. Click On to turn it on. |
|
IPsec pairwise-keying |
This is turned off by default. Click On to turn it on. |
|
Parameter Name |
Description |
||
|---|---|---|---|
|
Authentication Type |
Select the authentication types from the Authentication List, and click the arrow pointing right to move the authentication types to the Selected List column. Authentication types supported from Cisco IOS XE Catalyst SD-WAN Release 17.6.1a:
Authentication types supported in Cisco IOS XE Catalyst SD-WAN Release 17.5.1a and earlier:
|
Key Chain and Key ID
To add a new key chain, click New Key Chain and specify the following:
|
Parameter Name |
Description |
|---|---|
|
Keychain Name |
Enter a name for the key chain |
|
Key ID |
Specify a key ID |
Click Save.
In the data plane, IPsec is enabled by default on all routers, and by default IPsec tunnel connections use an enhanced version of the Encapsulating Security Payload (ESP) protocol for authentication on IPsec tunnels. On the routers, you can change the type of authentication, the IPsec rekeying timer, and the size of the IPsec anti-replay window.
From Cisco IOS XE Catalyst SD-WAN Release 17.6.1a Cisco SD-WAN Release 20.6.1, the following integrity types are supported:
esp: This option enables Encapsulating Security Payload (ESP) encryption and integrity checking on the ESP header.
ip-udp-esp: This option enables ESP encryption. In addition to the integrity checks on the ESP header and the payload, the checks also include the outer IP and UDP headers.
ip-udp-esp-no-id: This option is is similar to ip-udp-esp, however, the ID field of the outer IP header is ignored. Configure this option in the list of integrity types to have the Cisco Catalyst SD-WAN software ignore the ID field in the IP header so that the Cisco Catalyst SD-WAN can work in conjunction with non-Cisco devices.
none: This option turns integrity checking off on IPSec packets. We don't recommend using this option.
By default, IPsec tunnel connections use an enhanced version of the Encapsulating Security Payload (ESP) protocol for authentication. To modify the negotiated interity types, use the following command:
When you change the authentication-type from CLI, the configuration change works well but the new authentication-change doesn't show in the running configuration. We recommend you to change the authentication type to integrity type from Cisco SD-WAN Manager during the template push.
security ipsec integrity-type { none | ip-udp-esp | ip-udp-esp-no-id | esp }
When you modify the security ipsec integrity-type configuration, it temporarily brings down and then re-establishes all IPSec tunnels with the new integrity type. This tunnel recreation process can be lengthy on low-end platforms, particularly those with multiple features enabled and operating at full scale. This may also lead to some BFD sessions becoming stuck in a down state.
Therefore, we strongly recommend performing integrity-type configuration changes only during a scheduled maintenance window. If BFD sessions remain in a down state after such a change, execute the clear sdwan omp all command to trigger a reset and facilitate recovery.
By default, IPsec tunnel connections use an enhanced version of the Encapsulating Security Payload (ESP) protocol for authentication. To modify the negotiated authentication types, use the following command:
Device(config)# security ipsec authentication-type (ah-sha1-hmac | ah-no-id | sha1-hmac | )By default, IPsec tunnel connections use AES-GCM-256, which provides both encryption and authentication.
Configure each authentication type with a separate security ipsec authentication-type command. The command options map to the following authentication types, which are listed in order from most strong to least strong:
Note |
The |
ah-sha1-hmac enables encryption and encapsulation using ESP. However, in addition to the integrity checks on the ESP header and payload, the checks also include the outer IP and UDP headers. Hence, this option supports an integrity check of the packet similar to the Authentication Header (AH) protocol. All integrity and encryption is performed using AES-256-GCM.
ah-no-id enables a mode that is similar to ah-sha1-hmac, however the ID field of the outer IP header is ignored. This option accommodates some non-Cisco Catalyst SD-WAN devices, including the Apple AirPort Express NAT, that have a bug that causes the ID field in the IP header, a non-mutable field, to be modified. Configure the ah-no-id option in the list of authentication types to have the Cisco Catalyst SD-WAN AH software ignore the ID field in the IP header so that the Cisco Catalyst SD-WAN software can work in conjunction with these devices.
sha1-hmac enables ESP encryption and integrity checking.
For information about which data packet fields are affected by these authentication types, see Data Plane Integrity.
Cisco IOS XE Catalyst SD-WAN devices and Cisco vEdge devices advertise their configured authentication types in their TLOC properties. The two routers on either side of an IPsec tunnel
connection negotiate the authentication to use on the connection between them, using the strongest authentication type that
is configured on both of the routers. For example, if one router advertises the ah-sha1-hmac and ah-no-id types, and a second router advertises the ah-no-id type, the two routers negotiate to use ah-no-id on the IPsec tunnel connection between them. If no common authentication types are configured on the two peers, no IPsec
tunnel is established between them.
For the unicast traffic, the encryption algorithm on IPSec tunnel connections is AES-256-GCM. From Cisco IOS XE SD-WAN Release 17.2.1r, the multicast traffic also supports AES-256-GCM encryption algorithm. You cannot modify the encryption algorithm choice made by the software.
When the IPsec authentication type is changed, the AES key for the data path is changed.
Before Cisco IOS XE Catalyst SD-WAN devices and Cisco vEdge devices can exchange data traffic, they set up a secure authenticated communications channel between them. The routers use IPSec tunnels between them as the channel, and the AES-256 cipher to perform encryption. Each router generates a new AES key for its data path periodically.
By default, a key is valid for 86400 seconds (24 hours), and the timer range is 10 seconds through 1209600 seconds (14 days). To change the rekey timer value:
Device(config)# security ipsec
rekey seconds
The configuration looks like this:
security
    ipsec
      rekey seconds
    !
If you want to generate new IPsec keys immediately, you can do so without modifying the configuration of the router. To do this, issue the request platform software sdwan security ipsec-rekey command on the compromised router.
For example, the following output shows that the local SA has a Security Parameter Index (SPI) of 256:
Device# show sdwan ipsec local-sa

                                          SOURCE           SOURCE
TLOC ADDRESS     TLOC COLOR       SPI     IP               PORT    KEY HASH
------------------------------------------------------------------------------
172.16.255.15    lte              256     10.1.15.15       12346   *****b93a
A unique key is associated with each SPI. If this key is compromised, use the request platform software sdwan security ipsec-rekey command to generate a new key immediately. This command increments the SPI. In our example, the SPI changes to 257 and the key associated with it is now used:
Device# request platform software sdwan security ipsec-rekey
Device# show sdwan ipsec local-sa
                                          SOURCE           SOURCE
TLOC ADDRESS     TLOC COLOR       SPI     IP               PORT    KEY HASH
------------------------------------------------------------------------------
172.16.255.15    lte              257     10.1.15.15       12346   *****b93a
After the new key is generated, the router sends it immediately to the Cisco SD-WAN Controllers using DTLS or TLS. The Cisco SD-WAN Controllers send the key to the peer routers. The routers begin using it as soon as they receive it. Note that the key associated with the old SPI (256) will continue to be used for a short period of time, until it times out.
To stop using the old key immediately, issue the request platform software sdwan security ipsec-rekey command twice, in quick succession. This sequence of commands removes both SPI 256 and 257 and sets the SPI to 258. The router then uses the associated key of SPI 258. Note, however, that some packets will be dropped for a short period of time, until all the remote routers learn the new key.
Device# request platform software sdwan security ipsec-rekey
Device# request platform software sdwan security ipsec-rekey
Device# show sdwan ipsec local-sa
                                          SOURCE           SOURCE
TLOC ADDRESS     TLOC COLOR       SPI     IP               PORT    KEY HASH
------------------------------------------------------------------------------
172.16.255.15 lte 258 10.1.15.15 12346 *****b93a IPsec authentication provides anti-replay protection by assigning a unique sequence number to each packet in a data stream. This sequence numbering protects against an attacker duplicating data packets. With anti-replay protection, the sender assigns monotonically increasing sequence numbers, and the destination checks these sequence numbers to detect duplicates. Because packets often do not arrive in order, the destination maintains a sliding window of sequence numbers that it will accept.
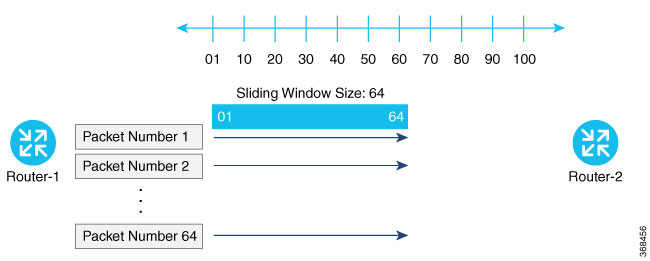
Packets with sequence numbers that fall to the left of the sliding window range are considered old or duplicates, and the destination drops them. The destination tracks the highest sequence number it has received, and adjusts the sliding window when it receives a packet with a higher value.

By default, the sliding window is set to 512 packets. It can be set to any value between 64 and 4096 that is a power of 2 (that is, 64, 128, 256, 512, 1024, 2048, or 4096). To modify the anti-replay window size, use the replay-window command, specifying the size of the window:
Device(config)# security ipsec replay-window
number
The configuration looks like this:
security
   ipsec
     replay-window number
   !
!
To help with QoS, separate replay windows are maintained for each of the first eight traffic channels. The configured replay window size is divided by eight for each channel.
If QoS is configured on a router, that router might experience a larger than expected number of packet drops as a result of the IPsec anti-replay mechanism, and many of the packets that are dropped are legitimate ones. This occurs because QoS reorders packets, giving higher-priority packets preferential treatment and delaying lower-priority packets. To minimize or prevent this situation, you can do the following:
Increase the size of the anti-replay window.
Engineer traffic onto the first eight traffic channels to ensure that traffic within a channel is not reordered.
|
Feature Name |
Release Information |
Description |
|---|---|---|
|
Anti-Replay Recovery Support |
Cisco IOS XE Catalyst SD-WAN Release 17.18.1a Cisco Catalyst SD-WAN Manager Release 20.18.1 |
This feature enables recovery support when there is anti-replay packet drops in the data plane with IPsec due to packets delivered out of order outside of the anti-replay window. |
The Auto Anti-Replay Recovery feature in Cisco's IPsec implementation is designed to handle packet drops that occur due to the anti-replay mechanism when Quality of Service (QoS) is configured. This feature helps in avoiding unnecessary packet drops by automatically recovering from situations where packets are dropped due to sequence number mismatches caused by QoS reordering or other network conditions. The recovery is typically quick, and normal traffic flow resumes shortly after the drops occur .
The anti-replay mechanism is a security feature that prevents attackers from capturing and replaying packets to disrupt communications. It works by assigning a sequence number to each packet, and the receiving device checks these numbers to ensure packets are received in order and are not duplicated.
At times, the 64-packet window size is not sufficient. For example, Cisco quality of service (QoS) gives priority to high-priority packets, which causes some low-priority packets to be discarded when they arrive outside of the 64 packet replay window at the decryptor. The IPsec Anti-Replay Recovery feature allows you to expand the window size, allowing the decryptor to keep track of more than 64 packets.
Increasing the anti-replay window size has no impact on throughput and security. The impact on memory is insignificant because only an extra 128 bytes per incoming IPsec SA is needed to store the sequence number on the decryptor. It is recommended that you use the full 1024 window size to eliminate any future anti-replay problems. The feature is disabled by default. The feature is enabled when the replay window size is set to 8192. Any other replay window size will disable this feature.
After changing the replay window size configuration, it is necessary to execute the command clear sdwan omp all to ensure that a new tunnel is created with the updated window size.
Note |
Auto anti-replay recovery feature is not supported on Cisco ASR 1001-HX and ASR 1002-HX platforms as they use octeon processors which offer dedicated hardware acceleration for IPsec. The IPSec datapath automatically detects IPSec packets dropped due to out-of-sequence errors within a tunnel based on the following criteria: Class 0 (Control Packets): Triggers after 64 consecutive lost packets. This threshold remains fixed at 64, regardless of the configured Anti-Replay (AR) window size. Class 1 and Class 2 (Data Packets): Triggers after losing twice the configured AR window size in consecutive packets. The following example shows the effective AR window of 64:
|
Auto anti-replay recovery is enabled only when the replay window size is set to 8192. Any other window size disables the feature. This feature can be enabled explicitly using the CLI command:
Device# config-t
Device(config)# platform ipsec auto-ar-recovery
Device(config)# commit
Device(config)#
Device# config-t
Device(config)# no platform ipsec auto-ar-recovery
Device(config)# commit
Device(config)#
The following example shows that the anti-replay recovery configuration:
Device# show platform hardware qfp active feature ipsec datapath crypto-sa 1556
Crypto Context Handle: d469560
 Flow id: 1037
 debug condition flow id: 0
 debug anti-replay: off
 debug hmac-drop: off
 peer sa handle: 0
 anti-replay enabled
 extended anti-replay disabled
 esn enabled
 H32 seq_num in ESP IV is enabled
 Auth_ah_no_id is FALSE
 Auth_ah is TRUE
 qfp sa ppe: 0
 Inbound SA
 Total SNS: 8
 Space                highest ar number
 ----------------------------------------
   0                             1001032
   1                                   0
   2                             1006659
   3                                   0
   4                                   0
   5                                   0
   6                                   0
   7                                   0
 Total inbound SA add received: 519, added: 519, deleted: 1
Total outbound SA add received: 519, added: 519, deleted: 1'Device# show logging
*Feb 20 07:54:58.899: %IPSEC-3-OUT_WINDOW_ERROR: F0: cpp_cp_svr: IPSec AR receives out of window error, DP Handle 1556, SPI 0x102, SNS_IDX 2QFP:0.0 Thread:001 TS:00000000665468936504
*Feb 20 07:54:58.901: %VDAEMON-6-IPSEC_REKEY: R0/0: vdaemon: IPSec SA auto-recover rekey done for tunnel established via GigabitEthernet1 (color: lte)
Device# show platform hardware qfp active feature ipsec state
QFP IPSEC state:

Message counter:
  Type                  Request          Reply (OK)       Reply (Error)
  -----------------------------------------------------------------------
...
Out-Window Notf       0                1                0            <<<<<<<<<< how many rekey notification sent from DP
Device# show sdwan ftm interfaces | in Gi
 IfName            HwIf IfIndex VR  Port  Qtag                    Hash  MTU  MSS Type      Color AR_rec_rcv Ar_rec_perfm
GigabitEthernet1    2       7   0     0     0    0    0   528 1500 1420  Wan        lte          1            1
GigabitEthernet2    3       8   0     0     0    0    0   528 1500 1420  Wan public-internet     0            0
GigabitEthernet5    6      11   0     0     0    0    0   528 1500 1420  Lan    invalid          0            0
GigabitEthernet3   14       9   3     0     0    0    0   528 1500 1420  Lan    invalid          0            0
AR_rec_rcv means how many notification received
Ar_rec_perfm means how many rekey performed.
This enables the feature regardless of the replay window size configured. The replay window size can be set to values other than 8192 (for example, 512), and the feature remains enabled. This example output shows where the replay window is 512, yet the feature is active.
Device# show version
Cisco IOS XE Software, Version 17.18.02
Device# show sdwan security-info
security-info authentication-type deprecated
security-info rekey  86400
security-info replay-window 512
security-info encryption-supported AES_GCM_256
security-info fips-mode Disabled
security-info pairwise-keying Disabled
security-info pwk-sym-rekey Enabled
security-info extended-ar-window Disabled
security-info integrity-type "ip-udp-esp esp"
Device# show run | i  auto-ar-recovery
platform ipsec auto-ar-recovery
Use this feature to configure security parameters for the data plane in the Cisco Catalyst SD-WAN overlay network.
See Configure Fabric Security Using a Configuration Group
The following tables describe the options for configuring the Fabric Security feature.
On the Configuration > Configuration Groups page, choose SD-WAN as the solution type.
|
Step 1 |
From the Cisco SD-WAN Manager menu, choose Configuration > Configuration Groups. |
|
Step 2 |
Create and configure a Fabric Security feature in a System profile. |
|
Step 3 |
Also see Deploy a Configuration Group
|
Feature Name |
Release Information |
Description |
|---|---|---|
|
Rekey Time increase to match OMP graceful-restart timer increase |
Cisco IOS XE Catalyst SD-WAN Release 17.18.1a Cisco Catalyst SD-WAN Manager Release 20.18.1 |
This feature enables an increased IPsec Rekey timer support to 63113904 seconds (730 days) to match the change for the OMP graceful restart Timer increase to 604800 seconds (365 days). |
Use the Cisco Security feature template for all Cisco IOS XE Catalyst SD-WAN devices. On the edge routers and on Cisco SD-WAN Validator, use this template to configure IPsec for data plane security. On Cisco SD-WAN Manager and Cisco SD-WAN Controller, use the Security feature template to configure DTLS or TLS for control plane security.
From the Cisco SD-WAN Manager menu, choose .
Click Feature Templates and then click Add Template.
Note |
In Cisco vManage Release 20.7.1 and earlier releases, Feature Templates is called Feature. |
From the Devices list in the left pane, choose a device.
The templates applicable to the selected device appear in the right pane.Click Cisco Security to open the template.
In the Template Name field, enter a name for the template. The name can be up to 128 characters and can contain only alphanumeric characters.
In the Template Description field, enter a description of the template. The description can be up to 2048 characters and can contain only alphanumeric characters.
When you first open a feature template, for each parameter that has a default value, the scope is set to Default (indicated by a check mark), and the default setting or value is shown. To change the default or to enter a value, click the scope drop-down menu to the left of the parameter field and choose one of the following:
|
Parameter Scope |
Scope Description |
|---|---|
|
Device Specific (indicated by a host icon) |
Use a device-specific value for the parameter. For device-specific parameters, you cannot enter a value in the feature template. You enter the value when you attach a Viptela device to a device template . When you click Device Specific, the Enter Key box opens. This box displays a key, which is a unique string that identifies the parameter in a CSV file that you create. This file is an Excel spreadsheet that contains one column for each key. The header row contains the key names (one key per column), and each row after that corresponds to a device and defines the values of the keys for that device. You upload the CSV file when you attach a Viptela device to a device template. For more information, see Create a Template Variables Spreadsheet . To change the default key, type a new string and move the cursor out of the Enter Key box. Examples of device-specific parameters are system IP address, hostname, GPS location, and site ID. |
|
Global (indicated by a globe icon) |
Enter a value for the parameter, and apply that value to all devices. Examples of parameters that you might apply globally to a group of devices are DNS server, syslog server, and interface MTUs. |
Note |
The Configure Control Plane Security section is applicable to Cisco SD-WAN Manager and Cisco SD-WAN Controller only. |
To configure the control plane connection protocol on a Cisco SD-WAN Manager instance or a Cisco SD-WAN Controller, choose the Basic Configuration area and configure the following parameters:
|
Parameter Name |
Description |
|---|---|
|
Protocol |
Choose the protocol to use on control plane connections to a Cisco SD-WAN Controller:
|
|
Control TLS Port |
If you selected TLS, configure the port number to use:Range: 1025 through 65535 Default: 23456 |
Click Save
Configure various data plane security parameters under the relevant areas of the template:
|
Parameter Name |
Description |
|---|---|
|
Rekey Time |
Specify how often a device changes the AES key used on its secure DTLS connection to the Cisco SD-WAN Controller. If OMP graceful restart is enabled, the rekeying time must be at least twice the value of the OMP graceful restart timer.Range: 10 through 63113904 seconds (730 days) Default: 86400 seconds (24 hours) |
|
Replay Window |
Specify the size of the sliding replay window. Values: 64, 128, 256, 512, 1024, 2048, 4096, 8192 packets. Default: 512 packets |
|
Extended Anti Replay |
This is turned off by default. Click On to turn it on. |
|
IPsec pairwise-keying |
This is turned off by default. Click On to turn it on. |
|
Parameter Name |
Description |
||
|---|---|---|---|
|
Authentication Type |
Select the authentication types from the Authentication List, and click the arrow pointing right to move the authentication types to the Selected List column. Authentication types supported from Cisco IOS XE Catalyst SD-WAN Release 17.6.1a:
Authentication types supported in Cisco IOS XE Catalyst SD-WAN Release 17.5.1a and earlier:
|
Key Chain and Key ID
To add a new key chain, click New Key Chain and specify the following:
|
Parameter Name |
Description |
|---|---|
|
Keychain Name |
Enter a name for the key chain |
|
Key ID |
Specify a key ID |
Click Save.
Use the VPN Interface IPsec feature template to configure IPsec tunnels on Cisco IOS XE service VPNs that are being used for Internet Key Exchange (IKE) sessions. You can configure IPsec on tunnels for VPNs in:
Range: 1 to 65525, excluding 512. For details see the VRF range behavior change described here.
Cisco Cisco IOS XE Catalyst SD-WAN devices use VRFs in place of VPNs. However, the following steps still apply to configure Cisco IOS XE Catalyst SD-WAN devices through Cisco SD-WAN Manager. In Cisco SD-WAN Manager, the system automatically maps the VPN configurations to VRF configurations.
In controller mode, only Route based IPSec tunnels are supported.
|
Step 1 |
From the Cisco SD-WAN Manager menu, choose . |
||
|
Step 2 |
Click Feature Templates.
|
||
|
Step 3 |
Click Add Template. |
||
|
Step 4 |
Choose a Cisco IOS XE Catalyst SD-WAN device from the list. |
||
|
Step 5 |
From the VPN section, click VPN Interface IPsec. The Cisco VPN Interface IPsec template displays. |
||
|
Step 6 |
In Template Name, enter a name for the template. The name can be up to 128 characters and can contain only alphanumeric characters. |
||
|
Step 7 |
In Template Description, enter a description of the template. The description can be up to 2048 characters and can contain only alphanumeric characters. |
When you first open a feature template, for each parameter that has a default value, the scope is set to Default (a  ), and the default setting or value is shown. To change the default or to enter a value, click the scope drop-down to the left of the parameter field and choose one of the following:
|
Parameter Name |
Description |
|---|---|

Device Specific |
Use a device-specific value for the parameter. For device-specific parameters, you cannot enter a value in the feature template. You enter the value when you attach a device to a device template. When you click Device Specific, the Enter Key box opens. This box displays a key, which is a unique string that identifies the parameter in a CSV file that you create. This file is an Excel spreadsheet that contains one column for each key. The header row contains the key names (one key per column), and each row after that corresponds to a device and defines the values of the keys for that device. Upload the CSV file when you attach a device to a device template. To change the default key, type a new string and move the cursor out of the Enter Key box. Examples of device-specific parameters are system IP address, hostname, GPS location, and site ID. |

Global |
Enter a value for the parameter, and apply that value to all devices. Examples of parameters that you might apply globally to a group of devices are DNS server, syslog server, and interface MTUs. |
Once you have created and named the template, enter the following values. Parameters marked with an asterisk are required.
To configure the IPsec tunnel that carries Internet Key Exchange (IKE) traffic, click IPsec and configure the following parameters:
| Parameter Name | Options | Description |
|---|---|---|
| IPsec Rekey Interval | 3600 - 1209600 seconds |
Specify the interval for refreshing IKE keys. Range: 1 hour through 14 days Default: 3600 seconds |
| IKE Replay Window | 64, 128, 256, 512, 1024, 2048, 4096, 8192 |
Specify the replay window size for the IPsec tunnel. Default: 512 |
| IPsec Cipher Suite |
aes256-cbc-sha1 aes256-gcm null-sha1 |
Specify the authentication and encryption to use on the IPsec tunnel Default: aes256-gcm |
| Perfect Forward Secrecy |
2 1024-bit modulus 14 2048-bit modulus 15 3072-bit modulus 16 4096-bit modulus none |
Specify the PFS settings to use on the IPsec tunnel. Choose one of the following Diffie-Hellman prime modulus groups: 1024-bit – group-2 2048-bit – group-14 3072-bit – group-15 4096-bit – group-16 none –disable PFS. Default: group-16 |
Note |
Starting from Cisco IOS XE Catalyst SD-WAN Release 17.11.1a, as part of the security hardening, the weaker ciphers are deprecated. As part of this change, the option to configure Diffie-Hellman (DH) groups 1, 2, and 5 is no longer supported. DH groups are used in IKE to establish session keys and are also available in IPsec as support for perfect forward secrecy. |
To save the feature template, click Save.
crypto
   ipsec
      profile ipsec_profile_name
         set ikev2-profile ikev2_profile_name
         set security-association
            lifetime {seconds 120-2592000 | kilobytes disable}
            replay {disable | window-size {64 | 128 | 256 | 512 | 1024 | 4096 | 8192}
         set pfs group {2 | 14 | 15 | 16 | none}
set transform-set transform_set_nameTo configure Internet key exchange (IKE) dead-peer detection (DPD) to determine whether the connection to an IKE peer is functional and reachable, click DPD and configure the following parameters:
|
Parameter Name |
Description |
|---|---|
|
DPD Interval |
Specify the interval for IKE to send Hello packets on the connection. Range: 10 through 3600 seconds Default: Disabled |
|
DPD Retries |
Specify how many unacknowledged packets to accept before declaring an IKE peer to be dead and then tearing down the tunnel to the peer. Range: 2 through 60 Default: 3 |
To save the feature template, click Save.
crypto
   ikev2
      profile ikev2_profile_name
dpd 10-3600 2-60 {on-demand | periodic}|
Feature Name |
Release Information |
Description |
|---|---|---|
|
SHA256 Support for IPSec Tunnels |
Cisco IOS XE Catalyst SD-WAN Release 17.2.1r |
This feature adds support for |
To configure IKE, click IKE and configure the following parameters:
Note |
When you create an IPsec tunnel on a Cisco IOS XE Catalyst SD-WAN device, IKE Version 1 is enabled by default on the tunnel interface. |
To configure the IPsec tunnel that carries IKEv1 and IKEv2 traffic, click IPSEC and configure the following parameters:
| Parameter Name | Options | Description | ||||
|---|---|---|---|---|---|---|
| IKE Version |
1 IKEv1 2 IKEv2 |
Enter 1 to choose IKEv1. Enter 2 to choose IKEv2. Default: IKEv1
|
||||
| IKE Mode |
Aggressive mode Main mode |
For IKEv1 only, specify one of the following modes:
Default: Main mode |
||||
| IPsec Rekey Interval | 3600 - 1209600 seconds |
Specify the interval for refreshing IKE keys. Range: 1 hour through 14 days Default: 14400 seconds (4 hours) |
||||
| IKE Cipher Suite |
|
Specify the type of authentication and encryption to use during IKE key exchange. Default: AES 256 CBC SHA 1 |
||||
| IKE Diffie-Hellman Group |
2 14 15 16 |
Specify the Diffie-Hellman group to use in IKE key exchange, whether IKEv1 or IKEv2.
Default: 4096-bit modulus |
||||
| IKE Authentication | Configure IKE authentication. | |||||
| Preshared Key | Enter the password to use with the preshared key. | |||||
| IKE ID for Local End Point |
If the remote IKE peer requires a local end point identifier, specify it. Range: 1 through 64 characters Default: Tunnel's source IP address |
|||||
| IKE ID for Remote End Point |
If the remote IKE peer requires a remote end point identifier, specify it. Range: 1 through 64 characters Default: Tunnel's destination IP address |
|||||
Note |
When you are pushing authentication from Cisco SD-WAN Manager, use the authentication string configured for the source and destination stations in double quotes as special characters are not supported. The string can be up to eight characters long. |
To save the feature template, click Save.
To change the IKE version, do the following:
From the Cisco SD-WAN Manager menu, choose Configuration > Templates.
Click Feature Templates, and then click Add Template.
Note |
In Cisco vManage Release 20.7.x and earlier releases, Feature Templates is called Feature. |
Choose the device for which you are creating the template.
Click Basic Configuration.
Use the shutdown parameter with the yes option (yes shutdown) to shut down the tunnel.
Remove the ISAKMP profile from the IPsec profile.
Attach the IKEv2 profile with the IPsec profile.
Note |
Perform this step if you already have an IKEv2 profile. Otherwise, create an IKEv2 profile first. |
Use the shutdown parameter with the no option (no shutdown) to start up the tunnel.
Note |
You must issue the shutdown operations in two separate operations. |
Note |
There is no single CLI for changing the IKE version. You need to follow the sequence of steps listed in the Change the IKE Version from IKEv1 to IKEv2 section. |
ISAKMP CLI Configuration for IKEv1
crypto
   isakmp
      keepalive 60-86400 2-60 {on-demand | periodic}
      policy policy_num
         encryption {AES128-CBC-SHA1 | AES256-CBC-SHA1}
         hash {sha384 | sha256 | sha}
         authentication pre-share
         group {2 | 14 | 16 | 19 | 20 | 21}
         lifetime 60-86400
      profile ikev1_profile_name
         match identity address ip_address [mask]
         keyring keyring_name
IPsec CLI Configuration for IKEv1
profile ipsec_profile_name
         set transform-set transform_set_name
         set isakmp-profile ikev1_profile_name
         set security-association
            lifetime {kilobytes disable | seconds 120-2592000}
            replay {disable | window-size [64 | 128 | 256 | 512 | 1024]}
         set pfs group {14 | 16 | 19 | 20 | 21}
   keyring keyring_name
      pre-shared-key address ip_address [mask] key key_string
ipsec transform-set transform_set_name {esp-gcm 256 | esp-aes 256 [esp-sha384-hmac | esp-sha256-hmac] mode tunnelenable
configure terminal
crypto isakmp policy priority
encryption {des | 3des | aes | aes 192 | aes 256 }
hash {sha | sha256 | sha384 | md5 }
authentication {rsa-sig | rsa-encr | pre-share }
group {1 | 2 | 5 | 14 | 15 | 16 | 19 | 20 | 24 }
lifetime seconds
exit
exit
crypto
   ikev2
      proposal proposal_name
         encryption {3des | aes-cbc-128 | aes-cbc-192 | aes-cbc-256 | des}
         integrity {sha256 | sha384 | sha512}
         group {2 | 14 | 15 | 16}
      keyring idev2_keyring_name
         peer peer_name
         address tunnel_dest_ip [mask]
         pre-shared-key key_string
      profile ikev2_profile_name
         match identity remote address ip_address
         authentication {remote | local} pre-share
         keyring local ikev2_keyring_name
lifetime 120-86400 |
Feature Name |
Release Information |
Feature Description |
|---|---|---|
|
Disable Weak SSH Encryption Algorithms on Cisco SD-WAN Manager |
Cisco vManage Release 20.9.1 |
This feature allows you to disable weaker SSH algorithms on Cisco SD-WAN Manager that may not comply with certain data security standards. |
|
Disabled Weak SSH Encryption Algorithms |
Cisco IOS XE Catalyst SD-WAN Release 17.16.1a Cisco Catalyst SD-WAN Control Components Release 20.16.1 |
For better security, certain weak SSH encryption algorithms are disabled by default on port 22 and port 830 for devices in the Cisco Catalyst SD-WAN overlay. |
When Cisco Catalyst SD-WAN Control Components establish control connections with each device in the network, they use an encryption algorithm that each device supports.
To improve security, from Cisco IOS XE Catalyst SD-WAN Release 17.16.1a, some SSH encryption algorithms are disabled by default.
For port 22, the SSH-RSA algorithm is disabled.
For port 830, these algorithms are disabled.
AES128-CBC
AES256-CBC
diffie-hellman-group14-sha1
HMAC-SHA1
SSH-RSA
Minimum supported releases: Cisco vManage Release 20.9.1
Cisco SD-WAN Manager provides an SSH client for communication with components in the network, including controllers and edge devices. The SSH client provides an encrypted connection for secure data transfer, based on a variety of encryption algorithms. Many organizations require stronger encryption than that provided by SHA-1, AES-128, and AES-192.
From Cisco vManage Release 20.9.1, you can disable these weak encryption algorithms so that an SSH client does not use these algorithms:
SHA-1
AES-128
AES-192
Starting from Cisco Catalyst SD-WAN Manager Release 20.16.1, the SHA-1 algorithm is disabled by default in Cisco SD-WAN Manager. Use the question mark (?) online help function on the CLI to find alternative algorithms to SHA-1.
Before disabling these encryption algorithms, ensure that Cisco vEdge devices, if any, in the network, are using a software release later than Cisco SD-WAN Release 18.4.6.
Note |
You cannot change the SSH KEX and cipher algorithms on the Cisco SD-WAN Controller and the Cisco Catalyst SD-WAN Validator through the CLI. It is only supported on Cisco SD-WAN Manager. |
Note |
Starting from Cisco Catalyst SD-WAN Manager Release 20.18.1, you can disable weak SSH encryption algorithms for Cisco SD-WAN Validator and Cisco SD-WAN Controller. |
Disabling weaker SSH encryption algorithms improves the security of SSH communication, and ensures that organizations using Cisco Catalyst SD-WAN are compliant with strict security regulations.
From the Cisco SD-WAN Manager menu, choose .
Choose the Cisco SD-WAN Manager device on which you wish to disable weaker SSH algorithms.
Enter the username and password to log in to the device.
Enter SSH server mode.
vmanage# config terminalvmanage(config)# systemvmanage(config-system)# ssh-serverDo one of the following to disable an SSH encryption algorithm:
Disable SHA-1:
vmanage(config-ssh-server)# no kex-algo sha1vmanage(config-ssh-server)# commitThe following warning message is displayed:
The following warnings were generated:
'system ssh-server kex-algo sha1': WARNING: Please ensure all your edges run code version > 18.4.6 which negotiates better than SHA1 with vManage. Otherwise those edges may become offline.
Proceed? [yes,no] yes
Ensure that any Cisco vEdge devices in the network are running Cisco SD-WAN Release 18.4.6 or later and enter yes.
Disable AES-128 and AES-192:
vmanage(config-ssh-server)# no cipher aes-128-192vmanage(config-ssh-server)# commitThe following warning message is displayed:
The following warnings were generated:
'system ssh-server cipher aes-128-192': WARNING: Please ensure all your edges run code version > 18.4.6 which negotiates better than AES-128-192 with vManage. Otherwise those edges may become offline.
Proceed? [yes,no] yes
Ensure that any Cisco vEdge devices in the network are running Cisco SD-WAN Release 18.4.6 or later and enter yes.
From the Cisco SD-WAN Manager menu, choose .
Select the Cisco SD-WAN Manager device you wish to verify.
Enter the username and password to log in to the device.
Run the following command:
show running-config system ssh-serverConfirm that the output shows one or more of the commands that disable weaker encryption algorithms:
no cipher aes-128-192
no kex-algo sha1
 Feedback