CLI ベースのセットアッププログラムによるスイッチの設定
この章では、スイッチのコマンド ライン インターフェイス(CLI)ベースのセットアップ手順について説明します。
コンソール ポート経由での CLI へのアクセス
Cisco IOS コマンドおよびパラメータは CLI によって入力できます。IE3x00 には、RJ45 8 ピン、または USB ミニタイプ B の 2 つのコンソールオプションがあります。CLI にアクセスするには、これらのオプションのいずれかを使用します。
RJ-45 コンソール ポート
-
コンソールケーブルの一方の端を PC に接続します。
接続するには、USB to RJ45 用のアダプタが必要になる場合があります。
-
ケーブルまたはアダプタのもう一方の端をスイッチのコンソールポートに接続します。
-
PC または端末上で端末エミュレーション ソフトウェアを起動します。プログラム(通常は PuTTY、HyperTerminal、Procomm Plus などの PC アプリケーション)によって、スイッチと PC または端末との通信が可能になります。
図 1. コンソール ケーブルの接続 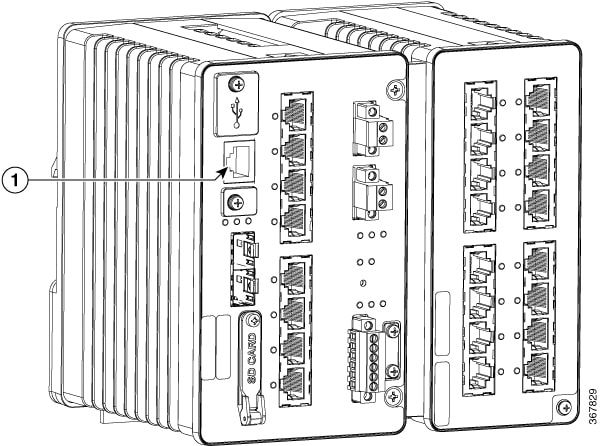
- 1
- RJ-45 コンソール ポート
-
PC または端末のボー レートおよびキャラクタ フォーマットを、次に示すコンソール ポートの特性に合わせて設定します。
-
9600 ボー
-
8 データ ビット
-
1 ストップ ビット
-
パリティなし
-
なし(フロー制御)
-
-
「電源への接続」の説明に従って、電源をスイッチに接続します。
-
PC または端末にブートローダ シーケンスが表示されます。Enter を押してセットアッププロンプトを表示します。セットアッププログラムを使用してスイッチを設定するには、初期設定情報の入力を参照してください。
USB ミニタイプ B コンソール ポート
-
スイッチの USB-mini コンソール ポートを Windows ベースの PC に最初に接続するときは、USB ドライバをインストールします。
-
プラスドライバを使用して、USB-mini タイプ B コンソールポートのカバーのネジを緩めます。ネジを取り外し、カバーを外します。
図 2. USB ミニタイプ B コンソール ポートのカバー 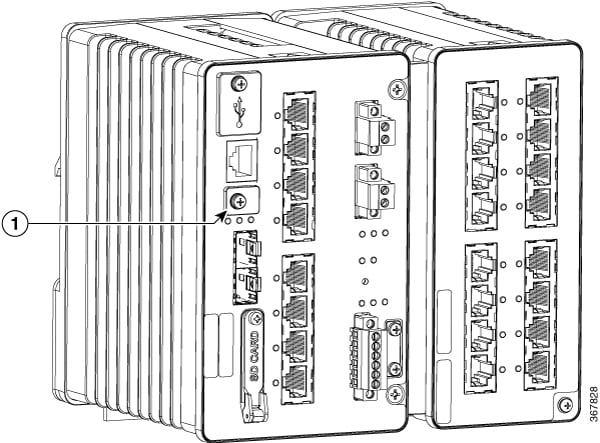
表 1. 1
USB ミニタイプ B コンソール ポートのカバー
-
USB ケーブルを PC の USB ポートに接続します。ケーブルのもう一端をスイッチのミニ B(5 ピン コネクタ)USB-mini コンソール ポートに接続します。
-
USB-mini コンソールポートに割り当てられた COM ポートを識別するには、次の手順を実行します。
-
PC または端末上で端末エミュレーション ソフトウェアを起動します。プログラム(通常は PuTTY、HyperTerminal、ProcommPlus などの PC アプリケーション)によって、スイッチと PC または端末との通信が可能になります。
-
COM ポートを設定します。
-
PC または端末のボー レートおよびキャラクタ フォーマットを、次に示すコンソール ポートの特性に合わせて設定します。
-
9600 ボー
-
8 データ ビット
-
1 ストップ ビット
-
パリティなし
-
なし(フロー制御)
-
-
「電源への接続」の説明に従って、電源をスイッチに接続します。
-
PC または端末にブートローダ シーケンスが表示されます。Enter を押してセットアッププロンプトを表示します。セットアッププログラムを使用してスイッチを設定するには、初期設定情報の入力を参照してください。
初期設定情報の入力
スイッチを設定するには、セットアップ プログラムを完了する必要があります。セットアップ プログラムは、スイッチの電源がオンになると自動的に実行されます。スイッチがローカル ルータやインターネットと通信するのに必要な IP アドレスやその他の設定情報を割り当てる必要があります。この情報は、WebUI を使用してスイッチを設定および管理する場合にも必要です。
Cisco IOS XE 17.10.1 以降では、ユーザーのパスワードがプレーンテキストで保存されないように、パスワード暗号化レベルを設定することができます。システムセキュリティ設定(Cisco IOS XE 17.10.1 以降)を参照してください。
IP とパスワードの設定
セットアップ プログラムを完了するには、ネットワーク管理者から次の情報を入手しておく必要があります。
-
暗号化レベルとマスターキー(Cisco IOS XE 17.10.1 以降)
-
スイッチの IP アドレス
-
サブネット マスク(IP ネットマスク)
-
デフォルト ゲートウェイ(ルータ)
-
イネーブル シークレット パスワード
-
イネーブル パスワード
初期設定(Cisco IOS XE 17.9.x 以前)
セットアッププログラムを使用して、スイッチの初期設定を行う手順は次のとおりです。
-
次の 2 つのプロンプトで Yes と入力します。
Would you like to enter the initial configuration dialog? [yes/no]: yes At any point you may enter a question mark '?' for help. Use ctrl-c to abort configuration dialog at any prompt. Default settings are in square brackets '[]'. Basic management setup configures only enough connectivity for management of the system, extended setup will ask you to configure each interface on the system. Would you like to enter basic management setup? [yes/no]: yes -
スイッチのホスト名を入力し、Return を押します。
指定できるホスト名の文字数は、コマンド スイッチでは 28 文字、メンバ スイッチでは 31 文字に制限されています。どのスイッチでも、ホスト名の最終文字として -n(n は数字)を使用しないでください。
Enter host name [Switch]: host_name -
イネーブル シークレット パスワードを入力し、Return を押します。
このパスワードは 1 ~ 25 文字の英数字で指定できます。先頭の文字を数字にしてもかまいません。大文字と小文字が区別されます。スペースも使えますが、先頭のスペースは無視されます。シークレット パスワードは暗号化されますが、イネーブル パスワードはプレーン テキストです。
Enter enable secret: secret_password -
イネーブル パスワードを入力し、Return を押します。
Enter enable password: enable_password -
仮想端末パスワードを入力し、Return を押します。
このパスワードは 1 ~ 25 文字の英数字で指定できます。大文字と小文字が区別されます。スペースも使えますが、先頭のスペースは無視されます。
Enter virtual terminal password: terminal-password -
(任意)プロンプトに従って、簡易ネットワーク管理プロトコル(SNMP)を設定します。後から、CLI、Device Manager、または Cisco Network Assistant アプリケーションを使用して SNMP を設定することもできます。SNMP を後で設定する場合は、no と入力します。
Configure SNMP Network Management? [no]: no -
管理ネットワークに接続するインターフェイスのインターフェイス名(物理的なインターフェイスまたは VLAN(仮想 LAN)の名前)を入力して、Return を押します。このリリースでは、インターフェイス名には必ず vlan1 を使用します。

(注)
スイッチは、vlan1 インターフェイス上で DHCP 検出メッセージを送信します。CLI の初期セットアッププロセスが開始される前にスイッチがネットワークに接続されている場合は、インターフェイスにダイナミック IP アドレスが割り当てられている可能性があります。vlan1 インターフェイスに IP アドレスが表示されていなくても問題ありません。このプロセスでは、動的に割り当てられた IP アドレスを上書きする管理用の静的 IP アドレスを設定できます。
Current interface summary Any interface listed with OK? value "NO" does not have a valid configuration Interface IP-Address OK? Method Status Protocol Vlan1 unassigned NO unset up down GigabitEthernet1/1 unassigned YES unset down down GigabitEthernet1/2 unassigned YES unset down down GigabitEthernet1/3 unassigned YES unset down down GigabitEthernet1/4 unassigned YES unset down down GigabitEthernet1/5 unassigned YES unset down down GigabitEthernet1/6 unassigned YES unset down down GigabitEthernet1/7 unassigned YES unset down down GigabitEthernet1/8 unassigned YES unset down down GigabitEthernet1/9 unassigned YES unset down down GigabitEthernet1/10 unassigned YES unset down down Enter interface name used to connect to the management network from the above interface summary: vlan1 Enter interface name used to connect to the management network from the above interface summary: vlan1 -
スイッチの IP アドレスとサブネットマスクを入力し、Return キーを押してインターフェイスを設定します。ここに示す IP アドレスとサブネット マスクは一例です。
Configuring interface Vlan1: Configure IP on this interface? [yes]: IP address for this interface: 10.1.1.2 Subnet mask for this interface [255.255.255.0] : Class A network is 10.0.0.0, 8 subnet bits; mask is /24 -
次のサマリーが表示されます。
The following configuration command script was created:
hostname ie3300
enable secret 9 $9$rkqtjJhIkZyANU$Ib4nfuxrpHBi.lixF.0Ir94k9XWYsW3nyF7Glmc6lkc
enable password cisco
line vty 0 15
password cisco
no snmp-server
!!
interface Vlan1
no shutdown
ip address 10.1.1.2 255.255.255.0
!
interface GigabitEthernet1/1
!
interface GigabitEthernet1/2
!
interface GigabitEthernet1/3
!
interface GigabitEthernet1/4
!
interface GigabitEthernet1/5
!
interface GigabitEthernet1/6
!
interface GigabitEthernet1/7
!
interface GigabitEthernet1/8
!
interface GigabitEthernet1/9
!
interface GigabitEthernet1/10
!
end
セットアップ プログラムが完了すると、スイッチは作成されたデフォルト設定を実行できます。次のいずれかのツールを使用すれば、この設定の変更や他の管理タスクを実行できます。
-
コマンドライン インターフェイス(CLI)
CLI を使用するには、端末エミュレーションプログラムを使用してコンソールポートから Switch> プロンプトにコマンドを入力します。設定情報については、スイッチの『Cisco Catalyst IE3x00 Rugged Switch software configuration guides』を参照してください。
-
システムセキュリティ設定(Cisco IOS XE 17.10.1 以降)
セキュリティを強化するには、パスワードなどの機密情報を暗号化する必要があります。設定ダイアログには、パスワード暗号化レベルを設定できる [System Security Configuration Dialog] が含まれています。暗号化レベルには、タイプ 6 およびタイプ 7 の暗号化が含まれます。両方のタイプを有効にすることをお勧めします。
-
タイプ 6 は、パスワードの暗号化に Advanced Encryption Standard(AES)を使用します。タイプ 6 パスワードの暗号化と暗号解読は、入力するマスターキーと結合されます。マスターキーはリカバリできないため、記憶しておく必要があります。
-
マスターキーは、AES 対称暗号を使用してスイッチ設定内の他のすべてのキーを暗号化するために使用されるパスワード/キーです。マスターキーはスイッチ設定には保存されず、スイッチに接続したとしてもどのような方法でも表示も取得もできません。設定されると、マスターキーを使用して、スイッチ設定内の既存または新しいキーが暗号化されます。password encryption aes コマンドを実行するまで、キーは暗号化されません。
-
タイプ 7 パスワードは、元のプレーンテキストパスワードを難読化したものです。これはヴィジュネル暗号に基づいており、設定内の実際のパスワードが誰かに見られるのを防ぎます。
セットアッププログラムを使用して、新しいスイッチと設定済みのスイッチの両方でパスワード暗号化レベルを設定できます。新しいスイッチについては、初期設定 - タイプ 6 暗号化 または 初期設定 - タイプ 7 暗号化 を参照してください。初期セットアップを実行せずにシステムセキュリティ設定を設定するには、パスワード暗号化レベルの設定 を参照してください。
初期設定 - タイプ 6 暗号化
タイプ 6 暗号化とセットアッププログラムを使用して、スイッチの初期設定を行う手順は次のとおりです。
始める前に
コンソール ポート経由での CLI へのアクセス の説明に従って CLI にアクセスします。
手順
|
ステップ 1 |
次のプロンプトで Yes を入力します。 |
||
|
ステップ 2 |
プロンプトで、適用するパスワード暗号化レベルを入力します。
|
||
|
ステップ 3 |
スイッチの他のすべてのキーの暗号化に使用するマスターキーを入力します。 |
||
|
ステップ 4 |
マスターキーをもう一度入力して確定します。
|
||
|
ステップ 5 |
プロンプトで 2 を入力して、システムセキュリティ設定を保存します。 |
||
|
ステップ 6 |
プロンプトで yes と入力して、基本管理設定を設定します。 |
||
|
ステップ 7 |
スイッチのホスト名を入力します。 |
||
|
ステップ 8 |
イネーブル シークレット パスワードを入力します。 |
||
|
ステップ 9 |
イネーブル シークレット パスワードをもう一度入力して確定します。 |
||
|
ステップ 10 |
イネーブルパスワードを入力します。 |
||
|
ステップ 11 |
仮想端末のパスワードを入力します。 このパスワードは 1 ~ 25 文字の英数字で指定できます。大文字と小文字が区別されます。スペースも使えますが、先頭のスペースは無視されます。 |
||
|
ステップ 12 |
管理ネットワークに接続するインターフェイスのインターフェイス名(物理的なインターフェイスまたは VLAN(仮想 LAN)の名前)を入力します。このリリースでは、インターフェイス名には必ず vlan1 を使用します。
|
||
|
ステップ 13 |
設定を保存するには、2 と入力します。 |
次のタスク
セットアップ プログラムが完了すると、スイッチは作成されたデフォルト設定を実行できます。次のいずれかのツールを使用すれば、この設定の変更や他の管理タスクを実行できます。
-
コマンドライン インターフェイス(CLI)
-
Web ユーザインターフェイス(WebUI)
CLI を使用するには、端末エミュレーションプログラムを使用してコンソールポートから、または Telnet を使用してネットワークから、Switch > プロンプトにコマンドを入力します。設定情報については、Cisco IE3x00 スイッチの設定ガイドを参照してください。
WebUI を使用するには、WebUI のオンライン ヘルプを参照してください。
初期設定 - タイプ 7 暗号化
タイプ 7 暗号化のみとセットアッププログラムを使用して、スイッチの初期設定を行う手順は次のとおりです。
始める前に
コンソール ポート経由での CLI へのアクセス の説明に従って CLI にアクセスします。
手順
|
ステップ 1 |
次のプロンプトで Yes を入力します。 |
||
|
ステップ 2 |
プロンプトで 1 を入力して、タイプ 7 パスワード暗号化のみを適用します。 |
||
|
ステップ 3 |
プロンプトで 2 を入力して、システムセキュリティ構成を保存します。 |
||
|
ステップ 4 |
プロンプトで yes と入力して、基本管理設定を設定します。 |
||
|
ステップ 5 |
スイッチのホスト名を入力します。 |
||
|
ステップ 6 |
イネーブル シークレット パスワードを入力します。 |
||
|
ステップ 7 |
イネーブル シークレット パスワードをもう一度入力して確定します。 |
||
|
ステップ 8 |
イネーブルパスワードを入力します。 |
||
|
ステップ 9 |
仮想端末のパスワードを入力します。 このパスワードは 1 ~ 25 文字の英数字で指定できます。大文字と小文字が区別されます。スペースも使えますが、先頭のスペースは無視されます。 |
||
|
ステップ 10 |
管理ネットワークに接続するインターフェイスのインターフェイス名(物理的なインターフェイスまたは VLAN(仮想 LAN)の名前)を入力します。このリリースでは、インターフェイス名には必ず vlan1 を使用します。
|
||
|
ステップ 11 |
設定を保存するには、2 と入力します。 |
次のタスク
セットアップ プログラムが完了すると、スイッチは作成されたデフォルト設定を実行できます。次のいずれかのツールを使用すれば、この設定の変更や他の管理タスクを実行できます。
-
コマンドライン インターフェイス(CLI)
-
Web ユーザインターフェイス(WebUI)
CLI を使用するには、端末エミュレーションプログラムを使用してコンソールポートから、または Telnet を使用してネットワークから、Switch > プロンプトにコマンドを入力します。設定情報については、Cisco IE3x00 スイッチの設定ガイドを参照してください。
WebUI を使用するには、WebUI のオンライン ヘルプを参照してください。
パスワード暗号化レベルの設定
この手順に従って、初期セットアップを実行せずにシステムセキュリティ設定(タイプ 6 およびタイプ 7 暗号化)を設定します。
手順
|
ステップ 1 |
次のプロンプトで No を入力します。 |
||
|
ステップ 2 |
プロンプトでイネーブルシークレットを入力します。 |
||
|
ステップ 3 |
2 を入力して設定を保存し、システムセキュリティ設定に移動します。 |
||
|
ステップ 4 |
プロンプトで、適用するパスワード暗号化レベルを入力します。 |
||
|
ステップ 5 |
スイッチの他のすべてのキーの暗号化に使用するマスターキーを入力します。 |
||
|
ステップ 6 |
マスターキーをもう一度入力して確定します。
|
||
|
ステップ 7 |
プロンプトで 2 を入力して、システムセキュリティ設定を保存します。 |
CLI セットアップの例
        --- System Configuration Dialog ---

Would you like to enter the initial configuration dialog? [yes/no]: yes
  -----System Security Configuration Dialog-----

 Cisco recommends that for enchanced security users should encrypt sensitive info
 The configuration dialog will allow you to set encryption level
 It is recommended that both type-6 & type-7 encryption should be enabled by user
 For type-6 user will need to create and remember Master key as it cannot be recovered

 [0] for both type-6 & type-7 encryption to be applied on the box
 [1] for only type-7 encryption to be applied on the box
 [2] for no encryption to be applied on the box

 Enter your encryption selection [2]: 0
Enter the Master key min 8 chars & max 127 chars, Master key should not begin with '!, #, ;' : ************
Confirm the master key: ************

The following configuration command script was created:

key config-key password-encrypt
Testkey12345
!
password encryption aes
service password-encryption
!
!
end
[0] Go to the IOS command prompt without saving this config.
[1] Return back to the setup without saving this config.
[2] Save this configuration to nvram and exit.

Enter your selection [2]: 2
Building configuration...
[OK]
Use the enabled mode 'configure' command to modify this configuration.
At any point you may enter a question mark '?' for help.
Use ctrl-c to abort configuration dialog at any prompt.
Default settings are in square brackets '[]'.


Basic management setup configures only enough connectivity
for management of the system, extended setup will ask you
to configure each interface on the system

Would you like to enter basic management setup? [yes/no]: yes
Configuring global parameters:
Enter host name [Switch]: Switch123
 The enable secret is a password used to protect
  access to privileged EXEC and configuration modes.
  This password, after entered, becomes encrypted in
  the configuration.
  -------------------------------------------------
  secret should be of minimum 10 characters and maximum 32 characters with
  at least 1 upper case, 1 lower case, 1 digit and
  should not contain [cisco]
  -------------------------------------------------
  Enter enable secret: **********
Confirm enable secret: **********
 The enable password is used when you do not specify an
  enable secret password, with some older software versions, and
  some boot images.
  Enter enable password: ********
  The virtual terminal password is used to protect
  access to the router over a network interface.
  Enter virtual terminal password: ********
Current interface summary
Interface IP-Address OK? Method Status Protocol
Vlan1 12.16.1.120 YES DHCP up up
GigabitEthernet1/1 unassigned YES unset up up
GigabitEthernet1/2 unassigned YES unset down down
GigabitEthernet1/3 unassigned YES unset up up
GigabitEthernet1/4 unassigned YES unset down down
GigabitEthernet1/5 unassigned YES unset down down
GigabitEthernet1/6 unassigned YES unset down down
GigabitEthernet1/7 unassigned YES unset up up
GigabitEthernet1/8 unassigned YES unset up up
GigabitEthernet1/9 unassigned YES unset down down
GigabitEthernet1/10 unassigned YES unset down down
AppGigabitEthernet1/1 unassigned YES unset up up
Enter interface name used to connect to the
management network from the above interface summary: vlan1
Configuring interface Vlan1:
IP address for this interface [12.16.1.120]:
Subnet mask for this interface [255.0.0.0] :
Class A network is 12.0.0.0, 8 subnet bits; mask is /8
The following configuration command script was created:
hostname Switch123
enable secret 9 $9$4kYFyV4Hh9JVOk$Cwi3/tNTc7uHy7CBsBfOWo6u1q/Sg07in3NJ5e7Yy0U
enable password 0 password
service password-encryption
line vty 0 15
password 0 password
no snmp-server
!
!
interface Vlan1
no shutdown
ip address 12.16.1.120 255.0.0.0
!
interface GigabitEthernet1/1
!
interface GigabitEthernet1/2
!
interface GigabitEthernet1/3
!
interface GigabitEthernet1/4
[0] Go to the IOS command prompt without saving this config.
[1] Return back to the setup without saving this config.
[2] Save this configuration to nvram and exit.

Enter your selection [2]:  2
Building configuration...
[OK]
Use the enabled mode 'configure' command to modify this configuration.


Press RETURN to get started!
--- System Configuration Dialog ---
Would you like to enter the initial configuration dialog? [yes/no]:
Autoinstall trying DHCPv6 on Vlan1 yes
-----System Security Configuration Dialog-----
Cisco recommends that for enchanced security users should encrypt sensitive info
The configuration dialog will allow you to set encryption level
It is recommended that both type-6 & type-7 encryption should be enabled by user
For type-6 user will need to create and remember Master key as it cannot be recovered
[0] for both type-6 & type-7 encryption to be applied on the box
[1] for only type-7 encryption to be applied on the box
[2] for no encryption to be applied on the box
Enter your encryption selection [2]: 0
Enter the Master key min 8 chars & max 127 chars, Master key should not begin with '!, #, ;' : ************
Confirm the master key: ************
The following configuration command script was created:
key config-key password-encrypt
Testkey12345
!
password encryption aes
service password-encryption
!
!
end
[0] Go to the IOS command prompt without saving this config.
[1] Return back to the setup without saving this config.
[2] Save this configuration to nvram and exit.

Enter your selection [2]: 2
Building configuration...
[OK]
Use the enabled mode 'configure' command to modify this configuration.
At any point you may enter a question mark '?' for help.
Use ctrl-c to abort configuration dialog at any prompt.
Default settings are in square brackets '[]'.


Basic management setup configures only enough connectivity
for management of the system, extended setup will ask you
to configure each interface on the system

Would you like to enter basic management setup? [yes/no]: yes
Configuring global parameters:
Enter host name [Switch]: Switch123
 The enable secret is a password used to protect
  access to privileged EXEC and configuration modes.
  This password, after entered, becomes encrypted in
  the configuration.
  -------------------------------------------------
  secret should be of minimum 10 characters and maximum 32 characters with
  at least 1 upper case, 1 lower case, 1 digit and
  should not contain [cisco]
  -------------------------------------------------
  Enter enable secret: **********
Confirm enable secret: **********
 The enable password is used when you do not specify an
  enable secret password, with some older software versions, and
  some boot images.
  Enter enable password: ********
  The virtual terminal password is used to protect
  access to the router over a network interface.
  Enter virtual terminal password: ********
Current interface summary
Interface IP-Address OK? Method Status Protocol
Vlan1 12.16.1.120 YES DHCP up up
GigabitEthernet1/1 unassigned YES unset up up
GigabitEthernet1/2 unassigned YES unset down down
GigabitEthernet1/3 unassigned YES unset up up
GigabitEthernet1/4 unassigned YES unset down down
GigabitEthernet1/5 unassigned YES unset down down
GigabitEthernet1/6 unassigned YES unset down down
GigabitEthernet1/7 unassigned YES unset up up
GigabitEthernet1/8 unassigned YES unset up up
GigabitEthernet1/9 unassigned YES unset down down
GigabitEthernet1/10 unassigned YES unset down down
AppGigabitEthernet1/1 unassigned YES unset up up
Enter interface name used to connect to the
management network from the above interface summary: vlan1
Configuring interface Vlan1:
IP address for this interface [12.16.1.120]:
Subnet mask for this interface [255.0.0.0] :
Class A network is 12.0.0.0, 8 subnet bits; mask is /8
The following configuration command script was created:
hostname Switch123
enable secret 9 $9$4kYFyV4Hh9JVOk$Cwi3/tNTc7uHy7CBsBfOWo6u1q/Sg07in3NJ5e7Yy0U
enable password 0 password
service password-encryption
line vty 0 15
password 0 password
no snmp-server
!
!
interface Vlan1
no shutdown
ip address 12.16.1.120 255.0.0.0
!
interface GigabitEthernet1/1
!
interface GigabitEthernet1/2
!
interface GigabitEthernet1/3
!
interface GigabitEthernet1/4
[0] Go to the IOS command prompt without saving this config.
[1] Return back to the setup without saving this config.
[2] Save this configuration to nvram and exit.

Enter your selection [2]:  2
Building configuration...
[OK]
Use the enabled mode 'configure' command to modify this configuration.


Press RETURN to get started!
 フィードバック