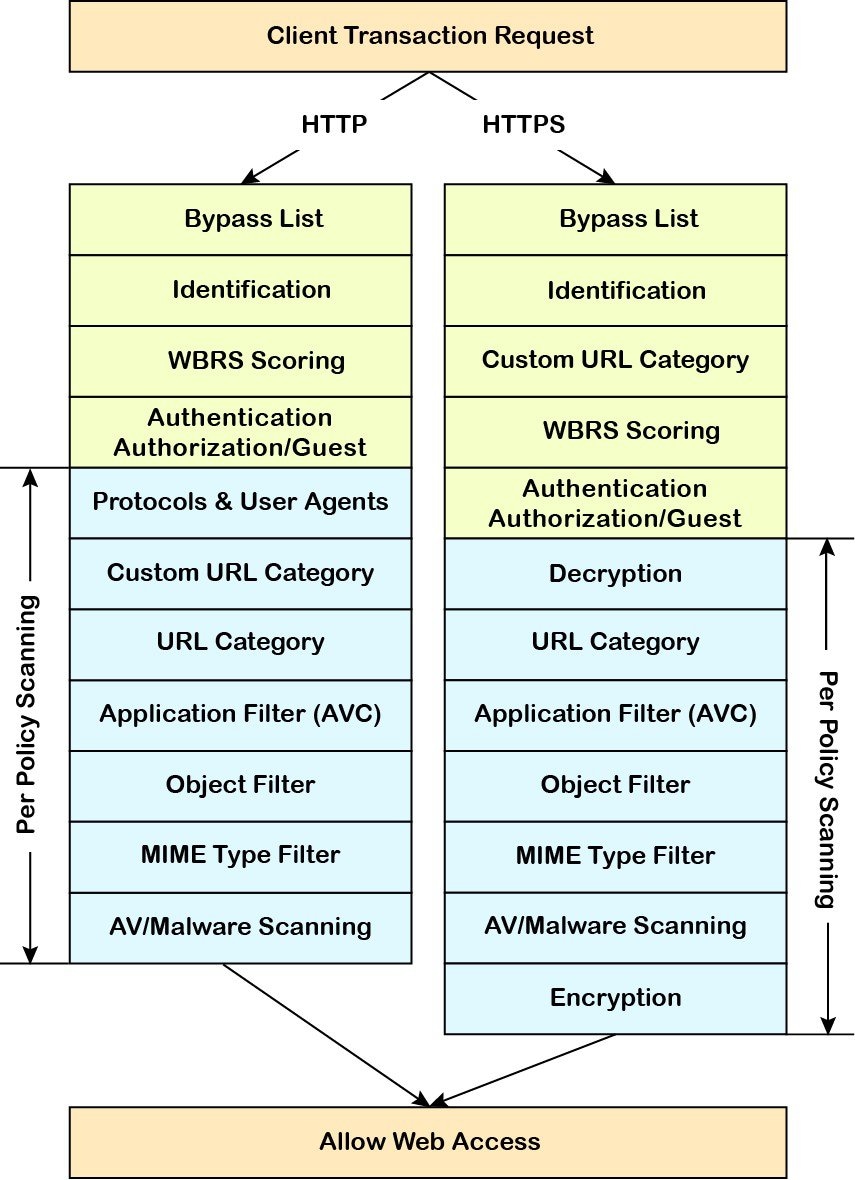
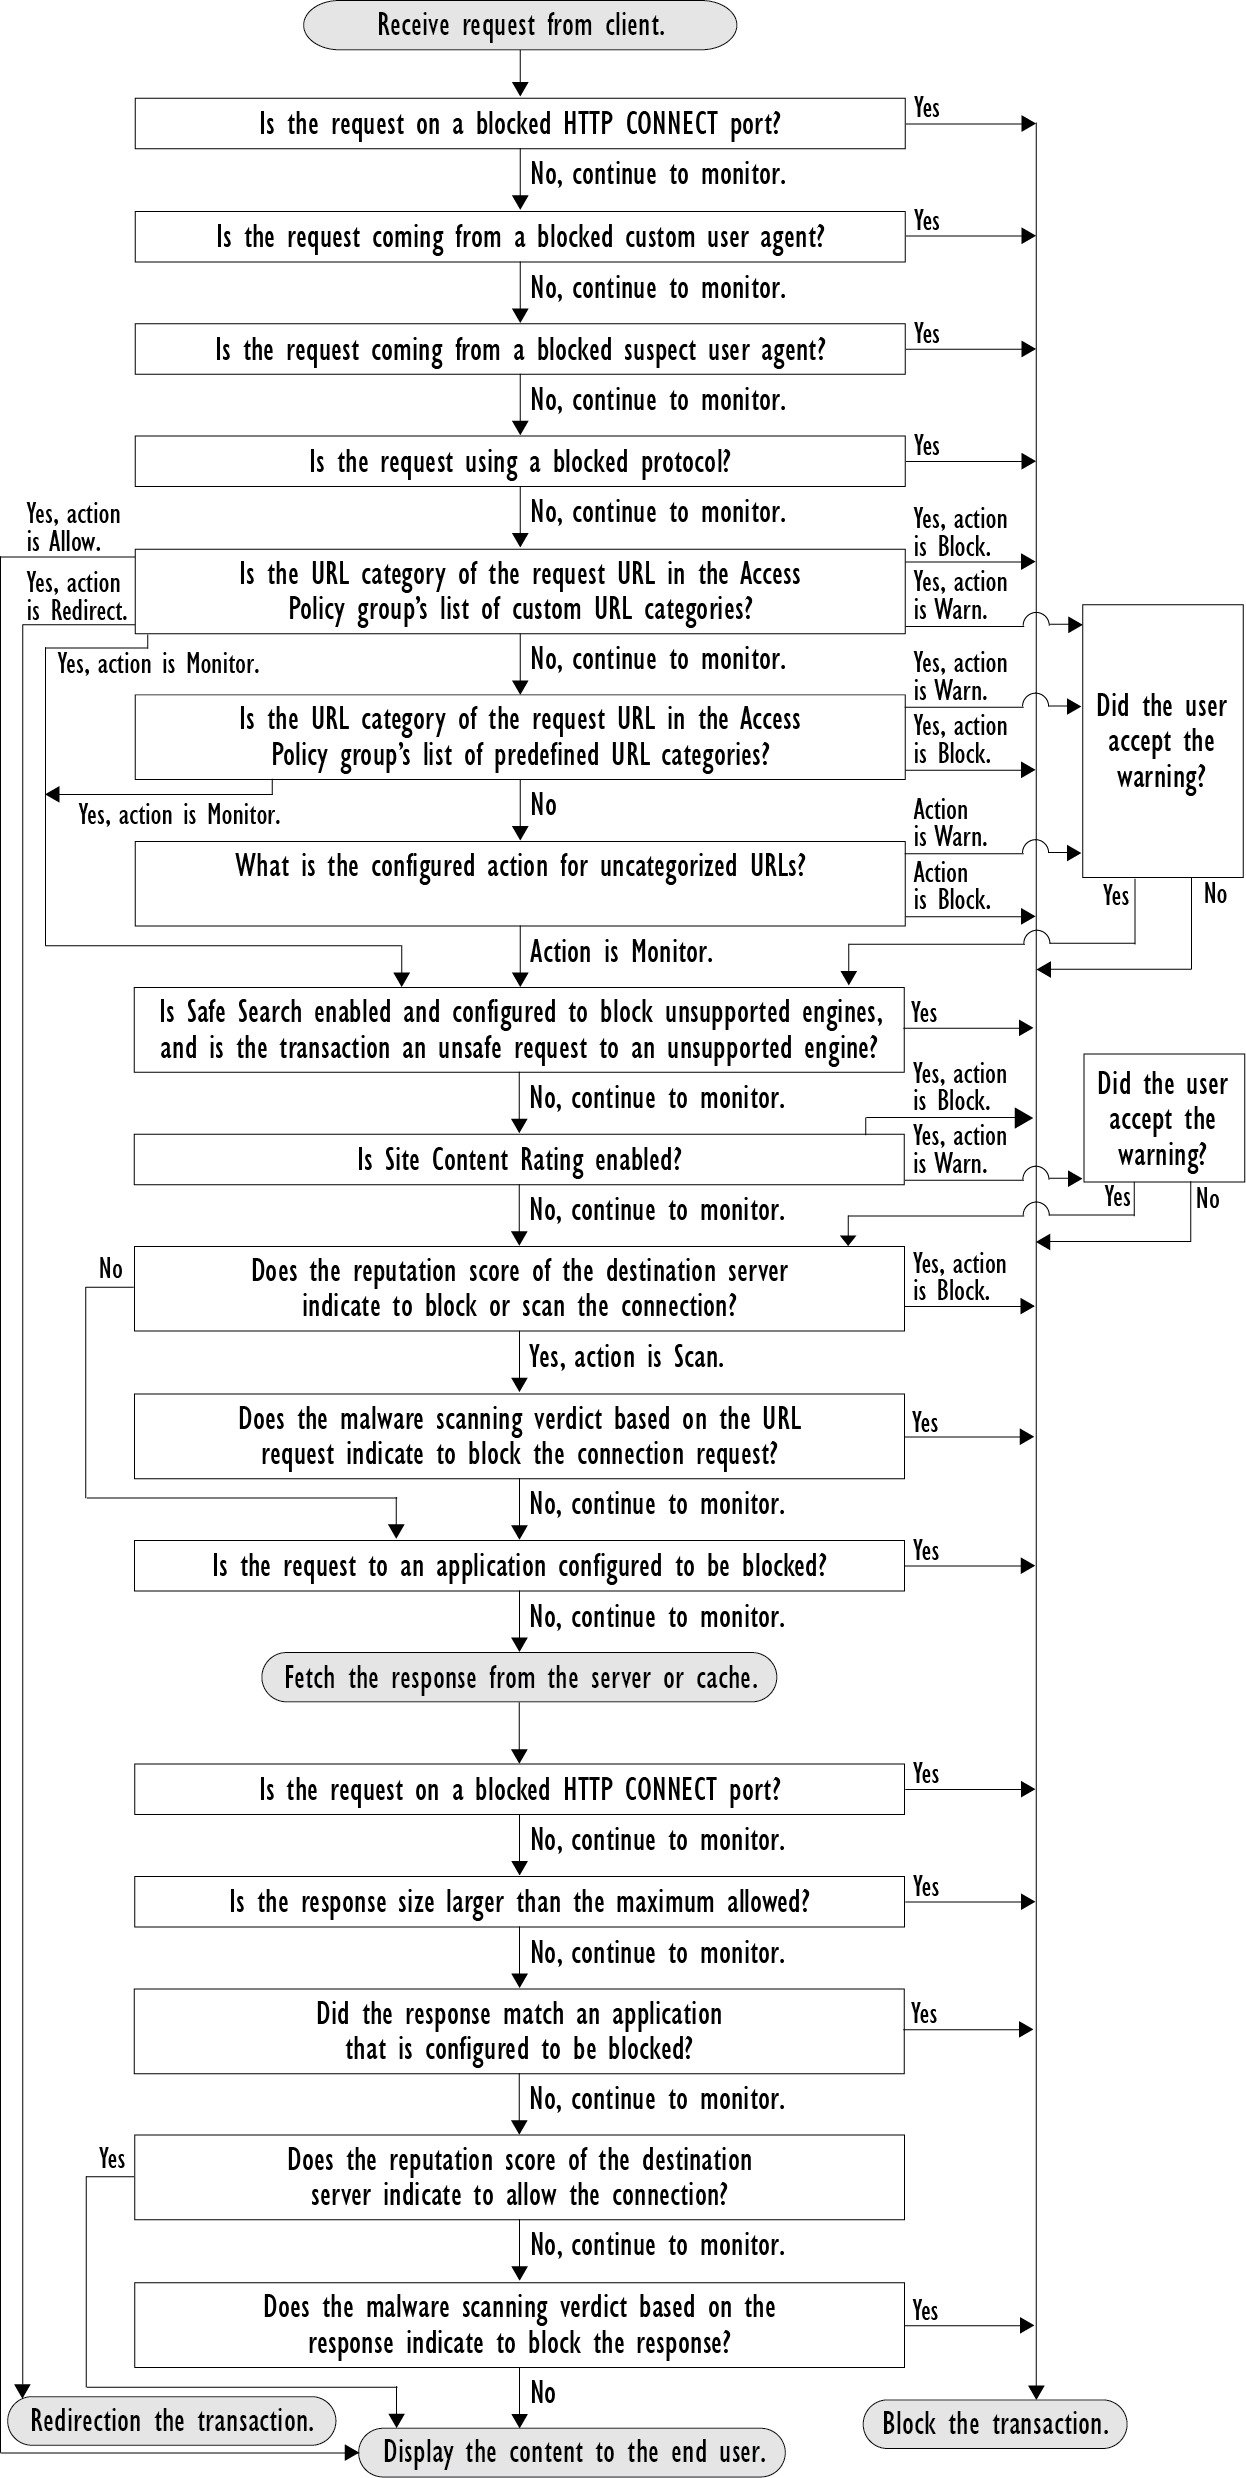
インターネット要求を制御するポリシーの作成

この章で説明する内容は、次のとおりです。

ポリシーの概要:代行受信されたインターネット要求の制御

ユーザーが Web 要求を作成すると、設定されている Secure Web Applianceが要求を代行受信し、最終結果を得るまでに要求が通過するプロセスを管理します。最終結果は特定の Web サイトや電子メールにアクセスすることであったり、さらにはオンラインアプリケーションにアクセスすることであったりします。 Secure Web Applianceのポリシーを設定する際に、ユーザーからの要求の基準とアクションを定義するためにポリシーが作成されます。

ポリシーは、 Secure Web Applianceが Web 要求を識別および制御する手段です。クライアントが Web 要求をサーバーに送信すると、Web プロキシはその要求を受信して評価し、要求が属しているポリシー グループを判定します。その後、ポリシーで定義されているアクションが要求に適用されます。

Secure Web Applianceは複数のポリシータイプを使用して、Web 要求のさまざまな側面を管理します。ポリシー タイプは独自にトランザクションを全面管理するか、追加の処理のために他のポリシー タイプにトランザクションを渡します。ポリシー タイプは、実行する機能(アクセス、ルーティング、セキュリティなど)によってグループ化できます。

AsyncOS は、アプライアンスからの不要な外部通信を避けるために、外部の依存関係を評価する前にポリシーに基づいてトランザクションを評価します。たとえば、未分類の URL をブロックするポリシーによってトランザクションがブロックされた場合、そのトランザクションが DNS エラーによって失敗することはありません。

代行受信された HTTP/HTTPS 要求の処理

次の図に、代行受信された Web 要求がアプライアンスによって処理される場合のフローを示します。

図 1. HTTP/HTTPS トランザクション フロー


さまざまなトランザクション処理フローを示した次の図も参照してください。

Managing Web Requests Through Policies Task Overview

Step

Task List for Managing Web Requests through Policies

Links to Related Topics and Procedures

1

Set up and sequence Authentication Realms

認証レルム

2

(For upstream proxies) Create a proxy group.

アップストリーム プロキシのプロキシ グループの作成

2

(Optional) Create Custom Client Applications

クライアント アプリケーション

3

(Optional) Create Custom URL Categories

カスタム URL カテゴリの作成および編集

4

Create Identification Profiles

ユーザーおよびクライアント ソフトウェアの分類

5

(Optional) Create time ranges to Limit Access by Time of Day

時間範囲およびクォータ

6

Create and Order Policies

ポリシーによる Web 要求の管理:ベスト プラクティス

Active Directory ユーザー オブジェクトを使用して Web 要求を管理する場合は、基準としてプライマリ グループを使用しないでください。Active Directory ユーザー オブジェクトにはプライマリ グループは含まれません。

ポリシー

ポリシー タイプ

ポリシー タイプ

要求タイプ

説明

タスクへのリンク

アクセス(Access)

  • HTTP

  • 復号された HTTPS

  • FTP

HTTP、FTP、復号 HTTPS の着信トラフィックをブロック、許可、またはリダイレクトします。

HTTPS プロキシがディセーブルの場合、アクセス ポリシーは暗号化された着信 HTTPSトラフィックも管理します。

Creating a Policy

SOCKS

  • SOCKS

Socks 通信要求を許可またはブロックします。

Creating a Policy

アプリケーション認証(Application Authentication)

  • アプリケーション

Software as a Service(SaaS)アプリケーションへのアクセスを許可または拒否します。

シングル サイン オンを使用してユーザーを認証し、アプリケーションへのアクセスをただちにディセーブルにすることによってセキュリティを向上させます。

ポリシーのシングルサインオン機能を使用するには、 Secure Web Applianceを ID プロバイダーとして設定し、SaaS の証明書とキーをアップロードまたは作成する必要があります。

SaaS アプリケーション認証ポリシーの作成

暗号化 HTTPS 管理(Encrypted HTTPS Management)

  • HTTPS

HTTPS 接続を復号、パススルー、またはドロップします。

AsyncOS は、その後の処理のために、復号したトラフィックをアクセス ポリシーに渡します。

Creating a Policy

データ セキュリティ(Data Security)

  • HTTP

  • 復号された HTTPS

  • FTP

Web へのデータのアップロードを管理します。データ セキュリティ ポリシーは発信トラフィックをスキャンし、宛先とコンテンツに基づいて、トラフィックがデータ アップロードの社内規則に準じていることを確認します。スキャンのために外部サーバーに発信トラフィックをリダイレクトする外部 DLP ポリシーとは異なり、データセキュリティポリシーは、 Secure Web Applianceを使用してトラフィックをスキャンし、評価します。

Creating a Policy

外部 DLP(データ漏洩防止)(External DLP (Data Loss Prevention))

  • HTTP

  • 復号された HTTPS

  • FTP

サードパーティの DLP システムを実行しているサーバーに発信トラフィックを送信します。DLP システムはトラフィックをスキャンし、トラフィックがデータ アップロードに関する社内規則に準拠していることを確認します。データのアップロードも管理するデータセキュリティポリシーとは異なり、外部 DLP ポリシーは Secure Web Applianceをスキャン作業から解放します。これによって、アプライアンスのリソースが解放され、サードパーティ製ソフトウェアによって提供されるその他の機能を活用できるようになります。

Creating a Policy

発信マルウェア スキャン(Outbound Malware Scanning)

  • HTTP

  • 復号された HTTPS

  • FTP

悪意のあるデータを含んでいる可能性があるデータのアップロード要求をブロック、モニター、または許可します。

ネットワークにすでに存在しているマルウェアが外部ネットワークに送信されるのを防止します。

Creating a Policy

ルーティング

  • HTTP

  • HTTPS

  • FTP

Web トラフィックをアップストリーム プロキシを介して送信するか、または宛先サーバーに送信します。既存のネットワーク設計を保護したり、 Secure Web Applianceからの処理をオフロードしたり、サードパーティのプロキシシステムから提供される追加機能を活用したりするために、アップストリームプロキシを介してトラフィックをリダイレクトできます。

複数のアップストリームプロキシが使用可能な場合、 Secure Web Applianceはロードバランシング技術を使用して、それらのプロキシにデータを分散できます。

クライアントの送信元 IP アドレスを保持するか、あるいは Web プロキシ IP または IP スプーフィングプロファイルを使用してカスタム IP に変更します。

Creating a Policy

各ポリシー タイプはポリシー テーブルを使用して、ポリシーを保存および管理します。各ポリシー テーブルには、ポリシー タイプのデフォルト アクションを保守管理する、定義済みのグローバル ポリシーが用意されています。必要に応じて、追加のユーザー定義ポリシーが作成され、ポリシー テーブルに追加されます。ポリシーは、ポリシー テーブルのリストに記載されている順序で処理されます。

個々のポリシーには、ポリシーが管理するユーザー要求のタイプおよび要求に対して実行するアクションが定義されています。各ポリシー定義には 2 つのメイン セクションがあります。

  • [識別プロファイルとユーザー(Identification Profiles and Users)]:識別プロファイルは、ポリシーのメンバーシップ基準で使用されます。Web トランザクションを識別するためのさまざまなオプションが含まれているので特に重要です。また、ポリシーと多くのプロパティを共有します。

  • [詳細設定(Advanced)]:ポリシーの適用対象となるユーザーの識別に使用される基準。1 つ以上の基準をポリシーで指定でき、基準を満たすにはすべてが一致する必要があります。

    • [プロトコル(Protocols)]:さまざまなネットワーク デバイス間でデータを転送できるようにします(http、https、ftp など)。

    • [プロキシポート(Proxy Ports)]:要求が Web プロキシへのアクセスに使用する番号付きのポート。

    • [サブネット(Subnets)]:要求が発信された、接続ネットワーク デバイスの論理グループ(地理的な場所、ローカル エリア ネットワーク(LAN)など)。

    • [時間範囲(Time Range)]:時間範囲を作成すると、ポリシーでそれを使用し、要求が行われた時間帯に基づいて Web 要求を識別したり、Web 要求にアクションを適用できます。時間範囲は、個々のユニットとして作成されます。

    • [URLカテゴリ(URL Categories)]:URL カテゴリは Web サイトの定義済みまたはカスタムのカテゴリです(ニュース、ビジネス、ソーシャル メディアなど)。これらを使用して、Web 要求を識別したり、Web 要求にアクションを適用できます。

    • [ユーザー エージェント(User Agents)]:要求の作成に使用されるクライアント アプリケーション(アップデータや Web ブラウザなど)があります。ユーザー エージェントに基づいてポリシーの基準を定義したり、制御設定を指定できます。認証からユーザー エージェントを除外することもできます。これは、クレデンシャルの入力を求めることができないアプリケーションで役立ちます。カスタム ユーザー エージェントを定義できますが、これらの定義を他のポリシーで再利用することはできません。


(注)  


複数のメンバーシップ基準を定義した場合、クライアント要求は、ポリシーに一致するために、すべての基準を満たす必要があります。

ポリシーの順序

ポリシー テーブルにポリシーを記載する順序によって、Web 要求に適用されるポリシーの優先順位が決まります。Web 要求との照合はテーブルの最上位のポリシーから順に行われ、要求がポリシーに一致した時点で照合は終了します。テーブル内のそれ以降のポリシーは処理されません。

ユーザ定義のポリシーが Web 要求と一致しない場合、そのポリシー タイプのグローバル ポリシーが適用されます。グローバル ポリシーは常にポリシー テーブルの最後に配置され、順序変更できません。

次の図に、アクセス ポリシー テーブルを介したクライアント要求のフローを示します。

図 2. アクセス ポリシーのポリシー グループ トランザクション フロー


Creating a Policy

Before you begin

  • Enable the appropriate proxy:

    • Web Proxy (for HTTP, decrypted HTTPS, and FTP)

    • HTTPS Proxy

    • SOCKS Proxy

  • Create associated Identification Profiles.

  • Understand ポリシーの順序.

  • (Encrypted HTTPS only) Upload or generate a Certificate and Key.

  • (Data Security only) Enable Cisco Data Security Filters Settings.

  • (External DLP only) Define an External DLP server.

  • (Routing only) Define the associated upstream proxy on the Secure Web Appliance.

  • (Optional) Create associated client applications.

  • (Optional) Create associated time ranges. See 時間範囲およびクォータ.

  • (Optional) Create associated URL categories. See カスタム URL カテゴリの作成および編集.

Procedure


Step 1

In the Policy Settings section, use the Enable Identity check box to enable this policy, or to quickly disable it without deleting it.

Step 2

Assign a unique policy Name.

Step 3

A Description is optional.

Step 4

From the Insert Above drop-down list, choose where this policy is to appear in the table.

Note

 
Arrange policies such that, from top to bottom of the table, they are in most-restrictive to least-restrictive order. See ポリシーの順序 for more information.

Step 5

In the Policy Expires area, check the Set Expiration for Policy check box to set the expiry time for the policy. Enter the date and time for the policy expiration that you want to set. The policies are automatically disabled once they exceed the set expiry time.

Note


System checks the policies every minute to disable the policies which get expired during the minute. For example, if a policy is set to expire at 11:00, at maximum it will be disabled by 11:01.

Policy Expiry feature is applicable only for Access, Decryption, and Web Traffic Tap policies.

You will receive an email prior to three days of the policy expiry and another one upon policy expiry.

Note

 
To receive alerts, you must enable Policy Expiration alerts using System Administration > Alerts . See ポリシーの期限切れアラート

You can set the policy expiration time through Cisco Content Security Management Appliances as well. The policies will get expired after the set expiry time but will not be shown as disabled in the Cisco Content Security Management Appliances GUI.

Once you set the policy expiration feature, the expiry happens based on the appliance's local time settings.

Step 6

In the Policy Member Definition section, specify how user and group membership is defined: from the Identification Profiles and Users list, choose one of the following:

  • All Identification Profiles – This policy will apply to all existing profiles. You must also define at least one Advanced option.

  • Select One or More Identification Profiles – A table for specifying individual Identification Profiles appears, one profile-membership definition per row.

Step 7

If you chose All Identification Profiles:

  1. Specify the authorized users and groups to which this policy applies by selecting one of the following options:

    • All Authenticated Users – All users identified through authentication or transparent identification.

    • Selected Groups and Users – Specified users and groups are used.

      To add or edit the specified ISE Secure Group Tags (SGTs) and the specified Users, click the link following the appropriate label. For example, click the list of currently specified users to edit that list. See ポリシーのセキュリティ グループ タグの追加と編集 for more information.

      If you use ISE, you can add or edit ISE Secure Group Tags. This is not supported in ISE-PIC deployments. To add or edit the specified ISE Groups, click the link following the label. This option is specific to ISE-PIC.

    • Guests – Users connected as guests and those failing authentication.

    • All Users – All clients, whether authenticated or not. If this option is selected, at least one Advanced option also must be provided.

Step 8

If you chose Select One or More Identification Profiles, a profile-selection table appears.

  1. Choose an Identification Profile from the Select Identification Profile drop-down list in the Identification Profiles column.

  2. Specify the Authorized Users and Groups to which this policy applies:

    • All Authenticated Users – All users identified through authentication or transparent identification.

    • Selected Groups and Users – Specified users and groups are used.

      To add or edit the specified ISE Secure Group Tags (SGTs) and the specified Users, click the link following the appropriate label. For example, click the list of currently specified users to edit that list. See ポリシーのセキュリティ グループ タグの追加と編集 for more information.

    • Guests – Users connected as guests and those failing authentication.

  3. To add a row to the profile-selection table, click Add Identification Profile. To delete a row, click the trash-can icon in that row.

Repeat steps (a) through (c) as necessary to add all desired Identification Profiles.

Step 9

Expand the Advanced section to define additional group membership criteria. (This step may be optional depending on selection in the Policy Member Definition section. Also, some of the following options will not be available, depending on the type of policy you are configuring.) .

Advanced Option

Description

Protocols

Select the protocols to which this policy will apply. All others means any protocol not selected. If the associated identification profile applies to specific protocols, this policy applies to those same protocols

Proxy Ports

Applies this policy only to traffic using specific ports to access the web proxy. Enter one or more port numbers, separating multiple ports with commas.

For explicit forward connections, this is the port configured in the browser.

For transparent connections, this is the same as the destination port.

Note

 
If the associated identification profile applies only to specific proxy ports, you cannot enter proxy ports here.

Subnets

Applies this policy only to traffic on specific subnets. Select Specify subnets and enter the specific subnets, separated by commas.

Leave Use subnets from selected Identities selected if you do not want additional filtering by subnet.

Note

 
If the associated identity applies to specific subnets, you can further restrict the application of this policy to a subset of the addresses to which the identity applies.

Time Range

You can apply time ranges for policy membership:

  • Time Range – Choose a previously defined time range (時間範囲およびクォータ).

  • Match Time Range – Use this option to indicate whether this time range is inclusive or exclusive. In other words, whether to match only during the range specified, or at all times except those in the specified range.

URL Categories

You can restrict policy membership by specific destinations (URLs) and by categories of URLs. Select all desired custom and predefined categories. See カスタム URL カテゴリの作成および編集 for information about custom categories.

User Agents

You can select specific user agents, and define custom agents using regular expressions, as part of membership definition for this policy.

  • Common User Agents

    • Browsers – Expand this section to select various Web browsers.

    • Others – Expand this section to select specific non-browser agents such as application updaters.

  • Custom User Agents – You can enter one or more regular expressions, one per line, to define custom user agents.

  • Match User Agents – Use this option to indicate whether these user-agent specifications are inclusive or exclusive. In other words, whether membership definition includes only the selected user agents, or specifically excludes the selected user agents.


ポリシーのセキュリティ グループ タグの追加と編集

ポリシーの特定の識別プロファイルに割り当てられているセキュリティ グループ タグ(SGT)のリストを変更するには、[ポリシーの追加または編集(Add/Edit Policy)] ページの [選択されたグループとユーザ(Selected Groups and Users)] リストで、[ISEセキュリティグループタグ(ISE Secure Group Tags)] ラベルの後ろのリンクをクリックします。(Creating a Policy を参照。)このリンクは、[タグが未入力(No tags entered)] または現在割り当てられているタグのリストです。リンクをクリックすると [セキュリティグループタグの追加または編集(Add/Edit Group)] ページが開きます。

現在このポリシーに割り当てられている SGT が [承認済みセキュリティグループタグ(Authorized Secure Group Tags)] セクションに表示されます。接続されている ISE サーバから使用可能なすべての SGT が、[セキュリティグループタグの検索(Secure Group Tag Search)] セクションに表示されます。

手順

ステップ 1

[承認済みセキュリティグループタグ(Authorized Secure Group Tags)] リストに 1 つ以上の SGT を追加するには、[セキュリティグループタグの検索(Secure Group Tag Search)] セクションに必要事項を入力し、[追加(Add)] をクリックします。

(注)  

 
  • すでに追加されている SGT が緑色で強調表示されます。この利用可能な SGT のリストから特定の SGT を検索するには、[検索(Search)] フィールドにテキスト文字列を入力します。

  • Secure Web Applianceが ISE/ISE-PIC に接続されている場合、ISE/ISE-PIC からのデフォルト SGT も表示されます。これらの SGT には割り当てられたユーザがありません。正しい SGT を選択したことを確認してください。

ステップ 2

[承認済みセキュリティグループタグ(Authorized Secure Group Tags)] リストから 1 つ以上の SGT を削除するには、削除するエントリを選択し、[削除(Delete)] をクリックします。

ステップ 3

[完了(Done)] をクリックして、[グループの追加または編集(Add/Edit Group)] ページに戻ります。


次のタスク

関連項目

ルーティングポリシーへのルーティング先と IP スプーフィングプロファイルの追加

ルーティングポリシーにルーティング先と IP スプーフィングプロファイルを設定することによって、Web プロキシが Web トラフィックを転送し、送信元 IP アドレスを要求する方法を設定できます。


(注)  


  • デフォルトでは、アップストリーム プロキシ グループがアプライアンス上に設定されていない場合でも、グローバル ルーティング ポリシーは有効になります。

  • IP スプーフィングプロファイルはルーティング先とは関連がないため、個別に設定できます。

  • ルーティングポリシーは、アップストリームプロキシを設定せずに有効にすることができます。


(注)  


セキュリティ管理アプライアンスでルーティングポリシーのアップストリーム プロキシ グループを設定するには、 Secure Web Applianceのコンフィギュレーション ファイルを保存し、セキュリティ管理アプライアンスにインポートします。それ以外の場合は、セキュリティ管理アプライアンスはアップストリームプロキシを「見つかりませんでした(Not Found)」として表示し、設定のプッシュ後にルーティングポリシーを無効にします。


手順

ステップ 1

[Web Security Manager] > [ルーティングポリシー(Routing Policies)] を選択します。

ステップ 2

[ルーティングポリシー(Routing Policies)] ページで、アップストリーム プロキシ グループを設定するルーティングポリシーの [ルーティング先(Routing Destination )] 列の下にあるリンクをクリックします。

ステップ 3

選択したポリシーに適したアップストリーム プロキシ グループを次から選択します。

アクション

説明

[グローバルポリシー設定を使用する(Use Global Policy Settings)]

Web プロキシは、グローバルポリシーで定義されている設定を使用します。これは、ユーザー定義のポリシー グループのデフォルト アクションです。デフォルトでは、グローバル ルーティング ポリシーのルーティング先は [直接接続(Direct Connection)] として設定されます。

ユーザー定義のポリシー グループにのみ適用されます。

直接接続

Web プロキシは、Web トラフィックを宛先 Web サーバーに直接転送します。

[カスタム アップストリーム プロキシ グループ(Custom upstream proxy group)]

Web プロキシは、Web トラフィックを外部のアップストリーム プロキシ グループにリダイレクトします。アップストリーム プロキシ グループの作成の詳細については、アップストリーム プロキシを参照してください。

ステップ 4

[ルーティングポリシー(Routing Policies)] ページで、IP スプーフィングプロファイルを設定するルーティングポリシーの [IP スプーフィング(IP Spoofing)] 列の下にあるリンクをクリックします。

ステップ 5

選択したポリシーに適した IP スプーフィングプロファイルを次から選択します。

アクション

説明

[グローバルポリシー設定を使用する(Use Global Policy Settings)]

Web プロキシは、グローバルポリシーで定義されている設定を使用します。これは、ユーザー定義のポリシー グループのデフォルト アクションです。グローバル ルーティング ポリシーの場合、IP スプーフィングはデフォルトで無効になっています。

ユーザー定義のポリシー グループにのみ適用されます。

[IP スプーフィングを使用しない(Do No Use IP Spoofing)]

Web プロキシは、要求送信元の IP アドレスを変更し、それ自体のアドレスと一致させてセキュリティを強化します。

[クライアント IP を使用する(Use Client IP)]

Web プロキシは送信元アドレスを保持するため、 Secure Web Applianceからではなく、送信元クライアントから発信されたように見えます。

[カスタム スプーフィング プロファイル名(Custom spoofing profile name)]

Web プロキシは、要求の送信元 IP アドレスを選択したカスタム IP スプーフィング プロファイル名に定義されているカスタム IP に変更します。

ステップ 6

変更を [実行(Submit)] して [確定する(Commit)] します。


次のタスク

関連項目

Policy Configuration

Each row in a table of policies represents a policy definition, and each column displays current contains a link to a configuration page for that element of the policy.


Note


Of the following policy-configuration components, you can specify the “Warn” option only with URL Filtering.

Option

Description

Protocols and User Agents

Used to control policy access to protocols and configure blocking for particular client applications, such as instant messaging clients, web browsers, and Internet phone services. You can also configure the appliance to tunnel HTTP CONNECT requests on specific ports. With tunneling enabled, the appliance passes HTTP traffic through specified ports without evaluating it.

URL Filtering

AsyncOS for Web allows you to configure how the appliance handles a transaction based on the URL category of a particular HTTP or HTTPS request. Using a predefined category list, you can choose to block, monitor, warn, or set quota-based or time-based filters.

You can also create custom URL categories and then choose to block, redirect, allow, monitor, warn, or apply quota-based or time-based filters for Websites in the custom categories. See カスタム URL カテゴリの作成および編集 for information about creating custom URL categories.

In addition, you can add exceptions to blocking of embedded or referred content.

Applications

The AVC or ADC engine is an acceptable use policy component which inspects web traffic to gain deeper understanding and control of web traffic used for applications. You can configure the web proxy to be configured to block or allow application based on the application types, and by individual applications.

Starting with AsyncOS 15.0, you can use either AVC or ADC engine to monitor web traffic. By default, AVC is enabled.

While the AVC engine operates the same as ADC, the AVC engine supports a limited number of applications. In AVC you can also apply controls to particular application behaviors, such as, file transfer within a particular application. See Web アプリケーションへのアクセスの管理 for configuration information

Note

 
In the post-configuration of ADC activities, the ADC application engine searches or evalutes for the activity information for a particular traffic.

Due to the ADC signature database update, even if the entire category is set to Block, any new applications added will be set to Monitor by default.

Objects

These options let you configure the Web Proxy to block file downloads based on file characteristics, such as file size, file type, and MIME type. An object is, generally, any item that can be individually selected, uploaded, downloaded and manipulated. See アクセス ポリシー:オブジェクトのブロッキング for information about specifying blocked objects.

Anti-Malware and Reputation

Web reputation filters allow for a web-based reputation score to be assigned to a URL to determine the probability of it containing URL-based malware. Anti-malware scanning identifies and stops web-based malware threats. Secure Endpoint identifies malware in downloaded files.

The Anti-Malware and Reputation policy inherits global settings respective to each component. Within Security Services > Anti-Malware and Reputation, malware categories can be customized to monitor or block based on malware scanning verdicts and web reputation score thresholds can be customized. Malware categories can be further customized within a policy. There are also global settings for file reputation and analysis services.

For more information, see アクセス ポリシーにおけるマルウェア対策およびレピュテーションの設定 and Configuring File Reputation and Analysis Features.

HTTP ReWrite Profile

You can configure custom header profiles for HTTP requests and can create multiple headers under a header rewrite profile. The header rewrite profile feature enables the appliance to pass the user and group information to another upstream device after successful authentication. The upstream proxy considers the user as authenticated, bypasses further authentication, and provides access to the user based on the defined access policies.

See ポリシーごとの Web プロキシ カスタム ヘッダー.
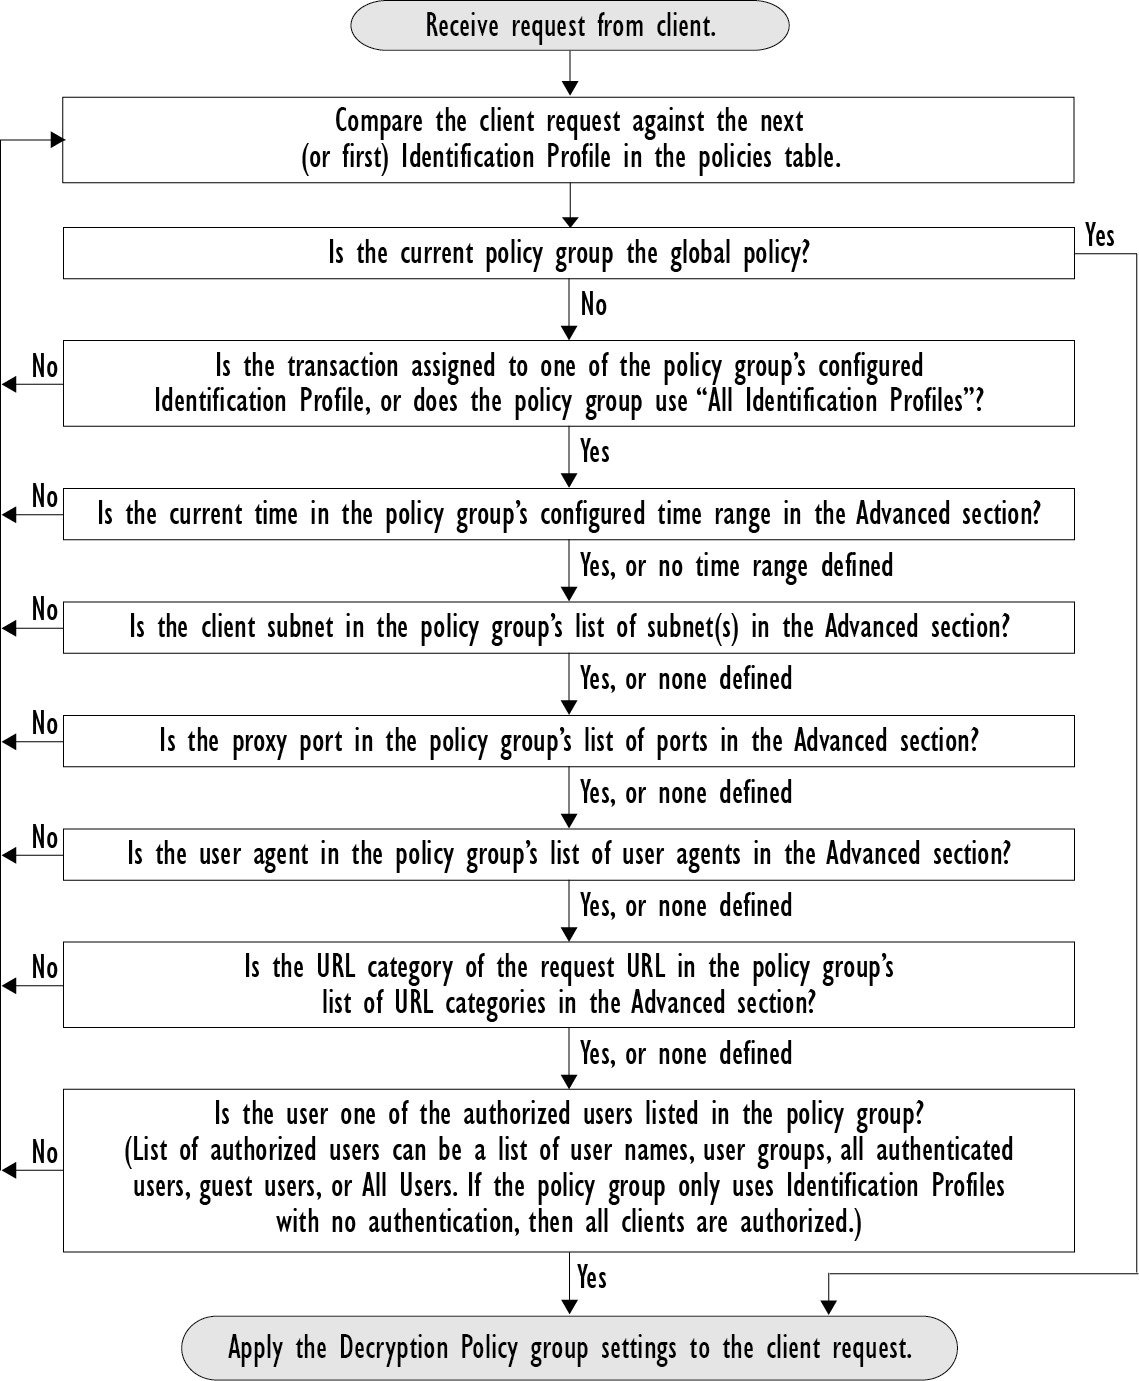
Clone Policy

If an existing policy has most of the settings that you want in a new policy, you can save time by cloning the existing policy and then modifying it. Although the cloned policy shares the same grouping attributes, it has its own unique identity, such as the display name, IP address, host, and domain name.

The following policies with cloning option in Secure Web Appliance can also be managed by Cisco Secure Email and Web Manager (SMA).

  • Access

  • Decryption

  • Identification

  • Routing

  • External DLP

  • Outbound Malware Scanning

  • HTTP ReWrite Profile

  • Cisco Data Security

Note


You can clone only one policy at an instance.

Delete

Deletes the created policy.

アクセス ポリシー:オブジェクトのブロッキング

[アクセス ポリシー:オブジェクト(Access Policies: Objects)] ページのオプションを使用して、ファイル サイズ、ファイル タイプ、MIME タイプなどのファイル特性に基づきファイルのダウンロードをブロックできます。オブジェクトとは一般的に、個々に選択、アップロード、ダウンロード、および処理できる項目を指します。

個々のアクセス ポリシー、およびグローバル ポリシーによって、さまざまなオブジェクト タイプをブロック対象に指定できます。これらのオブジェクト タイプには、アーカイブ、ドキュメント タイプ、実行可能コード、Web ページ コンテンツなどが含まれます。

手順


ステップ 1

[アクセス ポリシー(Access Policies)] ページ([Web セキュリティ マネージャ(Web Security Manager)] > [アクセス ポリシー(Access Policies)])で、編集対象のポリシーを表す行の [オブジェクト(Objects)] 列にあるリンクをクリックします。

ステップ 2

このアクセス ポリシーでブロックするオブジェクトのタイプを選択します。

  • [グローバル ポリシー オブジェクト ブロック設定を使用(Use Global Policy Objects Blocking Settings)]:このポリシーでは、グローバル ポリシーに対して定義されているオブジェクト ブロック設定を使用します。これらの設定は、読み取り専用モードで表示されます。設定を変更するには、グローバル ポリシーの設定を編集します。

  • [カスタム オブジェクト ブロック設定の定義(Define Custom Objects Blocking Settings)]:このポリシーのすべてのオブジェクト ブロック設定を編集できます。

  • [このポリシーのオブジェクト ブロックを無効にする(Disable Object Blocking for this Policy)]:このポリシーのオブジェクト ブロックを無効にします。オブジェクト ブロックのオプションは表示されません。

ステップ 3

前のステップで [カスタム オブジェクト ブロック設定の定義(Define Custom Objects Blocking Settings)] を選択した場合、[アクセス ポリシー:オブジェクト(Access Policies: Objects)] ページで、必要に応じてオブジェクト ブロックのオプションをオフにします。

オブジェクトのサイズ

ダウンロード サイズに基づいて、オブジェクトをブロックできます。

  • [HTTP/HTTPS 最大ダウンロード サイズ(HTTP/HTTPS Max Download Size)]:HTTP/HTTPS ダウンロードの最大オブジェクト サイズを指定するか(指定したサイズより大きいオブジェクトはブロックされます)、HTTP/HTTPS でダウンロードするオブジェクトに最大サイズの制限を設けないことを指定します。

  • [FTP 最大ダウンロード サイズ(FTP Max Download Size)]:FTP ダウンロードの最大オブジェクト サイズを指定するか(指定したサイズより大きいオブジェクトはブロックされます)、FTP でダウンロードするオブジェクトに最大サイズの制限を設けないことを指定します。

ブロックするオブジェクトタイプ

アーカイブ(Archives)

このセクションを展開して、ブロックするアーカイブ ファイイルのタイプを選択します。このリストには、ARC、BinHex、StuffIt などのアーカイブ タイプが含まれます。

検査可能なアーカイブ(Inspectable Archives)

このセクションを展開して、検査可能なアーカイブ ファイルの特定のタイプを [許可(Allow)]、[ブロック(Block)]、または [検査(Inspect)] します。検査可能なアーカイブとは、 Secure Web Appliance により各ファイルのコンテンツを検査し、ファイル タイプ ブロック ポリシーを適用できるアーカイブファイル(圧縮ファイル)のことです。検査可能なアーカイブ タイプには、7zip、Microsoft CAB、RAR、TAR などが含まれます。

アーカイブの検査には、以下のことが適用されます。

  • [検査(Inspect)] とマークされたアーカイブ タイプだけが展開されて検査されます。

  • 一度に検査できるアーカイブは 1 つだけです。同時に検査可能なアーカイブが他にある場合でも、それらのアーカイブは検査されません。

  • 検査されるアーカイブに、現在のポリシーで [ブロック(Block)] アクションが割り当てられているファイル タイプが含まれる場合、許可されるファイル タイプが含まれているとしても、アーカイブ全体がブロックされます。

  • サポートされないアーカイブ タイプが含まれる検査対象アーカイブは、「スキャン不可(unscannable)」としてマークされます。ブロック対象のアーカイブ タイプが含まれている場合、アーカイブはブロックされます。

  • パスワード保護された暗号化アーカイブはサポートされないため、「スキャン不可(unscannable)」としてマークされます。

  • 検査可能なアーカイブが不完全であるか破損している場合、「スキャン不可(unscannable)」としてマークされます。

  • [マルウェア対策とレピュテーション(Anti-Malware and Reputation)] グローバル設定に指定された [DVS エンジン オブジェクト スキャンの制限(DVS Engine Object Scanning Limits)] の値は、検査可能なアーカイブのサイズにも適用されます。指定されたサイズを超えているオブジェクトは、「スキャン不可(unscannable)」としてマークされます。このオブジェクト サイズ制限については、マルウェア対策とレピュテーション フィルタの有効化を参照してください。

  • 「スキャン不可(unscannable)」としてマークされた検査可能なアーカイブは、アーカイブ全体がブロックされるか、許可されるかのいずれかです。

  • カスタムの MIME タイプをブロックするようにアクセス ポリシーが設定されており、アーカイブ検査が有効になっている場合。

    • アプライアンスがカスタム MIME タイプのファイルを Content-Type ヘッダーの一部として直接ダウンロードしようとすると、アクセスがブロックされます。

    • 同じファイルが ZIP/アーカイブ ファイルの一部である場合、アプライアンスはアーカイブを検査し、独自の MIME 評価に基づいて MIME タイプを決定します。アプライアンスのエンジンによって評価される MIME が設定済みのカスタム MIME タイプと一致しない場合、コンテンツはブロックされません。

  • アプライアンスは設定されたアーカイブを検査できますが、RAR や 7-Zip などの特定のアーカイブを検査することには制限があります。

アーカイブ検査の設定について詳しくは、Archive Inspection Settingsを参照してください。

ドキュメント タイプ(Document Types)

このセクションを展開して、ブロックするテキスト ドキュメントのタイプを選択します。このリストには、FrameMaker、Microsoft Office、PDF などのドキュメント タイプが含まれます。

実行可能コード(Executable Code)

このセクションを展開して、ブロックする実行可能コードのタイプを選択します。このリストには、Java アプレット、UNIX 実行可能ファイル、Windows 実行可能ファイルが含まれます。

インストーラ(Installers)

ブロックするインストーラのタイプを選択します。このリストには、UNIX/LINUX パッケージが含まれます。

メディア(Media)

ブロックするメディア ファイルのタイプを選択します。このリストには、音声、ビデオ、および写真画像処理フォーマット(TIFF/PSD)が含まれます。

P2P メタファイル(P2P Metafiles)

このリストには BitTorrent リンク(.torrent)が含まれます。

Web ページ コンテンツ(Web Page Content)

このリストには、フラッシュおよびイメージが含まれます。

その他(Miscellaneous)

このリストには、カレンダー データが含まれます。

カスタム MIME タイプ

MIME タイプに基づいてブロックする追加のオブジェクト/ファイルを定義できます。

[ブロックする MIME タイプ(Block Custom MIME Types)] フィールドに、1 つ以上の MIME タイプを入力します。

ステップ 4

[送信(Submit)] をクリックします。


Archive Inspection Settings

You can Allow, Block, or Inspect specific types of Inspectable Archives for individual Access policies. Inspectable Archives are archive or compressed files that the Secure Web Appliance can inflate to inspect each of the contained files in order to apply the file-type block policy. See アクセス ポリシー:オブジェクトのブロッキング for more information about configuring archive inspection for individual Access policies.


(注)  


During archive inspection, nested objects are written to disk for examination. The amount of disk space that can be occupied at any given time during file inspection is 1 GB. Any archive file exceeding this maximum disk-use size will be marked unscannable.


The Secure Web Appliance’s Acceptable Use Controls page provides system-wide Inspectable Archives Settings; that is, these settings apply to archive extraction and inspection whenever enabled in an Access policy.

手順

ステップ 1

Choose Security Services > Acceptable Use Controls.

ステップ 2

Click the Edit Archives Settings button.

ステップ 3

Edit the Inspectable Archives Settings as needed.

  • Maximum Encapsulated Archive Extractions – Maximum number of “encapsulated” archives to be extracted and inspected. That is, maximum depth to inspect an archive containing other inspectable archives. An encapsulated archive is one that is contained in another archive file. This value can be zero through five; depth count begins at one with the first nested file.

    The external archive is considered file zero. If the archive has files nested beyond this maximum nested value, the archive is marked as unscannable. Note that this will impact performance.

  • Block Uninspectable Archives – If checked, the Secure Web Appliance will block archives it failed to inflate and inspect.

ステップ 4

Submit and Commit Changes.


トランザクション要求のブロック、許可、リダイレクト

Web プロキシは、トランザクション要求のグループ用に作成されたポリシーに基づいて、Web トラフィックを制御します。

  • [許可(Allow)]。Web プロキシは、中断のない接続を許可します。許可された接続は、DVS エンジンによってスキャンされていない可能性があります。
  • [ブロック(Block)]。Web プロキシは、接続を許可せず、ブロックの理由を説明するエンド ユーザー通知ページを表示します。
  • リダイレクト。Web プロキシは、最初に要求された宛先サーバーへの接続を許可せず、指定された別の URL に接続します(アクセス ポリシーでのトラフィックのリダイレクトを参照)。

(注)  


上記のアクションは、Web プロキシがクライアント要求に対して実行する最終アクションです。アクセス ポリシーに対して設定できるモニター アクションは最終アクションではありません。

通常、トラフィックは、トランスポート プロトコルに基づいて、さまざまなタイプのポリシーにより制御されます。

ポリシー タイプ

プロトコル

サポートされるアクション

HTTP

HTTPS

FTP

SOCKS

ブロック(Block)

許可(Allow)

リダイレクト

モニター(Monitor)

アクセス(Access)

x

x

x

x

x

x

x

SOCKS

x

x

x

SAAS

x

x

復号(Decryption)

x

x

x

データ セキュリティ(Data Security)

x

x

x

x

x

外部 DLP(External DLP)

x

x

x

x

発信マルウェア スキャン(Outbound Malware Scanning)

x

x

x

x

x

ルーティング

x

x

x

x


(注)  


復号ポリシーはアクセス ポリシーに優先します。

次の図に、Web プロキシが特定のアクセス ポリシーを要求に割り当てた後に、その要求で実行するアクションを決定する方法を示します。宛先サーバーの Web レピュテーション スコアが評価されるのは 1 回だけですが、その結果は、決定フローの 2 つのポイントで適用されます。

図 3. アクセス ポリシーのアクションの適用


クライアント アプリケーション

クライアント アプリケーションについて

クライアント アプリケーション(Web ブラウザなど)は要求を行うために使用されます。クライアント アプリケーションに基づいてポリシー メンバーシップを定義し、制御設定を指定してクライアント アプリケーションの認証を免除することがきます。これは、アプリケーションがクレデンシャルの入力を要求できない場合に役立ちます。

Using Client Applications in Policies

クライアント アプリケーションによるポリシー メンバーシップの定義

手順

ステップ 1

[Web セキュリティ マネージャ(Web Security Manager)] メニューからポリシー タイプを選択します。

ステップ 2

ポリシー テーブル内のポリシー名をクリックします。

ステップ 3

[詳細設定(Advanced)] セクションを展開して、[クライアントアプリケーション(Client Applications)] フィールド内のリンクをクリックします。

ステップ 4

クライアント アプリケーションを 1 つ以上定義します。

オプション

方法

定義済みクライアント アプリケーションを選択する

[ブラウザ(Browser)] と [その他(Other)] セクションを展開して、必要なクライアント アプリケーションのチェックボックスをオンにします。

ヒント


可能な場合は [すべてのバージョン(Any Version)] オプションだけを選択します。これによって、複数のオプションを選択するよりもパフォーマンスが向上します。

カスタム クライアント アプリケーションを定義する

[カスタムクライアントアプリケーション(Custom Client Applications)] フィールドに適切な正規表現を入力します。必要に応じて、新規行に追加の正規表現を入力します。

ヒント


正規表現の例を参照するには、[クライアントアプリケーションのパターン例(Example Client Applications Patterns)] をクリックします。

ステップ 5

(任意)定義したクライアント アプリケーション以外のすべてのクライアント アプリケーションにポリシー メンバーシップを基づかせるには、[選択したクライアント アプリケーション以外のすべてに一致(Match All Except The Selected Client Applications Definitions)] オプション ボタンをクリックします。

ステップ 6

[完了(Done)] をクリックします。


クライアント アプリケーションによるポリシー制御設定の定義

手順

ステップ 1

[Webセキュリティマネージャ(Web Security Manager)] メニューからポリシー タイプを選択します。

ステップ 2

ポリシー テーブルで必要なポリシー名を検索します。

ステップ 3

同じ行の [プロトコルとクライアントアプリケーション(Protocols and Client Applications)] 列のセル リンクをクリックします。

ステップ 4

[プロトコルおよびクライアントアプリケーション設定の編集(Edit Protocols and Client Applications Settings)] ペインのドロップダウン リストから、[カスタム設定を定義(Define Custom Settings)] を選択します(まだ設定していない場合)。

ステップ 5

定義するクライアント アプリケーションに対応する [カスタムクライアントアプリケーション(Custom Client Applications)] フィールドに正規表現を入力します。必要に応じて、新規行に追加の正規表現を入力します。

ヒント


正規表現の例を参照するには、[クライアント アプリケーションのパターン例(Example Client Application Patterns)] をクリックします。

ステップ 6

変更を送信し、保存します。


認証からのクライアント アプリケーションの除外

手順

  コマンドまたはアクション 目的

ステップ 1

認証が不要の識別プロファイルを作成する。

ユーザーおよびクライアント ソフトウェアの分類

ステップ 2

除外するクライアント アプリケーションとして識別プロファイルのメンバーシップを設定する。

Using Client Applications in Policies

ステップ 3

上記の識別プロファイル以外の他のすべての識別プロファイルを、認証が必要なポリシーのテーブルに配置する。

ポリシーの順序

時間範囲およびクォータ

ユーザがアクセスできる時間、ユーザの最大接続時間またはデータ量(「帯域幅クォータ」)を制限するために、アクセス ポリシーおよび復号ポリシーに時間範囲、時間クォータ、ボリューム クォータを適用できます。

ポリシーおよび使用許可コントロールの時間範囲

時間範囲によって、ポリシーおよび使用許可コントロールを適用する期間を定義します。


(注)  


時間範囲を使用して、ユーザ認証が必要な時間帯を定義することはできません。認証要件は識別プロファイルで定義されますが、時間範囲はサポートされません。

時間範囲の作成

手順

ステップ 1

[Web セキュリティマネージャ(Web Security Manager)] > [時間範囲およびクォータの定義(Define Time Ranges and Quotas)] を選択します。

ステップ 2

[時間範囲の追加(Add Time Range)] をクリックします。

ステップ 3

時間範囲の名前を入力します。

ステップ 4

[タイム ゾーン(Time Zone)] のオプションを選択します。

  • [アプライアンスのタイムゾーン設定を使用(Use Time Zone Setting from Appliance)] - Secure Web Applianceと同じタイムゾーンを使用します。

  • [この時間範囲のタイムゾーンを指定(Specify Time Zone for this Time Range)] - [GMTオフセット(GMT Offset)] として、またはその国の地域、国、および特定のタイムゾーンとして、異なるタイム ゾーンを定義します。

ステップ 5

1 つ以上の [曜日(Day of Week)] チェックボックスをオンにします。

ステップ 6

[時刻(Time of Day)] のオプションを選択します。

  • [終日(All Day)] - 24 時間中使用できます。

  • [開始(From)] と [終了(To)] - 特定の時間範囲を定義します。HH:MM(24 時間形式)で開始時刻と終了時刻を入力します。

ヒント


各時間範囲は、開始時刻と終了時刻の境界を定義します。たとえば、8:00 ~ 17:00 を入力する場合、8:00:00 ~ 16:59:59 に一致しますが 17:00: 00 には一致しません。深夜は、開始時刻が 00:00、終了時刻が 24:00 として指定する必要があります。

ステップ 7

変更を送信し、保存します。


Time and Volume Quotas

Quotas allow individual users to continue accessing an Internet resource (or a class of Internet resources) until they exhaust the data volume or time limit imposed. AsyncOS enforces defined quotas on HTTP, HTTPS and FTP traffic.

As a user approaches either their time or volume quota, AsyncOS displays first a warning, and then a block page.

Please note the following regarding use of time and volume quotas:

  • If AsyncOS is deployed in transparent mode and HTTPS proxy is disabled, there is no listening on port 443, and requests are dropped. This is standard behavior. If AsyncOS is deployed in explicit mode, you can set quotas in your access policies.

    When HTTPS proxy is enabled, possible actions on a request are pass-through, decrypt, drop, or monitor. Overall, quotas in decryption policies are applicable only to the pass-through categories.

    With pass-through, you will also have the option to set quotas for tunnel traffic. With decrypt, this option is not available, as the quotas configured in the access policy will be applied to decrypted traffic.

  • If URL Filtering is disabled or if its feature key is unavailable, AsyncOS cannot identify the category of a URL, and the Access Policy > URL Filtering page is disabled. Thus, the feature key needs to be present, and Acceptable Use Policies enabled, to configure quotas..
  • Many websites such as Facebook and Gmail auto-update at frequent intervals. If such a website is left open in an unused browser window or tab, it will continue to consume the user’s quota of time and volume.
  • When you restart the proxy and the high-performance mode is:
    • Enabled - Time and volume quotas are not reset. Quotas are automatically reset once within the 24-hour window based on the configured time.
    • Disabled - Time and volume quotas are reset. The reset impact remains only for the current 24-hour window as the quotas are automatically reset once within 24 hours. Proxy may restart due to configuration changes or proxy process crash.
  • Your EUN pages (both warning and block) cannot be displayed for HTTPS even when decrypt-for-EUN option is enabled.

Note


The most restrictive quota will always apply when more than one quota applies to any given user.

ボリューム クォータの計算

ボリューム クォータの計算方法は次のとおりです。

  • HTTP および復号された HTTPS トラフィック:HTTP 要求と応答の本文がクォータの上限に対してカウントされます。要求ヘッダーと応答ヘッダーは上限に対してカウントされません。
  • トンネル トラフィック(トンネル化 HTTPS を含む):AsyncOS は、トンネル化トラフィックをクライアントからサーバに(およびその逆に)移動するだけです。トンネル化トラフィックのデータ量全体が、クォータの上限に対してカウントされます。
  • FTP:制御接続トラフィックはカウントされません。アップロードおよびダウンロードされたファイルのサイズは、クォータの上限に対してカウントされます。

(注)  


クライアント側のトラフィックのみがクォータの上限に対してカウントされます。応答がキャッシュから送信された場合でもクライアント側のトラフィックが生成されるため、キャッシュされたコンテンツも上限に対してカウントされます。

Time Quota Calculations

Calculation of time quotas is as follows:

  • HTTP and decrypted HTTPS traffic – The duration of each connection to the same URL category, from formation to disconnect, plus one minute, is counted toward the time quota limit. If multiple requests are made to the same URL category within one minute of each other, they are counted as one continuous session and the one minute is added only at the end of this session (that is, after at least one minute of “silence”).
  • Tunnel traffic (including tunneled HTTPS) – The actual duration of the tunnel, from formation to disconnect, counts toward quota limits. The above calculation for multiple requests applies to tunneled traffic as well.
  • FTP – The actual duration of the FTP control session, from formation to disconnect, counts toward quota limits. The above calculation for multiple requests applies to FTP traffic as well.

時間、ボリューム、および帯域幅のクォータの定義

始める前に
  • [セキュリティサービス(Security Services)] > [使用許可コントロール(Acceptable Use Controls)] に移動し、使用許可コントロールをイネーブルにします。

  • 毎日の制限としてクォータを適用しない場合は、時間範囲を定義します。

手順

ステップ 1

[Web セキュリティマネージャ(Web Security Manager)] > [時間範囲およびクォータの定義(Define Time Ranges and Quotas)] に移動します。

ステップ 2

[クォータの追加(Add Quota)] をクリックします。

ステップ 3

[クォータ名(Quota Name)] に一意のクォータ名を入力します。

ステップ 4

時間とボリュームのクォータを毎日リセットするには、[毎日このクォータをリセットする時刻(Reset this quota daily at)]、および [毎日時間とボリュームのクォータをリセットする時刻(Reset Time and Volume quota daily at)] を選択し、フィールドに 12 時間形式で時刻を入力し、メニューから [AM] または [PM] を選択します。または、[事前定義された時間範囲プロファイルを選択します(Select a predefined time range profile)] を選択します。

(注)  

 
リセットクォータオプションを使用しても、設定した帯域幅クォータ値はリセットされません。

ステップ 5

時間クォータを設定するには、[時間クォータTime Quota] チェックボックスをオンにして、[時間(hrs)] メニューから時間数を、[分(mins)] メニューから分数を選択し、0 分(常にブロック)から 23 時間 59 分までの時間数を設定します。

ステップ 6

ボリューム クォータを設定するには、フィールドに数字を入力し、メニューから [KB](キロバイト)、[MB](メガバイト)、または [GB](ギガバイト)を選択します。

ステップ 7

帯域幅クォータを設定するには、フィールドに数値を入力し、メニューから [Kbps](キロバイト/秒)、または [Mbps](メガバイト/秒)を選択します。

  • ただし、同じアクセスポリシーや復号ポリシーに、URL 帯域幅クォータと全体的な Web アクティビティクォータの両方を設定することはできません。

  • 全体的な帯域幅制限または AVC 帯域幅制限が有効になっている場合、またはその逆の場合、帯域幅クォータは設定できません。

  • キャッシュされたコンテンツも帯域幅クォータで考慮されます。

  • クォータプロファイルの編集中は、CDS ポリシーにマッピングされている既存の時間またはボリュームクォータのプロファイルに帯域幅クォータを追加しないでください。

  • 復号ポリシーで Web アクティビティ全体の帯域幅クォータを使用して URL を調整するには、URL をパススルーに設定する必要があります。

  • 未分類の URL の場合、詳細な帯域幅制御を介してスロットルするには、次の設定が必要です。

    • アクセスポリシー:復号ポリシー内の未分類の URL は、アクセスポリシーおよび全体的な Web アクティビティ帯域幅クォータでそれぞれ [復号/監視(Decrypt/Monitor)] および [監視(Monitor)] に設定されています。

    • 復号ポリシー:復号ポリシーの未分類の URL は、パススルーおよび全体的な Web アクティビティの帯域幅クォータに設定されています。

(注)  


AsyncOS リリース 15.0 にアップグレードする前に帯域幅クォータが設定されたすべてのクォータプロファイルを削除します。

ステップ 8

[送信(Submit)] をクリックし、次に [変更を確定(Commit Changes)] をクリックして変更を適用します。または、[キャンセル(Cancel)] をクリックして変更を破棄します。


次のタスク

(任意)[セキュリティ サービス(Security Services)] > [エンドユーザ通知(End-User Notification)] に移動し、クォータ用のエンドユーザ通知を設定します。

URL カテゴリによるアクセス制御

対応する Web サイトのカテゴリに基づいて、Web 要求を識別してアクションを実行できます。 Secure Web Applianceには、多数の定義済み URL カテゴリ(Web ベースの電子メールなど)が用意されています。

定義済みのカテゴリおよびそれらに関連付けられている Web サイトは、 Secure Web Applianceに搭載されているフィルタリングデータベースで定義されます。これらのデータベースは、Cisco によって自動的に最新の状態に維持されます。指定したホスト名と IP アドレスに対してカスタム URL カテゴリを作成することもできます。

URL カテゴリは、要求を識別するポリシーを除くすべてのポリシーで使用できます。また、要求にアクションを適用するポリシー(アクセス、暗号化 HTTPS 管理、データ セキュリティ)でも使用できます。

カスタム URL カテゴリの作成については、カスタム URL カテゴリの作成および編集 を参照してください。

URL カテゴリによる Web 要求の識別

始める前に

手順


ステップ 1

[Webセキュリティマネージャ(Web Security Manager)] メニューからポリシー タイプ(SaaS 以外)を選択します。

ステップ 2

ポリシー テーブル内のポリシー名をクリックします(または新しいポリシーを追加します)。

ステップ 3

[詳細設定(Advanced)] セクションを展開して、[URLカテゴリ(URL Categories)] フィールド内のリンクをクリックします。

ステップ 4

Web 要求の識別に使用する URL カテゴリに対応する [追加(Add)] 列のセルをクリックします。この操作を、カスタム URL カテゴリと定義済み URL カテゴリのリストに対して実行します。

ステップ 5

[完了(Done)] をクリックします。

ステップ 6

変更を送信し、保存します。


URL カテゴリによる Web 要求へのアクション

始める前に


(注)  


ポリシー内で基準として URL カテゴリを使用している場合、同じポリシー内にアクションを指定する際には、それらのカテゴリだけを使用できます。そのため、下記のオプションの一部が異なっていたり、使用できないことがあります。

手順


ステップ 1

[Web セキュリティ マネージャ(Web Security Manager)] メニューから [アクセス ポリシー(Access Policies)]、[Cisco データ セキュリティ ポリシー(Cisco Data Security Policies)]、または [暗号化 HTTPS 管理(Encrypted HTTPS Management)] のいずれかを選択します。

ステップ 2

ポリシー テーブルで必要なポリシー名を検索します。

ステップ 3

同じ行の [URLフィルタリング(URL Filtering)] 列のセル リンクをクリックします。

ステップ 4

(任意)カスタム URL カテゴリを追加します。

  1. [カスタムカテゴリの選択(Select Custom Categories)] をクリックします。

  2. このポリシーに含めるカスタム URL カテゴリを選択して、[適用(Apply)] をクリックします。

    URL フィルタリング エンジンでクライアント要求と照合するカスタム URL カテゴリを選択します。URL フィルタリング エンジンは、クライアント要求と含まれているカスタム URL カテゴリを比較します。除外されたカスタム URL カテゴリは無視されます。URL フィルタリング エンジンは、定義済みの URL カテゴリよりも前に、含まれているカスタム URL カテゴリとクライアント要求の URL を比較します。

    ポリシーに含まれているカスタム URL カテゴリは、[カスタムURLカテゴリのフィルタリング(Custom URL Category Filtering)] セクションに表示されます。

ステップ 5

カスタムおよび定義済みの各 URL カテゴリのアクションを選択します。

(注)  


使用可能なアクションは、カスタム カテゴリと定義済みカテゴリとでは異なり、ポリシー タイプによっても異なります。

ステップ 6

[分類されてないURL(Uncategorized URLs)] セクションで、定義済み URL カテゴリにもカスタム URL カテゴリにも該当しない Web サイトへのクライアント要求に対して実行するアクションを選択します。

ステップ 7

変更を送信し、保存します。


リモートユーザー

リモート ユーザーについて

Cisco AnyConnect セキュアモビリティはネットワーク境界をリモートエンドポイントまで拡張し、 Secure Web Applianceにより提供される Web フィルタリングサービスの統合を実現します。

リモート ユーザーおよびモバイル ユーザーは Cisco AnyConnect Secure VPN(仮想プライベート ネットワーク)クライアントを使用して、適応型セキュリティ アプライアンス(ASA)との VPN セッションを確立します。ASA は、IP アドレスとユーザー名によるユーザー識別情報とともに、Web トラフィックを Secure Web Applianceに送信します。 Secure Web Applianceは、トラフィックをスキャンしてアクセプタブル ユース ポリシーを適用し、セキュリティ上の脅威からユーザを保護します。セキュリティ アプライアンスは、安全と判断された、ユーザーが受け入れ可能なすべてのトラフィックを返します。

セキュア モビリティがイネーブルの場合は、ID とポリシーを設定し、ユーザーの場所に応じてユーザーに適用できます。

  • リモート ユーザー。これらのユーザーは、VPN を使用してリモート ロケーションからネットワークに接続されます。Cisco ASA と Cisco AnyConnect クライアントの両方が VPN アクセスに使用されている場合、 Secure Web Applianceはリモート ユーザを自動的に識別します。それ以外の場合は、 Secure Web Applianceの管理者が IP アドレスの範囲を設定して、リモート ユーザを指定する必要があります。

  • ローカル ユーザー。これらのユーザーは、有線またはワイヤレスでネットワークに接続されます。

Secure Web Applianceを Cisco ASA と統合すると、認証されたユーザ名によりユーザを透過的に識別するように設定して、リモート ユーザのシングル サインオンを実現できます。

リモート ユーザーの ID を設定する方法

タスク

解説場所

1. リモート ユーザーの ID を設定する。

リモート ユーザーの ID の設定

2. リモート ユーザーの ID を作成する。

ユーザーおよびクライアント ソフトウェアの分類

  1. [ユーザーの場所別メンバーの定義(Define Members by User Location)] セクションで、[ローカルユーザーのみ(Local Users Only)] を選択します。

  2. [認証ごとにメンバを定義(Define Members by Authentication)] セクションで、[Cisco ASA統合を通じてユーザーを透過的に識別する(Identify Users Transparently through Cisco ASA Integration)] を選択します。

3. リモート ユーザーのポリシーを作成する。

Creating a Policy

リモート ユーザーの ID の設定

手順

ステップ 1

[セキュリティサービス(Security Services)] > [AnyConnectセキュアモビリティ(AnyConnect Secure Mobility)] で、[有効(Enable)] をクリックします。

ステップ 2

AnyConnect セキュア モビリティのライセンス契約書の条項を読み、[同意する(Accept)] をクリックします。

ステップ 3

リモート ユーザーの識別方法を設定します。

オプション

説明

この他の手順

[IPアドレス(IP Address)]

リモート デバイスに割り当てられているとアプライアンスが見なす IP アドレスの範囲を指定します。

  1. [IP 範囲(IP Range)] フィールドに IP アドレスの範囲を入力します。

  2. ステップ 4 に進みます。

Cisco ASA 統合(Cisco ASA Integration)

Secure Web Applianceが通信する 1 つ以上の Cisco ASA を指定します。Cisco ASAは IP アドレスとユーザーのマッピングを保持し、その情報を Secure Web Applianceに伝達します。Web プロキシはトランザクションを受信すると、IP アドレスを取得し、IP アドレスとユーザーのマッピングをチェックしてユーザーを特定します。Cisco ASA と統合してユーザーを特定する場合は、リモート ユーザーのシングル サイン オンをイネーブルにできます。

  1. Cisco ASA のホスト名または IP アドレスを入力します。

  2. ASA へのアクセスに使用するポート番号を入力します。Cisco ASA のデフォルト ポート番号は 11999 です。

  3. クラスタ内に複数の Cisco ASA が設定されている場合は、[行の追加(Add Row)] をクリックし、クラスタ内の各 ASA を設定します。

    (注)  

     
    2 つの Cisco ASA が高可用性に設定されている場合は、アクティブな Cisco ASA の 1 つのホスト名または IP アドレスのみを入力します。
  4. Cisco ASA のアクセス パスフレーズを入力します。

    (注)  

     
    ここで入力するパスフレーズは、指定した Cisco ASA 用に設定されているアクセス パスフレーズと一致する必要があります。
  5. (任意)[テスト開始(Start Test)] をクリックして、 Secure Web Applianceが設定されている Cisco ASAに接続できることを確認します。

ステップ 4

変更を送信して確定します([送信(Submit)] と [変更を確定(Commit Changes)])。

(注)  


Secure Web Applianceで [ユーザーの場所別メンバーの定義(Define Members by User Location)] オプションを有効にするには、AnyConnect セキュリティモビリティを有効にします([セキュリティサービス(Security Services)] > [AnyConnect Security Mobility])。デフォルトでは、このオプションは Cisco Content Security Management Appliance([Web] > [設定マスター(Configuration Master)] > [識別プロファイル(Identification Profiles)])で使用できます。[ユーザーの場所別メンバーの定義(Define Members by User Location)] オプションを使用してセキュリティ管理アプライアンスで識別プロファイルを設定し、その設定を AnyConnect セキュリティモビリティが有効になっていない Secure Web Applianceに公開すると、その識別プロファイルは無効になります。


ASA のリモート ユーザー ステータスと統計情報の表示

Secure Web Applianceが ASA と統合されている場合は、以下のコマンドを使用してセキュアモビリティに関連する情報を表示します。

コマンド

説明

musstatus

このコマンドにより、以下の情報が表示されます。

  • Secure Web Applianceと各 ASA との接続ステータス。

  • Secure Web Applianceと各 ASA との接続時間(分単位)。

  • 各 ASA からのリモート クライアントの数。

  • サービス対象のリモート クライアントの数。これは、 Secure Web Applianceを介してトラフィックの受け渡しを行ったリモート クライアントの数です。

  • リモート クライアントの合計数。

ポリシーに関するトラブルシューティング