- Cisco Mobility Express Overview
- Deploying Cisco Mobility Express
- Configuring Cisco Mobility Express controller
- Using internal DHCP server on Cisco Mobility Express
- Configuring Cisco Mobility Express for Site Survey
- Creating Wireless Networks
- Managing Services with Cisco Mobility Express
- Managing the Cisco Mobility Express Deployment
- Master AP Failover and Electing a new Master
Managing Services
with Cisco Mobility Express
There are a number of services supported in a Cisco Mobility Express deployment. In this section, the following Services will be covered.
- Application Visibility and Control
- iOS Optimized WiFi connectivity and Fast Lane
- Cisco Mobility Express with CMX Cloud
Application Visibility and Control
Network Based Application Recognition (NBAR) provides application-aware control on a wireless network and enhances manageability and productivity. It also extends Cisco's Application Visibility and Control (AVC) as an end-to-end solution, which gives a complete visibility of applications in the network and allows the administrator to take some action on the same.
NBAR is a deep-packet inspection technology, which supports stateful L4 - L7 classification. The key use cases for NBAR are capacity planning, network usage base lining and better understanding of what applications are consuming bandwidth. Trending of application usage helps network admin improve quality of experience by protecting key applications from bandwidth-hungry applications when there is congestion on the network, capability to prioritize or de-prioritize, and drop certain application traffic. The AVC/NBAR2 engine interoperates with QoS settings on the specific WLAN.
Enabling Application Visibility on WLAN
To configure Application Visibility on a WLAN, follow the procedure below:
Enabling Application Control on WLAN
After Application Visibility has been enabled on the WLAN, one can add control for various applications. There are two way to add control for applications. One can either add control directly from the Applications widget on the Network Summary page or one can navigate to Monitoring > Applications and add control for applications as needed.
Adding Application Control from Network Summary Page
Adding Application Control from Applications Page
iOS Optimized WiFi connectivity and Fast Lane
Configuring Optimized WiFi Connectivity
802.11r enabled WLAN provides faster roaming for wireless client devices. It is desired that iOS devices running iOS 10 will be able to join a WLAN with 11r enabled for better roaming experience. However, if 11r is enabled on a WLAN, the legacy devices that do not recognize the FT AKM's beacons and probe responses will not be able to join the WLAN. We need a way to identify the Client device capability and allow 11r capable device to join on the WLAN as an FT enabled device and at the same time to allow legacy device to join as an 11i/WPA2 device.
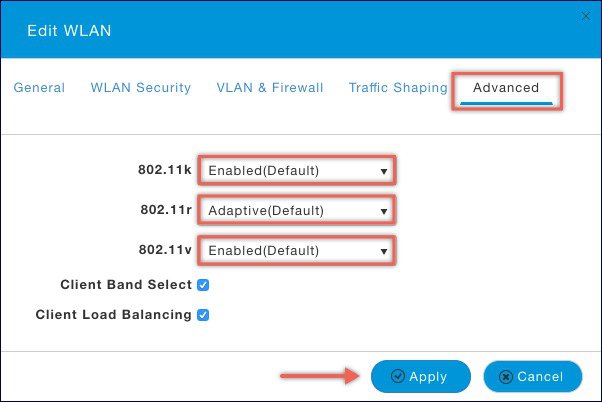
Cisco Mobility Express Release 8.4 will enable 802.11r on an 802.11i-enabled WLAN selectively for iOS devices. The capable iOS devices will identify this functionality and perform an FT Association on the WLAN. The Cisco Wireless infrastructure will allow FT association on the WLAN from devices that can negotiate FT association on a non-FT WLAN. In addition, with Mobility Express running AireOS 8.4, 802.11k and 11v features are enabled by default on an SSID. These features help clients roam better by telling them when to roam and providing them with information about neighboring APs so that no time is wasted scanning when roaming is needed. Since iOS devices support dual band, the 802.11k neighbor list is updated on dual-band, adaptively for iOS devices.
To configure 11k, r, v on a WLAN, follow the procedure below:

Configuring Fast Lane
Apple iOS device mark QoS as per IETF recommendations. With Mobility Express running AireOS 8.5, one can enable the Fastlane feature from CLI, which enables several beneficial functions:
- Your WLC QoS configuration is optimized globally to better support real-time applications
- iOS 10 devices can send upstream voice traffic without the requirement to perform WMM TSPEC/TCLAS negotiation. The infrastructure will honor the voice marking for these devices.
- You can apply a QoS profile to your iOS 10 devices, and decide which applications should receive QoS marking upstream, and which applications should be sent as best effort or background.
To configure Fast Lane on a WLAN from UI, follow the procedure below:
Cisco Mobility Express with CMX Cloud
Cisco CMX Cloud
Cisco Connected Mobile Experiences Cloud (Cisco CMX Cloud) is an simple and scalable offering which enables delivery of wireless guest access and in-venue analytics, integrating seamlessly with Cisco wireless infrastructure.
This cloud-delivered Software-as-a-Service (SaaS) offering is quick to deploy and intuitive to use. It is based on CMX 10.x code and is compatible with Cisco Mobility Express Release 8.3. It offers the following services:
- Connect for Guest Access-Providing an easy-to-use guest-access solution for visitors through a custom portal using various authentication methods including social, self-registration, and Short Message Service (SMS).
- Presence Analytics-Detecting all Wi-Fi devices (the "devices") in the venue and providing analytics on their presence, including dwell times, new vs. repeat visitors, and peak time.
Cisco CMX Cloud Solution Compatibility Matrix
Minimum requirements for Cisco CMX Cloud deployment
Below are the minimum requirements for CMX Cloud deployment:
Enabling CMX Cloud Service on Mobility Express for Presence Analytics
After CMX Cloud Account has been created, next step is to configure and enable the CMX Cloud Service on Master Access Point so that it can send data to the CMX Cloud. To configure, follow the procedure below:
Configuring Site on CMX Cloud for Presence Analytics
To create a site and add Access Points to the site in CMX Cloud for Presence Analytics, follow the procedure below:
| Step 1 | Login to CMX Cloud account at https://cmscisco.com/ |
| Step 2 | Navigate to Manage > Cloud Enabled WLC and verify that the IP address of the WLC shows up on the list. |
| Step 3 | Navigate to PRESENCE ANALYTICS > Manage. You should be in the Sites pane. Click on the Add Site button to create a site. |
| Step 4 | In the NEW SITE window, configure the following details: |
| Step 5 | Click Save to create the Site. |
| Step 6 | After the Site is created, click on Access Points under PRESENCE ANALYTICS > Manage. |
| Step 7 | Select the Access Points and add them to the Site by clicking on Add to Site button and selecting the Site from the drop-down list. |
| Step 8 | Finally, navigate to Presence Analytics dashboard. Select the Site you created. Within a few minutes, you should begin to see Presence data get populated. |
 Feedback