- Cisco Mobility Express Overview
- Deploying Cisco Mobility Express
- Configuring Cisco Mobility Express controller
- Using internal DHCP server on Cisco Mobility Express
- Configuring Cisco Mobility Express for Site Survey
- Creating Wireless Networks
- Managing Services with Cisco Mobility Express
- Managing the Cisco Mobility Express Deployment
- Master AP Failover and Electing a new Master
Creating Wireless
Networks
WLANs
Cisco Mobility Express solution supports a maximum of 16 WLANs. Each WLAN has a unique WLAN ID (1 through 16), a unique Profile Name, SSID, and can be assigned different security policies.
Access Points broadcast all active WLAN SSIDs and enforce the policies that you define for each WLAN.
A number of WLAN Security options are supported on Cisco Mobility Express solution and are outlined below:
For Guest WLAN, a number of capabilities are supported:
Creating Employee WLANs
Creating Employee WLAN with WPA2 Personal
Creating Employee WLAN using WPA2 Enterprise with External Radius Server
Creating Employee WLAN with WPA2 Enterprise and Authentication Server as AP
Creating Employee WLAN with WPA2 Enterprise/External RADIUS and MAC Filtering
Creating Guest WLANs
Mobility Express controller can provide guest user access on WLANs which are specifically designated for use by guest users. To set this WLAN exclusively for guest user access, enable the Guest Network under the WLAN Security tab.
Creating Guest WLAN with Captive Portal on CMX Connect
Creating Guest WLAN with Internal Splash Page
There is an internal splash page built into the Mobility Express controller which can be used to onboard the clients connecting to Guest WLANs. This internal splash page can also be customized by uploading a customized bundle. To upload a customized internal splash page, navigate to Wireless Settings > Guest WLANs. Select Page Type as Customized and click on the Upload button to upload a customized page bundle.
For internal splash page, Cisco Mobility Express supports multiple options for Access Type. They are as follows:
| Step 1 | Navigate to Wireless Settings > WLANs and then click on Add new WLAN button. The Add new WLAN Window will pop up. |
| Step 2 | In the Add
new WLAN window, on the
General
tab, configure the following:
|
| Step 3 | Enable the Guest Network under the WLAN Security tab. |
| Step 4 | Select Captive Portal as Internal Splash Page. |
| Step 5 | Select one of
the following
Access
Type as needed:
|
| Step 6 | Click Apply. |
Creating Guest WLAN with External Splash Page
An external splash page is one which resides on an external Web Server. Similar to the internal splash page, Cisco Mobility Express supports multiple options for Access Type with external splash page. They are as follows:
| Step 1 | Navigate to Wireless Settings > WLANs and then click on Add new WLAN button. The Add new WLAN Window will pop up. |
| Step 2 | In the Add
new WLAN window, on the
General
tab, configure the following:
|
| Step 3 | Enable the Guest Network under the WLAN Security tab. |
| Step 4 | Select Captive Portal as External Splash Page. |
| Step 5 | Select one
of the following
Access
Type as needed:
|
| Step 6 | Click Apply. |
Internal Splash Page for Web Authentication
Cisco Mobility Express supports a default internal guest portal that comes built-in and also a customized page, which can be imported by the user.
Using default internal guest portal
To use the default Guest Portal Page or import a customized Guest Portal page, follow the procedure below:
| Step 1 | Navigate to Wireless Settings > Guest WLANs. |
| Step 2 | Configure the
following on the Guest WLAN page:
|
| Step 3 | Click Apply. |
Using customized internal guest portal
If a customized guest portal has to be presented to guest users, a sample page can be downloaded from cisco.com which can then be edited and imported to the Cisco Mobility Express controller. After the page has been edited and ready to be uploaded to the Cisco Mobility Express controller, follow the steps below.
| Step 1 | Navigate to Wireless Settings > Guest WLANs. |
| Step 2 | Configure the
following on the Guest WLAN page:
|
| Step 3 | Click Apply. |
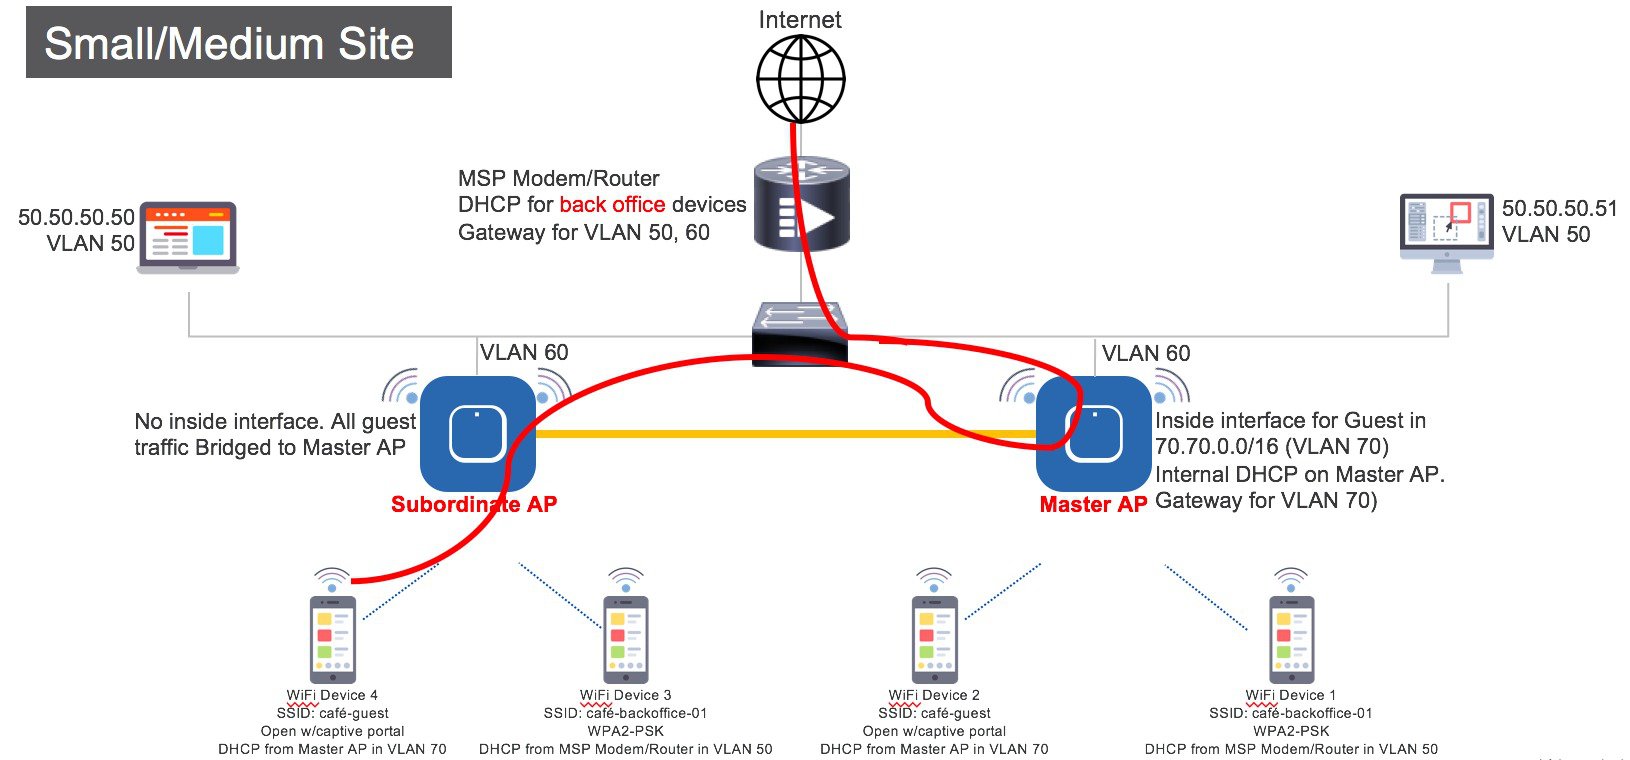
Centralized NAT on Guest WLANs
Managed Service Providers provide managed WiFi services at Hotels,
Retail locations with 1 - 70 APs on site with up 300 or more concurrent
wireless clients. In such locations aggregate throughput is limited by WAN
connectivity and is typically less than 250 Mbps. Use of external DHCP server
for clients is limited to back office devices/clients due to scale limitations.
For Guest devices, expectation is to use internal DHCP server on Master AP so
that and all guest traffic can be routed via the Master Access Point.
To configure centralized NAT on Guest WLANs, follow the procedure below:
| Step 1 | Add a DHCP Pool for the WLAN which has to bed NAT'ed. To create
the scope, navigate to
Wireless Settings > DHCP Server > Add new Pool. The
Add DHCP Pool window will pop up. On the
Add DHCP Pool window, configure the following:
| ||
| Step 2 | To create WLAN, navigate to
Wireless Settings > WLANs. On the
Add new WLAN or
Edit WLAN window, click on the
VLAN and Firewall tab and configure the following:
| ||
| Step 3 | Click Apply. |
Managing WLAN Users
Cisco Mobility Express supports creation of local user accounts. These users can be authenticated for WLANs configured to use Security as WPA2 Enterprise with Authentication Server set to AP or Guest WLANs configured to use internal or external splash page with Access Type as Local User Account.
To create local user accounts, follow the procedure below:
| Step 1 | Navigate to Wireless Settings > WLAN Users and then click on Add WLAN User button. |
| Step 2 | Configure the following for
the WLAN user:
|
Adding MAC for Local MAC Filtering on WLANs
Cisco Mobility Express supports MAC Filtering on WLANs on controller as well as with external RADIUS. MAC addresses can be added to the controller and be either Whitelisted or Blacklisted. To add MAC addresses to the controller, follow the procedure below:
| Step 1 | Navigate to Wireless Settings > WLAN Users and click on Local MAC Addresses. |
| Step 2 | Click Add MAC Address. |
| Step 3 | In the
Add MAC
Address window, configure the following:
|
| Step 4 | Click Apply. |
WLAN Passpoint Support
Starting Release 8.5, Cisco Mobility Express will add support for Passpoint on WLANs. Access Points which supports IEEE 802.11u-based network information and phone client devices that are certified for WiFi Alliance's are able to work together to support the Passpoint functionality.
The 802.11u enabled phone client devices discover and select target AP based on the information gathered during the pre-association stage from an 802.11u-enabled AP/Cisco Mobility Express controller. A phone client device has pre-provisioned network information such as home OI Information, realm name and domain name, presented as configuration file inside the phone client device. In addition, the phone client device may obtain home network information using the IMSI data derived from the inserted SIM/USIM card.
The 802.11u AP provides various information listings that provide the HotSpot owner details, roaming partners, realm list, 3GPP cellular information, and domain name. The realm list also provides listings of the realm name and its associated EAP authentication type mappings. Knowing this information is essential for the phone client device so that correct EAP credential exchange may take place.
Through the WLAN configuration, single SSID and multiple SSID will be configured with necessary Passpoint information. This additional Passpoint information will be added on beacon or probe response information, so that Passpoint-enabled phone client device can detect and query AP to get further information. During the query process, standard protocol format called ANQP-Access Network Query Protocol-is followed. Here, the protocol describes the standard 2-way or 4-way handshake process to get enough information from the AP and ANQP server to determine the best AP that the phone client device can authenticate and associate with. This handshake process is called GAS-Generic Advertisement Service-protocol that is defined on IEEE 802.11u standard.
To configure Passpoint, follow the procedure below:
| Command or Action | Purpose | |
|---|---|---|
| Step 1 | Enable Expert View on Cisco Mobility Express. Expert View is available on the top banner of the Cisco Mobility Express WebUI as shown below. This will enable the 802.11u and Hotspot 2.0 tabs on the WLANs. |

|
| Step 2 | To configure 802.11u and Hotspot 2.0 on WLAN, navigate to Wireless Settings > WLANs. On the Add new WLAN or Edit WLAN window, click on the 802.11u tab and Hotspot 2.0 tab to enter the relevant configuration. | |
| Step 3 | Click Apply. |
 Feedback