- Cisco Mobility Express Overview
- Deploying Cisco Mobility Express
- Configuring Cisco Mobility Express controller
- Using internal DHCP server on Cisco Mobility Express
- Configuring Cisco Mobility Express for Site Survey
- Creating Wireless Networks
- Managing Services with Cisco Mobility Express
- Managing the Cisco Mobility Express Deployment
- Master AP Failover and Electing a new Master
Configuring Cisco
Mobility Express controller
There are multiple ways one can configure a Cisco Mobility Express controller. They are as follows:
- CLI Setup Wizard
- Over-the-Air Setup Wizard
- Network Plug and Play
- APIC-EM Network Plug and Play Deployment Options with Cisco Mobility Express
- Connecting Cisco Mobility Access Points
CLI Setup Wizard
To use the Setup Wizard from CLI, you must connect to the console port of the Access Point. The default parameters for the console ports are 9600 baud, eight data bits, one stop bit, and no parity. The console ports do not support hardware flow control.
After connecting to the console port on the Access Point, power up the Access Point. After a few minutes, Access Point will start the Controller.
To configure the Mobility Express controller, follow the steps as shown in the example below:
System Name [Cisco_2c:3a:40] (31 characters max): me-wlc
Enter Country Code list (enter 'help' for a list of countries) [US]:

Configure a NTP server now? [YES][no]: no
Configure the system time now? [YES][no]: no

Note! Default NTP servers will be used

Management Interface IP Address: 40.40.40.10
Management Interface Netmask: 255.255.255.0
Management Interface Default Router: 40.40.40.1
Cleaning up Provisioning SSID
Create Management DHCP Scope? [yes][NO]: yes
DHCP Network : 40.40.40.0
DHCP Netmask : 255.255.255.0
Router IP: 40.40.40.1
Start DHCP IP address: 40.40.40.11
Stop DHCP IP address: 40.40.40.254
DomainName :
DNS Server : [OPENDNS][user DNS]
Create Employee Network? [YES][no]: YES
Employee Network Name (SSID)?: WestAutoBody-Employee
Employee VLAN Identifier? [MGMT][1-4095]: MGMT
Employee Network Security? [PSK][enterprise]: PSK
Employee PSK Passphrase (8-38 characters)?: Cisco123
Re-enter Employee PSK Passphrase: Cisco123
Create Guest Network? [yes][NO]: YES
Guest Network Name (SSID)?: WestAutoBody-Guest
Guest VLAN Identifier? [EMPLOYEE][1-4095]: EMPLOYEE
Guest Network Security? [WEB-CONSENT][psk]: WEB-CONSENT
Create Guest DHCP Scope? [yes][NO]: NO
Enable RF Parameter Optimization? [YES][no]: YES
Client Density [TYPICAL][Low][High]: TYPICAL
Traffic with Voice [NO][Yes]: Yes

Configuration correct? If yes, system will save it and reset. [yes][NO]: yes
Cleaning up Provisioning SSID
 Note | The Access Point will reboot and after it comes back up, login to the Mobility Express controller WebUI from the browser using https://<mangement_ip_address> Cisco Mobility Express controller uses a self-signed certificate for HTTPS. Therefore, all browsers display a warning message and asks whether you wish to proceed with an exception or not when the certificate is presented to the browser. Accept the risk and proceed to access the Mobility Express Wireless LAN Controller login page. |
Over-the-Air Setup Wizard
Over-the-air is a simple and easy way to configure Mobility Express out of the box. Over-the-Air provisioning can be done using a WiFi enabled device or the Cisco Wireless app which can be downloaded from App Store for iOS devices and Play Store for Android Devices. The Cisco Wireless app provides a minimum set of configurable options to deploy Mobility Express in just a few minutes.
Network Plug and Play
Introduction
The Cisco Network Plug and Play solution provides a simple, secure, unified, and integrated offering for enterprise network customers to ease new site rollouts for provisioning Cisco Mobility Express. The solution allows use of Cloud Redirection service, on-prem, or combination which provide a unified approach to provision enterprise networks comprised of Cisco Mobility Express, Cisco routers, switches, with a near zero touch deployment experience.
You can use the Cisco Network Plug and Play application to pre-provision the site and add Cisco Mobility Express capable access points to the site. This includes entering access point information and uploading a controller configuration file for virtual controller which will run on Mobility Express capable access points.
When an installer installs and powers up the Cisco Mobility Express capable access points, it auto-discovers the Cisco APIC-EM controller by using the DHCP, DNS or cloud redirection service. After the auto-discovery process is complete, the AP downloads the controller configuration file from local PnP server, or communicates with the cloud redirection service for direction to target PnP server.
Pre-requisites
- APIC-EM Release 1.4 or later with Cisco Network Plug and Play, virtually hosted in a Cisco UCS or equivalent server.
- Access Points–Cisco 802.11ac Wave 2 access points running Cisco Mobility Express software.
- Controller Configuration–Cisco Mobility Express controller configuration file to be uploaded on Network PnP.
APIC-EM discovery options
-
DHCP server configured with option 43 to allow Cisco Mobility Express capable access points to auto-discover the APIC-EM controller (option 43 is not required if only testing cloud redirection). DHCP option 43 consists of a string value that is a configured DHCP server: option 43 ascii "5A1N;B2;K4;I192.168.1.123;J80"
Note
192.168.1.123 is the IP address of the APCI-EM Server
-
On–prem PnP server can be added to DNS using ‘pnpserver.yourlocal.domain’ If DHCP discovery fails to get the IP address of the APIC-EM controller, for example, because option 43 is not configured, the Cisco Plug and Play Agent falls back on a DNS lookup method. Based on the network domain name returned by the DHCP server, it constructs a fully qualified domain name (FQDN) for the APIC-EM controller, using the preset hostname pnpserver. For example, if the DHCP server returns the domain name " customer.com ", the Cisco Plug and Play IOS Agent constructs the FQDN "pnpserver.customer.com ". It then uses the local name server to resolve the IP address for this FQDN
-
Cloud redirection service requires a connection to the internet, and valid DNS server that can resolve ‘devicehelper.cisco.com’. The cloud redirection service redirect Cisco Mobility Express Access Point to APIC-EM.
Configuring APIC-EM / Network PnP server
Site Pre-Provisioning Workflow
Cisco Network Plug and Play allows you to pre-provision and plan for new sites. When you create a new site, Cisco Network Plug and Play enables you to pre-provision Cisco Mobility Express access point(s) controller, configuration file, product ID, and product serial # for selected Access Points. This simplifies and accelerates the time that it takes to get a site fully functional.
For detailed info pm PnP Config about other functionality, see http://www.cisco.com/c/en/us/support/cloud-systems-management/one-enterprise-network-controller/products-installation-and-configuration-guides-list.html
To pre-provision a site on your network, perform these steps:
Importing Cisco Mobility Express configuration file to Network PnP

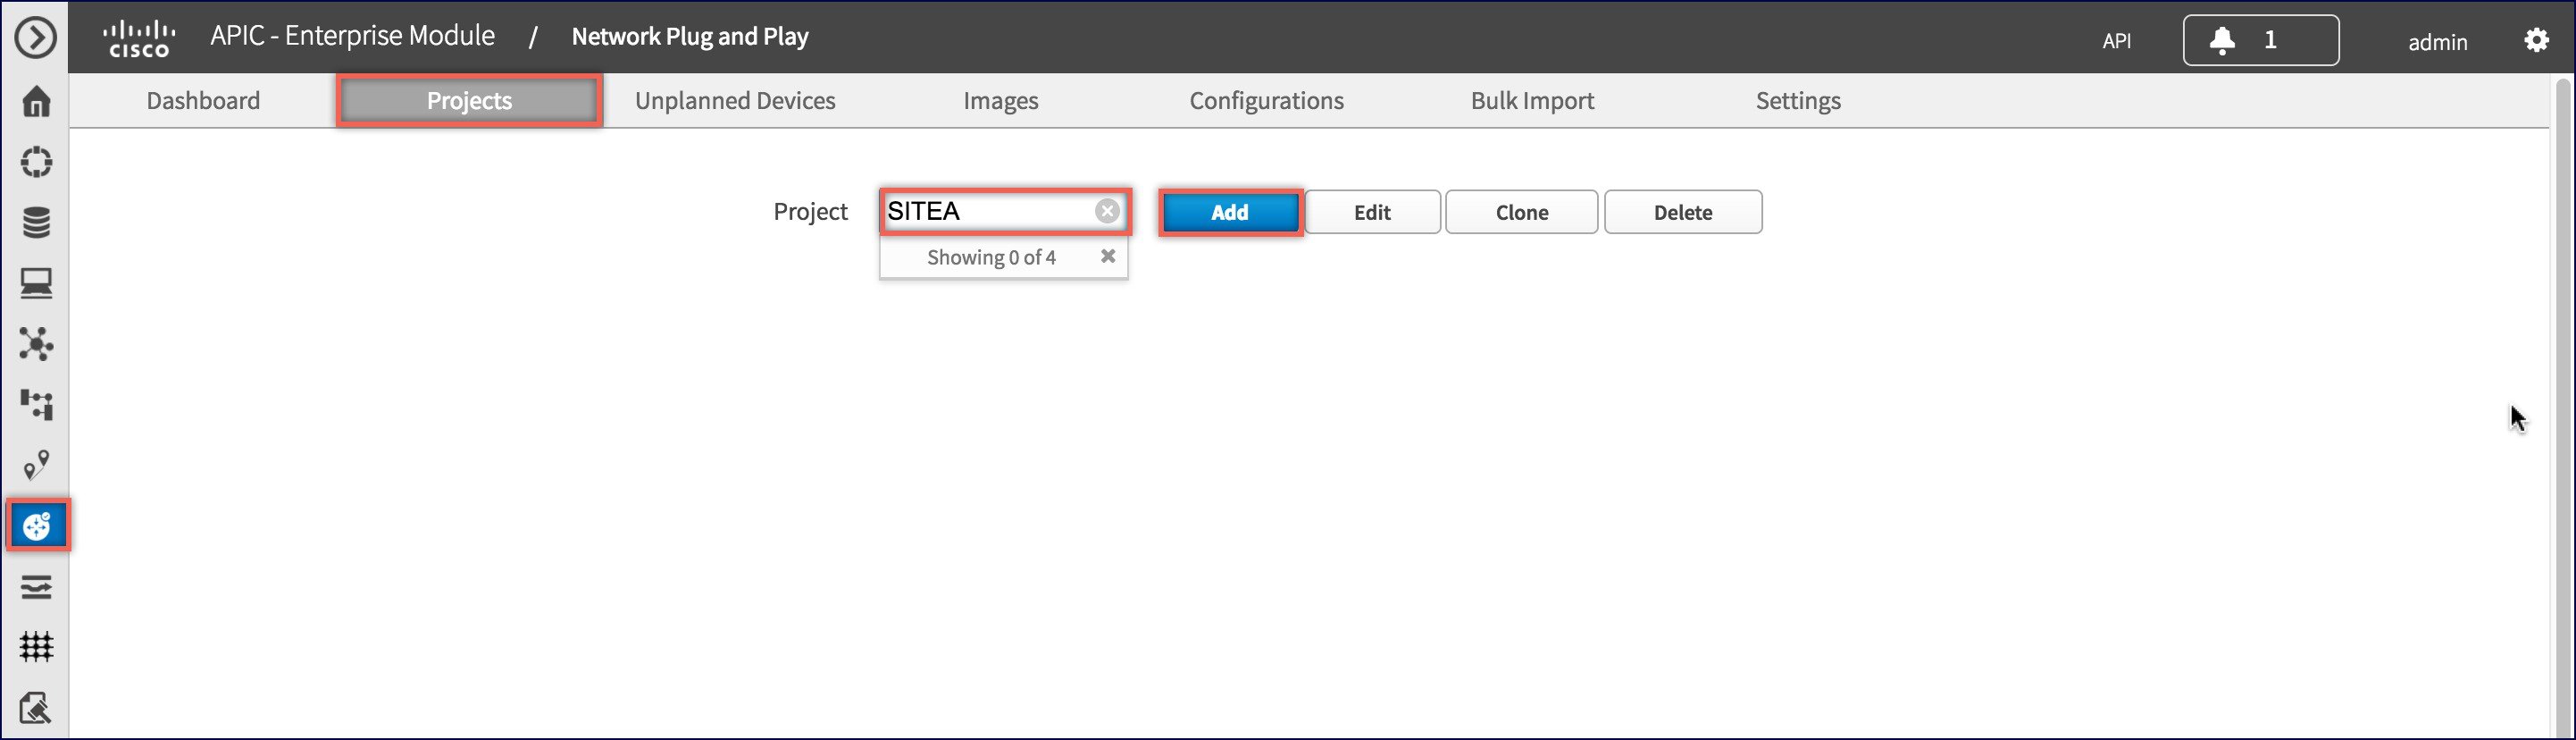
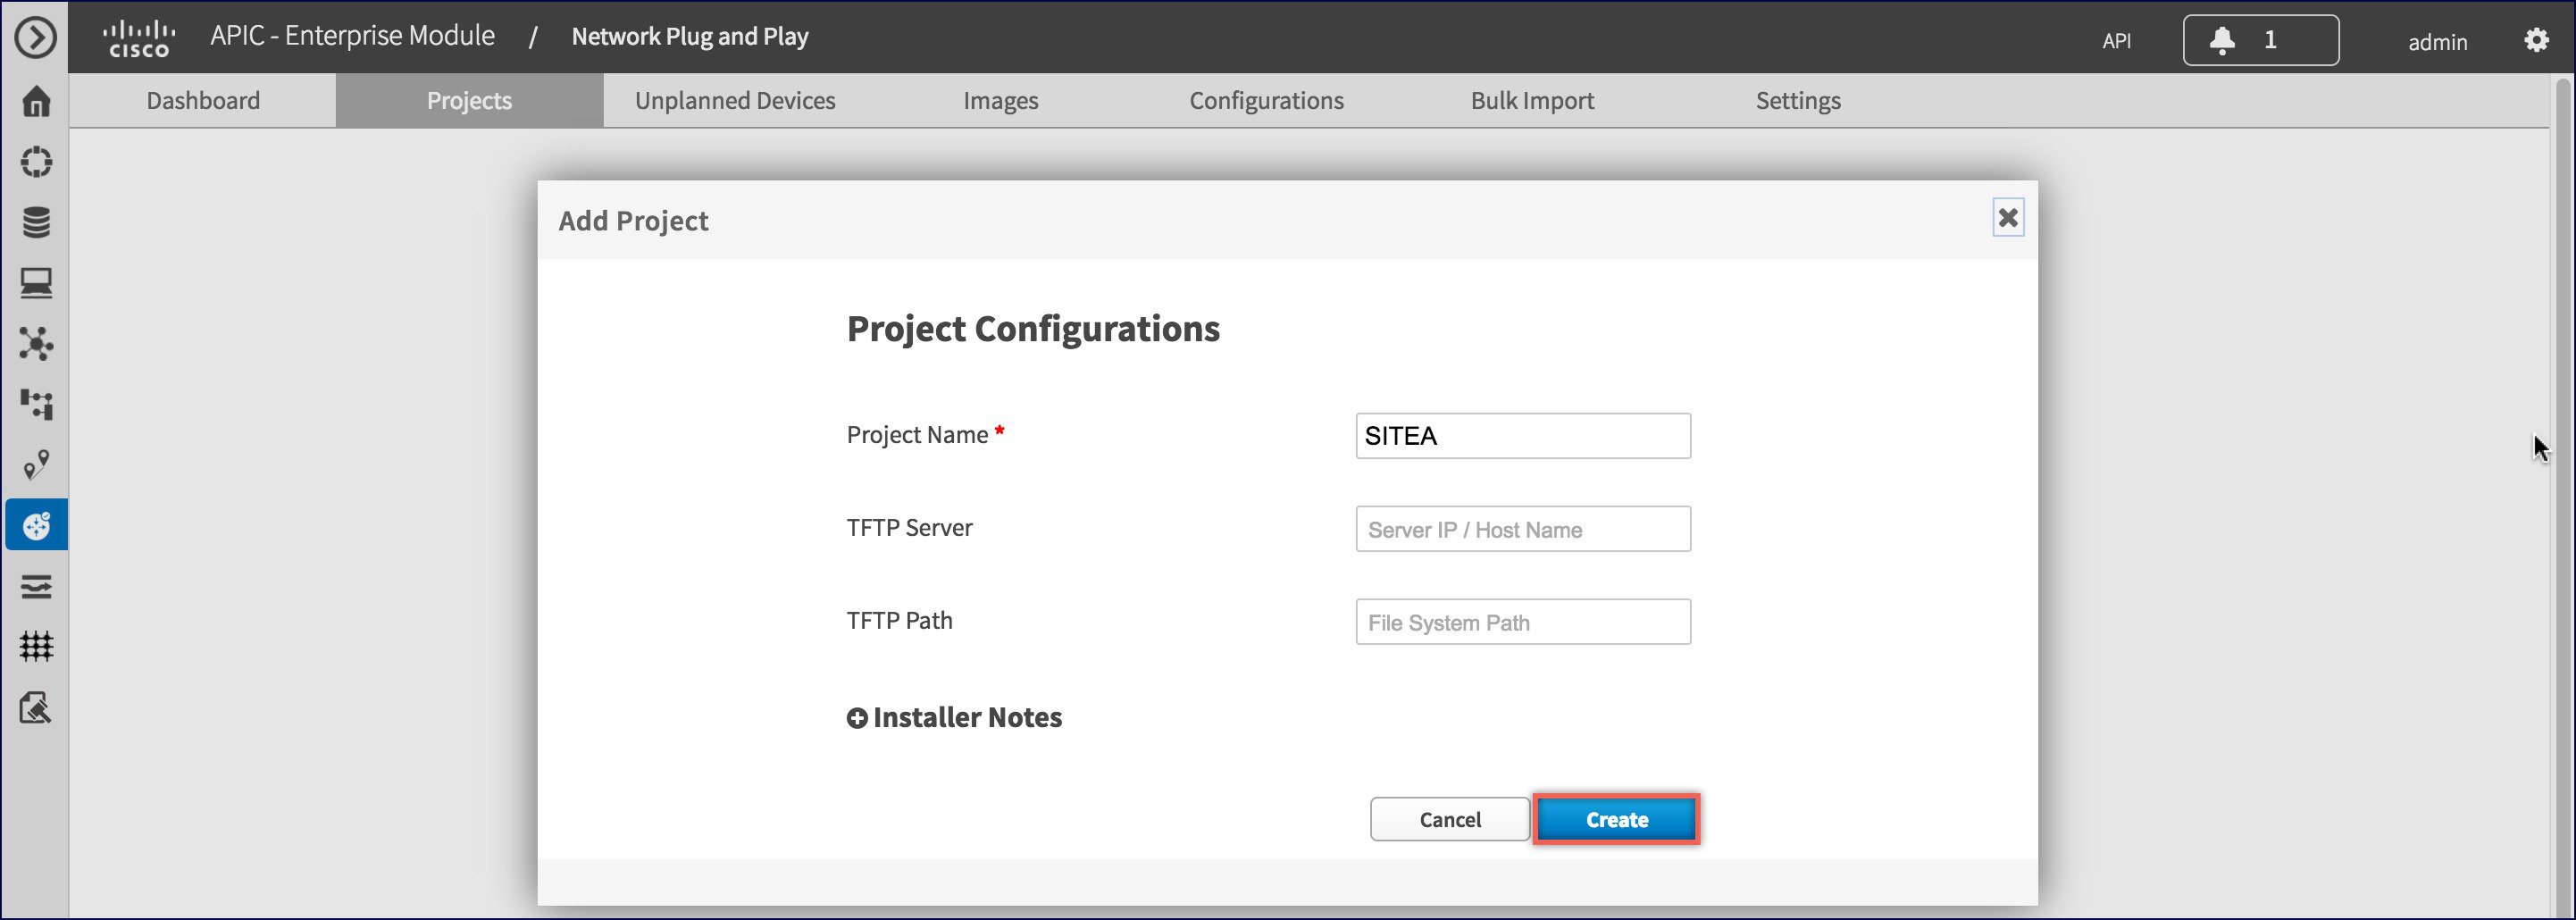
Creating a Project
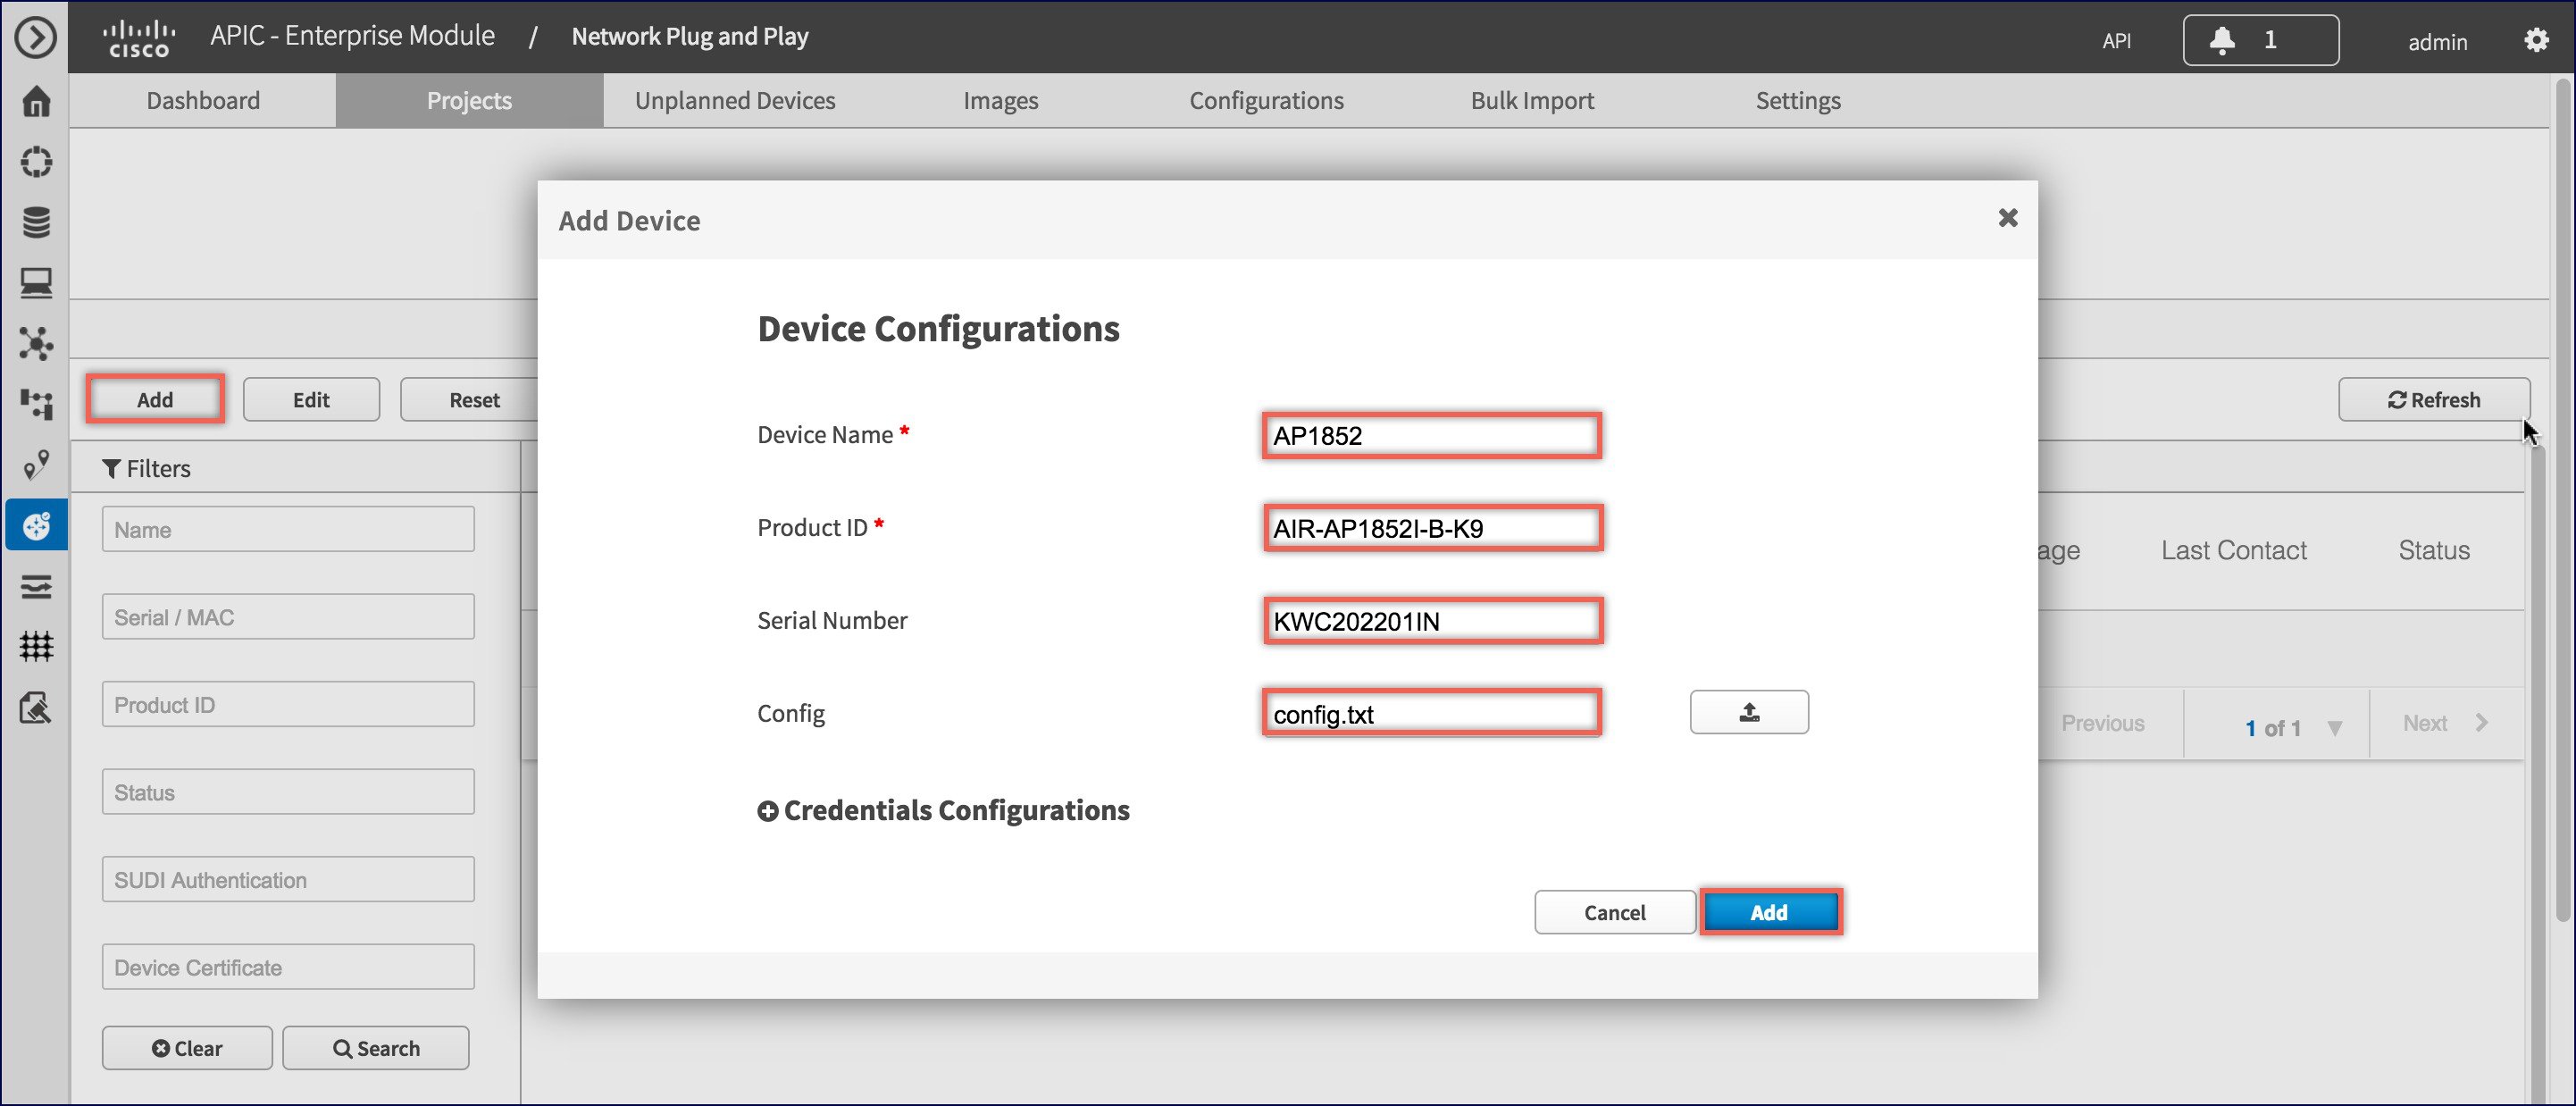
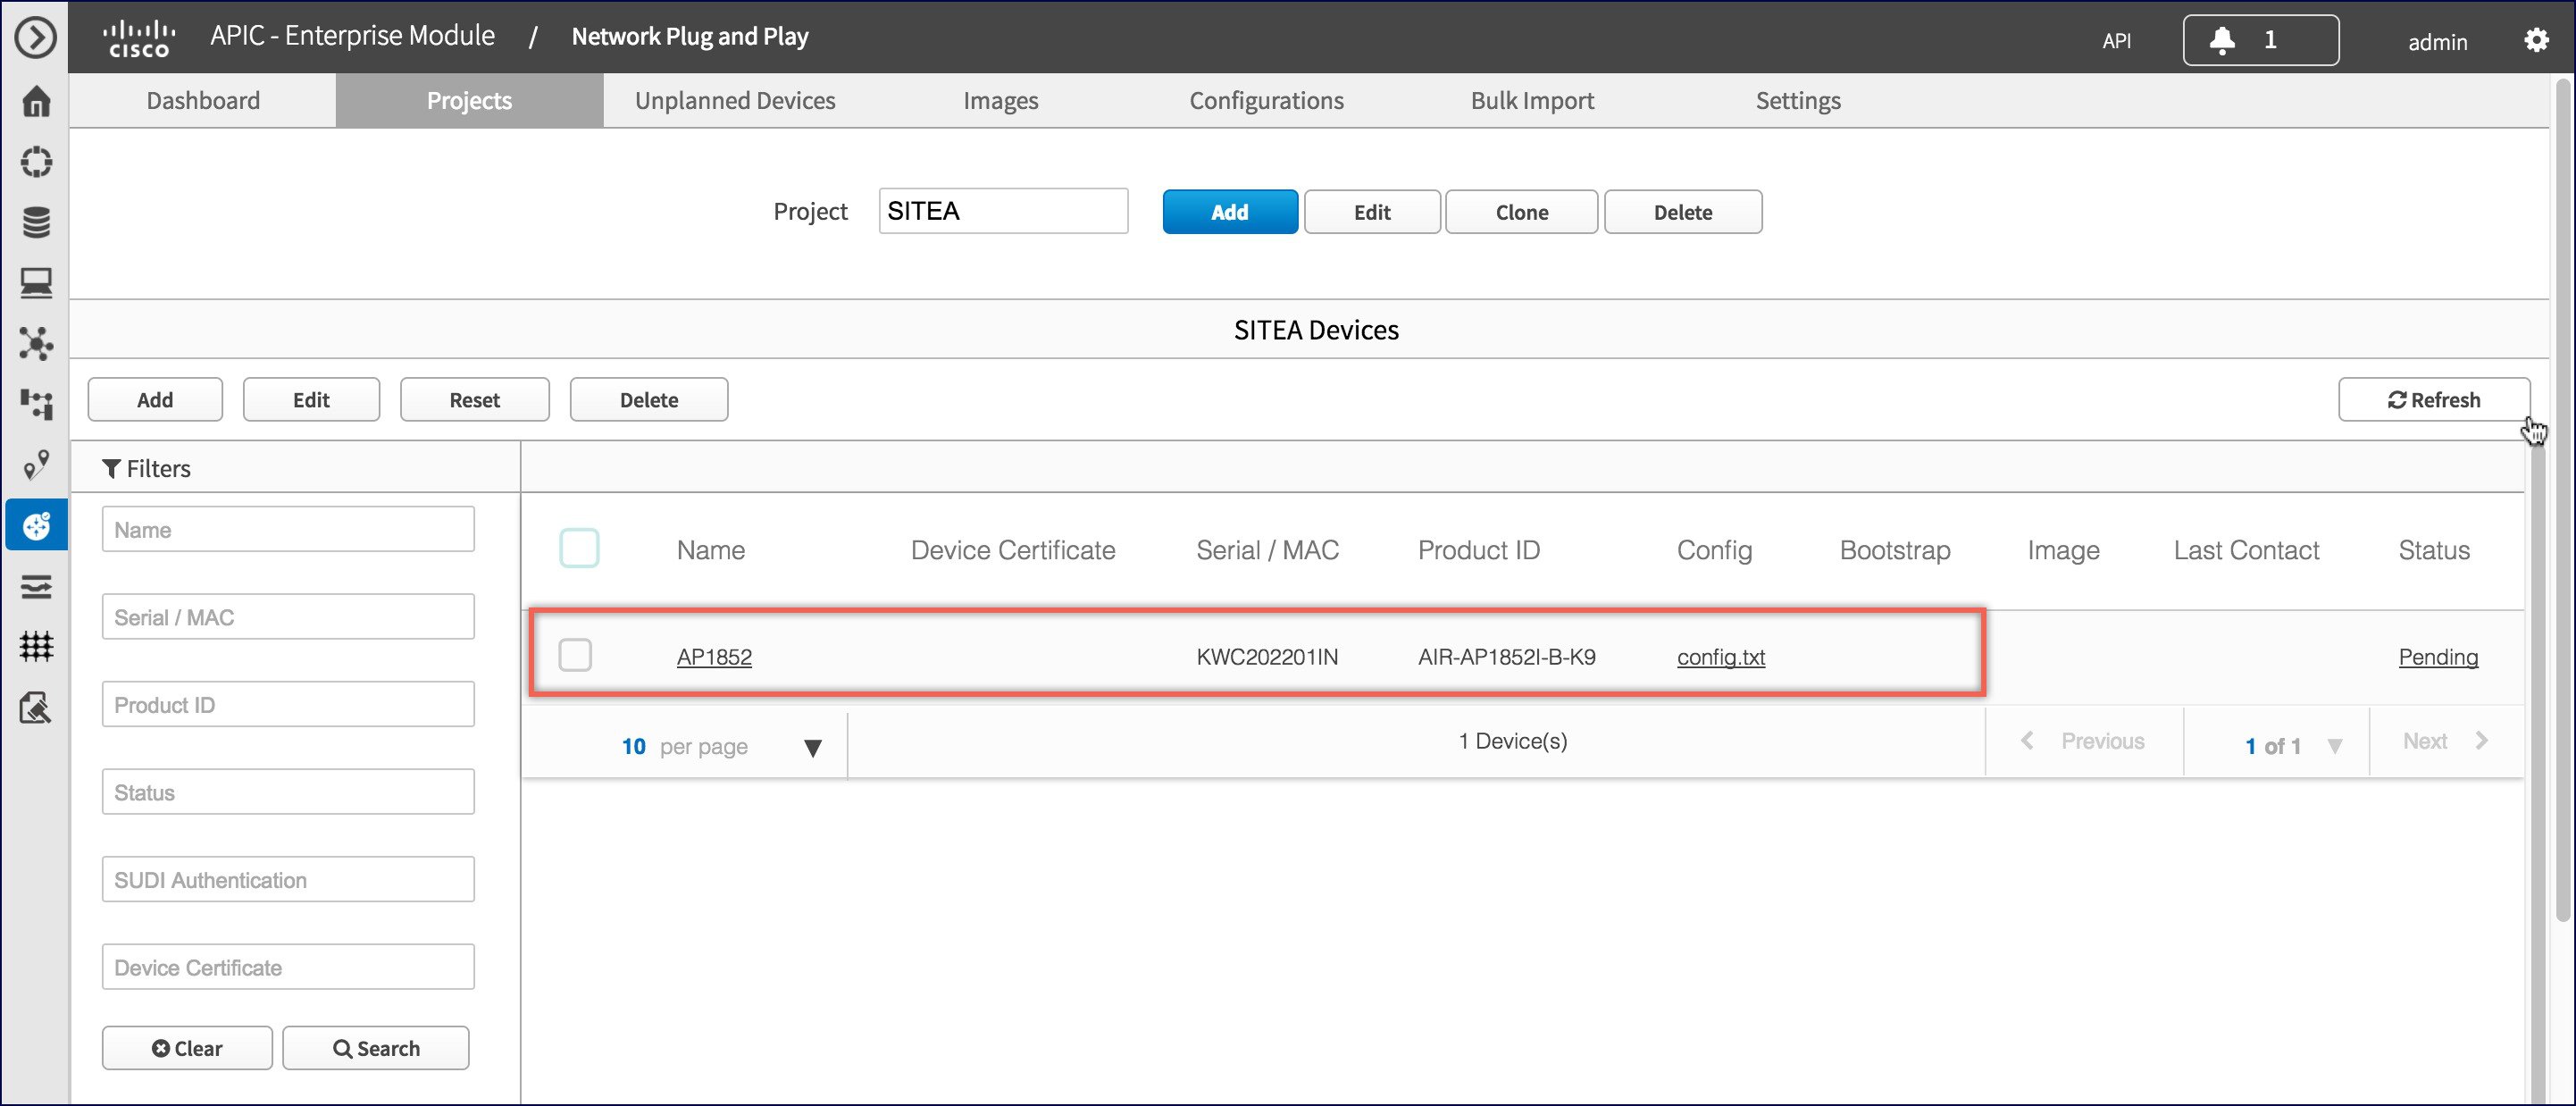
Adding Cisco Mobility Express capable Access Point to the Project and associating the controller config
| Step 1 | Navigate to Network Plug and Play > Projects. |
| Step 2 | Click on Add button under Project Devices. |
| Step 3 | In the Add
Device window, enter the following:
|
| Step 4 | Click on the
Add button.
|
APIC-EM Network Plug and Play Deployment Options with Cisco Mobility Express
There are two deployment options supported for deploying Cisco Mobility Express with Network Plug and Play.
APIC-EM controller in Private Cloud
Cloud Plug and Play Connect redirect to APIC-EM controller
- APIC-EM controller in Private Cloud
- Cloud Plug and Play Connect redirect to APIC-EM controller
- Cloud Plug and Play Device Redirect Provisioning Workflow
APIC-EM controller in Private Cloud
In this deployment option, there will be an On-Prem APIC-EM controller which can be discovered by Cisco Mobility Express Access Points using option 43 or DNS discovery.
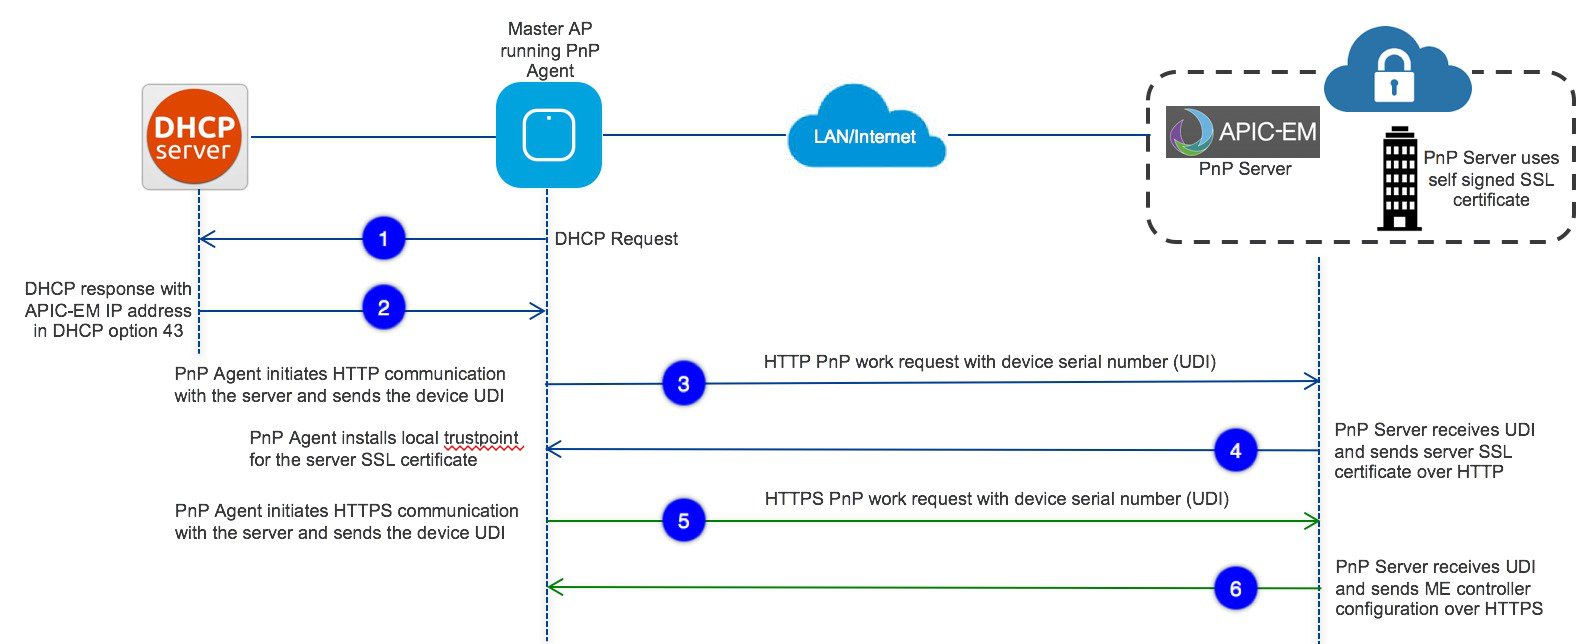
Option 43 points to APIC-EM controller IP address. To configure DHCP scope with Option 43, it is important follow the format as shown below. In the example below, 192.168.1.123 is the IP address of APIC-EM controller
ip dhcp pool pnp_device_pool
network 192.168.1.0 255.255.255.0
default-router 192.168.1.1
option 43 ascii "5A1N;B2;K4;I192.168.1.123;J80"
To discover APIC-EM controller using the DNS discovery options, configure the DNS server and domain name on the DHCP scope.
ip dhcp pool pnp_device_pool
network 192.168.1.0 255.255.255.0
default-router 192.168.1.1
domain-name cisco.com
dns-server 172.20.229.8
Cloud Plug and Play Connect redirect to APIC-EM controller
Cloud re-direction service uses Cisco public hosted cloud to re-direct Cisco Mobility Express capable access points to APIC-EM controller. The minimal requirement is that the Mobility Express Access Points network have DHCP and DNS, and connectivity reachable to Cisco public cloud. There is no need to configure Option 43 on DHCP scope with this deployment option. A simple test would be to obtain DHCP address and ping 'devicehelper.cisco.com' from where the Mobility Express AP will be deployed.
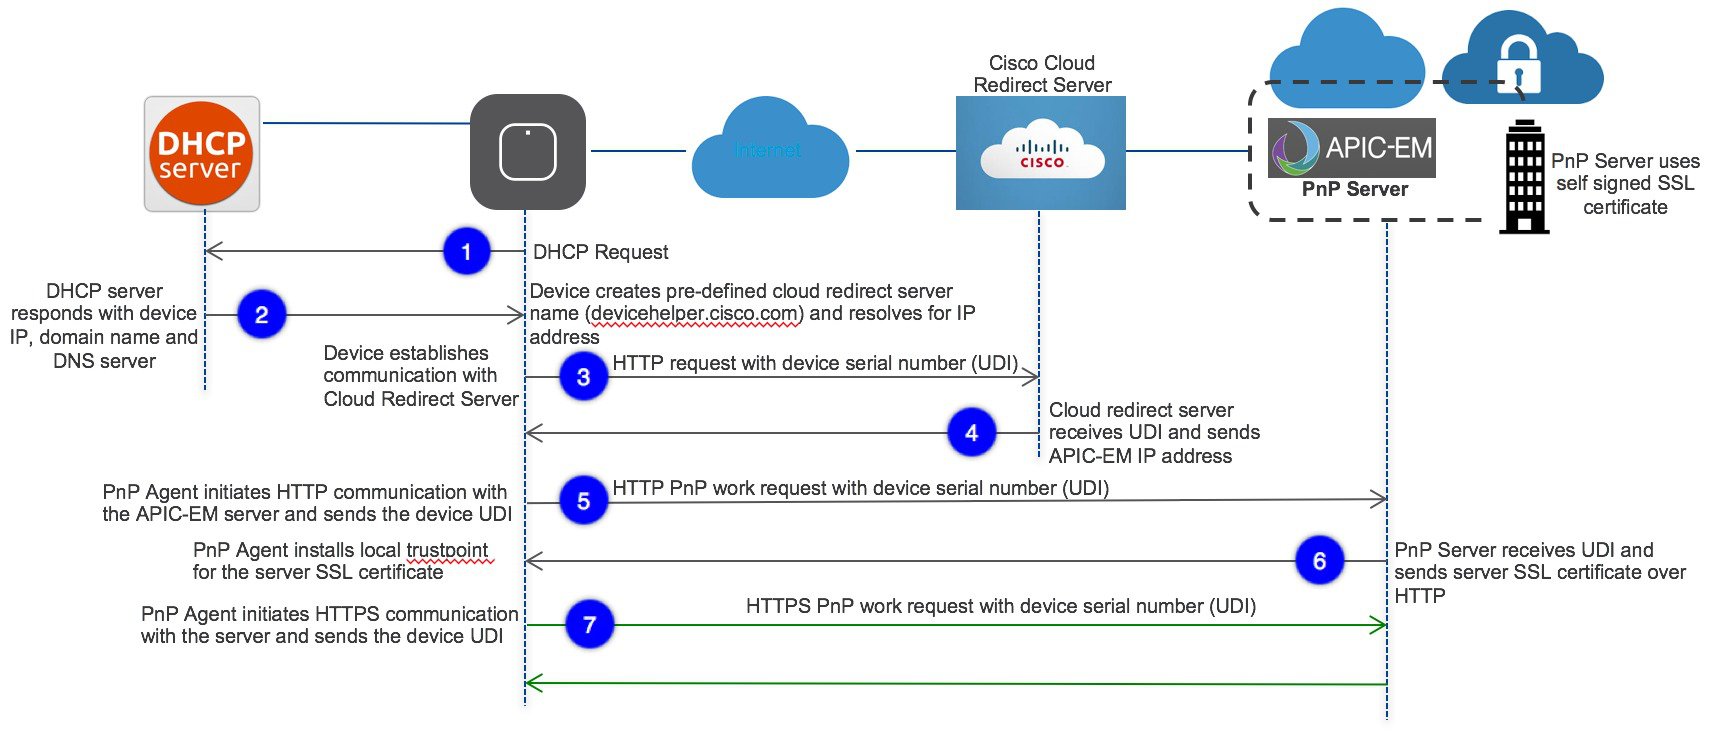
Cloud Plug and Play Device Redirect Provisioning Workflow
This section describes the steps to redirect Cisco Mobility Express Access Points to APIC-EM controller using Cloud Plug and Play Connect service.
To configure cloud Plug and Play connect redirect service, perform the following steps:
- Obtain a Smart Account
- Create APIC-EM Controller Profile
- Adding Mobility Express capable Access Point to the Devices list
- Associate Mobility Express capable Access Point to APIC-EM Controller profile
For detailed info on PnP Config about other functionality, see https://www.cisco.com/c/en/us/support/cloud-systems-management/one-enterprise-network-controller/products-installation-and-configuration-guides-list.html
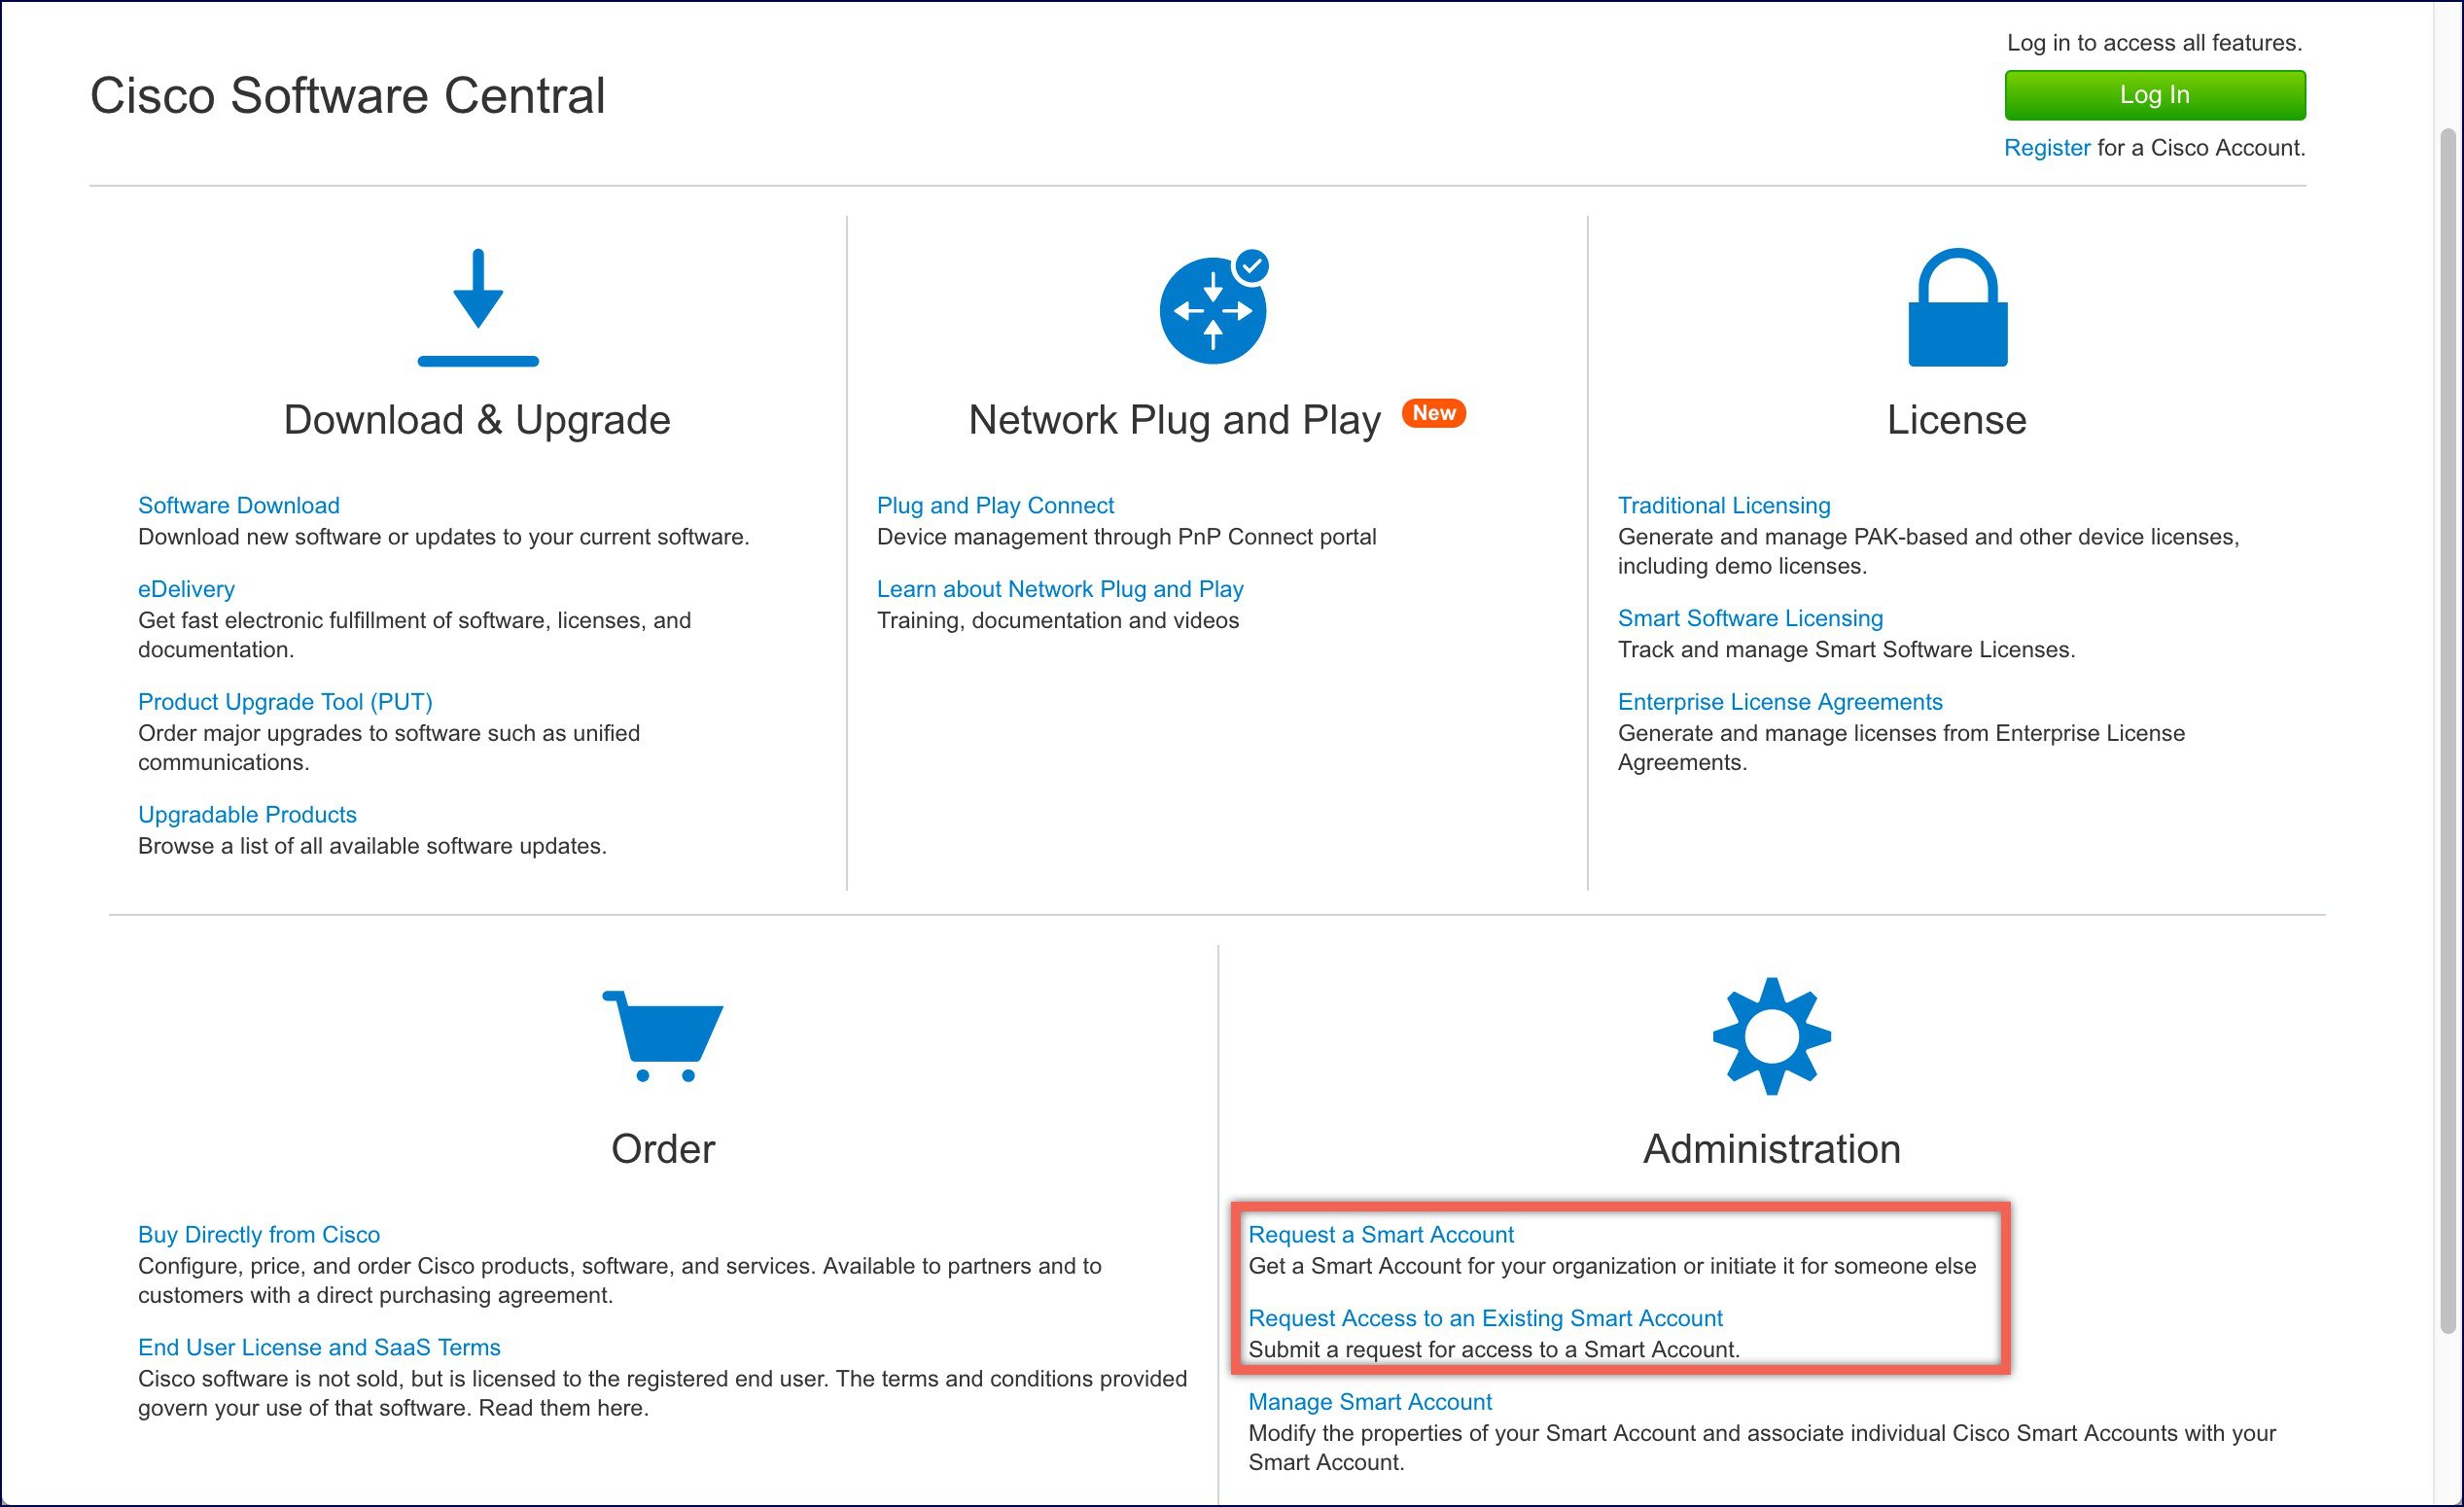
Obtain a Smart Account
Create APIC-EM Controller Profile
| Step 1 | Go to http://software.cisco.com and login | ||
| Step 2 | Navigate to
Provisioning > Plug and Play Connect
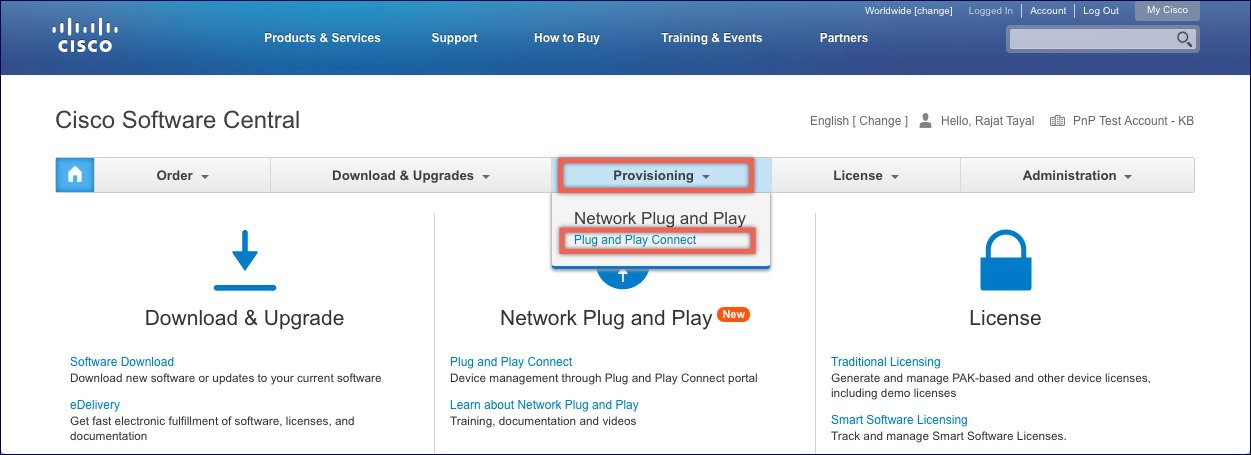
| ||
| Step 3 | Click on Controller Profiles. Select a Virtual Account. If you do have one, create a Virtual Account first. | ||
| Step 4 | Click on the
Add Profile to create a new controller profile.
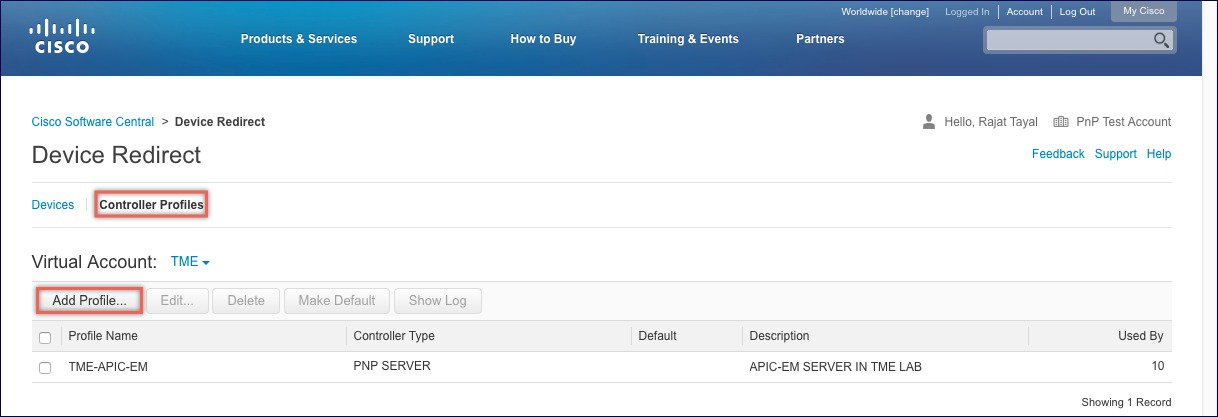
| ||
| Step 5 | Select
Controller Type as PNP Server from the drop-down list and click on Next.
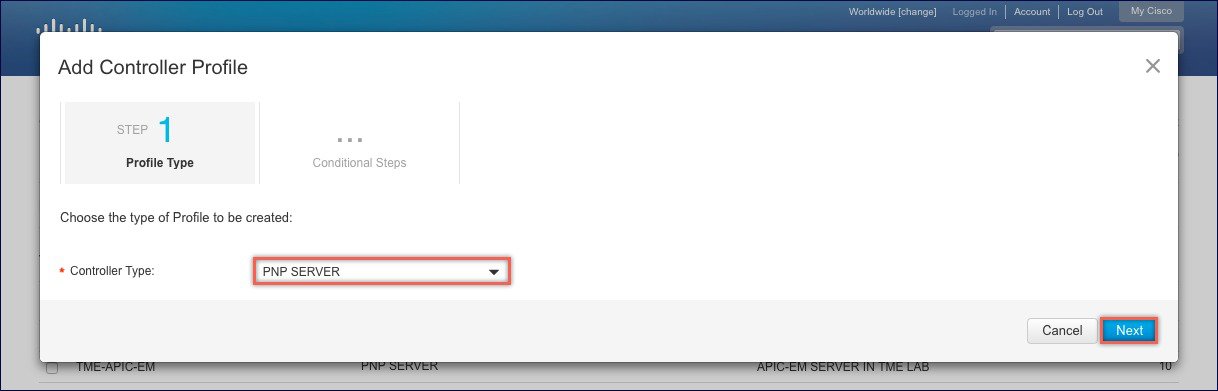
| ||
| Step 6 | Enter the
following and click
Next.
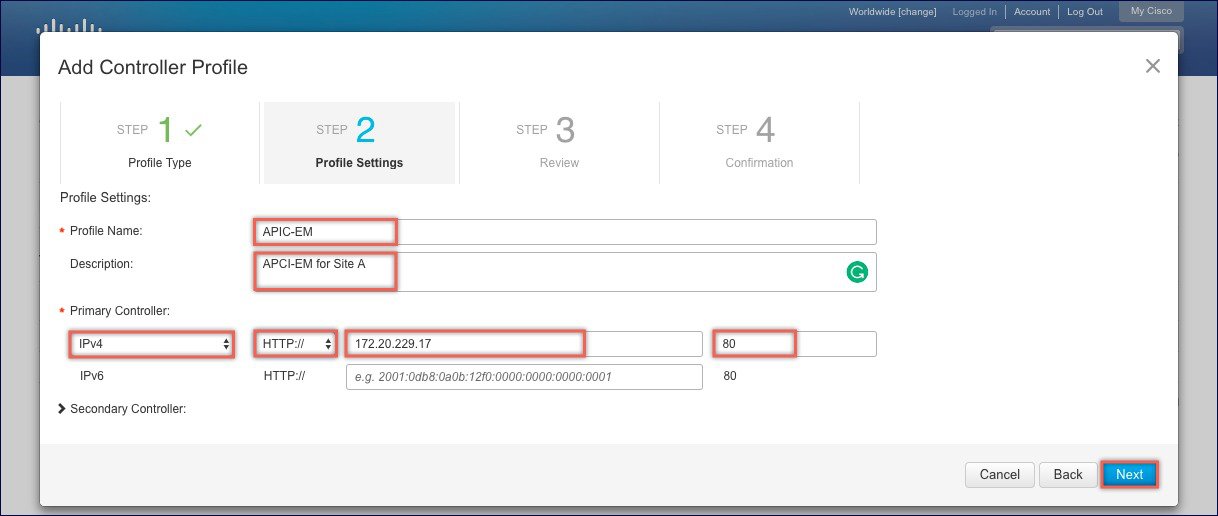
| ||
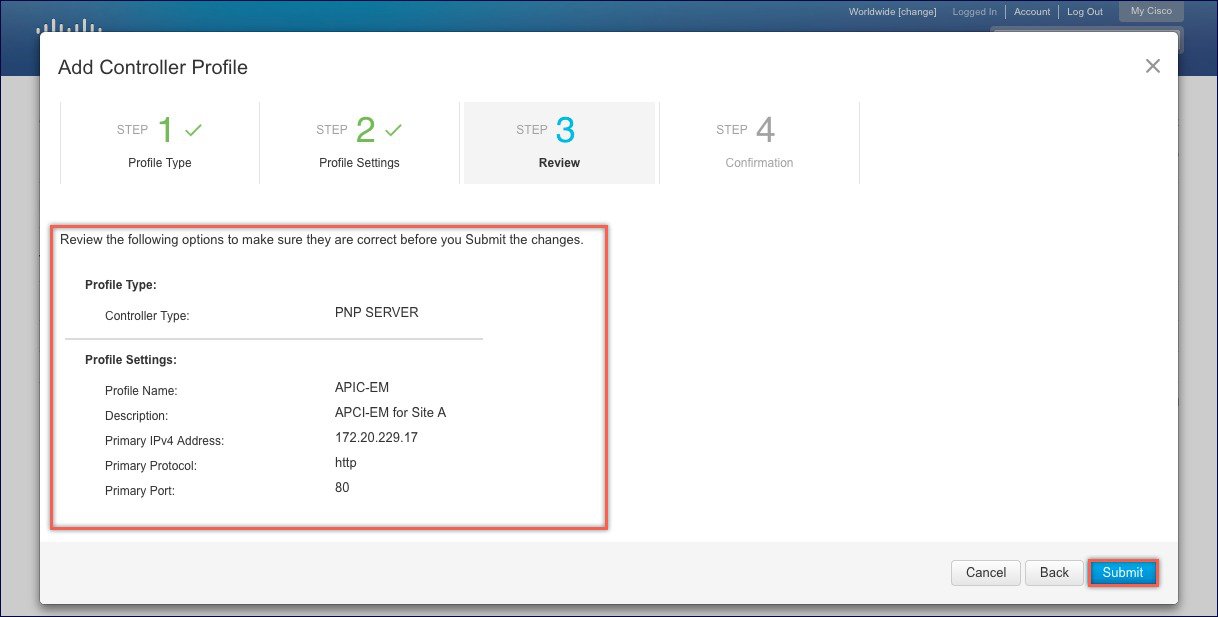
| Step 7 | Review the
entries and click on Submit button to add the Controller Profile and finally
click
Done.
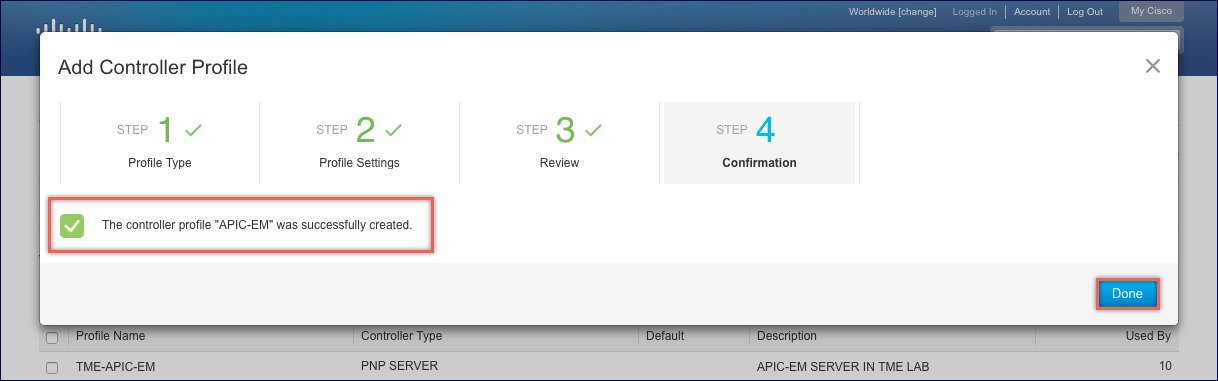
|
Adding Cisco Mobility Express capable Access Point to the Devices list
| Step 1 | Navigate to Provisioning > Plug and Play Connect. Click on Devices. |
| Step 2 | Click on Devices. Select a Virtual Account. If you do have one, create a Virtual Account first. |
| Step 3 | Click on
Add Devices button to add a new device (Mobility Express Access Point).
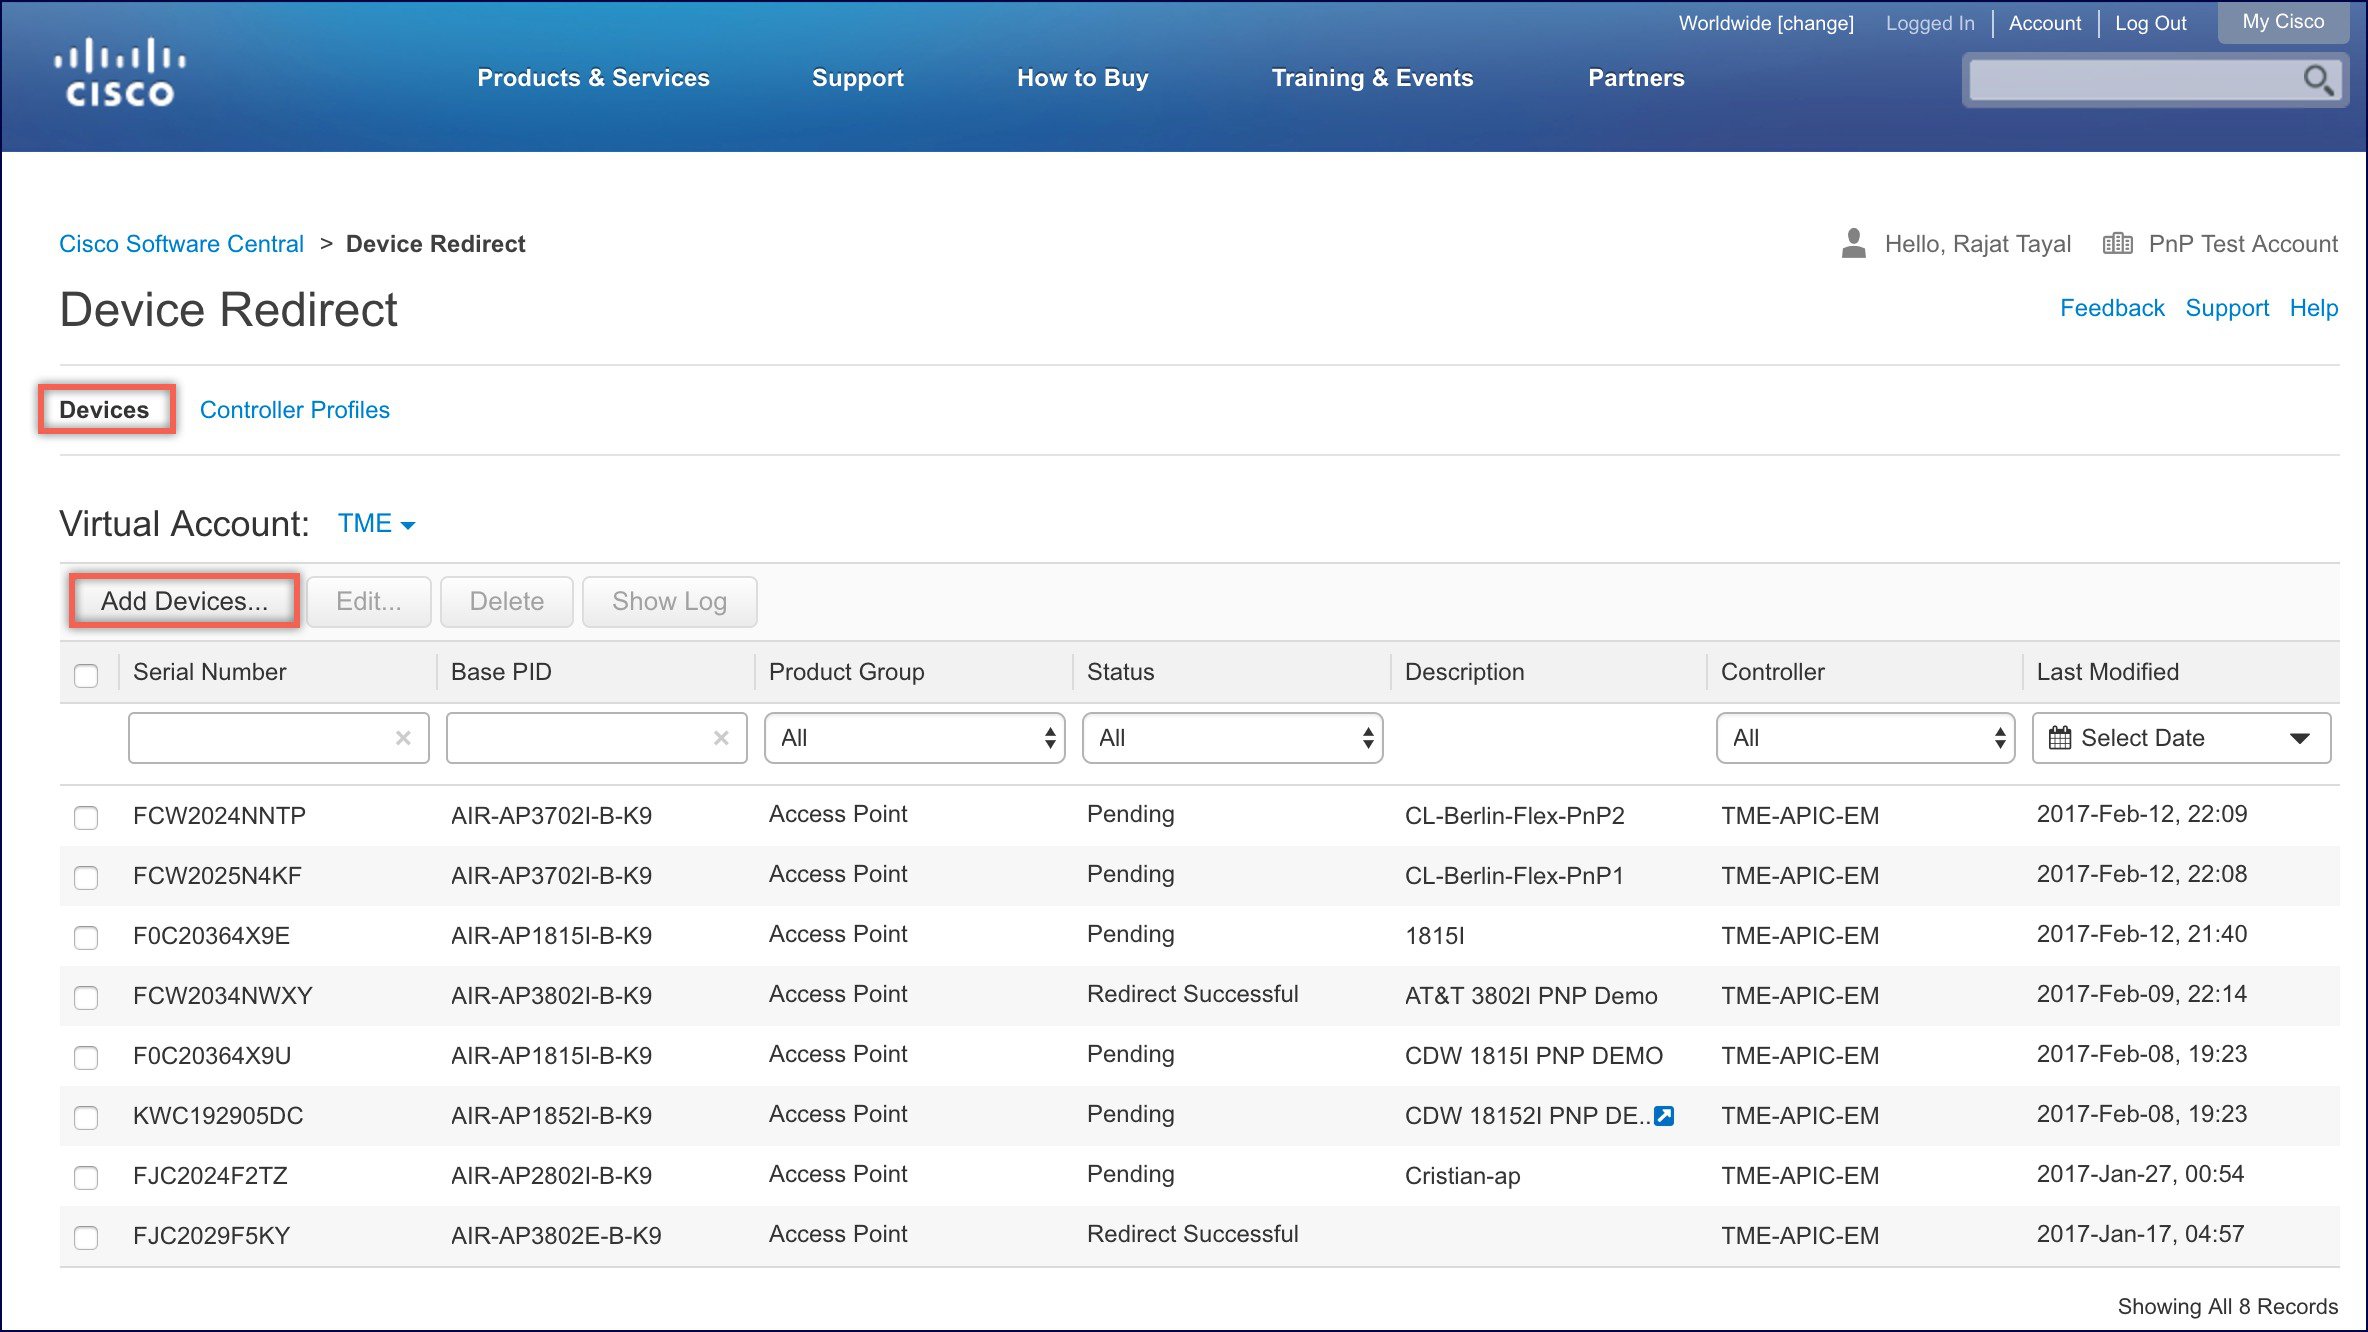 |
| Step 4 | Import a
csv file with the Device info or select Enter Device info manually. Click
Next.
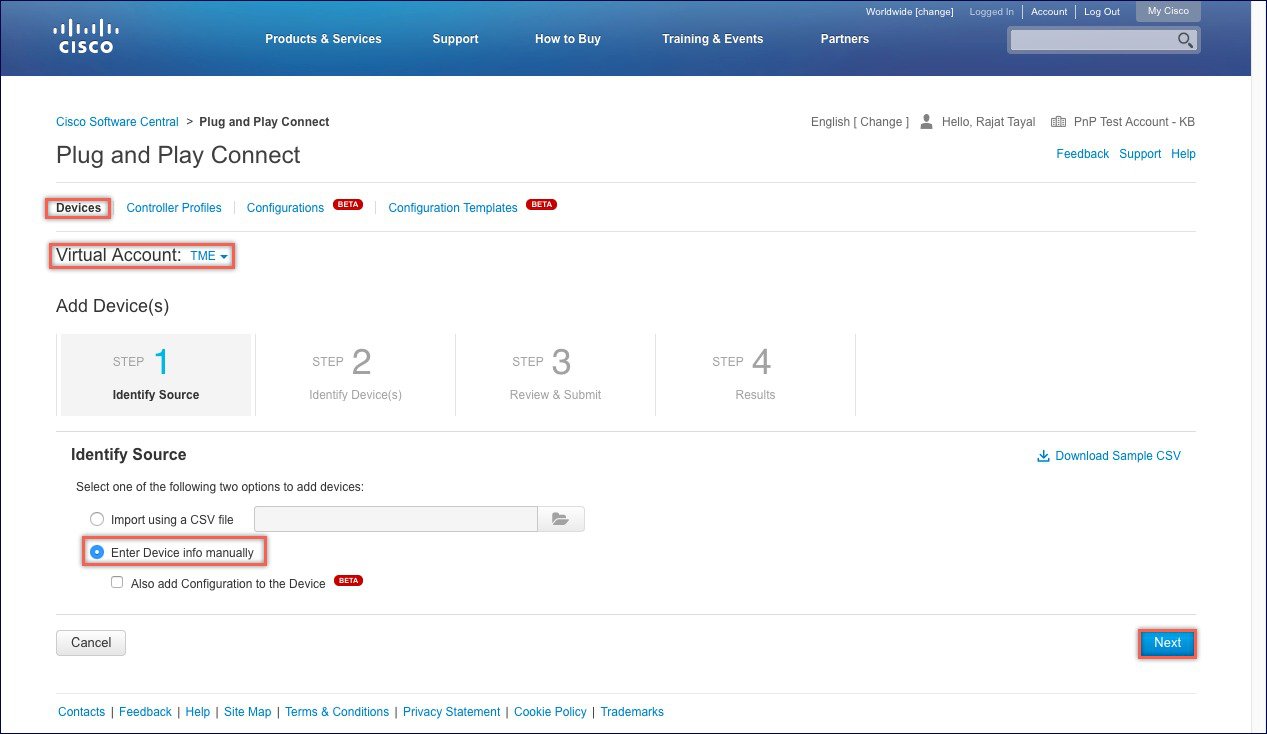
|
| Step 5 | Click on
Identify Device button. The Identify Device window will pop up. Enter Serial
Number, select Base PID, and Controller Profile(created earlier). Click on the
Save button followed by Next button.
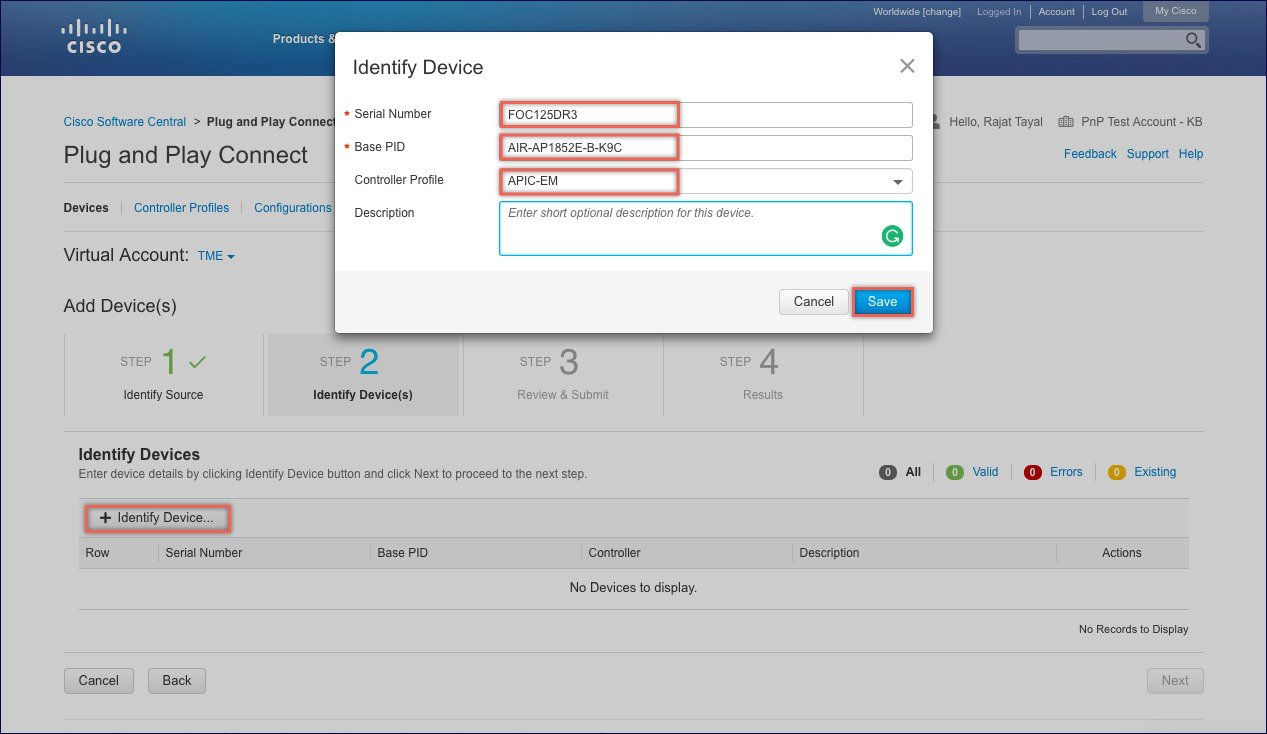
|
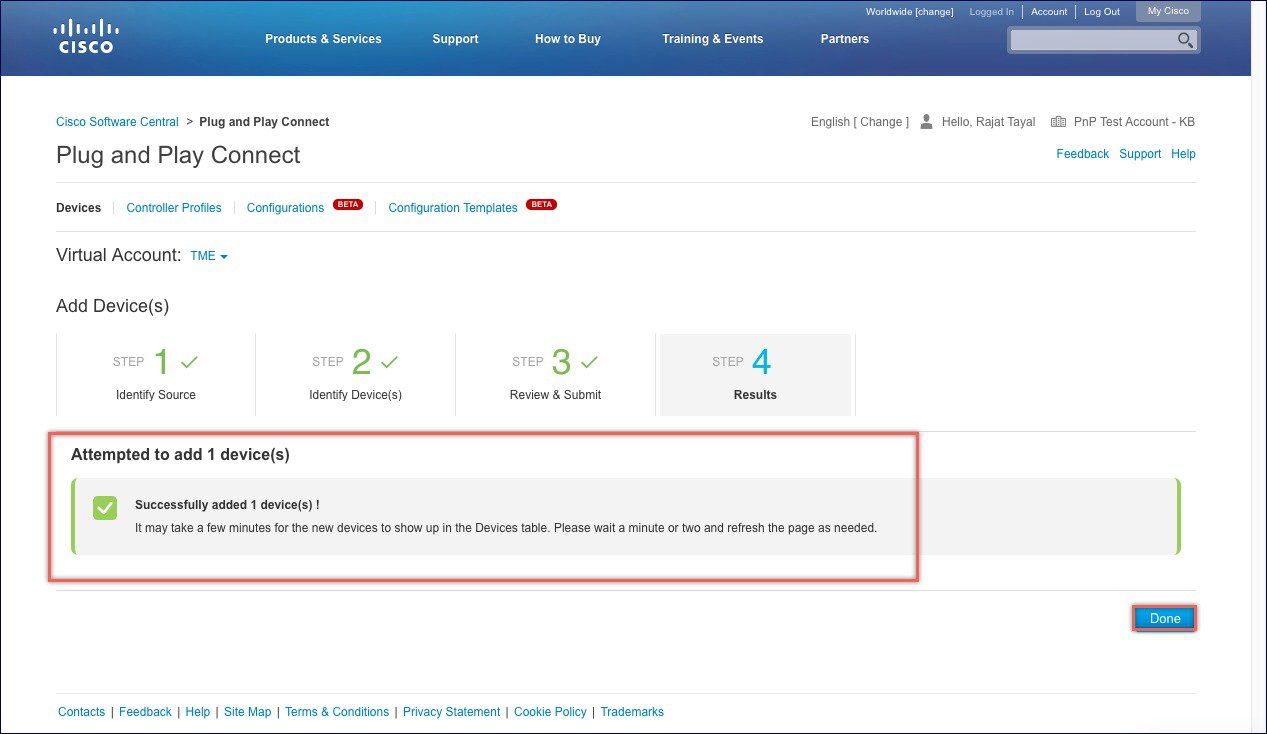
| Step 6 | Review the
entries and click on Submit button to add the Device. Finally, click Done.
|
| Step 7 | Verify that
the Device has been added and the status is Pending (Redirection).
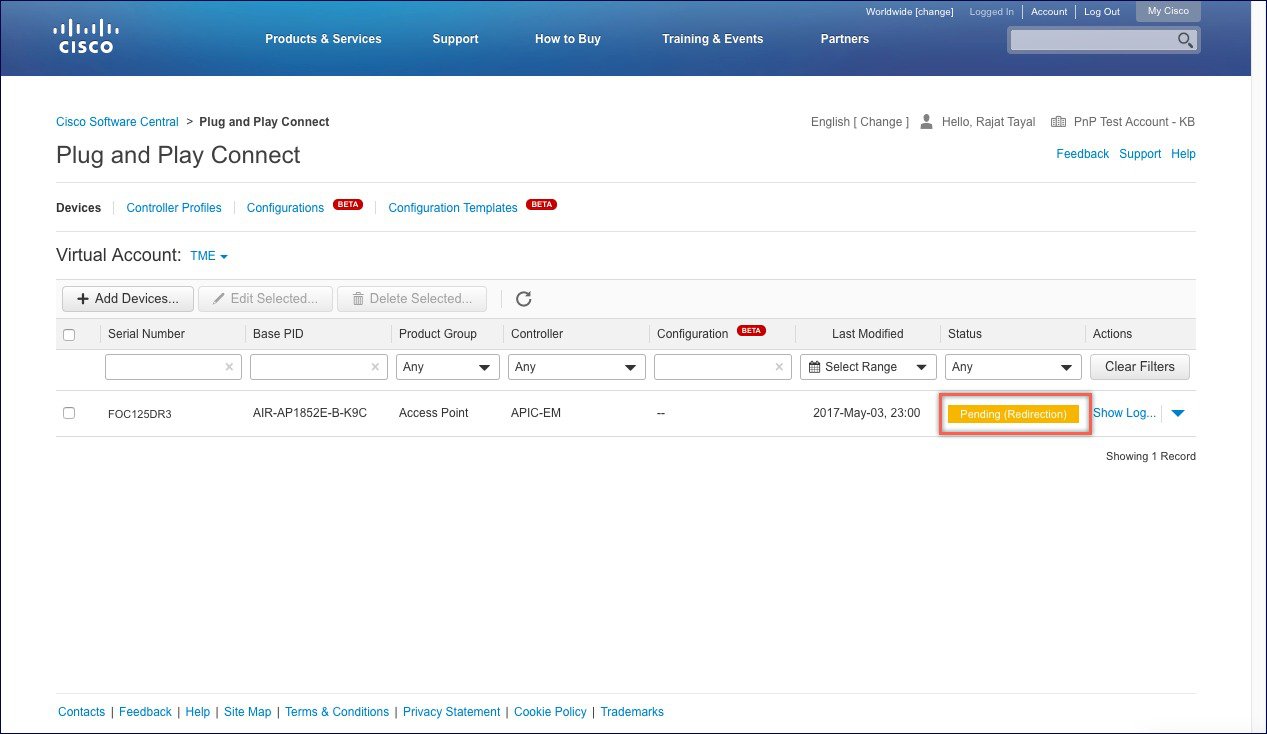
|
Connecting Cisco Mobility Access Points
To bring up a new Mobility Express site, make sure that Plug and Play service has been configured with Mobility Express Access Points with related controller configuration. If APIC-EM controller in Private Cloud deployment option is used, Option 43 or DNS discovery on DHCP scope must be configured. If Cloud Plug and Play Connect redirect to APIC-EM controller deployment option is used, make sure all the related configuration on Cloud Plug and Play Connect has also been done for successful redirect to APIC-EM controller.
Now, it is time to connect the Mobility Express Access Points at the site. One may connect one or more Access Points at a site. It is important to note that if multiple Mobility Express Access Points are connected at a site, Master Election will happen first and only after Master Access Point has been elected, it will initiate communication with the Network Plug and Play service and download the controller configuration file regardless of the deployment option. The other Access Points will not initiate communicate with the Network Plug and Play service. After the controller configuration file has been downloaded on the Access Point, it will reboot and after it comes up, it will run the controller. The rest of the Access Points at the site will join this Master Access Point as Subordinate Access Points.
 Feedback