|
Onboard hybrid services for customers using Control Hub
|
|
1
|
Place an order for Digital service for your customer using Cisco Commerce Workspace (CCW) and set up hybrid services for your
customer.
The Summary of Subscription page in CCW shows the features a customer has subscribed to during the onboarding process. This
page displays the list of features and includes the Order ID, Subscription ID, Org Name, Org ID, subscribed services, and
the number of licenses.
|
Note
|
Note that CCAI and Webex Connect are separate optional add-on features. Depending on customer orders in CCW, either CCAI,
Webex Connect, or both are available.
|
|
See the Set up hybrid services for your organization.
|
|
2
|
After hybrid services are set up, Digital services like Webex Connect are automatically provisioned as described below.
Once the initial Webex organization is created, auto-provisioning for Webex Connect is initiated, and the Digital tab will
briefly display the status of the provisioning process.
During the provisioning process, you must enter a Customer Admintrator's Cisco email on the Users page in Control Hub. This user account will be the First Customer Admin, which can be a new user with a Full Admin role or
an existing account that has been granted this role. You can add as many Customer Administrator user accounts as needed. The
Customer Admin accounts are needed to authorize task requests from Webex Connect to CCE via Cloud Connect in the next step.
|
Note
|
Once administrators are added, they must create their user account and navigate into Webex Connect within 7 days. Otherwise,
they'll need to return and recreate the user account so that they can access Webex Connect.
|
Partners accounts are the all entries you add under the External Administrators tab on the same Users page.
Upon successful completion of the provisioning, the following message is displayed: “Webex Connect & Webex Engage have been
provisioned, and you can start to set up digital channels there.”
All partners and the customer administrators can start using Webex Connect right away to set things up, without needing to
create a new user login. They can access Control Hub and then navigate to Contact Center > Tenant Settings > Digital to view and launch Webex Engage and Connect. These are also available as quick link from the Control Hub. The user management
for these roles is automatically synced between CCE and Webex Connect.
|
Note
|
Partner administrators don't have access to Webex Engage.
|
|
|
3
|
Complete node authorization in Webex Connect.
Under Assets in Webex Connect, you'll find two pre-provisioned integrations: Webex CC Engage and CCE. Set up node authorization for both these pre-built integrations by clicking on "Manage" option in the Actions drop-down.
|
For detailed instructions on how to set up node authorization, see CCE Integration Nodes and Node Authorizations and Webex Engage Nodes and Node Authorizations.
|
|
Integrate CCE and Webex Connect
|
|
Part 1—Cloud Connect Configurations
|
|
4
|
Install and add the Cloud Connect publisher and subscriber nodes to the inventory for your customer.
|
See the Install Publishers/Primary Nodes of VOS-Based Contact Center Applications and Install Subscribers/Secondary Nodes of VOS-Based Contact Center Applications sections in the Cisco Packaged Contact Center Enterprise Installation and Upgrade Guide.
|
|
5
|
Register Cloud Connect in the Unified CCE Administration portal.
|
See the Cloud Connect Integration section in the Cisco Packaged Contact Center Enterprise Administration and Configuration Guide.
|
|
6
|
Configure the Media Routing Peripheral Interface Manager (MR PIM) for the Digital Routing service.
|
See the Add PIMs to the Media Routing Peripheral Gateway section in the Cisco Packaged Contact Center Enterprise Administration and Configuration Guide
|
|
7
|
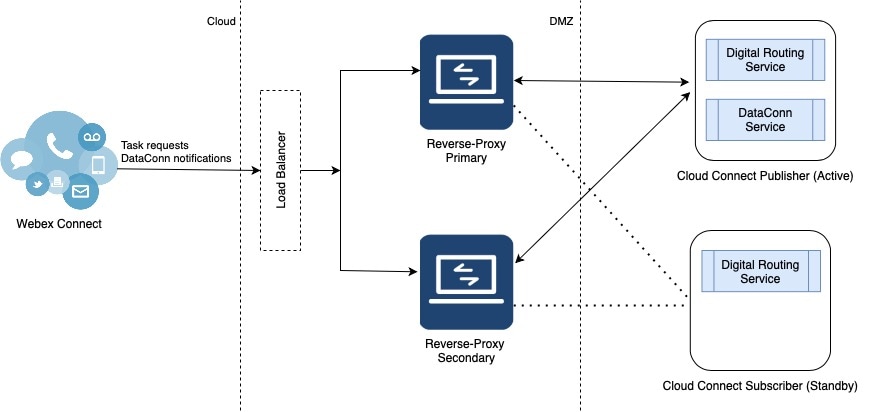
Establish secure connections between Cloud Connect and Media Routing Peripheral Gateway (MR PG), and set up the Nginx reverse
proxy server certificate for the digital channels interaction.
|
See the Certificate Management for Digital Channels Integration section in the Security Guide for Cisco Unified ICM/Contact Center Enterprise.
|
|
Part 2—Reverse Proxy Configurations
|
|
8
|
Set up and configure reverse proxy server for the digital channel interaction.
|
See Workflow to Configure Reverse Proxy using Automated Installer.
|
|
Part 3—CCE Configurations
|
|
9
|
Create a unique media routing domain (MRD) for each media channel and map it to your media channel if you want granular channel-specific
reporting and agent state control. Use the Media Routing Domain List tool to create the MRDs.
For Emails and asynchronous social chat channels such as SMS, Live Chat, Facebook Messenger, WhatsApp, or Apple Messages for
Business consider a longer Start Timeout and Max Duration for the Media Routing Domain.
You can also map existing MRDs to the Digital Routing media channels. This will avoid having to create new skill groups, precision
queues, and scripting logic changes to target the new media channels.
|
-
For instructions about how to create a new MRD, see the online help that is integrated with the Media Routing Domain List
tool.
-
For instructions about how to map the existing MRDs to the Digital Routing media channels, see Set up Media Channels.
|
|
10
|
Associate the MRDs that you have created for the digital channel integration using Webex Connect to the system-defined application
paths.
For every agent peripheral gateway, there is a system-defined application path that gets created with a suffix "UQ.Desktop".
There is also an associated system-defined application called UQ.Desktop that automatically gets created in the sytem and
identifies the Cisco Finesse server as a client to the Agent PG, to control Agent states in MRDs created for digital channels.
The first number in the application path identifies the Logical Controller ID of the PG. An example of the system-defined
application path is 5000.UQ.Desktop.
|
Note
|
If you create the MRDs through the Unified CCE Administration portal, the MRDs get automatically associated to the system-defined
application paths. If you have created the MRDs using the Media Routing Domain List tool under Configuration Manager, you
must explicitly associate the MRD with the application path.
|
|
See the online help that is integrated with the Application Path List tool
|
|
11
|
Create mandatory ECC variables in the Unified CCE Administration portal (). The ECC variables are required to identify the incoming tasks as Digital Routing tasks and the tasks to carry the Webex
Engage conversation ID.
|
-
For instructions about how to create ECC variables, see the Add and Maintain Expanded Call Variables section in the online help that is integrated with the tool.
-
For the list of mandatory ECC variables, see the ECC Variables for Digital Routing Tasks.
|
|
12
|
Configure digital channel capabilities for your customer in the Unified CCE Administration portal.
|
See Manage Digital Channels.
|
|
13
|
Create routing scripts for digital channel interaction.
|
See the Example Scripts for Digital Channel Interactions Using Webex Connect section in the Scripting and Media Routing Guide for Cisco Unified ICM/Contact Center Enterprise.
|
|
14
|
(Optional) You can configure an Agent Request or Web Callback feature to allow your customers to place a web callback request
to the contact center.
|
See Agent Request or Web Callback using Webex Connect.
|
|
Part 4—Cisco Finesse Configurations
|
Note
|
Ensure that you complete all the prerequisites listed in the Prerequisites to configure the Manage Digital Channels gadget section in the Cisco Finesse Administration Guide before you proceed with Finesse configurations to set up the Manage Digital Channels gadget.
|
|
|
15
|
Provision Cloud Connect on Cisco Finesse.
|
See the Cloud Connect Server Settings section in the Cisco Finesse Administration Guide.
|
|
16
|
Add the Manage Digital Channels gadget to the Cisco Finesse desktop layout.
|
See the Add Manage Digital Channels Gadget section in the Cisco Finesse Administration Guide.
|
|
Part 5—Webex Connect Configurations
|
|
17
|
Configure node authorizations in Webex Connect to inject new tasks, retrieve a task's details, and close tasks directly on
CCE.
|
See CCE Integration Nodes and Node Authorizations.
|
|
18
|
Configure channel assets for the required digital channels such as SMS, Live Chat, Email, Facebook Messenger, WhatsApp, and
Apple Messages for Business.
|
See the following sections:
|
|
19
|
Create flows using the Webex Connect Flow Builder feature for the various digital channels interactions such as SMS, Email,
Facebook Messenger, WhatsApp, Live Chat, and Apple Messages for Business.
|
See Flow Configurations.
|
|
Part 6—Webex Engage Configurations
|
|
20
|
Set up the customer chat widget.
|
See Administration and Setup Guide for Webex Engage with Cisco Contact Center Enterprise.
|
|
21
|
Verify that the agents who are enabled for digital channel interaction are synchronized to Webex Engage.
|
|
Work with Manage Digital Channels gadget
|
|
22
|
After you complete your initial configurations to enable digital channels interactions, the agents and supervisors can start
interacting with customers using the Manage Digital Channels gadget.
|
See the Cisco Contact Center Enterprise Manage Digital Channels Gadget User Guide.
|

 Feedback