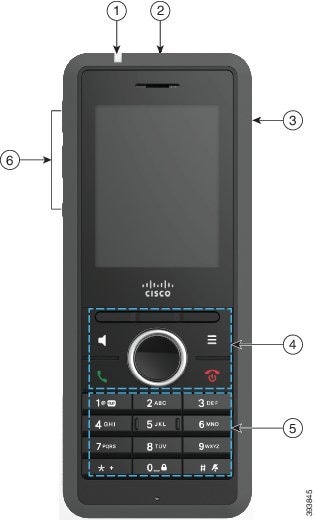
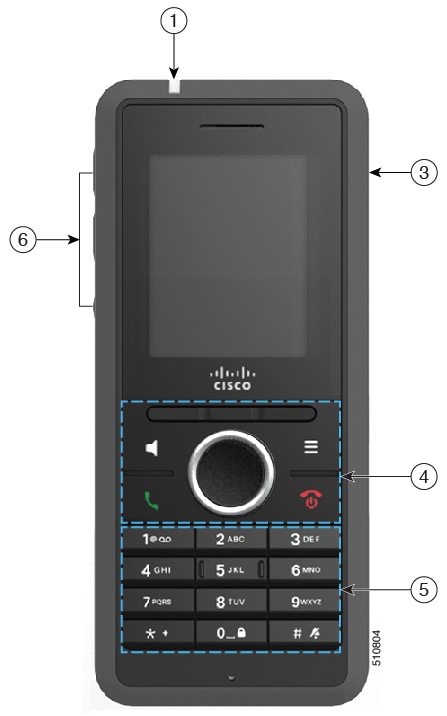
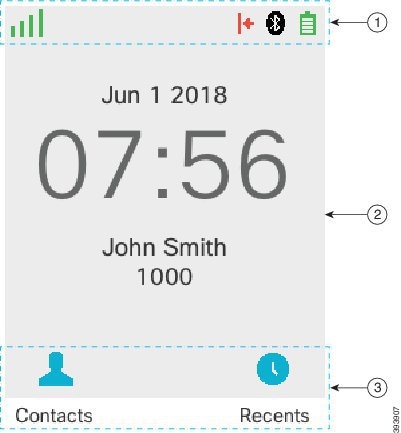
Your Handset

Your Handset

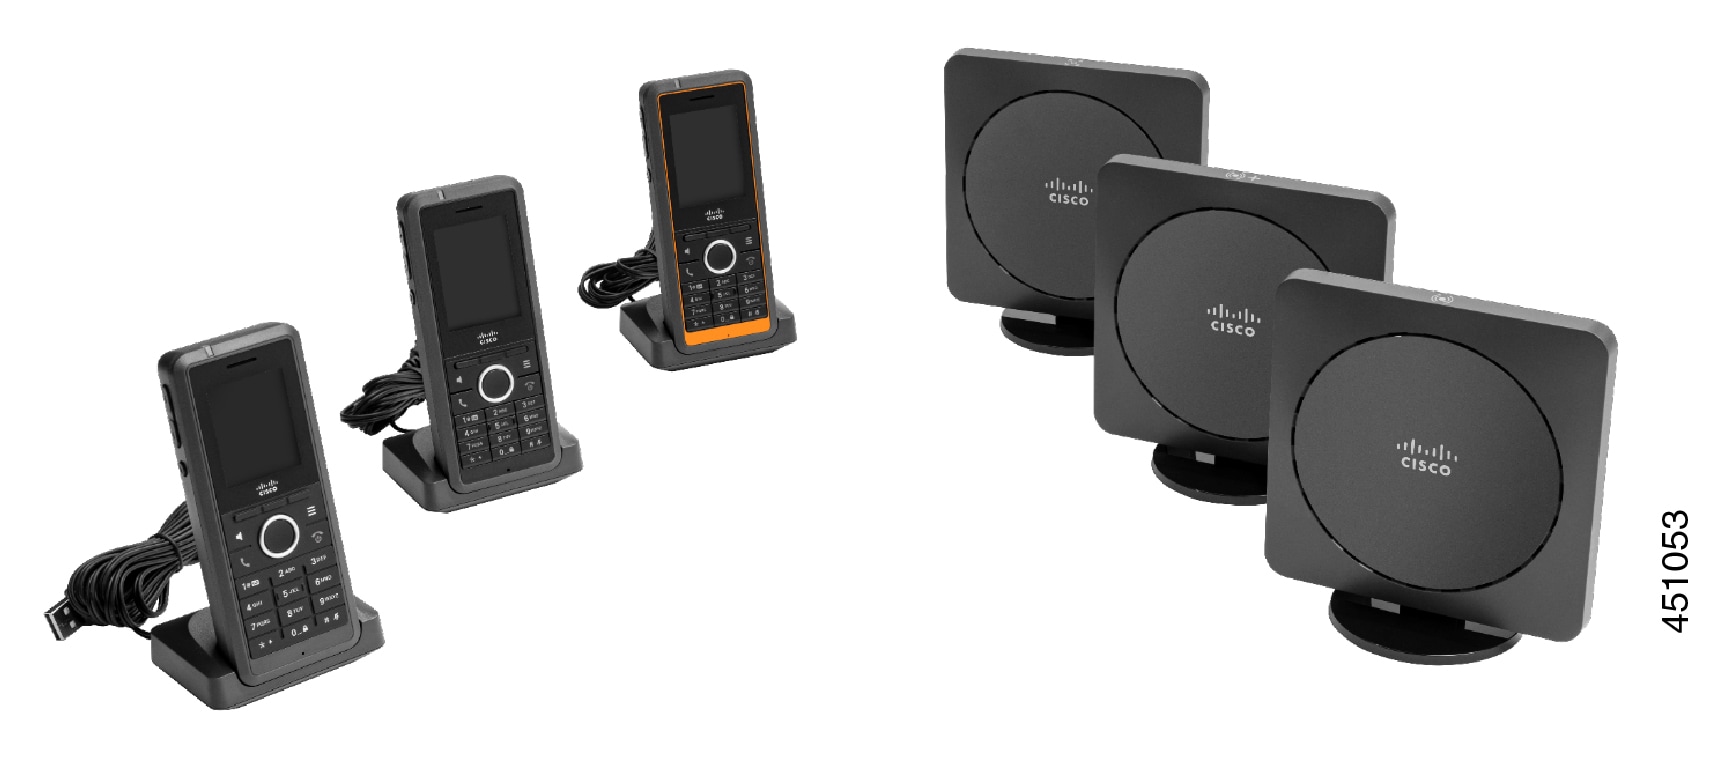
The Cisco IP DECT 6800 Series is designed for small and medium businesses, as well as larger organizations. The series is made up of:

  • Cisco IP DECT 110 Single-Cell Base Station

  • Cisco IP DECT 210 Multi-Cell Base Station

  • Cisco IP DECT 110 Repeater

  • Cisco IP DECT Phone 6823 Handset

  • Cisco IP DECT Phone 6825 Handset

  • Cisco IP DECT Phone 6825 Ruggedized Handset

The base stations and repeater look the same from the front, but each has a different function. The Base stations communicate with the call control system, the handsets, and the optional repeaters. Repeaters communicate with the base station and handsets. You can identify the devices by the symbol on the top of the device.

Device

Symbols

Cisco IP DECT 110 Single-Cell Base Station

single cell icon: dot with radiating rings

Cisco IP DECT 210 Multi-Cell Base Station

multicell icon: dot with radiating rings and a plus sign

Cisco IP DECT 110 Repeater

repeater icon: circle with four arrows


Note


This document covers the Cisco IP DECT 6800 Series only. This series is different from the Cisco IP Phone 6800 Series Multiplatform Phones. For information on the Cisco IP Phone 6800 Series Multiplatform Phones, see https://www.cisco.com/c/en/us/support/collaboration-endpoints/ip-phone-6800-series-multiplatform-firmware/series.html


Note


For information on the Product IDs of Cisco IP DECT 6800 Series, see Product IDs of Cisco IP DECT 6800 Series with Multiplatform Firmware.


Figure 1. Cisco IP DECT Phone 6823 Handset, Cisco IP DECT Phone 6825 Handset, Cisco IP DECT Phone 6825 Ruggedized Handset, Cisco IP DECT 110 Repeater, Cisco IP DECT 210 Multi-Cell Base Station, and Cisco IP DECT 110 Single-Cell Base Station
handset 6823, standard handset, ruggedized handset, 110 repeater, 210 base station, 110 base station

The handsets communicate with the base station and repeaters using Digital Enhanced Cordless Telecommunications (DECT).

If you need to use a handset in a volatile, dusty, or damp environment, you can use the Cisco IP DECT Phone 6825 Ruggedized Handset. This handset is IP65-rated, which means that the handset is sealed to protect it from dust and water.

The Cisco IP DECT Phone 6823 Handset is similar to the Cisco IP DECT Phone 6825 Handset, except for these differences. The use of keys and display of icons may differ between the two handsets.

Feature

Cisco IP DECT Phone 6825 Handset

Cisco IP DECT Phone 6823 Handset

Screen

Display: 2 inches

Resolution: 240 x 320 pixels

Display: 1.7 inches

Resolution: 128 x 160 pixels

Emergency button

Present

Not present

Bluetooth

Supported

Not supported

Charging cradle

USB port and LED

No USB port or LED

In this document, the term phone means the handset and the term system means the handset and base station.

The following table lists some common terms and their meanings used in this document.

Table 1. Terms

Term

Meaning

Handset or phone

6823 Handset

6825 Handset

6825 Ruggedized Handset

Base station

110 Single-Cell Base Station

210 Multi-Cell Base Station

Repeater

110 Repeater


Note


Not all features may be supported by your handset. Contact your service provider for the supported features.


Feature Support

This document describes all the features that the device supports. However, not all features may be supported with your current configuration. For information on supported features, contact your service provider or administrator.

New and Changed Information

New and Changed Information for Firmware Release 5.1(2)

Feature

New or Changed Information

Added new topics for Call transfer, direct transfer, and consult transfer

New section: Call TransferTransfer a call directly (Direct Transfer)

Consult and Transfer a Call (Consult Transfer)

Added information on PIDs for IP DECT 6800 Series

New section: Product IDs of Cisco IP DECT 6800 Series with Multiplatform Firmware

PID Descriptions for IP DECT 6800 Series

Updated section: Product IDs of Cisco IP DECT 6800 Series with Multiplatform Firmware

New and Changed Information for Firmware Release 5.1(1)

Feature

New or Changed Information

Automatic Handset Registration in HEBU Mode New section: Add the Handset Automatically in HEBU Mode

Call Groups Addition for Intercom Calls

New sections:

Dial Plan Enhancement

Updated section: Speed dial numbers

Incoming Call Validation Display on the Handset

Updated sections:

Reset Handset Language and Text to Default Settings

New section: Reset the Language and Text to Default in the Handset

New and Changed Information for Firmware Release 4.8

Feature

New or Changed Content

110 Single-Cell Base Station and 110 Repeater

Updated sections:

6823 Handset

Updated sections:

Paging

Added new section Paging.

Shared Call Enhancements

Updated sections:
New sections:

Swap Call with Navigation Key

Updated the section Swap Between Active and Held Calls.

Temporary Handset Addition to Base Station

New sections:

General Changes

New troubleshooting procedure in Handset Beeps Continuously While in the Charger

New and Changed Information for Firmware Release 4.7

Starting with this release:

  • The release number scheme changes to conform to the standard Cisco release numbers. Internally, the previous number scheme will display. Firmware Release 4.7 and Firmware Release V470 B6 are the same firmware release.

  • All document updates related to the release are clearly marked. For example, if there is a new field added or a field removed, the documentation will indicate the type of change and what release the change applies to.

Feature

New and Changed Information

6825 Ruggedized Handset support

Updated Your Handset

Updated Buttons and hardware

User Interface Enhancements

Add information about the out-of-range alert to Your Handset.

Add information about the Alarm screen display for recurrent alarms to Alarm Clock.

Other changes

New troubleshooting procedures Handset Won't Stay On and Handset Won't Turn On

New and Changed Information for Firmware Release V460

Feature

New or Updated Sections

Broadsoft All directory

Updated Call a central directory contact

Handset out-of-box enhancements

Updated Automatic Handset Configuration

New task Set up your handset automatically

Handset user interface enhancements

Updated Assign a speed dial number

New task Delete a speed dial number

New task Add a recent caller to your contact list

Updated Set the Ringtone For Different Call Types

General enhancements

New task Select Your Default Line

Getting Started

You must install the battery in the handset and charge the handset battery before you use your handset. For more information, see Install the battery in the handset and Charge the handset battery.

Turn on your handset

Procedure


Press and hold Power/End until the screen turns on.


Turn off your handset

Procedure


Press and hold Power/End until the screen turns off.


Report an emergency situation

Your 6825 Handset has an emergency button, located at the top of the handset. If set up by your administrator, you can press this button to raise an alert in an emergency situation. The handset places a call to a predefined emergency number and automatically turns on the speakerphone.

Note


The 6823 Handset doesn't have an Emergency button.


Procedure


Press and hold Emergency for 3 seconds.


Lock the handset keypad

You can manually lock the keypad to stop accidental dialing.

You can manually lock the keypad to stop accidental dialing. When you lock the keypad, the softkey label doesn't display.


Note


When the keypad is locked, you can only dial emergency numbers.


Procedure


Press and hold Zero (0) until the message "Press and hold 0" and the key lock icon ( or ) are displayed on the screen.


Unlock the handset keypad

If the keypad is locked, you must unlock it before you can place most calls. You may need to input a PIN to unlock the handset.

Note


When the keypad is locked, you can only dial emergency numbers.

You must unlock the keypad before you can place most calls. You may need to input a PIN to unlock the handset. The softkey labels appear when you unlock the keypad.

Procedure


Press and hold Zero (0) until the message "Press and hold *" and the key lock icon or doesn't display on the screen.


Buttons and hardware

Your handset has many buttons and hardware features that you'll use regularly. Use the following figure and table to identify the important button and hardware features. The figure shows the 6823 Handset and 6825 Handset. The 6825 Ruggedized Handset is similar to 6825 Handset in appearance.

Figure 2. 6825 Handset and 6823 Handset Buttons and Hardware
Image of the phone with callouts. Number 1 points to the light bar on the top left of the handset. Number 2 points to the large button on the top. Number 3 points to the right side of the handset. Number 4 points to the 3 buttons below the screen, the round navigation cluster below the softkeys and the four buttons that surround the navigation cluster. The top left button is the speaker button. The top right is the menu button. The lower left button is the Answer/Send button. The lower right button is the Power/End button. Number 5 points to the keypad. Number 6 points to the left side of the handset.
Table 2. 6825 Handset and 6823 Handset Buttons and Hardware

Item

Name or Grouping

Description

1

Indicator light (LED)

Indicator light—Use the light to identify states. You can configure the event that triggers the red, yellow, or green LED.

2

Emergency button

Emergency Raises an emergency alarm, if configured.

This button isn't available in the 6823 Handset.

3

Headset port

Headset port with cover . Remove the protective cover and plug in a headset or ear buds (3.5 mm audio jack).

4

Softkeys, handset control buttons (Speaker, Menu), Navigation cluster, call control buttons (Answer/Send, Power/End).

Softkeys Activate the option displayed on the screen.

Speaker Toggle the speaker mode on or off for the handset.

Menu Access directories, settings, status, and other information.

Navigation cluster Navigation ring and Select button:

  • Navigation ring (outer ring): Move up, down, left, or right.

  • Select button (center of the cluster): select a menu item.

Answer/Send Answer a ringing call or, after dialing a number, press to place the call.

Power/End Turn the handset on or off, or end a connected call. In menus, the button returns you to the previous screen.

5

Keypad

Dial numbers and enter letters.

One

  • Enter "1" when you dial a number.

  • Access voicemail Press and hold to automatically dial the voicemail system.

  • Enter these special text characters: . ! ? , - " @ + ; :

Asterisk

  • Press and hold to add the plus (+) symbol at the beginning of a phone number.

Zero

  • Enter "0" when you dial a number.

  • Press and hold to lock or unlock the keypad.

  • Enter a space.

Pound

  • Press and hold to silence the handset ringer. If configured, the handset vibrates instead.

  • Enter this special text character: #

Use the keys 2 through 9 to enter letters and numbers.

Note


In some languages, additional characters may be present.

6

Volume and Mute buttons

Volume

  • When the handset is idle, change the ring volume or turn off the ringer.

  • During a call, control the speaker volume for the active handset, headset, or speaker.

Mute Toggle the mute feature on or off.

Navigation

Use the outer ring of the Navigation cluster to scroll through menus and to move between fields. Use the inner Select button of the Navigation cluster to select menu items.

Navigation Cluster

Supported Characters

When you input information, the handsets support the following characters:

Figure 3. Supported Characters
table of characters

Note


You can press the center softkey in the 6823 Handset to access the special characters.


Handset Screen Features

The screen shows information about your handset such as directory number, date and time, and softkeys. The screen is made up of three sections: the header row, the middle section, and the footer row.

Figure 4. Handset Screen
screen image

1

At the top of the screen is the header row. The header row displays the radio signal strength and battery charge, as well a number of icons. The icons display when features are active.

If your organization uses the BroadWorks Shared Call Appearance feature, a row of boxes displays immediately below the header row. Each box represents a user on a shared line.

2

The middle of the screen displays the information associated with the handset: date and time, configured handset owner, and handset phone number.

3

The bottom row of the screen contains the softkey labels. Each label indicates the action for the softkey button below the screen. Sometimes, icons are displayed above the softkey labels.

Header Icons

The header icons tell you about the handset state. This section displays the header icons and gives their meaning. The header row icons can be different when do not disturb (DND) is enabled.

Audio Path Icons

Icon

DND Mode Icon

Description

Speaker is off

Headset in use.

Handset is muted.

Bluetooth Icons

The 6823 Handset doesn't support Bluetooth.

Icon

DND Mode Icon

Description

Bluetooth® is connected.

Bluetooth® is disconnected.

Network Icons

Icon

DND Mode Icon

Description

No network connection.

Weak network connection.

Good network connection.

Better network connection.

Best network connection

Battery Icons

Icon

DND Mode Icon

Description

Battery is depleted. Recharge the battery to use the handset.

Battery is 1% to 24% charged. Recharge the battery as soon as possible.

Battery is 25% to 49% charged.

Battery is 50% to 74% charged.

Battery is 75% to 100% charged.

Battery is charging.

Call-Related Icons

Icon

DND Mode Icon

Description

Answered call

Dialed call

Do not disturb is enabled.

Phone is forwarded.

Voicemail message waiting.

Missed call

Other Icons

Icon

DND Mode Icon

Description

Handset keypad is locked.

Message

Differences Between Phone Calls and Lines

We use the terms lines and calls in very specific ways to explain how to use your phone.

  • Lines—Each line corresponds to a directory number or intercom number that others can use to call you. You have up to four lines.

  • Calls—Each line can support up to two calls. However, you can have only two calls on the handset.

    Only one call can be active at any time; the other call is automatically placed on hold.

    Here is an example: If you have four lines and each line supports two calls, then you can have two connected calls at one time. These two calls can be on the same line or on different lines. Only one of those calls is active and the other is a held call.

Phone Batteries

Your phone contains a lithium ion battery. The fully charged battery provides the following hours of service:

  • Up to 17 hours of talk time

  • Up to 200 hours of standby time

The battery life is reduced when the phone is turned on. Calls, messages, application use, Bluetooth use, and actions like menu navigation use power and reduce the talk time. Your phone screen dims and turns off after a configurable period of inactivity to reduce battery drain.

You can clean your handset. Make sure you follow our cleaning instructions.

Clean your handset immediately if it comes in contact with anything that may cause stains, or other damage; for example, dirt or sand, ink, makeup, soap, detergent, acids, acidic foods, or lotions.


Caution


Do not blow or use compressed air (for example, aerosol cans, low- or high-pressure air nozzles) to clean the openings of the handset.

Do not use a vacuum cleaner or other suction device to clean the openings of the handset.

Do not use pins or other objects to clean the openings of the handset.

Use of air, suction, or mechanical objects to clean the openings can damage the handset and voids the handset warranty.


If you happen to drop the handset into water, or it gets splashed, follow our instructions to dry off the handset. See If you drop your handset in water.

Clean the handset screen

Procedure


If your handset screen gets dirty, wipe it with a soft, dry cloth.

Caution


Do not use any liquids or powders on the phone because they can contaminate the handset components and cause failures.


Clean the handset exterior

You can clean the handset exterior using a dry, lint-free cloth. For the health-care environment, we recommend that you use Caviwipes™ and Saniwipes™ to thoroughly clean the handset. Caviwipes and Saniwipes contain up to 17% isopropanol.

Caution


Excessive use of Caviwipes and Saniwipes more than 3 times a day will damage the handset surface coating and will change the appearance of handset.


Any cleaning solution containing a higher amount of isopropanol, including pure isopropanol, or an alternative alcohol-based liquid could potentially damage the handset. Do not clean the handset with bleach or other caustic products.

Clean your handset immediately if it comes in contact with anything that may cause stains, or other damage; for example, dirt or sand, ink, makeup, soap, detergent, acids, acidic foods, or lotions.


Caution


Do not blow or use compressed air (for example, aerosol cans, low- or high-pressure air nozzles) to clean the openings of the handset.

Do not use a vacuum cleaner or other suction device to clean the openings of the handset.

Do not use pins or other objects to clean the openings of the handset.

Use of air, suction, or mechanical objects to clean the openings can damage the handset and voids the handset warranty.


Procedure


Step 1

Remove the handset from the charger.

Step 2

Wipe the handset and screen with a soft, lint-free cloth or with an approved sanitizing wipe.

Step 3

If there are foreign objects (for example, fine sand) in an opening in the handset, tap the handset against your hand to dislodge the objects.


If you drop your handset in water

If you drop your handset in water, here's what you do:

  • Gently shake the water off the handset.

  • Dry the handset with a soft, dry, lint-free cloth.

  • Leave your handset in a dry area with some air flow; for example, a fan blowing cool air can be directed onto the handset speaker grill to help the handset dry out. Just don't put the fan close to the handset.

Here are some things you don't do:

  • Don't open the battery door while the handset is wet.

  • Don't use compressed air to blow off the water.

  • Don't use a hair dryer to dry off the handset.

  • Don't put a cotton swab, paper towel, or cloth into the headset jack or inside the battery compartment.

  • Don't tap the handset on a hard surface.

  • Don't put a wet handset into the charging cradle. You must wait until the handset is completely dry.


Note


The handset warranty does not cover handsets that have been dropped in water or other fluids.


Caution


Do not blow or use compressed air (for example, aerosol cans, low- or high-pressure air nozzles) to clean the openings of the handset.

Do not use a vacuum cleaner or other suction device to clean the openings of the handset.

Do not use pins or other objects to clean the openings of the handset.

Use of air, suction, or mechanical objects to clean the openings can damage the handset and voids the handset warranty.


If the sound is muffled after you dry the handset, there may still be water in the microphone or speaker compartments. Place your handset, speaker-side down, on a dry, lint-free cloth to see if water drips out. If there is still water in the handset, allow the handset to completely dry before you use it.

Additional Help and Information

If you have questions about the functions available on your phone, contact your administrator.

The Cisco website (https://www.cisco.com) contains more information about the phones and call control systems.

Document Accessibility for Visually-Impaired and Blind Users

The HTML version of this document supports the use of a JAWS® reader.

Lost Phone Connectivity

Sometimes your phone can lose its connection to the base station, or the base station can lose its connection to the call control system. When this connection is lost, your phone displays a message.

If you are on an active call when either connection is lost, the call ends.

If you lost the connection because you moved out of the base station range, you should add a coverage warning. For more information, see Set the Coverage Warning.

When the phone reconnects to the base station or the base station reconnects to the call control system, you'll be able to use your phone normally again.

Cisco One-Year Limited Hardware Warranty Terms

Special terms apply to your hardware warranty and services that you can use during the warranty period.

Your formal Warranty Statement, including the warranties and license agreements applicable to Cisco software, is available at: Product Warranties.