Handset Setup

Handset Hardware Installation

Handset package contents

Your handset package has the following contents:

  • Handset with attached belt clip. Inside the handset is the battery, with a piece of plastic over the battery contacts.


    Note


    You need to remove the plastic over the battery contacts. For more information, see Install the battery in the handset.


  • Charging cradle with attached USB cable.

  • Regional power adapter for the charging cradle.

  • Plastic cover to replace the belt clip on the handset.


    Note


    Make sure that you save this small plastic cover, in case you want to use the handset without the belt clip.


  • Printed compliance document.

You need the label on the box during handset registration.

Install the battery in the handset

The handset battery is shipped inside the handset, but there’s a plastic tab over the battery contacts. You need to remove the plastic tab.

Procedure


Step 1

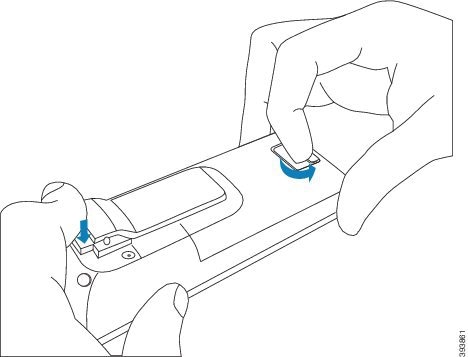
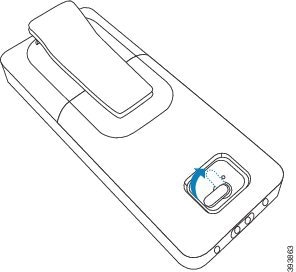
On the back of the handset, turn the latch counterclockwise to unlock the back, lift the clip, and lift the cover to remove the battery cover.

Step 2

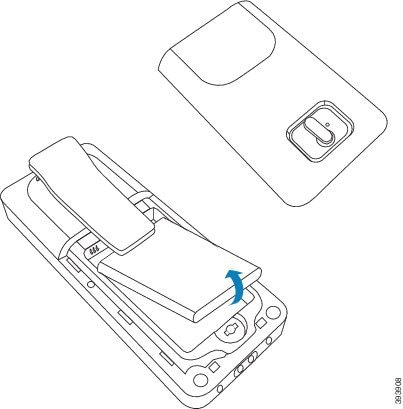
Remove the battery from the handset.

Step 3

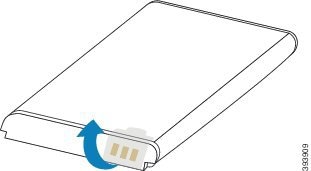
Remove the plastic over the contacts.

Step 4

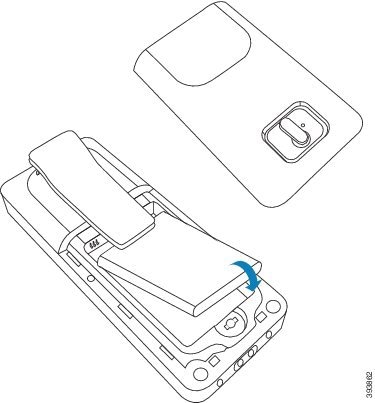
Place the battery under the clip and drop it into the compartment.

The battery contacts are on the top left edge of the battery and the top left edge of the battery compartment. Ensure that the contacts meet and that the battery is seated in the compartment.

Note

 
The battery fits only one way in the compartment. Don’t force the battery in the wrong way in the battery compartment.

Step 5

Replace the battery cover, make sure that the cover is closed, and turn the latch clockwise to the locked position.

Don't force the cover closed. If it doesn't close easily, take it off and check that the battery is completely seated in the battery compartment.


What to do next

Before you use the handset, you need to charge it. See Charge the handset battery.

Remove the handset clip

You can remove the clip from the back of the handset and replace it with a smooth cover that shipped with your handset.

Before you begin

You need:

  • #1 Phillips-head screwdriver

  • Plastic cover to replace the belt clip on the handset. This cover is shipped to you in the product box.

Procedure

Step 1

Turn off the handset.

Step 2

Place the handset face down on a flat, level surface. You may want to place the handset on a large, clean cloth to protect the handset.

Step 3

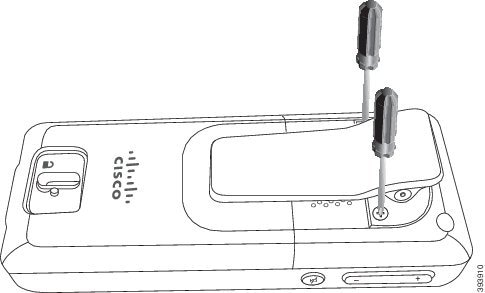
Use the screwdriver to remove the screws on the clip. Set the screws aside.

Note


The screws are small, so be careful not to lose them.

Step 4

Lift up the loose end of the clip. The clip assembly should come off the handset.
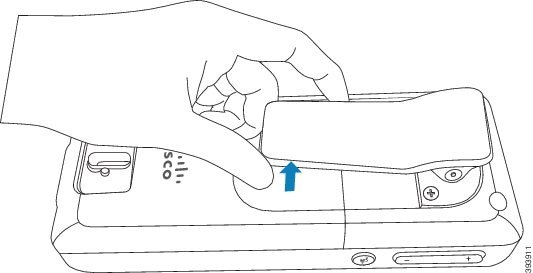
Step 5

The replacement cover has a hook in the back. Slide the hook into the recessed area of the handset and press it into the handset.

This diagram shows the hook on the back.

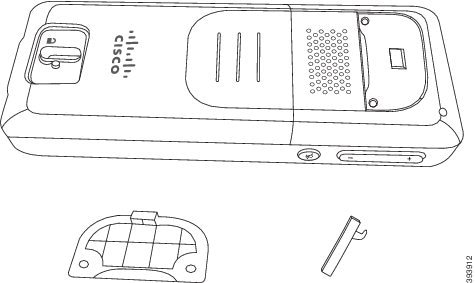
This diagram shows the way you put the hook into the handset.

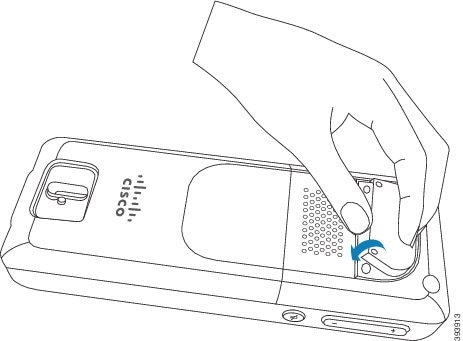
Press down until the clip is in position and the back is flat.
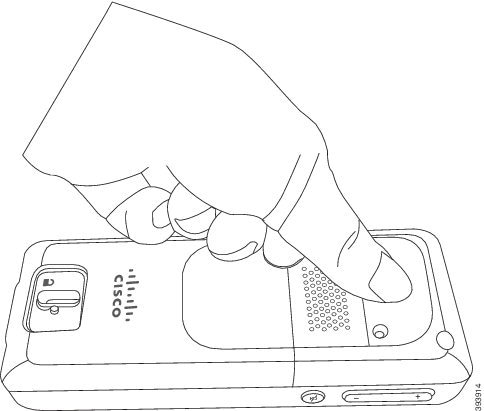
Step 6

Use the screwdriver to screw the screws into the cover and handset.
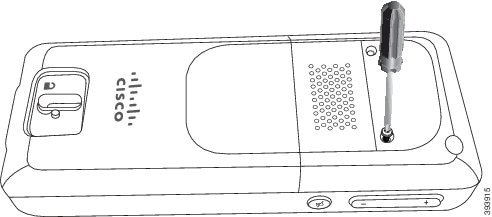
Step 7

Store the cover with the belt clip, in case you need to use it.


Handset Battery Charging

Set Up the charging cradle

You use the charging cradle to charge the handset. The cradle has a built-in USB cable that plugs into the power adapter. The power adapter is designed for your country's electrical outlet configuration and power rating.

Procedure


Step 1

Place the cradle on a level surface.

Step 2

Plug the USB connector of the power cord into the power adapter.

Step 3

Plug the power adapter into the electrical outlet.


Charge the handset battery

You use the handset charger to charge the handset battery.


Note


The battery comes partially charged, but you should charge it for a minimum of 10 hours before you use it for the first time. If you don't fully charge it, you may decrease the life of the battery.


If you remove and replace the battery from the handset, you need to fully discharge and then fully charge the battery so that the battery indicator is accurate.


Caution


Charge the battery with the handset charger provided. If you use another method, you can damage the battery, the handset, or your surrounding area.


Only charge the battery in environments where the temperature is between 32°F (0°C) and 104°F (40°C).


Caution


Don’t charge the battery in hazardous environments or where there’s explosion danger.


When you place the handset into the charger, it turns on (if not already on) and displays a message that the handset is charging. The handset screen dims and turns off at the configured time.

If the LED on the handset starts to flash, the handset is updating its firmware.

Before you begin

Set up the cradle as described in Set Up the charging cradle.

Ensure that your handset charger is plugged into the electrical outlet.

Procedure


Place the handset in the charger so that the contacts in the handset and the contacts in the charger match.

The handset beeps, screen turns on, and displays a message that the handset is charging. If this doesn't happen, remove the handset from the charger and try again.


Automatic Handset Configuration

Your handset may be set up to automatically configure itself. If your handset doesn't automatically configure, you have to manually configure it, using information provided by your administrator or service provider.

Set up your handset automatically

In many cases, when you first power-on the handset, it automatically starts to configure itself to communicate with the base station. You may get further instructions if there are choices or additional information.

When your handset successfully registers, you see the Registered message, and then the idle screen is displayed.

Procedure


Step 1

Press and hold Power/End until the screen turns on.

The handset displays Search for base station.

Step 2

If the handset displays a list of base stations, press down on the navigation ring to highlight the base station that you need to connect to and press Select.

Step 3

If the handset displays Enter the code, contact your administrator for the base station access code.

Step 4

If the screen doesn't display the Registered message, make note of the error message and contact your administrator or service provider for assistance.


Set Up a Handset Automatically with the Username and Password

When you power on a new handset, it automatically registers itself with the base station which is in promiscuous mode. If the server requests authorization, you enter the username and password. When you need to register multiple handsets, we recommend that you power on one handset to enter the credentials. The other handsets don't receive the authorization request when they register.

The username and password can be a combination of letters, numbers, and symbols. The username can be between 1 and 24 characters and password can be between 1 and 128 characters.

If you enter a wrong username or password, an error message displays. You have three attempts to enter the correct username and password. If you fail all the attempts, the handset deregisters from the base station. Restart the handset and enter the correct username and password, or contact your administrator.

Before you begin

Your administrator or service provider gives you the username and password.

Procedure


Step 1

Press and hold Power/End until the screen turns on.

Step 2

Enter the Username and Password in the Sign in screen.

Step 3

Press Submit.


Set Up a Handset Automatically with a Short Activation Code

When you power on a new handset, it automatically registers itself with the base station which is in promiscuous mode. If the server requests the short activation code, you enter the short activation code. After the short activation code input, if the server requires authentication, you enter the username and password. When you need to register multiple handsets, we recommend that you power on one handset to enter the short activation code. The other handsets won't receive the authorization request when they register.

The short activation code starts with the # and varies between 3 to 16-digit number. The username and password can be a combination of letters, numbers, and symbols. The username can be between 1 and 24 characters and password can be between 1 and 128 characters.

If you enter a wrong short activation code, an error message screen displays. You have three attempts to enter the correct short activation code. If you fail all the attempts, the handset deregisters from the base station. Restart the handset and enter the correct short activation code, or contact your administrator.

Before you begin

Your administrator or service provider gives you the short activation code, username, and password.

Procedure


Step 1

Press and hold Power/End until the screen turns on.

Step 2

Enter the short activation code in the Enter activation code screen.

Step 3

Press Submit.

Step 4

(Optional) Enter the Username and Password in the Sign in screen.

Step 5

Press Submit.


Add the Handset Automatically in HEBU Mode

You can SIP register a handset to a base station in the Handset Extension by Username (HEBU) mode. When you power on a handset, a login screen displays to enter the username and password. You may need to enter the access code before this screen displays. If the username and password you enter match with the defined HEBU username and password in the base station, the handset registers to the defined extension.

The username and password can be a combination of letters, numbers, and symbols. The username or password can be from 1 to 40 characters.

If you enter a wrong username or password, an error message displays. You have three attempts to enter the correct username and password. If you fail all the attempts or a timeout occurs, the handset deregisters from the base station.

You can restart the handset and enter the correct username and password, or contact your administrator.

In a dualcell or a multicell system, you can register up to 20 handsets simultaneously with the base station in this mode.

Before you begin

Your administrator or service provider gives you the username and password.

Procedure


Step 1

Press and hold Power/End until the screen turns on.

Step 2

Enter the Username and Password in the Login screen.

Step 3

Press Submit.


Manual Handset Configuration

Sometimes you have to manually configure your handset. Your administrator will give you the information you need to access the base station web pages, access appropriate web pages, and set various fields.

You can find the manual configuration instructions in the Cisco IP DECT 6800 Series Administration Guide.

Reset the Language and Text to Default in the Handset

You can use the handset keys to reset the language and text display on your handset. After the reset, the handset has the default settings. The default settings change when the base station updates the handset.

The language and texts settings reset to default until the handset updates with new settings.

Before you begin

Make sure that your handset is off.

Procedure


Press the keys 3 and 5 until the screen turns on.


What to do next

Verify that the language and the text settings are default on your handset.

DECT handset firmware upgrades

From time to time, your administrator will need to upgrade the firmware on your handset. The handset downloads the new firmware file from the server.

After the download completes, the handset needs to install the file. You see a message on the handset screen to tell you to put your handset into the charging cradle. When you put the handset in the charging cradle, the LED flashes to alert you that the handset is loading the new firmware. Leave the handset in the charging cradle until the LED stops flashing.