- For Assistants—Using the Manager Assistant on Your Phone
- Log In to the Manager Assistant on Your Phone
- Check the Status of Your Managers
- Handle Calls and Perform Other Actions
- Answer a Call Using Manager Assistant on the Phone
- Configure Manager Settings
- Configure Assistant Settings
- Customize the Distinctive Ringing feature
For Assistants—Using the Manager Assistant on Your Phone
For Assistants—Using the Manager Assistant on Your Phone
This chapter describes how you can access Manager Assistant features directly on your Cisco Unified IP Phone (sometimes called the “Assistant Phone”).
You can use the buttons and softkeys on your phone to perform most tasks that you can perform using the Assistant Console. You can also use your phone to perform some tasks while you use the Assistant Console at the same time to perform other tasks. Also, features available on your phone are also available on the Assistant Console, with the exception of Distinctive Ringing.
To use the Manager Assistant on your phone, we recommend strongly that assistants support no more than five managers.
Also, several tasks cannot be performed on the phone, such as assigning the preferred assistants. The manager assigns these tasks using a website that your system administrator sets up, and you assign these tasks using the Assistant Console.
The Manager Assistant feature on your phone is supported on these Cisco Unified IP Phones:
Cisco Unified IP Phones 7945G, 7942G, 7941G-GE, 7941G, and 7940G
Cisco Unified IP Phones 7965G, 7962G, 7961G-GE, 7961G, and 7960G
Cisco Unified IP Phone 7975G, 7971G-GE, and 7970G
 Note | Before you begin, you must identify which mode your system administrator chose: shared-line or proxy-line. For more information about the modes and for which mode you are using, see Shared-Line and Proxy-Line Modes Overview. |
Log In to the Manager Assistant on Your Phone
Use these steps to log in to the Manager Assistant on your phone.
What to Do Next
If the Primary IP Manager Assistant(IPMA) service goes down, your IP Phone screen will not receive notification about this condition. However, you will receive a Host not found Exception message when you try to use a softkey. In this case, you must select Secondary IPMA Phone Service manually from the IP Services menu and log in again.
Log In to the Manager Assistant on Cisco Desktop Collaboration Experience Phones
Use these steps to log in to the Manager Assistant on your phone.
Make sure that your phone is active
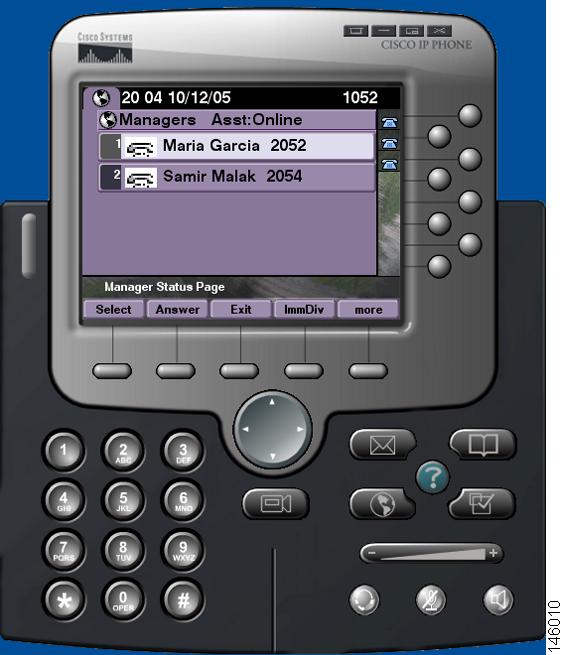
Check the Status of Your Managers
You can see a list of managers that an assistant supports on the Manager Status screen. This topic describes the screen and the softkeys on it.
For each manager that an assistant supports, this information is displayed:
Manager’s Assistant Status line—Indicates if the assistant is online or offline.
Number of managers in the list—Enables you to determine the number of managers quickly.
Name of manager—The names are sorted based on new call indication, change of manager status from on hook or phone on hook.
Call-status icon—The Call Status icons on the Manager Status Screen table describes the status icons that can appear to the left of the manager’s name
Proxy line of the manager
Manager call status icon |
What it does |
|---|---|
Busy |
Appears if the manager’s phone is busy (phone line is in use). |
Hold |
Appears if the manager places a call on hold. |
Idle/on hook |
Appears if the manager’s phone is on hook. |
Off hook |
Appears if the manager’s phone is off hook (the handset is lifted or another audio device is in use). |
Ring |
Appears next when the manager’s phone is ringing. |
Unknown |
Appears when Manager Assistant cannot determine the state, such as in the case of a CTI failure or when the manager is logged in. |
MWI |
MWI (which means message waiting indicator) appears if the manager has a voice message waiting. |
Handle Calls and Perform Other Actions
The table describes the softkeys that appear on the Manager Status screen. The softkeys enable you to perform a different call-handling tasks.
|
Softkey |
What it does |
||
|---|---|---|---|
|
Select |
Selects the highlighted manager from the list of managers and takes you to the Manager Settings screen, where you can configure settings for the selected manager. |
||
|
Answer |
Answers an incoming call for the corresponding manager. |
||
|
Exit |
Exits the Manager Status screen and takes you to the Services menu page. |
||
|
Redirect |
Immediately diverts a ringing, connected or on-hold call to the corresponding manager (by default) or to another preset number. To set the divert target to a directory number, press AsstSett, then press Set Divert Target, then enter the number. |
||
|
More |
Shows the remaining available softkeys for the Manager Status screen. |
||
|
TrnsfVM |
Sends a ringing, connected, or on-hold call to that manager’s voice mailbox. |
||
|
InterCom |
Enables you to speak to a manager on an intercom line. |
||
|
GoOffLine |
Takes you offline. If there is another assistant configured for the manager and if that assistant is online, that assistant becomes the active assistant for the manager. If no other assistants are available, calls for the manager are not filtered or diverted, and all ring at the manager’s phone.
|
||
|
AsstSett |
Takes you to the Assistant Settings screen, where you configure various settings. See Table 1 for the fields you can configure. |
Answer a Call Using Manager Assistant on the Phone
You can answer a call to a manager displayed on the Manager Status page:
Configure Manager Settings
The Manager Settings screen, which appears when you select a manager from the list shown in the Manager Status screen.
This table describes how to set the fields in this screen.
Note | If you press menu items too rapidly when change the manager settings from the Assistant Console, that manager is logged out as a security measure and the Assistant Watch window disappears. For the manager to be logged back in, a Save operation must be executed on that particular Manager Configuration web page. |
Softkey |
What it does |
||
|---|---|---|---|
Filter |
Toggles between On and Off. Change the setting of this field by highlighting the field and pressing Select. If this field is set to On, then the filter rules configured in the Filter Mode field apply.
|
||
Filter Mode |
Toggles between Exclusive and Inclusive. Change the setting of this field by highlighting the field and pressing Select.
Permitted wildcard characters are X for a single digit and * for a string of digits at the beginning or end of a number only. |
||
Do Not Disturb |
Turns off the ringer on the manager’s phone. This task can be performed on a per-manager basis. |
||
Divert Calls |
Toggles between On and Off. Change the setting of this field by highlighting the field and pressing Select. If this field is set to On then ringing, connected, or held call is sent to the manager or to another preset number (a number you specify by selecting the Set Divert Target field). |
||
Set Divert Target |
The number to which calls are diverted, if the Divert Calls field is On. Default: Calls are diverted to the corresponding manager’s phone unless another Directory Number is configured here. |
||
Alert Tone |
Toggles between On and Off. Change the setting of this field by highlighting the field and pressing Select. If this field is set to On in a proxy-line environment, calls to the manager generate an audio alert on the manager’s phone. |
- Display Manager Settings Screen on Cisco Desktop Collaboration Experience Phones
- Configure Manager Settings for Cisco Desktop Collaboration Experience Phones
Display Manager Settings Screen on Cisco Desktop Collaboration Experience Phones
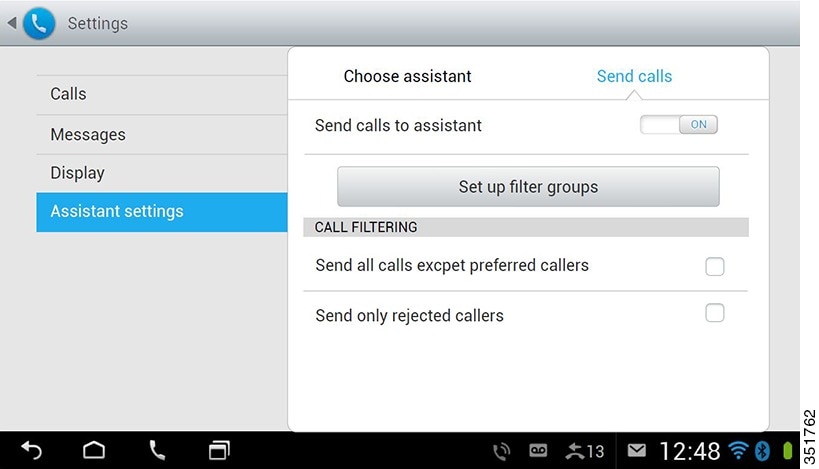
Configure Manager Settings for Cisco Desktop Collaboration Experience Phones
This table describes how to set the fields on the Manager Settings screen.
Note | If you press menu items too rapidly when you change the manager settings from the Assistant Console, that manager is logged out as a security measure and the Assistant Watch window disappears. For the manager to be logged back in, click Save on that particular Manager Configuration web page. |
|
Softkey |
What it does |
||
|---|---|---|---|
|
Choose Assistant |
Press to select an assistant to apply the settings.
|
||
|
Send calls to assistant |
Toggles between On and Off. |
||
|
Set up filter groups |
Press to set up the filter groups.
|
||
|
Send all calls except preferred calls to assistant |
Toggles between On and Off. |
||
|
Send only rejected callers |
Toggles between On and Off. |
Configure Assistant Settings
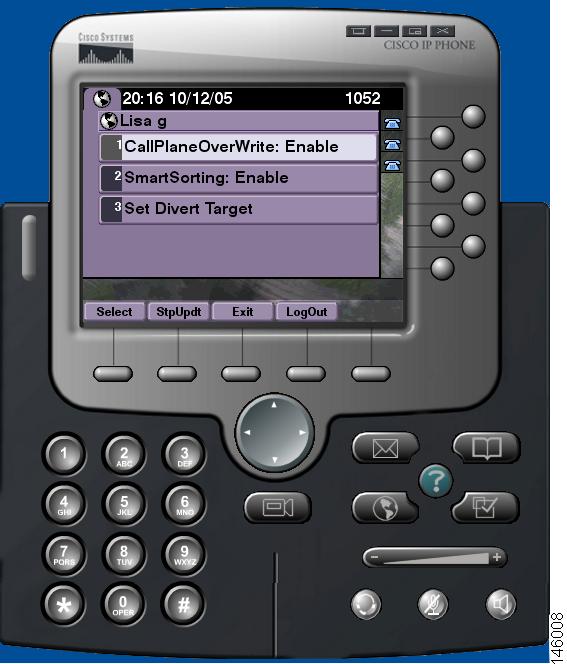
The following figure shows the Assistant Settings screen, which displays when you press the AsstSett softkey on the Manager Status screen. The Assistant Settings screen lets you configure such items as divert targets and sorting for the Manager Status screen.
The Assistant Settings Fields table describes how to set the fields on the screen, and Assistant Settings Softkeys table describes how to use the softkeys on the screen.
|
Field |
What it does |
|---|---|
|
CallPlaneOverWrite |
Toggles between Enabled and Disabled. Change the setting of this field by highlighting the field and pressing Select. When you enable this field real-time updates while you are on a call is sent. It is useful to check if a manager’s status is busy or idle before diverting a call to that manager. With this field enabled, a change in the manager’s status displays while you are on a call. |
|
SmartSorting |
Toggles between Enabled and Disabled. Change the setting of this field by highlighting the field and pressing Select. When you enable this field, the Manager Status screen is sorted based on new call events. For the hierarchy of how the managers list is sorted, see Check the Status of Your Managers. When this field is disabled, the Manager Status screen is static. |
|
SetDivertTarget |
When the Divert All field is set to On for a manager, incoming calls to that manager are diverted to the divert target, which is either the currently selected manager (by default) or a directory number. To divert calls to a Directory Number, enter the number in the SetDivertTarget field; to change a directory number, edit the SetDivertTarget field. |
|
Field |
What it does |
||
|---|---|---|---|
|
Select |
Press the button to change the settings for the two toggled fields on the screen—CallPlaneOverWrite and SmartSorting. If you highlight the Set Divert Target field and press Select, you are taken to the screen to configure the divert target number. |
||
|
StpUpdt/StrUpdt |
The Manager Status screen, by default, refreshes when a change in a manager’s status occurs or when there is a new call for a manager. The StpUpdt button prevents this automatic refresh. You might use this button, for example, if you have support 33 managers and would like to change the setting for the 20th manager. You would scroll down the manager list on the Manager Status screen, highlight the 20th name, and press Select. However, if your screen gets updated during this time, you would lose your place in the scroll list, as well as miss potentially important status updates. Therefore, to avoid refreshes from occurring in such a situation, press the StpUpdt button.
|
||
|
Exit |
Exits out of the Assistant Settings screen and returns you to the Manager Status screen. |
||
|
LogOut |
Logs you out of the IPMA service. You must login to the service again after you log out. |
Customize the Distinctive Ringing feature
Distinctive Ringing enables you to associate a unique audible ring type with each of your phone lines. You can associate a unique ring type with your manager’s proxy line to distinguish quickly between your incoming calls and your manager’s incoming calls.
Use this procedure to customize the Distinctive Ringing feature directly on your phone.
 Feedback