Configure Webex Calling

Before You Begin


Important

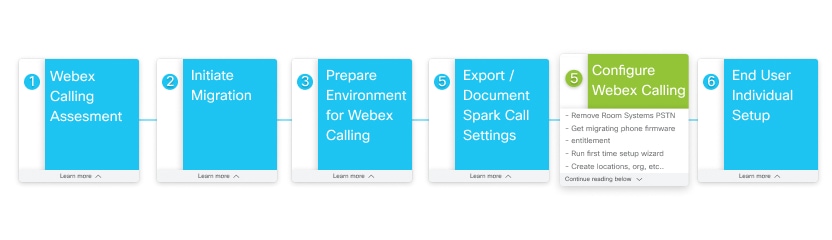
Before you configure Webex Calling in your organization, you must ensure that you coordinated with the Cisco services team. They need to first apply configuration in the backend that points your Control Hub organization to Webex Calling and away from Spark Call.

If you confirmed with Cisco that this backend configuration is set, then you can safely run the First Time Setup Wizard and configure Webex Calling. (If not yet set, Control Hub shows an error if you try to run the wizard.)

Also, after the team sets the backend configuration, your Spark Call subscription and related settings are no longer available. Make sure you followed all of the steps in the previous section (Preserve Spark Call Configuration).


Configure Webex Calling Workflow

Configure First Time Setup, Locations, and PSTN Service

After your Cisco Webex Calling licenses are applied to your organization, you receive a welcome email, from which you can create your administrator credentials, sign into Control Hub, and set up your organization's services. This task walks you through how to set up your basic Calling service settings in the First Time Setup Wizard.

Procedure


Step 1

Set up initial calling settings—provisioning country, default location, license assignment, PSTN provider, phone number entry, and location number assignment.

Use Set Up Calling Settings in First Time Setup Wizard for specific steps.
Step 2

Add more locations to contain specific configuration (licenses, users, numbers, PSTN) for your branches or sattelite locations.

Use Add Location for specific steps.

Step 3

Configure a dial plan with internal and external dialing.

Use Configure Your Webex Calling Dial Plan for specific steps.

Step 4

If you chose local gateway for the PSTN provider, add the local gateway to a location if it's ready.

Use the following documents for specific steps:


Determine PSTN Functionality for Room Devices in a Workspace

Use this procedure to configure Room/Desk/Board devices in Workspaces for your new Webex Calling organization.

Before you begin

  • Partners must order the required number of Webex Calling Common Area licenses.


    Note

    If your subscription is under the Named User model, and you're ordering only Video Device registration licenses, manual intervention is required to ensure that Common Area licenses are provisioned properly. Work with your partner or Cisco contact.


  • Partners must coordinate with IntelePeer or the applicable Preferred Media Provider to schedule reconfiguring the customer PSTN traffic from Spark Call to Webex Calling trunks.

  • Follow all the required first time setup and location configuration.

Procedure

  • Workspaces with Room/Desk/Board Devices without PSTN—Nothing is required since these devices are enabled with Free Calling. If you want to add PSTN, enable the Workspace with Webex Calling, then assign a number and/or extension.

  • Workspaces with Room/Desk/Board Devices with PSTN—You must convert the Spark Call licenses to Webex Calling. Change the call service to Free Calling to remove the phone numbers from the devices, then change the call service to Webex Calling to re-provision the phone number on Webex Calling for the devices. The PSTN must also be ported from the Preferred Media Provider trunk to a Webex Calling trunk or to another PSTN provider.

    1. From the customer view in https://admin.webex.com, go to Workspaces, search for the Workspace enabled for Spark Call, and then open it.

    2. Go to Calling and click the cogwheel , choose Free Calling (default), and then click Save.

      This step does not delete the Workspace in Control Hub. This step removes Spark Call functionality (such as PSTN access through a cloud preferred media provider) from the Cisco Webex devices in the Workspace. Any devices in the remaining Workspace can still support the features that come with free calling, specifically SIP dialing and pairing to the Webex app.

      After you migrate to Webex Calling, you can use the procedure in Configure and Manage Webex Calling Devices to reenable these Workspaces with PSTN service through Webex Calling.

  • Workspaces with Phones—Workspaces with Phones using Spark Call are covered by the previous bulk CSV procedure.

    1. Go to Devices, choose phone devices, and then Export as CSV. (As covered in Export Device List From Spark Call Organization.)

      Export Workspaces with Phones using the Devices export function. This provides the Workspaces name and associated Device.

    2. Capture Numbers associated to Workspace Phones. You must do this manually. We recommend adding a column to the Devices export file to keep record of phone number associations.

    3. Bulk add Workspaces using bulk devices upload. See Add and Assign Devices in Bulk for guidance.

Migrate Enterprise Phones to Webex Calling

As a partner, you can use the My Cisco Entitlements (MCE) to request migration licenses that move supported phones with enterprise firmware (the firmware used on Spark Call) over to multiplatform phones (MPPs, the firmware used on Webex Calling).

Multiplatform phone (MPP) firmware enables the Cisco IP Phone 6800, 7800, and 8800 Series to work with Cisco Webex Calling

Before you begin

  • Verify if the hardware version and models are eligible for the migration. Please see Firmware Migration (Overview) for more details.

  • Get a record of the existing phone MAC addresses by exporting them from Devices in the customer view in Control Hub. See Export Device List From Spark Call Organization.

  • Ensure that your phones are running the latest enterprise firmware version. The minimum required version is 12.5(1)SR2. You can use the features of Cloud Upgrader (https://upgrade.cisco.com) to upgrade your 78xx or 88xx phones to the required version.

Procedure


Step 1

Go to https://mce.cisco.com and follow the steps to obtain migration licenses.

See How to Use My Cisco Entitlements (MCE) for more information.

Note 

Depending on your account, you may be directed to the Product Upgrade Tool (PUT). If you use PUT (https://upgrad.cloudapps.cisco.com/gct/Upgrade/) for product upgrades, see the PUT Reference Guide and this video on How to Place an Upgrade Order.

Step 2

After you obtain the migration licenses, go to https://upgrade.cisco.com, click Enterprise->Webex Calling/MPP under Migration services, and then click Step 1. Hardware and Licenses.

The licenses are required to authorize and validate your eligibility to migrate the firmware. They are included in a Webex Calling subscription (Collaboration Flex Plan) but must be requested and tied to the MAC addresses (one file per phone/MAC). See Appendix A and Appendix B for more details.

Once you obtain the license files, upload them on this screen. The following types of files are allowed to be uploaded:

  • A single file per phone (.lic extension)
  • A bundle of license files (.zip archives with multiple .lic files)
  • Only ZIP archives are allowed and the maximum size is 30 MB
Step 3

Click Step 2. Network and Firewall and then follow the instructions.

If your firewall supports URL filtering, white list the following URLs:
  • cloudupgrader.webex.com, ports: 6970/443
  • activate.cisco.com (MAC-based activation), ports: 443
  • activation.webex.com (Code-based activation), ports 443
Please see Webex Calling Port Information for other ports and URLs/IP addresses that are required to successfully register your phones to Webex Calling.
Step 4

Click Step 3. Migration Method and then follow the steps on screen for MAC-based activation.

When adding MPP devices in Webex Control Hub, you can provide the MAC address of the device so that it registers to the cloud. We recommend this method because you can bulk assign MAC addresses to users and your users don't need to perform any additional steps. For more details, refer to Configure and Manage Webex Calling Devices.


Configure Webex Calling Organization Features

After your organization is provisioned for Webex Calling licenses and you set up locations, you're ready to set up organization-wide features.

Before you begin

Open any reference materials (documentation or screenshots) that you extracted from your previous Spark Call feature configuration.


Note

While Spark Call and Webex Calling share some features, they are designed differently. You may have to make adjustments to your configuration steps as you set up the new Webex Calling features.


Procedure


Step 1

From the customer view in https://admin.webex.com, go to Services, and then click Features from the Call card.

Step 2

Click New Feature, choose the feature that you want to create or recreate, and then follow the setup instructions on screen.

Use Set Up Your Webex Calling Features for specific steps to follow in Control Hub and the Calling Admin Portal.


Assign Webex Calling, Locations, and Numbers to Users

Use this procedure to assign the Webex Calling service, a location, and a number to users in your organization.

Procedure


Choose a service, location, and number assignment method:


End users in your organization can continue to use their Webex accounts after you migrate to Webex Calling. You can use this high level flow to guide them on the process if they need help.

  • Users receive email invites to create accounts that give them access to https://settings.webex.com—For Webex Calling, this portal cross-launches to the Calling User Portal (CUP) where users can self-serve and configure their own settings.

  • Users can then reauthenticate with Webex.

  • If enabled for a cross launch to the Webex Calling app for advanced features, they can install the app and sign in with the same credentials. See Install the Webex Calling App for guidance.

Prepare for Cutover

Procedure


Step 1

Schedule forwarding from Toll Free numbers to a Webex Calling DID, if necessary.

Step 2

Notify PSTN of numbers migrating and time of migration at least 48 hours in advance of cutover. Additional notice required for after hours/special circumstances.

Step 3

All users are required to log out of Webex1.

Step 4

Work with the Cisco services team to confirm on-site contact persons and contact method for each location.

Step 5

Use Control Hub to deploy any new phones as necessary for unsupported device replacements or new Webex Calling users.


What to do next

The Cisco Services team initiates a transition firmware load so that the phones are on the appropriate firmware for Webex Calling.