Start Here
Topics in this section explain how to maintain and administer your DMP.
Concepts
DMPDM Workflow
The typical workflow in DMPDM assumes that you will test settings before you commit to them.
Settings in DMPDM might revert to their most recent state after your DMP restarts. This occurs by design, so that you can test new settings. If your changes cause unforseen problems, you can abandon them without consequence. And, when your changes are satisfactory, you can commit to them.
- Click Apply to test new values for a condition or setting. After this click, the change takes effect. However, this change is temporary and reversible. The values that you overwrote will return the next time that your DMP restarts, unless you commit to them explicitly.
- Choose Administration > Save Configuration to store changed settings permanently. After this click, the changes persist even after your DMP restarts. When the Save Configuration page appears, you must click Save to actually save your work.
DMPDM Differences by Firmware Release and DMP Model
Your DMP model and its installed firmware version dictate which elements and supported features you see in DMPDM.
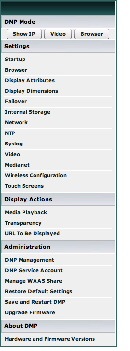
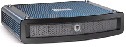
DMPDM on a DMP 4305G
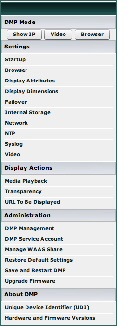
|
DMPDM on a DMP 4310G

|
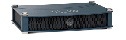
DMPDM on a DMP 4400G
|
Procedures
Log in to DMPDM
- This procedure assumes that you connected your DMP to its presentation system, and now they are both turned On.
Step 1![]() While your presentation system shows the Cisco logo and shows an IP address for your DMP, write down the IP address.
While your presentation system shows the Cisco logo and shows an IP address for your DMP, write down the IP address.
Step 2![]() Point your browser to the IP address that you wrote down.
Point your browser to the IP address that you wrote down.

Note![]() Use HTTPS as the connection protocol. The connection fails when you use HTTP instead of HTTPS. This failure occurs by design, to support security in your network.
Use HTTPS as the connection protocol. The connection fails when you use HTTP instead of HTTPS. This failure occurs by design, to support security in your network.
Step 3![]() Respond to the prompt. It sometimes varies.
Respond to the prompt. It sometimes varies.
The first time that you start DMPDM, it prompts you to change its factory-defined master password. You will never see this prompt again, unless you restore your DMP to its factory-default settings.
a.![]() Enter a new master password that contains at least eight characters, which combine uppercase and lowercase letters with numerals
Enter a new master password that contains at least eight characters, which combine uppercase and lowercase letters with numerals
b.![]() Use whichever master password you saved most recently.
Use whichever master password you saved most recently.
Step 4![]() Stop. Remain logged in. You have completed this procedure.
Stop. Remain logged in. You have completed this procedure.
Save Configured Settings
You can save every change that you made to the values for every option in DMPDM since the last time that you clicked Save or the last time that you restarted the DMP.

Tip![]() Changes to some DMP configuration settings do not take effect until after the DMP restarts. Check the instructions for a procedure to see if you must restart your DMP after you change a setting.
Changes to some DMP configuration settings do not take effect until after the DMP restarts. Check the instructions for a procedure to see if you must restart your DMP after you change a setting.
Step 1![]() Complete whichever variation of this step applies to you. It might vary between any two DMP models, and also between the model-specific firmware versions from any two maintenance releases.
Complete whichever variation of this step applies to you. It might vary between any two DMP models, and also between the model-specific firmware versions from any two maintenance releases.
|
|
|
||
|---|---|---|---|
|
|

|
|
|
The saved configuration persists even after your DMP restarts.
Step 2![]() Stop. You have completed this procedure.
Stop. You have completed this procedure.
Restart Your DMP
Step 1![]() Complete whichever variation of this step applies to you. It might vary between any two DMP models, and also between the model-specific firmware versions from any two maintenance releases.
Complete whichever variation of this step applies to you. It might vary between any two DMP models, and also between the model-specific firmware versions from any two maintenance releases.
|
|
|
||
|---|---|---|---|
|
|
|

|
|
Step 2![]() Stop. You have completed this procedure.
Stop. You have completed this procedure.
Rare but Essential Tasks
Configure NTP Settings for Time-Dependent Features, As Needed
IP-enabled devices including DMPs can use network time protocol (NTP) to synchronize themselves with radio and atomic clocks located on the Internet. Thus, the accuracy of their local time-keeping is ensured. NTP can synchronize distributed clocks within milliseconds over long time periods. You must configure NTP settings on any DMP through which you will provide:
- IPTV services with Cisco Cast.
- Proof-of-play services with Cisco Digital Signs.
- Any other service that is dependent upon accurate Start and Stop times.
Step 1![]() Click NTP in the Settings list.
Click NTP in the Settings list.
Step 2![]() Choose On from the Enable NTP Service list.
Choose On from the Enable NTP Service list.
Step 3![]() Use the fields marked Hostname 1, Hostname 2, and Hostname 3 to specify which NTP servers your DMP should use.
Use the fields marked Hostname 1, Hostname 2, and Hostname 3 to specify which NTP servers your DMP should use.
- Hostname 1 — Enter the DNS-resolvable name of the network time server to use by default. This is your primary time server. Your DMP will not use any other time server while this one is available.
Note![]() We recommend that you set the default NTP hostname to pool.ntp.org.
We recommend that you set the default NTP hostname to pool.ntp.org.
- Hostname 2 — Enter the DNS-resolvable name of a network time server to use whenever the primary time server is not available.
- Hostname 3 — Enter the DNS-resolvable name of a network time server to use whenever the secondary time server is not available.
Step 4![]() Choose from the Time Zone list the time zone that is correct and local for your DMP at its location.
Choose from the Time Zone list the time zone that is correct and local for your DMP at its location.
Step 5![]() Enter in the Refresh Interval field the maximum number of milliseconds that are permitted to elapse before your DMP retrieves a fresh time stamp from its NTP server. The factory-default maximum is 17 ms.
Enter in the Refresh Interval field the maximum number of milliseconds that are permitted to elapse before your DMP retrieves a fresh time stamp from its NTP server. The factory-default maximum is 17 ms.
Step 6![]() Click Apply to confirm and test your choices.
Click Apply to confirm and test your choices.
Your entries are recorded to volatile memory and take effect — but only until you change them or restart your DMP.
Step 7![]() When you are satisfied that you chose the correct settings, click Save Configuration in the Administration list, and then click Save.
When you are satisfied that you chose the correct settings, click Save Configuration in the Administration list, and then click Save.
Your entries take effect permanently and will persist even after your DMP restarts.
Step 8![]() Stop. You have completed this procedure.
Stop. You have completed this procedure.
Restore Factory Default Settings
You can restore factory settings to your DMP.

Step 1![]() Click Restore Default Settings in the Administration list.
Click Restore Default Settings in the Administration list.
Step 2![]() Click Restore when the Restore Default Settings page appears.
Click Restore when the Restore Default Settings page appears.
Your DMP restarts automatically and its factory settings are restored.
Step 3![]() (Optional) Will you deploy your DMP where there is no local DHCP server? If so, complete the “Preconfigure a DMP To Run Without a Local DHCP Server” procedure in the getting started guide for your DMP.
(Optional) Will you deploy your DMP where there is no local DHCP server? If so, complete the “Preconfigure a DMP To Run Without a Local DHCP Server” procedure in the getting started guide for your DMP.
Step 4![]() Log in with the factory default username admin.
Log in with the factory default username admin.
Step 5![]() Reconfigure your DMP and change its default passwords, when prompted.
Reconfigure your DMP and change its default passwords, when prompted.
To learn how, see Getting Started Guide for Cisco Digital Media Players at s/dmp/getting/started/guide/5_2_x/dmp5_2_x.html" CLASS="URL">http://cisco.com/en/US/docs/video/digital_media_systems/dmp/getting/started/guide/5_2_x/dmp5_2_x.html.
Step 6![]() Stop. You have completed this procedure.
Stop. You have completed this procedure.
Investigate Which DMP Firmware Updates Are Available
Step 1![]() Log in to your Cisco.com account, and then go to http://cisco.com/cgi-bin/tablebuild.pl/dms.
Log in to your Cisco.com account, and then go to http://cisco.com/cgi-bin/tablebuild.pl/dms.
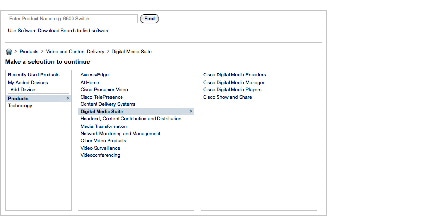
Step 2![]() Click Digital Media Players in the far-right column.
Click Digital Media Players in the far-right column.
The selector shifts all columns to the left by one slot. This movement exposes the options for another navigation level in the far-right column.

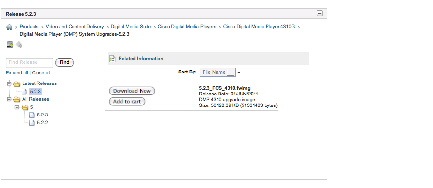
Step 3![]() Click the name of a DMP model to see a selection tree that lists its available firmware versions.
Click the name of a DMP model to see a selection tree that lists its available firmware versions.

Step 4![]() Expand the tree as needed, and then click a release number to see its details.
Expand the tree as needed, and then click a release number to see its details.
Note![]() Every firmware file is DMP model-specific.
Every firmware file is DMP model-specific.
Tip Allow your pointer to hover for a moment over the Related Information link. Doing so reveals more options that you might consider helpful.
Step 5![]() Follow the prompts to download your preferred firmware within a compressed archive file.
Follow the prompts to download your preferred firmware within a compressed archive file.
Step 6![]() Decompress the archive.
Decompress the archive.
It contains a README file, which:
- States how the new firmware might affect your equipment and network.
- Includes installation procedures.
Step 7![]() Complete procedures that the README file recommends for you.
Complete procedures that the README file recommends for you.
Step 8![]() Stop. You have completed this procedure.
Stop. You have completed this procedure.
Upgrade (or Downgrade) DMP Firmware
You can install an update to the firmware for your DMP.
If your DMP firmware is so comparatively recent that it does not work well with older software on your DMM server, you can install older firmware on your DMP.
- Investigate which DMP firmware releases are available on Cisco.com.
- Confirm that the “Enable Cisco TAC Troubleshooting Access” feature is enabled in DMPDM. If you must enable it manually, you must also restart your DMP before this change can take effect.
Step 1![]() Click Upgrade Firmware in the Administration list.
Click Upgrade Firmware in the Administration list.
Step 2![]() Click Browse — or its equivalent if your browser applies a different name to this button — when the Upgrade Firmware page appears.
Click Browse — or its equivalent if your browser applies a different name to this button — when the Upgrade Firmware page appears.
Step 3![]() Navigate to the firmware update that you downloaded, and then choose it.
Navigate to the firmware update that you downloaded, and then choose it.
Note![]() Do not close or browse away from this page until messages in DMPDM state that your DMP has loaded the firmware image and started to burn it. Otherwise, upgrade fails.
Do not close or browse away from this page until messages in DMPDM state that your DMP has loaded the firmware image and started to burn it. Otherwise, upgrade fails.
Step 5![]() Stop. You have completed this procedure.
Stop. You have completed this procedure.
View DMP Hardware and Firmware Versions
Step 1![]() Click Hardware and Firmware Versions to see information about your DMP.
Click Hardware and Firmware Versions to see information about your DMP.
You cannot change the information.
Step 2![]() Stop. You have completed this procedure.
Stop. You have completed this procedure.
Reference
UI Reference Topics
UI Reference: Elements to Upgrade or Downgrade DMP Firmware
|
|
|
|---|---|
|
Upgrade Firmware |
|
The full pathname to the binary file. If you do not know the full pathname, click Browse. |
|
|
Upgrade Status |
|
 Feedback