- Concepts
- Procedures
- Activate Medianet Support
- Configure HTTP Proxy Server Settings for a DMP4310G
- Configure HTTP Proxy Server Settings for a DMP4400G or DMP4305G
- Configurea WirelessNetwork Connection
- Prepare Your DMP to Use a Static IP Address Over Ethernet
- Assign a Static IP Address to a Wireless DMP4400G
- Show the Assigned IP Address
- Reference
Configure Network Settings
Concepts
- Glossary
- Understand WEP Keys and Passphrases
- Workflow to Define Wi-Fi Settings
- Partial Support for Cisco Medianet 2.1 Features
- Understand Medianet Autoconfiguration for DMP 4310G Endpoints
- Information That Medianet and DMPs Exchange
- Restrictions
Glossary

Timesaver Go to terms that start with... [ numerals | A | C | D | E | L | M | P | S | T | W ].
|
|
|
|
|
|
|
|
|
|
|
|
|
|
|
|
|
|
|
|
|
|
|
|
|
|
 Glossary
|
|
|
|
|
|
|
|
|
|
|
|
|
|
|
|
|
|
|
|
|
 Glossary
|
|
|
This value describes the physical site — including the municipality, street address, floor designation, and so on — where a switch and its attached nodes are deployed. additional-location-information This value describes any additional details to inject into the encapsulated CDP message. As this is a data injection, it depends wholly on the presence of a defined civic-location-id value. Absent that value, there is no way for this value to reach any endpoint. Later, when you plug a Medianet-ready DMP into a properly configured switch, the Location Services feature of MSI populates the Location URL field automatically in DMPDM. 
Note CDP and LLDP constrain how much location information you can store on a Medianet-enabled switch. Make sure that this information never exceeds 255 bytes. Note A DMP 4400G cannot receive or use Location Services information over Wi-Fi. Its connection type to your Medianet-enabled switch must be Ethernet. |
|
|
 Glossary
|
|
|
|
|
|
|
|
|
|
|
|
$ echo 'ibase=10;obase=16;  ' | bc ' | bc
And so, in keeping with the previous conversion example, shown in red.... • 128 becomes x80 • 107 becomes x6b • 224 becomes xe0 • 188 becomes xbc Note For 32-bit Windows Server, the DLL filename is DHCPSDDLLx86.DLL. 
\HKEY_LOCAL_MACHINE\SYSTEM\CurrentControlSet\Services\DHCPServer\Paramters
•
CalloutEnabled REG_DWORD 1• CalloutDlls REG_MULTI_SZ < full_path_to_DLL > Note See the Medianet documentation on Cisco.com for detailed instructions. |
|
|
|
|
|
|
|
|
|
|
|
|
|
|
|
|
|
|
|
|
|
|
|
|
|
|
|
|
|
|
|
|
Wi-Fi Protected Access. WPA is a standards-based, interoperable security enhancement that strongly increases the level of data protection and access control for existing and future wireless LAN systems. It is derived from and will be forward-compatible with the upcoming IEEE 802.11i standard. WPA leverages TKIP for data protection and 802.1X for authenticated key management. |
Understand WEP Keys and Passphrases
Timesaver Does your wireless network use WPA instead of WEP? If so, you can ignore this topic.
Many 802.11 access points (wireless routers) accept only a hexadecimal passphrase for WEP-64 and WEP-128. And yet, DMPs accept only an ASCII passphrase for WEP. For this reason, it might be necessary at times to translate your WEP passphrase from ASCII to hexadecimal.

Note![]() Many third-party converters are available. We do not offer any Cisco converter for this purpose.
Many third-party converters are available. We do not offer any Cisco converter for this purpose.
The typical WEP process is as follows.
1.![]() Pick an ASCII passphrase. For example, PassphraseWEP128.
Pick an ASCII passphrase. For example, PassphraseWEP128.
2.![]() Convert your string of ASCII characters to the hexadecimal key or keys for your network.
Convert your string of ASCII characters to the hexadecimal key or keys for your network.
3.![]() Configure your DMP to use the ASCII from which you derived the hexadecimal.
Configure your DMP to use the ASCII from which you derived the hexadecimal.
4.![]() Configure your wireless router to use the appropriate hexadecimal key or keys.
Configure your wireless router to use the appropriate hexadecimal key or keys.
Workflow to Define Wi-Fi Settings
It is not necessary, useful, or correct to restart a DMP immediately after you define its 802.11 settings. Instead, the typical workflow is as follows.

|

|
a. b. b. c. 
|

|
Partial Support for Cisco Medianet 2.1 Features
Cisco Medianet is an end-to-end architecture for networks that deliver rich-media experiences. Some DMP endpoints support some Cisco Medianet 2.1 features.
Note![]() We do not support any Medianet features on DMP 4305G endpoints.
We do not support any Medianet features on DMP 4305G endpoints.

Tip • To assess your network for Medianet readiness, see http://cisco.com/go/mra.
- To review solution reference network designs (SRNDs) for Medianet, see http://www.cisco.com/en/US/solutions/ns340/ns414/ns742/ns819/landing_vid_medianet.html .
|
DMP 4310G endpoints support discovery via DHCP and can learn their physical location. In addition, they know and can broadcast their product type, model, and software version. Through their use of your Medianet, they can receive their IP address, VLAN assignment, and network configuration settings automatically. Furthermore, they receive information from Medianet through DHCP3 that helps them to autoregister themselves with your DMM server. Later, after a successful autoregistration, the splash screen on these DMPs includes key parameters and states explicitly that setup succeeded. |
|
Medianet 2.1 feature support by DMP 4400G endpoints is equivalent to support by DMP 4310G endpoints, with just one exception. Ordinarily, a DMP 4400G can participate in networks via either an Ethernet connection or a Wi-Fi connection. However: A Wi-Fi connection by a DMP 4400G prevents it from obtaining or using any Location Services information that Medianet might be configured to provide. |
|
3.With DHCP option 125 (V-I Vendor-Specific Information) for service discovery, after you configure your supported DHCP server to support this option. See RFC 3925. |
Note![]() These features are designed to simplify the largest deployments, whereas DMPDM is designed to support the smallest deployments. If you manage your DMP primarily via DMPDM, your benefit from Medianet integration will be minimal.
These features are designed to simplify the largest deployments, whereas DMPDM is designed to support the smallest deployments. If you manage your DMP primarily via DMPDM, your benefit from Medianet integration will be minimal.
Understand Medianet Autoconfiguration for DMP 4310G Endpoints
DMP 4310G and 4400G endpoints can use CDP to announce and identify themselves on networks.
AND
You might use Ethernet cables to connect such DMPs to switches where the autoconfiguration (Auto Smartports) features of Medianet are enabled.
When you do, these switches recognize from the CDP announcements that the newly connected devices are DMPs.
After recognizing that a DMP is attached to one of its Ethernet ports, the switch can apply to this port a set of built-in configuration macros (Auto Smartports) that are optimized specifically for DMPs. By configuring so many settings automatically, Medianet can accelerate and simplify DMP mass deployments, QoS configuration, and asset tracking. In turn, these simplified deployments can lower your operating costs.
Information That Medianet and DMPs Exchange
Medianet and a DMP 4310G can exchange these types of data.
- name of the chassis
- system name
- system object
- hardware revision
- firmware revision
- software revision
- seial number
- manufacturing name
- model name
- asset identifier
- CDP timeout
- VLAN assignment
- switch port assignment
- switch name and model
- switch IP address
- loation string
If you would like to learn more about Medianet, see http://cisco.com/go/medianet.
Restrictions
- Ethernet connections take priority over Wi-Fi connections on DMPs where both are active.
- We do not support “open” Wi-Fi networks. They are a security risk.
- We do not support media streams to DMPs over Wi-Fi networks. The experience is poor.
- DMP 4305G endpoints do not support Wi-Fi.
- Autoregistration depends upon the Cisco TAC Troubleshooting Access option for DMPs and fails unless this option is enabled.
- When a DMP 4310G relies upon a Medianet switch where more than one VLAN uses DHCP, the DMP might come to use the wrong IP address. For this to occur, temporary conditions that do not sever the DMP's AC power connection must nonetheless interrupt its network connection through the switch. (Thus, this problem cannot possibly occur while the DMP uses PoE.) Specifically, the Medianet switch assigns its default VLAN to your DMP. But then — after your DMP’s network connection is interrupted and restored — your Medianet switch assigns to your DMP a dynamic IP address from another VLAN on your Medianet switch. This easily prevented mismatch disrupts centralized management of your DMP. To prevent this problem or to recover from it, you can download and run the patch from Cisco.com.
Procedures
- Activate Medianet Support
- Configure HTTP Proxy Server Settings for a DMP 4310G
- Configure HTTP Proxy Server Settings for a DMP 4400G or DMP 4305G
- Configure a Wireless Network Connection
- Prepare Your DMP to Use a Static IP Address Over Ethernet
- Assign a Static IP Address to a Wireless DMP 4400G
- Show the Assigned IP Address
Activate Medianet Support
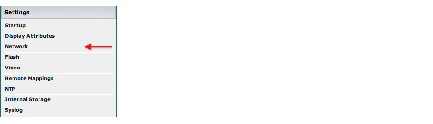
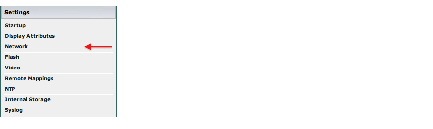
Step 1![]() Click Network in the Settings area.
Click Network in the Settings area.
Step 2![]() Choose On from the Medianet Enabled list in the Medianet Services area.
Choose On from the Medianet Enabled list in the Medianet Services area.

Step 3![]() Save this changed setting, and then restart your DMP.
Save this changed setting, and then restart your DMP.
Configure HTTP Proxy Server Settings for a DMP 4310G
Note ●![]() The only transport protocol that we can proxy in this release is HTTP over :80 or :8080.
The only transport protocol that we can proxy in this release is HTTP over :80 or :8080.
You can configure a DMP 4310G to use a proxy server and you can specify which of your content servers should be exempt from this proxy service.
Step 1![]() Click Network in the Settings area.
Click Network in the Settings area.
Step 2![]() Choose Enabled from the Use HTTP Proxy list.
Choose Enabled from the Use HTTP Proxy list.

Step 3![]() Three fields become editable.
Three fields become editable.
- To proxy the playback of video assets from an HTTP server, you must enter the routable IP address of your proxy server. Do not enter a hostname. Do not use any wildcards.
- To proxy the playback of SWF assets from an HTTP server, you can enter either the routable IP address or the FQDN (DNS-resolvable hostname) of your proxy server. Do not enter any wildcards.
Port — Enter either 80 or 8080. Do not enter any other value.
No Proxy List (IP addresses separated by commas)
- To bypass your proxy when you play video assets from particular HTTP servers, you must enter comma-separated IP addresses. These identify each content server that should be excluded from proxy. Nonetheless, we continue to proxy video playback from any other HTTP server. Do not enter any hostnames. Do not enter any wildcards.
- To bypass your proxy when you play SWF assets from particular HTTP servers, you can enter either comma-separated IP addresses or comma-separated FQDNs (DNS-resolvable hostnames). These identify each content server that should be excluded from proxy. Nonetheless, we continue to proxy video playback from any other HTTP server. Do not enter any wildcards.
Note![]() Proxy settings do not have any effect on RSS traffic. When an RSS request crosses from one Internet domain to another, your DMP is its own proxy.
Proxy settings do not have any effect on RSS traffic. When an RSS request crosses from one Internet domain to another, your DMP is its own proxy.
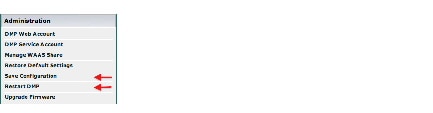
Step 5![]() Click Save Configuration in the Administration list, and then click Save.
Click Save Configuration in the Administration list, and then click Save.
Step 6![]() Click Restart DMP in the Administration list, and then click Restart.
Click Restart DMP in the Administration list, and then click Restart.
Configure HTTP Proxy Server Settings for a DMP 4400G or DMP 4305G
Note![]() The only transport protocol that we can proxy in this release is HTTP over :80 or :8080.
The only transport protocol that we can proxy in this release is HTTP over :80 or :8080.
You can configure a DMP 4400G or DMP 4305G to use a proxy server and you can specify which of your content servers should be exempt from this proxy service.
Step 1![]() Click Network in the Settings area.
Click Network in the Settings area.
Step 2![]() Choose Enabled from the Use HTTP Proxy list.
Choose Enabled from the Use HTTP Proxy list.
Step 3![]() Three fields become editable.
Three fields become editable.
- Proxy Server IP Address or Hostname — The routable IP address or the FQDN (DNS-resolvable hostname) of your proxy server. Do not enter any wildcards..
- Port — Enter either 80 or 8080. Do not enter any other value.
- No Proxy List — To bypass your proxy when you play assets from particular HTTP servers, you can enter either comma-separated IP addresses or comma-separated FQDNs (DNS-resolvable hostnames). These identify each content server that should be excluded from proxy. Nonetheless, we continue to proxy content from any other HTTP server. Do not enter any wildcards.
Note![]() Proxy settings do not have any effect on RSS traffic. When an RSS request crosses from one Internet domain to another, your DMP is its own proxy.
Proxy settings do not have any effect on RSS traffic. When an RSS request crosses from one Internet domain to another, your DMP is its own proxy.
Step 5![]() Click Save Configuration in the Administration list, and then click Save.
Click Save Configuration in the Administration list, and then click Save.
Step 6![]() Click Restart DMP in the Administration list, and then click Restart.
Click Restart DMP in the Administration list, and then click Restart.
Configure a Wireless Network Connection
Timesaver Complete this optional procedure at your discretion.
- Do the hardware and firmware for your DMP support wireless networking? DMP 4305G and DMP 4310G endpoints do not.
–![]() To verify whether you must use an Ethernet cable, see Table 2.
To verify whether you must use an Ethernet cable, see Table 2.
–![]() Alternatively, if Table 2 does not describe your DMP model, see its datasheet at http://cisco.com/go/dms/dmp/datasheets.
Alternatively, if Table 2 does not describe your DMP model, see its datasheet at http://cisco.com/go/dms/dmp/datasheets.
- The Broadcast SSID setting must be enabled on your wireless access points (also known as wireless routers or WLAN controllers). Otherwise, your DMPs cannot connect to your WLAN and are prevented from obtaining IP addresses.
- We do not support “open” wireless networks. They are a security risk.
- Does a security policy in your network restrict DHCP address assignments to known MAC addresses? If so, locate the WLAN address printed on a sticker that is affixed to your DMP. Then, share this address with your security policy administrator.
- Verify that your wireless network is working correctly, is available, and you understand how it authenticates connection requests.
- Connect Over Ethernet.
- Log in to DMPDM.
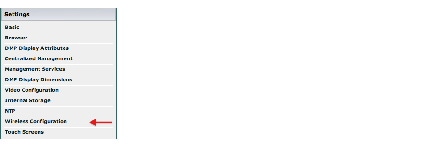
Step 1![]() Click Wireless Configuration in the Settings list.
Click Wireless Configuration in the Settings list.
Tip Do you see this option in DMPDM? If not, your DMP might not support it. But you can learn whether any firmware upgrade is available that adds this feature to your DMP model.
• See our release notes — http://cisco.com/go/dms/releasenotes.
• See our compatibility information — http://cisco.com/go/dms/compatibility.
If newer firmware is available, follow the published instructions to obtain it. Then, complete the firmware upgrade procedure in your DMPDM user guide at http://cisco.com/go/dms/dmpdm.
The nature of your Cisco DMS service contract might limit:
• Which upgrades are available to you.
• Where and how you obtain upgrades.
• Whether you must pay anything to obtain upgrades.
To learn about Cisco service contracts, see http://cisco.com/go/cscc.
Step 2![]() Choose Enabled from the Wireless Interface list.
Choose Enabled from the Wireless Interface list.
Each 802.11 wireless network is assigned a name to distinguish it from other networks. The technical term for this network name is Service Set Identifier, or SSID.
Step 3![]() Double-click the SSID for your network in the Detected Networks table.
Double-click the SSID for your network in the Detected Networks table.
When you do not see your SSID in the Detected Networks table, do the following.
a.![]() Enter in the Network SSID field the SSID for your network.
Enter in the Network SSID field the SSID for your network.
b.![]() Choose from the Security list the security method for your network. Its options are:
Choose from the Security list the security method for your network. Its options are:
The security method that you choose controls, in part, which fields and options this DMPDM page shows to you.
- When you see the PSK field and you chose a WEP-based security method, enter in it the key from which your 64-bit or 128-bit passphrase is cryptographically derived.
- When you see the PSK field and you chose a WPA-based or WPA-2-based security method, enter in it the pre-shared key for your network.
- When you see the Encryption list, choose from it either TKIP or CCMP AES.
- When you see the EAP list, choose from it either FAST, MD5, or PEAP (ver.0).
- When you see the Username and Password fields, enter in them respectively a valid username for your wireless network and the password for that username.
c.![]() Choose Enabled from the Dynamic IP Addressing (DHCP) list.
Choose Enabled from the Dynamic IP Addressing (DHCP) list.
Tip Will you ever deploy your DMP in a wireless network that does not have any DHCP server? If so, you can configure your DMP to use a static IP address.
d.![]() (Optional) Click Probe to check whether these settings work correctly with your wireless network.
(Optional) Click Probe to check whether these settings work correctly with your wireless network.
e.![]() When you are satisfied with your choices, Click Select.
When you are satisfied with your choices, Click Select.
f.![]() Click Save Configuration in the Administration list, and then click Save.
Click Save Configuration in the Administration list, and then click Save.
Step 4![]() Disconnect the Ethernet cable from your DMP.
Disconnect the Ethernet cable from your DMP.
Step 5![]() Click Restart DMP in the Administration list, and then click Restart.
Click Restart DMP in the Administration list, and then click Restart.
Step 6![]() Stop. You have completed this procedure.
Stop. You have completed this procedure.
Prepare Your DMP to Use a Static IP Address Over Ethernet
Timesaver Complete this optional procedure at your discretion. It explains what to do when a DMP’s ultimate deployment site does not use DHCP.
- Connect Over Ethernet.
OR
Obtain an Ethernet crossover cable. - Do one of the following.
–![]() Transport your DMP to a site where the local network segment includes a DHCP server and ensure that you have access there to a web browser.
Transport your DMP to a site where the local network segment includes a DHCP server and ensure that you have access there to a web browser.
–![]() Configure any system at your current location to run temporarily as a DHCP server and ensure that you have access to a web browser.
Configure any system at your current location to run temporarily as a DHCP server and ensure that you have access to a web browser.
Step 1![]() Connect your DMP to its presentation system.
Connect your DMP to its presentation system.
Step 2![]() Turn On the presentation system
Turn On the presentation system![]() and then do one of the following.
and then do one of the following.
- Use a standard, category 5 (RJ-45) Ethernet cable — either 10/100 or 10/100/1000, depending on your DMP model — to connect your DMP to the network segment that includes the DHCP server.
- Use an Ethernet crossover cable to connect your DMP directly to the DHCP server.
Step 3![]() If the DHCP server process is not running yet on the DHCP server, start that process now — along with any processes that it uses.
If the DHCP server process is not running yet on the DHCP server, start that process now — along with any processes that it uses.
Step 4![]() Turn On your DMP and make a note of the IP address that it shows on its presentation system
Turn On your DMP and make a note of the IP address that it shows on its presentation system![]() .
.
Step 5![]() Point your browser to the IP address.
Point your browser to the IP address.
Note![]() Is your DMP brand-new? Or, have its settings been restored to factory defaults? If so, DMPDM prompts you to define a master password for your DMP. You must do this before you can do anything else. See the “Log in to DMPDM” section.
Is your DMP brand-new? Or, have its settings been restored to factory defaults? If so, DMPDM prompts you to define a master password for your DMP. You must do this before you can do anything else. See the “Log in to DMPDM” section.
Step 6![]() When prompted to log in, use the master username and password that you defined.
When prompted to log in, use the master username and password that you defined.
DMPDM loads its basic settings page in your browser.
Step 7![]() Choose Disabled from the Dynamic IP Addressing (DHCP) list, and then:
Choose Disabled from the Dynamic IP Addressing (DHCP) list, and then:
a.![]() Enter in the IP Address field the static IP address that your DMP should use.
Enter in the IP Address field the static IP address that your DMP should use.
b.![]() Enter in the Subnet Mask field the netmask that your DMP should use with its static IP address.
Enter in the Subnet Mask field the netmask that your DMP should use with its static IP address.
c.![]() Enter in the Default Gateway field the network gateway that your DMP should use with its static IP address.
Enter in the Default Gateway field the network gateway that your DMP should use with its static IP address.
d.![]() Enter in the Primary DNS Server field the DNS server that your DMP should use with its static IP address.
Enter in the Primary DNS Server field the DNS server that your DMP should use with its static IP address.
Step 8![]() (Optional) Will a network address translation (NAT) service give your DMP a private IP address? If so:
(Optional) Will a network address translation (NAT) service give your DMP a private IP address? If so:
a.![]() Choose Yes from the Using NAT list.
Choose Yes from the Using NAT list.
b.![]() Enter in the NAT IP Address field the 1-to-1 public address (which is configured on the local router) that corresponds to the private IP address.
Enter in the NAT IP Address field the 1-to-1 public address (which is configured on the local router) that corresponds to the private IP address.
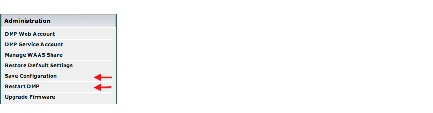
Step 10![]() Click Save Configuration in the Administration list, and then click Save.
Click Save Configuration in the Administration list, and then click Save.
Step 11![]() Click Restart DMP in the Administration list, and then click Restart.
Click Restart DMP in the Administration list, and then click Restart.
Step 12![]() Ship or deliver the DMP to its deployment site, and then:
Ship or deliver the DMP to its deployment site, and then:
a.![]() Connect it to its presentation system.
Connect it to its presentation system.
b.![]() Connect it to its local network segment.
Connect it to its local network segment.
c.![]() Connect it to its power source.
Connect it to its power source.
Step 13![]() Stop. You have completed this procedure.
Stop. You have completed this procedure.
Assign a Static IP Address to a Wireless DMP 4400G
Step 1![]() Log in to your wireless access point as an administrator.
Log in to your wireless access point as an administrator.
Step 2![]() Use its administrative features to assign a static IP address to your DMP.
Use its administrative features to assign a static IP address to your DMP.
Step 3![]() Stop. You have completed this procedure.
Stop. You have completed this procedure.
Show the Assigned IP Address
- If you have not yet obtained an IP address for your DMP, see the quick start guide for your DMP model type to learn how to connect and set up your DMP.
Step 1![]() Click
Click  to learn the IP address of your DMP.
The address is briefly visible on your DMP display.
Step 2![]() Stop. You have completed this procedure.
Stop. You have completed this procedure.
Reference
Network Settings Reference
UI Reference: Elements to Define Basic Network Settings
FAQs and Troubleshooting
DMP Network Connectivity
Q. What prevents me from centrally managing my DMP?
- Has your DHCP server changed the IP address assignment for your DMP?
- Was your DMP running when its address changed?
If these statements are true, do not wait for your DMP to restart automatically. Instead, restart it manually. Until it is restarted, it cannot be centrally managed.
 Feedback