- Preface
- New and Changed Information for this Release
- Overview
- Installing Cisco UCS Director Baremetal Agent
- Configuring Cisco UCS Director Baremetal Agent
- Adding and Configuring PXE Boot Requests
- Orchestration Workflow Tasks for PXE Boot
- Adding Windows Operating System Images
- Manual Setup of Operating System Images
- Sample Operating System Configuration Template Files
- Ports
- About the Network Configuration Options
- Single Network for Management and PXE
- Separate Networks for Management and PXE
- Configuring Cisco UCS Director Baremetal Agent
- Configuring the DHCP Server for a Baremetal Agent Account
- Starting and Stopping Baremetal Agent Services
- Configuring the Interface for the PXE Network
- Changing the Default Baremetal Agent Account
- Changing the Default Samba User Password
- Viewing the Logs for a Baremetal Agent Account
- Viewing the DHCP Logs for a Baremetal Agent Account
Configuring Cisco
UCS Director Baremetal Agent
This chapter contains the following sections:
- About the Network Configuration Options
- Single Network for Management and PXE
- Separate Networks for Management and PXE
- Configuring Cisco UCS Director Baremetal Agent
- Configuring the DHCP Server for a Baremetal Agent Account
- Starting and Stopping Baremetal Agent Services
- Configuring the Interface for the PXE Network
- Changing the Default Baremetal Agent Account
- Changing the Default Samba User Password
- Viewing the Logs for a Baremetal Agent Account
- Viewing the DHCP Logs for a Baremetal Agent Account
About the Network Configuration Options
You can choose between the following network configuration options for Cisco UCS Director Baremetal Agent:
-
Single network for management and Preboot Execution Environment (PXE)
-
Separate networks for management and PXE
Choose the network configuration option that best meets the requirements of your environment.
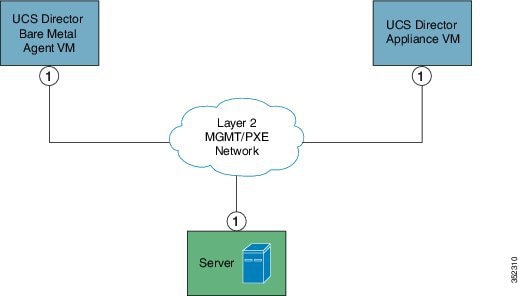
Single Network for Management and PXE
We recommend that you choose this network configuration option if your environment permits the following to be hosted on the same network interface and Layer 2 network (see the following figure):
-
Services provided by Baremetal Agent, such as DHCP, TFTP, and HTTP
-
Management traffic between Baremetal Agent and Cisco UCS Director or other devices and appliances
Prerequisites and Assumptions for a Single Network Configuration
If you plan to configure Baremetal Agent with a single network configuration, ensure that your environment meets the following prerequisites:
-
Cisco UCS Director has been installed and the network interface configured, as described in the appropriate Cisco UCS Director installation guide.
-
Cisco UCS Director is reachable through a web browser and you can log in.
-
Baremetal Agent has been installed, as described in the Cisco UCS Director Baremetal Agent Installation and Configuration Guide, and no additional configuration has been performed.
-
The required single Management and PXE VLAN is provisioned and available as a virtual port group or port profile that virtual machines (VMs) can be attached to or leverage.
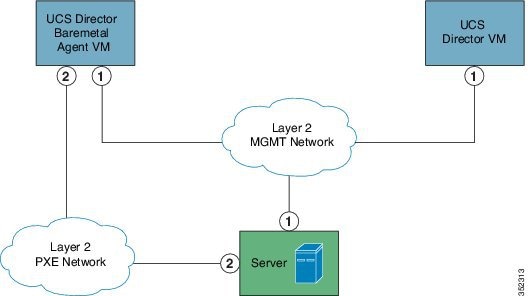
Separate Networks for Management and PXE
We recommend that you choose this network configuration option if your environment does not permit the following to be hosted on the same network interface and Layer 2 network (see the following figure):
-
On the PXE network, services provided by Baremetal Agent, such as DHCP, TFTP, and HTTP
-
On the Management network, traffic between Baremetal Agent and Cisco UCS Director or other devices and appliances
Prerequisites and Assumptions for a Separate Network Configuration
If you plan to configure Baremetal Agent with a separate network configuration, make sure that your environment meets the following prerequisites:
-
Cisco UCS Director has been installed and the network interface configured, as described in the appropriate Cisco UCS Director installation guide.
-
Cisco UCS Director Baremetal Agent is reachable through a web browser and you can log in.
-
Baremetal Agent has been installed, and no additional configuration has been performed.
-
The following networks are provisioned and available as a virtual port group or port profile that VMs can be attached to or leverage:
Configuring Cisco UCS Director Baremetal Agent
Before you configure Cisco UCS Director Baremetal Agent, do the following:
-
Make sure that the Baremetal Agent is installed.
-
Make sure that the Baremetal Agent VM is completely booted up, and that the VM Console is closed. You must have the IP address of the Baremetal Agent VM.
-
Set up the environment required to support a single or separate PXE and Management network configuration, with the appropriate VLANs.
-
To provide required DHCP services, ensure that at least one DHCP server is located in the same PXE VLAN as Baremetal Agent and configure that DHCP server with an appropriate IP address range.
What to Do Next
Configure the DHCP Server for Baremetal Agent.
Configuring the DHCP Server for a Baremetal Agent Account
 Note | For a multi-home DHCP configuration, use this procedure to configure the first subnet for the DHCP server. For the remaining subnets, you must manually edit the DHCP configuration file (/etc/dhcpd.conf). |
To provide required DHCP services, ensure that at least one DHCP server is located in the same PXE VLAN as Baremetal Agent. Configure the DHCP server with an appropriate IP address range. The DHCP server, together with the TFTP server, is used to communicate with a PXE server.
| Step 1 | On the menu bar, choose . |
| Step 2 | Click the Bare Metal Agents tab. |
| Step 3 | Click the row for the Baremetal Agent account for which you want to configure the DHCP server. |
| Step 4 | Click Service Status to verify that services for the Baremetal Agent account are stopped. |
| Step 5 | Click Configure DHCP. |
| Step 6 | In the
Configure DHCP dialog box, complete the following
fields and click
Submit.
The DHCP IP address assignments are updated, and the DHCP service is restarted. |
| Step 7 | Click the row for the Baremetal Agent account and click Start Services. |
| Step 8 | After the
services have started, do the following:
|
What to Do Next
Set up PXE boot requests.
Viewing the DHCP Configuration for a Baremetal Agent Account
| Step 1 | On the menu bar, choose . |
| Step 2 | Click the Bare Metal Agents tab. |
| Step 3 | Click the row for the Baremetal Agent account for which you want to view the DHCP configuration. |
| Step 4 | Click
View DHCP Configuration.
You might need to click the Down arrow at the end of the button bar to access the View DHCP Configuration option. The View DHCP Server Configuration window displays the contents of the DHCP server configuration file for the account. |
Starting and Stopping Baremetal Agent Services
| Step 1 | On the menu bar, choose . |
| Step 2 | Click the Bare Metal Agents tab. |
| Step 3 | Click the row for the Baremetal Agent account whose services you want to start or stop. |
| Step 4 | Click one of the following: |
| Step 5 | Click
Service
Status and check the status displayed in the
Enabled
Services column to ensure that services have started or stopped as
desired.
If services do not start, check the status displayed in the Enabled Services column. If this status indicates that services are not enabled, verify the configuration of your DHCP server and try again. |
Configuring the Interface for the PXE Network
You can use this to change or add an IP address for the PXE network used by Baremetal Agent.
| Step 1 | On the menu bar, choose . |
| Step 2 | Click the Bare Metal Agents tab. |
| Step 3 | Click the row for the Baremetal Agent account for which you want to configure the interface for the PXE network. |
| Step 4 | Click Configure Interface. |
| Step 5 | In the Configure PXE Interface dialog box, complete the following fields: |
Changing the Default Baremetal Agent Account
The first Baremetal Agent account that you create is designated as the default account. This account is used by default in legacy workflows. To use a different account in the legacy workflows, you must designate that Baremetal Agent account as the default.
Changing the Default Samba User Password
A fresh installation of Baremetal Agent comes with a default Samba user. To change the default Samba password, use the changePasswdSmb.sh shell script.
| Step 1 | Log on to the Shell Admin using the root password. |
| Step 2 | Navigate to the /opt/infra/ directory. |
| Step 3 | Run the shell script, changePasswdSmb.sh. |
| Step 4 | Provide a new
password at the
Enter
samba password for smbuser: prompt.
Example: [root@localhost infra]# [root@localhost infra]# [root@localhost infra]# [root@localhost infra]# ./changePasswdSmb.sh Enter samba password for smbuser: |
Viewing the Logs for a Baremetal Agent Account
| Step 1 | On the menu bar, choose . |
| Step 2 | Click the Bare Metal Agents tab. |
| Step 3 | Click the row for the Baremetal Agent account for which you want to view the logs. |
| Step 4 | Click
View Baremetal Agent Logs.
You might need to click the Down arrow at the end of the button bar to access the View Baremetal Agent Logs option. The View Baremetal Agent Log window displays the logs for the account. |
Viewing the DHCP Logs for a Baremetal Agent Account
| Step 1 | On the menu bar, choose . |
| Step 2 | Click the Bare Metal Agents tab. |
| Step 3 | Click the row for the Baremetal Agent account for which you want to view the DHCP logs. |
| Step 4 | Click
View DHCP Logs.
You might need to click the Down arrow at the end of the button bar to access the View DHCP Logs option. The View Baremetal Agent DHCP Log window displays the contents of the DHCP server logs for the account. |
 Feedback