- Preface
- New and Changed Information for this Release
- Overview
- Installing Cisco UCS Director Baremetal Agent
- Configuring Cisco UCS Director Baremetal Agent
- Adding and Configuring PXE Boot Requests
- Orchestration Workflow Tasks for PXE Boot
- Adding Windows Operating System Images
- Manual Setup of Operating System Images
- Sample Operating System Configuration Template Files
- Ports
- Windows Operating Systems Images for Cisco UCS Director Baremetal Agent
- Guidelines and Limitations for Windows Operating System Images
- Determining the Windows OS Flavor Name
- Windows Server 2008 R2 x64 Operating System Images
- Prerequisites for Setting Up Windows Server 2008 R2 x64 Operating System Images
- Creating a Customized WinPE
- Creating a Boot Configuration Data File
- Verifying the Version of the Windows Installation Files
- Customizing and Copying the WinPE.wim and PXE Boot Files
- Copying the Windows Installation Files to the Server Folder Path
- Windows Server 2012 x64 and 2012 R2 x64 Operating System Images
- Prerequisites for Setting Up Windows Server 2012 x64 and 2012 R2 x64 Operating System Images
- Creating a Custom WinPE and Copying the PXE Supported Files for Windows 2012
- Creating a Custom WinPE and Copying the PXE Supported Files for Windows 2012 R2
- Installing and Setting Up the Boot Configuration Data File
- Copying the Windows Installation Files to the Server Folder
- Simultaneous Deployment of Windows Server Operating Systems
Adding Windows
Operating System Images
This chapter contains the following sections:
- Windows Operating Systems Images for Cisco UCS Director Baremetal Agent
- Guidelines and Limitations for Windows Operating System Images
- Determining the Windows OS Flavor Name
- Windows Server 2008 R2 x64 Operating System Images
- Windows Server 2012 x64 and 2012 R2 x64 Operating System Images
- Simultaneous Deployment of Windows Server Operating Systems
Windows Operating Systems Images for Cisco UCS Director Baremetal Agent
After installing and adding Baremetal Agent to UCS Director, and running inventory, UCS Director shows as if Windows images are added by default. But no Windows images are added. Install Windows images manually, as discussed in the "Adding Windows Operating System Images" appendix.
Cisco UCS Director Baremetal Agent (Baremetal Agent) supports the following Windows operating system (OS) images and the automated creation of their required answer files:
You can set up all three OS images in Baremetal Agent. However, a single Baremetal Agent cannot simultaneously provision more than one version of the Windows OS. For example, you can use a single Baremetal Agent to simultaneously provision several servers with Windows Server 2012 R2, but you cannot use the same Baremetal Agent to simultaneously provision both Windows Server 2008 R2 and Windows Server 2012 R2.
You can use the same answer file for local boot and SAN boot.
The steps for setting up a Windows OS image depend upon the operating system. Make sure you use the appropriate procedure for the OS image that you are setting up.
Guidelines and Limitations for Windows Operating System Images
Consider the following guidelines and limitations when you set up Windows Server OS images for provisioning:
Follow a Strict Naming Convention
You must follow a strict naming convention when you configure the files for Windows OS images. The paths and file names are case sensitive.
 Note | Mistakes in naming will require you to modify the names throughout the Baremetal Agent data infrastructure. |
Ensure That File Names, Drive Letters, and Other Information Match in All Files
If you use the automatically generated answer file, Baremetal Agent ensures that the file names, drive letters and other information match.
However, if you manually edit the answer file, you must ensure that the drive letter in the WinPE.wim matches the drive letter provided in the answer file. With this configuration you are defining WinPE.wim such that it installs Windows from a particular location by using an answer file setup option. The static names, paths, IP addresses, drive letters, answer file name, and user name credentials must be correct.
File and folder names are case sensitive: WinPE.wim names must exactly match entries in the Boot Configuration Data (BCD) store.
Use Single Path Workflow for SAN Boot
Note | Because the Windows installation does not support multi-path SAN boot, you must use the single path workflow to achieve SAN boot. |
Determining the Windows OS Flavor Name
The flavor name is required for successful PXE boot of a Windows Server image. You must enter the exact character string used by Windows PE (WinPE). This string is case sensitive. The OS flavor name follows a consistent naming convention. Some examples of OS flavor names are as follows:
Windows Server 2008 R2 SERVERSTANDARD
Windows Server 2008 R2 SERVERSTANDARDCORE
Windows Server 2008 R2 SERVERENTERPRISE
Windows Server 2008 R2 SERVERENTERPRISECORE
Windows Server 2008 R2 SERVERDATACENTER
Windows Server 2008 R2 SERVERDATACENTERCORE
Windows Server 2008 R2 SERVERWEB
Windows Server 2008 R2 SERVERWEBCORE
Windows Server 2012 SERVERSTANDARD
Windows Server 2012 SERVERSTANDARDCORE
Windows Server 2012 R2 SERVERSTANDARD
Windows Server 2012 R2 SERVERSTANDARDCORE
Windows Server 2012 R2 SERVERDATACENTER
Windows Server 2012 R2 SERVERDATACENTERCORE
Windows Server 2008 R2 x64 Operating System Images
The Windows Server 2008 R2 x64 OS (Windows 2008 OS) supports PXE boot and installation operations. You can use this OS image in baremetal provisioning workflows.
- Prerequisites for Setting Up Windows Server 2008 R2 x64 Operating System Images
- Creating a Customized WinPE
- Creating a Boot Configuration Data File
- Verifying the Version of the Windows Installation Files
- Customizing and Copying the WinPE.wim and PXE Boot Files
- Copying the Windows Installation Files to the Server Folder Path
Prerequisites for Setting Up Windows Server 2008 R2 x64 Operating System Images
To install and set up the environment and files that are required for the setup of Windows Server 2008 R2 x64 OS images, you must first download the following:
-
Windows Automated Installation Kit (AIK, sometimes called WAIK). See http://www.microsoft.com/en-us/download/details.aspx?id=5188. This website enables you to generate a customized WinPE. It also supplies an answer file template in its most fundamental form.
-
Windows Server 2008 R2 x64 ISO version.
Note | You do not need to manually create a Windows answer file when setting up Windows OS images. Baremetal Agent builds the Windows answer file necessary to support your PXE Boot request, based on the information you provide when you create the PXE boot request. |
Before you can install the Windows 2008 operating system image in the /opt/cnsaroot/Boot directory of the Baremetal Agent VM, you must install and set up the following prerequisites:
-
A customized Windows Preinstallation Environment (WinPE)
-
Boot Configuration Data (BCD) file
-
Windows installation files (the files extracted from the ISO)
 Tip | We recommend that you use the ISO download file, which contains all editions, including Standard, Enterprise, Datacenter, and Web. You can typically remove all editions except for Standard and Datacenter. |
After the system image is in place, you must do the following:
Creating a Customized WinPE
You need to create and customize the Windows Preinstallation Environment (WinPE) for Windows 2008 R2 x64. The initial WinPE includes the minimum boot image necessary to load kernel and default device drivers supported by the Windows OS. Most servers require additional drivers, such as storage controller drivers that enable Windows to detect disks during installation. You must add these drivers into WinPE.wim.
You use Deployment Image Servicing and Management (DISM.exe), which is installed with WAIK tools, to add the drivers to WinPE. Make sure that you download the required drivers before you execute the associated DISM commands.
The following procedure includes sample data that is for reference only. The sample data might not work in your applications. For information about adding drivers to WinPE through DISM.exe, see the documentation provided by Microsoft.
Complete the prerequisites listed in Prerequisites for Setting Up Windows Server 2008 R2 x64 Operating System Images.
Download the following:
What to Do Next
Create a Boot Configuration Data (BCD) store to hold the boot configuration parameters.
Creating a Boot Configuration Data File
The Boot Configuration Data (BCD) file contains the boot configuration parameters. It controls how the operating system is started in Windows and is used to load the base kernel (WinPE.wim) from the PXE server. You do not need to create a BCD file. Baremetal Agent provides a BCD file with default paths that you can use. The BCD file can be used by any Windows OS version, if you have not changed the basic settings.
By default, the BCD file points to the /Boot/WinPE.wim and boot.sdi files. These filenames are case sensitive.
Note | We recommend that you use a set of standard names for Baremetal Agent configuration purposes. The folder name should be Boot. The winpe file name should be WinPE.wim. Use corresponding filenames such as boot.sdi. The created BCD file should be in uppercase, and this file will not have any file extension. Baremetal Agent delivers the BCD file to /opt/cnsaroot/Boot, which contains a default path pointing to /opt/cnsaroot/Boot/WinPE.wim. |
What to Do Next
Verify that you have the correct download version of the Windows installation files extracted from the ISO version.
Verifying the Version of the Windows Installation Files
You use the Windows 2008 ISO version of the Windows installation files to set up the answer file template. This version of the Windows installation files supports all editions of Windows 2008 OS. Otherwise, you have to use the Windows AIK tools to create the entire answer file, which is a more complicated and labor-intensive task.
Install the ISO version of Windows 2008 R2 OS.
If the WinPE.wim file does not point to the Baremetal Agent IP address in the startnet.cmd file, then you must edit the WinPE.wim file as described in Customizing and Copying the WinPE.wim and PXE Boot Files.
Customizing and Copying the WinPE.wim and PXE Boot Files
| Step 1 | Mount WinPE.wim to a folder. | ||
| Step 2 | Edit
WinPE.wim so that it includes the correct
Baremetal Agent
IP address.
See the following example. Your filenames may differ. DISM.exe /mount-wim /wimfile:c:\win2k8r2x64\WinPE.wim /index:1 /mountdir:c:\win2k8r2x64\mount | ||
| Step 3 | In
WinPE.wim, add the required PowerShell packages and
edit the paths in each command with the correct mount point and ADK
installation path for your environment.
Dism /Add-Package /Image:"C:\win2k8r2x64\mount" /PackagePath:"C:\Program Files\Windows Kits\8.1\Assessment and Deployment Kit\Windows Preinstallation Environment\amd64\WinPE_OCs\WinPE-WMI.cab" Dism /Add-Package /Image:"C:\win2k8r2x64\mount" /PackagePath:"C:\Program Files\Windows Kits\8.1\Assessment and Deployment Kit\Windows Preinstallation Environment\amd64\WinPE_OCs\en-us\WinPE-WMI_en-us.cab" Dism /Add-Package /Image:"C:\win2k8r2x64\mount" /PackagePath:"C:\Program Files\Windows Kits\8.1\Assessment and Deployment Kit\Windows Preinstallation Environment\amd64\WinPE_OCs\WinPE-NetFX.cab" Dism /Add-Package /Image:"C:\win2k8r2x64\mount" /PackagePath:"C:\Program Files\Windows Kits\8.1\Assessment and Deployment Kit\Windows Preinstallation Environment\amd64\WinPE_OCs\en-us\WinPE-NetFX_en-us.cab" Dism /Add-Package /Image:"C:\win2k8r2x64\mount" /PackagePath:"C:\Program Files\Windows Kits\8.1\Assessment and Deployment Kit\Windows Preinstallation Environment\amd64\WinPE_OCs\WinPE-Scripting.cab" Dism /Add-Package /Image:"C:\win2k8r2x64\mount" /PackagePath:"C:\Program Files\Windows Kits\8.1\Assessment and Deployment Kit\Windows Preinstallation Environment\amd64\WinPE_OCs\en-us\WinPE-Scripting_en-us.cab" Dism /Add-Package /Image:"C:\win2k8r2x64\mount" /PackagePath:"C:\Program Files\Windows Kits\8.1\Assessment and Deployment Kit\Windows Preinstallation Environment\amd64\WinPE_OCs\WinPE-PowerShell.cab" Dism /Add-Package /Image:"C:\win2k8r2x64\mount" /PackagePath:"C:\Program Files\Windows Kits\8.1\Assessment and Deployment Kit\Windows Preinstallation Environment\amd64\WinPE_OCs\en-us\WinPE-PowerShell_en-us.cab" Dism /Add-Package /Image:"C:\win2k8r2x64\mount" /PackagePath:"C:\Program Files\Windows Kits\8.1\Assessment and Deployment Kit\Windows Preinstallation Environment\amd64\WinPE_OCs\WinPE-StorageWMI.cab" Dism /Add-Package /Image:"C:\win2k8r2x64\mount" /PackagePath:"C:\Program Files\Windows Kits\8.1\Assessment and Deployment Kit\Windows Preinstallation Environment\amd64\WinPE_OCs\en-us\WinPE-StorageWMI_en-us.cab" Dism /Add-Package /Image:"C:\win2k8r2x64\mount" /PackagePath:"C:\Program Files\Windows Kits\8.1\Assessment and Deployment Kit\Windows Preinstallation Environment\amd64\WinPE_OCs\WinPE-DismCmdlets.cab" Dism /Add-Package /Image:"C:\win2k8r2x64\mount" /PackagePath:"C:\Program Files\Windows Kits\8.1\Assessment and Deployment Kit\Windows Preinstallation Environment\amd64\WinPE_OCs\en-us\WinPE-DismCmdlets_en-us.cab" | ||
| Step 4 | Navigate to the mount folder (c:\win2k8r2x64\mount in the code example above) and verify that you can see the data inside the mount folder. | ||
| Step 5 | Navigate to
\windows\system32 in the mount folder and do the
following:
wpeinit wpeutil.exe InitializeNetwork wpeutil.exe disablefirewall ECHO OFF net use R: \\Baremetal_Agent_PXE_IP_Address\bits /user:user_id password ECHO ON R: @echo Powershell.exe -NonInteractive -NoLogo -ExecutionPolicy bypass -command R:\enroute.ps1 | ||
| Step 6 | Save the startnet.cmd file. | ||
| Step 7 | Copy all files
that support the PXE boot from the mount folder to the
Baremetal Agent
VM, as follows:
| ||
| Step 8 | After you have
confirmed that the
startnet.cmd is updated correctly, unmount
WinPE.wim with the DISM Unmount command and use the
/commit option
to save the modified
startnet.cmd file.
DISM.exe /Unmount-Wim /Mountdir:c:\win2k8r2x64\mount /commit
| ||
| Step 9 | Copy WinPE.wim to the opt/cnsaroot/Boot directory in the Baremetal Agent VM. |
What to Do Next
Copy the Windows installation files to the server folder path.
Copying the Windows Installation Files to the Server Folder Path
You must have the following in place:
-
Customized WinPE.wim and PXE boot files in the opt/cnsaroot/Boot directory in the Baremetal Agent VM.
-
Configured BCD file in the /opt/cnsaroot/Boot directory in the Baremetal Agent VM.
-
Windows installation files (ISO version)
-
The setup.exe file from the extracted ISO in the /samba/Win2k8R2x64 folder.
-
Baremetal Agent directories, completed .cfg files and a .remap file.
Windows Server 2012 x64 and 2012 R2 x64 Operating System Images
Note | If you need to support both Windows 2012 and 2012 R2, you must perform the image setup process twice, once for each OS. Although it is possible to set up a single WinPE file that supports multiple Windows OS versions, we recommend that you set up a separate WinPE file for each OS. |
- Prerequisites for Setting Up Windows Server 2012 x64 and 2012 R2 x64 Operating System Images
- Creating a Custom WinPE and Copying the PXE Supported Files for Windows 2012
- Creating a Custom WinPE and Copying the PXE Supported Files for Windows 2012 R2
- Installing and Setting Up the Boot Configuration Data File
- Copying the Windows Installation Files to the Server Folder
Prerequisites for Setting Up Windows Server 2012 x64 and 2012 R2 x64 Operating System Images
Before you can install a Windows 2012 or 2012 R2 OS image in the /opt/cnsaroot/Boot directory of the Baremetal Agent VM, you must install and set up the following prerequisites:
- Windows Assessment and Deployment Kit (Windows ADK, version 8.0 or later recommended, depending on the Windows version compatibilities with respect to the WinPE.wim file)
-
A customized Windows Preinstallation Environment (WinPE.wim) and PXE supporting files
-
Boot Configuration Data (BCD) file
-
Windows installation files (the files extracted from the ISO)
Note | You do not need to manually create a Windows answer file when setting up Windows OS images. Baremetal Agent builds the Windows answer file necessary to support your PXE Boot request, based on the information you provide when you create the PXE boot request. |
To install and set up the images, you will first need to download the following:
-
Windows Assessment and Deployment Kit that supports Windows Server 2012 and Windows Server 2012 R2. For more information, see http://technet.microsoft.com/en-us/library/dn613859.aspx.
-
Windows Server 2012 x64 and/or 2012 R2 x64 (Standard and Datacenter editions are required).
Tip | We recommend that you use the ISO download file, which contains all editions, including Standard, Enterprise, Datacenter, and Web. You can typically remove all editions except for Standard and Datacenter. |
After the system image is in place, you must perform additional procedures:
Creating a Custom WinPE and Copying the PXE Supported Files for Windows 2012
Note | The /opt/cnsaroot/Boot folder is static, and each Baremetal Agent can have only one boot folder. |
Complete the prerequisites listed in Prerequisites for Setting Up Windows Server 2012 x64 and 2012 R2 x64 Operating System Images.
| Step 1 | Download an
ADK version that supports Windows 2012 and install it on a Windows 2012
machine.
| ||
| Step 2 | Navigate to
the Windows Pre-installation Environment folder in the ADK tools and execute
copype.cmd to
create the files that WinPE requires.
Copype.cmd amd64 C:\WinPE_amd64 The target directory contains the WinPE.wim file. The latest ADK versions create a boot.vim file, which needs to be renamed to WinPE.wim. | ||
| Step 3 | In the Windows machine that has the ADK tools installed, create a directory. Copy the WinPE.wim file from /opt/cnsaroot/Boot to the directory you have created. | ||
| Step 4 | At the command line, navigate to the ADK installed folder. | ||
| Step 5 | Add the
drivers from their folder locations to the WinPE image.
Use the following DISM.exe command when you know the paths to the drivers that you want to add. // The DISM.exe command mounts the WinPE to a folder. // In this example, the c:\win2k12x64 directory and the \mount subdirectory have been created before running the command. DISM.exe /mount-wim /wimfile:c:\win2k12x64\WinPE.wim /index:1 /mountdir:c:\win2k12x64\mount // To add individual driver files to WinPE image, use the following format. DISM.exe /image:c:\win2k12x64\mount /Add-Driver /driver:C:\test\drivers\1.inf /driver:C:\test\drivers\2.inf /driver:C:\test\drivers\3.inf Use the following DISM.exe command when you do not know the paths to the drivers that you want to add and need to query all subfolders. // The DISM.exe command mounts the WinPE to a folder. // In this example, the c:\win2k12x64 directory and the \mount subdirectory have been created before running the command. DISM.exe /mount-wim /wimfile:c:\win2k12x64\WinPE.wim /index:1 /mountdir:c:\win2k12x64\mount // To add individual driver files to WinPE image, use the following format. DISM.exe /image:c:\win2k12x64\mount /Add-Driver /driver:c:\test\drivers /Recurse | ||
| Step 6 | Mount WinPE.wim to a folder. | ||
| Step 7 | In
WinPE.wim, add the required PowerShell packages and
edit the paths in each command with the correct mount point and ADK
installation path for your environment.
\\ Sample PowerShell package files. \\ The PowerShell packages and file names that you need to add to WinPE.wim vary depending on the version of Windows and WinPE.wim. Dism /Add-Package /Image:"C:\win2k12x64\mount" /PackagePath:"C:\Program Files\Windows Kits\8.1\Assessment and Deployment Kit\Windows Preinstallation Environment\amd64\WinPE_OCs\WinPE-WMI.cab" Dism /Add-Package /Image:"C:\win2k12x64\mount" /PackagePath:"C:\Program Files\Windows Kits\8.1\Assessment and Deployment Kit\Windows Preinstallation Environment\amd64\WinPE_OCs\en-us\WinPE-WMI_en-us.cab" Dism /Add-Package /Image:"C:\win2k12x64\mount" /PackagePath:"C:\Program Files\Windows Kits\8.1\Assessment and Deployment Kit\Windows Preinstallation Environment\amd64\WinPE_OCs\WinPE-NetFX.cab" Dism /Add-Package /Image:"C:\win2k12x64\mount" /PackagePath:"C:\Program Files\Windows Kits\8.1\Assessment and Deployment Kit\Windows Preinstallation Environment\amd64\WinPE_OCs\en-us\WinPE-NetFX_en-us.cab" Dism /Add-Package /Image:"C:\win2k12x64\mount" /PackagePath:"C:\Program Files\Windows Kits\8.1\Assessment and Deployment Kit\Windows Preinstallation Environment\amd64\WinPE_OCs\WinPE-Scripting.cab" Dism /Add-Package /Image:"C:\win2k12x64\mount" /PackagePath:"C:\Program Files\Windows Kits\8.1\Assessment and Deployment Kit\Windows Preinstallation Environment\amd64\WinPE_OCs\en-us\WinPE-Scripting_en-us.cab" Dism /Add-Package /Image:"C:\win2k12x64\mount" /PackagePath:"C:\Program Files\Windows Kits\8.1\Assessment and Deployment Kit\Windows Preinstallation Environment\amd64\WinPE_OCs\WinPE-PowerShell.cab" Dism /Add-Package /Image:"C:\win2k12x64\mount" /PackagePath:"C:\Program Files\Windows Kits\8.1\Assessment and Deployment Kit\Windows Preinstallation Environment\amd64\WinPE_OCs\en-us\WinPE-PowerShell_en-us.cab" Dism /Add-Package /Image:"C:\win2k12x64\mount" /PackagePath:"C:\Program Files\Windows Kits\8.1\Assessment and Deployment Kit\Windows Preinstallation Environment\amd64\WinPE_OCs\WinPE-StorageWMI.cab" Dism /Add-Package /Image:"C:\win2k12x64\mount" /PackagePath:"C:\Program Files\Windows Kits\8.1\Assessment and Deployment Kit\Windows Preinstallation Environment\amd64\WinPE_OCs\en-us\WinPE-StorageWMI_en-us.cab" Dism /Add-Package /Image:"C:\win2k12x64\mount" /PackagePath:"C:\Program Files\Windows Kits\8.1\Assessment and Deployment Kit\Windows Preinstallation Environment\amd64\WinPE_OCs\WinPE-DismCmdlets.cab" Dism /Add-Package /Image:"C:\win2k12x64\mount" /PackagePath:"C:\Program Files\Windows Kits\8.1\Assessment and Deployment Kit\Windows Preinstallation Environment\amd64\WinPE_OCs\en-us\WinPE-DismCmdlets_en-us.cab" | ||
| Step 8 | Navigate to
\windows\system32 in the mount folder. In the
startnet.cmd, update the IP address for
Baremetal Agent.
| ||
| Step 9 | Unmount the
WinPE, commit the changes, and copy the file to the
/opt/cnsaroot/Boot directory in the
Baremetal Agent
VM.
DISM.exe /Unmount-Wim /Mountdir:c:\win2k12x64\mount /commit |
What to Do Next
Install and set up (as necessary) the Boot Configuration Data (BCD) file.
Creating a Custom WinPE and Copying the PXE Supported Files for Windows 2012 R2
For Windows Server 2012 R2 x64, Baremetal Agent provides the WinPE and supported PXE files. You need only add any required drivers to the WinPE.wim file, and then edit the WinPE.wim file to change the IP address in the startnet.cmd file to the PXE IP address for your Baremetal Agent.
Note | The /opt/cnsaroot/Boot folder is static, and each Baremetal Agent can have only one boot folder. |
Complete the prerequisites listed in Prerequisites for Setting Up Windows Server 2012 x64 and 2012 R2 x64 Operating System Images.
| Step 1 | Download an ADK
version that supports Windows 2012 R2 and install it on a Windows 2012 R2
machine.
| ||
| Step 2 | In the Windows machine that has the ADK tools installed, create a directory. Copy the WinPE.wim file from /opt/cnsaroot/Boot to the directory you created. | ||
| Step 3 | At the command line, navigate to the ADK installed folder. | ||
| Step 4 | Add the drivers
from their folder locations to the WinPE image.
Use the following DISM.exe command when you know the paths to the drivers that you want to add. // The DISM.exe command mounts the WinPE to a folder. // In this example, the c:\win2k12r2x64 directory and the \mount subdirectory have been created before running the command. DISM.exe /mount-wim /wimfile:c:\win2k12r2x64\WinPE.wim /index:1 /mountdir:c:\win2k12r2x64\mount // To add individual driver files to WinPE image, use the following format. DISM.exe /image:c:\win2k12r2x64\mount /Add-Driver /driver:C:\test\drivers\1.inf /driver:C:\test\drivers\2.inf /driver:C:\test\drivers\3.inf Use the following DISM.exe command when you do not know the paths to the drivers that you want to add and need to query all subfolders. // The DISM.exe command mounts the WinPE to a folder. // In this example, the c:\win2k12r2x64 directory and the \mount subdirectory have been created before running the command. DISM.exe /mount-wim /wimfile:c:\win2k12r2x64\WinPE.wim /index:1 /mountdir:c:\win2k12r2x64\mount // To add individual driver files to WinPE image, use the following format. DISM.exe /image:c:\win2k12r2x64\mount /Add-Driver /driver:c:\test\drivers /Recurse | ||
| Step 5 | Mount winPE.wim to a folder. | ||
| Step 6 | In
WinPE.wim, add the required PowerShell packages and
edit the paths in each command with the correct mount point and ADK
installation path for your environment.
\\ Sample PowerShell package files. \\ The PowerShell packages and file names that you need to add to WinPE.wim vary depending on the version of Windows and WinPE.wim. Dism /Add-Package /Image:"C:\win2k12r2x64\mount" /PackagePath:"C:\Program Files\Windows Kits\8.1\Assessment and Deployment Kit\Windows Preinstallation Environment\amd64\WinPE_OCs\WinPE-WMI.cab" Dism /Add-Package /Image:"C:\win2k12r2x64\mount" /PackagePath:"C:\Program Files\Windows Kits\8.1\Assessment and Deployment Kit\Windows Preinstallation Environment\amd64\WinPE_OCs\en-us\WinPE-WMI_en-us.cab" Dism /Add-Package /Image:"C:\win2k12r2x64\mount" /PackagePath:"C:\Program Files\Windows Kits\8.1\Assessment and Deployment Kit\Windows Preinstallation Environment\amd64\WinPE_OCs\WinPE-NetFX.cab" Dism /Add-Package /Image:"C:\win2k12r2x64\mount" /PackagePath:"C:\Program Files\Windows Kits\8.1\Assessment and Deployment Kit\Windows Preinstallation Environment\amd64\WinPE_OCs\en-us\WinPE-NetFX_en-us.cab" Dism /Add-Package /Image:"C:\win2k12r2x64\mount" /PackagePath:"C:\Program Files\Windows Kits\8.1\Assessment and Deployment Kit\Windows Preinstallation Environment\amd64\WinPE_OCs\WinPE-Scripting.cab" Dism /Add-Package /Image:"C:\win2k12r2x64\mount" /PackagePath:"C:\Program Files\Windows Kits\8.1\Assessment and Deployment Kit\Windows Preinstallation Environment\amd64\WinPE_OCs\en-us\WinPE-Scripting_en-us.cab" Dism /Add-Package /Image:"C:\win2k12r2x64\mount" /PackagePath:"C:\Program Files\Windows Kits\8.1\Assessment and Deployment Kit\Windows Preinstallation Environment\amd64\WinPE_OCs\WinPE-PowerShell.cab" Dism /Add-Package /Image:"C:\win2k12r2x64\mount" /PackagePath:"C:\Program Files\Windows Kits\8.1\Assessment and Deployment Kit\Windows Preinstallation Environment\amd64\WinPE_OCs\en-us\WinPE-PowerShell_en-us.cab" Dism /Add-Package /Image:"C:\win2k12r2x64\mount" /PackagePath:"C:\Program Files\Windows Kits\8.1\Assessment and Deployment Kit\Windows Preinstallation Environment\amd64\WinPE_OCs\WinPE-StorageWMI.cab" Dism /Add-Package /Image:"C:\win2k12r2x64\mount" /PackagePath:"C:\Program Files\Windows Kits\8.1\Assessment and Deployment Kit\Windows Preinstallation Environment\amd64\WinPE_OCs\en-us\WinPE-StorageWMI_en-us.cab" Dism /Add-Package /Image:"C:\win2k12r2x64\mount" /PackagePath:"C:\Program Files\Windows Kits\8.1\Assessment and Deployment Kit\Windows Preinstallation Environment\amd64\WinPE_OCs\WinPE-DismCmdlets.cab" Dism /Add-Package /Image:"C:\win2k12r2x64\mount" /PackagePath:"C:\Program Files\Windows Kits\8.1\Assessment and Deployment Kit\Windows Preinstallation Environment\amd64\WinPE_OCs\en-us\WinPE-DismCmdlets_en-us.cab" | ||
| Step 7 | Navigate to
\windows\system32 in the mount folder. In the
startnet.cmd, update the IP address for
Baremetal Agent.
| ||
| Step 8 | Unmount the
WinPE, commit the changes, and copy the file to the
/opt/cnsaroot/Boot directory in the
Baremetal Agent
VM.
DISM.exe /Unmount-Wim /Mountdir:c:\win2k12r2x64\mount /commit |
What to Do Next
Install and set up (as necessary) the Boot Configuration Data (BCD) file.
Installing and Setting Up the Boot Configuration Data File
The Boot Configuration Data (BCD) file contains the boot configuration parameters. It controls how the operating system is started in Windows and is used to load the base kernel (WinPE.wim) from the PXE server. You do not need to create a BCD file. Baremetal Agent provides a BCD file with default paths that you can use.
By default, the BCD file points to the /Boot/WinPE.wim and boot.sdi files. These filenames are case sensitive.
Note | We recommend that you use a set of standard names for Baremetal Agent configuration purposes. The folder name should be Boot. The winpe file name should be WinPE.wim. Use corresponding filenames such as boot.sdi. The created BCD file should be in uppercase, and this file will not have any file extension. Baremetal Agent delivers the BCD file to /opt/cnsaroot/Boot, which contains a default path pointing to /opt/cnsaroot/Boot/WinPE.wim. This file can be used by any Windows OS version, unless you change the path names. |
The command bcdedit.exe used to create BCD files is commonly available in the Windows operating systems root directory: c:\windows\system32.
Create a custom WinPE and copy the PXE supported files
| Step 1 | Navigate to
the directory that contains the
bcdedit.exe
command and run the following sequence of commands to create the BCD file.
The bcdedit.exe command is commonly available in the Windows operating systems root directory: c:\windows\system32. |
| Step 2 |
bcdedit.exe /createstore
BCD
|
| Step 3 | bcdedit.exe /store BCD /create {ramdiskoptions} /d "Ramdisk
options"
|
| Step 4 | bcdedit.exe /store BCD /set {ramdiskoptions} ramdisksdidevice
boot
|
| Step 5 | bcdedit.exe /store BCD /set {ramdiskoptions} ramdisksdipath
\Boot\boot.sdi
|
| Step 6 | bcdedit.exe /store BCD /create /d "My WinPE Boot
Image"
/application osloader
At this point, the GUID is displayed. Replace {a20f8db8-7459-11e2-8ec3-00155d37efa7} in the following steps with the GUID from your system. |
| Step 7 | bcdedit.exe /store BCD /set
{a20f8db8-7459-11e2-8ec3-00155d37efa7}
systemroot
\Windows
|
| Step 8 | bcdedit.exe /store BCD /set
{a20f8db8-7459-11e2-8ec3-00155d37efa7}
detecthal
Yes
|
| Step 9 | bcdedit.exe /store BCD /set
{a20f8db8-7459-11e2-8ec3-00155d37efa7} winpe Yes
|
| Step 10 | bcdedit.exe /store BCD /set
{a20f8db8-7459-11e2-8ec3-00155d37efa7}
osdevice
ramdisk=[boot]\Boot\WinPE.wim,{ramdiskoptions}
|
| Step 11 | bcdedit.exe /store BCD /set
{a20f8db8-7459-11e2-8ec3-00155d37efa7}
device
ramdisk=[boot]\Boot\WinPE.wim,{ramdiskoptions}
|
| Step 12 | One of the following: |
| Step 13 | bcdedit.exe /store BCD /set {bootmgr} timeout 30
|
| Step 14 | bcdedit.exe /store BCD /displayorder
{a20f8db8-7459-11e2-8ec3-00155d37efa7}
|
| Step 15 | Use the following command to verify that the configuration names are correct: bcdedit.exe /store BCD /enum all |
What to Do Next
Copy the Windows installation ISO image to the server folder.
Copying the Windows Installation Files to the Server Folder
You must have the following in place:
| Step 1 | Extract the downloaded ISO that you obtained and validated. | ||||||||
| Step 2 | Copy the folders
and files from the downloaded ISO to the appropriate directory in the
Baremetal Agent
VM.
The following is a sample of the contents of a Win2k12R2x64 folder after the Window installation files have been copied to it: boot efi sources support autorun.inf bootmgr.efi setup.exe | ||||||||
| Step 3 | Open the /samba/notifications/notify.ps1 file and verify that the IP address matches the PXE IP address of Baremetal Agent. |
Simultaneous Deployment of Windows Server Operating Systems
You can use Baremetal Agent to run parallel workflows and simultaneously deploy Windows server images on multiple baremetal servers.
Prerequisites for Simultaneous Deployment
To ensure that you can perform simultaneous deployment of Windows Server operating system images, you must perform the appropriate configuration required for the versions of the operating system that are described in the following topics, including:
Baremetal Workflows
You do not need to make any changes to your existing baremetal provisioning workflows to support simultaneous deployment of Windows server operating systems.
A PXE boot task in a workflow can only provision one server with a Windows operating system. You cannot use a single PXE boot task to provision multiple servers, but you can execute PXE boot tasks simultaneously multiple times.
Maximum Number of Simultaneous Deployments
The maximum number of simultaneous deployments is dependent upon the bandwidth of your TFTP and PXE networks.
One Windows Version for Each Baremetal Agent
Due to a limitation in the process of the Windows unattended installation, you can only deploy one version of Windows with each Baremetal Agent added to Cisco UCS Director. If you want to deploy a different version of Windows, you must add another Baremetal Agent to Cisco UCS Director.
Minimum Supported Level of Baremetal Agent
Simultaneous deployment of Windows server operating systems requires a minium of Baremetal Agent, Release 5.4. It is not supported in earlier releases of Baremetal Agent.
- Files and Folders Used In Simultaneous Deployment
- Example: Simultaneous Deployment of Windows Server Operating Systems
Files and Folders Used In Simultaneous Deployment
The following files and folders are used during simultaneous deployment of Windows operating systems:
PXElinux.cfg File
The PXElinux.cfg file contains the MAC addresses for each of the servers and points to the WinPE.wim file.
Samba Folder
The /samba folder contains a folder for each of the following items. Additional information about the script and folder is provided below.
AS-Repository Folder
The /samba/as-repository folder contains a folder for each MAC address of the servers for which a Windows operating is to be deployed. The PXE boot task creates and stores a separate Windows answer file for each of these servers in the appropriate MAC address folder. This folder might not be created until after the first PXE boot workflow is run.
EnRoute.ps1 Script
The EnRoute.ps1 script determines which Windows answer file in the as-repository folder belongs to the server that is being provisioned. If desired, you can customize this script. However, when you add the Baremetal Agent to Cisco UCS Director, the script in the as-repository folder will revert to the default script without the customizations.
Note | By default, the EnRoute.ps1 script is hardcoded with the Windows Server 2012 R2 operating system. To deploy a different supported Windows Server operating system, replace the default value of $OsPath="R:\Win2k12R2x64\" with one of the following values:
|
Windows Answer File
The Windows answer file contains settings and values that are used during the deployment of a Windows operating system. This answer file is typically named unattend.xml. During simultaneous deployment, a separate Windows answer file is created in each MAC address folder and then sent to the server to be used during the Windows operating system setup.
When the installation is successfully completed, the name of the answer file is changed to include "Completed."
For more information, see the Microsoft TechNet article on Understanding Answer Files.
Example: Simultaneous Deployment of Windows Server Operating Systems
This example describes what actions Baremetal Agent performs when you execute two workflows at the same time, with each workflow designed to provision a baremetal server with a Windows operating system. The illustrations below describe how server 1 and server 2 are provisioned when the PXE tasks in the workflows are executed.
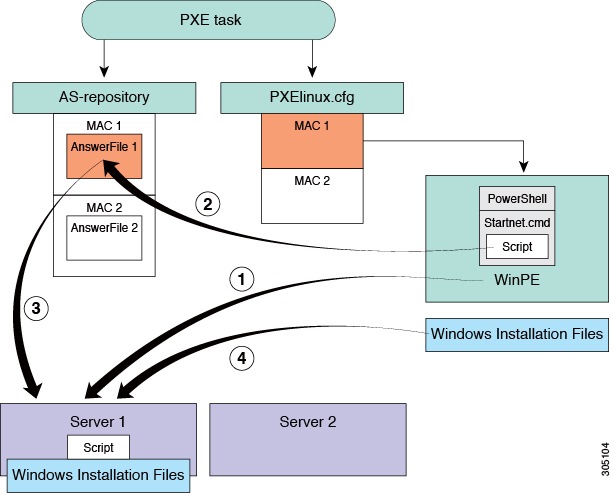
When the PXE boot task is executed in the workflow that provisions Server 1, the steps shown in the above illustration occur:
|
Step |
Action |
|---|---|
|
1 |
Server 1 boots up. The WinPE.wim file, together with its PowerShell packages and Startnet.cmd, is copied to the server. |
|
2 |
The Startnet.cmd calls the EnRoute.ps1 script from the /samba folder on the Baremetal Agent VM. A folder is created under /samba/as-repository/ with MAC address of Server 1 as its name, for example, /samba/as-repository/MAC 1, and a Windows answer file is placed into that folder. |
|
3 |
The EnRoute.ps1 script compares the MAC address on Server 1 with the MAC address folders available in the /samba/as-repository folder and finds the Windows answer file for Server 1 in the /samba/as-repository/MAC 1 folder. |
|
4 |
Using the Windows answer file, the appropriate Windows operating system (shown as Windows installation files) is installed on Server 1. When the installation is successfully completed, the name of the answer file is changed to include "Completed." |
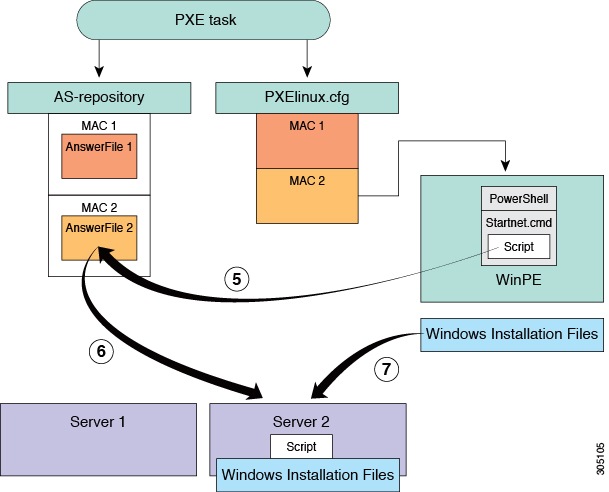
At the same time as Server 1 is being provisioned, when the PXE boot task is executed in the workflow that provisions Server 2, the steps shown in the above illustration occur:
|
Step |
Action |
|---|---|
|
5 |
Server 2 boots up. The WinPE.wim file, together with its PowerShell packages and Startnet.cmd, is copied to the server. The Startnet.cmd calls the EnRoute.ps1 script from the /samba folder on the Baremetal Agent VM. A folder is created under /samba/as-repository/ with MAC address of Server 2 as its name, for example, /samba/as-repository/MAC 2, and a Windows answer file is placed into that folder. |
|
6 |
The EnRoute.ps1 script compares the MAC address on Server 2 with the MAC address folders available in the /samba/as-repository folder and finds the Windows answer file for Server 2 in the /samba/as-repository/MAC 2 folder. |
|
7 |
Using the Windows answer file, the appropriate Windows operating system (shown as Windows installation files) is installed on Server 2. When the installation is successfully completed, the name of the answer file is changed to include "Completed." |
 Feedback