Storage Controller Considerations

This appendix provides storage controller (RAID and HBA) information.

Supported Storage Controllers and Cables

This server supports a single, PCIe-style, SAS RAID or HBA controller that plugs into a dedicated internal socket.


Note

For SFF, 8-drives version only (UCSC-C240-M5S): Do not mix controller types in the server. Do not use the embedded SATA controller and a hardware-based RAID controller card to control front-loading drives at the same time. This combination is not supported and could result in data loss.

Note

NVMe PCIe SSDs cannot be controlled by a SAS/SATA RAID controller.

This server supports the RAID and HBA controller options and cable requirements shown in the following table.

Controller

Server Version/Maximum Drives Controlled

RAID Levels

Optional Supercap Backup?

Required Cables

Embedded RAID (PCH SATA)

  • All server versions can use the embedded SATA controller to control two internal SATA M.2 drives.

  • SFF 8-drives only (UCSC-C240-M5S):

    8 front-loading, SATA-only drives

0, 1, 10

No

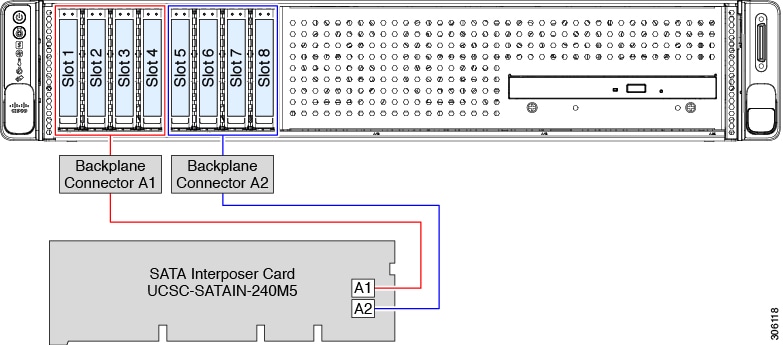
UCSC-C240-M5S only: Use the SAS/SATA cable included with the chassis to connect the interposer to the front drive backplane.

No cables are required for control of internal SATA M.2 drives.

Cisco 12G Modular RAID Controller

UCSC-RAID-M5

Includes 2-GB cache; controls up to 16 drives.

This controller is supported only in the following server versions:

  • SFF 24-drives (UCSC-C240-M5SN)

    16 front-loading SAS/SATA drives (bays 9-24)

  • SFF 8-drives (UCSC-C240-M5S):

    8 front-loading, plus 2 rear-loading SAS/SATA drives

  • LFF 12-drives (UCSC-C240-M5L):

    12 front-loading, plus 2 rear-loading SAS/SATA drives

0, 1, 5, 6, 10, 50, 60

JBOD mode is also supported.

Yes

Use SAS/SATA cable included with chassis to connect controller to drive backplanes.

Cisco 12G Modular RAID Controller

UCSC-RAID-M5HD

Includes 4-GB cache; controls up to 26 drives

This controller is supported only in the following server version:

  • SFF 24-drives (UCSC-C240-M5SX):

    24 front-loading, plus 2 rear-loading SAS/SATA drives

0, 1, 5, 6, 10, 50, 60

JBOD mode is also supported.

Yes

Use SAS/SATA cable included with chassis to connect controller to drive backplanes.

Cisco 12G Modular SAS HBA

UCSC-SAS-M5

Controls up to 16 drives.

This controller is supported only in the following server versions:

  • SFF 24-drives (UCSC-C240-M5SN)

    16 front-loading SAS/SATA drives (bays 9-24)

  • SFF 8-drives (UCSC-C240-M5S):

    8 front-loading, plus 2 rear-loading SAS/SATA drives

  • LFF 12-drives (UCSC-C240-M5L):

    12 front-loading, plus 2 rear-loading SAS/SATA drives

Non-RAID

No

Use SAS/SATA cable included with chassis to connect controller to drive backplanes.

Cisco 12G Modular SAS HBA (For Up To 24 Drives)

UCSC-SAS-M5HD

Controls up to 24 drives.

This controller is supported only in the following server version:

  • SFF 24-drives (UCSC-C240-M5SX):

    24 front-loading, plus 2 rear-loading SAS/SATA drives

Non-RAID

No

Use SAS/SATA cable included with chassis to connect controller to drive backplanes.

Cisco 12G 9400-8e HBA for external JBOD attach

UCSC-9400-8E

Supported in all server versions:

8 external SAS/SATA ports, controlling up to 1024 external drives.

Non-RAID

No

External drive cables not sold by Cisco.

NOTE: This HBA does not support optical cables for connection to external storage (copper only).

Storage Controller Card Firmware Compatibility

Firmware on the storage controller (RAID or HBA) must be verified for compatibility with the current Cisco IMC and BIOS versions that are installed on the server. If not compatible, upgrade or downgrade the storage controller firmware using the Host Upgrade Utility (HUU) for your firmware release to bring it to a compatible level.


Note

For servers running in standalone mode only: After you replace controller hardware (UCSC-RAID-M5, UCSC-RAID-M5HD, UCSC-SAS-M5, or UCSC-SAS-M5HD), you must run the Cisco UCS Host Upgrade Utility (HUU) to update the controller firmware, even if the firmware Current Version is the same as the Update Version. This is necessary to program the controller's suboem-id to the correct value for the server SKU. If you do not do this, drive enumeration might not display correctly in the software. This issue does not affect servers controlled in UCSM mode.


See the HUU guide for your Cisco IMC release for instructions on downloading and using the utility to bring server components to compatible levels: HUU Guides.

RAID Backup (Supercap)

This server supports installation of one supercap unit. The unit mounts to a bracket in-line with the fan modules.

The optional SCPM provides approximately three years of backup for the disk write-back cache DRAM in the case of a sudden power loss by offloading the cache to the NAND flash.

For supercap unit replacement instructions, see Replacing the Supercap (RAID Backup).

Write-Cache Policy for Cisco 12G SAS Modular RAID Controllers

For this server and other Cisco Generation M5 servers, the default write-cache policy for the Cisco Modular RAID controllers is Write Through (irrespective of the presence of a charged supercap or “good BBU”). This utilizes the optimal performance characteristics of the controller.

The write policy can be set to Write Back, if preferred. You can set the write policy using the following methods:

  • For standalone servers, use the Cisco IMC interface to set Virtual Drive Properties > Write Policy. See the “Managing Storage Adapters” section in your Cisco IMC Configuration Guide.

    Cisco IMC GUI and CLI Configuration Guides

  • For Cisco UCS-integrated servers, use the Cisco UCS Manager interface to set the write-cache policy as part of virtual drive configuration in your storage profile.

    Cisco UCS Manager Configuration Guides

  • Use the LSI Option ROM Configuration Utility.

Mixing Drive Types in RAID Groups

The following table lists the technical capabilities for mixing hard disk drive (HDD) and solid state drive (SSD) types in a RAID group. However, see the recommendations that follow for the best performance.

Table 1. Mixing Drive Types

Mix of Drive Types in RAID Group

Allowed?

SAS HDD + SATA HDD

Yes

SAS SSD + SATA SSD

Yes

HDD + SSD

No

Drive Type Mixing Best Practices

For the best performance follow these guidelines:

  • Use either all SAS or all SATA drives in a RAID group.

  • Use the same capacity for each drive in the RAID group.

  • Never mix HDDs and SSDs in the same RAID group.

RAID Controller Migration

The SFF, 8-drives version of the server (UCSC-C240-M5S) can use the software-based, embedded SATA RAID controller to control front-loading SATA drives.


Note

For SFF, 8-drives version only (UCSC-C240-M5S): Do not mix controller types in the server. Do not use the embedded SATA controller and a hardware-based RAID controller card to control front-loading drives at the same time. This combination is not supported and could result in data loss.

See the table below for which data migrations are allowed and a summary of migration steps.

Starting RAID Controller

Migrate to Hardware RAID Allowed?

Migrate to Software RAID Allowed?

None (no drives).

Embedded RAID is disabled in the BIOS.

Allowed

  1. Install RAID card.

  2. Connect SAS cables.

Allowed

  1. Install SATA interposer card.

  2. Connect SATA cables.

  3. Enable embedded RAID in BIOS.

Embedded software RAID.

Embedded RAID is enabled in the BIOS.

Caution 
Data migration from software RAID to hardware RAID is not supported and could result in data loss.

Allowed only before there is data on the drives; data migration is not supported.

  1. Disable embedded RAID in the BIOS.

  2. Install RAID card.

  3. Install SAS cables.

-

Hardware RAID.

Embedded RAID is disabled in the BIOS.

-

Not allowed.

Storage Controller Cable Connectors and Backplanes

This section describes cabling for the storage controllers and backplanes. The SAS/SATA cables are factory-installed and are used for all supported internal controllers.

This section also contains diagrams that show the cable-to-drive mapping.

Embedded SATA RAID

This SW RAID option is supported for controlling front-loading SATA drives in the SFF, 8-drive version only (UCSC-C240-M5S).

This embedded RAID option requires that you have a SATA interposer card installed in the dedicated controller socket. Use the SAS/SATA cables that came with the server.

  1. Connect SAS/SATA cable A1 from the A1 interposer connector to the A1 front backplane connector.

  2. Connect SAS/SATA cable A2 from the A2 interposer connector to the A2 front backplane connector.

Figure 1. SATA Interposer Cabling (SFF, 8-Drive Version Only)

Cisco 12G Modular SAS RAID Controller or HBA For Up To 16 Drives (UCSC-RAID-M5 or UCSC-SAS-M5)

The drive support differs by server version, as described in the following sections. These controllers are supported only in these server versions:

  • SFF 8-Drives UCSC-C240-M5S

  • SFF 24-Drives NVMe UCSC-C240-M5SN

  • LFF 12-Drives UCSC-C240-M5L

SFF 8-Drives UCSC-C240-M5S

This HW RAID or HBA option can control up to 8 front-loading SAS/SATA drives in this server version, plus two rear-loading SAS/SATA drives.

  1. Connect SAS/SATA cable A1 from the A1 card connector to the A1 front backplane connector.

  2. Connect SAS/SATA cable A2 from the A2 card connector to the A2 front backplane connector.

  3. Optional for rear drives: Connect SAS/SATA cable B1 from the B1 card connector to the rear backplane connector.

Figure 2. SFF, 8-Drive UCSC-C240-M5S Cabling With UCSC-RAID-M5

LFF 12-Drives UCSC-C240-M5L

This HW RAID or HBA option can control up to 12 front-loading SAS/SATA drives in this server version, plus 2 rear-loading SAS/SATA drives.

  1. Connect SAS/SATA cable A1 from the A1 card connector to the A1 front backplane connector.

  2. Connect SAS/SATA cable A2 from the A2 card connector to the A2 front backplane connector.

  3. Connect SAS/SATA cable B2 from the B2 card connector to the B2 front backplane connector.

  4. Optional for rear drives: Connect SAS/SATA cable B1 from the B1 card connector to the rear backplane connector.

Figure 3. LFF, 12-Drive UCSC-C240-M5L Cabling With UCSC-RAID-M5

Cisco 12G Modular SAS RAID Controller or HBA For Up To 26 Drives (UCSC-RAID-M5HD or UCSC-SAS-M5HD)

This controller is supported only in this server version:

  • SFF 24-Drives UCSC-C240-M5SX

This HW RAID or HBA option can control up to 24 front-loading SAS/SATA drives in this server version, plus 2 rear-loading SAS/SATA drives.

  1. Connect SAS/SATA cable A double-connectors A1 and A2 to the A1 and A2 connectors on the controller card.

  2. Connect SAS/SATA cable A, single connector CONN-A to the CONN-A backplane connector.

  3. Connect SAS/SATA cable B double-connectors B1 and B2 to the B1 and B2 connectors on the controller card.

  4. Connect SAS/SATA cable B, single connector CONN-B to the CONN-B backplane connector.

  5. Connect SAS/SATA cable C double-connectors C1 and C2 to the C1 and C2 connectors on the controller card.

  6. Connect SAS/SATA cable C, single connector CONN-C to the CONN-C backplane connector.

  7. Optional for rear drives: Connect SAS/SATA cable D from the D1 card connector (on the reverse side of the card) to the rear backplane connector.

Figure 4. SFF, 24-Drive UCSC-C240-M5SX Cabling With UCSC-RAID-M5HD

Embedded SATA RAID Controller

All versions of the server include an embedded SATA MegaRAID controller that can be used to control two internal SATA M.2 drives. This controller supports RAID levels 0, 1, and 10.

The SFF, 8-drives version of the server (UCSC-C240-M5S) can also use the embedded SATA controller to control up to eight front-loading, SATA-only drives. Control of front-loading drives with this embedded controller is not supported in other versions of the server.


Note

The VMware ESX/ESXi operating system is not supported with the embedded SATA MegaRAID controller in SW RAID mode. You can use VMWare in AHCI mode.

Note

The Microsoft Windows Server 2016 Hyper-V hypervisor is supported for use with the embedded MegaRAID controller in SW RAID mode, but all other hyperviors are not supported. All Hypervisors are supported in AHCI mode.


Note

You cannot control the M.2 SATA SSDs in the server with a HW RAID controller.


Embbeded SATA RAID Requirements

The embedded SATA RAID controller requires the following items:

  • For control of front-loading SATA drives: SFF, 8-drives server version UCSC-C240-M5S (only). Other versions of the server do not support control of front-loading drives with this embedded controller.

  • For control of front-loading SATA drives: Interposer card UCSC-SATAIN-240M5 installed in the dedicated storage controller socket.

  • For control of front-loading SATA drives: The SAS/SATA cables that are preinstalled in the chassis.

  • Primary controller: SATA drives only (up to eight, in front drive bays 1–8).

  • Secondary controller: M.2 mini-storage module with two SATA M.2 SSDs.

  • The embedded SATA RAID controllers must be enabled in the server BIOS. If you ordered the server with embedded SATA RAID, it is enabled at the factory.

  • (Optional) LSI MegaSR drivers for Windows or Linux.

  • The software RAID controller requires UEFI boot mode; Legacy boot mode is not supported.

  • If you use an embedded RAID controller with Linux and a DVD drive is present on the pSATA controller, both the pSATA and the sSATA controller must be set to LSI SW RAID mode.

Embedded SATA RAID Controller Considerations

Note the following considerations:

  • The SFF, 8-drives version of the server (UCSC-C240-M5S) can use the embedded SATA controller to control up to eight front-loading, SATA-only drives, and up to two internal M.2 SATA drives. Control of the two internal M.2 SATA drives is supported in all versions of the server; control of front-loading drives is not supported in other versions of the server.

  • The default setting for this embedded controller hub is SATA RAID 0, 1, and 10 support for up to eight SATA drives. The hub is divided into two SATA controllers that have different functions. See Embedded SATA RAID: Two SATA Controllers.

  • When you order the server with this embedded controller, the controller is enabled in the BIOS. Instructions for enabling the controller are included for the case in which a server is reset to defaults. See Enabling SATA Mode For the Embedded Controllers.

  • You cannot downgrade from using a hardware RAID controller card for front-loading drive control to using the software RAID embedded controller for front-loading drive control (see RAID Controller Migration).


    Caution

    Data migration from software RAID (embedded RAID) to hardware RAID (a controller card) for front-loading drives is not supported and could result in data loss. Migrations from software RAID to hardware RAID are supported only before there is data on the front-loading drives, or when there are no drives in the server.
  • The required drivers for this controller are already installed and ready to use. However, if you will use this controller with Windows or Linux, you must download and install additional drivers for those operating systems. See Installing LSI MegaSR Drivers For Windows and Linux.

Embedded SATA RAID: Two SATA Controllers

The embedded RAID platform controller hub (PCH) is split into two controllers: primary SATA (pSATA) and secondary SATA (sSATA). These two controllers are seen as separate RAID controllers in the Cisco IMC interface and are configurable separately.

  • SFF 8-drives server UCSC-C240-M5S (only):

    • The pSATA controller controls up to eight front-loading SATA drives.

    • The sSATA controller controls two internal SATA M.2 drives, when they are present in the M.2 mini-storage module option.

      If the M.2 mini-storage module is not present, or if M.2 NVMe drives are installed in the mini-storage module, the sSATA controller is automatically disabled.

  • All other versions of the server:

    • The pSATA controller is disabled.

    • The sSATA controller controls two internal SATA M.2 drives, when they are present in the SATA mini-storage module option.

      If the M.2 mini-storage module is not present, or if M.2 NVMe drives are installed in the mini-storage module, the sSATA controller is automatically disabled.

  • Each controller is listed separately in the BIOS. You can enable or disable the controllers in the BIOS. See Enabling SATA Mode For the Embedded Controllers.

Enabling SATA Mode For the Embedded Controllers

This procedure uses the server's BIOS Setup Utility

Procedure


Step 1

Set the SATA mode:

  1. Boot the server and press F2 when prompted to enter the BIOS Setup utility.

  2. Choose the Advanced tab, and then choose LOM and PCIe Slots Configuration.

  3. Server version UCSC-C240-M5S only: For the primary pSATA controller, select pSATA, and then choose one of the options from the dialog:

    • LSI SW RAID—Enable the embedded pSATA RAID controller.

      Note 

      This menu option does not appear when the server is set to boot in Legacy mode (UEFI mode is required). To change the boot mode, use the BIOS setting for Boot Options > Boot Mode.

    • Disabled—Disable the embedded pSATA RAID controller.

  4. For the secondary sSATA controller, select M.2 and then choose one of the options from the dialog:

    • LSI SW RAID—Enable the embedded sSATA RAID controller for control of internal SATA M.2 drives.

      Note 

      This menu option does not appear when the server is set to boot in Legacy mode (UEFI mode is required). To change the boot mode, use the BIOS setting for Boot Options > Boot Mode.

      Note 

      This menu option does not appear when the server has no M.2 mini storage module, or when no SATA M.2 drive is installed in the mini-storage module.

    • AHCI—Enable control of the internal SATA M.2 drives by AHCI through your OS rather than the embedded RAID controller.

    • Disabled—Disable the embedded sSATA RAID controller.

Step 2

Press F10 to save your changes and exit the utility.


Accessing the Software RAID Configuration Utility

To configure RAID settings for the embedded SATA RAID controllers, use the utility that is built into the BIOS. Each controller is controlled by its own instance of the utility.

Procedure


Step 1

Boot the server and press F2 when prompted to enter the BIOS Setup utility.

Step 2

Choose the Advanced tab.

Step 3

Select the instance of the utility that is for the controller that you want to manage (primary or secondary):

  • For the pSATA controller, select LSI Software RAID Configuration Utility (SATA).

  • For the sSATA controller, select LSI Software RAID Configuration Utility (sSATA).


Installing LSI MegaSR Drivers For Windows and Linux


Note

The required drivers for this controller are already installed and ready to use. However, if you will use this controller with Windows or Linux, you must download and install additional drivers for those operating systems.

This section explains how to install the LSI MegaSR drivers for the following supported operating systems:

  • Microsoft Windows Server

  • Red Hat Enterprise Linux (RHEL)

  • SUSE Linux Enterprise Server (SLES)

For the specific supported OS versions, see the Hardware and Software Compatibility Matrix for your server release.

Downloading the MegaSR Drivers

The MegaSR drivers are included in the C-Series driver ISO for your server and OS.

Procedure

Step 1

Find the drivers ISO file download for your server online and download it to a temporary location on your workstation:

  1. See the following URL: http://www.cisco.com/cisco/software/navigator.html.

  2. Type the name of your server in the Select a Product search field and then press Enter.

  3. Click Unified Computing System (UCS) Drivers.

  4. Click the release number that you are downloading.

  5. Click the Download icon to download the drivers ISO file.

Step 2

Continue through the subsequent screens to accept the license agreement and then browse to a location where you want to save the driver ISO file.


Microsoft Windows Server Drivers

Installing Microsoft Windows Server Drivers

The Windows Server operating system automatically adds the driver to the registry and copies the driver to the appropriate directory.

Before you begin

Before you install this driver on an embedded controller, you must configure a RAID drive group on the embedded controller for the drives where you will install the OS (pSATA and/or sSATA).

To access the configuration utility, open the BIOS Setup Utility, go to the Advanced tab, and then choose the utility instance for the embedded controller:

  • For pSATA, select LSI Software RAID Configuration Utility (SATA)

  • For sSATA, select LSI Software RAID Configuration Utility (sSATA)

Procedure

Step 1

Download the Cisco UCS C-Series drivers’ ISO, as described in Downloading the MegaSR Drivers.

Step 2

Prepare the drivers on a USB thumb drive:

  1. Burn the ISO image to a disk.

  2. Browse the contents of the drivers folders to the location of the embedded MegaRAID drivers: /<OS>/<version>/Intel/C600/

  3. Expand the Zip file, which contains the folder with the MegaSR driver files.

  4. Copy the expanded folder to a USB thumb drive.

Step 3

Start the Windows driver installation using one of the following methods:

  • To install from local media, connect an external USB DVD drive to the server (if the server does not have a DVD drive installed) and then insert the first Windows installation disk into the DVD drive. Skip to Step 6.

  • To install from remote ISO, log in to the server’s Cisco IMC interface and continue with the next step.

Step 4

Launch a Virtual KVM console window and click the Virtual Media tab.

  1. Click Add Image and browse to select your remote Windows installation ISO file.

  2. Check the check box in the Mapped column for the media that you just added, and then wait for mapping to complete.

Step 5

Power cycle the server.

Step 6

Press F6 when you see the F6 prompt during bootup. The Boot Menu window opens.

Step 7

On the Boot Manager window, choose the physical disk or virtual DVD and press Enter. The Windows installation begins when the image is booted.

Step 8

Press Enter when you see the prompt, “Press any key to boot from CD.”

Step 9

Observe the Windows installation process and respond to prompts in the wizard as required for your preferences and company standards.

Step 10

When Windows prompts you with “Where do you want to install Windows,” install the drivers for embedded MegaRAID:

  1. Click Load Driver. You are prompted by a Load Driver dialog box to select the driver to be installed.

  2. Connect the USB thumb drive that you prepared in Step 3 to the target server.

  3. On the Windows Load Driver dialog, click Browse.

  4. Use the dialog box to browse to the location of the drivers folder on the USB thumb drive, and then click OK.

    Windows loads the drivers from the folder and when finished, the driver is listed under the prompt, “Select the driver to be installed.”

  5. Click Next to install the drivers.


Updating Microsoft Windows Server Drivers
Procedure

Step 1

Click Start, point to Settings, and then click Control Panel.

Step 2

Double-click System, click the Hardware tab, and then click Device Manager. Device Manager starts.

Step 3

In Device Manager, double-click SCSI and RAID Controllers, right-click the device for which you are installing the driver, and then click Properties.

Step 4

On the Driver tab, click Update Driver to open the Update Device Driver wizard, and then follow the wizard instructions to update the driver.


Linux Drivers

Dowloading the Driver Image File

See Downloading the MegaSR Drivers for instructions on downloading the drivers. The Linux driver is included in the form of dud-[driver version].img, which is the boot image for the embedded MegaRAID stack.


Note

The LSI MegaSR drivers that Cisco provides for RHEL and SLES are for the original GA versions of those distributions. The drivers do not support updates to those OS kernels.
Preparing Physical Thumb Drive for Linux

This topic describes how to prepare physical Linux thumb drive from the driver image files.

This procedure requires a CD or DVD drive that you can use to burn the ISO image to disk; and a USB thumb drive.

Alternatively, you can mount the dud.img file as a virtual floppy disk, as described in the installation procedures.

For RHEL and SLES, you can use a driver disk utility to create disk images from image files.

Procedure

Step 1

Download the Cisco UCS C-Series drivers ISO, as described in Downloading the MegaSR Drivers and save it to your Linux system.

Step 2

Extract the dud.img or dd.iso driver file:

Note 

For RHEL 7.1 and later, there is no dud.img file--the driver is contained in a dd.iso file.

  1. Burn the Cisco UCS C-Series Drivers ISO image to a disc.

  2. Browse the contents of the drivers folders to the location of the embedded MegaRAID drivers: /<OS>/Storage/Intel/C600-M5/

  3. Expand the Zip file, which contains the folder with the driver files.

Step 3

Copy the driver update disk image dud-[driver version].img (or dd.iso) to your Linux system.

Step 4

Insert a blank USB thumb drive into a port on your Linux system.

Step 5

Create a directory and mount the dud.img or dd.iso image to that directory:

Example:
mkdir <destination_folder>
mount -oloop <driver_image> <destination_folder>
Step 6

Copy the contents in the directory to your USB thumb drive.


Installing the Red Hat Enterprise Linux Driver

For the specific supported OS versions, see the Hardware and Software Compatibility Matrix for your server release.

This topic describes the fresh installation of the RHEL device driver on systems that have the embedded MegaRAID stack.


Note

If you use an embedded RAID controller with Linux, both the pSATA and the sSATA controller must be set to LSI SW RAID mode.


Before you begin

Before you install this driver on an embedded controller, you must configure a RAID drive group on the embedded controller that controls the drives where you will install the OS (pSATA and/or sSATA).

To access the configuration utility, open the BIOS Setup Utility, go to the Advanced tab, and then choose the utility instance for the embedded controller:

  • For pSATA, select LSI Software RAID Configuration Utility (SATA)

  • For sSATA, select LSI Software RAID Configuration Utility (sSATA)

Procedure

Step 1

Prepare the dud.img (or dd.iso) file using one of the following methods:

Note 

For RHEL 7.1 and later, there is no dud.img file--the driver is contained in a dd.iso file.

Step 2

Extract the dud.img (or dd.iso) file:

  1. Burn the Cisco UCS C-Series Drivers ISO image to a disk.

  2. Browse the contents of the drivers folders to the location of the embedded MegaRAID drivers: /<OS>/Storage/Intel/C600-M5/

  3. Copy the dud-<driver version>.img (or dd.iso) file to a temporary location on your workstation.

  4. If you are using RHEL 7.x, rename the saved dd.iso to dd.img.

    Note 

    If you are using RHEL 7.x, renaming the dd.iso file to dd.img simplifies this procedure and saves time. The Cisco UCS virtual drive mapper can map only one .iso at a time, and only as a virtual CD/DVD. Renaming the file to dd.img allows you to mount the RHEL installation ISO as a virtual CD/DVD and the renamed dd.img as a virtual floppy disk or removable disk at the same time. This avoids the steps of unmounting and remounting the RHEL ISO when the dd.iso driver file is prompted for.

Step 3

Start the Linux driver installation using one of the following methods:

  • To install from local media, connect an external USB CD/DVD drive to the server and then insert the first RHEL installation disk into the drive. Then continue with Step 5.

  • To install from virtual disk, log in to the server’s Cisco IMC interface. Then continue with the next step.

Step 4

Launch a Virtual KVM console window and click the Virtual Media tab.

  1. Click Add Image and browse to select your remote RHEL installation ISO image.

    Note 

    An .iso file can be mapped only as a virtual CD/DVD.

  2. Click Add Image again and browse to select your RHEL 6.x dud.img or the RHEL 7.x dd.img file that you renamed in step 2.

    Note 

    Map the .img file as a virtual floppy disk or virtual removable disk.

  3. Check the check boxes in the Mapped column for the media that you just added, then wait for mapping to complete.

Step 5

Power-cycle the target server.

Step 6

Press F6 when you see the F6 prompt during bootup. The Boot Menu window opens.

Note 

Do not press Enter in the next step to start the installation. Instead, press e to edit installation parameters.

Step 7

On the Boot Menu window, use the arrow keys to select Install Red Hat Enterprise Linux and then press e to edit installation parameters.

Step 8

Append one of the following blacklist commands to the end of the line that begins with linuxefi:

  • For RHEL 6.x (32- and 64-bit), type:

    linux dd blacklist=isci blacklist=ahci nodmraid noprobe=<atadrive number>

    Note 

    The noprobe values depend on the number of drives. For example, to install RHEL 6.x on a RAID 5 configuration with three drives, type:

    Linux dd blacklist=isci blacklist=ahci nodmraid noprobe=ata1 noprobe=ata2

  • For RHEL 7.x (32- and 64-bit), type:

    linux dd modprobe.blacklist=ahci nodmraid

Step 9

Optional: To see full, verbose installation status steps during installation, delete the Quiet parameter from the line.

Step 10

On the Boot Menu window, press Ctrl+x to start the interactive installation.

Step 11

Below Driver disk device selection, select the option to install your driver .img file. (Type r to refresh the list if it is not populated.)

Note 

The installer recognizes the driver file as an .iso file, even though you renamed it to dd.img for mapping.

Type the number of the driver device ISO in the list. Do not select the RHEL ISO image. In the following example, type 6 to select device sdb:

5) sr0 iso9660 RHEL-7.6\x20Server.x
6) sdb iso9660 CDROM
# to select, ‘r’ - refresh, or ‘c’ -continue: 6

The installer reads the driver file and lists the drivers.

Step 12

Under Select drivers to install, type the number of the line that lists the megasr driver. In the following example, type 1:

1) [ ] /media/DD-1/rpms/x86_61/kmod-megasr-18.01.2010.1107_e17.6-1.x86_61.rpm
# to toggle selection, or ‘c’ -continue: 1

Your selection is displayed with an X in brackets.

1) [X] /media/DD-1/rpms/x86_61/kmod-megasr-18.01.2010.1107_e17.6-1.x86_61.rpm
Step 13

Type c to continue.

Step 14

Follow the RHEL installation wizard to complete the installation.

Step 15

When the wizard’s Installation Destination screen is displayed, ensure that LSI MegaSR is listed as the selection. If it is not listed, the driver did not load successfully. In that case, select Rescan Disc.

Step 16

After the installation completes, reboot the target server.


Installing the SUSE Linux Enterprise Server Driver

For the specific supported OS versions, see the Hardware and Software Compatibility Matrix for your server release.

This topic describes the fresh installation of the SLES driver on systems that have the embedded MegaRAID stack.


Note

If you use an embedded RAID controller with Linux, both the pSATA and the sSATA controller must be set to LSI SW RAID mode.


Before you begin

Before you install this driver on an embedded controller, you must configure a RAID drive group on the embedded controller that controls the drives where you will install the OS (pSATA and/or sSATA).

To access the configuration utility, open the BIOS Setup Utility, go to the Advanced tab, and then choose the utility instance for the embedded controller:

  • For pSATA, select LSI Software RAID Configuration Utility (SATA)

  • For sSATA, select LSI Software RAID Configuration Utility (sSATA)

Procedure

Step 1

Prepare the dud.img file using one of the following methods:

Step 2

Extract the dud.img file that contains the driver:

  1. Burn the ISO image to a disk.

  2. Browse the contents of the drivers folders to the location of the embedded MegaRAID drivers: /<OS>/Storage/Intel/C600-M5/...

  3. Within the SLES folder for your version, the dud-<driver version>.img file is packaged in a compressed .gz file. Extract the .img file from the .gz file.

  4. Copy the dud-<driver version>.img file to a temporary location on your workstation.

Step 3

Start the Linux driver installation using one of the following methods:

  • To install from local media, connect an external USB DVD drive to the server and then insert the first SLES installation disk into the drive. Then continue with Step 5.

  • To install from remote ISO, log in to the server’s Cisco IMC interface. Then continue with the next step.

Step 4

Launch a Virtual KVM console window and click the Virtual Media tab.

  1. Click Add Image and browse to select your remote SLES installation ISO file.

  2. Click Add Image again and browse to select your dud-<driver version>.img file.

  3. Check the check boxes in the Mapped column for the media that you just added, then wait for mapping to complete.

Step 5

Power-cycle the target server.

Step 6

Press F6 when you see the F6 prompt during bootup. The Boot Menu window opens.

Step 7

On the Boot Manager window, select the physical or virtual SLES installation ISO and press Enter.

The SLES installation begins when the image is booted.

Step 8

When the first SLES screen appears, select Installation.

Step 9

Press e to edit installation parameters.

Step 10

Append the following parameter to the end of the line that begins with linuxefi:

brokenmodules=ahci

Step 11

Optional: To see detailed status information during the installation, add the following parameter to the line that begins with linuxefi:

splash=verbose

Step 12

Press Ctrl+x to start the installation.

The installation proceeds. The installer finds the LSI driver automatically in the dud-<driver version>.img file that you provided. With verbose status messages, you see the driver being installed when LSI MegaRAID SW RAID Module is listed.

Step 13

Follow the SLES installation wizard to complete the installation. Verify installation of the driver when you reach the Suggested Partitioning screen:

  1. On the Suggested Partitioning screen, select Expert Partitioner.

  2. Navigate to Linux > Hard disks and verify that there is a device listed for the LSI - LSI MegaSR driver. The device might be listed as a type other than sda. For example:

    dev/sdd: LSI - LSI MegaSR

    If no device is listed, the driver did not install properly. In that case, repeat the steps above.

Step 14

When installation is complete, reboot the target server.


For More RAID Utility Information

The Broadcom utilities have help documentation for more information about using the utilities.