- Preface
- Overview
- Using the Command-Line Interface
- Configuring the Switch Alarms
- Performing Switch Setup Configuration
- Configuring Cisco IOS Configuration Engine
- Configuring Switch Clusters
- Performing Switch Administration
- Configuring PTP
- Configuring PROFINET
- Configuring CIP
- Configuring SDM Templates
- Configuring Switch-Based Authentication
- Configuring IEEE 802.1x Port-Based Authentication
- Configuring Web-Based Authentication
- Configuring Interface Characteristics
- Configuring Smartports Macros
- Configuring VLANs
- Configuring VTP
- Configuring Voice VLAN
- Configuring STP
- Configuring MSTP
- Configuring Optional Spanning-Tree Features
- Configuring Resilient Ethernet Protocol
- Configuring Flex Links and the MAC Address-Table Move Update Feature
- Configuring DHCP
- Configuring Dynamic ARP Inspection
- Configuring IP Source Guard
- Configuring IGMP Snooping and MVR
- Configuring Port-Based Traffic Control
- Configuring SPAN and RSPAN
- Configuring LLDP, LLDP-MED, and Wired Location Service
- Configuring CDP
- Configuring UDLD
- Configuring RMON
- Configuring System Message Logging
- Configuring SNMP
- Configuring Network Security with ACLs
- Configuring QoS
- Configuring Auto-QoS
- Configuring EtherChannels
- Configuring Static IP Unicast Routing
- Configuring IPv6 Host Functions
- Configuring Link State Tracking
- Configuring IPv6 MLD Snooping
- Configuring Cisco IOS IP SLAs Operations
- Configuring Layer 2 Network Address Translation
- Troubleshooting the Cisco IOS Software
- Working with the Cisco IOS File System, Configuration Files, and Software Images
Cisco IE 2000 Switch Software Configuration Guide, Cisco IOS Release 15.0(2)EB
Bias-Free Language
The documentation set for this product strives to use bias-free language. For the purposes of this documentation set, bias-free is defined as language that does not imply discrimination based on age, disability, gender, racial identity, ethnic identity, sexual orientation, socioeconomic status, and intersectionality. Exceptions may be present in the documentation due to language that is hardcoded in the user interfaces of the product software, language used based on RFP documentation, or language that is used by a referenced third-party product. Learn more about how Cisco is using Inclusive Language.
- Updated:
- May 23, 2017
Chapter: Configuring Layer 2 Network Address Translation
- Finding Feature Information
- Prerequisites for Layer2NAT
- Restrictions for Configuring Layer2NAT
- Guidelines
- Information About Configuring Layer2 NAT
- Using the Management Interfaces
- How to Configure Layer2NAT
- Monitoring the Layer2NAT Configuration
- Troubleshooting the Layer2NAT Configuration
- Configuration Examples
- Additional References
Configuring Layer 2 NAT
This chapter provides information to help you configure the Layer 2 NAT features introduced in Cisco IOS Release 15.0(2)EB.
- Finding Feature Information
- Prerequisites for Layer 2 NAT
- Restrictions for Configuring Layer 2 NAT
- Guidelines
- Information About Configuring Layer 2 NAT
- Using the Management Interfaces
- How to Configure Layer 2 NAT
- Monitoring the Layer 2 NAT Configuration
- Troubleshooting the Layer 2 NAT Configuration
- Configuration Examples
- Additional References

Note![]() For complete information about Cisco Industrial Ethernet 2000 Series switches, see the Release Notes, Command Reference, and Configuration Guide at www.cisco.com/en/US/products/ps12451/tsd_products_support_series_home.html
For complete information about Cisco Industrial Ethernet 2000 Series switches, see the Release Notes, Command Reference, and Configuration Guide at www.cisco.com/en/US/products/ps12451/tsd_products_support_series_home.html
Finding Feature Information
Your software release may not support all the features documented in this document. For the latest feature information and caveats, see the release notes for your platform and software release.
Use Cisco Feature Navigator to find information about platform support and Cisco software image support. To access Cisco Feature Navigator, go to http://www.cisco.com/go/cfn. An account on Cisco.com is not required.
Prerequisites for Layer 2 NAT
Layer 2 NAT is included in the Enhanced LAN Base feature set, available for Cisco IOS 15.0(2)EB or later. It may require a license upgrade and a software upgrade, depending on the model. For detailed instructions, see www.cisco.com/en/US/docs/switches/lan/cisco_ie2000/software/release/15_0_2_eb/upgrade/guide/ie2000_ug.html
Restrictions for Configuring Layer 2 NAT
- Layer 2 NAT is included in the Enhanced LAN Base feature set, available for Cisco IOS 15.0(2)EB or later.
- Only IPv4 addresses can be translated.
- Layer 2 NAT applies only to unicast traffic. You can permit or allow untranslated unicast traffic, multicast traffic, and IGMP traffic.
- If you configure a translation for an Layer 2 NAT host, do not configure it as a DHCP client.
- Layer 2 NAT is not capable of adjusting application layer headers for FTP. This causes FTP to break.
Guidelines
You need to configure Layer 2 NAT instances that specify the address translations. Then you attach these instances to interfaces and VLANs. For unmatched traffic and traffic types that are not configured to be translated, you can choose to permit or drop the traffic. You can view detailed statistics about the packets sent and received.
- You can configure Layer 2 NAT on the two uplink ports of this switch.
- The downlink port can be VLAN, trunk, or Layer 2channel.
- You can configure 128 Layer 2 NAT instances on the switch.
- You can configure 128 translation entries.
- Up to 128 VLANs are allowed to have Layer 2 NAT configuration.
- Certain protocols such as ARP and ICMP do not work transparently across Layer 2 NAT but are “fixed up” by default.
Information About Configuring Layer 2 NAT
Conceptual Overview
One-to-one (1:1) Layer 2 NAT is a service that allows the assignment of a unique public IP address to an existing private IP address (end device), so that the end device can communicate on both the private and public subnets. This service is configured in a NAT enabled device and is the public “alias” of the IP address physically programmed on the end device. This is typically represented by a table in the NAT device.
Layer 2 NAT has two translation tables where private-to-public and public-to-private subnet translations can be defined. Layer 2 NAT is a hardware based implementation which provides the same high level of (bump-on-the-wire) performance throughout switch loading. This implementation also supports multiple VLAN’s through the NAT boundary for enhanced network segmentation. Ring architecture support is built into Layer 2 NAT which allows for redundancy through the NAT boundary.
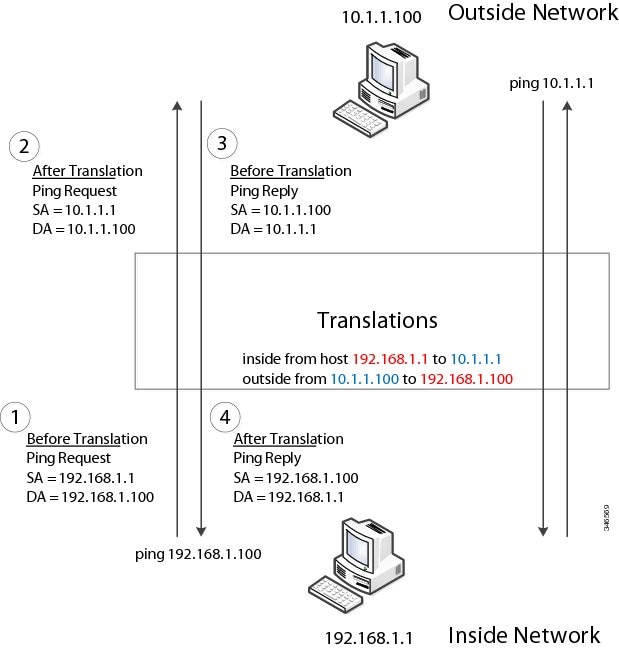
In Figure 46-1 Layer 2 NAT translates addresses between sensors on a 192.168.1.x network and a line controller on a 10.1.1.x network.
1.![]() The sensor at 192.168.1.1 sends a ping request to the line controller by using an “inside” address, 192.168.1.100.
The sensor at 192.168.1.1 sends a ping request to the line controller by using an “inside” address, 192.168.1.100.
2.![]() Before the packet leaves the internal network, Layer 2 NAT translates the source address to 10.1.1.1 and the destination address to 10.1.1.100.
Before the packet leaves the internal network, Layer 2 NAT translates the source address to 10.1.1.1 and the destination address to 10.1.1.100.
3.![]() The line controller sends a ping reply to 10.1.1.1.
The line controller sends a ping reply to 10.1.1.1.
4.![]() When the packet is received on the internal network, Layer 2 NAT translates the source address to 192.168.1.100 and the destination address to 192.168.1.1.
When the packet is received on the internal network, Layer 2 NAT translates the source address to 192.168.1.100 and the destination address to 192.168.1.1.
Figure 46-1 Translating Addresses Between Networks

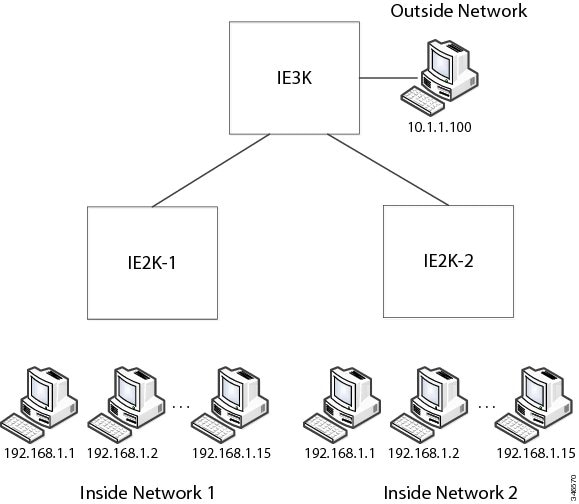
For large nodes, you can quickly enable translations for all devices in a subnet. In this scenario, addresses from Inside Network 1 can be translated to outside addresses in the 10.1.1.0/28 subnet, and addresses from Inside Network 2 can be translated to outside addresses in the 10.1.1.16/28 subnet. All addresses in each subnet can be translated with one command.

Using the Management Interfaces
The management interface is behind the Layer 2 NAT function. Therefore this interface should not be on the private network VLAN. If it is on the private network VLAN, assign an inside address and configure an inside translation.
How to Configure Layer 2 NAT
Default Layer 2 NAT Settings
|
|
|
|---|---|
Permit or drop packets for unmatched traffic and traffic types that are not configured to be translated |
|
Setting Up Layer 2 NAT
To set up Layer 2 NAT, follow these steps. Refer to the examples in this chapter for more details.
Monitoring the Layer 2 NAT Configuration
Troubleshooting the Layer 2 NAT Configuration
|
|
|
|---|---|
Enables showing real-time Layer 2 NAT configuration details when the configuration is applied. |
Configuration Examples
Basic Inside-to-Outside Communications Example
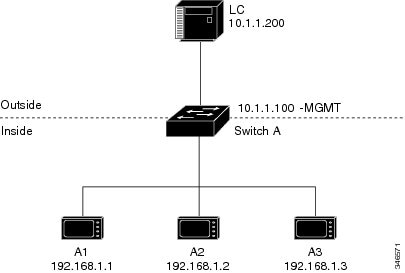
Figure 46-2 Basic Inside-to-Outside Communications

In this scenario, A1 needs to communicate with a logic controller LC that is directly connected to the uplink port. An Layer 2 NAT instance is configured to provide an address for A1 on the outside network (10.1.1.1) and an address for the LC on the inside network (192.168.1.250).
Now this communication can occur:
1.![]() A1 sends an ARP request:
A1 sends an ARP request:
SA: 192.168.1.1
DA: 192.168.1.250
2.![]() Cisco Switch A fixes up the ARP request:
Cisco Switch A fixes up the ARP request:
SA:10.1.1.1
DA: 10.1.1.200
3.![]() LC receives the request and learns the MAC Address of 10.1.1.1.
LC receives the request and learns the MAC Address of 10.1.1.1.
4.![]() LC sends a response:
LC sends a response:
SA: 10.1.1.200
DA: 10.1.1.1
5.![]() Cisco Switch A fixes up the ARP response:
Cisco Switch A fixes up the ARP response:
SA: 192.168.1.250
DA: 192.168.1.1
6.![]() A1 learns the MAC address for 192.168.1.250, and communication starts.
A1 learns the MAC address for 192.168.1.250, and communication starts.

Note![]() The management interface of the switch must be on a different VLAN from the inside network 192.168.1.x.
The management interface of the switch must be on a different VLAN from the inside network 192.168.1.x.
Table 46-2 shows the configuration tasks for this scenario. The Layer 2 NAT instance is created, two translation entries are added, and the instance is applied to the interface. ARP fixups are enabled by default.
Duplicate IP Addresses Example
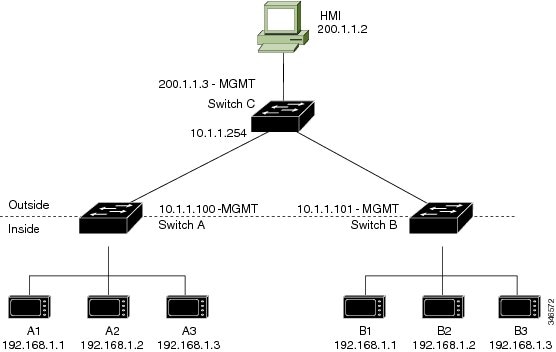
Figure 46-3 Duplicate IP Addresses

In this scenario, two machine nodes are pre-configured with addresses in the 192.168.1.x space. Layer 2 NAT is used to translate these addresses to unique addresses on separate subnets of the outside network. In addition, for machine-to-machine communications, the Node A machines need unique addresses on the Node B space and the Node B machines need unique addresses in the Node A space.
- Switch C needs an address in the 192.168.1.x space. When packets come into Node A or Node B, the 10.1.254 address of Switch C is translated to 192.168.1.254. When packets leave Node A or Node B, the 192.168.1.254 address of Switch C is translated to 10.1.1.254.
- Node A and Node B machines need unique addresses in the 10.1.1.x space. For quick configuration and ease of use, the 10.1.1.x space is divided into subnets: 10.1.1.0, 10.1.1.16, 10.1.1.32, and so on. Each subnet can then be used for a different node. In this example, 10.1.1.16 is used for Node A, and 10.1.1.32 is used for Node B.
- Node A and Node B machines need unique addresses to exchange data. The available addresses are divided into subnets. For convenience, the 10.1.1.16 subnet addresses for the Node A machines are translated to 192.168.1.16 subnet addresses on Node B. The10.1.1.32 subnet addresses for the Node B machines are translated to 192.168.1.32 addresses on Node A.
- Machines have unique addresses on each network:
|
|
|
|
|
|---|---|---|---|
Table 46-4 shows the configuration tasks for Switch A. Table 46-5 shows the configuration tasks for Cisco Switch B.
Additional References
The following sections provide references related to switch administration:
Related Documents
|
|
|
|---|---|
Software Activation Licensing Upgrade Instructions for the Cisco IE2000 Switch Series |
Standards
|
|
|
|---|---|
No new or modified standards are supported by this feature, and support for existing standards has not been modified by this feature. |
MIBs
|
|
|
|---|---|
To locate and download MIBs using Cisco IOS XR software, use the Cisco MIB Locator found at the following URL and choose a platform under the Cisco Access Products menu: http://cisco.com/public/sw-center/netmgmt/cmtk/mibs.shtml |
RFCs
|
|
|
|---|---|
No new or modified RFCs are supported by this feature, and support for existing RFCs has not been modified by this feature. |
 Feedback