- Switch Models
- Front Panel
- Rear Panel
Product Overview
The Catalyst 3650 Series switches are Ethernet switches to which you can connect devices such as
Cisco IP phones, Cisco Wireless Access Points, workstations, and other network devices such as servers, routers, and other switches.
The Catalyst 3650 switches support stacking through Cisco StackWise-160 technology.
Unless otherwise noted, the term switch refers to a standalone switch and to a switch stack.
Switch Models
|
|
|
|
|---|---|---|
| 24 10/100/1000 Ethernet downlink ports |
||
| 24 10/100/1000 PoE+1 downlink ports |
||
| 24 10/100/1000 Ethernet downlink ports |
||
| 48 10/100/1000 Ethernet downlink ports |
||
| 24 10/100/1000 PoE+ downlink ports |
||
| 48 10/100/1000 PoE+ downlink ports |
||
| 48 10/100/1000 Full PoE+ downlink ports |
||
| 48 10/100/1000 Full PoE downlink ports |
||
| 48 10/100/1000 PoE+ downlink ports |
||
| 48 10/100/1000 Ethernet downlink ports |
||
| 8 100M/1G/2.5G/5G/10G Cisco UPOE downlink ports 16 10/100/1000 Cisco UPOE downlink ports |
||
| 8 100M/1G/2.5G/5G/10G PoE+ downlink ports 16 10/100/1000 PoE+ downlink ports |
||
| 12 100M/1G/2.5G/5G/10G Cisco UPOE downlink ports 36 10/100/1000 Cisco UPOE downlink ports |
||
| 12 100M/1G/2.5G/5G/10G Cisco UPOE downlink ports 36 10/100/1000 Cisco UPOE downlink ports |
||
| 12 100M/1G/2.5G/5G/10G Cisco UPOE downlink ports 36 10/100/1000 Cisco UPOE downlink ports |
||
| 12 100M/1G/2.5G/5G/10G Full PoE downlink ports 36 10/100/1000 Full PoE downlink ports |
||
| 24 10/100/1000 PoE+ downlink ports |
||
| 48 10/100/1000 Full PoE downlink ports |
||
| 24 10/100/1000 Ethernet downlink ports |
||
| 48 10/100/1000 Ethernet downlink ports |
||
| 24 10/100/1000 PoE+ downlink ports |
||
| 48 10/100/1000 PoE+ downlink ports |
||
| 48 10/100/1000 Full PoE+ downlink ports |
||
| 48 10/100/1000 Full PoE downlink ports |
||
| 48 10/100/1000 PoE+ downlink ports |
||
| 48 10/100/1000 Ethernet downlink ports |
||
| 8 100M/1G/2.5G/5G/10G Cisco UPOE downlink ports 16 10/100/1000 Cisco UPOE downlink ports |
||
| 8 100M/1G/2.5G/5G/10G PoE+ downlink ports 16 10/100/1000 PoE+ downlink ports |
||
| 12 100M/1G/2.5G/5G/10G Cisco UPOE downlink ports 36 10/100/1000 Cisco UPOE downlink ports |
||
| 12 100M/1G/2.5G/5G/10G Cisco UPOE downlink ports 36 10/100/1000 Cisco UPOE downlink ports |
||
| 12 100M/1G/2.5G/5G/10G Cisco UPOE downlink ports 36 10/100/1000 Cisco UPOE downlink ports |
||
| 12 100M/1G/2.5G/5G/10G Full PoE downlink ports 36 10/100/1000 Full PoE downlink ports |
||
| 24 10/100/1000 PoE+ downlink ports |
||
| 48 10/100/1000 Full PoE downlink ports |
|
1.PoE+ = Power over Ethernet plus (provides up to 30 W per port). |
Front Panel
This section describes the front panel components:
–![]() 10/100/1000 Cisco UPOE ports
10/100/1000 Cisco UPOE ports
–![]() 100M/1G/2.5G/5G/10G PoE+ ports
100M/1G/2.5G/5G/10G PoE+ ports
–![]() 100M/1G/2.5G/5G/10G Cisco UPOE ports
100M/1G/2.5G/5G/10G Cisco UPOE ports
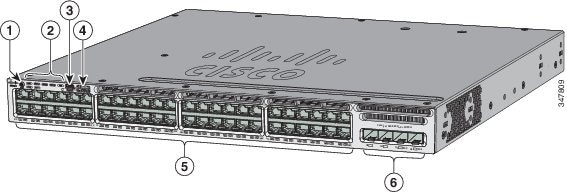
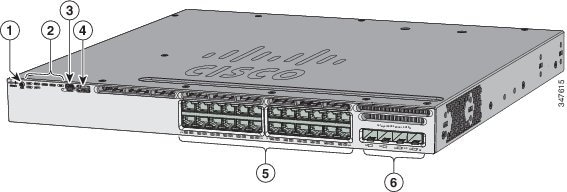
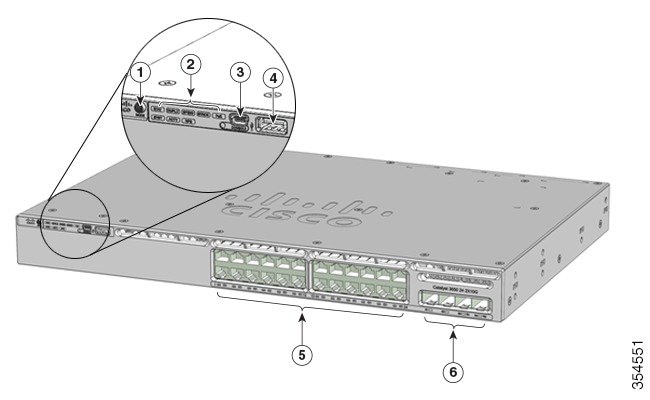
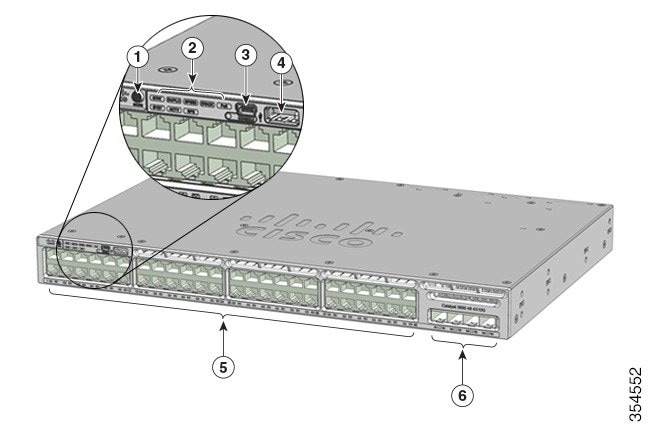
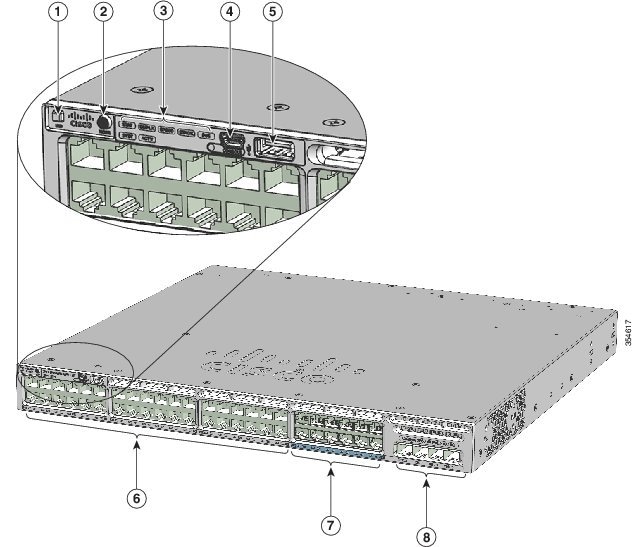
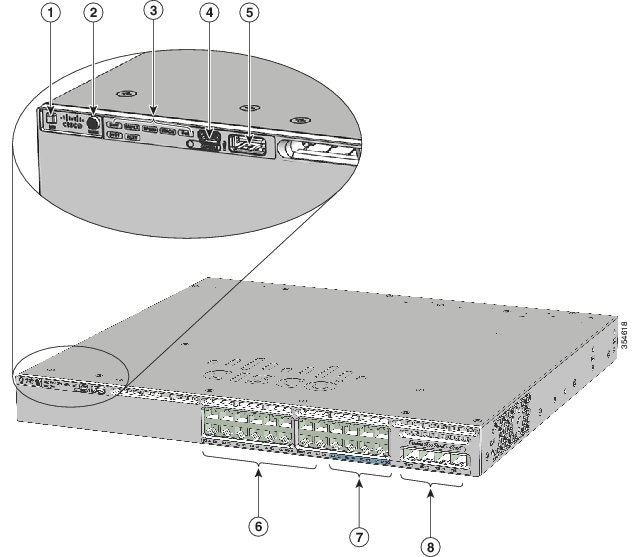
All the switches have similar components. See the following figures for examples.

Note![]() The illustrations of the Catalyst 3650 switch are not intended to depict any particular color scheme. They are provided as a reference for various features and markings described within this guide.
The illustrations of the Catalyst 3650 switch are not intended to depict any particular color scheme. They are provided as a reference for various features and markings described within this guide.
Figure 1-1 Catalyst 3650-48PD-L Switch Front Panel
|
|
|
||
|
|
|
||
|
|
|
Figure 1-2 Catalyst 3650-24PS-L Switch Front Panel
|
|
|
||
|
|
|
||
|
|
|
Figure 1-3 Catalyst 3650-24PDM Switches Front Panel
|
|
|
||
|
|
|
||
|
|
|
Figure 1-4 Catalyst 3650-48FQM Switches Front Panel
|
|
|
||
|
|
|
||
|
|
|
Figure 1-5 Catalyst WS-3650-12X48UQ-L/S/E Switches Switches Front Panel
|
|
|
||
|
|
|
||
|
|
|
||
|
|
|
Figure 1-6 Catalyst WS-3650-8X24UQ-L/S/E Switches Front Panel
|
|
|
||
|
|
|
||
|
|
|
||
|
|
|
10/100/1000 Ethernet Ports
The 10/100/1000 Ethernet ports use RJ-45 connectors with Ethernet pinouts. The maximum cable length is 328 feet (100 meters). The 100BASE-TX and 1000BASE-T traffic requires Category 5, Category 5e, or Category 6 unshielded twisted pair (UTP) cable. The 10BASE-T traffic can use Category 3 or Category 4 UTP cable.
100M/1G/2.5G/5G/10G Ethernet Ports
The 100M/1G/2.5G/5G/10G Ethernet ports use RJ45 connectors with Ethernet pinouts. These ports do not support 10 Mbps speed. The 100 Mbps and 1 Gbps traffic requires Category 5/5e/6 unshielded twisted pair (UTP) cable, with a maximum cable length of 100 m. The 2.5 Gbps traffic requires Category 5e/6/6a UTP cable, with a maximum cable length of 100 m. The 5 Gbps traffic requires Category 5e UTP cable, with a maximum cable length of 70 m, and Category 6/6a UTP cable, with a maximum cable length of 100 m. The 10G traffic requires Category 6 UTP cable, with a maximum cable length of 55 m, and Category 6a UTP cable, with a maximum cable length of 100 m.
PoE+ and Cisco UPOE Ports
The PoE+ and Cisco UPOE ports use the same connectors, as described in the “10/100/1000 Ethernet Ports” section.
- Support for IEEE 802.3af-compliant powered devices (up to 15.4 W PoE per port) and support for IEEE 802.3at-compliant powered devices (up to 30 W PoE+ per port).
- Support for Cisco-enhanced PoE.
- Support for prestandard Cisco-powered devices.
- Configurable support for Cisco intelligent power management, including enhanced power negotiation, power reservation, and per-port power policing.
The Cisco UPOE ports provide support for powered devices (up to 60 W per port).
Depending on the installed power supply modules, each port can deliver up to 60 W of Cisco UPOE. See Table 1-15 for the power supply matrix that defines the available PoE and PoE+, and Cisco UPOE power per port.

Note ●![]() For information on 250-W AC power supply support on the PoE-capable switch models, refer to the Cisco Catalyst 3650 Series Switches Release Notes at http://www.cisco.com/c/en/us/support/switches/catalyst-3650-series-switches/products-release-notes-list.html.
For information on 250-W AC power supply support on the PoE-capable switch models, refer to the Cisco Catalyst 3650 Series Switches Release Notes at http://www.cisco.com/c/en/us/support/switches/catalyst-3650-series-switches/products-release-notes-list.html.
- The output of the PoE+ circuit has been evaluated as a Limited Power Source (LPS) according to IEC 60950-1.
Management Ports
- Ethernet management port (see the “Ethernet Management Port” section)
- RJ-45 console port (EIA/TIA-232) (see the “RJ-45 Console Port” section)
- USB mini-Type B console port (5-pin connector)
You can connect the switch to a host such as a Windows workstation or a terminal server through the Ethernet management port, the RJ-45 console port, or the USB console port (USB mini-Type B port).
The USB console port connection uses a USB Type A to 5-pin USB Mini-Type B cable. The USB console interface speeds are the same as the RJ-45 console interface speeds.
USB Mini-Type B Port
The switch provides a USB mini-Type B console connection on the front panel, and the RJ-45 console port on the switch’s rear panel. Console output is always active on both the connectors, but the console input is active on only one connector at a time, with the USB connector taking precedence over the RJ-45 connector.
Use a USB type-A-to-USB 5-pin mini-Type B cable to connect a PC or other device to the switch. The required USB cable is included in the optional accessory kit.
The connected device must include a terminal emulation application.

Note![]() Windows PCs need a driver for the USB port.
Windows PCs need a driver for the USB port.
When the switch detects a valid USB connection to a powered device, input from the RJ-45 console port is immediately disabled, and input from the USB console is enabled. Removing the USB connection immediately re-enables input from the RJ-45 console connection. An LED on the switch front panel (see Figure 1-8) is green when the USB console connection is enabled.
The switch provides a configurable inactivity timeout that reactivates the RJ-45 console if no input activity has occurred on the USB console for a specified time period. After the USB console has been deactivated due to a timeout, you can restore its operation by disconnecting and reconnecting the USB cable. You can disable USB console operation by using Cisco IOS commands. For details, see the Cisco Cisco Catalyst 3650 Series Switches Software Configuration Guides at http://www.cisco.com/c/en/us/support/switches/catalyst-3650-series-switches/products-installation-and-configuration-guides-list.html.
The 4-pin mini-Type B connectors resemble 5-pin mini-Type B connectors. However, they are not compatible. Use only the 5-pin mini-Type B. See Figure 1-7.
Figure 1-7 USB Mini-Type B Port

Use the CLI to configure an inactivity timeout that reactivates the RJ-45 console if the USB console has been activated and no input activity has occurred on the USB console for a specified time period.
After the USB console deactivates due to inactivity, you cannot use the CLI to reactivate it. Disconnect and reconnect the USB cable to reactivate the USB console. For information on using the CLI to configure the USB console interface, ee the Cisco Cisco Catalyst 3650 Series Switches Software Configuration Guides at http://www.cisco.com/c/en/us/support/switches/catalyst-3650-series-switches/products-installation-and-configuration-guides-list.html.
USB Type A Port
The USB Type A interface provides access to external USB flash devices (also known as thumb drives or USB keys).
The interface supports Cisco USB flash drives with capacities ranging from 64 MB to 1 GB.
Cisco IOS software provides standard file system access to the flash device: read, write, erase, and copy, as well as the ability to format the flash device with a FAT file system.
Uplink Ports
Depending upon the switch model, several uplink ports are available to connect to other devices:
- Four slots supporting only 1-Gigabit SFP modules
- Two slots (left side) supporting only 1-Gigabit SFP modules and two slots (right side) supporting either 10-Gigabit SFP+ modules or 1-Gigabit SFP modules
- Two slots supporting either 1-Gigabit SFP modules or 10-Gigabit SFP+ modules
- Four slots supporting either 1-Gigabit SFP modules or 10-Gigabit SFP+ modules
- Eight slots supporting either 1-Gigabit SFP modules or 10-Gigabit SFP+ modules
- Two slots supporting 40-Gigabit QSFP+ modules

Note![]() If you insert an SFP+ module in an SFP module slot, the SFP+ module slot does not operate, and the switch logs an error message. SFP modules can operate in SFP+ module slots.
If you insert an SFP+ module in an SFP module slot, the SFP+ module slot does not operate, and the switch logs an error message. SFP modules can operate in SFP+ module slots.
SFP, SFP+, and QSFP+ Modules
The SFP and SFP+ modules provide copper or fiber-optic connections to other devices. These transceiver modules are field replaceable, and provide the uplink interfaces when installed in an SFP module slot. The SFP modules have LC connectors for fiber-optic connections or RJ-45 connectors for copper connections.
Use only Cisco SFP and SFP+ modules on the switch. For the latest information about supported SFP/SFP+ modules, refer to Cisco Transceiver Modules Compatibility Matrix at:
http://www.cisco.com/en/US/products/hw/modules/ps5455/products_device_support_tables_list.html
The 40-Gigabit QSFP+ transceiver module is a hot-swappable, parallel fiber-optical module with four independent optical transmit and receive channels. These channels can terminate in another 40-Gigabit QSFP+ transceiver, or the channels can be broken out to four separate 10-Gigabit SFP+ transceivers.
For information on the 40-Gigabit QSFP+ module, refer to Cisco 40-Gigabit QSFP+ Transceiver Modules Installation Note at:
http://www.cisco.com/c/en/us/td/docs/interfaces_modules/transceiver_modules/installation/note/OL_24862.html
LEDs
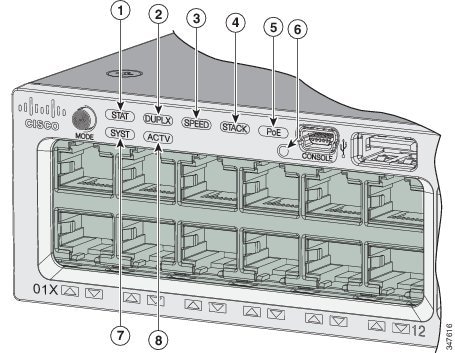
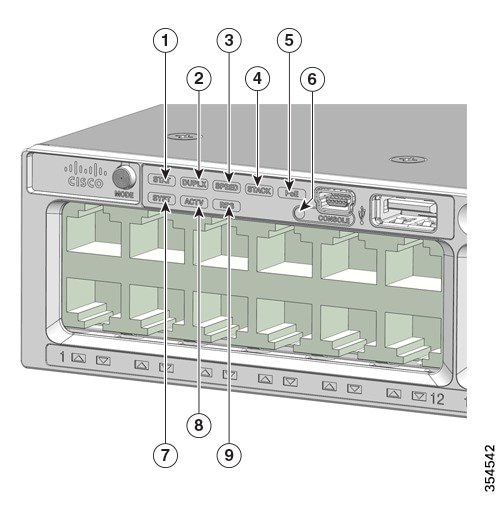
You can use the switch LEDs to monitor switch activity and its performance. Figure 1-8 shows the switch LEDs and the Mode button that you use to select a port mode.
Figure 1-8 Switch Front Panel LEDs
|
|
|
PoE2 |
|
|
|
|
||
|
|
|
||
|
|
|
|
|
Figure 1-9 Catalyst 3650-24PDM and Catalyst 3650-48FQM Switches Front Panel LEDs
|
|
|
||
|
|
|
||
|
|
|
||
|
|
|
||
|
|
PoE3 |
|
SYST LED
The LED colors for the switch and their corresponding status indications are given below:
|
|
|
|---|---|
Port LEDs and Modes
Each Ethernet port, 1-Gigabit Ethernet module slot, and 10-Gigabit Ethernet module slot has a port LED. These port LEDs, either as a group, or individually, display information about the switch and the individual ports. The port mode determines the type of information shown by the port LEDs. Table 1-3 lists the mode LEDs and their associated port modes and meanings.
To select or change a mode, press the Mode button until the desired mode is highlighted. When you change port modes, the meanings of the port LED colors also change. Table 1-4 explains how to interpret the port LED colors in different port modes.
When you press the Mode button on any switch in the switch stack, all the stack switches change to show the same selected mode. For example, if you press the Mode button on the active switch to show the SPEED LED, all the other switches in the stack also show the SPEED LED.
|
|
|
|
|---|---|---|
PoE4 |
|
|
|
|
|
|
|---|---|---|
Link fault. Error frames can affect connectivity, and errors such as excessive collisions, Cyclic Redundancy Check (CRC) errors, and alignment and jabber errors are monitored for a link-fault indication. |
||
Port is blocked by Spanning Tree Protocol (STP) and is not forwarding data. After a port is reconfigured, the port LED can be amber for up to 30 seconds because STP checks the switch for possible loops. |
||
|
|
||
Port is operating at 2.5 Gbps, 5 Gbps, or 10 Gbps link speeds. Use CLI to determine link speed. |
||
|
|
||
Switch is a standby member of a data stack and assumes active responsibilities if the current active switch fails. |
||
| PoE5 |
PoE is off. |
|
PoE is on. The port LED is green when the switch port is providing power. |
||
PoE is denied because providing power to the powered device will exceed the switch power capacity. |
||
PoE is off due to a fault or because it has exceeded a limit set in the switch software. 
|
||
|
|
USB Console LED
The USB console LED (Figure 1-8) shows whether there is an active USB connection to the port.
|
|
|
|---|---|
ACTV LED
The ACTV LED (Figure 1-8) shows the status of the switch being active or not.
|
|
|
|---|---|
An error occurred when the switch was selecting the active switch, or another type of stack error occurred. |
|
STACK LED
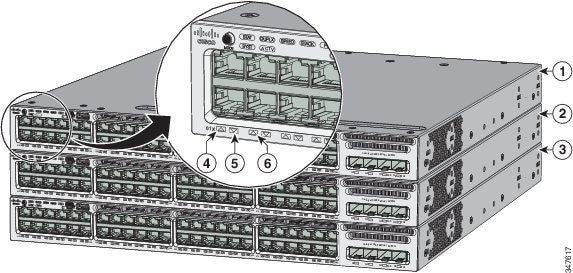
The STACK LED shows the sequence of member switches in a stack. Up to nine switches can be members of a stack. The first nine port LEDs show the member number of a switch in a stack. Figure 1-10 shows the LEDs on the first switch, which is stack member number 1. For example, if you press the Mode button and select Stack, the LED for port 1 blinks green. The LEDs for port 2 and port 3 are solid green, as these represent the member numbers of other switches in the stack. The other port LEDs are off because there are no more members in the stack.
|
|
|
LED blinks green to show that this is switch 1 in the stack. |
|
|
|
|
||
|
|
|
When you select the STACK LED mode, the representative STACK LEDs are green when the StackWise ports are up, and the representative STACK LEDs are amber when the ports are down.
RPS LED
The RPS LED is available only on the Catalyst 3650-24PDM and Catalyst 3650-48FQM switch models.
PoE LED
The PoE LED have the following colors to indicate the status.
|
|
|
|---|---|
PoE mode is selected, and the port LEDs show the PoE status. |
Uplink port LEDs
The uplink ports have various status LEDs. Each port LED is labeled according to its SFP and SFP+ module status.
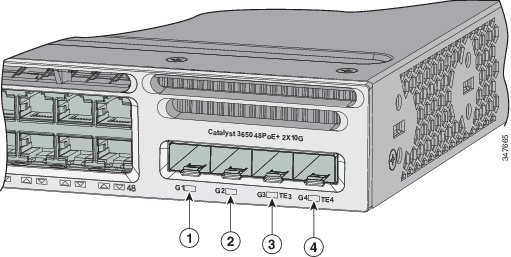
For SFP ports, a G(x) labeling nomenclature is used, where G = 1 Gigabit and x = the port number. The The G(x) label appears to the left of the uplink port LED.
For SFP+ ports, a TE(x) labeling nomenclature is used, where TE = 10 Gigabit and x = the port number. The TE(x) label appears to the right of the uplink port LED.
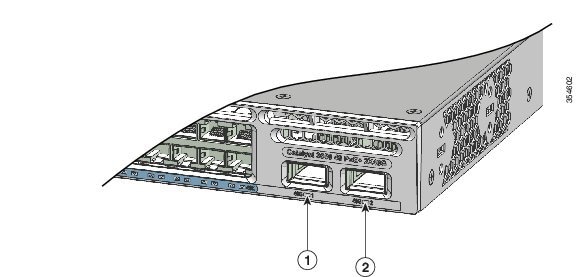
QSFP+ ports are labelled 1, 2, 3, and so on.
An SFP+ module ports has two labels, G(x) and TE(x), because it supports both SFP and SFP+ modules.
The uplink port labeling layouts for the various switch models are:
- Four uplink port LEDs labeled G1, G2, G3, G4—This labeling represents four ports supporting SFP modules.
- Four uplink port LEDs labeled G1, G2, G3, G4 and two right-side uplink port LEDs also labeled TE3 and TE4—This labeling represents two ports (left side) supporting SFP modules and two ports (right side) supporting SFP and SFP+ modules.
- Four uplink port LEDs labeled G1, G2, G3, G4 and TE1, TE2, TE3, TE4—This labeling represents four slots supporting SFP and SFP+ modules.
- Ports labelled 1 to 8—This labelling represents eight ports supporting SFP and SPF+ modules.
- Two ports labelled 40G1 and 40G2—This labelling represents QSFP+ uplink ports.
- Four uplink port LEDs labeled TE1, TE2, TE3, TE4—This labeling represents four slots supporting SFP and SFP+ modules.
- Two uplink port LEDs labeled TE1, TE2—This labeling represents two slots supporting SFP and SFP+ modules.
Figure 1-11 shows an example of an uplink port LED arrangement representing two SFP and two SFP+ ports (Catalyst 3650-48FD-S switch model).
|
|
|
||
|
|
|
Figure 1-12 shows an example of an uplink port LED arrangement representing QSFP+ ports (Catalyst 3650-12X48UZ-X switch models).
Figure 1-12 QSFP+ ports for Catalyst 3650-12X48UZ-X Switches
|
|
|
UID/Beacon LED
The UID and the Beacon LED can be turned on by the administrator to indicate that the switch needs attention. It helps the administrator identify the switch. The beacon can be turned on by either pressing the UID button on the switch front panel, or by using the CLI. There is a blue beacon on the front and rear panel of the switch. The blue beacon on the front panel is a button labeled UID, and on the back panel it is a LED labeled BEACON.
The following switch models have a UID LED:
- WS-C3650-8X24UQ-L/S/E
- WS-C3650-8X24PD-L/S/E
- WS-C3650-12X48UZ-L/S/E
- WS-C3650-12X48UR-L/S/E
- WS-C3650-12X48UQ-L/S/E
- WS-C3650-12X48FD-L/S/E
|
|
|
|---|---|
Rear Panel
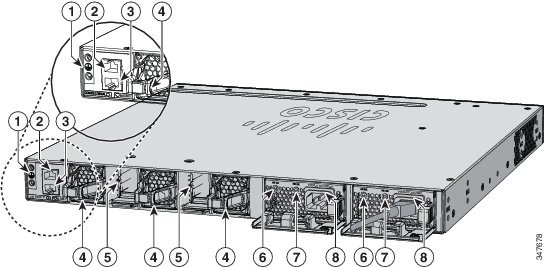
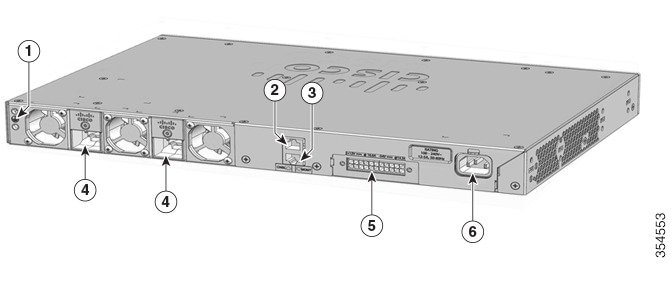
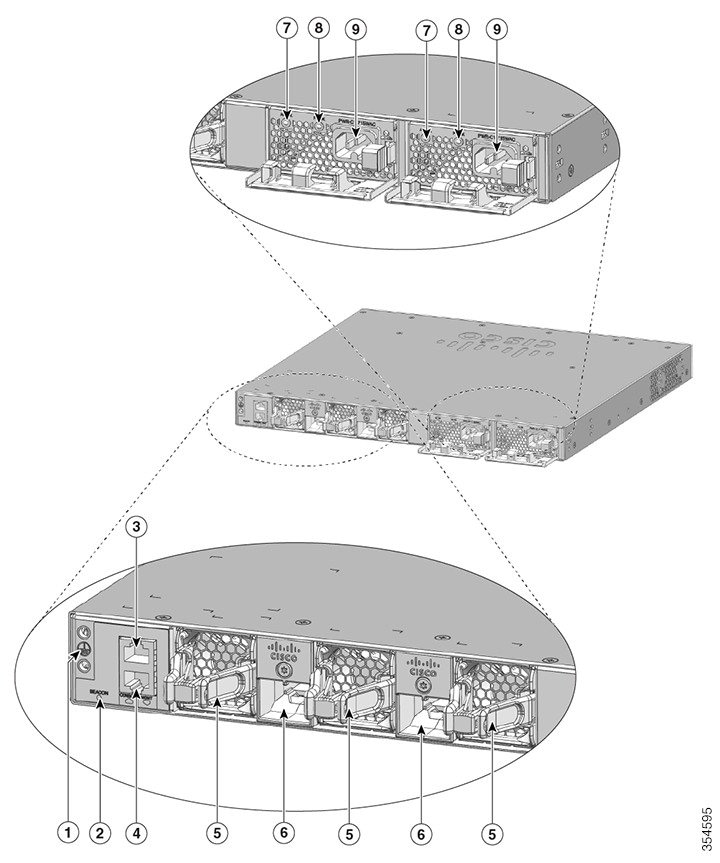
The switch rear panel includes StackWise connectors, ports, fan modules, and power supply modules. See Figure 1-13.
Figure 1-13 Catalyst 3650 Switch Rear Panel
|
|
|
||
|
|
|
||
|
|
|
||
|
|
|
Figure 1-14 Catalyst 3650-24PDM and Catalyst 3650-48FQM Switches’ Rear Panel
|
|
|
||
|
|
|
||
|
|
|
Figure 1-15 Catalyst 3650-8X24UQ/PD and 3650-12X48FD/UQ/UR/UZ Switches Rear Panel
|
|
|
||
|
|
|
||
|
|
|
||
|
|
|
||
|
|
|
Figure 1-15 is a representative illustration for the following switch models:
- WS-C3650-8X24UQ-L/S/E
- WS-C3650-8X24PD-L/S/E
- WS-C3650-12X48UZ-L/S/E
- WS-C3650-12X48UR-L/S/E
- WS-C3650-12X48UQ-L/S/E
- WS-C3650-12X48FD-L/S/E
RJ-45 Console Port LED
The RJ-45 Console Port LED indicates whether the RJ-45 console is enabled or disabled.
|
|
|
|---|---|
|
|
StackWise Ports
StackWise ports are used to connect switches in StackWise stacking configurations. StackWise cables are used to connect the StackWise ports for stacking.
A StackWise adapter must be installed in a StackWise port to enable stacking. StackWise adapter blanks installed in the StackWise ports is the default setup.
For Catalyst 3650 switches in which stacking is specified, StackWise adapters are preinstalled in the StackWise ports, and optional StackWise cables can be ordered. When stacking is not specified, but is required, the StackWise adapter blanks must be removed and StackWise adapters installed.


Note![]() You cannot have a switch stack containing a mix of Catalyst 3650 and Catalyst 3850 switches.
You cannot have a switch stack containing a mix of Catalyst 3650 and Catalyst 3850 switches.
Power Supply Modules
The 24-port and 48-port switches are powered through one or two internal power supply modules.
The switch has two internal power supply module slots. You can use two AC modules, two DC modules, a mixed configuration of one AC and one DC power supply module, or one power supply module and a blank cover. The switch can operate with either one or two active power supply modules.
Table 1-1 shows the default power supply modules that ship with each switch model. All power supply modules (except the blank covers) have internal fans. All switches ship with a blank cover in the second power supply slot if switches are configured with only one power supply.

Power Supply for Catalyst 3650-24TS/PS/TD/PD and Catalyst 3650-48TS/PS/FS/TD/PD/FD/FQ/PQ/TQ Switches
For the following Catalyst switch models:
- WS-C3650-24TS-L/S/E
- WS-C3650-48TS-L/S/E
- WS-C3650-24PS-L/S/E
- WS-C3650-48PS-L/S/E
- WS-C3650-48FS-L/S/E
- WS-C3650-24TD-L/S/E
- WS-C3650-48TD-L/S/E
- WS-C3650-24PD-L/S/E
- WS-C3650-48PD-L/S/E
- WS-C3650-48FD-L/S/E
- WS-C3650-48FQ-L/S/E
- WS-C3650-48PQ-L/S/E
- WS-C3650-48TQ-L/S/E
- WS-C3650-24PDM-L/S/E
- WS-C3650-48FQM-L/S/E
Power Supply Module Specifications
This section specifies the power requirements for Catalyst 3650 switches.
|
|
|
|
|---|---|---|
|
|
|
|
|---|---|---|
|
7.The 640-W DC (PWR-C2-640WDC) power supply is the only DC module. |
|
|
|
|
|---|---|---|
|
8.A 48-port switch with one 640-W power supply provides up to 390 W of PoE to all ports. |
Power Supply Module for Catalyst 3650-24PDM and Catalyst 3650-48FQM Switches
The Catalyst WS-3650-24PDM and Catalyst WS-3650-48FQM switches come with fixed power supplies. Unlike the other Catalyst 3650 switches, they do not have slots for changing the power supplies.
|
|
|
|
|---|---|---|
Power Supply for Catalyst 3650-8X24UQ/PD and Catalyst 3650-12X48FD/UQ/UR/UZ Switches
The Catalyst switch models and their supported power modules are shown below:
|
|
|
|---|---|
Regardless of which power supply is used, some power is drawn by the switch, and the remaining is available for connected devices.
|
|
|
|
|---|---|---|
As an example, if the default power supply of 1100-W is used, the power available for connected devices will be as follows:
|
|
|
|
|---|---|---|
|
|
|
|---|---|
Power Supply Module LEDs
The power supply modules have two status LEDs.
RPS Connector
The Cisco Redundant Power Supply (RPS) 2300 (Model PWR-RPS2300) supports the Catalyst 3650-24PDM and Catalyst 3650-48FQM switches.

Warning![]() Attach only the following Cisco RPS model to the RPS receptacle: RPS2300. Statement 370
Attach only the following Cisco RPS model to the RPS receptacle: RPS2300. Statement 370
Connect the switch and the redundant power system to different AC power sources.
Cisco RPS 2300
Cisco RPS 2300 is a redundant power system that can support six external network devices and provide power to one or two failed devices at a time. It senses when the internal power supply of a connected device fails and provides power to the failed device, preventing loss of network traffic. For more information, see the Cisco Redundant Power System 2300 Hardware Installation Guide : http://www.cisco.com/en/US/products/ps7148/prod_installation_guides_list.html
The Cisco RPS 2300 has two output levels, 52 V and 12 V, with a total maximum output power of 2300 W.
All supported and connected switches can simultaneously communicate with the RPS 2300. You can configure these RPS 2300 features through the switch software:
- Enable RPS active or standby mode for each connected switch
- Configure switch priority for RPS support
- List the connected switches and the power supply module sizes
- Obtain reports when a switch is powered by the RPS
- Obtain status reports for the RPS power supply module
- Read and monitor backup, failure, and exception history
Fan Modules
The switch has three internal hot-swappable 12-V fan modules. The air circulation system consists of the fan modules and the power supply modules. The airflow patterns vary depending on the power supply configuration.
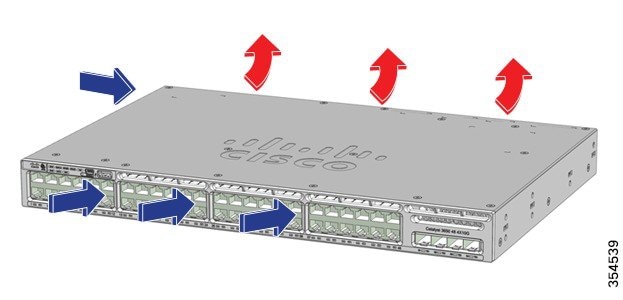
Figure 1-16 shows the airflow patterns for the 24-port and 48-port switches. The blue arrow shows cool air flow, and the red arrow shows warm air flow. When the fan modules are operating properly, a green LED is on at the top left corner of the fan assembly (viewed from the rear). If the fan fails, the LED turns to amber. The switch can operate with two operational fans, but the failed fan should be replaced as soon as possible to avoid a service interruption due to a second fan fault.

Note![]() Three fans are required for proper cooling.
Three fans are required for proper cooling.
|
|
|
|---|---|
Figure 1-16 24-Port and 48-Port Switch Airflow Patterns

Fan Airflow for Catalyst 3650-24PDM and Catalyst 3650-48FQM Switches
The Catalyst 3650-24PDM and Catalyst 3650-48FQM switches have fixed fan modules. Unlike the other Catalyst 3650 switches, they do not have slots for changing the fan modules.
Figure 1-17 Catalyst 3650-24PDM and Catalyst 3650-48FQM Switches’ Airflow Pattern
Management Ports
The switch configurations can be managed through a 10/100/1000 Ethernet port or an RJ-45 console port.
Ethernet Management Port
You can connect the switch to a host such as a Windows workstation or a terminal server through the 10/100/1000 Ethernet management port, or one of the console ports (see Figure 1-13). The 10/100/1000 Ethernet management port is a VPN routing and forwarding interface and uses an RJ-45 crossover cable or straight-through cable.

Note![]() The 10/100/1000 Ethernet management port is an RJ-45 connector that should be connected to a Windows workstation or a terminal server. Do not connect this port to another port in the same switch or to any port within the same switch stack.
The 10/100/1000 Ethernet management port is an RJ-45 connector that should be connected to a Windows workstation or a terminal server. Do not connect this port to another port in the same switch or to any port within the same switch stack.
Table 1-23 shows the Ethernet management port LED colors and their meanings.
|
|
|
|---|---|
RJ-45 Console Port
The RJ-45 console port connection uses the supplied RJ-45-to-DB-9 female cable.
Table 1-24 shows the RJ-45 console port LED colors and their meanings.
|
|
|
|---|---|
Management Options
The Configuration Wizard is a web-based controller user interface (UI) that lets you complete the initial wireless configuration after you configure the IP address, local username, and password or authorization using the authentication server. Using the web UI, you can configure the controller, WLAN, and radios for all initial operations, establish management parameters, set security policies, access software management commands, configure system logs, and other tasks.
- For more information on using the Configuration Wizard, see the Cisco Catalyst 3650 Series Switches Software Configuration Guides at http://www.cisco.com/c/en/us/support/switches/catalyst-3650-series-switches/products-installation-and-configuration-guides-list.html.
- Device Manager
You can use Device Manager, which is in the switch memory, to manage individual and standalone switches. This web interface offers quick configuration and monitoring. You can access Device Manager from anywhere in your network through a web browser. For more information, see the Catalyst 3650 Switch Getting Started Guide at http://www.cisco.com/c/en/us/td/docs/switches/lan/catalyst3650/hardware/quick/guide/cat3650_gsg.html.
You can configure and monitor the switch and switch cluster members from the CLI. You can access the CLI by connecting your management station directly to the switch console port or by using Telnet from a remote management station. See the Cisco Catalyst 3650 Series Switches Command Reference Guides at http://www.cisco.com/c/en/us/support/switches/catalyst-3650-series-switches/products-command-reference-list.html.
Cisco Prime Infrastructure combines the wireless functionality of Cisco Prime Network Control System (NCS) and the wired functionality of Cisco Prime LAN Management Solution (LMS), with the application performance monitoring and troubleshooting capabilities of Cisco Prime Assurance Manager. For more information, see the Cisco Prime Infrastructure documentation at:
http://www.cisco.com/en/US/products/ps12239/index.html
Network Configurations
See the switch’s software configuration guide on Cisco.com for network configuration concepts and examples about how to use the switch to create dedicated network segments and interconnecting the segments through Gigabit Ethernet connections.
 Feedback