New and Changed Information
This table provides an overview of the significant changes to this guide up to this current release. The table does not provide an exhaustive list of all changes made to the guide or of the new features up to this release.
|
Cisco APIC Release |
Feature |
Description |
|---|---|---|
|
6.2(2) |
Read-Only API Proxy Access for Cisco TAC via Intersight |
Cisco TAC can now perform read-only GET API queries on your APIC cluster through the Intersight device connector. Access is limited to a predefined allow-list of API endpoints. No additional configuration is required beyond claiming the APIC in Intersight. For more information, see What happens after you claim an APIC in Intersight |
|
6.0(2) |
New Cisco Intersight proxy added directly to switches |
Usage of this new proxy requires a completed DNS Service Policy in the management VRF instance to program DNS onto all switch nodes to enable this new proxy to reach Cisco Intersight and share Asset Device Registration (Connected Device Sub Target) telemetry. Prior to the 6.0(2) release, this was handled through the Cisco APIC Connector, and switch DNS configuration was not a requirement. For more information, see the "Configuring a DNS Service Policy" section in the Cisco APIC Basic Configuration Guide. |
|
6.0(1) |
Switches get claimed automatically |
When you claim a Cisco APIC, all switches in the fabric will also get claimed automatically in Cisco Intersight. For more information see Claiming a Device Using the Intersight Device Connector GUI. |
|
5.2(1) |
DNS and proxy configurations are no longer configured within the Intersight - Device Connector pages |
The DNS and proxy configurations are no longer configured within the Intersight - Device Connector pages. Instead, these settings are configured in a centralized area in the Cisco APIC, outside of the Intersight - Device Connector pages. |
|
4.2(5) |
Auto Update is enabled by default |
The Auto Update option is now enabled by default. |
|
4.1(2) |
Initial release of this feature |
Initial release of this feature. |
About Device Connector
Devices are connected to the Intersight portal through a Device Connector that is embedded in the management controller of each system. Device Connector provides a secure way for the connected devices to send information and receive control instructions from the Cisco Intersight portal, using a secure Internet connection.
When an Intersight-enabled device or application starts, the Device Connector starts at boot by default, and attempts to connect to the cloud service. If the Auto Update option is enabled, the Device Connector is automatically updated to the latest version through a refresh by the Cisco Intersight service when you connect to Cisco Intersight. For more information on the Auto Update option, see About the Auto Update Option.
About the Auto Update Option
If you enabled the Auto Update option, the Device Connector automatically initiates an upgrade after receiving an Upgrade message from the Cisco Intersight Cloud. During this time, the Device Connector checks if a Cisco Application Policy Infrastructure Controller (APIC) is being upgraded. If a Cisco APIC is being upgraded, then the Device Connector upgrade will be postponed to maximum of 24 hours, after which the Device Connector is upgraded regardless if a Cisco APIC is being upgraded. If there are no Cisco APICs being upgraded, then the Device Connector initiates its upgrade immediately. Likewise, the Cisco APIC upgrade pre-validation process verifies if the Device Connector is being upgraded when you initiate a Cisco APIC upgrade. In such a case, the upgrade page displays a corresponding warning message.
If a Device Connector upgrade is in progress, the following message displays:
DC upgrade is in progress. Wait for DC upgrade to complete before triggering APIC upgradeIf the Cisco APIC pre-upgrade validation is unable to check the Device Connector upgrade status, the following message displays:
Could not check DC upgrade statusIn this case, re-initiate the Cisco APIC upgrade. If the upgrade fails again with the same message, wait 1 or 2 minutes and try again.
If the Auto Update option is disabled and there is a new Device Connector software version available, you will be prompted in the Device Connector GUI page to update the software manually when new releases become available. In addition, the Device Connector can become out-of-date, which can affect the ability of the Device Connector to connect to Cisco Intersight.
We recommend that you enable the Auto Update option. Beginning in Cisco APIC release 4.2(5), this option is enabled by default.
Device Connector Auto Upgrade Constraints
-
If you downgrade the Cisco APIC to the 4.2(4) or earlier release, the Device Connector upgrade policy will be set to Manual if the policy was set to Auto in the 4.2(5) or later release.
-
Device Connector auto-upgade function will happen only in primary APIC clusters in release 6.0(4).
-
Device Connector auto-upgade function will not happen in all APIC clusters in release 6.0(5).
About Device Connector Configuration Changes in Clustered APIC Nodes
The Cisco APIC appliance is deployed as a cluster. A minimum of three infrastructure controllers, or nodes, are configured in a cluster to provide control of the scale-out Cisco ACI fabric.
When you make a configuration change to a Device Connector in one of the clustered nodes in the Cisco APIC fabric, that configuration change is automatically reflected on the other Device Connectors in the other nodes in that Cisco APIC cluster.
For example, assume you have two DNS servers shown as configured in the DNS Configuration page for the Device Connector in one of the APIC nodes in the cluster. If you were to go into the same pages for the Device Connector in the other two APIC nodes in the cluster, you should see the same two DNS servers configured in those nodes as well. Then, if you were to add a third DNS server in the DNS Configuration page for the Device Connector in one of the APIC nodes in the cluster and click Save in that page, after the two-minute cycle for DNS change to take affect, that change will be shown in the DNS Configuration page for the Device Connector in the other two APIC nodes in the cluster.
This configuration change behavior applies to claimed and unclaimed Device Connectors in clustered nodes in the Cisco APIC fabric as well. For example, if you were to configure and claim the Device Connector in one of three APIC nodes in a cluster, you would see that the Device Connector is automatically configured and claimed in the other two APIC nodes in that cluster. Likewise, if you were to then unclaim the Device Connector in one of the APIC nodes in a cluster, you would then see that the Device Connector is unclaimed automatically in the other APIC nodes in that cluster.
Configuring the Intersight Device Connector
Procedure
|
Step 1 |
In the Cisco Application Policy Infrastructure Controller (APIC), on the menu bar, choose . |
||
|
Step 2 |
In the Navigation pane, click Intersight. On the newer versions, the label may show Nexus Cloud Connectivity, Nexus Cloud and Intersight Conencitivty, or Intersight Connectivity. The Intersight - Device Connector overview page appears. The Device Connector should be shown as connected to the Internet (green dotted lines) in the Device Connector graphic in this page. 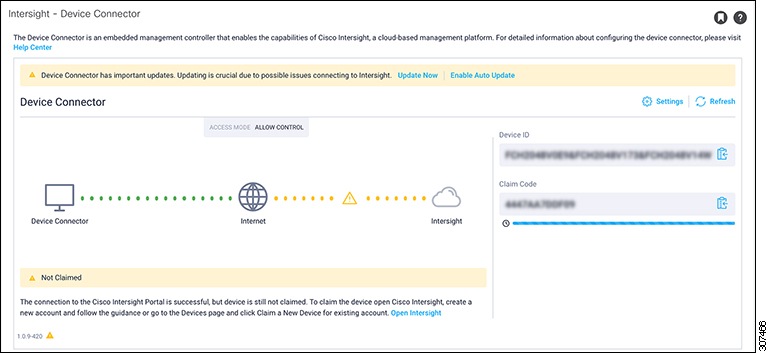
The figure below shows the screen starting in release 5.2(1). The screen shot was taken from Release 6.1(2) as an example. 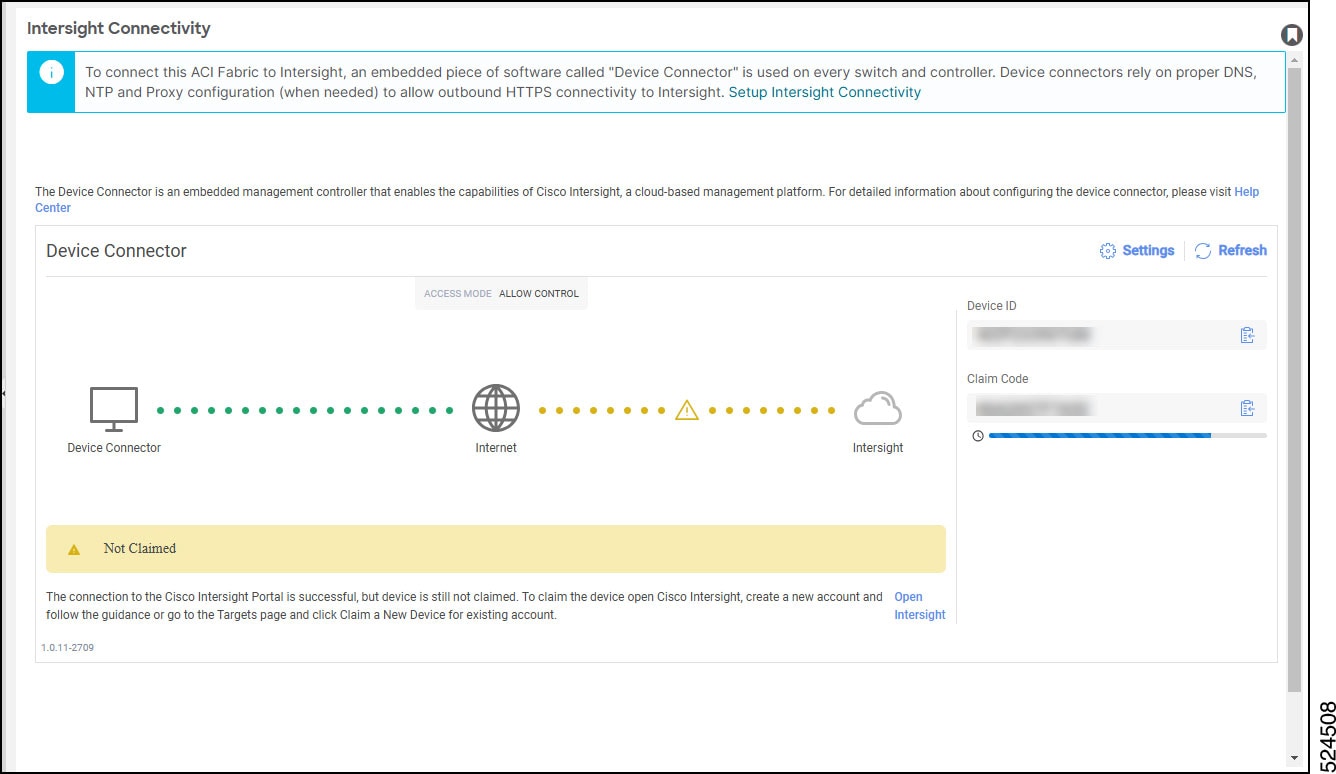
|
||
|
Step 3 |
Determine if you would like to update the software at this time, if there is a new Device Connector software version available. If there is a new Device Connector software version available and you do not have the Auto Update option enabled, you will see a message towards the top of the screen telling you that Device Connector has important updates available.
|
||
|
Step 4 |
Click the Settings link to the far right of the Device Connector heading. The Settings page appears with the General tab selected by default.
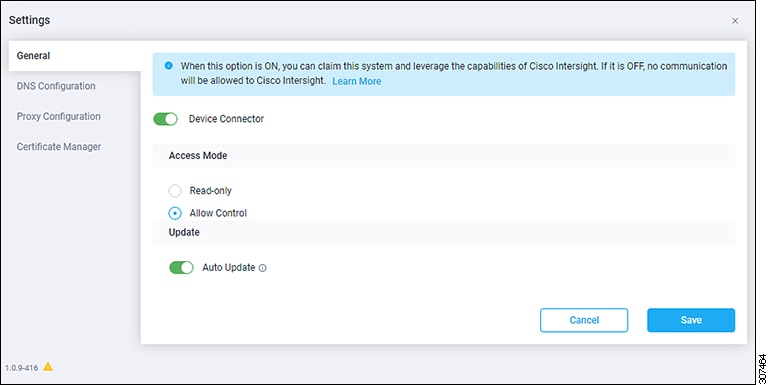
The figure below shows tabs in the Settings page for newer versions of Device Connector. 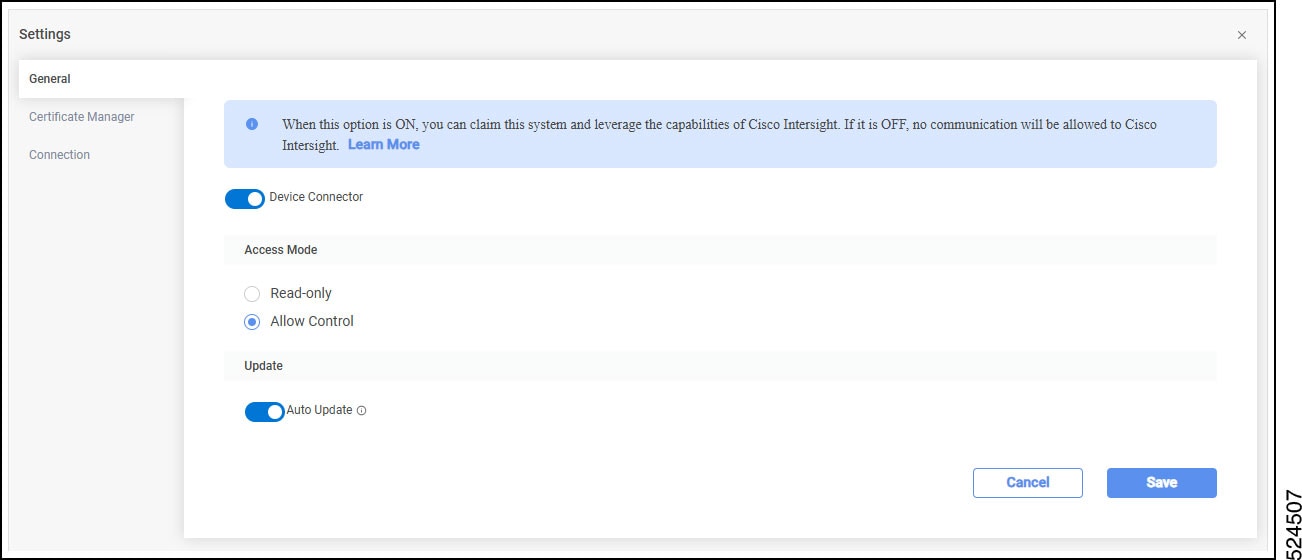
|
||
|
Step 5 |
In the General page, configure these settings. |
||
|
Step 6 |
When you have completed the configurations in the General page, click Save. A Successfully Saved Settings pop-up apears. The Intersight - Device Connector overview pages appears again. |
||
|
Step 7 |
Continue with the next steps of the configuration process, depending on the release of the software.
|
||
|
Step 8 |
To configure or verify the DNS settings, click Settings, then click DNS Configuration. The DNS Configuration page appears. 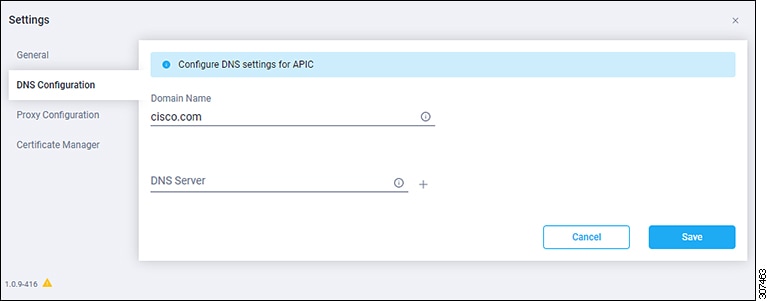
|
||
|
Step 9 |
In the DNS Configuration page, configure or verify the DNS settings. While you can configure DNS servers in this page, we recommend that you use the general Cisco APIC settings instead to configure a DNS service policy to connect with DNS providers. Navigate to , then right-clicking on DNS Profiles and selecting Create DNS Profile. For more information on configuring a DNS service policy, see the Cisco APIC Basic Configuration Guide. If you use the general Cisco APIC settings instead to configure a DNS service policy to connect with DNS providers as described above, you should see the DNS configuration information already populated in this DNS Configuration page. If you do not, or if you would rather configure DNS servers in this page, use these steps:
Every two minutes, the Device Connector queries the Cisco APIC for any DNS changes, so you might see a warning message at this point, saying "APIC DNS changes can take up to two minutes to take effect."
|
||
|
Step 10 |
When you have completed the configurations in the DNS Configuration page, click Save. The Intersight - Device Connector overview pages appears again. At this point, you can make or verify several configure settings for the Intersight Device Connnector: |
||
|
Step 11 |
If you want to configure the proxy that the Device Connector will use to communicate with the Intersight cloud, click Settings, then click Proxy Configuration. The Proxy Configuration page appears. 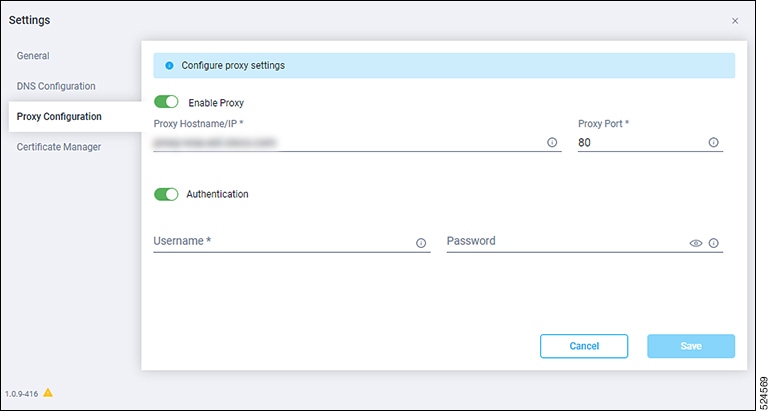
|
||
|
Step 12 |
In the Proxy Configuration page, configure these settings. In this page, you can configure the proxy that the Device Connector will use to communicate with the Intersight cloud.
|
||
|
Step 13 |
When you have completed the configurations in the Proxy Configuration page, click Save. The Intersight - Device Connector overview pages appears again. If you want to make manage certificates with the Device Connector, go to the next step. |
||
|
Step 14 |
If you want to manage certificates with the Device Connector, click Settings, then click Certificate Manager. The Certificate Manager page appears. 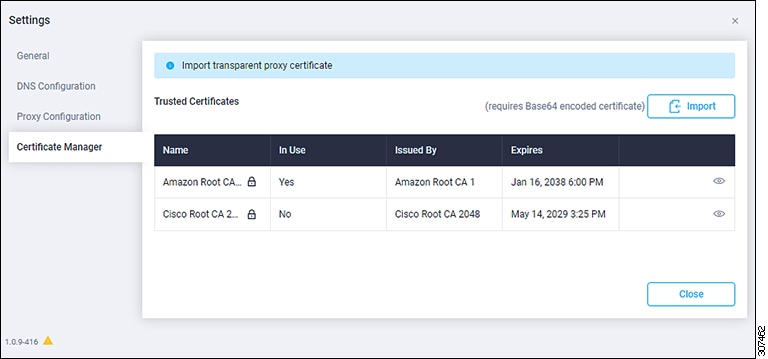 |
||
|
Step 15 |
In the Certificate Manager page, configure these settings. By default, the device connector trusts only the built-in svc.ucs-connect.com certificate. If the device connector establishes a TLS connection and a server sends a certificate that does not match the built-in svc.ucs-connect.com certificate, the device connector terminates TLS connections because it cannot determine if the server is a trusted device or not. Click the Import link in the far right of the screen to import a CA signed certificate. The imported certificates must be in the *.pem (base64 encoded) format. After a certificate is successfully imported, it shows in the Trusted Certificates list. If the certificate is correct, it shows in the In-Use column. View these details for a list of certificates that are used to connect to svc.ucs-connect.com (intersight.com):
Delete a certificate from the list of Trusted certificates. However, you cannot delete bundled certificates (root+intermediate certificates) from the list. The lock icon represents the Bundled certificates. |
||
|
Step 16 |
When you have completed the configurations in the Certificate Manager page, click Close. |
||
|
Step 17 |
If you are running on release 5.2(1) or later, configure the proxy settings in the centralized area in APIC by navigating to these locations:
You can also configure both DNS and the Proxy Settings through the First Time Setup wizard. Access it, click the Setup Intersight Connectivity link in the blue note box at the top of the Intersight Connecitivty Pane, shown in Figure 2. For more information, see the chapter "First Time Setup Wizard" in the Cisco APIC Basic Configuration Guide. |
||
|
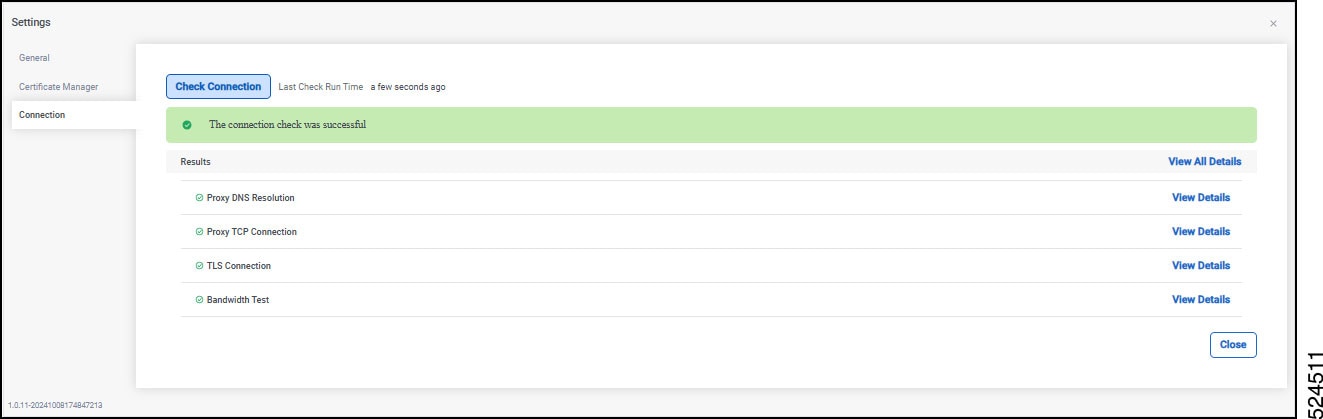
Step 18 |
To see the valid connection to Intersight to various services, click the Connection tab. Click Check Connection. The process runs a diagnostic and results show in the window with green check marks. 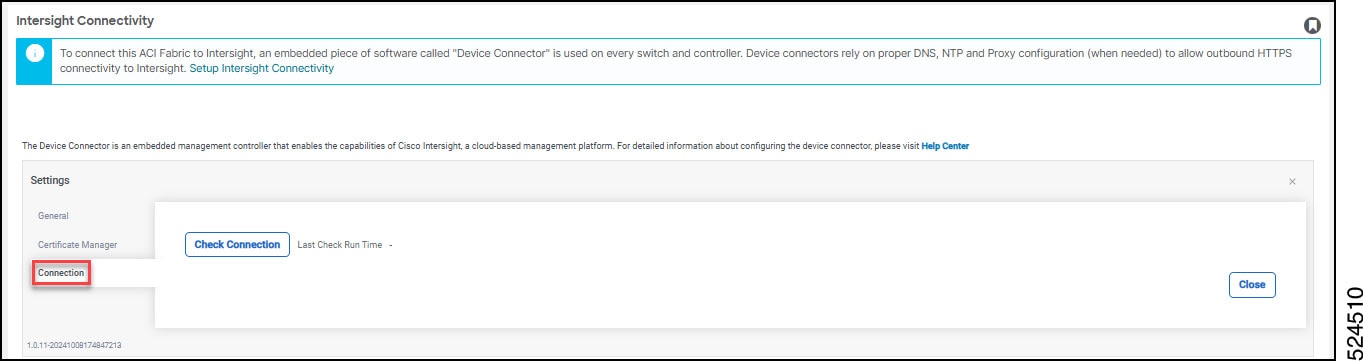
|
What to do next
Claim the device using the instructions provided in Claiming a Device Using the Intersight Device Connector GUI.
Claiming a Device Using the Intersight Device Connector GUI
Before you begin
Configure the Cisco Intersight Device Connector information from the Cisco Application Policy Infrastructure Controller (APIC) site using the instructions provided in Configuring the Intersight Device Connector.
Procedure
|
Step 1 |
Log into the Cisco Intersight cloud site: |
||
|
Step 2 |
In the Cisco Intersight cloud site, click the System tab from the drop-down menu in the top margin. Click Settings > Targets from the left banner. 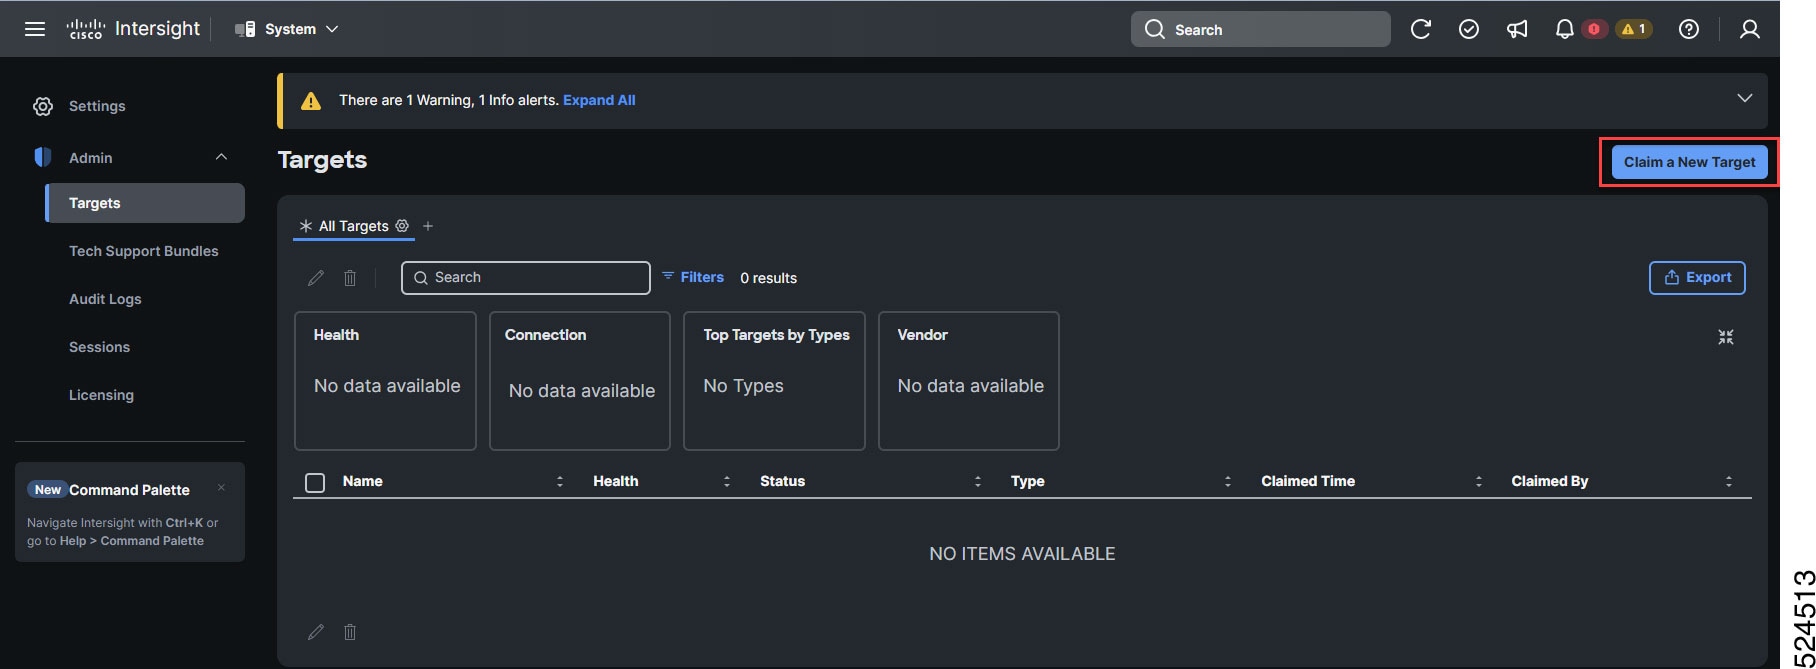
Click Claim a New Target. The Claim a New Target page appears. 
Click Network as the target type. Select Cisco APIC from the Network options.
|
||
|
Step 3 |
Go back to the Cisco APIC site. Copy the Device ID and Claim Code from the site and paste them into the proper fields in the Claim a New Target page in the Cisco Intersight cloud site. Click the clipboard next to the fields in the Cisco APIC site to copy the field information into the clipboard. |
||
|
Step 4 |
In the Claim a New Target page in the Cisco Intersight cloud site, click Claim. You will see the message "Your target has been successfully claimed" in the Claim a New Target page. Also, in the main page, you will see your Cisco APIC system, with When you claim an APIC cluster, switches that are attached to it are "automatically exposed" to Cisco Intersight. |
||
|
Step 5 |
Go back to the Intersight - Device Connector page in the Cisco APIC GUI and verify that Cisco Intersight successfully claimed the system. You will see green-dotted lines connecting Internet to Intersight in the Device Connector graphic. The text Claimed underneath the graphic. 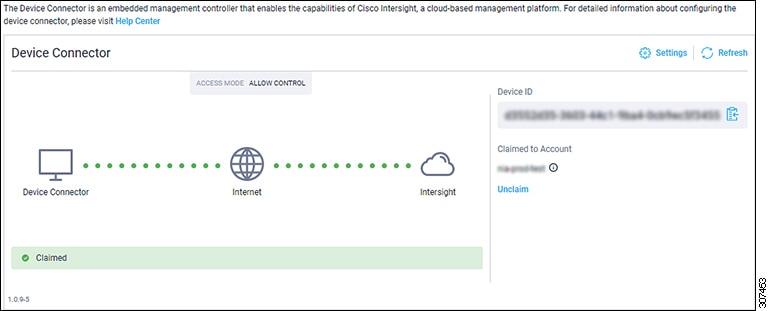
If you decide to unclaim this device for some reason, locate the Unclaim link in the Intersight - Device Connector page and click that link. |
What happens after you claim an APIC in Intersight
When you claim an APIC in Intersight, certain capabilities are enabled automatically through the device connector. You do not need to perform any additional configuration to enable these capabilities.
This section describes what data is collected and what access is enabled after claiming an APIC.
Telemetry Collection
After you claim the APIC, Intersight begins collecting telemetry data from the APIC cluster automatically. This includes information such as:
-
Node inventory
-
Software versions
-
Device health status
This data collection is continuous and starts immediately after claiming. It is used by Cisco support teams to monitor fabric health and identify potential issues.
 Note |
If you do not want telemetry data to be collected, do not claim the APIC in Intersight. |
For information about how Cisco uses this telemetry data in proactive support cases, see About Proactive ACI Engagements.
After you claim the APIC, Cisco TAC engineers can query your APIC cluster through Intersight using a read-only API proxy. TAC uses this access to retrieve diagnostic information needed to troubleshoot and resolve support cases.
You do not need to enable or configure anything for this capability. It is available as soon as the APIC is claimed.
What TAC Can Do
-
TAC can send read-only (GET) API requests to your APIC cluster through Intersight.
-
Requests are limited to a predefined set of APIC API endpoints. TAC cannot query arbitrary APIs on your APIC.
What TAC Cannot Do
-
TAC cannot modify, create, or delete any objects on your APIC through this proxy.
-
TAC cannot query APIC APIs that are not on the predefined allow-list. Requests to unsupported endpoints return the following error:
{ "code": "InternalServerError", "message": "Cannot execute the request due to an error - 'access to this resource is restricted: /api/node/class/<unsupported-class>'", "messageId": "barcelona_request_internal_error_with_param", "messageParams": { "1": "access to this resource is restricted: /api/node/class/<unsupported-class>" }, "traceId": "<trace-id>" } -
TAC cannot change the rate limits or timeout settings for this feature.
-
TAC cannot make any changes to your APIC configuration. Write operations such as POST and DELETE are not supported.
How Requests Are Executed
All API requests from Intersight are executed on the APIC using a dedicated Intersight application user account. This user account is created automatically on the APIC when the device connector establishes a connection with Intersight.
Rate Limits
The following rate limits apply to TAC requests through the API proxy. These limits are fixed and cannot be changed.
|
Parameter |
Value |
|---|---|
|
Maximum requests per second |
5 |
|
Maximum burst |
20 requests |
|
Maximum concurrent requests per APIC cluster |
2 |
Timeout Behavior
-
The default timeout for each API proxy request is 30 seconds.
-
TAC accounts can extend the timeout up to 600 seconds using a URL parameter.
-
However, each individual request processing thread has a hard maximum of 90 seconds. Setting the timeout higher than 90 seconds does not extend the actual processing time.
Response Size Limit
The APIC device connector has a 5 MB limit on the size of API response payloads. If a response exceeds 5 MB:
-
The device connector truncates the response data.
-
Intersight detects the truncation and returns an HTTP 502 (Bad Gateway) error instead of returning incomplete data.
To avoid this, TAC uses pagination and query filters to keep response sizes below the limit.
How You Can Track TAC Activity
When TAC queries your APIC using this proxy, the following applies:
-
TAC case documentation: All queries performed by TAC through this proxy are tied to a TAC Service Request (SR). The results of any queries and the actions taken are documented in the external notes of the SR, which are visible to you.
-
APIC logs: Because the proxy performs read-only operations, these requests do not appear in APIC audit logs. However, they are recorded in the APIC nginx and API request logs if you need to review them.
Opting Out
This capability is enabled automatically when you claim the APIC in Intersight. There is no way to disable only this feature while keeping the APIC claimed.
If you do not want TAC to have read-only API access to your APIC through Intersight, do not claim the APIC in Intersight, or unclaim it if it is already claimed.
Related Resources
The following documents provide additional information about the topics covered in this section.
|
Topic |
Link |
|---|---|
|
How Cisco TAC uses Intersight data for proactive support |
|
|
How to configure the APIC device connector for Intersight |
|
|
APIC support resources |
About Auto-Populating the Data Center HTTP or HTTPS Proxy Configuration
Starting with the 4.2(4o) release, the Cisco Application Policy Infrastructure Controller (APIC) can automatically populate the proxy configuration for the data center by using values from the smart license HTTP or HTTPS proxy configuration. This feature simplifies the process of configuring the data center proxy and reduces the possiblity of human error. The data center reads the proxy configuration only during the data center bootstrap time--either during the Cisco APIC or the data center upgrade time. The Cisco APIC auto-populates the configuration under these conditions:
-
If there is no proxy is configured in the data center, the Cisco APIC reads from the license manager during the data center bootstrap time as a result of a Cisco APIC or data center upgrade, and populates the proxy information from the smart license configuration.
-
The data center will not monitor for any configuration changes from the Cisco APIC or smart license.
-
Any changes made to the smart license proxy configuration after the data center bootstrap is complete are not reflected in the data center. If the data center is not able to communicate with Cisco Intersight, there will be an appropriate alert raised in the GUI.
-
If configuration is already present in the data center as a result of pre-populating the configuration from the smart license or user configuration, the data center will not use the configuration from smart license on the next bootstrap time.
-
Even though proxy information is pre-populated in the data center, inventory sharing with the Cisco APIC is still controlled from Cisco Network Insights Advisor.
-
The data center cannot pre-populate the proxy authentication configuration (username/password) if the proxy server requires authentication, because this information is not available from the smart license.
The data center reads the proxy configuration from the licenseLicPolicy managed object and only populates the configuration if the mode is set to proxy.
Disabling the Data Center HTTP or HTTPS Proxy Configuration Auto-Population
If you do not want to share the Cisco Application Policy Infrastructure Controller (APIC) inventory with Cisco, you can disable the proxy configuration in the Cisco APIC, which also disables the proxy configuration auto-population feature.
Note |
In releases prior to 5.2(1), if the proxy configuration is not already configured from the Intersight - Device Connector Settings window, then the Device Connector will try to pull it from Smart License feature. |
Procedure
|
Step 1 |
In the Cisco APIC, on the menu bar, choose . |
|
Step 2 |
In the Navigation pane, choose Intersight. |
|
Step 3 |
In the Work pane, click Settings > Proxy Configuration. |
|
Step 4 |
Click the Enable Proxy slider to disable it. The slider will move to the left side and the slider's background will turn gray. |
|
Step 5 |
Click Save. |
 Feedback