About ACI IP SLAs
Many companies conduct most of their business online and any loss of service can affect their profitability. Internet service providers (ISPs) and even internal IT departments now offer a defined level of service, a service level agreement (SLA), to provide their customers with a degree of predictability.
IP SLA tracking is a common requirement in networks. IP SLA tracking allows a network administrator to collect information about network performance in real time. With the Cisco ACI IP SLA, you can track an IP address using ICMP and TCP probes. Tracking configurations can influence route tables, allowing for routes to be removed when tracking results come in negative and returning the route to the table when the results become positive again.
ACI IP SLAs are available for the following:
-
Static routes:
-
New in ACI 4.1
-
Automatically remove or add a static route from/to a route table
-
Track the route using ICMP and TCP probes
-
-
Policy-based redirect (PBR) tracking:
-
Available since ACI 3.1
-
Automatically remove or add a next -hop
-
Track the next-hop IP address using ICMP and TCP probes, or a combination using L2Ping
-
Redirect traffic to the PBR node based on the reachability of the next-hop
-
For more information about PBR tracking, see Configuring Policy-Based Redirect in the Cisco APIC Layer 4 to Layer 7 Services Deployment Guide.
 Note |
For either feature, you can perform a network action based on the results of the probes, including configuration, using APIs, or running scripts. |
ACI IP SLA Supported Topologies
The following ACI fabric topologies support IP SLA:
-
Single Fabric: IP SLA tracking is supported for IP address reachable through both L3out and EPG/BD
-
Multi-Pod
-
You can define a single object tracking policy across different Pods.
-
A workload can move from one Pod to another. The IP SLA policy continues to check accessibility information and detects if an endpoint has moved.
-
If an endpoint moves to another Pod, IP SLA tracking is moved to the other Pod as well, so that tracking information is not passed through the IP network.
-
-
Remote Leaf
-
You can define single object tracking policies across ACI main data center and the remote leaf switch.
-
IP SLA probes on remote leaf switches track IP addresses locally without using the IP network.
-
A workload can move from one local leaf to a remote leaf. The IP SLA policy continues to check accessibility information and detects if an endpoint has moved.
-
IP SLA policies move to the remote leaf switches or ACI main data center, based on the endpoint location, for local tracking, so that tracking traffic is not passed through the IP network.
-
Note |
Currently, ACI does not support IP SLA for static route in vPC topology. |
Cisco ACI IP SLA Operation
A Cisco ACI IP SLA provides monitoring capabilities on the ACI fabric allowing the SLA probing to occur across the data center network and out to the external network. This is accomplished by configuring an IP SLA monitoring policy which defines the probe type used during monitoring. The monitoring policy is then associated with monitoring probe profiles known as "track members". Once configured, track members define an endpoint or next-hop by IP address, the associated monitoring policy, and the scope (bridge domain or L3Out). One or more track members can be assigned to a "track list". Track lists configure thresholds that, if exceeded, determine if a track list is available (up) or unavailable (down).
The following four examples show the supported use cases for ACI IP SLAs in static routes.
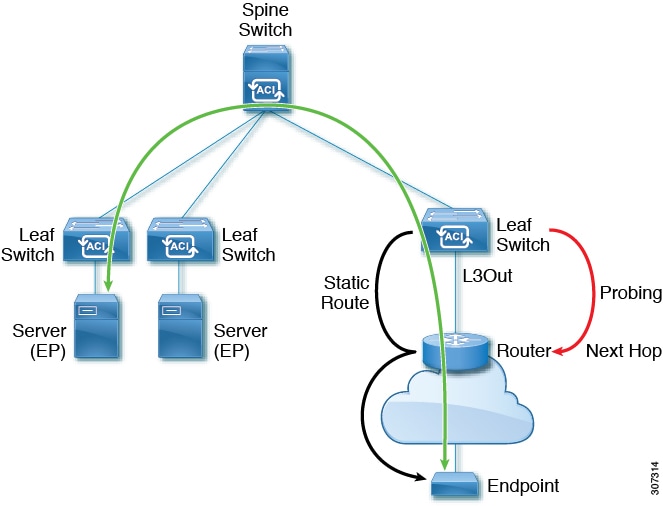
Example 1: Static Route Availability by Tracking the Next-Hop
The following figure shows the network topology and the operation for tracking the static route availability of a router.
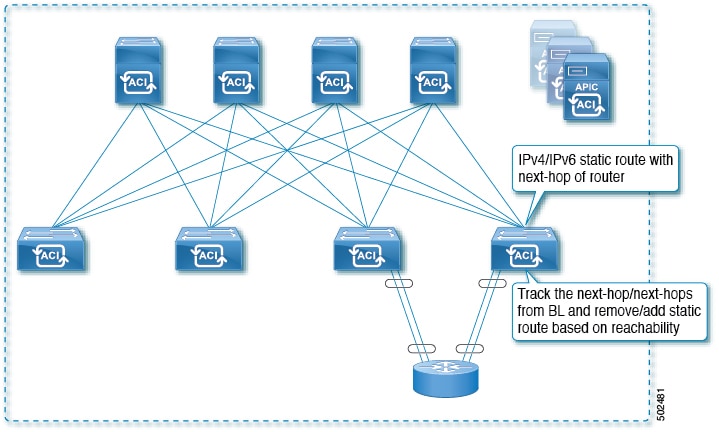
For this use case:
-
The next-hop can be direct or indirect meaning that the next-hop can be a loopback IP address of the router.
-
The next-hop can be accessed through a physical interface, sub-interface, port channel (PC), PC sub-interface, or switch virtual interface (SVI).
-
The static route is configured under the L3out external network and can be removed or added from/to the route table based on the accessibility of the next-hop .
Example 2: Static Route Availability by Tracking an IP Address Through L3Out
The following figure shows the network topology and the operation for tracking the static route availability of a server through an L3Out external route.
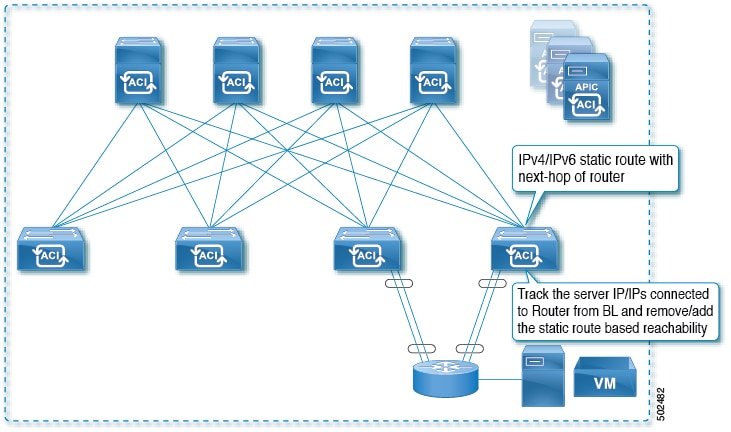
For this use case:
-
Track the server IP address connected to the router from the ACI fabric (border leaf) and remove or add the static route based on accessibility of the server.
-
The L3Out can be through a port channel (PC), PC sub-interface, switch virtual interface (SVI), L3 interface, or an L3 sub-interface.
-
The static route is configured under L3Out and is removed or added based on the accessibility of the IP address.
Example 3: Static Route Removal by Tracking an IP Address Through L3Out
The following figure shows the network topology and the operation for tracking the static route availability of a server through an L3Out external route. The route is removed if it is not accessible through the L3Out/VRF.

For this use case:
-
The L3Out is configured over VLAN/SVI, and that SVI is extended across multiple leaves.
-
The server IP address that is accessible through the L3Out can move across leaves.
-
Track the server IP address(es) and if they are not accessible through the L3Out/VRF, then remove the static route from the route table.
-
The static route is added back to the route table when server is accessible again.
Example 4: Static Route Removal by Tracking an IP Address in the ACI Fabric
Although, as shown in the previous examples, the probe IP of IP SLA for routes is typically the next-hop of the route or an external IP address that should be reachable via the route, you can also use an endpoint IP address in the ACI BD as the probe IP, even if the endpoint does not reside behind the route targeted by the IP SLA. This might be helpful when the static route is to be used solely by certain specific endpoints inside ACI. If such endpoints don’t exist, there is no use for the route.
The following figure shows the network topology and the operation for tracking an IP address in the ACI fabric.
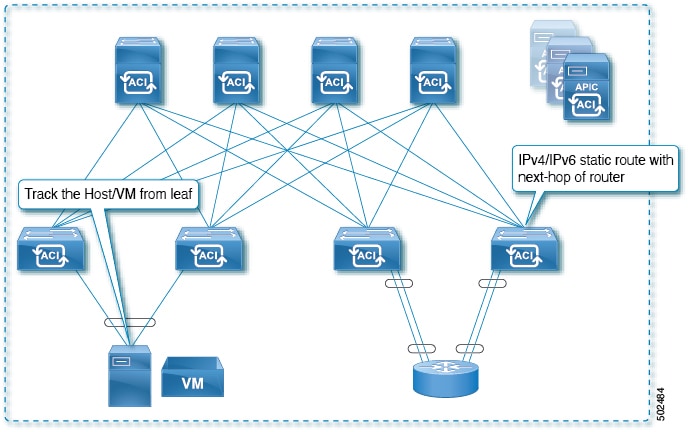
For this use case:
-
Track the IP reachability of the endpoints that are connected through the EPG/BD.
-
Based on the accessibility of the endpoints, the static route will be removed or added in the L3Out.
-
Even if the endpoint moves from one location to another within the fabric, as long as there is the IP reachability to the endpoint from the same BD, IP SLA monitoring considers it accessible and there will be no impact to the validity of the static route.
IP SLA Monitoring Policy
IP Service Level Agreements (SLAs) use active traffic monitoring to generate traffic in a continuous, reliable, and predictable manner, and analyze it to measure the network performance. Measurement statistics that are provided by the IP SLA monitoring policy operations can be used for troubleshooting, problem analysis, and designing network topologies.
With Cisco ACI, the IP SLA monitoring policy is associated with:
-
Service Redirect Policies: All the destinations under a service redirect policy are monitored based on the configurations and parameters that are set in the monitoring policy.
-
Static Routes: Adding an IP SLA monitoring policy to a track list or track member and associated it with a static route provides the mechanism for monitoring the availability of the next hop segments of the route.
An IP SLA monitoring policy identifies the probe frequency and the type of probe.
ACI IP SLA Monitoring Operation Probe Types
Using ACI IP SLAs, you can monitor the performance between any area in the network: core, distribution, and edge. Monitoring can be done anytime, anywhere, without deploying a physical probe. ACI IP SLAs use generated traffic to measure network performance between two networking devices such as switches. The types of IP SLA operations include:
-
ICMP: Echo Probes
-
TCP: Connect Probes
TCP Connect Operation
The IP SLAs TCP connect operation measures the response time that is taken to perform a TCP probe between a Cisco switch and an IP device. TCP is a transport layer (Layer 4) Internet Protocol that provides reliable full-duplex data transmission. The destination device can be any device using IP.
In the following figure, Switch B is configured as the source IP SLA device based on the configured static route. A TCP connect operation is configured in the IP SLA monitoring policy (associated with the static route) with the destination device as IP Host 1.
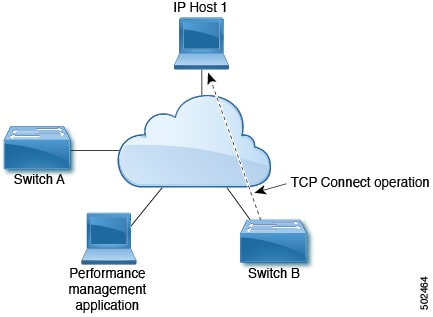
The connection response time is computed by measuring the time that is taken between sending a TCP request message from Switch B to IP Host 1 and receiving a reply from IP Host 1.
ICMP Echo Operation
The Internet Control Message Protocol (ICMP) Echo operation measures the end-to-end response time between two devices that use IPv4 or IPv6. The response time is computed by measuring the time that is taken between sending an ICMP Echo request message to the destination and receiving a reply. An ICMP Echo is useful for troubleshooting network connectivity issues. The results of the ICMP Echo operation can be displayed and analyzed to determine how the network IP connections are performing.
In the following figure, the ICMP Echo operation uses a ping-based probe to measure the response time between the source IP SLAs device and the destination IP device. Many customers use IP SLA ICMP-based operations, in-house ping testing, or ping-based dedicated probes for response time measurements.
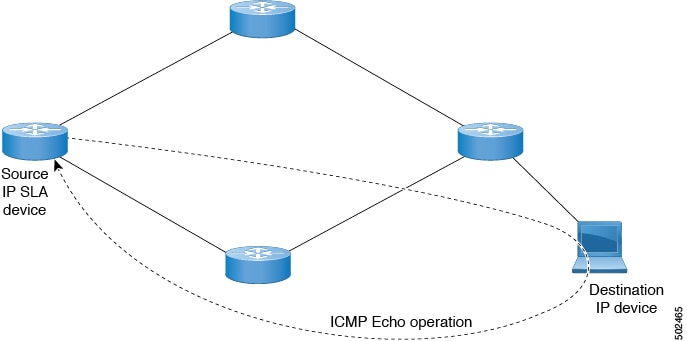
The IP SLA ICMP Echo operation conforms to the same IETF specifications for ICMP ping testing and the two methods result in the same response times.
IP SLA Track Members
An IP SLA track member identifies the:
-
IP address to be tracked
-
IP SLA monitoring policy (probe frequency and type)
-
Scope (bridge domain or L3Out)
IP SLA Track Lists
An IP SLA track list aggregates one or more IP SLA track members representing a network segment to be monitored. The track list determines what percentage or weight of track members must be up or down for the static route to be considered available or unavailable. If the track list is up, based on the threshold percentage or weight, then the static route remains in routing table. If the track list is down, then the static route is removed from the routing table until the track list recovers.
The following is an example of configuring four track members in a track list using the threshold percentage option.
Threshold configuration:
-
Set the Percentage Up parameter to 100 (percent)
-
Set the Percentage Down parameter to 50 (percent)
In this track list, each of the four track members is assigned 25%. For the track list to become unreachable (down), two of the four track members must be unreachable (50%). For the track list to return to reachable (up), all four track members must be reachable (100%).
Note |
When a track list is associated with a static route and the track list becomes unreachable (down), the static route is removed from the routing table until the track list becomes reachable again. |
Example IP SLA Configuration Component Associations
ACI IP SLAs rely on track members and track lists to identify the types of probes to send and where to send them. Planning the configuration will help make the task easy and fast. This section uses an example to explain how to set up the IP SLA.
Cisco ACI IP SLA L3Out Example
The following figure shows a Cisco ACI IP SLA providing monitoring/probing of a specific configured static route within the ACI fabric and including an external endpoint.
The following image shows a static route for the endpoint prefix of 192.168.13.1/24. It also shows a pair of routers in a static route between an L3Out leaf switch and a consumer endpoint.
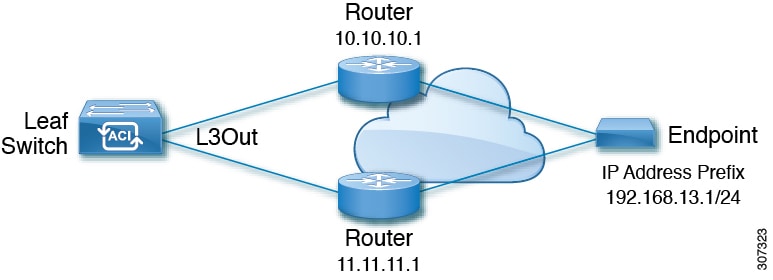
To configure an ACI IP SLA based on the figure above, the router must be monitored to ensure connectivity to the consumer endpoint. This is accomplished by creating a static route, track members, and track lists:
-
Static route for 192.168.13.1/24 with next hops of 10.10.10.1 and 11.11.11.1
-
Track Member 1 (TM-1) includes the router IP address 10.10.10.1 (this is the next hop probe)
-
Track Member 2 (TM-2) includes the router IP address 11.11.11.1 (this is the next hop probe)
-
Track List 1 (TL-1) with TM-1 and TM-2 included (track list associated with a static route. The track list contains list of next hops through which configured prefix end points can be reached. Thresholds determining if the track list is reachable or unreachable are also configured.)
-
Track List 2 (TL-2) with TM-1 included (associated with a next hop entry included in a static route)
-
Track List 3 (TL-3) with TM-2 included (associated with a next hop entry included in a static route)
For a generic static route, you can associate TL-1 with the static route, associate TL-2 with the 10.10.10.1 next hop, and associate TL-3 with the 11.11.11.1 next hop. For a pair of specific static routes (both 192.168.13.1/24), you can associate TL-2 on one and TL-3 on the other. Both should also have TL-2 and TL-3 associated with the router next hops.
These options allow for one router to fail while providing a back-up route in case of the failure. See the following sections to learn more about track members and track lists.
 Feedback