MLD Snooping

This chapter contains the following sections:

About Cisco APIC and MLD Snooping

Multicast Listener Discovery (MLD) snooping enables the efficient distribution of IPv6 multicast traffic between hosts and routers. It is a Layer 2 feature that restricts IPv6 multicast traffic within a bridge domain to a subset of ports that have transmitted or received MLD queries or reports. In this way, MLD snooping provides the benefit of conserving the bandwidth on those segments of the network where no node has expressed interest in receiving the multicast traffic. This reduces the bandwidth usage instead of flooding the bridge domain, and also helps hosts and routers save unwanted packet processing.

The MLD snooping functionality is similar to IGMP snooping, except that the MLD snooping feature snoops for IPv6 multicast traffic and operates on MLDv1 (RFC 2710) and MLDv2 (RFC 3810) control plane packets. MLD is a sub-protocol of ICMPv6, so MLD message types are a subset of ICMPv6 messages and MLD messages are identified in IPv6 packets by a preceding next header value of 58. Message types in MLDv1 include listener queries, multicast address-specific (MAS) queries, listener reports, and done messages. MLDv2 is designed to be interoperable with MLDv1 except that it has an extra query type, the multicast address and source-specific (MASS) query. The protocol level timers available in MLD are similar to those available in IGMP.

The following figure shows the different components in an MLD snooping arrangement.

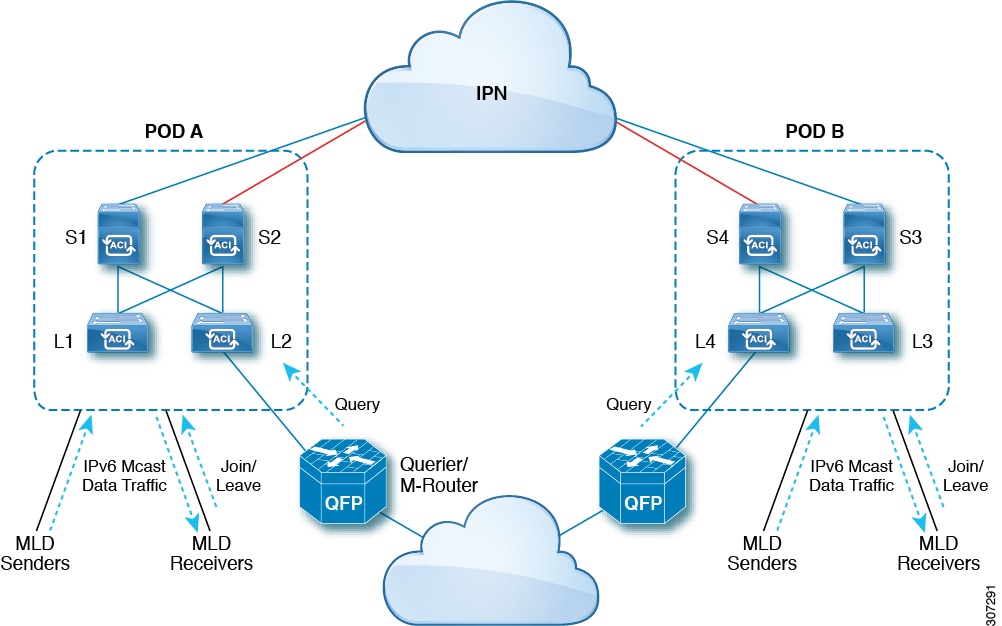
Following are explanations of the components in the figure:

  • MLD Senders (sources): Hosts that send IPv6 traffic into the fabric.

  • MLD Receivers: Hosts interested in receiving the IPv6 multicast packets. They can choose to join or leave the sessions.

  • Querier/M-Router: A router or switch that periodically sends queries, and maintains a group membership database. The querier will periodically send queries to determine who might be interested in joining a multicast stream. The M-Router (multicast router) is a gateway to the world outside of the fabric. If there is multicast data traffic inside the fabric, that stream can go outside of the fabric through the multicast router.

When MLD snooping is disabled, then all the multicast traffic is flooded to all the ports, whether they have an interest or not. When MLD snooping is enabled, the fabric will forward IPv6 multicast traffic based on MLD interest. Unknown IPv6 multicast traffic will be flooded based on the bridge domain's IPv6 L3 unknown multicast flood setting.

There are two modes for forwarding unknown IPv6 multicast packets:

  • Flooding mode: All EPGs and all ports under the bridge domain will get the flooded packets.

  • OMF (Optimized Multicast Flooding) mode: Only multicast router ports will get the packet.

Guidelines and Limitations

The MLD snooping feature has the following guidelines and limitations:

  • MLD snooping is supported only on new generation ToR switches, which are switch models with "EX", "FX" or "FX2" at the end of the switch name.

  • Support is enabled for up to 2000 IPv6 multicast groups to be snooped across the fabric.

  • Hardware forwarding happens with the (*,G) lookup, even for the source-specific snoop entry with MLDv2.

  • The following features are not supported for MLD snooping in this release:

    • Layer 3 multicast routing across bridge domains or VRFs is not supported for IPv6 multicast traffic

    • Static MLD snooping entry

    • Access filter for MLD snoop entries through a route map

    • Virtual endpoints behind the VTEPs (VL)

Configuring and Assigning an MLD Snooping Policy

Configuring and Assigning an MLD Snooping Policy to a Bridge Domain in the GUI

To implement MLD snooping functionality, you configure an MLD snooping policy then assign that policy to one or more bridge domains.

Configuring an MLD Snooping Policy Using the GUI

Create an MLD snooping policy whose MLD snooping settings can be assigned to one or multiple bridge domains.

Procedure


Step 1

Click the Tenants tab and the name of the tenant on whose bridge domain you intend to configure MLD snooping support.

Step 2

In the Navigation pane, click Policies > Protocol > MLD Snoop.

Step 3

Right-click MLD Snoop and select Create MLD Snoop Policy.

Step 4

In the Create MLD Snoop Policy dialog, configure a policy as follows:

  1. In the Name and Description fields, enter a policy name and optional description.

  2. In the Admin State field, select Enabled or Disabled to enable or disable this entire policy.

    The default entry for this field is Disabled.

  3. In the Control field, select or unselect Fast Leave to enable or disable MLD v1 immediate dropping of queries through this policy.

  4. In the Control field, select or unselect Enable querier to enable or disable the MLD querier activity through the MLD Snoop Policy.

    Note


    For this option to be effectively enabled, you must enable Querier in the MLD Snoop Policy of the bridge domains to which this policy is applied. The navigation path to the properties page on which this setting is located is Tenants > tenant_name > Networking > Bridge Domains > bridge_domain_name > MLD Snoop Policy.

  5. Specify in seconds the Query Interval value for this policy.

    The Query Interval is the interval between general queries sent by the querier. The default entry for this fields is 125 seconds.

  6. Specify in seconds Query Response Interval value for this policy.

    When a host receives the query packet, it starts counting to a random value, less than the maximum response time. When this timer expires, the host replies with a report.

    This is used to control the maximum response time for hosts to answer an MLD query message. Configuring a value less than 10 seconds enables the router to prune groups much faster, but this action results in network burstiness because hosts are restricted to a shorter response time period.

  7. Specify in seconds the Last Member Query Interval value for this policy.

    MLD uses this value when it receives an MLD Leave report. This means that at least one host wants to leave the group. After it receives the Leave report, it checks that the interface is not configured for MLD Fast Leave and, if not, it sends out an out-of-sequence query.

    If no reports are received in the interval, the group state is deleted. The software can detect the loss of the last member of a group or source more quickly when the values are smaller. Values range from 1 to 25 seconds. The default is 1 second.

  8. Specify the Start Query Count value for this policy.

    Number of queries sent at startup that are separated by the startup query interval. Values range from 1 to 10. The default is 2.

  9. Specify in seconds a Start Query Interval for this policy.

    By default, this interval is shorter than the query interval so that the software can establish the group state as quickly as possible. Values range from 1 to 18,000 seconds. The default is 31 seconds.

Step 5

Click Submit.


The new MLD Snoop policy is listed in the Protocol Policies - MLD Snoop summary page.

What to do next

To put this policy into effect, assign it to any bridge domain.

Assigning an MLD Snooping Policy to a Bridge Domain Using the GUI

Assigning an MLD Snooping policy to a bridge domain configures that bridge domain to use the MLD Snooping properties specified in that policy.

Before you begin

  • Configure a bridge domain for a tenant.

  • Configure the MLD Snooping policy that will be attached to the bridge domain.


Note


For the Enable Querier option on the assigned policy to be effectively enabled, the Subnet Control: Querier IP setting must also be enabled in the subnets assigned to the bridge domains to which this policy is applied. The navigation path to the properties page on which this setting is located is Tenants > tenant_name > Networking > Bridge Domains > bridge_domain_name > Subnets > bd_subnet .


Procedure


Step 1

Click the APIC Tenants tab and select the name of the tenant whose bridge domains you intend to configure with an MLD Snoop policy.

Step 2

In the APIC navigation pane, click Networking > Bridge Domains, then select the bridge domain to which you intend to apply your policy-specified MLD Snoop configuration.

Step 3

On the main Policy tab, scroll down to the MLD Snoop Policy field and select the appropriate MLD policy from the drop-down menu.

Step 4

Click Submit.

The target bridge domain is now associated with the specified MLD Snooping policy.

Step 5

To configure the node forwarding parameter for Layer 3 unknown IPv6 Multicast destinations for the bridge domain:

  1. Select the bridge domain that you just configured.

  2. Click the Policy tab, then click the General sub-tab.

  3. In the IPv6 L3 Unknown Multicast field, select either Flood or Optimized Flood.

Step 6

To change the Link-Local IPv6 address for the switch-querier feature:

  1. Select the bridge domain that you just configured.

  2. Click the Policy tab, then click the L3 Configurations sub-tab.

  3. In the Link-local IPv6 Address field, enter a Link-Local IPv6 address, if necessary.

    The default Link-Local IPv6 address for the bridge domain is internally generated. Configure a different Link-Local IPv6 address for the bridge domain in this field, if necessary.


Configuring and Assigning an MLD Snooping Policy to a Bridge Domain using the NX-OS Style CLI

Before you begin

  • Create the tenant that will consume the MLD Snooping policy.

  • Create the bridge domain for the tenant, where you will attach the MLD Snooping policy.

Procedure

  Command or Action Purpose

Step 1

configure terminal

Example:


apic1# configure terminal
apic1(config)# 

Enters configuration mode.

Step 2

tenant tenant-name

Example:


apic1(config)# tenant tn1
apic1(config-tenant)# 

Creates a tenant or enters tenant configuration mode.

Step 3

template ipv6 mld snooping policy policy-name

Example:


apic1(config-tenant)# template ipv6 mld snooping policy mldPolicy1
apic1(config-tenant-template-ip-mld-snooping)#

Creates an MLD snooping policy. The example NX-OS style CLI sequence creates an MLD snooping policy named mldPolicy1.

Step 4

[no] ipv6 mld snooping

Example:


apic1(config-tenant-template-ip-mld-snooping)# ipv6 mld snooping
apic1(config-tenant-template-ip-mld-snooping)# no ipv6 mld snooping

Enables or disables the admin state of the MLD snoop policy. The default state is disabled.

Step 5

[no] ipv6 mld snooping fast-leave

Example:


apic1(config-tenant-template-ip-mld-snooping)# ipv6 mld snooping fast-leave
apic1(config-tenant-template-ip-mld-snooping)# no ipv6 mld snooping fast-leave

Enables or disables IPv6 MLD snooping fast-leave processing.

Step 6

[no] ipv6 mld snooping querier

Example:


apic1(config-tenant-template-ip-mld-snooping)# ipv6 mld snooping querier
apic1(config-tenant-template-ip-mld-snooping)# no ipv6 mld snooping querier

Enables or disables IPv6 MLD snooping querier processing. For the enabling querier option to be effectively enabled on the assigned policy, you must also enable the querier option in the subnets assigned to the bridge domains to which the policy is applied, as described in Step 14.

Step 7

ipv6 mld snooping last-member-query-interval parameter

Example:


apic1(config-tenant-template-ip-mld-snooping)# ipv6 mld snooping last-member-query-interval 25

Changes the IPv6 MLD snooping last member query interval parameter. The example NX-OS style CLI sequence changes the IPv6 MLD snooping last member query interval parameter to 25 seconds. Valid options are 1-25. The default is 1 second.

Step 8

ipv6 mld snooping query-interval parameter

Example:


apic1(config-tenant-template-ip-mld-snooping)# ipv6 mld snooping query-interval 300

Changes the IPv6 MLD snooping query interval parameter. The example NX-OS style CLI sequence changes the IPv6 MLD snooping query interval parameter to 300 seconds. Valid options are 1-18000. The default is 125 seconds.

Step 9

ipv6 mld snooping query-max-response-time parameter

Example:


apic1(config-tenant-template-ip-mld-snooping)# ipv6 mld snooping query-max-response-time 25

Changes the IPv6 MLD snooping max query response time. The example NX-OS style CLI sequence changes the IPv6 MLD snooping max query response time to 25 seconds. Valid options are 1-25. The default is 10 seconds.

Step 10

ipv6 mld snooping startup-query-count parameter

Example:


apic1(config-tenant-template-ip-mld-snooping)# ipv6 mld snooping startup-query-count 10

Changes the IPv6 MLD snooping number of initial queries to send. The example NX-OS style CLI sequence changes the IPv6 MLD snooping number of initial queries to send to 10. Valid options are 1-10. The default is 2.

Step 11

ipv6 mld snooping startup-query-interval parameter

Example:


apic1(config-tenant-template-ip-mld-snooping)# ipv6 mld snooping startup-query-interval 300

Changes the IPv6 MLD snooping time for sending initial queries. The example NX-OS style CLI sequence changes the IPv6 MLD snooping time for sending initial queries to 300 seconds. Valid options are 1-18000. The default is 31 seconds.

Step 12

exit

Example:


apic1(config-tenant-template-ip-mld-snooping)# exit
apic1(config-tenant)# 

Returns to configure mode.

Step 13

interface bridge-domain bridge-domain-name

Example:


apic1(config-tenant)# interface bridge-domain bd1
apic1(config-tenant-interface)# 

Configures the interface bridge-domain. The example NX-OS style CLI sequence configures the interface bridge-domain named bd1.

Step 14

ipv6 address sub-bits/prefix-length snooping-querier

Example:


apic1(config-tenant-interface)# ipv6 address 2000::5/64 snooping-querier

Configures the bridge domain as switch-querier. This will enable the querier option in the subnet assigned to the bridge domain where the policy is applied.

Step 15

ipv6 mld snooping policy policy-name

Example:


apic1(config-tenant-interface)# ipv6 mld snooping policy mldPolicy1

Associates the bridge domain with an MLD snooping policy. The example NX-OS style CLI sequence associates the bridge domain with an MLD snooping policy named mldPolicy1.

Step 16

exit

Example:


apic1(config-tenant-interface)# exit
apic1(config-tenant)#

Returns to configure mode.

Configuring and Assigning an MLD Snooping Policy to a Bridge Domain using the REST API

Procedure


To configure an MLD Snooping policy and assign it to a bridge domain, send a post with XML such as the following example:

Example:

https://apic-ip-address/api/node/mo/uni/.xml
<fvTenant name="mldsn">
    <mldSnoopPol adminSt="enabled" ctrl="fast-leave,querier" name="mldsn-it-fabric-querier-policy" queryIntvl="125"
        rspIntvl="10" startQueryCnt="2" startQueryIntvl="31" status=""/>
    <fvBD name="mldsn-bd3">
        <fvRsMldsn status="" tnMldSnoopPolName="mldsn-it-policy"/>
    </fvBD>
</fvTenant>

This example creates and configures the MLD Snooping policy mldsn with the following properties, and binds the MLD policy mldsn-it-fabric-querier-policy to bridge domain mldsn-bd3:

  • Fast leave processing is enabled

  • Querier processing is enabled

  • Query Interval is set at 125

  • Max query response time is set at 10

  • Number of initial queries to send is set at 2

  • Time for sending initial queries is set at 31