Cisco Catalyst SD-WAN Control Components Certificates and Authorized Serial Number File Prescriptive Deployment Guide
Available Languages
Bias-Free Language
The documentation set for this product strives to use bias-free language. For the purposes of this documentation set, bias-free is defined as language that does not imply discrimination based on age, disability, gender, racial identity, ethnic identity, sexual orientation, socioeconomic status, and intersectionality. Exceptions may be present in the documentation due to language that is hardcoded in the user interfaces of the product software, language used based on RFP documentation, or language that is used by a referenced third-party product. Learn more about how Cisco is using Inclusive Language.
- US/Canada 800-553-2447
- Worldwide Support Phone Numbers
- All Tools
 Feedback
 Feedback
Contents
Process 1: Deploying Control Component Certificates
Option 1: Automated certificate signing through Cisco Systems
Option 2: Manual certificate signing through Cisco Systems
Option 3: Enterprise Root Certificate Authority (CA)
Process 2: Deploying the Signed WAN Edge Authorized Serial Number List
Option 2: Automatically sync to the PnP Connect portal from SD-WAN Manager
Appendix A—Hardware and software used for validation
Appendix B—Windows OpenSSL Certificate Authority (CA)
Appendix C: Plug and Play (PnP) Connect Portal
About the Guide
This document provides technical guidance on the steps needed to successfully install certificates on on-premise Cisco Catalyst SD-WAN control components or in a Cisco-hosted or provider-hosted cloud solution. It includes different methods for obtaining signed control components certificates and how to configure and load the authorized serial number file. The certificate renewal process is also covered.
This guide assumes that the control components are deployed and have been added to the SD-WAN Manager. Many of the procedures assume a new certificate install on newly-installed, on-prem control components, but much of the information is relevant to an existing SD-WAN Catalyst control component deployment.
See the Cisco Catalyst SD-WAN Design Guide for background information.
| NOTE: Starting March 31, 2023, Cisco is no longer sponsoring Symantec/Digicert control component X.509 certificates for Cisco Catalyst SD-WAN, so Symantec/Digicert certificates will no longer be signed and released by Cisco. Existing Cisco Catalyst SD-WAN Symantec/Digicert control component certificates will be valid until expiration of those certificates, at which point, all Cisco Catalyst SD-WAN control connections will fail. Please migrate to Cisco PKI certificates or Enterprise CA certificates before certificate expiration. Symantec/Digicert certificates can still be used if purchased directly from Digicert, then installed manually using the Enterprise CA certificate method on SD-WAN Manager versions 20.3.6, 20.6.4, 20.7.1 and higher. Cisco PKI is the recommended control component certificate method. To assist with migration from Symantec/Digicert, see the Video guide or reference the step-by-step document. See the Field Notice for more information. |
This document contains four major sections:
● The Define section gives background on the SD-WAN solution as it relates to certificates and the authorized serial number file.
● The Design section discusses the solution components, design aspects, and any prerequisites.
● The Deploy section provides information about various configurations and best practices.
● The Operate section shows how to manage different aspects of the solution.
Audience
This document is for anyone interested in installing and/or renewing Cisco Catalyst SD-WAN control component certificates, either for production or lab purposes. In addition, it also provides information to create and download or synchronize the authorized serial number file to the SD-WAN Manager for authorizing devices on the SD-WAN overlay.
| Tech Tip |
| Cisco SD-WAN has been rebranded to Cisco Catalyst SD-WAN. As part of this rebranding, the vManage name has been changed to SD-WAN Manager, the vSmart name has been changed to SD-WAN Controller, and the vBond name has been changed to SD-WAN Validator. Together, the vManage, vSmart, and vBond will be referred to as the SD-WAN control components or the SD-WAN control complex in this document. Screenshots may still refer to the previously branded names. |
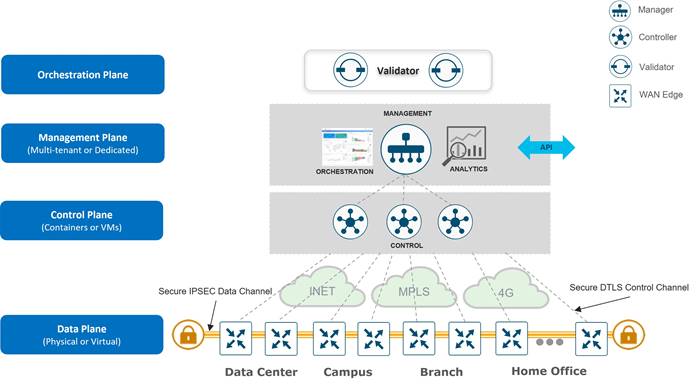
There are three distinct types of control components within the Cisco Catalyst SD-WAN solution, residing on different planes:
● The Orchestration Plane assists in securely onboarding the Cisco Catalyst SD-WAN WAN Edge routers into the SD-WAN overlay network. The SD-WAN Validator makes up the orchestration plane, and it authenticates and authorizes devices onto the network and distributes control information (SD-WAN Manager/s and SD-WAN Controllers information) to all WAN Edge routers so control connections can be established.
● The Management Plane is responsible for central configuration and monitoring. The SD—WAN Manager makes up the management plane and is a single pane of the glass for Day 0, Day 1, and Day 2 operations. It provides centralized provisioning, troubleshooting, and monitoring for the solution.
● The Control Plane builds and maintains the network topology and makes decisions on the traffic flows. The SD-WAN Controllers are part of the control plane, and they disseminate control plane information between routers, implement control plane policies, and distribute centralized data plane polices to the routers.
In addition, WAN Edge routers reside in a separate plane, the data plane.
● The Data Plane is responsible for forwarding packets based on decisions from the control plane. WAN Edge physical or virtual devices provide secure data-plane connectivity between the sites in the same SD-WAN overlay network. WAN Edge devices are responsible for establishing secure connections for traffic forwarding, for security, encryption, Quality of Service (QoS) enforcement and more.
Control Connections
The Cisco Catalyst SD-WAN Manager and SD-WAN Controllers and the WAN Edge devices initially contact and authenticate to the SD-WAN Validator and then subsequently establish and maintain DTLS/TLS connections with other SD-WAN Managers and SD-WAN Controllers. The SD-WAN Managers and Controllers maintain persistent connections to the SD-WAN Validator as well as to each other, while WAN Edge devices drop this connection to the SD-WAN Validator and maintain connections with the SD-WAN Manager and SD-WAN Controllers.
Authorized List Model
All WAN Edge devices and control components mutually authenticate each other using an authorized list model, where the devices have to be authorized before being allowed access onto the network.
There are two authorized lists that are distributed by the SD-WAN Manager, one for the control components and one for WAN Edge devices.
● Authorized control components list: The authorized control components list is a result of the administrator adding the control components manually into the SD-WAN Manager user interface. This list can be distributed from the SD-WAN Manager to all the control components and subsequently, from the SD-WAN Validator to the SD-WAN Controller.
● Authorized serial number list for WAN Edge devices: The digitally-signed, authorized serial number list for the WAN Edge devices can be retrieved from the Plug and Play Connect portal at https://software.cisco.com/#pnp-devices.
The list can be retrieved manually or synced automatically from the SD-WAN Manager by a user with a valid Cisco CCO account with access to the proper Smart Account and Virtual Account for the SD-WAN overlay. After the file is uploaded or synced to the SD-WAN Manager, it is distributed by the SD-WAN Manager to all the control components.
| Tech Tip |
| Unsigned authorized serial number lists for WAN Edge routers using .CSV files are supported as of SD-WAN Manager version 20.3.1, which does not require access to the Plug and Play Connect portal. |
Identity
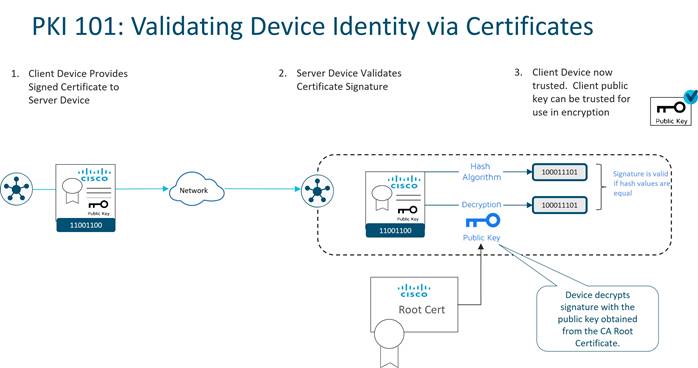
Authentication between devices involves validating device identity via certificates.
How device certificate validation works:
● The client device presents a CA-signed device certificate to the server.
● The server validates the certificate signature by
1. Running a hash algorithm on the certificate data to get a value, and
2. Decrypting the certificate signature with the public key obtained from the CA Root certificate to get a second value.
If both values are equal, then the signature is valid.
● The client device is now trusted and the client public key can be trusted for use in encryption.
Control Component Identity
Control component identity is provided by a Symantec/DigiCert or Cisco-signed certificate, or alternatively, an Enterprise CA certificate. Each control component in the network must have a device certificate signed and installed. In addition, the root certificate chain for the corresponding CA must also be installed for each control component before the control component device certificates can be installed. Additional root certificate chains are present in order to trust the device certificates of other SD-WAN control components and software devices. Most root certificates are pre-loaded or automatically installed, and others, like the Enterprise root CA, must be installed by an administrator.
WAN Edge Router Identity
Identity for vEdge hardware routers is provided by a device certificate signed by Avnet, generated during the manufacturing process and burned into the Trusted Platform Module (TPM) chip. The Symantec/DigiCert and Cisco root certificates are pre-loaded in software for trust for the control components’ certificates. Additional root certificates may either be loaded manually, distributed automatically by the SD-WAN Manager, or installed during the automated provisioning process.
Identity for IOS XE SD-WAN hardware routers, with the exception of the ASR 1002-X, is provided by the Secure Unique Device Identifier (SUDI), which is an X.509v3 certificate associated with a key pair that is protected in hardware (Trust Anchor Module, or TAm). Also present in the TAm is the root certificate chain for the SUDI device certificate. The Symantec/DigiCert and Cisco root certificates are pre-loaded in software for trust for the control components’ certificates. Additional root certificates may either be loaded manually, distributed automatically by SD-WAN Manager, or installed during the automated provisioning process.
vEdge cloud routers, ISRv routers, Catalyst 8000V, CSR1000v routers, and Cisco ASR 1002-X routers do not have device certificates pre-installed. Each device uses a One Time Password (OTP)/Token that is generated by the SD-WAN Manager and configured during device deployment for the purpose of a temporary identity. Once the device is temporarily authenticated, a permanent identity is provided by the SD-WAN Manager, which can operate as a Certificate Authority (CA) to generate and install certificates for these devices.
The following diagram illustrates device certificates and a subset of root certificates installed for the control components and IOS XE SD-WAN routers. In this example, Cisco PKI certificates are installed on the control components.
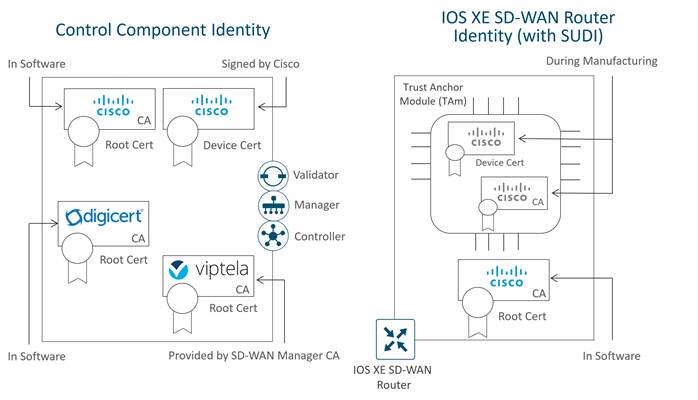
In this example, a Cisco device certificate is installed for control component identity, a Cisco root certificate chain is used to trust other control component certificates, and the Viptela root certificate chain is used to trust cloud router and IOS XE SD-WAN router (with no SUDI) certificates. For the IOS XE-WAN router, a Cisco device certificate is loaded in hardware during manufacturing, and a Cisco root certificate chain is present in software in order to trust control component certificates.
Note that the certificates installed on the control components and the certificates installed in the TAm are both issued by Cisco but they do not share the same CA root chain and thus their CA root chains cannot be used to verify or trust the other.
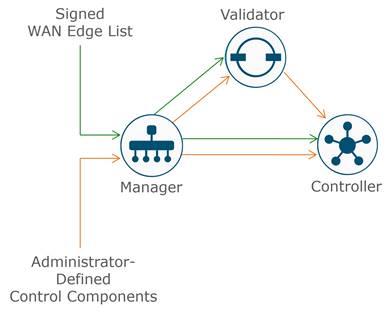
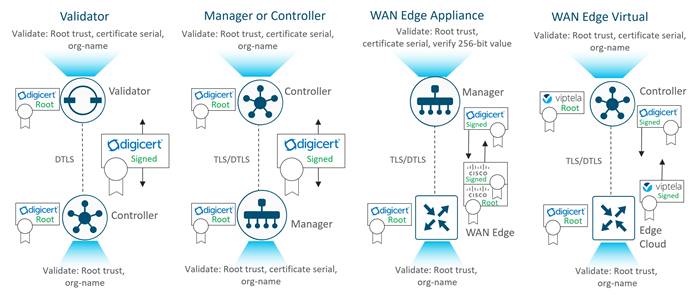
Authentication/Authorization of SD-WAN devices
When the control components authenticate each other, they generally:
1. Receive from the opposite control component a trusted device certificate.
2. Compare the certificate serial numbers against the authorized serial number list distributed from the SD-WAN Manager (except when authenticating against the SD-WAN Validator).
3. Compare the organization name of the received certificate OU against the locally configured one (except when authenticating against WAN Edge hardware devices).
4. Validate the trust for the certificate root Certificate Authority (CA)
When WAN Edge devices authenticate to the control components, the WAN Edge routers generally:
1. Receive from the control component a trusted device certificate.
2. Compare the organization name of the received certificate OU against the locally configured one.
3. Validate the trust for the certificate root Certificate Authority (CA).
When control components authenticate to WAN Edge devices, the control components:
1. Send a 256-bit random value to the WAN Edge router, which is signed by the WAN Edge router with a private key.
2. Receive from the WAN Edge the serial and chassis number, the 256-bit value signed with the WAN Edge’s private key, and the trusted board ID certificate (which also includes its CA root certificate chain).
3. Compare the certificate serial numbers against the authorized serial number list distributed from the SD-WAN Manager.
4. Verify the 256-bit value using the public key which is extracted from the board ID certificate.
5. Validate the trust for the certificate root Certificate Authority (CA).
After authentication and authorization succeeds on both ends, a DTLS/TLS connection is established.
The following diagram illustrates how different devices authenticate with each other using Symantec/DigiCert or Cisco certificates. Enterprise CA certificates operate in the same manner.
See the Cisco Catalyst SD-WAN Overlay Network Bring-Up Process for more information.
Certificates
Before control components can be operational in an SD-WAN overlay network, each control component must have both a root certificate plus a control component certificate that is signed and installed. Root certificates come pre-installed on the control components except when using an Enterprise CA, and in that case, a root certificate needs to be installed before control component certificates can be installed. In the case of control component certificates, a Certificate Signing Request (CSR) is generated for each control component, either when the control component is added to the SD-WAN Manager, or initiated by an administrator through the SD-WAN Manager GUI. Each CSR is then submitted and signed and then the signed certificate is retrieved and installed on the respective control component.
There are different ways to accomplish the control component certificate signing and installation process:
| Tech Tip |
| Note that as of March 31, 2023, the automated and manual third-party certificate signing through Symatec/Digicert options are no longer supported. |
1. Automated Cisco PKI certificate signing (recommended): This option requires SD-WAN Manager version 19.1 at a minimum. A CSR is generated for each control component and is automatically sent to the Cisco PKI certificate server. After the signing is complete, the SD-WAN Manager automatically retrieves each signed certificate and installs it on the respective control component. Note that the root certificate is installed by default on each control component.
2. Manual Cisco PKI certificate signing: This option requires SD-WAN Manager version 19.1. A CSR is generated for each control component and is copied or downloaded locally. A separate certificate request for each control component is made manually through the Cisco Software Central> Plug and Play Connect > Certificates portal at https://software.cisco.com/#pnp-certificates, using the CSR generated in the previous step. After the signing is complete, the certificates can be downloaded by the administrator and each certificate is then uploaded to the SD-WAN Manager. The SD-WAN Manager installs each certificate on the respective control component. Note that the root certificate is installed by default on each control component.

3. Enterprise Root Certificate Authority (CA): Customers can use their own CA servers to sign control component certificates. This method is similar to the manual Cisco PKI certificate signing method as automatic enrollment using Simple Certificate Enrollment Protocol (SCEP) to an Enterprise CA is not supported for control components. In addition, as a first step, the Enterprise CA root certificate is installed on the SD-WAN Manager, which can automatically distribute the root certificate to the other control components. Once a root certificate is installed, a CSR is generated for each control component and is either copied or downloaded locally. Separate certificate requests are made for each control component to the Enterprise Root CA, submitting the CSR generated in the previous step. Once signed, the generated certificates can be uploaded to the SD-WAN Manager by the administrator. The SD-WAN Manager will install each certificate on the respective control component.
| Tech Tip |
| Note that when using this method, any deletion or modification of the root certificate chain is automatically propagated by the Manager to other Controllers and Validators. |
Choosing a Method
The recommended method is the automated Cisco PKI certificate signing method (option 1), which is supported starting from SD-WAN Manager version 19.1 (version 19.2 or higher is recommended). This method simplifies the process as it requires a single step, which is CSR generation initiated from an administrator. If the SD-WAN Manager has no Internet access, the manual Cisco PKI method can be used instead (option 2).
| Tech Tip |
| Note that when using the Cisco PKI method, you need to ensure that the WAN Edge devices have a Cisco root certificate installed in order to trust the control component device certificates. If this certificate is not loaded, authentication fails and the WAN Edge device is not able to be brought up onto the overlay. The Cisco root certificate is bundled into the software of IOS XE SD-WAN routers starting in the 17.2.2 version of code. It is also bundled consistently into the software of vEdge routers starting in the 18.4.6, 19.2.4, 20.1.2, and 20.3.2 and higher versions of code. Ensure you are running a minimum of these versions on WAN Edge routers before joining an SD-WAN overlay with control components using Cisco PKI certificates. Alternatively, Cisco root certificates can be loaded manually or obtained through automated provisioning (PnP/ZTP) if these certificates are not preinstalled. You can migrate to Cisco PKI certificates from an SD-WAN overlay using Symantec/DigiCert certificates, and the Cisco root certificate is distributed to the WAN Edge routers automatically from the SD-WAN Manager. The control components must be on 19.x code and higher and the WAN Edge routers must have a control connection to the SD-WAN Manager in order for this to work. See the Operate section for details. |
The Enterprise CA is an option for those who require it (option 3) or for those running a SD-WAN Manager version less than 19.1. This option requires the Enterprise root certificate to be installed on WAN Edge devices, either manually or through automated provisioning (PnP/ZTP).
The following table summarizes the software requirements for the different SD-WAN components for each certificate type. Note that while 16.12.3/16.10.4/17.x IOS-XE and 19.2.3 ViptelaOS are the minimum software versions required to support Cisco PKI integration, there were versions of code which did not bundle the Cisco PKI root certificate in software, which prevents the WAN Edge routers from joining the overlay network if control components are running Cisco PKI certificates and the corresponding root certificates aren’t loaded ahead of time. The table reflects PKI support as well as minimum code versions which contain the Cisco PKI root certificate in software:
Table 1. Software requirements for each certificate type*
| Certificate Type |
SD-WAN Manager Version |
IOS-XE SD-WAN |
vEdge OS |
| Cisco PKI |
19.1 & above |
17.2.2 & above |
19.2.4, 20.1.2, 20.3.2 & above |
| Enterprise |
Any |
Any |
Any |
*Refer to the Cisco Catalyst SD-WAN Control Components Compatibility Matrix to verify compatibility between control components and WAN Edge code versions.
Control Plane Authorization
All WAN Edge devices and control components need to be known and authorized before allowing access to the network. This is accomplished through two authorized lists that are distributed through the SD-WAN Manager - one for the control components and one for WAN Edge devices.
Authorized Control Component List
When the control components are authenticated to each other, part of the check is to ensure that the certificate serial number of the control component they are trying to authenticate with is listed in the authorized list that is distributed from the SD-WAN Manager. Only the SD-WAN Validator is not checked against the authorized list, but control component devices are configured with the SD-WAN Validator IP address or domain name and it is the first control component they authenticate to. This list, which includes the certificate serial numbers of each control component, is automatically created and sent to all control components when control component devices are added into the SD-WAN Manager GUI. The list is also distributed by the SD-WAN Validator as connections are established.

WAN Edge Authorized Serial Number List
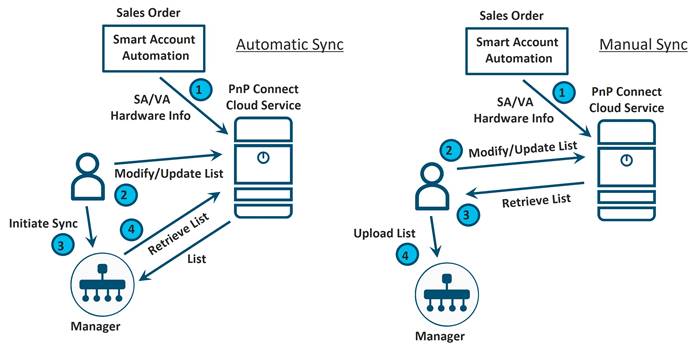
When the control components authenticate to the WAN Edge routers, part of the check is for the control components to ensure the certificate serial number of the WAN Edge router they are trying to authenticate with is listed in the WAN Edge Authorized Serial Number list that is distributed from SD-WAN Manager. This list, which includes the certificate serial numbers of each WAN Edge device can be retrieved from the Plug and Play (PnP) Connect portal at https://software.cisco.com/#pnp-devices. The WAN Edge routers are associated with a Smart Account (SA) and Virtual Account (VA) at the time of ordering and the device information, once shipped, is automatically transferred to the PnP portal. In addition, the list can be modified by the administrator for any devices not already listed. The administrator can have SD-WAN Manager synchronize to the portal to retrieve this information, or the administrator can download the list manually and upload it to SD-WAN Manager.
Prerequisites
Certificates
Prerequisites for the certificate installation process will depend on which method you use. Some general prerequisites that apply to all methods:
● Before a Certificate Signing Request can be generated, the organization name needs to be defined in the SD-WAN Manager GUI under Administration>Settings>Organization Name. The organization name is included in the certificate and is checked during the control components authentication process.
● If no DTLS/TLS connections are up yet between the control components, ensure that both NETCONF and SSH are allowed on the VPN 0 tunnel interface and that the appropriate ports are open on any firewalls between control components, or certificate installation may fail. SD-WAN Manager uses NETCONF (TCP 830) to communicate to the control components, so communication will be unencrypted if there is no DTLS/TLS connection yet formed between them. SD-WAN Manager cannot generate CSRs for the other control components without TCP port 830 open. In addition, SSH (TCP 22) also needs to be permitted because SCP (which uses SSH) is used to load certificates on the control components.
| Tech Tip |
| If you are using TLS for control connections, ensure that the tunnel hello interval is set to 1000 and the hello tolerance is set to 12. These settings are located in each WAN interface feature template under Tunnel>Advanced Options. If hello intervals and hello tolerances are set too long, TLS connections can time out during a certificate install/renewal and cause the new certificate to be marked as invalid, thus preventing the control component from becoming active in the SD-WAN network. This can occur in SD-WAN Manager versions prior to 20.7. |
There are additional prerequisites that need to be considered depending on the method:
Cisco PKI
● This method requires SD-WAN Manager version 19.1 or higher (version 19.2 or higher is recommended).
● You need a Smart Account and Virtual Account at http://software.cisco.com to use the automated or manual method. You can manually generate certificates at https://software.cisco.com/#pnp-certificates, which is in the PnP Connect portal under the Certificates tab. It is important that the Virtual Account has a controller profile defined, and the organization name in the profile must match the organization name in the SD-WAN Manager GUI. For the automated method, valid Smart Account credentials should be configured in the SD-WAN Manager GUI under Administration>Settings>Smart Account Credentials. These credentials must belong to a smart account or virtual account admin user and the user must have accepted the End User Agreement on the PnP Connect portal. The End User Agreement is displayed upon logging into the PnP Connect portal if it has not been already accepted.
● When using the automated method, the SD-WAN Manager needs to reach the Cisco certificate server. The SD-WAN Manager needs a DNS server configured in VPN 0 to resolve the domain names, cloudsso.cisco.com, swapi.cisco.com, and apx.cisco.com. The SD-WAN Manager reaches the domains on TCP port 443.
● For an existing SD-WAN network, ensure that Cisco root certificates are loaded on the WAN Edge devices before converting to Cisco PKI or else the WAN Edge devices will not come up onto the network. Cisco root certificates are integrated in IOS XE SD-WAN software versions starting in the 17.2.2 version of code and are also bundled consistently into the software of vEdge routers starting in the 18.4.6, 19.2.4, 20.1.2, and 20.3.2 and higher versions.
● For existing SD-WAN networks running Symantec/DigiCert certificates, you can load Cisco root certificates automatically through SD-WAN Manager by upgrading to SD-WAN Manager 19.1 or higher and then migrating to Cisco PKI (For more information, see the Operate section). You can also load root certificates manually or through automated provisioning (PnP/ZTP).
Enterprise CA
● For the other certificate methods, the root CA chain is already pre-installed on the control components. Before generating requests and installing signed certificates, the Enterprise Root CA method requires that a full root CA chain certificate gets installed on all the control components.
Note: If you are on version prior to SD-WAN Manager 18.3, the root CA chain certificate needs to be installed manually through CLI on each control component.
● Ensure that enterprise root certificates are loaded on the WAN Edge devices, either manually or through automated provisioning (PnP/ZTP). For the PnP/ZTP process to work, add the root CA certificate to the controller profile on the PnP Connect portal.
WAN Edge Authorized Serial Number List
The control component authorized list is generated and distributed automatically when control components are added by the administrator into SD-WAN Manager, so just the WAN Edge Authorized Serial Number list is covered in the remaining section. Prerequisites for installing the signed WAN Edge Authorized Serial Number list include the following:
● A Smart Account and Virtual Account at http://software.cisco.com is required in order to use either the automated or manual method.
● A controller profile needs to be created in the PnP portal. This may or may not already be done for you. If it is not present, you will be required to create one. Using the controller profile, you can download the authorized serial number list, also called the provisioning file.
● When using the automated method, the SD-WAN Manager needs to reach the PnP cloud service. The SD-WAN Manager needs a DNS server configured in VPN 0 to resolve the domain names, cloudsso.cisco.com, swapi.cisco.com, and apx.cisco.com. The SD-WAN Manager reaches these domains on port 443.
● If you are using the automated method, configure the Smart account credentials. This can be initially configured in the SD-WAN Manager GUI by going to Configuration>Devices and under the WAN Edge List tab, click Sync Smart Account.
| Tech Tip |
| You can upload and sync multiple lists to SD-WAN Manager, and the duplicates should be removed. This could be needed if you have an older vEdge authorized serial number list that did not get moved to the PnP portal. Note that you can install an unsigned WAN Edge Authorized Serial Number list using a .CSV file without needing a smart account, virtual account, or access to the PnP portal. |
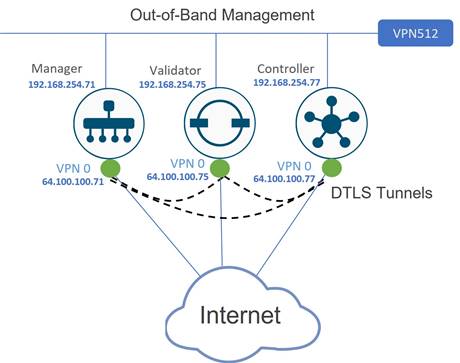
Architecture
The following example topology is used in this deployment guide, although there are many different options available. The example topology consists of one SD-WAN Manager, Validator, and Controller. All control components are configured with a public IP address and all control components have access to the internet. The control components have just been created and deployed with a minimal configuration and the SD-WAN Controller and Validator have been added as devices into the SD-WAN Manager.
Process 1: Deploying Control Component Certificates
| Note that the CA/Browser (CAB) Forum has taken progressive steps and dropped the Maximum Certificate Lifetime to 825 days (27 months) in 2018. This means that the certificate validity can only be set to one or two years when generating CSRs and submitting certificate requests. |
Overview
Installing certificates involve various steps and are covered in detail later in this section. The summary of steps are as follows:
1. Prerequisites: Ensure that NETCONF and SSH are allowed on the control component interface tunnels. Ensure NTP is enabled so time is synchronized between the control components and WAN Edge routers. Configure the organization name in the SD-WAN Manager GUI, and depending on the method, validate your server connectivity, configure Smart Account credentials, and/or ensure a DNS server is configured in SD-WAN Manager for VPN 0.
2. Configure SD-WAN Manager certificate settings: Set the certificate method in the SD-WAN Manager GUI under Administration>Settings>Controller Certificate Authorization.
3. Install the full root CA certicate chain: This needs to be done only for the Enterprise CA method, as for the other methods, the root certificate is already pre-installed.
4. Generate certificate signing requests: Generate certificate signing requests for each control component using the SD-WAN Manager GUI by navigating to the Controllers tab under Configuration>Certificates.
5. Submit certificate signing requests: This may be done automatically or manually, depending on the method.
6. Sign certificate signing requests: This may be done automatically or manually, depending on the method.
7. Receive the signed certificates: This may be done automatically by SD-WAN Manager or can be manually downloaded.
8. Install the signed certificates: The signed certificates are installed on the control components, either automatically or manually, depending on the method.
The following describes the detailed steps needed to deploy control component certificates.
Procedure 1. Verify and configure the organization name
The organization name must be configured in the SD-WAN Manager GUI before certificate signing requests can be made. This may have been automatically configured and synchronized from the SD-WAN Manager CLI during setup or may have been configured earlier in the control components deployment process.
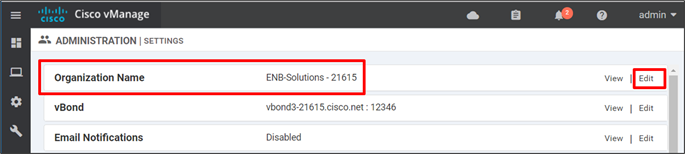
Step 1. In the SD-WAN Manager GUI, go to Administration>Settings. Next to Organization Name, verify the settings.
Step 2. If the organization name needs to be configured, click Edit. Type in the Organization Name (ENB-Solutions – 21615, for example), then type the name again to confirm. The name is case-sensitive and must match exactly, including any characters. Click Save.
Procedure 2. Ensure that NETCONF and SSH are allowed on the control component VPN 0 interface
For a new control component deployment, where DTLS/TLS connections are not established yet, both NETCONF and SSH must be permitted on the VPN 0 interface tunnels on the SD-WAN Validators and Controllers for certificate installation. If there are no tunnels configured on the control components, then all protocols will be permitted. If tunnels are configured on the VPN 0 interface, then verify that NETCONF and SSH are both allowed:
Step 1. SSH or console to the SD-WAN Validator or Controller
Step 2. Issue a show running-config. If NETCONF or SSH are not both allowed as a service, configure them to be allowed:
config terminal
interface ge0/0
tunnel-interface
allow-service sshd
allow-service netconf
commit and-quit
Procedure 3. Ensure NTP is enabled
For certificate authentication to succeed, all control components (SD-WAN Manager, Validator, and Controller) and Edge routers should have their time synchronized. Configuring NTP is strongly recommended. To verify if NTP is enabled:
Step 1. SSH or console to each control component (SD-WAN Manager, Controller, and Validator)
Step 2. Issue a show ntp associations. If there are no entries found, configure NTP:
config terminal
system ntp server time.google.com
commit and-quit
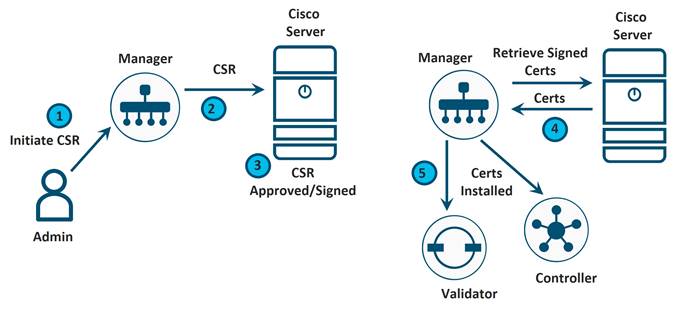
Option 1: Automated certificate signing through Cisco Systems
With this option, certificate signing requests are automatically sent to the Cisco PnP cloud service where the certificate is signed. The SD-WAN Manager then automatically retrieves the certificate and installs it. A DNS server needs to be configured to resolve the hostnames, cloudsso.cisco.com, swapi.cisco.com, and apx.cisco.com. The SD-WAN Manager needs to reach these servers on TCP port 443.
Note that this option requires SD-WAN Manager version 19.1 or higher (19.2 or higher is recommended) and also requires that Smart Account credentials are configured before this certificate option can be configured.
Procedure 1. Verify Cisco server reachability
Step 1. Ensure that a DNS server is defined for VPN 0 on the SD-WAN Manager via SSH or console:
config terminal
vpn 0
dns 208.67.222.222 primary
commit and-quit
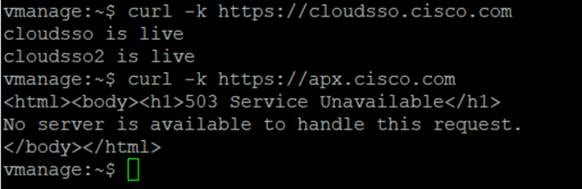
Step 2. To validate if the SD-WAN Manager can reach the Cisco PnP server, go to the SD-WAN Manager CLI, type in vshell, then type:
curl -k https://cloudsso.cisco.com (you should see a message that the host is live)
Then, type:
curl -k https://apx.cisco.com (you should get an html response from the server that the service unavailable)
If the servers are not reachable, you should see “Failed to connect” messages. Type exit to exit vshell mode.
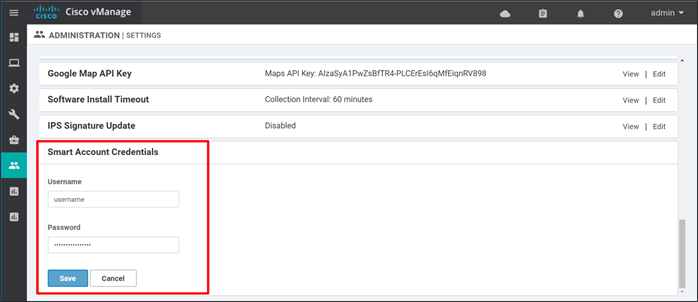
Procedure 2. Configure Smart Account credentials
Before you can enable automatic signing of Cisco certificates, Smart Account credentials have to be configured.
Step 1. On the SD-WAN Manager GUI, Go to Administration>Settings.
Step 2. Towards the bottom of the page, go to the right of Smart Account Credentials and click Edit.
Step 3. Enter the Username and Password that gives you access to your Smart Account information at https://software.cisco.com.
Step 4. Click Save.
Procedure 3. Configure SD-WAN Manager certificate settings
Step 1. On the SD-WAN Manager Administration>Settings page, go to the right of Controller Certificate Authorization and click Edit.
Step 2. Select Cisco Automated (Recommended). If you change the setting, you will get a popup window asking to confirm the Certificate Authorization change. Click Proceed.
Step 3. Select the Validity Period. Select 1 or 2 years.
Step 4. Set the Certificate Retrieve Interval. This is the interval the SD-WAN Manager will check on whether the signed certificates are available after the CSR has been submitted. The default is 60 minutes, so you may want to decrease this value.
Step 5. Click the Save button.

Procedure 4. Generate certificate signing requests
Next, generate and submit certificate signing requests.
Step 1. Navigate to Configuation>Certificates and click the Controllers tab
Step 2. On the right side of the SD-WAN Manager, click … and select Generate CSR from the drop-down box.

Step 3. A pop-up window states that the generated CSR has been sent to Cisco for signing. Click Close.
Step 4. Repeat the process for the SD-WAN Controller and Validator.
Procedure 5. Sign and install certificate signing requests
The signing and installation of the Cisco certificates are completely automated. To view the status:
Step 1. Go to https://software.cisco.com/#pnp-certificates and login if prompted.
Step 2. Ensure the proper Virtual Account is chosen in the upper right-hand corner. This is the Virtual Account with the controller profile of the organization name used for the SD-WAN overlay.
Step 3. Ensure you are on the Certificates tab.
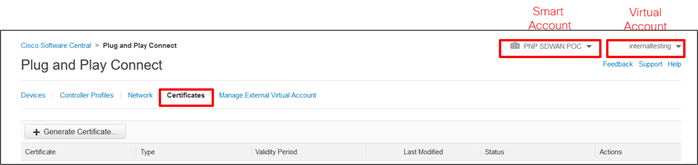
When a CSR is generated, you will see an enrollment request and the Status changes to In Process. When the request is signed, the Status changes to Completed.
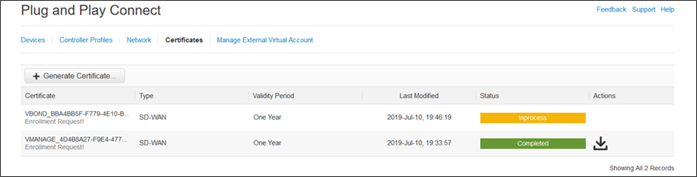 The SD-WAN Manager will automatically check at the configured interval for the signed certificates and install them.
Option 2: Manual certificate signing through Cisco Systems
With this option, certificate signing requests are manually submitted by the administrator to the Cisco PnP cloud service, where the certificate is signed. The administrator can then download the resulting certificates from the PnP Connect portal and manually install them in the SD-WAN Manager.
Note that this option requires SD-WAN Manager version 19.1 or higher (19.2 or higher is recommended).
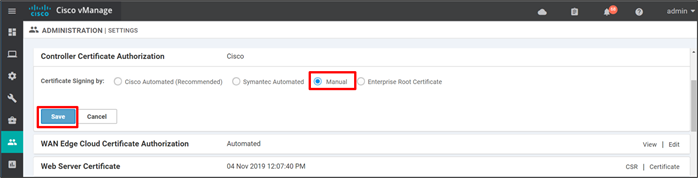
Procedure 1. Configure SD-WAN Manager certificate settings
Step 1. On the SD-WAN Manager GUI, go to Administration>Settings.
Step 2. To the right of Controller Certificate Authorization, Click Edit.
Step 3. Select Manual if it is not already selected. If this is a change from the current configuration, you may get a pop-up window asking to confirm that you want to change the certificate authority which is used for authentication. Click Proceed.
Step 4. Click the Save button.
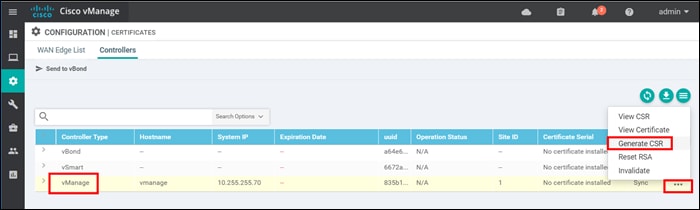
Procedure 2. Generate certificate signing requests
Next, generate and submit certificate signing requests.
Step 1. Navigate to Configuration>Certificates and click the Controllers tab
Step 2. On the right side of the SD-WAN Manager, click … and select Generate CSR from the drop-down box.
Step 3. A pop-up window appears with the certificate signing request. Download or copy the certificate signing request to submit for signing.
Step 4. Click Close. You can always view or download the CSR again by clicking … to the right of the control component and selecting View CSR from the drop-down menu.
Step 5. Repeat the process for the SD-WAN Controller and Validator.
Procedure 3. Submit and sign the certificate signing requests
Next, the CSRs will be submitted to the Certificate Authority to be signed. This needs to be done for each control component.
Step 1. Go to the Certificate portal at https://software.cisco.com/#pnp-certificates and login if prompted.
Step 2. Ensure the correct Virtual Account is chosen in the upper right-hand corner. This is the Virtual Account with the controller profile of the organization name used for the SD-WAN overlay.
Step 3. Ensure you are on the Certificates tab.
Step 4. Click the Generate Certificate button. The Generate Certificate window is displayed.

Step 5. Next to Certificate Name, enter a name for the certificate (VMANAGE)
Step 6. Next to Certificate Signing Request, paste the CSR copied from the SD-WAN Manager GUI. Be certain to include the “---BEGIN CERTIFICATE REQUEST---” and “---END CERTIFICATE REQUEST---” wording.
Step 7. Next to Validity Period, choose a timeframe for how long you want the certificate to be valid (One Year).
Step 8. Optionally, next to Description, type a description of the certificate (Certificate for vManage).
Step 9. Click the Next button.

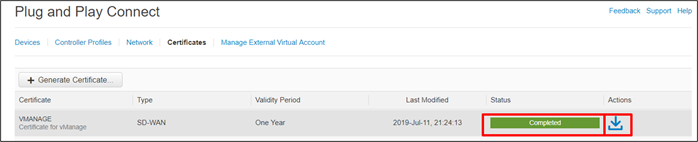
Step 10. On the next screen, review and click Submit.
Step 11. A message will indicate that a certificate was successfully requested. Click Done.
Step 12. When the processing is complete, the status will show as Completed. Refresh the page if required.
Step 13. To the right under the Actions column, click the down arrow to download the certificate.
Step 14. Repeat Procedure 3 for the SD-WAN Validator and Controllers.
Procedure 4. Install the signed certificates
Signed certificates are downloaded directly from the Plug and Play Connect portal in the previous procedure. The resulting certificates are uploaded and installed manually in the SD-WAN Manager.
| Tech Tip |
| In the 19.1.0 version of SD-WAN Manager, the SD-WAN Manager expects to see uploaded certificates in PEM format, which uses a plain-text header (BEGIN CERTIFICATE) and footer (END CERTIFICATE), but the PnP Connect portal does not generate the certificates with the BEGIN CERTIFICATE and END CERTIFICATE text. If you install the certificate into the SD-WAN Manager without adding the header and footer, you may get an error similar to: System organization [ENB-Solutions – 21615] does not match cert subject’s OU []. To correct this, manually insert “-----BEGIN CERTIFICATE-----” [carriage return] at the beginning of the file, and [carriage return] “ -----END CERTIFICATE-----“ at the end of the file, save it, then upload this certificate to the SD_WAN Manager. Starting in version 19.2, the certificate can be installed without adding delimiters. |
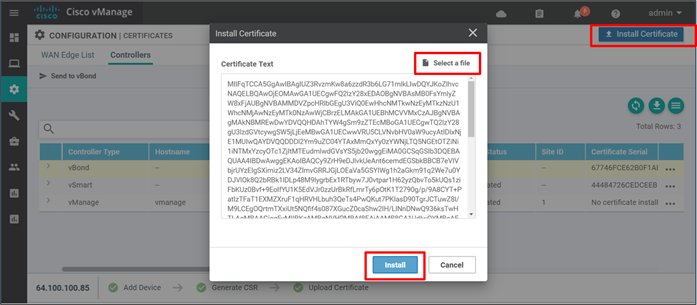
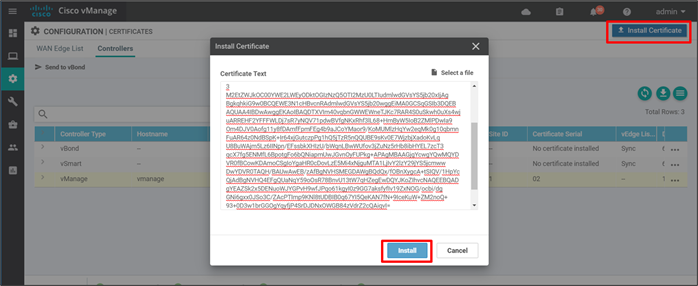
Step 1. Go to Configuration>Certificates and click the Controllers tab.
Step 2. In the top right of the screen, click the Install Certificate button. No specific control component needs to be selected. The SD-WAN Manager applies them to the proper control component.
Step 3. Paste the contents of the certificate into the window or click Select a file and choose the certificate to upload. Note that the SD-WAN Manager looks for a .pem file, but the certificate may have been downloaded with a .cer extension instead. The difference in extension names does not cause any issues.
Step 4. Click Install.
Repeat the procedure for all the additional control components.
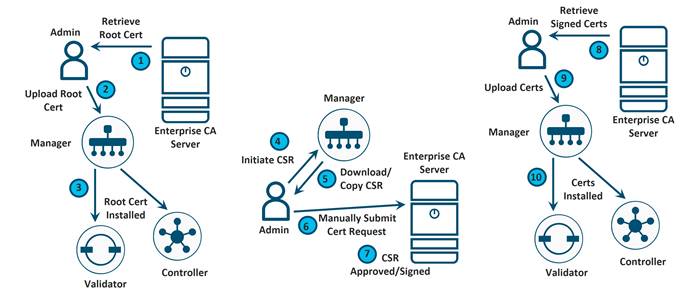
Option 3: Enterprise Root Certificate Authority (CA)
With this option, an Enterprise-existing CA infrastructure can be leveraged. Certificate signing requests get manually submitted by the administrator to the Enterprise CA, where the certificates are signed. The administrator then receives the resulting certificates and manually installs them in the SD-WAN Manager. Note that this option requires a full root certificate chain to be loaded in the SD-WAN Manager which is automatically distributed to the other control components when the SD-WAN Manager certificate setting type is configured to be Enterprise Root Certificate.
| Tech Tip |
| The automatic distribution of the root certificate to the other control components is supported starting in 18.3 SD-WAN Manager code. Before that, the root certificates needed to be installed manually on each control component. |
In lab testing, there are some options to create your own CAs. Some examples include Linux-based XCA, TinyCA, or OpenSSL (which is part of all Linux distributions) or Windows (where you can install an Ubuntu shell or OpenSSL).
Some tips to keep in mind when you are using an Enterprise CA:
● When you are generating a root certificate on the Enterprise CA, the organization name does not need to match the organization name that you use for the SD-WAN overlay.
● Once you have the PKI server configured, you can use it to sign the certificates for the control components. When you generate the CSR from the SD-WAN Manager, the organization unit name of the CSR will match the organization name of the SD-WAN overlay. When you perform the signing, it is important that the PKI server does not overwrite the populated fields of the CSR, so accept what is defined in the CSR and confirm issuing of the certificate.
● If you are using subordinate servers, be certain to export, and then import the full root CA chain into the SD-WAN Manager, which includes both the root and the subordinate, or intermediate, certificates.
In this deployment, OpenSSL installed on Windows 10 was used. See Appendix B for the setup information.
Procedure 1. Retrieve the root certificate from your CA server
Step 1. In this example, the root CA and sub CA were created using OpenSSL and the steps are shown in Appendix B. The resulting CA root chain certificate was created and named root-ca-chain.pem.
Procedure 2. Configure SD-WAN Manager certificate settings and install the root certificate chain
Step 1. On the SD-WAN Manager GUI, go to Administration>Settings.
Step 2. To the right of Controller Certificate Authorization, Click Edit.
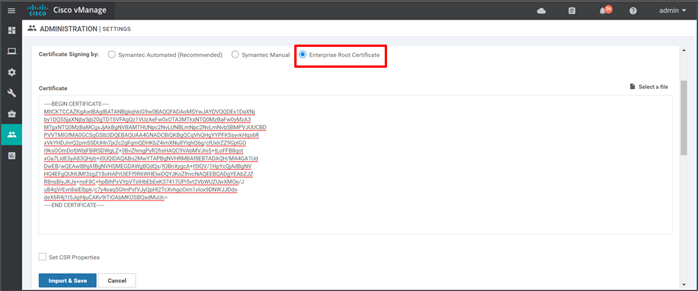
Step 3. Select Enterprise Root Certificate if it is not already selected. If this is a change from the current configuration, you may get a pop-up window asking to confirm that you want to change the certificate authority which is used for authentication. Click Proceed.
Step 4. Upload or copy and paste the root certificate chain file (root-ca-chain.pem) into the Certificate box or click Select a file and choose the certificate to upload. Note that SD-WAN Manager looks for a .pem file, but the certificate may have been downloaded with a different extension depending on how it was saved and named on download. The certificate should be in PEM format, which means that each certificate in the file begins with the text “-----BEGIN CERTIFICATE-----” and ends with the text “-----END CERTIFICATE-----“.
| Tech Tip |
| Note that there is a checkbox that allows you to set properties within the Certificate Signing Request (CSR) that is generated for each control component and submitted and signed with the Enterprise CA. Starting in 19.2, WAN Edge cloud devices use control component CSR properties when being deployed, but the SD-WAN Validator validates the organization field and expects it to contain either Viptela LLC or vIPtela Inc. If it does not, certificate validation fails for these cloud devices. To avoid this, use one of two workarounds: ● Do not modify the CSR properties so the default settings will be used. ● If CSR properties need to be configured, use “Viptela LLC” for the Organization field. This should be addressed in SD-WAN Manager version 20.4. |
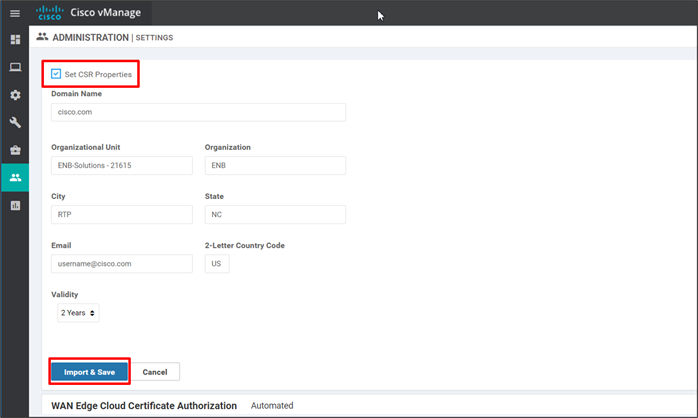
Step 5. (optional) Click the box next to Set CSR Properties. The Organization Unit is already populated (ENB-Solutions – 21615, in this example) since this was previously defined under Administration>Settings>Organization Name. Fill in the Domain Name (cisco.com), Organization (Viptela LLC), City (RTP), State (NC), Email (username@cisco.com), Country Code (US), and Validity (2 Years).
| Tech Tip |
| Enterprise Certificate Common Names (CN) are composed of a combination of Device Personality (vmanage, vbond, vsmart), Device UUID (36 characters), an ID, and the provided Domain Name. Together, this Common Name cannot be more than 64 characters long. An example of a Common Name is vmanage-d1d673bd-339e-4812-ac65-1d1c86ae2b2a-1.cisco.com, where Device Personality is “vmanage”, the UUID is “d1d673bd-339e-4812-ac65-1d1c86ae2b2a”, the id is 1, and the domain is “cisco.com”. |
Step 6. Click the Import & Save button.
After the root certificate is imported, the SD-WAN Manager installs the root certificates on the remaining control components.
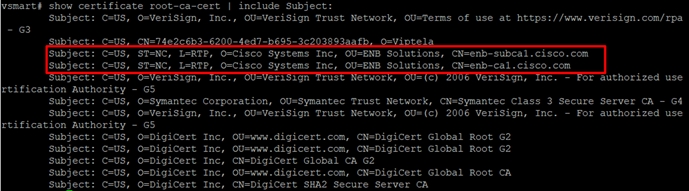
To verify root certificate installation, you can issue a show certificate root-ca-cert | include Subject: on the CLI of each control component.
Note: If you add a new control component to the SD-WAN Manager after the root certificate has been distributed by the SD-WAN Manager, the root certificate will be distributed to the new control component automatically.
If you are running SD-WAN Manager code prior to 18.3, the root certificate chain needs to be installed manually on all the control components.
| Tech Tip |
| It is not recommended to install root certificates manually in SD-WAN Manager versions 18.3 and above. |
Procedure 3. Generate certificate signing requests
Next, generate and submit certificate signing requests.
Step 1. On the SD-WAN Manager GUI, navigate to Configuation>Certificates and click the Controllers tab
Step 2. On the right side of the SD-WAN Manager, click … and select Generate CSR from the drop-down box.

Step 3. A pop-up window appears with the certificate signing request. Download or copy the certificate signing request so it can be submitted for signing. In this example, the CSR is downloaded and moved to the C:\OpenSSL-Win64\bin folder so it can be submitted easily to the CA.
| Tech Tip |
| Note that the downloaded file may be automatically downloaded as undefined.csr, so you many want to change the name of the downloaded file before submitting the CSR to the CA. |
Step 4. Click Close. You can always view or download the CSR again by clicking … to the right of the control component and selecting View CSR from the drop-down menu.
Step 5. Repeat the process for the SD-WAN Controller and Validator.
Procedure 4. Submit and sign the certificate signing requests
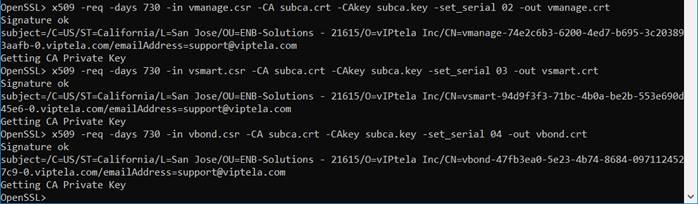
Step 1. Next, the CSRs are submitted to the Certificate Authority to be signed. This needs to be done for each control component. Each CSR is submitted and signed for a validity period of two years. Each resulting certificate has a unique serial number. The resulting certificates are vmanage.crt, vsmart.crt, and vbond.crt. If you are using default path settings for OpenSSL, the certificates will be created in the \bin folder, which in this example is C:\OpenSSL-Win64\bin.
| Tech Tip |
| Ensure the certificate serial numbers generated for each control component is unique. |
OpenSSL> x509 -req -days 730 -in vmanage.csr -CA subca.crt -CAkey subca.key -set_serial 02 -out vmanage.crt
Open SSL> x509 -req -days 730 -in vsmart.csr -CA subca.crt -CAkey subca.key -set_serial 03 -out vsmart.crt
OpenSSL> x509 -req -days 730 -in vbond.csr -CA subca.crt -CAkey subca.key -set_serial 04 -out vbond.crt
Procedure 5. Install the signed certificates
Certificate files can be uploaded to the SD-WAN Manager, or they can be copied and pasted in.
Step 1. In the SD-WAN Manager, go to Configuration>Certificates and click the Controllers tab.
Step 2. In the top right of the screen, click the Install Certificate button. No specific control component needs to be selected. SD-WAN Manager applies them to the proper control component.
Step 3. Copy and paste or upload the resulting certificate from the previous procedure.
Step 4. Click Install.
Step 5. Repeat the procedure for the additional control components.
Process 2: Deploying the Signed WAN Edge Authorized Serial Number List
In order for the WAN Edge devices to come up and be active in the overlay, you must have a valid authorized serial number file uploaded to the SD-WAN Manager. This authorized serial number file lists the serial and chassis numbers for all the WAN Edge routers allowed in the network. The SD-WAN Manager sends this file to the control components, and only devices that match serial numbers on this list will be validated and authenticated successfully by the control components.
The legacy authorized serial number files for vEdge routers were once located at the Cisco Catalyst SD-WAN support website, but these files are now migrated to the Plug and Play (PnP) Connect portal. The authorized serial number file on the PnP Connect portal also contains IOS XE SD-WAN router information. See Appendix C for information on how to create a controller profile or add any WAN Edge devices to the portal if needed before downloading or syncing the authorized serial number file. Note that you can upload multiple authorized serial number files to the SD-WAN Manager and the duplicates should be filtered.
There are two ways to load the signed WAN Edge Authorized Serial Number List in SD-WAN Manager, either by manually uploading the serial file or automatically syncing the file from the PnP Connect portal. With the manual method, a signed serial file can either be retrieved from the PnP Connect portal, or starting in SD-WAN Manager version 20.3.1, an unsigned .csv file can be created with the required device information and uploaded to SD-WAN Manager. Refer to the product documentation for more information on the .csv file.
The following section details how to retrieve the WAN Edge authorized serial number list from the PnP Connect portal and how to upload it manually to the SD-WAN Manager.
Procedure 1. Retrieve the authorized WAN Edge serial number file from the PnP Connect Portal
Step 1. Navigate to https://software.cisco.com/#pnp-devices.
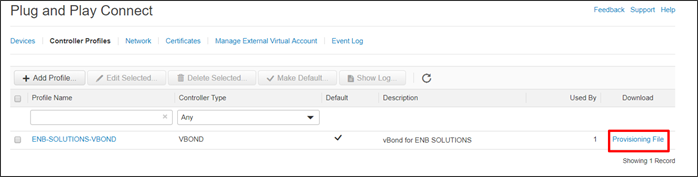
Step 2. Click on Controller Profiles.
Step 3. Select the Smart Account and Virtual Account in the upper right-hand corner that contains the Controller profile which references the proper Cisco Catalyst SD-WAN overlay Organization Name (ENB-SOLUTIONS-VBOND, in this example).
Step 4. Next to the correct controller profile (ENB-SOLUTIONS-VBOND), click on the Provisioning File text.
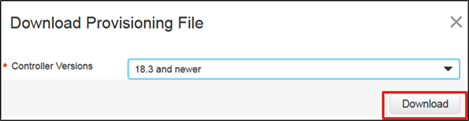
Step 5. In the pop-up window, select the control component versions from the drop-down box. Choose 18.3 and newer. Click Download and save the file to your computer. It is saved as serialFile.viptela by default.
Procedure 2. Load the authorized WAN Edge serial number file manually
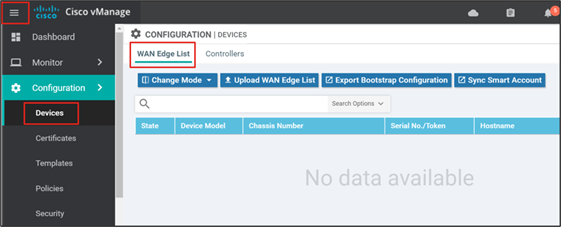
Step 1. In the SD-WAN Manager GUI, go to Configuration>Devices in the left pane, or alternatively, expand the left pane by selecting the three horizontal bars in the top left corner of the GUI, then select Configuration>Devices. Ensure the WAN Edge List tab is selected.
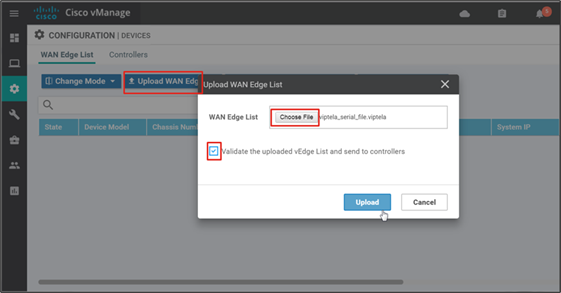
Step 2. Select the Upload WAN Edge List button. A pop-up window appears. Select Choose File. Browse and select the serial number file (serialFile.viptela by default). Select Open.
Step 3. Now that the file is selected, select the check box in order to validate the list and send it to the control components. Select the Upload button. If you select the check box, this will put all the devices on the list into a valid state, which means they are authorized on the network and can be brought up at any time to start forwarding traffic. If you do not select Validate, then all the devices show the status as invalid, and you have to individually change them to valid if you want to bring them up on the network and participate in the overlay.
Step 4. Select OK in the confirmation box that appears.
Step 5. A pop-up window appears to inform you that the list uploaded successfully and informs you of the number of WAN Edge routers that were uploaded successfully. Select OK. A page will indicate that the list has been successfully pushed out to the SD-WAN Validators and Controllers.
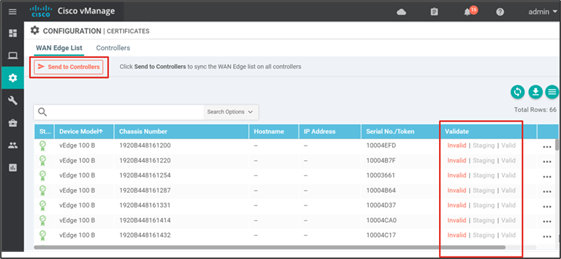
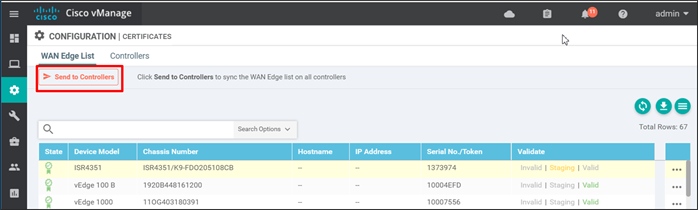
Step 6. If you did not select the check box to validate the uploaded list to send to the control components, you can go to Configuration>Certificates, ensure the WAN Edge List tab is selected, and select the Send to Controllers button in the top left section of the screen. This will distribute the list of WAN Edge routers to all the control components. A page will indicate that the list has been successfully pushed out to the SD-WAN Validators and Controllers. All devices are in an invalid state.
Option 2: Automatically sync to the PnP Connect portal from SD-WAN Manager
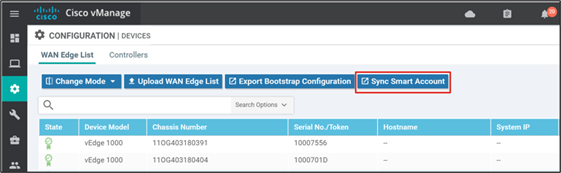
Starting from version 18.3, the SD-WAN Manager has a Sync Smart Account option, which allows the SD-WAN Manager to automatically connect to the PnP Connect portal and download the authorized WAN Edge serial number file.
Step 1. In the SD-WAN Manager GUI, go to Configuration>Devices, and ensure the WAN Edge List tab is selected.
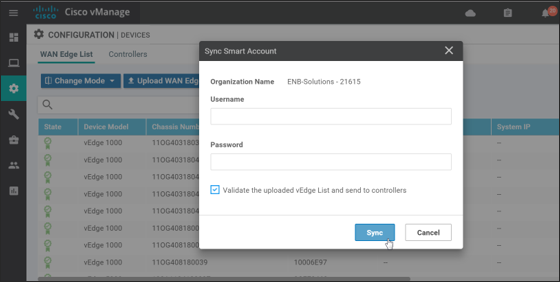
Step 2. Click on Sync Smart Account and a window pops up which prompts you for your Username and Password.
Step 3. Enter your username and password for the https://software.cisco.com website. The checkbox which validates the uploaded list is selected by default. Note that the list still needs to be distributed to the other control componets once synced with the SD-WAN Manager even if the checkbox was selected.
Step 4. Click Sync. The SD-WAN Manager connects to the Cisco servers and the authorized list is downloaded. Status should indicate Success.
Step 5. Go to Configuration>Certificates in the SD-WAN Manager to view the uploaded list. The devices should all be in a valid state.
Step 6. Click the Send to Controllers button in the top left corner of the GUI in order for all of the control components to be updated with the valid WAN Edge list. Once completed, the operation should indicate success.
Control Component certificate status
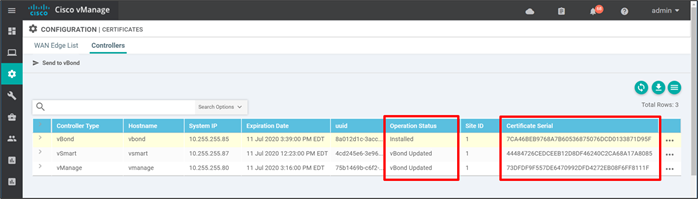
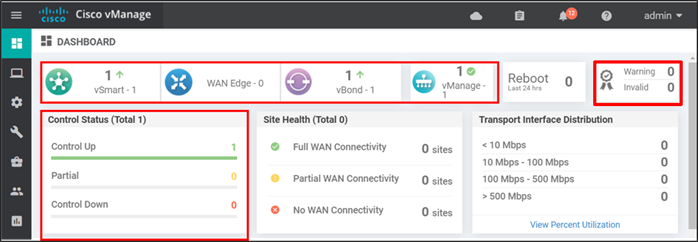
Go to the SD-WAN Manager dashboard. You should now see vSmart, vBond, and vManage icons with a green up arrow. This indicates that the control connections from the SD-WAN Manager to the other control components are up. The Control Status box indicates the control connection of the SD-WAN Manager to the SD-WAN Controller. Control connections cannot be completed without valid certificates. Any warnings or invalid certificates associated with control connections are also shown on the dashboard.
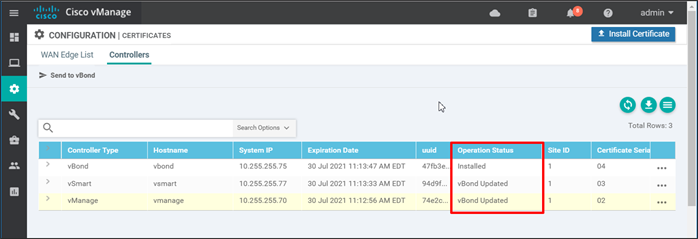
Go to Configuration>Certificates and click the Controllers tab. The Operation Status shows Installed for the vBond and vBond Updated for the remaining control component types.
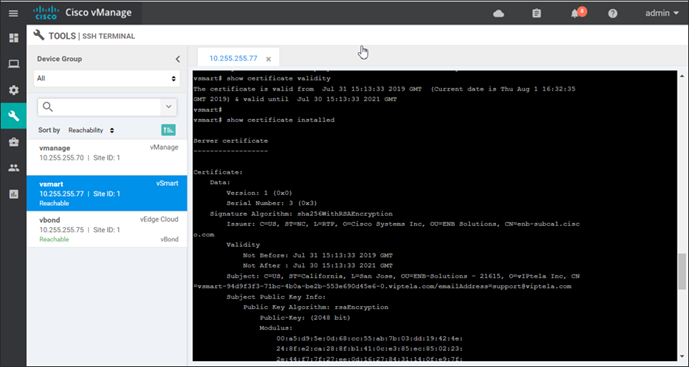
Select Tools>SSH Terminal to establish a SSH connection to a device from the SD-WAN Manager. Select the device on the left (vsmart) and login with the proper credentials. You can now execute the following commands to check certificate details:
● show control local-properties
● show certificate validity
● show certificate installed
● show certificate root-ca-cert
WAN Edge Device Certificate Status
There are three different states of a WAN Edge certificate:
● Valid (shown in green): The certificate is valid and the WAN Edge router can fully participate and forward traffic in the SD-WAN overlay network.
● Staging (shown in yellow): The certificate is in staging state and the WAN Edge router can form control connections with the control components, but it cannot join the overlay and forward traffic until it is in a valid state. More specifically, each WAN Edge router becomes an OMP peer with the SD-WAN Controllers, but no OMP routes will be sent nor will any local routes be redistributed into OMP.
● Invalid (shown in red): The certificate is not valid and the WAN Edge router will be barred from forming control connections.
| Tech Tip |
| When you manually load or sync the WAN authorization serial number list, you have the option to validate the list before you complete the upload or sync. If you select validate, all devices will be in the Valid state when the list is loaded. If you do not select validate, all devices will be in the Invalid state when the list is loaded, and you will need to manually validate each one as the invalid devices cannot form control connections with the control components. |
To check the certificate status:
Step 1. On the SD-WAN Manager GUI, navigate to Configuration>Certficates. Ensure the WAN Edge List tab is selected. In the Validate column you can view the current status of the certificate.
To change the certificate status:
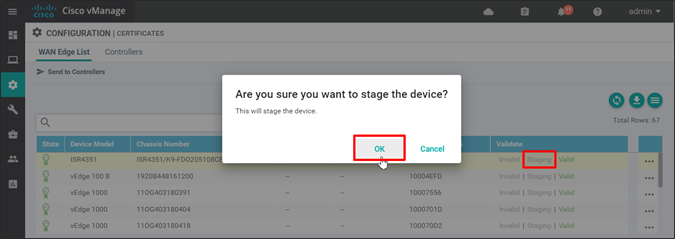
Step 1. From the Configuration>Certificates>WAN Edge List page, next to the targeted WAN Edge router, select the desired status (Staging for example).
Step 2. A pop-up window will ask if you to confirm. Click OK.
Step 3. The Send to Controllers text in the top left of the page will be marked in red, indicating that the control components need to be updated with the modified list. Click Send to Controllers.
The updated serial number list is sent to all the control components.
To check the WAN Edge authorized serial number list on the control components, you can execute a show orchestrator valid-vedges command on the SD-WAN Validator, or a show control valid-vedges on the SD-WAN Controller or SD-WAN Manager.
CHASSIS NUMBER SERIAL NUMBER VALIDITY ORG
--------------------------------------------------------------------------------
11OG403180391 10007556 valid ENB-Solutions – 21615
ISR4351/K9-FDO205108CB 1373974 staging ENB-Solutions - 21615
Note that when a device certificate is set to invalid, the device is removed from the authorized list. Only devices in valid and staging status appear on the list. Control connections are deleted to the invalid devices once the list is updated and distributed to all the control components.
When a device’s certificate has been set to invalid and tries to connect to the SD-WAN Validator, you might see the following information on the SD-WAN Validator (partial output):
vbond# show orchestrator connections-history
[edited]
PEER
PEER PEER PUBLIC REPEAT
TYPE PUBLIC IP PORT STATE LOCAL/REMOTE COUNT
--------------------------------------------------------------------------
Unknown 64.100.103.3 12386 challenge RXTRDWN/CRTVERFL 541
The command lists a legend for the error codes, and the error code CRTVERFL means the SD-WAN Validator failed to verify the peer certificate. If you run a show orchestrator valid-vedges command on the SD-WAN Validator, you can see if the specific WAN Edge device is in the authorized serial number file list that was distributed to the control components.
Invalidate a control component certificate
To invalidate a control component certificate:
Step 1. In the SD-WAN Manager GUI, go to Configuration>Certificates and click the Controllers tab.
Step 2. To the far right of the control component you want to invalidate, click … and choose Invalidate.
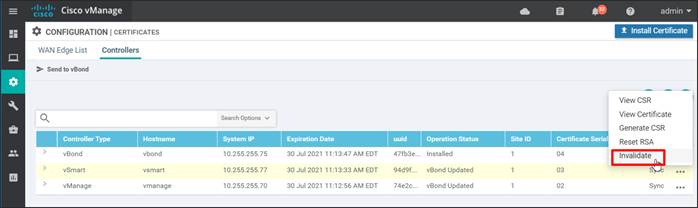
Step 3. Select OK to confirm the action.
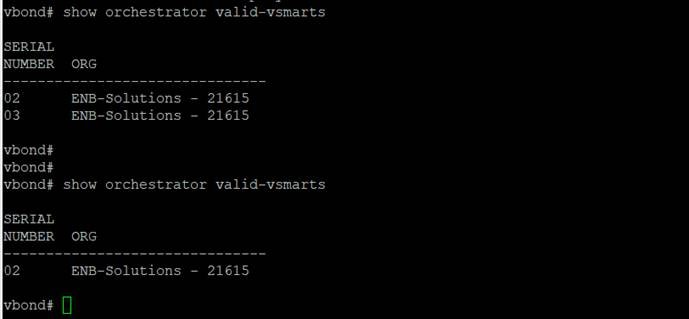
Step 4. The device is removed from SD-WAN Manager and the authorized control component list is updated with the device removed. A show orchestrator valid-vsmarts on the SD-WAN Validator (or a show control valid-vsmarts from a SD-WAN Controller or SD-WAN Manager) displays the authorized control component list, that consists of the SD-WAN Controllers and SD-WAN Managers.
The following screenshot shows the control component list before and after a SD-WAN Controller invalidation:
Renew control component certificates
The control component certificates must be renewed before the expiration date. If a valid certificate is not present in the control component, the control connections are disabled.
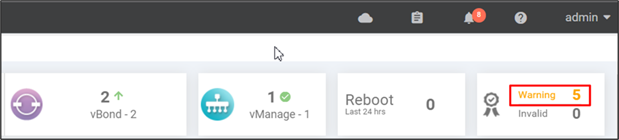
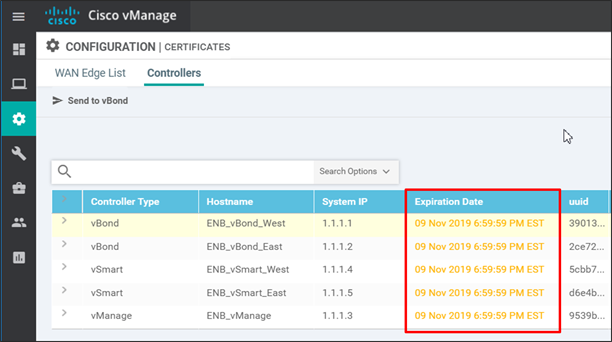
Several months in advance, SD-WAN Manager will indicate on the SD-WAN Manager Dashboard that there are certificate warnings indicating that certificates will expire. The Configuration>Certificates>Controllers tab will indicate the certificate expiration dates marked in yellow or red.
When the Cisco Viptela SDWAN control component certificates are renewed and installed, the control plane will flap briefly, however, there is no impact to the data plane. Although the certificate installation takes only a few minutes, it is recommended to change certificates using a maintenance window time of 1 hour.
| Tech Tip |
| It is recommended to renew certificates one by one. Proceed to renew the next certificate only after the previous certificate has completed renewal successfully, and you have confirmed that the control connection has dropped and reformed successfully. |
The renewal process is the same procedure as the initial deployment of certificates. CSRs are first generated, then signed and received, and then installed. Here is an example of a renewal using the automated Cisco PKI method:
Step 1. On the SD-WAN Manager GUI, go to Administration>Settings and next to Controller Certificate Authorization, click Edit.
Step 2. Review the settings for accuracy, then click Save.
Step 3. Go to Configuration>Certificates and click the Controllers tab.
Step 4. To the far right of the SD-WAN Manager, select … and select Generate CSR from the drop-down box. Repeat for each control component.
Step 5. The SD-WAN Manager automatically retrieves and installs the signed certificates. Verify the certificates have been updated.
When transitioning, devices with the new certificates installed will lose connections to the devices with the old certificate. Connections are re-initiated. Once renewed certificates are installed on all control components, connections will come up fully. Data traffic will continue to run and should not be affected.
Manual Loading of Root Certificates (WAN Edge Routers)
In the event that root certificates (either Enterprise Root certificates or Cisco Root certificates) need to be manually installed in a WAN Edge router, use the following procedures:
WAN Edge Enterprise Root Certificate
To install an individual Enterprise Root Certificate, which will be installed as the current root certificate chain, do the following (note that the root certificate should be pre-loaded onto a server reachable from the WAN Edge router in PEM format):
vEdge router
Step 1. Either copy the PEM-formatted certificate file into the router or paste the certificate into a file.
● To copy, use the download command. The file will be installed by default in the /home/admin folder if you are logged in as admin.
br3-we1# request download vpn 512 ftp://admin:c1sco123@192.168.254.51/ent-root-ca-chain.pem
--2019-08-07 16:19:40-- ftp://admin:*password*@192.168.254.51/ent-root-ca-chain.pem
=> 'ent-root-ca-chain.pem'
Connecting to 192.168.254.51:21... connected.
Logging in as admin ... Logged in!
==> SYST ... done. ==> PWD ... done.
==> TYPE I ... done. ==> CWD not needed.
==> SIZE ent-root-ca-chain.pem ... 3992
==> PASV ... done. ==> RETR ent-root-ca-chain.pem ... done.
Length: 3992 (3.9K) (unauthoritative)
ent-root-ca-chain.pem
100%[===========================================================>] 3.90K --.-KB/s in 0s
2019-08-07 16:19:40 (68.4 MB/s) - 'ent-root-ca-chain.pem' saved [3992]
● To paste directly into a file:
◦ Enter vshell mode.
◦ Type in “vi” with the name of the file. In this case, vi ent-root-ca-chain.pem.
◦ Type “i”, then paste in the certificate (PEM format).
◦ Type “:”, then “wq” to save and quit.
◦ Exit out of vshell mode by typing “exit”.
Step 2. Install the certificate into the root certificate store by typing request root-cert-chain install <path/certname>.
br3-we1# request root-cert-chain install /home/admin/ent-root-ca-chain.pem
Uploading root-ca-cert-chain via VPN 0
Copying ... /home/admin/ent-root-ca-chain.pem via VPN 0
Updating the root certificate chain..
Successfully installed the root certificate chain
Step 3. To verify, issue show certificate root-ca-cert.
br3-we1# show certificate root-ca-cert | inc ENB
Issuer: C=US, ST=NC, L=RTP, O=Cisco Systems Inc, OU=ENB Solutions, CN=enb-ca1.cisco.com
Subject: C=US, ST=NC, L=RTP, O=Cisco Systems Inc, OU=ENB Solutions, CN=enb-subca1.cisco.com
Issuer: C=US, ST=NC, L=RTP, O=Cisco Systems Inc, OU=ENB Solutions, CN=enb-ca1.cisco.com
Subject: C=US, ST=NC, L=RTP, O=Cisco Systems Inc, OU=ENB Solutions, CN=enb-ca1.cisco.com
Cisco IOS XE SD-WAN router
The process is similar for the Cisco IOS XE SD-WAN routers.
Step 1. Copy the PEM-formatted certificate file into the router.
br2-we1#copy ftp://admin:c1sco123@192.168.254.51/ent-root-ca-chain.pem bootflash: vrf Mgmt-intf
Destination filename [ent-root-ca-chain.pem]?
Accessing ftp://*:*@192.168.254.51/ent-root-ca-chain.pem...!
[OK - 3992/4096 bytes]
3992 bytes copied in 0.027 secs (147852 bytes/sec)
Step 2. Install the certificate into the root certificate store by typing request platform sdwan root-cert-chain install <path/certname>.
br2-we1#request platform software sdwan root-cert-chain install bootflash:ent-root-ca-chain.pem
Uploading root-ca-cert-chain via VPN 0
Copying ... /bootflash/ent-root-ca-chain.pem via VPN 0
Updating the root certificate chain..
Successfully installed the root certificate chain
| Tech Tip |
| Note that when you try to verify whether a particular root certificate is installed, the show sdwan certificate root-ca-cert command only returns one certificate in IOS XE SD-WAN code prior to 16.12.x. |
WAN Edge Cisco PKI Root Certificate
This process is identical to the Enterprise Root Certificate deployment in the previous operation.
When you install it, you can verify it on a vEdge router using the show certificate root-ca-cert command.
br5-we1# show certificate root-ca-cert | inc Cisco
Issuer: OU=Arcturus, O=Cisco, CN=Internal Customer Root CA
Subject: O=Cisco, OU=Albireo, CN=Viptela SubCA
Issuer: OU=Arcturus, O=Cisco, CN=Internal Customer Root CA
Subject: OU=Arcturus, O=Cisco, CN=Internal Customer Root CA
If you do not have a copy of the Cisco root certificates, you can install the entire root certificate chain instead. See the next section for instructions.
WAN Edge Root Certificate Chain
In this section, the entire root certificate chain can be exported from a control component and imported into a WAN Edge router.
Step 1. From a control component, export the root certificate chain to an external server.
vbond# request upload vpn 512 ftp://admin:c1sco123@192.168.254.51/root-cert-chain.crt master_root.crt
ENB_vBond_West# vshell
ENB_vBond_West:~$ cp /usr/share/viptela/root-ca.crt /home/admin/root-ca.crt
ENB_vBond_West:~$ exit
exit
vbond# request upload vpn 512 ftp://admin:c1sco123@192.168.254.51/root-ca.crt root-ca.crt
vEdge router
Step 1. Uninstall the previous root certificate chain.
br3-we1# request root-cert-chain uninstall
Successfully uninstalled the root certificate chain
Step 2. Copy the PEM-formatted certificate file into the router.
To copy, use the request download command. The file will be installed by default in the /home/admin folder if you are logged in as admin.
br3-we1# request download vpn 512 ftp://admin:c1sco123@192.168.254.51/root-ca.crt
--2019-08-07 20:01:27-- ftp://admin:*password*@192.168.254.51/root-ca.crt
=> 'root-ca.crt'
Connecting to 192.168.254.51:21... connected.
Logging in as admin ... Logged in!
==> SYST ... done. ==> PWD ... done.
==> TYPE I ... done. ==> CWD not needed.
==> SIZE root-ca.crt ... 42492
==> PASV ... done. ==> RETR root-ca.crt ... done.
Length: 42492 (41K) (unauthoritative)
root-ca.crt 100%[===========================>]41.50K --.-KB/s in 0.001s
2019-08-07 20:01:28 (34.8 MB/s) - 'root-ca.crt' saved [42492]
Step 3. Install the certificate into the root certificate store by typing request root-cert-chain install <path/certname>.
br3-we1# request root-cert-chain install /home/admin/root-ca.crt
Uploading root-ca-cert-chain via VPN 0
Copying ... /home/admin/root-ca.crt via VPN 0
Installing the new root certificate chain
Successfully installed the root certificate chain
Step 4. To verify, issue show certificate root-ca-cert
br3-we1# show certificate root-ca-cert | inc Cisco
Issuer: OU=Arcturus, O=Cisco, CN=Internal Customer Root CA
Subject: O=Cisco, OU=Albireo, CN=Viptela SubCA
Issuer: OU=Arcturus, O=Cisco, CN=Internal Customer Root CA
Subject: OU=Arcturus, O=Cisco, CN=Internal Customer Root CA
Cisco IOS XE SD-WAN router
The process is similar for the Cisco IOS XE SD-WAN routers.
Step 1. Uninstall the previous root certificate chain.
br2-we1#request platform software sdwan root-cert-chain uninstall
Successfully uninstalled the root certificate chain
Step 2. Copy the PEM-formatted certificate file into the router.
br2-we1#copy ftp://admin:c1sco123@192.168.254.51/root-ca.crt bootflash: vrf Mgmt-intf
Destination filename [root-ca.crt]?
Accessing ftp://*:*@192.168.254.51/root-ca.crt...!
[OK - 42492/4096 bytes]
42492 bytes copied in 0.051 secs (833176 bytes/sec)
Step 3. Install the certificate into the root certificate store by typing request platform sdwan root-cert-chain install <path/certname>.
br2-we1#request platform software sdwan root-cert-chain install bootflash:root-ca.crt
Uploading root-ca-cert-chain via VPN 0
Copying ... /bootflash/root-ca.crt via VPN 0
Successfully installed the root certificate chain
Migration to Cisco PKI Certificates
When moving to Cisco PKI certificates, it is imperative that all WAN Edge devices have the Cisco PKI root certificate chain installed before the migration to Cisco PKI. If a device is missing the certificate and Cisco PKI certificates are installed on the control components, the WAN Edge device will be unable to connect to the SD-WAN overlay and the certificate chain will need to be manually installed. Alternatively, the Cisco PKI root certificate can be distributed by the PnP or ZTP server when the WAN Edge is automatically provisioned. For WAN Edge routers, the Cisco root certificate is bundled in the software, so the WAN Edge routers could be manually upgraded to a code version containing the Cisco root certificate as an alternative. The Cisco root certificate was bundled into the software of IOS XE SD-WAN routers starting in the 17.2.2 version of code. It was also bundled consistently into the software of vEdge routers starting in the 18.4.6, 19.2.4, 20.1.2, and 20.3.2 and higher version of code.
Cisco Catalyst SD-WAN Manager allows you to have a seamless migration from Symantec/Digicert certificates to Cisco PKI certificates by loading Cisco PKI root certificates automatically on WAN Edge routers for you. Starting in SD-WAN Manager version 19.1, SD-WAN Manager distributes the root certificate chain to all WAN Edge devices, so it is important that all WAN Edge devices are authenticated and connected into the overlay when SD-WAN Manager is upgraded to 19.1. This ensures that the WAN Edge devices receive the Cisco PKI root certificate and are able to authenticate to the control components when Cisco PKI certificates are installed on the control components.
For an existing SD-WAN network, the best way to migrate to Cisco PKI certificates from Symantec/DigiCert:
Step 1. Ensure that all WAN Edge routers have connections to the control components.
Step 2. Upgrade the control complex to 19.1, first the SD-WAN Managers, followed by the SD-WAN Validators, then followed by the SD-WAN Controllers.
Step 3. Verify that the Cisco root certificate has been installed on the WAN Edge devices. For vEdge routers, issue the show certificate root-ca-cert | inc Cisco command.
br3-we1# show certificate root-ca-cert | inc Cisco
Issuer: OU=Arcturus, O=Cisco, CN=Internal Customer Root CA
Subject: O=Cisco, OU=Albireo, CN=Viptela SubCA
Issuer: OU=Arcturus, O=Cisco, CN=Internal Customer Root CA
Subject: OU=Arcturus, O=Cisco, CN=Internal Customer Root CA
If you go to vshell mode on a control component, you can verify the file length of the root-ca.crt file:
ENB_vBond_West# vshell
ENB_vBond_West:~$ ls -l /usr/share/viptela/root-ca.crt
-rwxr-xr-x 1 root root 42492 Aug 6 20:33 /usr/share/viptela/root-ca.crt
ENB_vBond_West:~$ exit
exit
For Cisco IOS XE SD-WAN routers prior to code version 16.12.x, the show sdwan certificate root-ca-cert command may only show one root certificate. In that case, you can look at the timestamp to see if the root-ca.crt was updated around the time of the SD-WAN Manager upgrade. You can also compare the file size of root-ca.crt to the size of the root-ca.crt file on a control component to see if they match.
br2-we1#show bootflash: | inc sdwan/usr/share/viptela/root-ca.crt
1366 42492 Aug 07 2019 20:09:22.0000000000 +00:00 /bootflash/sdwan/usr/share/viptela/root-ca.crt
Step 4. Once you verify the root certificate has been distributed to the WAN Edge routers, the migration to Cisco PKI certificates can be performed. See Option 3: Automated certificate signing through Cisco Systems or Option 4: Manual certificate signing through Cisco Systems in the Deploying Certificates section.
Appendix A—Hardware and software used for validation
This guide was validated using the following hardware and software. Most screenshots were captured using SD-WAN Manager version 18.4.1.
| Functional Area |
Product |
Software Version |
| Cisco Catalyst SD-WAN control components |
SD-WAN Manager, Validator, and Controller |
18.4.1, 19.1.0, 20.3.3.1 |
| Server |
Hypervisor/vSphere client |
VMware ESXi, 6.7.0, 10302608/version 6.7.0.20000 |
Appendix B—Windows OpenSSL Certificate Authority (CA)
The following shows an example of how to set up a Windows OpenSSL CA, along with a subordinate CA. Due to some error codes in the later versions, version 1.0.2s 64-bit is used in this deployment.
Procedure 1. Install OpenSSL
Step 1. Use https://wiki.openssl.org/index.php/Binaries to find binary distributions. Many Linux operating systems come with pre-compiled SSL packages.
Step 2. Run the installer. In this example, the program was installed in C:\OpenSSL-Win64
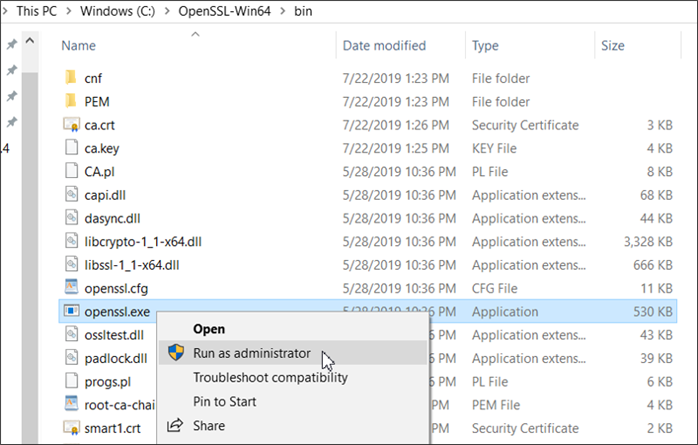
Step 3. Start the OpenSSL application. Go to C:\OpenSSL-Win64\bin, right-click openssl.exe and choose Run as administrator.
A command window with the OpenSSL prompt opens up.
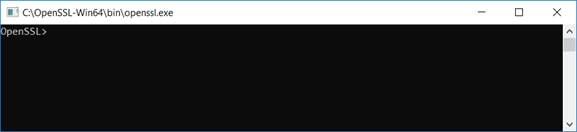
Step 4. Optionally, you can customize the OpenSSL configuration file (openssl.cfg) and specify the local CA folder structure, default validity in days, policy, etc. By default, created keys and certificates will appear in C:/OpenSSL-Win6/bin.
Procedure 2. Set up the Root Certificate Authority
Step 1. Generate a 4096-bit RSA key for the root CA and store it in the ca.key file.
OpenSSL> genrsa -out ca.key 4096
Step 2. Create the self-signed root CA certificate ca.crt to provide identity for the root CA. Specify the validity of the root certificate for 5 years (1825 days).
OpenSSL> req -new -x509 -days 1825 -key ca.key -out ca.crt
Step 3. Enter in the fields for the root certificate. Note that Organization Name does not need to match the SD-WAN overlay organization name. In this example, the following fields are used:
● Country Name: US
● State or Province Name: NC
● Locality Name: RTP
● Organization Name: Cisco Systems Inc
● Organizational Unit Name: ENB Solutions
● Common Name: enb-ca1.cisco.com
● Email Address: [blank]
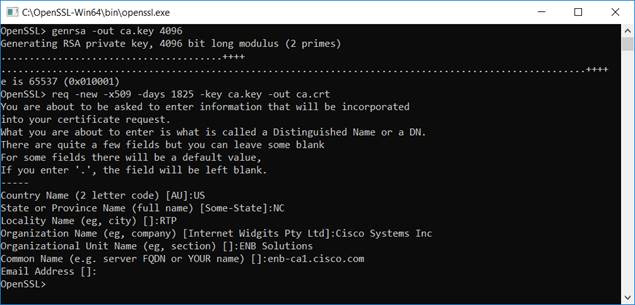
Procedure 3. Set up the Subordinate Certificate Authority (Sub CA)
Step 1. Generate a 4096-bit RSA key for the sub CA and store it in the subca.key file.
OpenSSL> genrsa -out subca.key 4096
Step 2. Generate the sub CA certificate request, which will be submitted to the root CA for signing.
OpenSSL> req -new -key subca.key -out subca.csr
Step 3. Enter in the fields for the sub CA CSR. Note that Organization Name does not need to match the SD-WAN overlay organization name. In this example, the following fields are used:
● Country Name: US
● State or Province Name: NC
● Locality Name: RTP
● Organization Name: Cisco Systems Inc
● Organizational Unit Name: ENB Solutions
● Common Name: enb-subca1.cisco.com
● Email Address: [blank]
● A challenge password: c1sco123
● An optional company name: [blank]
Step 4. Submit the sub CA CSR for signing. Set the validity period for 3 years (1095 days). The resulting certificate will be named subca.crt.
OpenSSL> x509 -req -days 1095 -in subca.csr -CA ca.crt -CAkey ca.key -set_serial 01 -out subca.crt
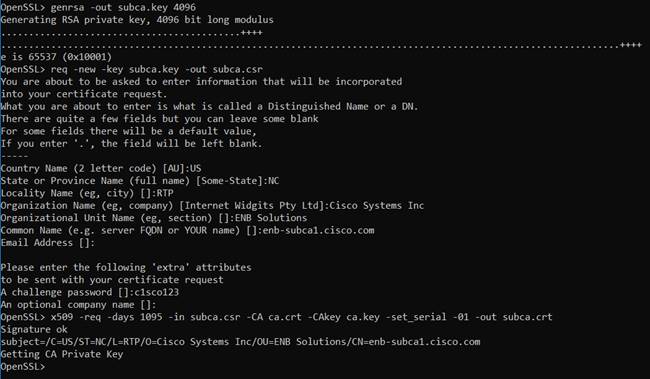
Procedure 4. Create the Root CA certificate chain
In the above procedures, the root CA certificate and the sub CA certificate were created. The SD-WAN Manager needs the full root CA certificate loaded, which includes the root CA certificate and any intermediate certficates. The intermediate certificates should come first in the file, followed by the root CA certificate. To create the file, you can use the type command at the Windows cmd prompt.
C:\OpenSSL-Win64\bin>type subca.crt ca.crt > root-ca-chain.pem
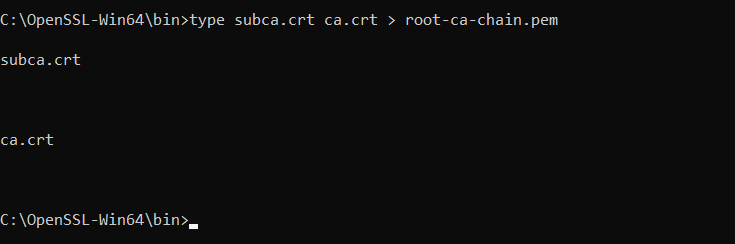
Appendix C: Plug and Play (PnP) Connect Portal
The PnP portal is located at http://software.cisco.com. At this website, you can download software, manage devices through the PnP Connect portal, and manage licenses. Licenses can be managed with the traditional method or through Smart accounts. Smart accounts are required in order to use smart licensing and they provide a central location where you can manage Cisco licenses across the entire organization. After you set up a Smart Account, you have the flexibility to create sub accounts (virtual accounts) to help manage your licenses for departments, areas, or locations within your organization. A virtual account is like a file folder, where you can add multiple virtual accounts based on your business functions. A Smart Account and Virtual Account is required in order to create a controller profile on the PnP Connect portal.
For additional information on Smart Accounts and Smart Licensing:
https://cisco.com/go/smartlicensing
The Plug and Play Connect portal contains a list of devices and allows you to do multiple things, including:
1. Enable automatic network provisioning of the IOS XE SD-WAN routers. A controller profile is created within the portal which defines your SD-WAN Validator and organization name information. On bootup, the IOS XE SD-WAN router looks for devicehelper.cisco.com, which directs the router to the PnP portal. The PnP portal checks the serial number of the router and pushes key parameters to it, such as SD-WAN Validator IP address and organization name. From there, the router contacts the SD-WAN Validator and control plane connectivity is initiated from there. The PnP portal information is used to populate the Zero-Touch Provisioning (ZTP) servers so the vEdge routers can be enabled for automatic network provisioning.
2. Through the controller profile, you can create a serial authorization file for the WAN Edge hardware that you can load into the SD-WAN Manager manually. Alternatively, you can allow SD-WAN Manager to sync to the PnP account to download the serial authorization information without manual intervention. Without the serial authorization file, the WAN Edge routers cannot join the overlay network.
3. Transfer devices between Smart Accounts and Virtual Accounts
4. Submit CSRs and receive Cisco PKI certificates for control component certificates as an alternative to Symantec/DigiCert certificates. This can be done automatically by SD-WAN Manager or manually.
If you have a Cisco cloud-hosted control component deployment, the controller profile should already be created in the PnP portal. Also, WAN Edge devices that are ordered through Cisco Commerce Workspace (CCW) with a Smart account and Virtual account associated with them should be automatically pushed to the PnP portal.
For on-premise control component deployments, a controller profile can be created manually and WAN Edge devices that are not already in the PnP portal can also be added manually.
This section can show you how to:
● Create a controller profile if one hasn't already been created
● Add WAN Edge devices to the portal and associate them with a controller profile
For more information, review the Cisco Plug and Play Support Guide for Cisco Catalyst SD-WAN products at https://www.cisco.com/c/dam/en_us/services/downloads/SD-WAN_pnp_support_guide.pdf
Procedure 1. Log into the PnP Connect portal
Step 1. Navigate to https://software.cisco.com/#pnp-devices.
Step 2. Within the Plug and Play Connect portal, find your Virtual Account linked to the Smart Account on the top right.
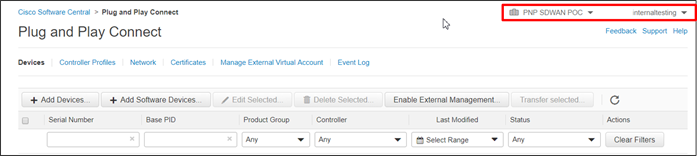
If you have not already created the controller profile, do so now. If you have a Cisco cloud-hosted control component model, the information pertaining to your SD-WAN Validator should be pre-populated within the controller profiles and you can skip procedure 2.
Procedure 2. Configure the controller profile
Step 1. Click the Controller Profiles tab located directly beneath the Plug and Play Connect title and to the right of the Devices tab.
Step 2. Click Add Profile. The Add Controller Profile dialog box opens with Step 1 Profile Type highlighted.
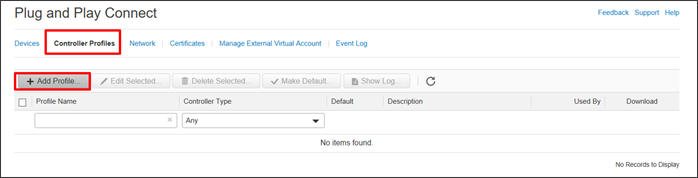
Step 3. In the Controller Type drop-down, select vBond.
Step 4. Click Next. Step 2 Profile Settings is highlighted and the profile setting fields displayed.
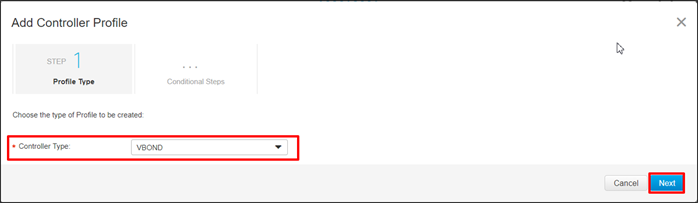
Step 5. In the Profile Name field, enter a name for the controller profile you are creating (ENB-SOLUTIONS-VBOND in the example).
Step 6. In the Description field, enter a description of the profile you are creating (vBond for ENB SOLUTIONS). This field is optional.
Step 7. In the Default Profile drop-down box, select Yes if no other controller profile exists. Regardless of the setting, each WAN Edge that gets added to the PnP Connect portal needs to have a profile associated with it.
Step 8. In the Multi-tenancy box, select No if you are using the SD-WAN Manager in single tenancy mode, select Yes if you are using the SD-WAN Manager in Multi-tenancy mode.
Step 9. In the Organization Name field, enter the organization name (ENB-Solutions – 21615 in this example). You can find the organization name in the SD-WAN Manager GUI under the Administration> Settings screen.
Step 10. In the Primary Controller drop down box, select Domain Name or IPv4 and fill out the SD-WAN Validator hostname or IP address. In the example, select Host Name from the drop-down box, and type in the SD-WAN Validator hostname (vbond-21615.cisco.net in this example) in the text box. In the textbox to the right, keep the SD-WAN Validator port number at the default (or update it if you have configured a different SD-WAN Validator port number in your network).
Step 11. Click Next.
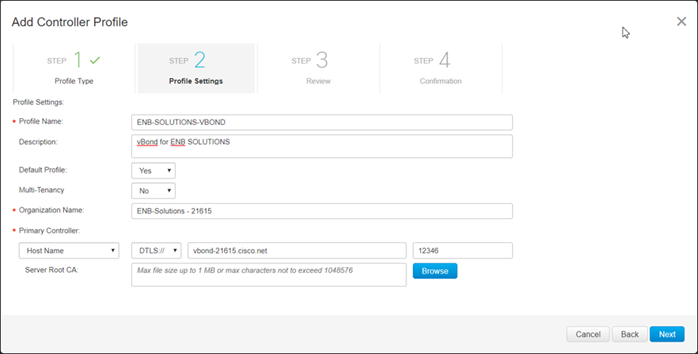
Step 12. Review the options you just configured. If this is a single tenant SD-WAN Manager, then the SP Organization Name will be blank. Select Submit if they are correct, else go back to correct any settings.
Step 13. The window indicates that the profile was successfully created. Select Done.
Procedure 3. Add WAN Edge devices to the portal
You can manually add WAN Edge devices that have not already been added to the portal through the Cisco hardware ordering process (Cisco Commerce Workspace).
To add IOS XE devices to the PnP portal, you need to know the Serial Number, the Base PID (Product Identifier), and the Certificate Serial number. This information is available within the show crypto pki certificates CISCO_IDEVID_SUDI command issued on CLI mode in IOS XE code. For the purposes of PnP, the Chassis Serial Number and SUDI certificate (Secure Unique Device Identification) is bound to the Smart account to enable authentication and easy provisioning of the IOS XE device. Note that you need to be on at least 3.14.0s software or higher in order to be able to run this command for the ISR4k.
ISR4351#show crypto pki certificates CISCO_IDEVID_SUDI
Certificate
Status: Available
Certificate Serial Number (hex): 01373974
Certificate Usage: General Purpose
Issuer:
cn=ACT2 SUDI CA
o=Cisco
Subject:
Name: ISR4351/K9
Serial Number: PID:ISR4351/K9 SN:FDO205108CB
If you have already converted to the SD-WAN image then use the command, show sdwan certificate installed instead.
Router#show sdwan certificate installed
Board-id certificate
--------------------
Certificate:
Data:
Version: 3 (0x2)
Serial Number: 20396404 (0x1373974)
Signature Algorithm: sha256WithRSAEncryption
Issuer: O=Cisco, CN=ACT2 SUDI CA
Validity
Not Before: Dec 16 01:53:51 2016 GMT
Not After : Dec 16 01:53:51 2026 GMT
Subject: serialNumber=PID:ISR4351/K9 SN:FDO205108CB, O=Cisco,
Alternatively, you can use show sdwan certificate serial:
Router#show sdwan certificate serial
Chassis number: ISR4351/K9-FDO205108CB Board ID serial number: 01373974
For vEdge routers, you need the serial number and PID of the device in order to add the device to the portal. If this isn't already known, the information can be retrieved using the show hardware inventory CLI command.
Step 1. Navigate to https://software.cisco.com#pnp-devices.
Step 2. Ensure the correct Smart and Virtual account is chosen in the top right corner.
Step 3. The Devices tab should be selected by default. Select Add Devices.
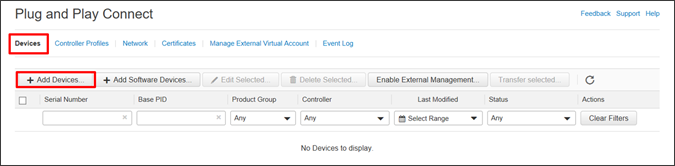
Step 4. The first step is to identify how the device information will be entered, either manually or through a .csv file. Click the Download Sample CSV text to use if you select the .csv import method. Select the radio button next to Enter Device info manually and click Next.

Step 5. Click on the Identify Device button. A popup-window will prompt for the Serial Number and Base PID, a Controller Profile to associate the device with, and a Description.
7. Enter the Serial Number (FDO205108CB), and the Base PID (ISR4351/K9) of the device. Once you select the Base PID textbox, enter values to search on, press enter and then select the PID that matches your device. Once a PID is selected, additional fields may appear. Enter the Certificate Serial Number (1373974) and choose the Controller Profile (ENB-SOLUTIONS-VBOND) to associate with the device when using PnP. Enter an optional Description (BR1-WE1) and click Save.
Note that the certificate serial number is in hex format with no preceding 0x.
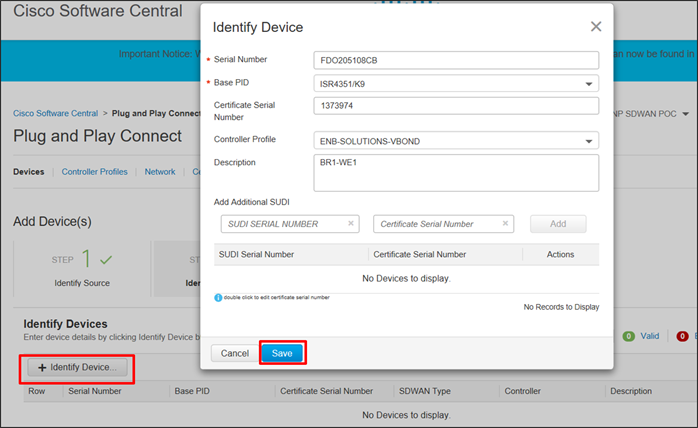
Step 6. Select Next. Review the device information. Click the Back button if information for the device needs to be modified.
Step 7. Click Submit. The page will indicate that it successfully added 1 device.
Step 8. Select Done to refresh the page. By default, an IOS XE SD-WAN device will be in Pending (Redirection) status and marked yellow/brown, and a vEdge device will be in Pending for publish status and marked yellow/brown. Once PnP occurs with an IOS XE SD-WAN device, the device will be in Redirect Successful status and marked green. Once the vEdge information is synced to the ZTP server, the device will be in Provisioned status and marked green.
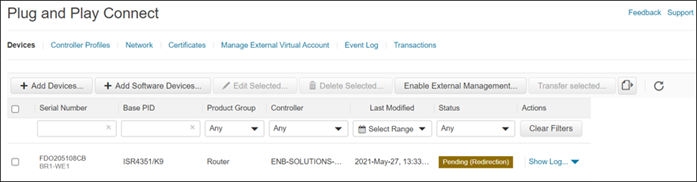
Step 9. Repeat steps to add any additional devices.
For comments and suggestions about this guide and related guides, join the discussion on Cisco Community at https://cs.co/en-cvds.
[GC(1]Update table