Use an ACME Certificate for a Remote Access VPN Policy in Secure Firewall Management Center
Is this Guide for You?
This guide is for network administrators who manage SSL and TLS certificates for Threat Defense devices managed by Cisco Secure Management Center. It provides detailed information about how to use an Automated Certificate Management Environment (ACME) certificate from Lets Encrypt to authenticate a Threat Defense device as a remote access VPN gateway.
You can obtain ACME certificates from other ACME servers as well; however, in this guide, we use Let's Encrypt as the ACME server.
Overview of ACME Enrollments
ACME protocol is an open and standardized protocol designed to automate the issuance, renewal, and management of SSL and TLS certificates. By automating interactions between a certificate authority (CA) and a client, ACME eliminates the manual and complex processes for managing certificates.
Firewall Management Center communicates with an ACME-enabled CA server using the authentication protocol through an authentication interface. For each device, you must have a manual CA certificate for authentication and communication with the ACME server. The ACME server validates domain ownership through port 80 of the Firewall Threat Defense device's authentication interface. After domain validation, the ACME server issues an SSL or TLS certificate to the device.
In an HA pair, the standby device inherits the ACME certificate and all related configurations from the active device’s ACME certificate enrollment object.
Benefits of using ACME Enrollments
-
Automation: Automates the lifecycle of SSL and TLS certificates that includes tasks such as:
-
Requesting certificates
-
Managing domain validations
-
Renewing certificates
You can also update the domain information of an ACME certificate by editing the ACME enrolment object.
-
Revoking certificates
-
-
Security: Ensures security through various mechanisms such as:
-
Using HTTPS for secure communication between the client and the CA server.
-
Using key pairs for authentication requests.
-
Reducing the risk of service outages and site vulnerabilities caused by expired certificates.
-
Validating domain ownership.
-
-
Cost-effectiveness: Allows use of free certificate services, such as Let's Encrypt, to reduce SSL and TLS certification expenses.
-
Scalability: Manages numerous certificates efficiently across multiple domains and subdomains, providing a scalable SSL and TLS certificate management solution.
How ACME Certificates Work
This figure shows the stages of ACME certificate enrollment.
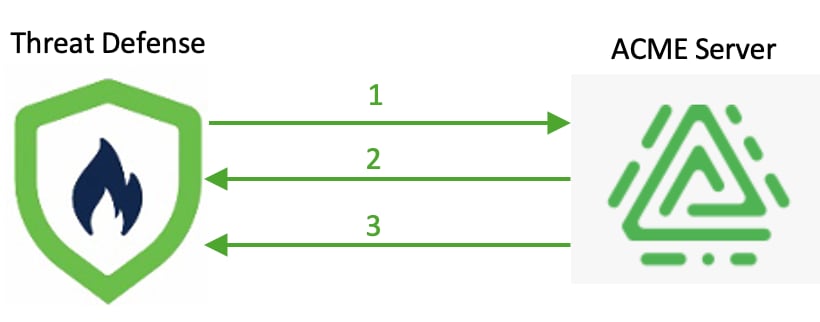
This table explains the process of ACME certificate enrollment for a Firewall Threat Defense device.
|
Stage |
Description |
||
|---|---|---|---|
|
1 |
Firewall Threat Defense device requests an ACME certificate for a specific domain or a list of domains through the source interface. |
||
|
2 |
ACME server validates the domain ownership through TCP port 80 of the Firewall Threat Defense device's authentication interface. For domain validation, the Firewall Threat Defense device uses an HTTP-based challenge mechanism (HTTP-01).
|
||
|
3 |
After domain validation, the ACME server issues an SSL or TLS certificate to the Firewall Threat Defense device. |
 Note |
The stages are repeated for each FQDN in the certificate enrollment request. |
System Requirements
Table 1 lists the platforms and versions for this use case.
|
Product |
Version |
Version Used in This Document |
|---|---|---|
|
Cisco Secure Firewall Management Center |
10.0 or later |
10.0 |
|
Cisco Secure Firewall Threat Defense |
10.0 or later |
10.0 |
|
ACME Server |
- |
Let’s Encrypt |
Prerequisites for Using ACME Certificates
General Prerequisites
-
Ensure that the Firewall Threat Defense device is Version 10.0 or later.
-
Configure DNS in the Firewall Threat Defense platform settings to resolve the domain name of the ACME server.
-
Ensure your domain maps to a public IP address. Configure the device interface with this IP address, and set it as the authentication interface in the ACME certificate enrollment.
-
Enroll an ACME CA certificate, a manual CA-only certificate that authenticates the ACME server, on the device.
-
When you use Let’s Encrypt as the ACME server, you must get the Internet Security Research Group (ISRG) root certificate from https://letsencrypt.org/certificates/ and attach it as a manual CA-only certificate on the device.
For example, use the root certificate from https://letsencrypt.org/certs/isrgrootx1.pem.txt to configure the manual CA certificate for the ACME server.
Sample manual CA certificate for the ACME server from https://letsencrypt.org/certs/isrgrootx1.pem.txt:
-----BEGIN CERTIFICATE-----
MIIFazCCA1OgAwIBAgIRAIIQz7DSQONZRGPgu2OCiwAwDQYJKoZIhvcNAQELBQAw
TzELMAkGA1UEBhMCVVMxKTAnBgNVBAoTIEludGVybmV0IFNlY3VyaXR5IFJlc2Vh
cmNoIEdyb3VwMRUwEwYDVQQDEwxJU1JHIFJvb3QgWDEwHhcNMTUwNjA0MTEwNDM4
WhcNMzUwNjA0MTEwNDM4WjBPMQswCQYDVQQGEwJVUzEpMCcGA1UEChMgSW50ZXJu
ZXQgU2VjdXJpdHkgUmVzZWFyY2ggR3JvdXAxFTATBgNVBAMTDElTUkcgUm9vdCBY
MTCCAiIwDQYJKoZIhvcNAQEBBQADggIPADCCAgoCggIBAK3oJHP0FDfzm54rVygc
h77ct984kIxuPOZXoHj3dcKi/vVqbvYATyjb3miGbESTtrFj/RQSa78f0uoxmyF+
0TM8ukj13Xnfs7j/EvEhmkvBioZxaUpmZmyPfjxwv60pIgbz5MDmgK7iS4+3mX6U
A5/TR5d8mUgjU+g4rk8Kb4Mu0UlXjIB0ttov0DiNewNwIRt18jA8+o+u3dpjq+sW
T8KOEUt+zwvo/7V3LvSye0rgTBIlDHCNAymg4VMk7BPZ7hm/ELNKjD+Jo2FR3qyH
B5T0Y3HsLuJvW5iB4YlcNHlsdu87kGJ55tukmi8mxdAQ4Q7e2RCOFvu396j3x+UC
B5iPNgiV5+I3lg02dZ77DnKxHZu8A/lJBdiB3QW0KtZB6awBdpUKD9jf1b0SHzUv
KBds0pjBqAlkd25HN7rOrFleaJ1/ctaJxQZBKT5ZPt0m9STJEadao0xAH0ahmbWn
OlFuhjuefXKnEgV4We0+UXgVCwOPjdAvBbI+e0ocS3MFEvzG6uBQE3xDk3SzynTn
jh8BCNAw1FtxNrQHusEwMFxIt4I7mKZ9YIqioymCzLq9gwQbooMDQaHWBfEbwrbw
qHyGO0aoSCqI3Haadr8faqU9GY/rOPNk3sgrDQoo//fb4hVC1CLQJ13hef4Y53CI
rU7m2Ys6xt0nUW7/vGT1M0NPAgMBAAGjQjBAMA4GA1UdDwEB/wQEAwIBBjAPBgNV
HRMBAf8EBTADAQH/MB0GA1UdDgQWBBR5tFnme7bl5AFzgAiIyBpY9umbbjANBgkq
hkiG9w0BAQsFAAOCAgEAVR9YqbyyqFDQDLHYGmkgJykIrGF1XIpu+ILlaS/V9lZL
ubhzEFnTIZd+50xx+7LSYK05qAvqFyFWhfFQDlnrzuBZ6brJFe+GnY+EgPbk6ZGQ
3BebYhtF8GaV0nxvwuo77x/Py9auJ/GpsMiu/X1+mvoiBOv/2X/qkSsisRcOj/KK
NFtY2PwByVS5uCbMiogziUwthDyC3+6WVwW6LLv3xLfHTjuCvjHIInNzktHCgKQ5
ORAzI4JMPJ+GslWYHb4phowim57iaztXOoJwTdwJx4nLCgdNbOhdjsnvzqvHu7Ur
TkXWStAmzOVyyghqpZXjFaH3pO3JLF+l+/+sKAIuvtd7u+Nxe5AW0wdeRlN8NwdC
jNPElpzVmbUq4JUagEiuTDkHzsxHpFKVK7q4+63SM1N95R1NbdWhscdCb+ZAJzVc
oyi3B43njTOQ5yOf+1CceWxG1bQVs5ZufpsMljq4Ui0/1lvh+wjChP4kqKOJ2qxq
4RgqsahDYVvTH9w7jXbyLeiNdd8XM2w9U/t7y0Ff/9yi0GE44Za4rF2LN9d11TPA
mRGunUHBcnWEvgJBQl9nJEiU0Zsnvgc/ubhPgXRR4Xq37Z0j4r7g1SgEEzwxA57d
emyPxgcYxn/eR44/KJ4EBs+lVDR3veyJm+kXQ99b21/+jh5Xos1AnX5iItreGCc=
-----END CERTIFICATE-----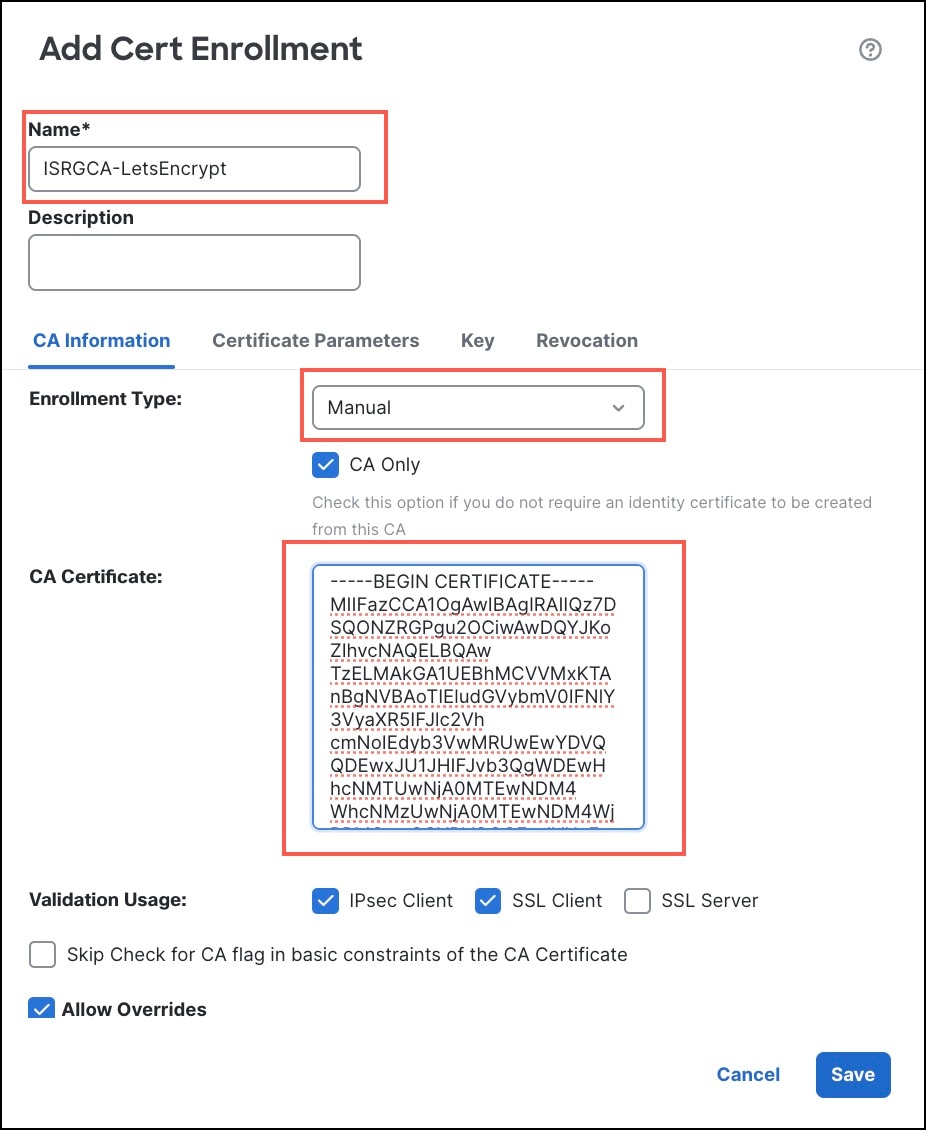
Figure 2. Details of the manual CA certificate 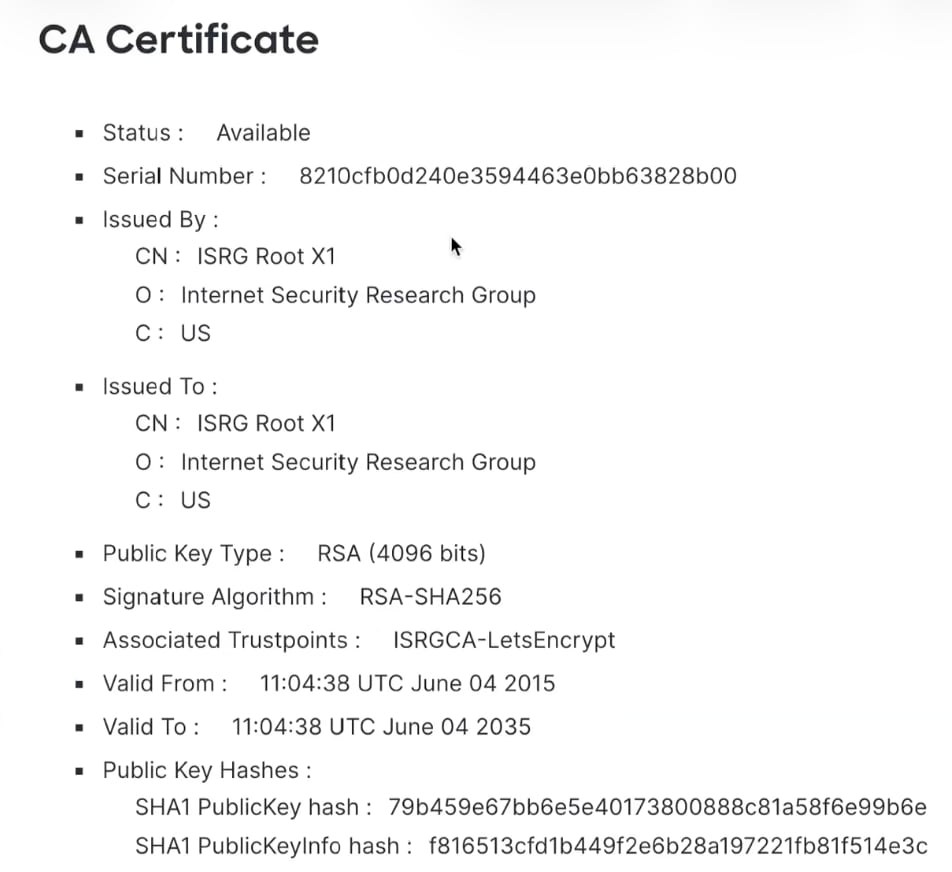
-
If you configure object overrides for any device, ensure that you enroll an ACME CA certificate on that device too.
-
-
Configure the same NTP server for the ACME server and the Firewall Threat Defense device.
Prerequisites for ACME Server
-
Ensure that you have access to the Let's Encrypt ACME server.
-
Ensure that the ACME server is reachable from the Firewall Threat Defense device.
-
Ensure that the ACME server can validate the domain name and the alternate FQDNs.
-
Ensure that the ACME server is reachable from the source interface of the device, if the authentication interface is different from the source interface.
Prerequisite for VPN Load Balancing
Ensure you include the director and member FQDNs in the Alternate FQDN field when you configure an ACME enrollment object for a VPN load balancing group. Note that ACME certificates do not support wildcard certificates.
Guidelines and Limitations for Using ACME Certificates
Guideline
To renew an ACME certificate on the device before its lifetime, re-enroll the certificate and deploy the configuration in the device.
Limitations
-
ACME certificates do not support:
-
Site-to-site VPN
-
Management interface in the converged mode
-
DNS authentication (DNS-01); only HTTP-01 is supported
-
Domain override
-
Wildcard certificates: These certificate secure a single domain and multiple subdomains using a wildcard character (*) in the domain name field.
-
Clustering
-
-
ACME certificates support only 2048, 3072, and 4096 key sizes for RSA keys and 256, 384 and 521 for ECDSA keys.
-
ACME enrolment is not compatible with control plane ACLs.
When using Let's Encrypt with control plane ACLs:
-
Disable the ACL before the ACME enrollment to allow port 80 access.
-
Enroll the ACME certificate.
-
Verify the enrollment.
-
Re-enable the ACL.
When using ACME servers other than Let's Encrypt with control plane ACLs, include the server's FQDN in the ACL.
-
Workflow of ACME Enrollment in Firewall Management Center
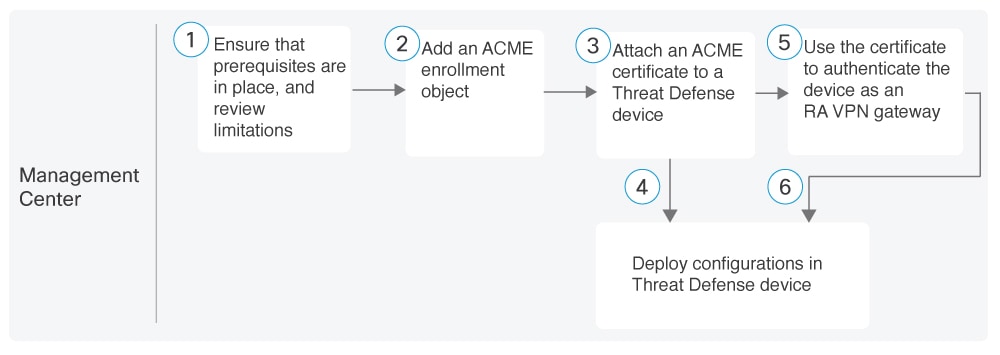
Workflow
These are the stages of enrolling an ACME certificate in Firewall Management Center:
-
Ensure that Prerequisites for Using ACME Certificates are in place, and review Guidelines and Limitations for Using ACME Certificates.
-
Attach an ACME Certificate to a Firewall Threat Defense Device.
-
Deploy configurations in the device.
-
Use the certificate as an identity certificate to authenticate the device as an RA VPN gateway. For more information, see Configure a New Remote Access VPN Policy with an ACME Certificate.
-
Deploy configurations in the device.
Add an ACME Certificate Enrollment Object
Before you begin
Ensure that you review Prerequisites for Using ACME Certificates and Guidelines and Limitations for Using ACME Certificates.
Procedure
|
Step 1 |
Choose . |
|
Step 2 |
Click Add Cert Enrollment. |
|
Step 3 |
In the Name field, enter the name for the ACME certificate enrollment. When the enrollment is complete, the trustpoint name on the managed devices will be the given name. |
|
Step 4 |
(Optional) In the Description field, enter a description for the enrollment. |
|
Step 5 |
In the CA Information tab: 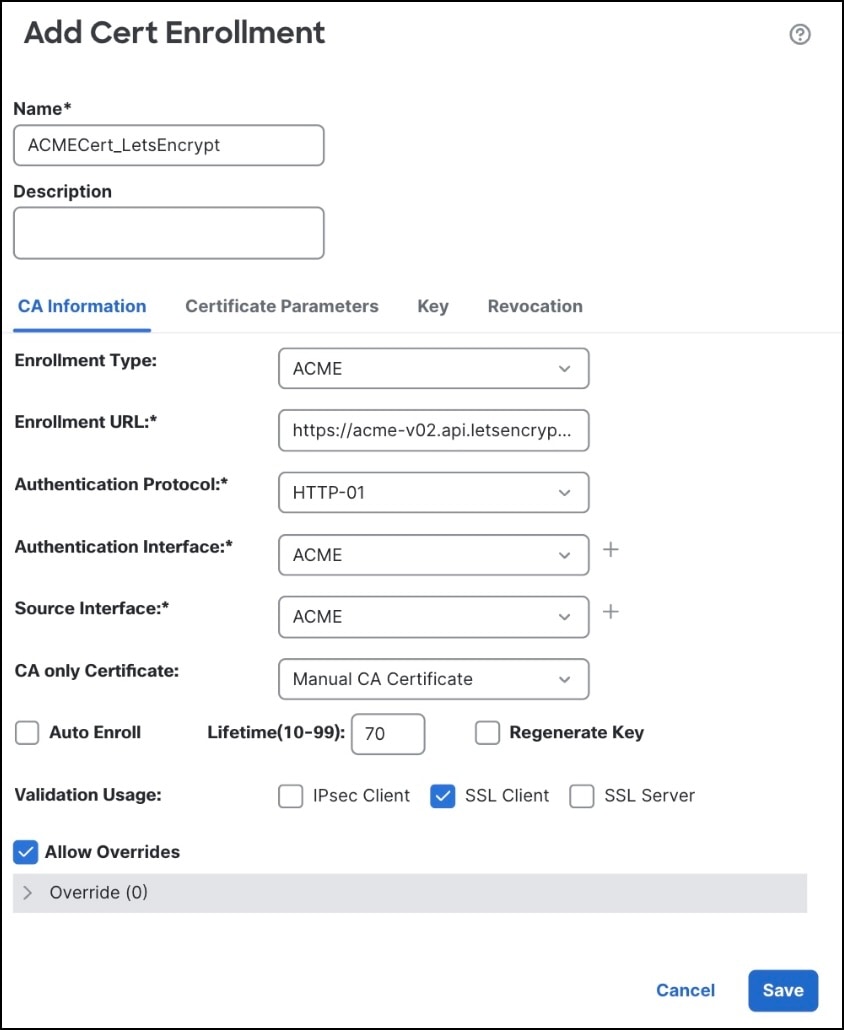
|
|
Step 6 |
In the Certificate Parameters tab:
|
|
Step 7 |
In the Key tab:
|
|
Step 8 |
(Optional) Configure the Advanced Settings, if required. |
|
Step 9 |
In the Revocation tab, you can keep the default values. 
|
|
Step 10 |
Check the Allow Overrides check box to configure any object overrides for any device or domain. By default, this option is enabled. If you plan to configure object overrides, you must enable this option before enrolling the certificate to the first device. |
|
Step 11 |
Click Save. You can view the ACME certificate enrollment object in the Certificate Enrollment page 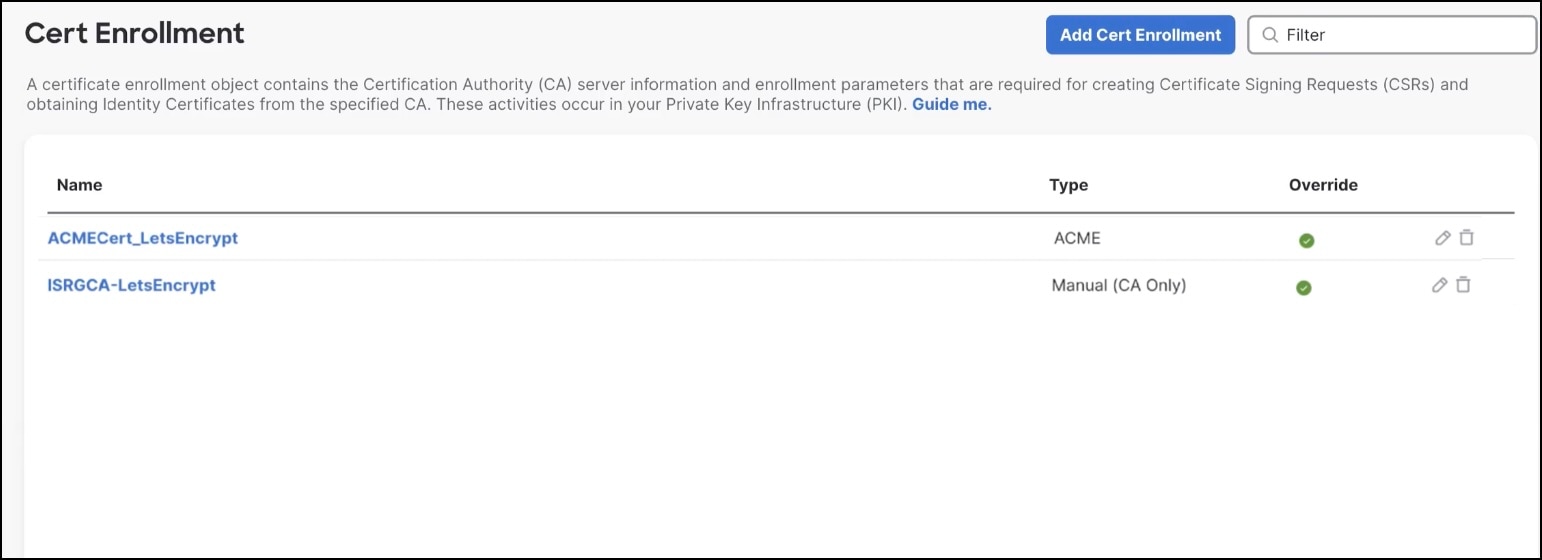
|


What to do next
Edit an ACME Certificate Enrollment Object or Attach an ACME Certificate to a Firewall Threat Defense Device
Edit an ACME Certificate Enrollment Object
Before you begin
Procedure
|
Step 1 |
In the certificate enrollment object page, click the edit icon adjacent to the ACME certificate enrollment object that you want to edit. |
|
Step 2 |
Click the CA Information tab. |
|
Step 3 |
Update the Auto-Enroll, Lifetime, Regenerate Key fields as required. You cannot edit any other fields in this tab. |
|
Step 4 |
Click the Certificate Parameters tab |
|
Step 5 |
Edit the Alternate FQDN field, if required. You cannot edit any other fields in this tab. |
|
Step 6 |
Click Save. |
|
Step 7 |
Choose . The message |
|
Step 8 |
Re-enroll the ACME certificate to push the updated configurations to the device. During re-enrollment, the existing alternate FQDNs are removed, and the new FQDNs are pushed to the device. |
What to do next
Attach an ACME Certificate to a Firewall Threat Defense Device
Before you begin
Add an ACME certificate enrollment object. For more information, see Add an ACME Certificate Enrollment Object.
Procedure
|
Step 1 |
Choose . |
|
Step 2 |
Click Add. |
|
Step 3 |
From the Device drop-down list, choose a Firewall Threat Defense device. |
|
Step 4 |
From the Cert Enrollment drop-down list, choose an ACME certificate or click + to create an ACME certificate enrollment. Review the certificate details. 
|
|
Step 5 |
Click Add to attach the certificate on the device. During this process, the Status in the Certificates page will be In Progress until the task is completed. After the certificate is successfully attached to the device, the ID icon is displayed under Status. 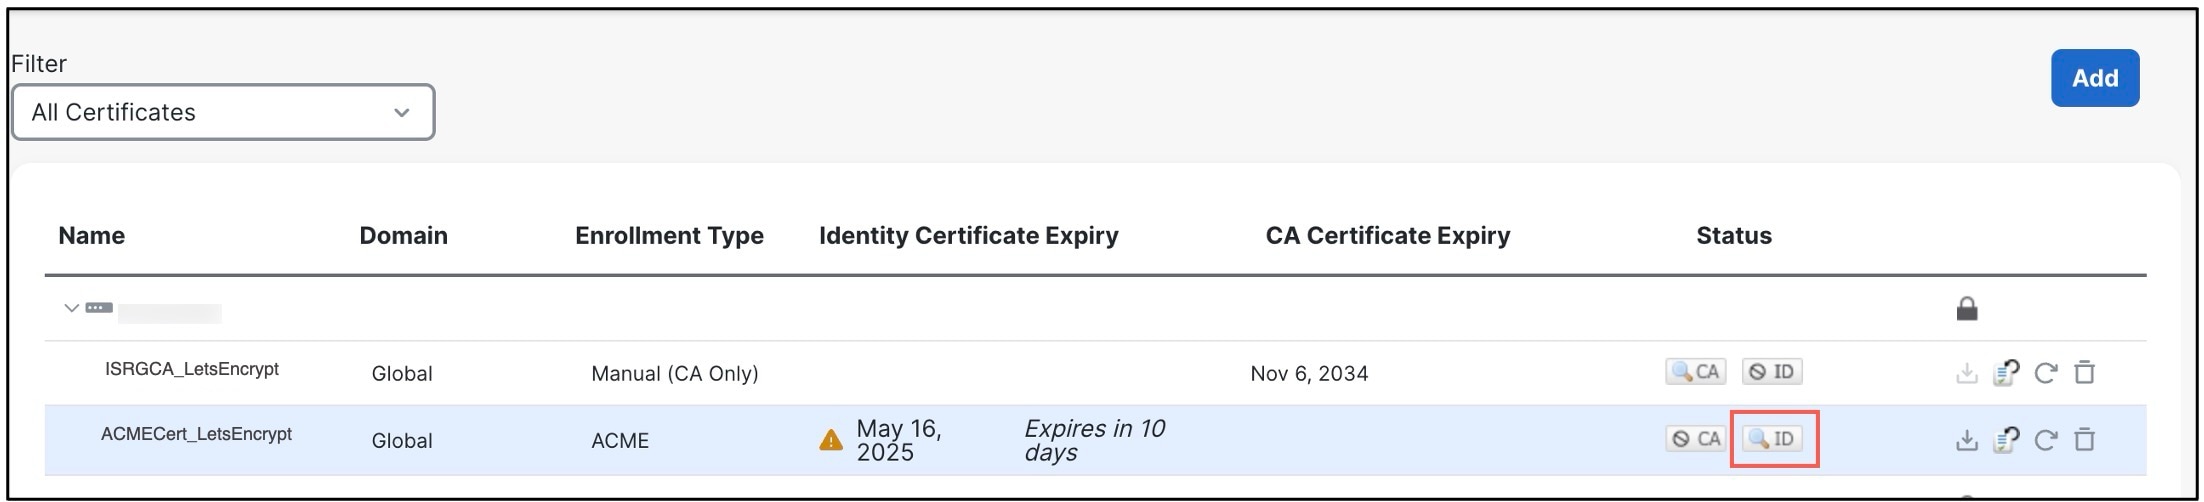
Click the ID icon to view the certificate details. Review these details, and click Close. 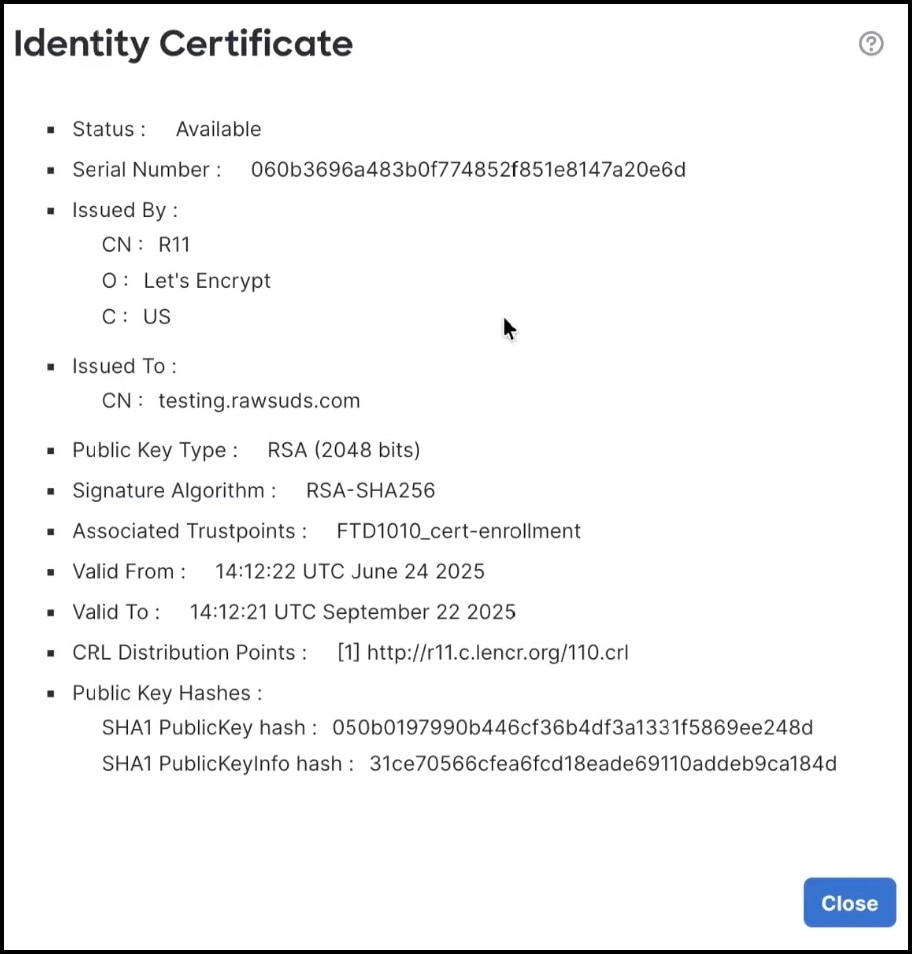 |
What to do next
-
Deploy the configurations in the device.
After a successful deployment, the device requests the ACME server for an ACME certificate. Upon domain validation, the ACME server issues an ACME certificate.
-
Use the ACME certificate to authenticate the device as an RA VPN gateway. For more information, see Configure a New Remote Access VPN Policy with an ACME Certificate or Update a Remote Access VPN Policy with an ACME Certificate.
Configure a New Remote Access VPN Policy with an ACME Certificate
Before you begin
Ensure that you have attached an ACME certificate to a Firewall Threat Defense and deployed the configurations on the device. For more information, see Attach an ACME Certificate to a Firewall Threat Defense Device.
Procedure
|
Step 1 |
Choose . |
|
Step 2 |
Click Add to create a new remote access VPN policy. |
|
Step 3 |
In the Name field, enter the name for the remote access VPN policy. |
|
Step 4 |
In the Description field, enter a description for the policy. |
|
Step 5 |
In VPN Protocols, select the protocols. You can select SSL or IPSec-IKEv2, or both the VPN protocols. Firewall Threat Defense supports both the protocols to establish secure connections over a public network through VPN tunnels. |
|
Step 6 |
In Targeted Devices, select the devices. The devices that you select here function as your remote access VPN gateways for the VPN client users. |
|
Step 7 |
Click Next. |
|
Step 8 |
Configure the Connection Profile and Group Policy settings. |
|
Step 9 |
Configure the Authentication, Authorization & Accounting settings. |
|
Step 10 |
Configure the Client Address Assignment settings. |
|
Step 11 |
Configure the Group Policy settings. |
|
Step 12 |
Click Next. |
|
Step 13 |
Select the AnyConnect image that the VPN users will use to connect to the remote access VPN. |
|
Step 14 |
Click Next. |
|
Step 15 |
Configure Network Interface for Incoming VPN Access. |
|
Step 16 |
Configure Device Certificates. Device certificate (also called identity certificate) identifies the VPN gateway to the remote access clients. Select a certificate which is used to authenticate the VPN gateway. From the Certificate Enrollment drop-down list, choose the ACME certificate to authenticate the VPN gateway. 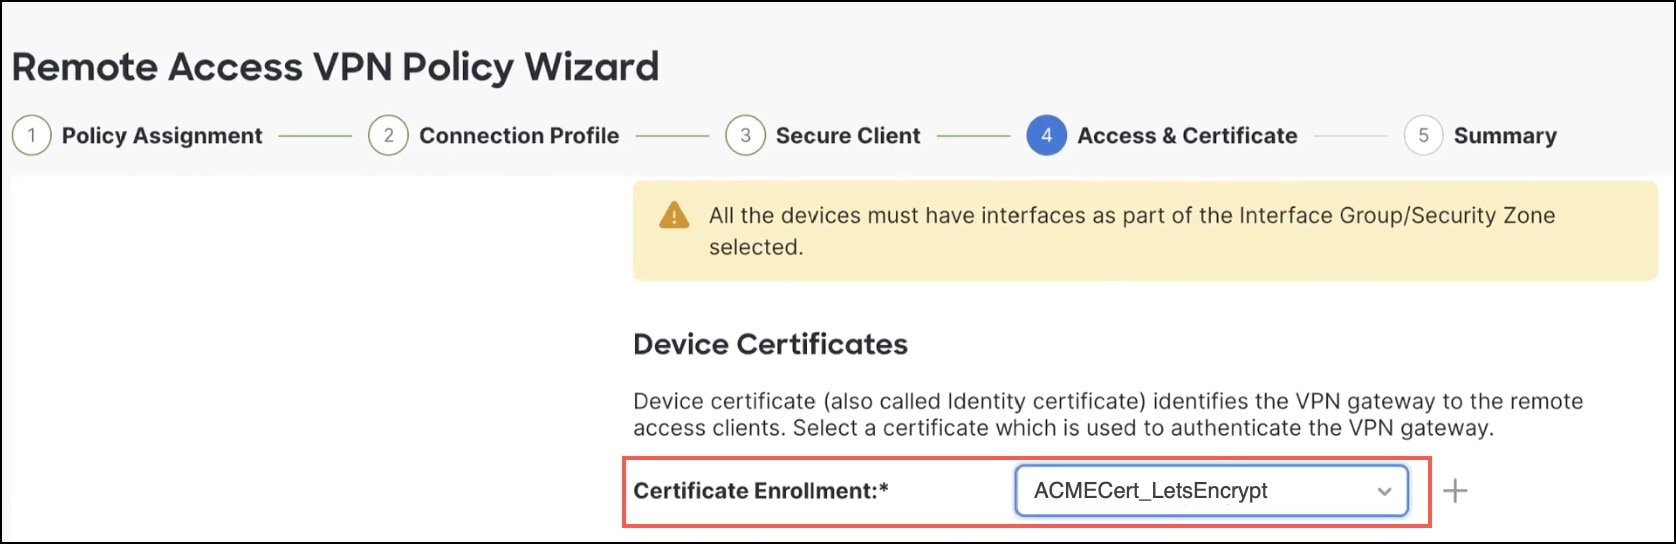
|
|
Step 17 |
Configure Service Access Control. |
|
Step 18 |
Configure Access Control for VPN Traffic . |
|
Step 19 |
Click Next. |
|
Step 20 |
View the Summary of the remote access VPN policy configuration. The Remote Access Summary page displays all the remote access VPN settings you have configured so far and provides links to the additional configurations that need to be performed before deploying the remote access VPN policy on the selected devices. Click Back to make changes to the configuration, if required. |
|
Step 21 |
Click Finish to complete the basic configuration for the remote access VPN policy. |
|
Step 22 |
Deploy the configurations in the device. |
What to do next
For detailed information about configuring remote access VPNs, see Configuring a New Remote Access VPN Connection in the Firewall Management Center Device Configuration Guide.
Update a Remote Access VPN Policy with an ACME Certificate
To add the ACME certificate to a device in an existing remote access VPN policy:
Before you begin
-
Ensure that you have attached an ACME certificate to a Firewall Threat Defense and deployed the configurations on the device. For more information, see Attach an ACME Certificate to a Firewall Threat Defense Device.
-
Ensure that you have configured a remote access policy.
Procedure
|
Step 1 |
Choose . |
|
Step 2 |
Click the edit icon adjacent to the remote access policy that you want to edit. |
|
Step 3 |
Click Access Interfaces. |
|
Step 4 |
In the SSL Global identity Certificate drop-down list, choose the ACME certificate. 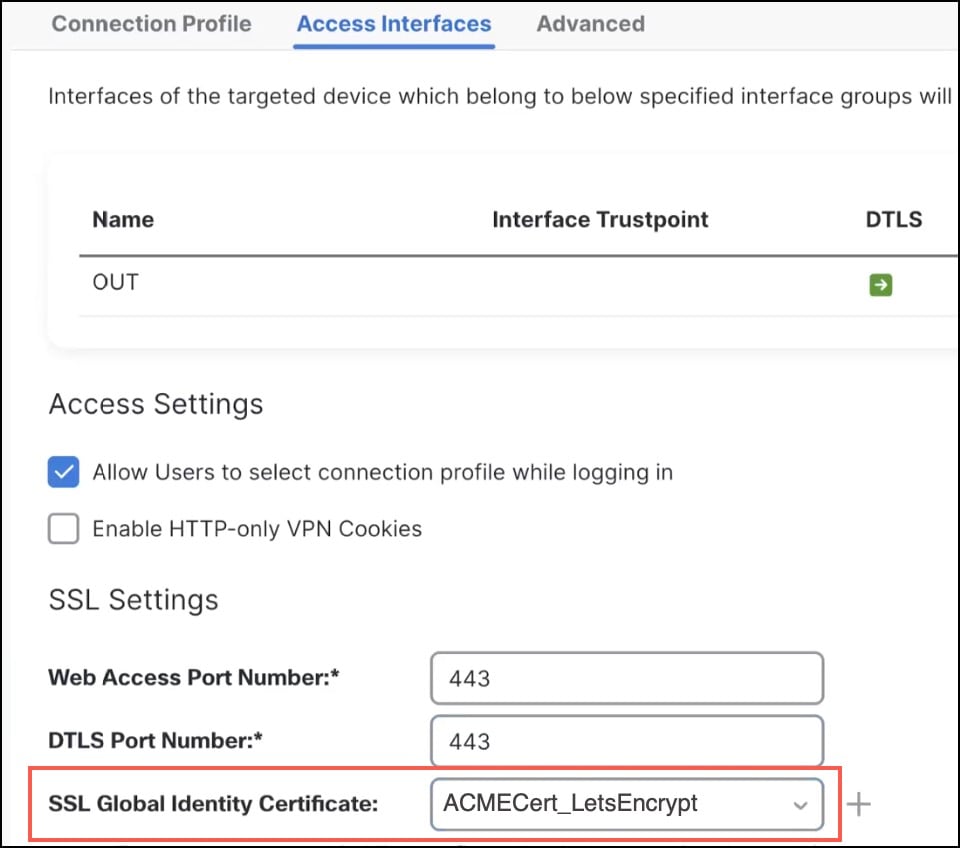
|
|
Step 5 |
Click Save. |
|
Step 6 |
Deploy the configurations in the device. During the deployment, the ACME certificate is linked to the device’s SSL trustpoint, ensuring that remote access VPN connections use the new certificate for secure SSL communication. |
What to do next
Validate ACME Certificate Enrollments
From the Firewall Threat Defense device CLI, run these commands:
-
show crypto ca certificates
Displays details about the certificates present in the Firewall Threat Defense device. You can verify if the ACME certificate is installed in the device.
firepower#show crypto ca certificates LE_ACME_cert_FTD1010 Certificate Status: Available Certificate Serial Number: 060b3696a483b0f774852f851e8147a20e6d Certificate Usage: General Purpose Public Key Type: RSA (2048 bits) Signature Algorithm: RSA-SHA256 Issuer Name: CN=R11 O=Let's Encrypt C=US Subject Name: CN=test.rawsuds.com CRL Distribution Points: [1] http://r11.c.lencr.org/110.crl Validity Date: start date: 14:12:22 UTC Jun 24 2025 end date: 14:12:21 UTC Sep 22 2025 renew date: 14:12:21 UTC Aug 26 2025 Storage: immediate Associated Trustpoints: FTD1010_cert-enrollment Public Key Hashes: SHA1 PublicKey hash: 050b0197990b446cf36b4df3a1331f5869ee248d SHA1 PublicKeyInfo hash: 31ce70566cfea6fcd18eade69110addeb9ca184d -
show crypto ca trustpoints
Displays details about the trustpoints present in the Firewall Threat Defense device.
The Device Certificate field indicates if the certificate is installed in the device.
The Last Enrollment Result field indicates the success of the last re-enrollment.
firepower# show crypto ca trustpoints
Trustpoint LE_ACME_cert_FTD1010:
    Not authenticated.
    Device certificate: Expires at 14:12:21 UTC Sep 22 2025
    ACME URL: https://acme-v02.api.letsencrypt.org:443/directory
    Current enrollment status:       Idle
    Last enrollment attempt:         15:10:57 UTC Jun 24 2025
    Last enrollment type:            Manual
    Last enrollment result:          SUCCESS
    Auto enrollment request count:   0
    Manual enrollment request count: 3


Trustpoint ISRG_root-cert:
    Subject Name:
        CN=ISRG Root X1
        O=Internet Security Research Group
        C=US
    Serial Number: 8210cfb0d240e3594463e0bb63828b00
    CA Certificate configured.
    Device certificate: Not present
Troubleshoot ACME Certificates
Use Debug Commands
Note |
Use debug commands only during low network traffic periods and for specific troubleshooting or TAC sessions, as they increase CPU usage. |
-
Use the debug crypto ca <debug-level> command to capture debug logs related to crypto CA operations.
-
Use the debug crypto ca acme <debug-level> command to capture debug logs related to ACME enrollments.
Troubleshoot ACME Enrollment Errors
-
Symptom: When you attach the ACME certificate to the device, the Status displays
Failed.Resolution: Hover over the warning to see the recommended actions. For more information, see Prerequisites for Using ACME Certificates.
-
Symptom: When you attach the ACME certificate to the device, the Status displays
Failed. When you hover over the ID symbol,Failed to configure identity certificateerror appears.Possible Causes: The ACME CA certificate is not attached to the device.
Resolution: Attach the ACME CA certificate to the device.
-
Symptom:
Unable to connect to the serverorUnable to connect to <ACME_server>error message appears.Possible Causes:
-
The ACME server is not reachable.
-
The ACME server is reachable, but the ACME service is not running.
-
The ACME CA certificate is not attached to the device.
Resolution:
-
Ensure that the ACME server is reachable from the Firewall Management Center.
-
Verify the state of the ACME service and restart it if it is not running.
-
Attach the ACME CA certificate to the device.
-
-
Symptom:
Unable to validate the ACME server certificateerror message appears.Possible Cause: ACME CA certificate for the device is not enrolled in the Firewall Management Center
Resolution: Attach an ACME CA certificate for the device in the Firewall Management Center.
-
Symptom:
ACME processing timeouterror message appears.Possible Causes:
-
Firewall Management Center cannot resolve the requested FQDNs to the Authentication Interface.
-
URL of the ACME server is incorrect.
-
DNS is not configured in the device platform settings.
-
Domain names are inaccurate.
Resolution:
-
Ensure that the Firewall Management Center can resolve the requested FQDNs to the Authentication Interface.
-
Verify the URL of the ACME server.
-
Run the
ping <interface> <acme-ca-fqdn>command to verify DNS resolution, and verify if DNS is configured in the device platform settings. -
Verify the FQDNs or alternate FQDNs. Re-enroll the certificate if you update the FQDNs.
-
Use Syslogs
To enable ACME enrollment syslogs, follow these steps:
-
Choose .
-
Create or edit a platform settings policy.
-
In the left pane, click Syslog.
-
Click the Logging Setup tab and check the Enable Logging check box.
-
In Basic Logging Settings, check the Enable Logging check box.
-
In Logging to Secure Firewall Management Center, select All Logs or VPN Logs.
-
Click the Syslog Settings tab.
-
Click the Enable All Syslog Messages tab.
The ACME enrollment syslogs are 717067, 717068, 717069, and 717070.
Use Troubleshooting Logs
Note |
Ensure that you configure the syslog settings in the device platform settings. |
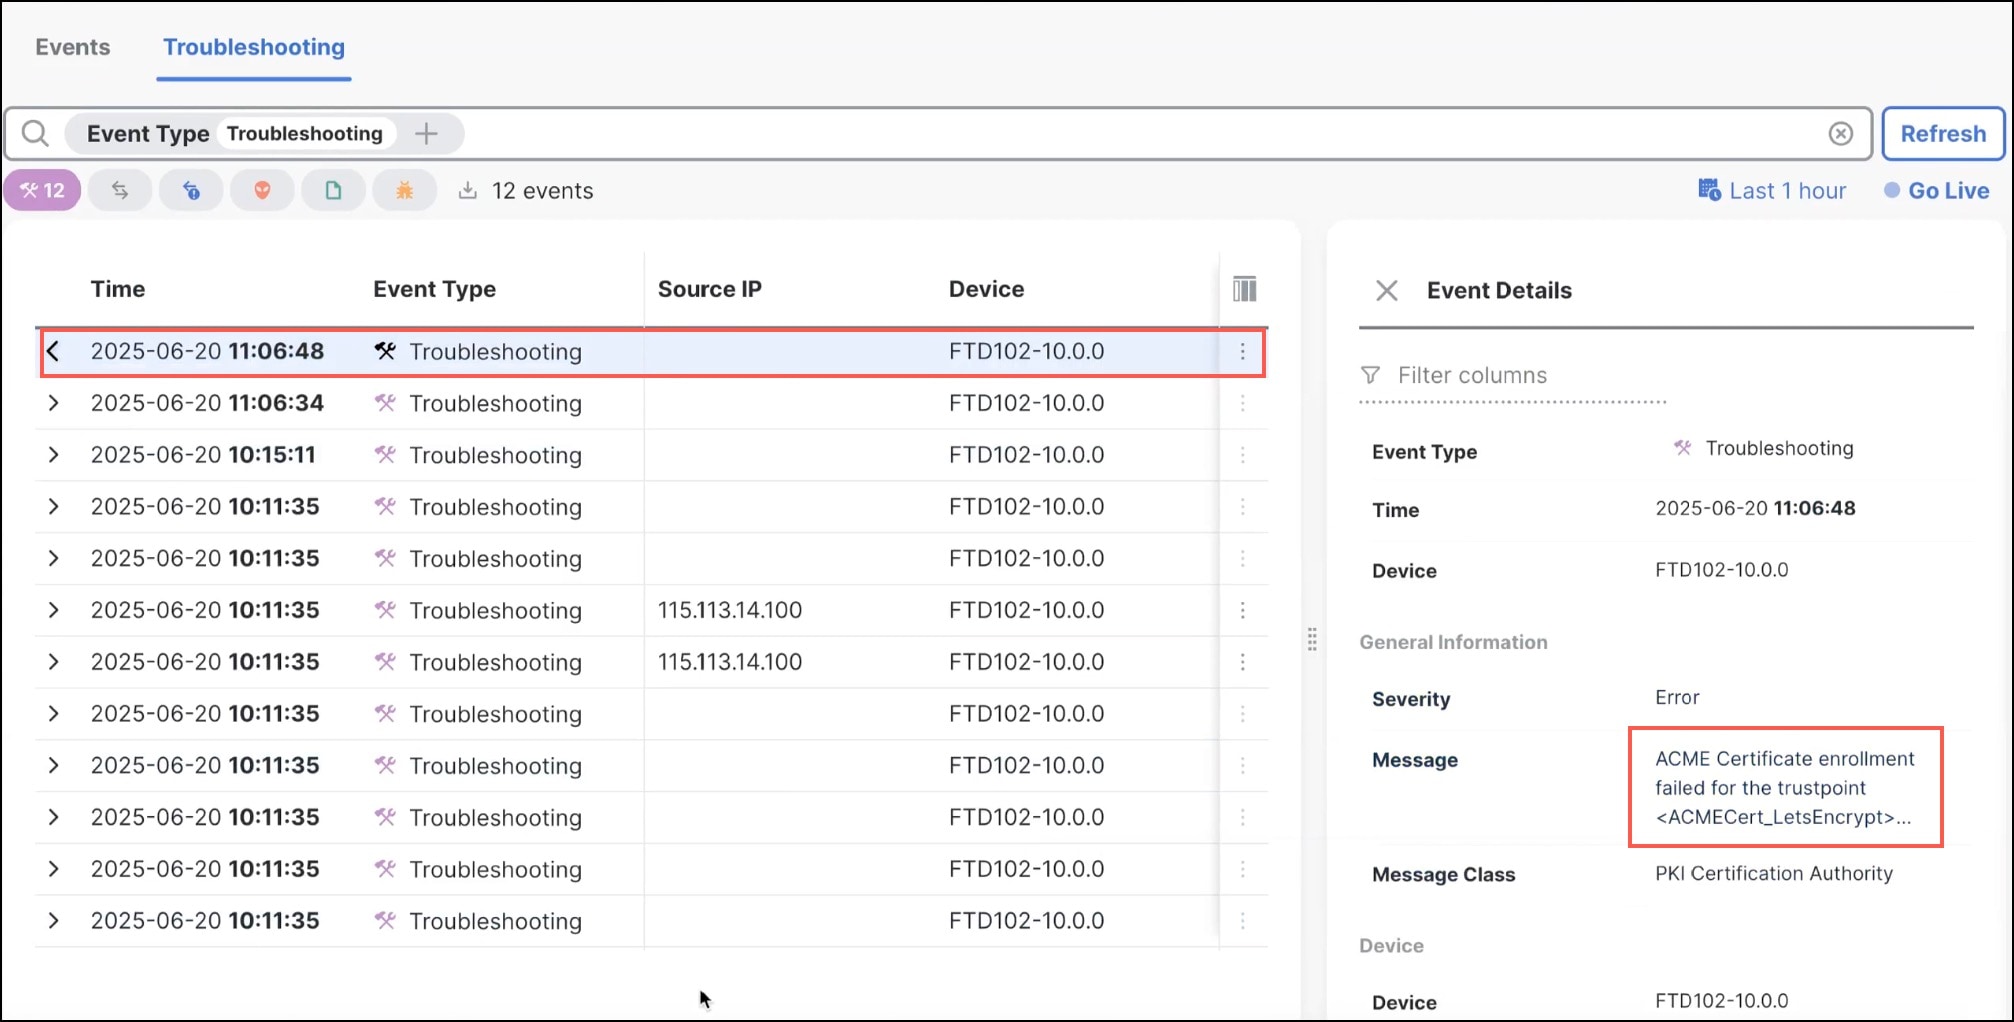
To monitor ACME enrollment logs:
-
Choose .
-
Click the Troubleshooting tab.
-
In the Troubleshooting Events table, you can do these actions:
-
View and analyze the troubleshooting events.
-
Click Go Live to monitor troubleshooting events in real time and correlate device logs with recent configuration changes.
-
 Feedback