Compliance

Posture Types

The following posture agents monitor and enforce Cisco ISE posture policies:

  • AnyConnect: Deploys the AnyConnect agent to monitor and enforce Cisco ISE posture policies that require interaction with the client. The AnyConnect agent stays on the client. For more information about using AnyConnect in Cisco ISE, see Cisco AnyConnect Secure Mobility.

  • AnyConnect Stealth: Runs posture as a service, with no user interface. The agent stays on the client.

    When you choose the AnyConnect Stealth posture type in the posture requirement, some of the conditions, remediations, or attributes in a condition are disabled (grayed out). For example, when you enable AnyConnect Stealth requirement, the Manual Remediation Type is disabled (grayed out) because this action requires client-side interaction.

    When you map the posture profile to the AnyConnect configuration, and then map the AnyConnect configuration to the Client Provisioning window for AnyConnect Stealth mode deployment:

    • AnyConnect can read the posture profile and set it to the intended mode.

    • AnyConnect can send information related to the selected mode to Cisco ISE during the initial posture request.

    • Cisco ISE can match the right policy, based on the mode and other factors, such as identity group, OS, and compliance module.


    Note


    AnyConnect Stealth mode requires AnyConnect version 4.4 and later.

    For more information about configuring AnyConnect Stealth in Cisco ISE, see Configure AnyConnect Stealth Mode Workflow.

  • Temporal Agent: When a client attempts to access the trusted network, Cisco ISE opens the Client Provisioning portal. The portal instructs the user to download and install the agent, and run the agent. The temporal agent checks the compliance status, and sends the status to Cisco ISE. Cisco ISE acts based on the results. The temporal agent removes itself from the client after compliance processing completes. The temporal agent does not support custom remediation. The default remediation supports only message text.

    The Temporal Agent does not support the following conditions:

    • Service Condition MAC—System Daemon check

    • Service Condition-MAC—Daemon or User Agent check

    • PM—Up To Date check

    • PM—Enabled check

    • DE—Encryption check

    • Configure posture policies using the Posture Types Temporal Agent and Compliance Module 4.x or later. Do not configure the compliance module as 3.x or earlier or Any Version.

    • For the Temporal Agent, you can only view Patch Management conditions containing the Installation check type in the Requirements window.

    • Cisco ISE does not support VLAN-controlled posture with the Temporal Agent for macOS because macOS cannot detect VLAN changes. When you change the network access from an existing VLAN to a new VLAN, the user’s IP address is released before the VLAN change. The client gets a new IP address by DHCP when the user connects to the new VLAN. Recognizing the new IP address requires root privileges, but the Temporal Agent runs as a user process.

    • For the other operating systems, the Temporal Agent does not renew the IP address. The operating system should renew the IP address.

    • Cisco ISE supports ACL-controlled posture environment, which does not require the refreshing of endpoint IP addresses.

    • For more information about configuring the Temporal agent in Cisco ISE, see Configure Cisco Temporal Agent Workflow.

  • AMP Enabler—The AMP Enabler pushes the AMP for Endpoints software to a subset of endpoints from a server hosted locally within the enterprise, and installs AMP services to its existing user base.

  • Agentless Posture—Agentless posture provides posture information from clients, and completely removes itself when finished. No action is required from the end user. Unlike the Temporal agent, Agentless Posture connects to the client as an administrative user. For more information about using Agentless Posture in Cisco ISE, see Agentless Posture.

You can select the posture type in the Client Provisioning window (Policy > Policy Elements > Results > Client Provisioning > Resources) and the Posture Requirements window (Policy > Policy Elements > Results > Posture > Requirements). The best practice is to provision the posture profile in the Client Provisioning window.
Agentless Posture

Agentless posture provides posture information from clients, and completely removes itself when finished, until invoked by Cisco ISE again. No action is required from the end user.

The agentless posture package is available as part of the default Cisco ISE client provisioning resources. You can select this package while creating an agent configuration to be used for the client provisioning policy.

Prerequisites:

  • The client must be reachable through its IPv4 address, and that IP address must be available in RADIUS accounting. IPv6 is not supported.

  • Windows and Mac clients are currently supported:

    • For Windows clients, port 5985 to access powershell on the client must be open. Powershell must be v5.1 or later. The client must have cURL v7.34 or later.

    • For MacOS clients, port 22 to access SSH must be open to access the client. The client must have cURL v7.34 or later.

  • Client credentials for shell login must have local admin privileges.

  • Run the posture feed update to get the latest clients, as described in the configuration steps.

  • Ensure that the following entry is updated in the sudoers file to avoid certificate installation failure on the endpoints:

    <macadminusername> ALL = (ALL) NOPASSWD: /usr/bin/security, /usr/bin/osascript
  • For MacOS, the user account that is configured must be an administrator's account. Agentless posture for MacOS does not work with any other account type, even if you grant more privileges. To view this window, click the Menu icon () and choose Administration > System > Settings > Endpoint Scripts > Login Configuration > MAC Local User.

  • In case of changes in port-related activities in Windows clients due to updates from Microsoft, you might have to reconfigure the agentless posture configuration workflow for Windows clients.

Supported Posture Conditions

  • File conditions, except the conditions that use the USER_DESKTOP and USER_PROFILE file paths

  • Service conditions, except System Daemon and Daemon or User Agent checks on macOS

  • Application conditions

  • External Data Source conditions

  • Compound conditions

  • Anti-malware conditions

  • Patch management condition, except the Enabled and Up To Date condition checks

  • Firewall conditions

  • Disk encryption conditions, except the encryption location-based condition check

  • Registry conditions, except the conditions that use HCSK as root key


Note


If dual stack protocol is used for authentication in the agentless posture flow, the NADs must also use the same protocol.


Unsupported Posture Conditions

  • Remediation

  • Grace period

  • Periodic Reassessment

  • Acceptable Use-policy

Supported Client Operating Systems

  • Microsoft Windows versions: 10, 11

  • macOS versions: 10.13, 10.14, 10.15, 13.x, and 14

Agentless Posture Process Flow

  1. The client connects to the network.

  2. Cisco ISE detects if agentless posture is enabled in the authorization profile used by client.

  3. If so, Cisco ISE sends an agentless posture job request to the Cisco ISE Messaging queue.

  4. Cisco ISE gets the job from the messaging queue, and starts the agentless posture flow.

  5. Cisco ISE connects to the client via power shell or SSH.

  6. Cisco ISE pushes the certificate, if it’s not already in the client's trust certificate authority store.

  7. Cisco ISE runs the client provisioning policy.

  8. Cisco ISE pushes the agentless plug-in to the client and launches the plug-in.

  9. Posture evaluation runs on the client, and sends the status to Cisco ISE.

  10. Cisco ISE removes the agentless plug-in from the client. Logs of the posture flow remain on the client for 24 hours, or until the client deletes them.

Agentless Posture Configuration

  1. In the Cisco ISE GUI, click the Menu icon () and choose Policy > Policy Elements > Results > Posture > Requirements, and create one or more Posture Requirements that use Agentless posture to identify the requirement.

  2. In the Cisco ISE GUI, click the Menu icon () and choose Work Centers > Posture > Posture Policy, and create one or more supported Posture Policy rules that use Agentless posture for that Posture Requirement. You can duplicate the rules you plan to use, and change the Posture type to Agentless.

  3. In the Cisco ISE GUI, click the Menu icon () and choose Policy > Policy Elements > Results > Authoriation > Authorization Profiles and create an Authorization Profile that evaluates the results from Agentless Posture.

    • Enable Agentless posture in the authorization profile.

    • Use this profile only for Agentless posture. Do not also use this for other posture types.

    • CWA and Redirect ACL is not required for Agentless posture. You can use VLANs, DACLs, or ACLs as part of your segmentation rules.

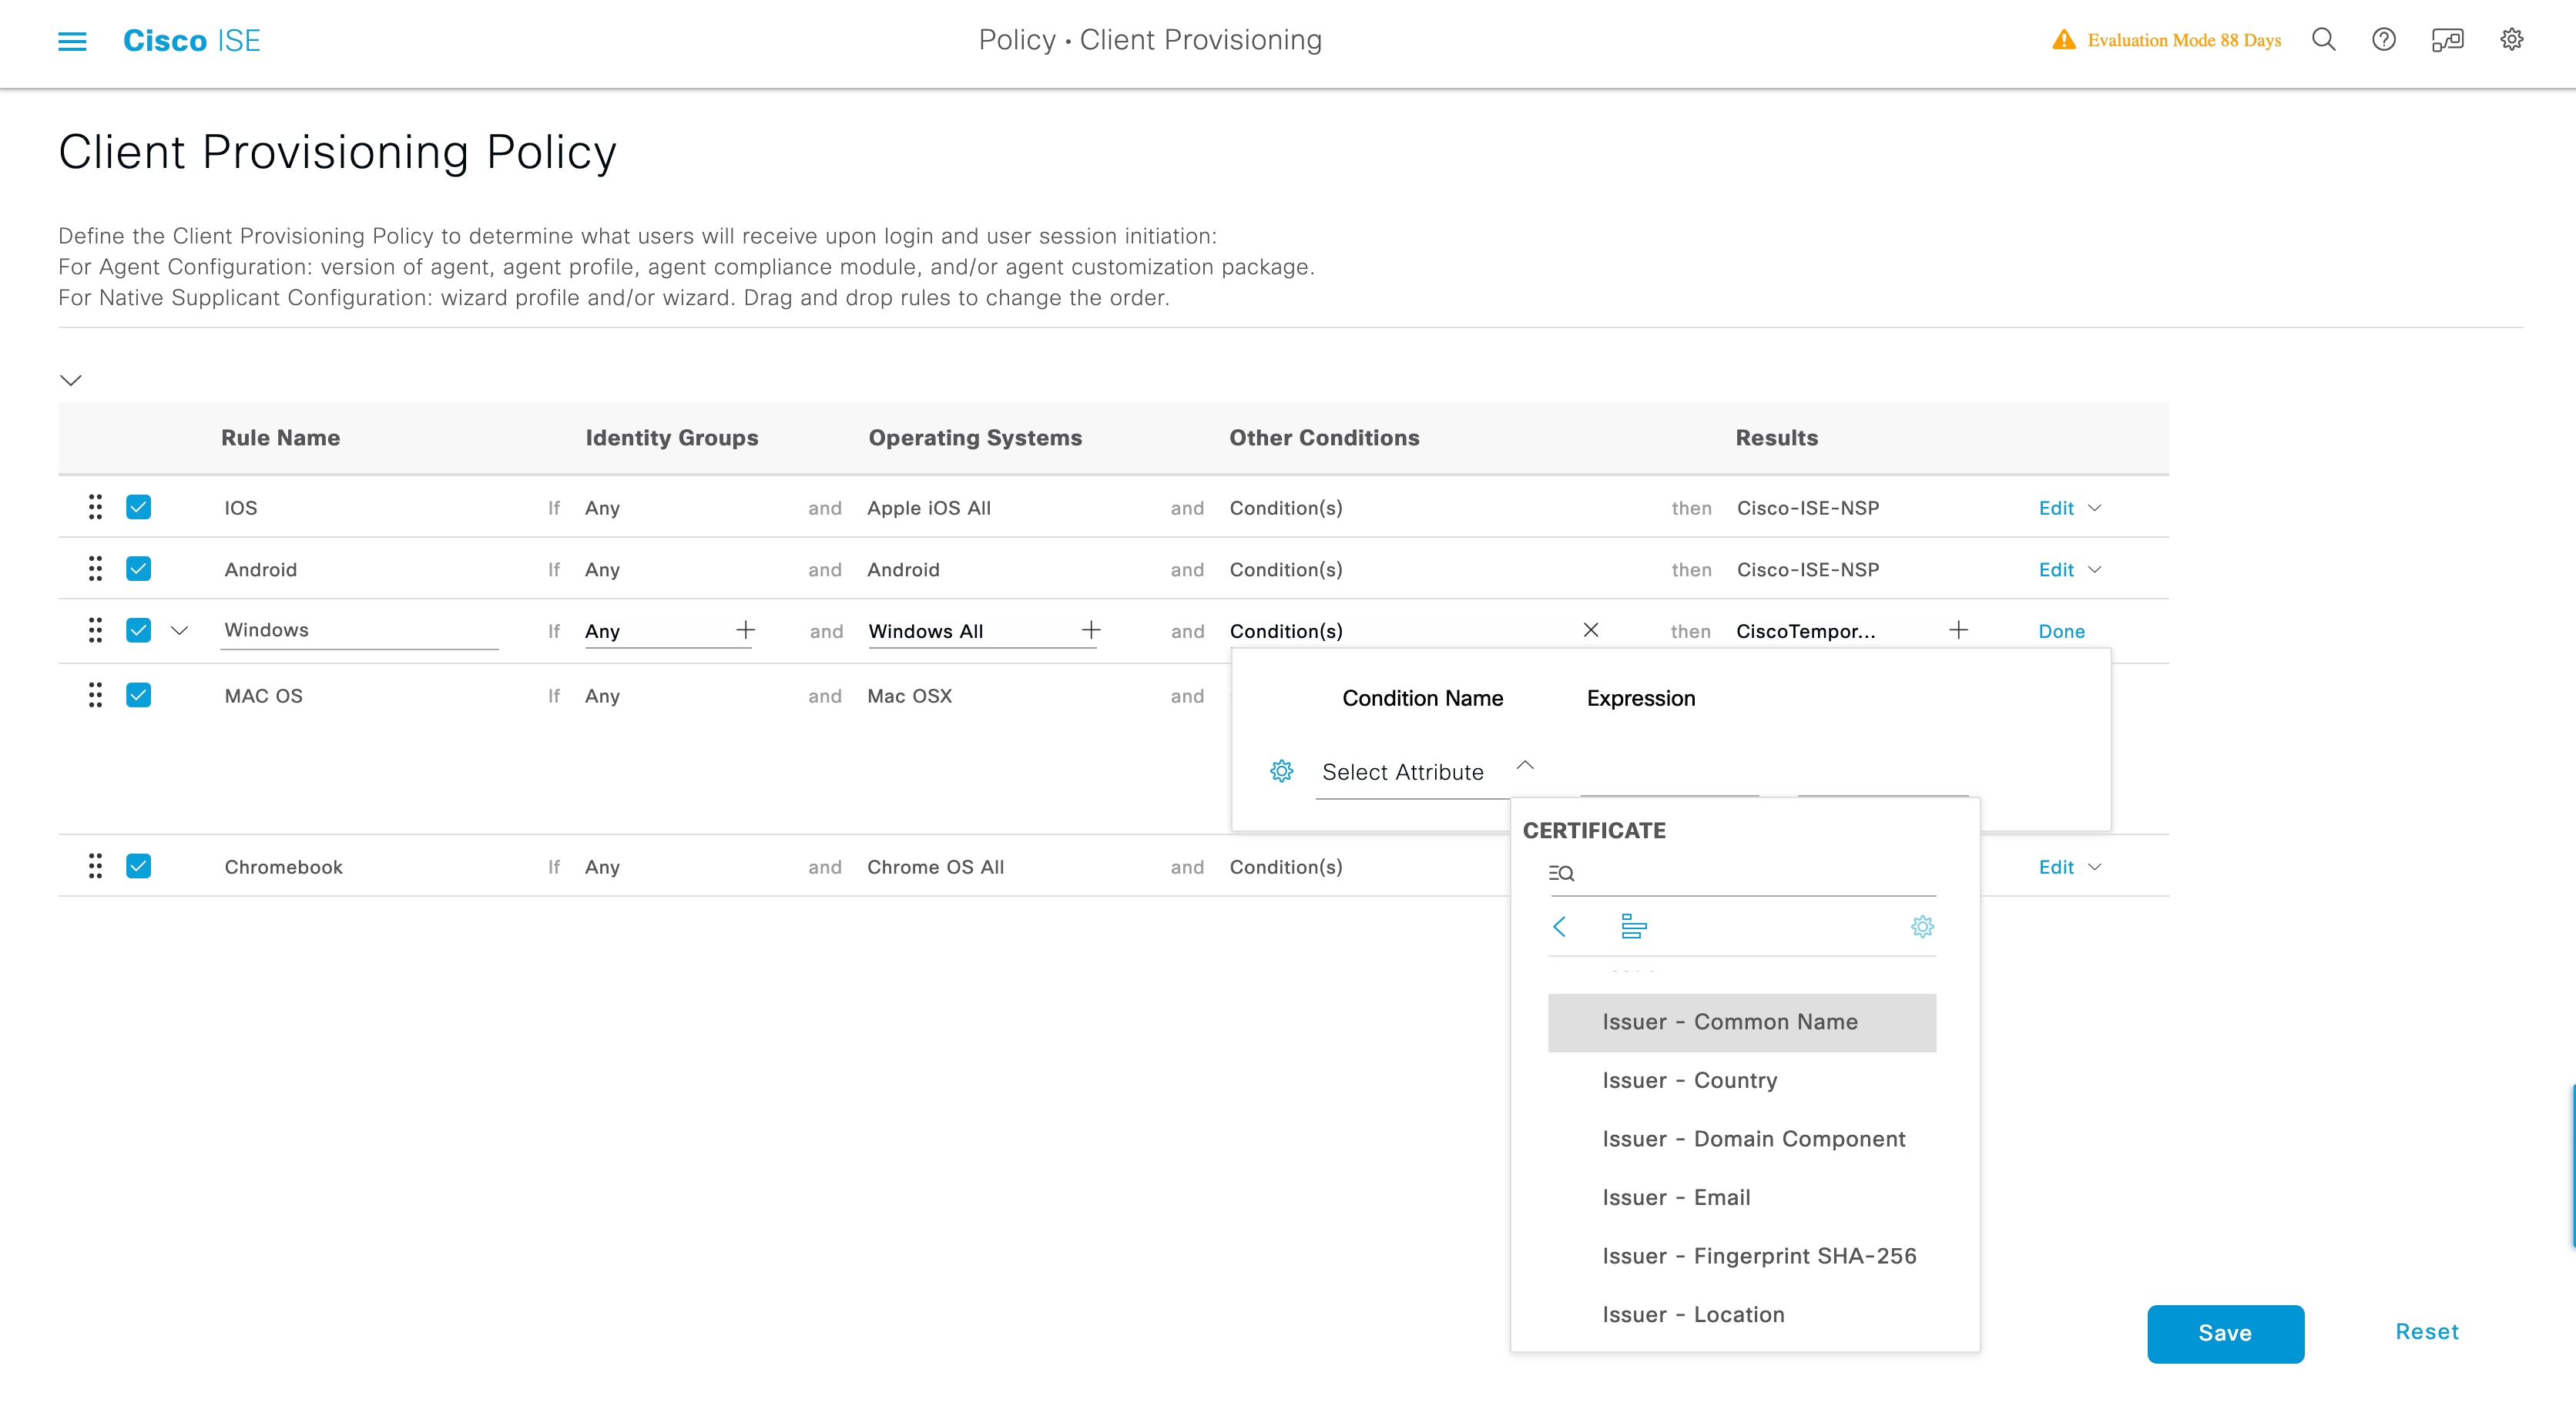
  4. In the Cisco ISE GUI, click the Menu icon () and choose Policy > Client Provisioning and add a Client Provisioning policy. For the Cisco Agent Configuration, choose the Agentless plug-in for the Operating System that you configured. For Windows, the plug-in is CiscoAgentlessWindows 4.9.01095. For MacOS, the plug-in is CiscoAgentlessOSX 4.9.01095. Select the posture condition this rule checks for. Note, if you’re using Active Directory, you can use Active Directory groups in your policy.


    Note


    Agentless posture configuration for MACOSX 10.14 and 10.15 versions aren’t available until you update the posture feed. Before you can run the posture feed, update the posture feed URL. In the Cisco ISE GUI, click the Menu icon () and choose Work Centers > Posture > Settings > Software Updates > Posture Updates. In the Posture Updates window, enter the url (https://www.cisco.com/web/secure/spa/posture-update.xml) in the Update Feed URL field and click Update Now.


  5. In the Cisco ISE GUI, click the Menu icon () and choose Policy > Policy Sets and expand Authorization Policy. Enable and configure the following three Authorization policies:

    • Unknown_Compliance_Redirect: Configure conditions Network_Access_Authentication_Passed AND Compliance_Unknown_Devices with result Agentless Posture.

    • NonCompliant_Devices_Redirect: Configure conditions Network_Access_Authentication_Passed and Non_Compliant_Devices with result DenyAccess.

    • Compliant_Devices_Access: Configure conditions Network_Access_Authentication_Passed and Compliant_Devices with result PermitAccess.

  6. In the Cisco ISE GUI, click the Menu icon () and choose Administration > Settings > Endpoint Scripts > Endpoint Login Configuration , and configure the client credentials to log onto clients. These same credentials are used by the Endpoint Scripts.

  7. In the Cisco ISE GUI, click the Menu icon () and choose Administration > Settings > Endpoint Scripts > Settings, and configure Max retry attempts for OS identification and Delay between retries for OS identification. These settings determine how quickly connectivity issues can be confirmed. For example, an error that the PowerShell port is not open displays in logs only after all retries are not exhausted.

  8. In the Cisco ISE GUI, click the Menu icon () and choose Administration > System > Settings > Posture > General Settings, and configure the Agentless Posture settings.

  9. As clients connect with Agentless posture, you can see them in the Live Logs.

Debugging and Troubleshooting

Enable debug log level for:

  • Infrastructure

  • Client Provisioning

  • Posture

The debug log is in ise-psc.log

Agentless Posture Troubleshooting is available under:

  • In the Cisco ISE GUI, click the Menu icon () and choose Operations > Live Logs—The three dots under the Posture Status column opens Agentless Posture Troubleshooting.

  • In the Cisco ISE GUI, click the Menu icon () and choose Operations > Troubleshoot > Diagnostics > General Tools

Agentless Posture Troubleshooting

The Agentless Posture report is the main troubleshooting tool to use when agentless posture isn’t working as expected. This report shows the stages of agentless flow, including events such as script upload completed, script upload failed, script execution completed, and so on, along with any known failure reasons, if any.


Note


The agentless posture script cannot verify itself, but the script verifies the data received from Cisco ISE after it is executed.


You can access Agentless Posture Troubleshooting from two locations:

  • In the Cisco ISE GUI, click the Menu icon () and choose Operations > Live Logs, and click the vertical three dots in the Posture Status column adjacent to the client you want to troubleshoot.

  • In the Cisco ISE GUI, click the Menu icon () and choose Operations > Troubleshoot > Diagnostics > General Tools > Agentless Posture Troubleshooting.

The Agentless Posture Troubleshooting tool collects Agentless Posture activity for a specified client. Agentless Posture Flow initiates posture and displays all the interactions between a currently active client and Cisco ISE. Only Download Client Logs creates logs with up to 24 hours of posture flows from the client. The client can delete the logs at any time. After collection is completed, you can export a ZIP file of the logs.

Reports

In the Cisco ISE GUI, click the Menu icon () and choose Operations > Reports > Reports > Endpoints and Users > Agentless Posture to view all the endpoints that ran Agentless posture.

Posture Administration Settings

You can globally configure the Admin portal for posture services. You can download updates automatically to the Cisco ISE server through the web from Cisco. You can also update Cisco ISE manually offline later. In addition, having an agent like AnyConnect or the Web Agent installed on the clients provides posture assessment and remediation services to clients. The client agent periodically updates the compliance status of clients to Cisco ISE. After login and successful requirement assessment for posture, the client agent displays a dialog with a link that requires end users to comply with terms and conditions of network usage. You can use this link to define network usage information for your enterprise network that end users accept before they can gain access to your network.

Client Posture Requirements

To create a posture requirement:

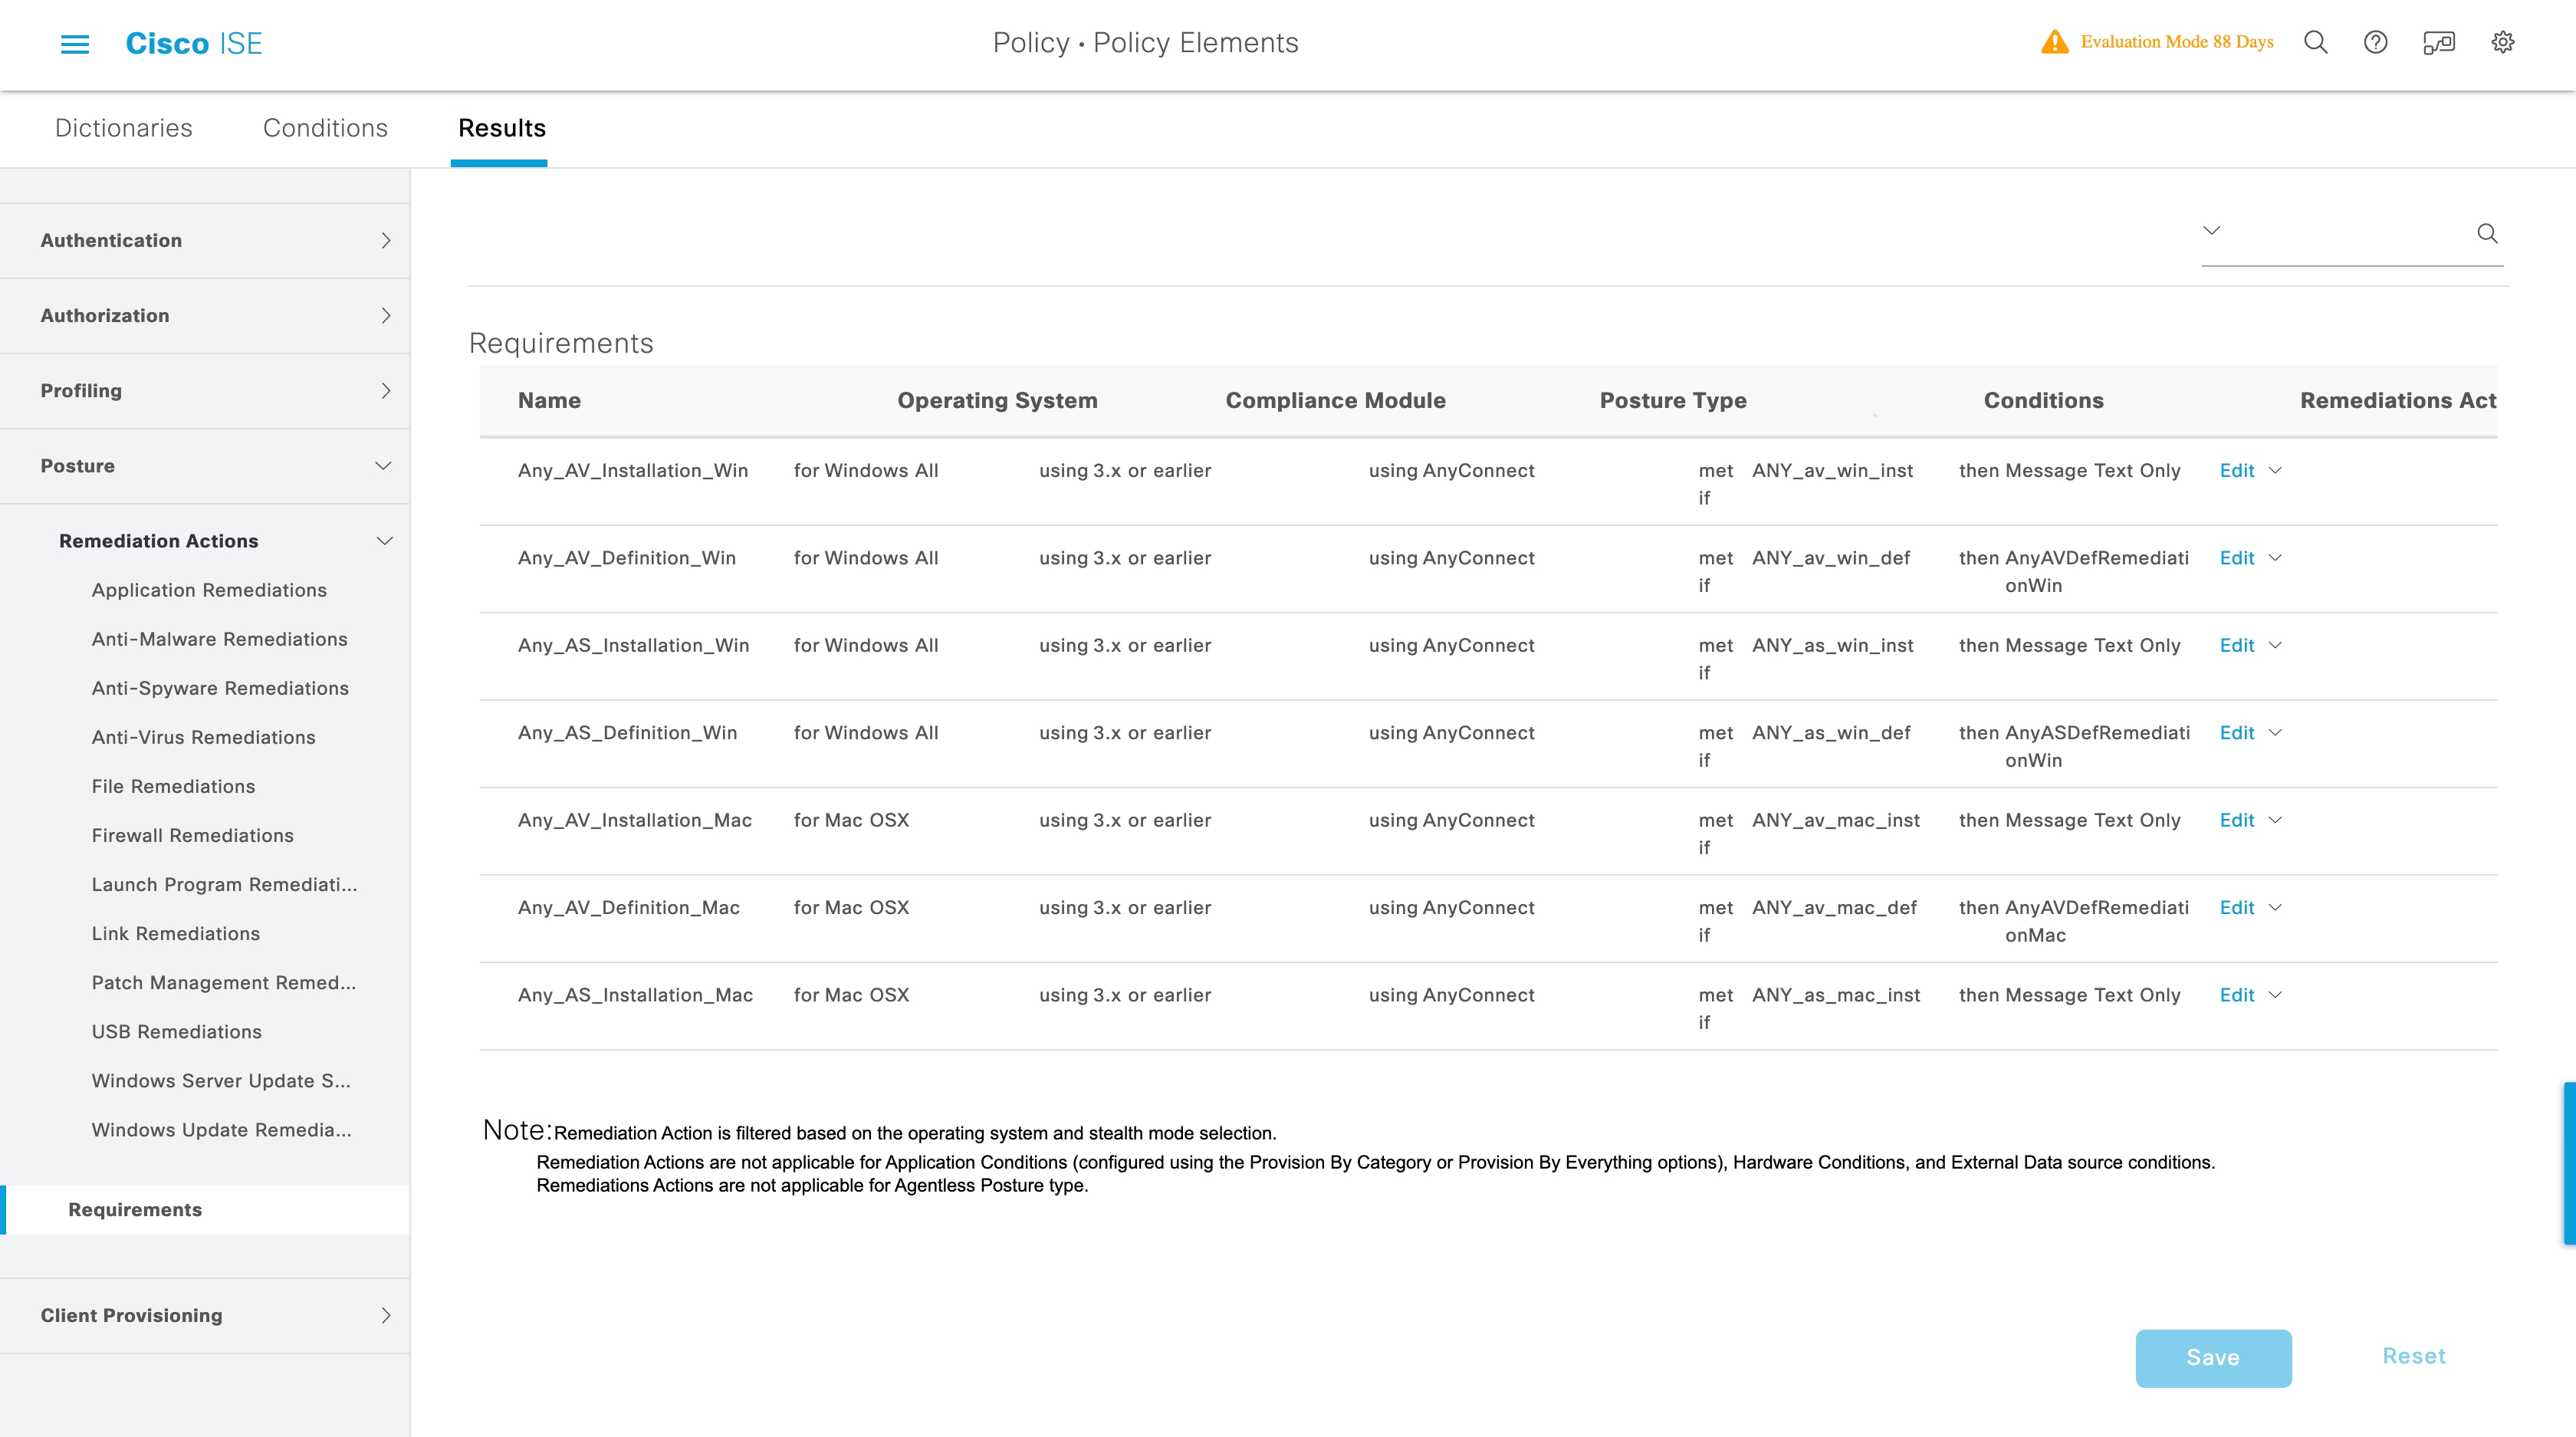
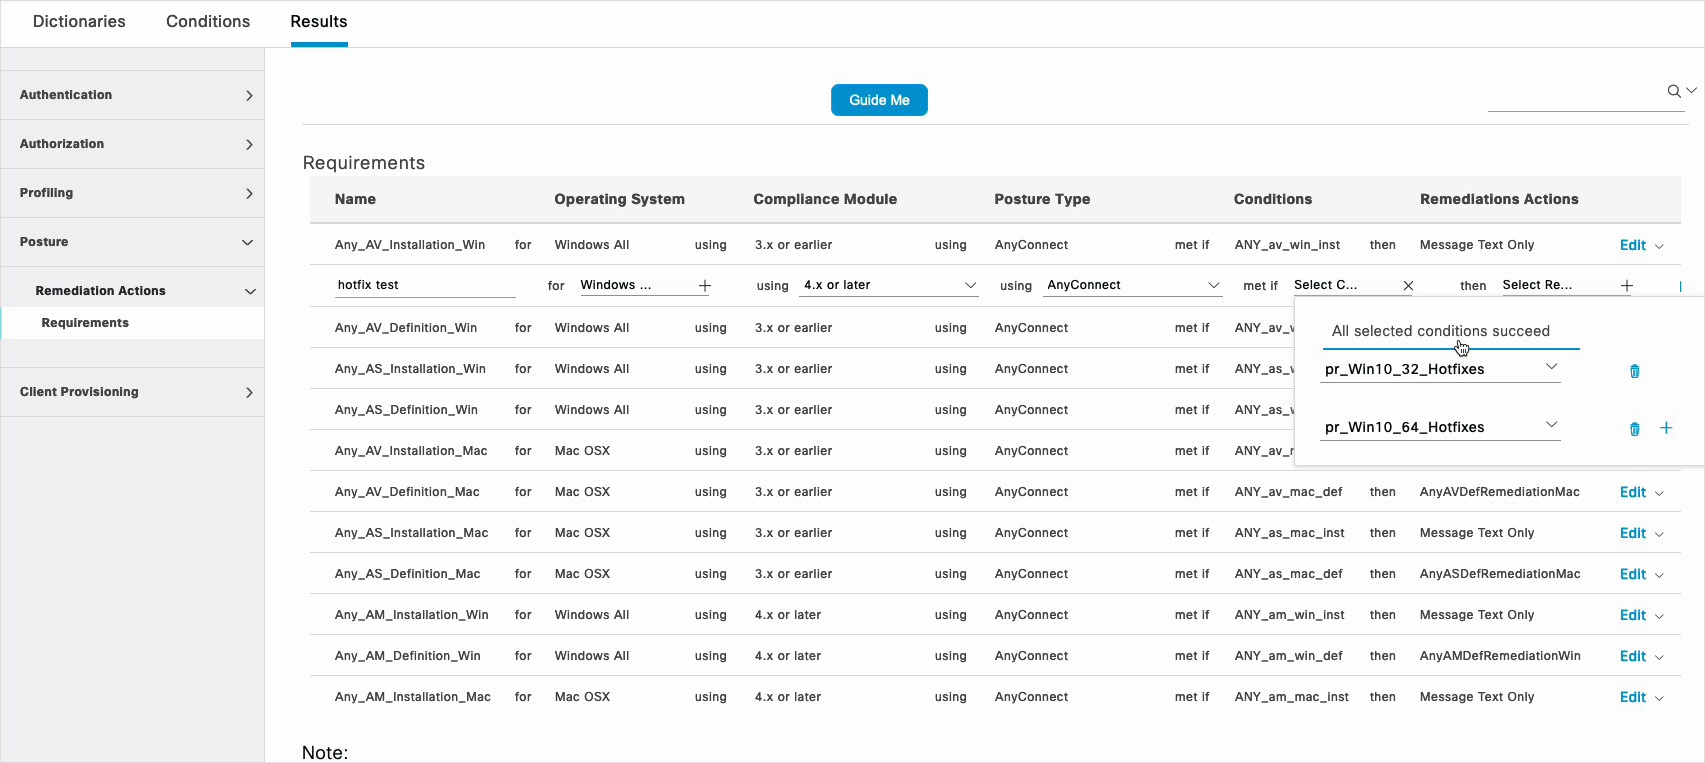
  1. In the Cisco ISE GUI, click the Menu icon () and choose Policy > Policy Elements > Results > Posture > Requirements.

  2. From the Edit drop-down list at the end of any requirement row, choose Insert New Requirement.

  3. Enter the required details and click Done.

The following table describes the fields in the Client Posture Requirements window.

Table 1. Posture Requirement

Field Name

Usage Guidelines

Name

Enter a name for the requirement.

Operating Systems

Choose an operating system.

Click plus [+] to associate more than one operating system to the policy.

Click minus [-] to remove the operating system from the policy.

Compliance Module

From the Compliance Module drop-down list, choose the required compliance module:

  • 4.x or Later: Supports antimalware, disk encryption, patch management, and USB conditions.

  • 3.x or Earlier: Supports antivirus, antispyware, disk encryption, and patch management conditions.

  • Any Version: Supports file, service, registry, application, and compound conditions.

For more information about compliance module, see Compliance Module.

Posture Type

From the Posture Type drop-down list, choose the required posture type.

  • AnyConnect: Deploys the AnyConnect agent to monitor and enforce Cisco ISE policies that require client interaction.

  • AnyConnect Stealth: Deploys the AnyConnect agent to monitor and enforce Cisco ISE posture policies without any client interaction.

  • Temporal Agent: A temporary executable file that is run on the client to check the compliance status.

Conditions

Choose a Condition from the list.

You can also create any user defined condition by clicking the Action Icon and associate it with the requirement. You cannot edit the associated parent operating system while creating user defined conditions.

The pr_WSUSRule is a dummy compound condition, which is used in a posture requirement with an associated Windows Server Update Services (WSUS) remediation. The associated WSUS remediation action must be configured to validate Windows updates by using the severity level option. When this requirement fails, the agent on the Windows client enforces the WSUS remediation action based on the severity level that you define in the WSUS remediation.

The pr_WSUSRule cannot be viewed in the Compound conditions list page. You can only select the pr_WSUSRule from the Conditions widget.

Remediation Actions

Choose a Remediation from the list.

You can also create a remediation action and associate it with the requirement.

You have a text box for all the remediation types that can be used to communicate to the agent users. In addition to remediation actions, you can communicate to agent users about the non-compliance of clients with messages.

The Message Text Only option informs agent users about the noncompliance. It also provides optional instructions to the user to contact the Help desk for more information, or to remediate the client manually. In this scenario, the agent does not trigger any remediation action.

Timer Settings for Clients

You can set up timers for users to remediate, to transition from one state to another, and to control the login success screen.

We recommend configuring agent profiles with remediation timers and network transition delay timers and the timer used to control the login success screen on client machines so that these settings are policy based. You can configure all these timers for agents in client provisioning resources in the AnyConnect Posture Profile window ( Policy > Policy Elements > Results > Client Provisioning > Resources > Add > AnyConnect Posture Profile).

However, when there are no agent profiles configured to match the client provisioning policies, you can use the settings in the General Settings configuration window ( Administration > System > Settings > Posture > General Settings).

Set Remediation Timer for Clients to Remediate Within Specified Time

You can configure the timer for client remediation within a specified time. When clients fail to satisfy configured posture policies during an initial assessment, the agent waits for the clients to remediate within the time configured in the remediation timer. If the client fails to remediate within this specified time, then the client agent sends a report to the posture run-time services after which the clients are moved to the noncompliance state.

Procedure

Step 1

In the Cisco ISE GUI, click the Menu icon () and choose Administration > System > Settings > Posture > General Settings.

Step 2

In the Remediation Timer field, enter a time value in minutes.

The default value is 4 minutes. The valid range is 1–300 minutes.

Step 3

Click Save.


Set Network Transition Delay Timer for Clients to Transition

You can configure the timer for clients to transition from one state to the other state within a specified time using the network transition delay timer, which is required for Change of Authorization (CoA) to complete. It may require a longer delay time when clients need time to get a new VLAN IP address during success and failure of posture. When successfully postured, Cisco ISE allows clients to transition from unknown to compliant mode within the time specified in the network transition delay timer. Upon failure of posture, Cisco ISE allows clients to transition from unknown to noncompliant mode within the time specified in the timer.

Procedure

Step 1

In the Cisco ISE GUI, click the Menu icon () and choose Administration > System > Settings > Posture > General Settings.

Step 2

Enter a time value in seconds, in the Network Transition Delay field.

The default value is 3 seconds. The valid range is 2 to 30 seconds.

Step 3

Click Save.


Set Login Success Window to Close Automatically

After successful posture assessment, the client agent displays a temporary network access screen. The user needs to click the OK button in the login window to close it. You can set up a timer to close this login screen automatically after specified time.

Procedure

Step 1

In the Cisco ISE GUI, click the Menu icon () and choose Administration > System > Settings > Posture > General Settings.

Step 2

Check the Automatically Close Login Success Screen After check box.

Step 3

Enter a time value in seconds, in the field next to Automatically Close Login Success Screen After check box.

The valid range is 0 to 300 seconds. If the time is set to zero, then AnyConnect does not display the login success screen.

Step 4

Click Save.


Set Posture Status for Nonagent Devices

You can configure the posture status of endpoints that run on non-agent devices. When Android devices and Apple devices such as an iPod, iPhone, or iPad connect to a Cisco ISE enabled network, these devices assume the Default Posture Status settings.

These settings can also be applied to endpoints that run on Windows and MacOS operating systems when a matching client provisioning policy is not found during posture runtime while redirecting the endpoints to the client provisioning portal.

Before you begin

In order to enforce policy on an endpoint, you must configure a corresponding Client Provisioning policy (Agent installation package). Otherwise, the posture status of the endpoint automatically reflects the default setting.

Procedure


Step 1

In the Cisco ISE GUI, click the Menu icon () and choose Administration > System > Settings > Posture > General Settings.

Step 2

From the Default Posture Status drop-down list, choose the option as Compliant or Noncompliant.

Step 3

Click Save.


Posture Lease

You can configure Cisco ISE to perform posture assessment every time a user logs into your network or perform posture assessment in specified intervals. The valid range is from 1 to 365 days.

This configuration applies only for those who use AnyConnect agent for posture assessment.

When the posture lease is active, Cisco ISE will use the last known posture state and will not reach out to the endpoint to check for compliance. But when the posture lease expires, Cisco ISE does not automatically trigger a re-authentication or a posture reassessment for the endpoint. The endpoint will stay in the same compliance state since the same session is being used. When the endpoint re-authenticates, posture will be run and the posture lease time will be reset.

Example Use Case Scenario:

  • The user logs on to the endpoint and gets it posture compliant with the posture lease set to one day.

  • Four hours later the user logs off from the endpoint (the posture lease now has 20 hours left).

  • One hour later the user logs on again. Now the posture lease has 19 hours left. The last know posture state was compliant. Hence the user is provided access without posture being run on the endpoint.

  • Four hours later the user logs off (the posture lease now has 15 hours left).

  • 14 hours later, the user logs on. The posture lease has one hour left. The last known posture state was compliant. The user is provided access without posture being run on the endpoint.

  • One hour later, the posture lease expires. The user is still connected to the network as the same user session is being used.

  • One hour later, user logs off (the session is tied to the user but not to the machine, so the machine can stay on the network).

  • One hour later the user logs on. Since the posture lease has expired and a new user session is launched, the machine performs a posture assessment, the results are sent to the Cisco ISE and the posture lease timer is reset to one day in case of this use case.

Periodic Reassessments

Periodic reassessment (PRA) can be done only for clients that are already successfully postured for compliance. PRA cannot occur if clients are not compliant on your network.

A PRA is valid and applicable only if the endpoints are in a compliant state. The policy service node checks the relevant policies, and compiles the requirements depending on the client role that is defined in the configuration to enforce a PRA. If a PRA configuration match is found, the policy service node responds to the client agent with the PRA attributes that are defined in the PRA configuration for the client before issuing a CoA request. The client agent periodically sends the PRA requests based on the interval specified in the configuration. The client remains in the compliant state if the PRA succeeds, or the action configured in the PRA configuration is to continue. If the client fails to meet PRA, then the client is moved from the compliant state to the noncompliant state.

The PostureStatus attribute shows the current posture status as compliant in a PRA request instead of unknown even though it is a posture reassessment request. The PostureStatus is updated in the Monitoring reports as well.

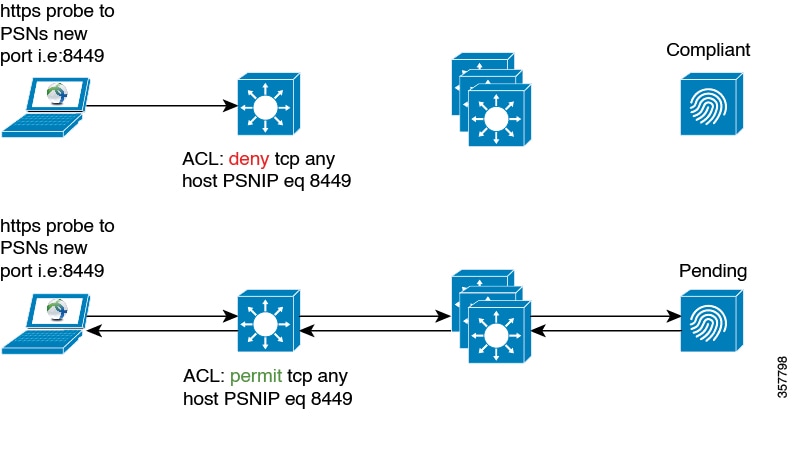
When the posture lease has not expired, an endpoint becomes compliant based on the Access Control List (ACL), and PRA is initiated. If PRA fails, the endpoint is deemed noncompliant and the posture lease is reset.


Note


PRA is not supported during PSN failover. After PSN failover, you must either enable rescan on the client or enable posture lease.


Configure Periodic Reassessments

You can configure periodic reassessments only for clients that are already successfully postured for compliance. You can configure each PRA to a user identity group that is defined in the system.

Before you begin
  • Ensure that each Periodic reassessment (PRA) configuration has a unique group or a unique combination of user identity groups assigned to the configuration.

  • You can assign a role_test_1 and a role_test_2, which are the two unique roles to a PRA configuration. You can combine these two roles with a logical operator and assign the PRA configuration as a unique combination of two roles. For example, role_test_1 OR role_test_2.

  • Ensure that two PRA configurations do not have a user identity group in common.

  • If a PRA configuration already exists with a user identity group Any, you cannot create other PRA configurations unless you perform one of the following:

    • Update the existing PRA configuration with the Any user identity group to reflect a user identity group other than Any.

    • Delete the existing PRA configuration with a user identity group “Any”.

Procedure

Step 1

In the Cisco ISE GUI, click the Menu icon () and choose Administration > System > Settings > Posture > Reassessments.

Step 2

Click Add.

Step 3

Modify the values in the New Reassessment Configuration window to create a new PRA.

Step 4

Click Submit to create a PRA configuration.


Posture Troubleshooting Settings

The following table describes the fields on the Posture troubleshooting window, which you use to find and resolve posture problems on the network. In the Cisco ISE GUI, click the Menu icon () and choose Operations > Troubleshoot > Diagnostic Tools > General Tools > Posture Troubleshooting.

Table 2. Posture Troubleshooting Settings

Field Name

Usage Guidelines

Search and Select a Posture event for troubleshooting

Username

Enter the username to filter on.

MAC Address

Enter the MAC address to filter on, using format: xx-xx-xx-xx-xx-xx

Posture Status

Select the authentication status to filter on:

Failure Reason

Enter the failure reason or click Select to choose a failure reason from a list. Click Clear to clear the failure reason.

Time Range

Select a time range. The RADIUS authentication records that are created during this time range are used.

Start Date-Time:

(Available only when you choose Custom Time Range) Enter the start date and time, or click the calendar icon to select the start date and time. The date should be in the mm/dd/yyyy format and time in the hh:mm format.

End Date-Time:

(Available only when you choose Custom Time Range) Enter the end date and time, or click the calendar icon to select the start date and time. The date should be in the mm/dd/yyyy format and time in the hh:mm format.

Fetch Number of Records

Select the number of records to display: 10, 20, 50, 100, 200, 500

Search Result

Time

Time of the event

Status

Posture status

Username

User name associated with the event

MAC Address

MAC address of the system

Failure Reason

Failure reason for the event

Posture General Settings

The following table describes the fields on the Posture General Settings window, which you can use to configure general posture settings such as remediation time and posture status. To view this window, click the Menu icon () and choose Administration > System > Settings > Posture > General Settings.

These settings are the default settings for posture, which can be overridden by a posture profile.

General Posture Settings

  • Remediation Timer: Enter the time to wait before starting remediation. The default value is 4 minutes. The valid range is 1–300 minutes.

  • Network Transition Delay: Enter a time value in seconds. The default value is 3 seconds. The valid range is from 2 to 30 seconds.

  • Default Posture Status: Choose Compliant or Noncompliant. Non-agent devices assume this status while connecting to the network.

  • Automatically Close Login Success Screen After: Check the check box to close the login success screen automatically after the specified time. You can configure the timer to close the login screen automatically. The valid range is from 0 to 300 seconds. If the time is set to zero, then the agents on the client do not display the login success screen.

  • Continuous Monitoring Interval: Specify the time interval after which AnyConnect should start sending monitoring data. For application and hardware conditions, the default value is 5 minutes.

  • Agentless posture client timeout: Specify how long to wait before a posture check is considered as failed.

  • Remove Agentless Plugin after each run: Enabling this setting removes the agent from the client after running Agentless posture. We strongly recommend that you leave this disabled, so that the downloaded plugin can be reused, until newer versions are available. Leaving this disabled helps to reduce network traffic.

  • Acceptable Use Policy in Stealth Mode: Choose Block in stealth mode to move a client to noncompliant posture status, if your company's network-usage terms and conditions are not met.

Posture Lease

  • Perform posture assessment every time a user connects to the network: Select this option to initiate posture assessment every time the user connects to network

  • Perform posture assessment every n days: Select this option to initiate posture assessment after the specified number of days, even if the client is already postured Compliant.

  • Cache Last Known Posture Compliant Status: Check this check box for Cisco ISE to cache the result of posture assessment. By default, this field is disabled.

  • Last Known Posture Compliant Status: This setting only applies if you have checked Cache Last Known Posture Compliant Status. Cisco ISE caches the result of posture assessment for the amount of time specified in this field. Valid values are from 1 to 30 days, or from 1 to 720 hours, or from 1 to 43200 minutes.

Download Posture Updates to Cisco ISE

Posture updates include a set of predefined checks, rules, and support charts for antivirus and antispyware for both Windows and MacOS operating systems, and operating systems information that are supported by Cisco. You can also update Cisco ISE offline from a file on your local system, which contains the latest archives of updates.

When you deploy Cisco ISE on your network for the first time, you can download posture updates from the web. This process usually takes approximately 20 minutes. After the initial download, you can configure Cisco ISE to verify and download incremental updates to occur automatically.

Cisco ISE creates default posture policies, requirements, and remediations only once during an initial posture updates. If you delete them, Cisco ISE does not create them again during subsequent manual or scheduled updates.

Before you begin

To ensure that you are able to access the appropriate remote location from which you can download posture resources to Cisco ISE, you may be required to verify that you have the correct proxy settings configured for your network as described in Specifying Proxy Settings in Cisco ISE.

You can use the Posture Update window to download updates dynamically from the web.

Procedure


Step 1

In the Cisco ISE GUI, click the Menu icon () and choose Administration > System > Settings > Posture > Updates.

Step 2

Choose the Web option to download updates dynamically.

Step 3

Click Set to Default to set the Cisco default value for the Update Feed URL field.

If your network restricts URL-redirection functions (via a proxy server, for example) and you are experiencing difficulty accessing the above URL, try also pointing your Cisco ISE to the alternative URL in the related topics.

Step 4

Modify the values in the Posture Updates window.

Step 5

Click Update Now to download updates from Cisco.

After being updated, the Posture Updates window displays the current Cisco updates version information as a verification of an update under Update Information section in the Posture Updates window.

Step 6

Click Yes to continue.


Cisco ISE Offline Updates

This offline update option allows you to download client provisioning and posture updates, when direct internet access to Cisco.com from a device using Cisco ISE is not available or is not permitted by a security policy.

To download offline client provisioning resources:

Procedure


Step 1

Go to: https://software.cisco.com/download/home/283801620/type/283802505/release/3.0.0.

Step 2

Provide your login credentials.

Step 3

Navigate to the Cisco Identity Services Engine download window, and select the release.

The following Offline Installation Packages are available for download:

  • win_spw-<version>-isebundle.zip—Offline SPW Installation Package for Windows

  • mac-spw-<version>.zip—Offline SPW Installation Package for Mac OS X

  • compliancemodule-<version>-isebundle.zip—Offline Compliance Module Installation Package

  • macagent-<version>-isebundle.zip—Offline Mac Agent Installation Package

  • webagent-<version>-isebundle.zip—Offline Web Agent Installation Package

Step 4

Click either Download or Add to Cart.


For more information on adding the downloaded installation packages to Cisco ISE, see the "Add Client Provisioning Resources from a Local Machine" section in the Cisco Identity Services Engine Administrator Guide.

You can update the checks, operating system information, and antivirus and antispyware support charts for Windows and Mac operating systems offline from an archive in your local system, using posture updates.

For offline updates, ensure that the versions of the archive files match the versions in the configuration file. Use offline posture updates after you configure Cisco ISE and want to enable dynamic updates for the posture policy service.

To download offline posture updates:

Procedure

Step 1

Go to https://www.cisco.com/web/secure/spa/posture-offline.html.

Step 2

Save the posture-offline.zip file to your local system. This file is used to update the operating system information, checks, rules, and antivirus and antispyware support charts for Windows and Mac operating systems.

Step 3

In the Cisco ISE GUI, click the Menu icon () and choose Administration > System > Settings > Posture.

Step 4

Click the arrow to view the settings for posture.

Step 5

Click Updates.

The Posture Updates window is displayed.

Step 6

Click the Offline option.

Step 7

Click Browse to locate the archive file (posture-offline.zip) from the local folder in your system.

Note

 
The File to Update field is a mandatory field. You can select only one archive file (.zip) containing the appropriate files. Archive files other than .zip, such as .tar, and .gz are not supported.

Step 8

Click Update Now.


Download Posture Updates Automatically

After an initial update, you can configure Cisco ISE to check for the updates and download them automatically.

Before you begin

  • You should have initially downloaded the posture updates to configure Cisco ISE to check for the updates and download them automatically.

Procedure


Step 1

In the Cisco ISE GUI, click the Menu icon () and choose Administration > System > Settings > Posture > Updates.

Step 2

In the Posture Updates window, check the Automatically check for updates starting from initial delay check box.

Step 3

Enter the initial delay time in hh:mm:ss format.

Cisco ISE starts checking for updates after the initial delay time is over.

Step 4

Enter the time interval in hours.

Cisco ISE downloads the updates to your deployment at specified intervals from the initial delay time.

Step 5

Click Save.


Posture Acceptable Use Policy Configuration Settings

The following table describes the fields in the Posture Acceptable Use Policy Configurations window, which you can use to configure an acceptable use policy for posture. To view this window, click the Menu icon () and choose Administration > System > Settings > Posture > Acceptable Use Policy.

Table 3. Posture AUP Configurations Settings

Field Name

Usage Guidelines

Configuration Name

Enter the name of the AUP configuration that you want to create.

Configuration Description

Enter the description of the AUP configuration that you want to create.

Show AUP to Agent users (for Windows only)

When selected, the link to network usage terms and conditions for your network is displayed to users upon successful authentication and posture assessment.

Use URL for AUP message

When selected, you must enter the URL to the AUP message in the AUP URL field.

Use file for AUP message

When selected, you must browse to the location and upload a file in a zipped format. The file must contain the index.html at the top level.

The .zip file can include other files and subdirectories in addition to the index.html file. These files can reference each other using HTML tags.

AUP URL

Enter the URL to the AUP, which users must access upon successful authentication and posture assessment.

AUP File

Browse to the file and upload it to the Cisco ISE server. It should be a zipped file and should contain the index.html file at the top level.

Select User Identity Groups

Choose a unique user identity group or a unique combination of user identity groups for your AUP configuration.

Note the following while creating an AUP configuration:

  • Posture AUP is not applicable for a guest flow

  • No two configurations have any user identity group in common

  • If you want to create a AUP configuration with a user identity group “Any”, then delete all other AUP configurations first

  • If you create a AUP configuration with a user identity group “Any”, then you cannot create other AUP configurations with a unique user identity group or user identity groups. To create an AUP configuration with a user identity group other than Any, either delete an existing AUP configuration with a user identity group “Any” first, or update an existing AUP configuration with a user identity group “Any” with a unique user identity group or user identity groups.

Acceptable use policy configurations—Configurations list

Lists existing AUP configurations and end user identity groups associated with AUP configurations.

Configure Acceptable Use Policies for Posture Assessment

After login and successful posture assessment of clients, the client agent displays a temporary network access screen. This screen contains a link to an acceptable use policy (AUP). When the user clicks the link, they are redirected to a page that displays the network-usage terms and conditions, which they must read and accept.

Each Acceptable Use Policy configuration must have a unique user identity group, or a unique combination of user identity groups. Cisco ISE finds the AUP for the first matched user identity group, and then it communicates to the client agent that displays the AUP.

Procedure


Step 1

In the Cisco ISE GUI, click the Menu icon () and choose Administration > System > Settings > Posture > Acceptable Use Policy.

Step 2

Click Add.

Step 3

Modify the values in the New Acceptable Use Policy Configuration window.

Step 4

Click Submit.


Posture Conditions

A posture condition can be any one of the following simple conditions: a file, a registry, an application, a service, or a dictionary condition. One or more conditions from these simple conditions form a compound condition, which can be associated to a posture requirement.

When you deploy Cisco ISE on your network for the first time, you can download posture updates from the web. This process is called the initial posture update.

After an initial posture update, Cisco ISE also creates Cisco defined simple and compound conditions. Cisco defined simple conditions have pc_ as their prefixes and compound conditions have pr_ as their prefixes.

You can also configure Cisco ISE to download the Cisco-defined conditions periodically as a result of dynamic posture updates through the web. You cannot delete or edit Cisco defined posture conditions.

A user defined condition or a Cisco defined condition includes both simple conditions and compound conditions.

Simple Posture Conditions

You can use the Posture Navigation pane to manage the following simple conditions:

  • File Conditions: A condition that checks the existence of a file, the date of a file, and the versions of a file on the client.

  • Registry Conditions: A condition that checks for the existence of a registry key or the value of the registry key on the client.

  • Application Conditions: A condition that checks if an application or process is running or not running on the client.


    Note


    If a process is installed and running, user is compliant. However, the Application condition works in reverse logic; If an application is not installed and not running, the end user is complaint. If an application is installed and running, the end user is non-complaint.


  • Service Conditions: A condition that checks if a service is running or not running on the client.

  • Dictionary Conditions: A condition that checks a dictionary attribute with a value.

  • USB Conditions: A condition that checks for the presence of USB mass storage device.

Create Simple Posture Conditions

You can create file, registry, application, service, and dictionary simple conditions that can be used in posture policies or in other compound conditions.

Before you begin

To perform the following task, you must be a Super Admin or Policy Admin.

Procedure


Step 1

In the Cisco ISE GUI, click the Menu icon () and choose Policy > Policy Elements > Conditions > Posture.

Step 2

Choose any one of the following: File, Registry, Application, Service, or Dictionary Simple Condition.

Step 3

Click Add.

Step 4

Enter the appropriate values in the fields.

Step 5

Click Submit.


Compound Posture Conditions

Compound conditions are made up of one or more simple conditions, or compound conditions. You can make use of the following compound conditions while defining a Posture policy.

  • Compound Conditions: Contains one or more simple conditions, or compound conditions of the type File, Registry, Application, or Service condition

  • Antivirus Compound Conditions: Contains one or more AV conditions, or AV compound conditions

  • Antispyware Compound Conditions: Contains one or more AS conditions, or AS compound conditions

  • Dictionary Compound Conditions: Contains one or more dictionary simple conditions or dictionary compound conditions

  • Antimalware Conditions: Contains one or more AM conditions.

Create Compound Posture Conditions

You can create compound conditions that can be used in posture policies for posture assessment and validation.

Before you begin

To perform the following task, you must be a Super Admin or Policy Admin.

Procedure

Step 1

In the Cisco ISE GUI, click the Menu icon () and choose Policy > Policy Elements > Conditions > Posture > Compound Conditions > Add.

Step 2

Enter appropriate values for the fields.

Step 3

Click Validate Expression to validate the condition.

Step 4

Click Submit.


Dictionary Compound Condition Settings

Table 4. Dictionary Compound Condition Settings

Field Name

Usage Guidelines

Name

Enter the name of the dictionary compound condition that you want to create.

Description

Enter the description of the dictionary compound condition that you want to create.

Select Existing Condition from Library

Define an expression by selecting pre-defined conditions from the policy elements library or add ad-hoc attribute/value pairs to your expression in the subsequent steps.

Condition Name

Choose dictionary simple conditions that you have already created from the policy elements library.

Expression

The Expression is updated based on your selection from the Condition Name drop-down list.

AND or OR operator

Choose an AND, or an OR operator to logically combine dictionary simple conditions, which can be added from the library.

Click the Action icon to do the following:

  • Add Attribute/Value

  • Add Condition from Library

  • Delete

Cisco ISE will process each OR condition in a compound condition sequentially. For example, if a compound condition checks for A OR B, Cisco ISE first checks A and then B. If either condition A or B is passed, the overall result is marked as passed.

If condition A fails and condition B succeeds, then the overall result is marked as passed. In this case, condition A is marked as failed and condition B as passed in the posture reports.

If condition A succeeds, Cisco ISE skips condition B and marks the overall result as passed. In the posture reports, condition A is marked as passed, condition B as skipped, and the overall result as passed.

Create New Condition (Advance Option)

Select attributes from various system or user-defined dictionaries.

You can also add predefined conditions from the policy elements library in the subsequent steps.

Condition Name

Choose a dictionary simple condition that you have already created.

Expression

From the Expression drop-down list, you can create a dictionary simple condition.

Operator

Choose an operator to associate a value to an attribute.

Value

Enter a value that you want to associate to the dictionary attribute, or choose a value from the drop-down list.

Predefined Condition for Enabling Automatic Updates in Windows Clients

The pr_AutoUpdateCheck_Rule is a Cisco predefined condition, which is downloaded to the Compound Conditions window. This condition allows you to check whether the automatic updates feature is enabled on Windows clients. If a Windows client fails to meet this requirement, then the Network Access Control (NAC) Agents enforce the Windows client to enable (remediate) the automatic updates feature. After this remediation is done, the Windows client becomes posture compliant. The Windows update remediation that you associate in the posture policy overrides the Windows administrator setting, if the automatic updates feature is not enabled on the Windows client.

Preconfigured Antivirus and Antispyware Conditions

Cisco ISE loads preconfigured antivirus and antispyware compound conditions in the AV and AS Compound Condition windows, which are defined in the antivirus and antispyware support charts for Windows and MacOS operating systems. These compound conditions can check if the specified antivirus and antispyware products exist on all the clients. You can also create new antivirus and antispyware compound conditions in Cisco ISE.

Antivirus and Antispyware Support Chart

Cisco ISE uses an antivirus and antispyware support chart, which provides the latest version and date in the definition files for each vendor product. Users must frequently poll antivirus and antispyware support charts for updates. The antivirus and antispyware vendors frequently update antivirus and antispyware definition files, look for the latest version and date in the definition files for each vendor product.

Each time the antivirus and antispyware support chart is updated to reflect support for new antivirus and antispyware vendors, products, and their releases, the agents receive a new antivirus and antispyware library. It helps the Agents to support newer additions. Once the agents retrieve this support information, they check the latest definition information from the periodically updated se-checks.xml file (which is published along with the se-rules.xml file in the se-templates.tar.gz archive), and determine whether clients are compliant with the posture policies. Depending upon what is supported by the antivirus and antispyware library for a particular antivirus, or antispyware product, the appropriate requirements will be sent to the agents for validating their existence, and the status of particular antivirus and antispyware products on the clients during posture validation.

For more information on the antivirus and anti-malware products supported by the ISE posture agent, see the Cisco AnyConnect ISE Posture Support Charts: Cisco ISE Compatibility Guide.

You can verify the minimum compliance module version while creating an anti-malware posture condition. After the posture feed is updated, choose Work Centers > Posture > Policy Elements > Anti-Malware Condition and then choose the Operating System and Vendor to view the support chart.


Note


Some of the Anti-Malware endpoint security solutions (such as FireEye, Cisco AMP, Sophos, and so on) require network access to their respective centralized service for functioning. For such products, AnyConnect ISE posture module (or OESIS library) expects the endpoints to have internet connectivity. It is recommended that internet access is allowed for such endpoints during pre-posture for these online agents (if offline detection is not enabled). Signature Definition condition might not be applicable in such cases.


Compliance Module

The compliance module contains a list of fields, such as vendor name, product version, product name, and attributes provided by OPSWAT that supports Cisco ISE posture conditions.

Vendors frequently update the product version and date in the definition files, therefore, you must look for the latest version and date in the definition files for each vendor product by frequently polling the compliance module for updates. Each time the compliance module is updated to reflect the support for new vendors, products, and their releases, the AnyConnect agent receives a new library. It helps the AnyConnect agent to support newer additions. The AnyConnect agent retrieves this support information and checks the latest definition information from the periodically updated se-checks.xml file (which is published along with the se-rules.xml file in the se-templates.tar.gz archive), and determine whether clients are compliant with the posture policies. Depending upon what is supported by the library for a particular antivirus, antispyware, antimalware, disk encryption, or patch management product, the appropriate requirements will be sent to the AnyConnect agent for validating their existence, and the status of the particular products on the clients during posture validation.

The compliance module is available on Cisco.com.

Table given below lists the OPSWAT API versions that support and do not support the ISE posture policy. There are different policy rules for agents that support versions 3 and 4.

Table 5. OPSWAT API Versions

Posture Condition

Compliance Module Version

OPSWAT

Antivirus

3.x or earlier

Antispyware

3.x or earlier

Antimalware

4.x or later

Disk Encryption

3.x or earlier and 4.x or later

Patch Management

3.x or earlier and 4.x or later

USB

4.x or later

Non-OPSWAT

File

Any version

Application

Any version

Compound

Any version

Registry

Any version

Service

Any version


Note


  • Be sure to create separate posture policies for version 3.x or earlier and version 4.x or later, in anticipation of clients that may have installed any one of the above versions.

  • OESIS version 4 support is provided for compliance module 4.x and Cisco AnyConnect 4.3 and higher. However, AnyConnect 4.3 supports both OESIS version 3 and version 4 policies.

  • Version 4 compliance module is supported by ISE 2.1 and higher.


Check Posture Compliance

Procedure


Step 1

Log in to Cisco ISE and access the dashboard.

Step 2

In the Posture Compliance dashlet, hover your cursor over a stack bar or sparkline.

A tooltip provides detailed information.

Step 3

Expand the data categories for more information.

Step 4

Expand the Posture Compliance dashlet.

A detailed real-time report is displayed.

Note


You can view the posture compliance report in the Context Visibility window. Navigate Context Visibility > Endpoints > Compliance. This window displays different charts based on Compliance Status, Location, Endpoints, and Applications by Categories.

You might see the posture status for endpoints that do not have any active sessions. For example, if the last known posture status for an endpoint is Compliant, the status remains Compliant in the Context Visibility window until the next update is received for the endpoint, even if the endpoint session is terminated. The posture status is retained in the Context Visibility window until that endpoint is deleted or purged.


Create Patch Management Conditions

You can create a policy to check the status of a selected vendor's patch management product.

For example, you can create a condition to check if Microsoft System Center Configuration Manager (SCCM), Client Version 4.x software product is installed at an endpoint.


Note


Supported versions of Cisco ISE and AnyConnect:
  • Cisco ISE version 1.4 and later

  • AnyConnect version 4.1 and later


Before you begin

To perform the following task, you must be a Super Admin or Policy Admin.

Procedure


Step 1

In the Cisco ISE GUI, click the Menu icon () and choose Policy > Policy Elements > Conditions > Posture > Patch Management Condition.

Step 2

Click Add.

Step 3

Enter the condition name and description in the Name and Description fields.

Step 4

Choose the appropriate operating system from the Operating System drop-down field.

Step 5

Choose the Compliance Module from the drop-down list.

Step 6

Choose the Vendor Name from the drop-down list.

Step 7

Choose the Check Type.

Step 8

Choose the appropriate patch from the Check patches installed drop-down list.

Step 9

Click Submit.


Create Disk Encryption Conditions

You can create a policy to check if an end point is compliant with the specified data encryption software.

For example, you can create a condition to check if the C: drive is encrypted in an end point. If the C: drive is not encrypted then the end point receives a non-compliance notification and ISE logs a message.

Before you begin

To perform the following task, you must be a Super Admin or Policy Admin. You can associate a Disk Encryption condition with a posture requirement only when you use the AnyConnect ISE posture agent.

Procedure


Step 1

In the Cisco ISE GUI, click the Menu icon () and choose Policy > Policy Elements > Conditions > Posture > Disk Encryption Condition.

Step 2

Click Add.

Step 3

In the Disk Encryption Condition window, enter the appropriate values in the fields.

Step 4

Click Submit.


Posture Condition Settings

This section describes simple and compound conditions used for posture.

File Condition Settings

The following table describes the fields in the File Conditions window. In the Cisco ISE GUI, click the Menu icon () and choose Policy > Policy Elements > Conditions > Posture > File Condition.

Table 6. File Condition Settings

Field Name

Usage Guidelines for Windows OS

Usage Guidelines for macOS

Usage Guidelines for Linux OS

Name

Enter the name of the file condition.

Enter the name of the file condition.

Enter the name of the file condition.

Description

Enter a description for the file condition.

Enter a description for the file condition.

Enter a description for the file condition.

Operating System

Choose any Windows operating system to which the file condition should be applied.

Choose any macOS to which the file condition should be applied.

Choose any Linux OS (Ubuntu, Red Hat, or SUSE) to which the file condition should be applied. For OS support information, see the Compatibility Matrix for your Cisco ISE release.

File Type

Choose one of the following options:

  • FileDate: Checks whether a file with a particular file-created or file-modified date exists in the system.

  • FileExistence: Checks whether a file exists in the system.

  • FileVersion: Checks whether a particular version of a file exists in the system.

  • CRC32: Checks the data integrity of a file using the checksum function.

  • SHA-256: Checks the data integrity of a file using the hash function.

Choose one of the following options:

  • FileDate: Checks whether a file with a particular file-created or file-modified date exists in the system.

  • FileExistence: Checks whether a file exists in the system.

  • CRC32: Checks the data integrity of a file using the checksum function.

  • SHA-256: Checks the data integrity of a file using the hash function.

  • PropertyList: Checks the property value in a plist file, such as loginwindow.plist.

Choose one of the following options:

  • FileDate: Checks whether a file with a particular file-created or file-modified date exists in the system.

  • FileExistence: Checks whether a file exists in the system.

  • CRC32: Checks the data integrity of a file using the checksum function.

  • SHA-256: Checks the data integrity of a file using the hash function.

Data Type and Operator

NA

(Available only if you select PropertyList as the File Type) Choose the data type or value of the key to be searched in the plist files. Each data type contains a set of operators.

  • Unspecified: Checks the existence of the specified key. Enter an Operator (Exists, DoesNotExist).

  • Number: Checks for the specified key of number data type. Enter an Operator (equals, does not equal, greater than, less than, greater than or equal to, less than or equal to) and a Value.

  • String: Checks for the specified key of string data type. Enter an Operator (equals, does not equal, equals (ignore case), starts with, does not start with, contains, does not contain, ends with, does not end with) and a Value.

  • Version: Checks for the value of the specified key as a version string. Enter an Operator (earlier than, later than, same as) and a Value.

NA

Property Name

NA

(Available only if you select PropertyList as the File Type) Enter the name of the key, for example, BuildVersionStampAsNumber

NA

File Path

Choose one of the following options:

  • ABSOLUTE_PATH: Checks the file in the fully qualified path of the file. For example, C:\<directory>\file name. For other settings, enter only the file name.

  • SYSTEM_32: Checks the file in the C:\WINDOWS\system32 directory. Enter the file name.

  • SYSTEM_DRIVE: Checks the file in the C:\ drive. Enter the file name.

  • SYSTEM_PROGRAMS: Checks the file in the C:\Program Files. Enter the file name.

  • SYSTEM_ROOT: Checks the file in the root path for Windows system. Enter the file name.

  • USER_DESKTOP: Checks if the specified file is present on the Windows user's desktop. Enter the file name.
  • USER_PROFILE: Checks if the file is present in the Windows user's local profile directory. Enter the file path.

Choose one of the following options:

  • Root: Checks the file in the root (/) directory. Enter the file path.

  • Home: Checks the file in the home (~) directory. Enter the file path.

Choose one of the following options:

  • Root: Checks the file in the root (/) directory. Enter the file path.

  • Home: Checks the file in the home (~) directory. Enter the file path.

File Date Type

(Available only if you select FileDate as the File Type) Choose Creation Date or Modification Date.

(Available only if you select FileDate as the File Type) Choose Creation Date or Modification Date.

(Available only if you select FileDate as the File Type) Choose Creation Date or Modification Date.

File Operator

The File Operator options change according to the settings you select in the File Type. Choose the settings appropriately:

FileDate

  • EarlierThan

  • LaterThan

  • EqualTo

  • Within: The last n number of days. Valid range is from 1 to 300.

FileExistence

  • Exists

  • DoesNotExist

FileVersion

  • EarlierThan

  • LaterThan

  • EqualTo

The File Operator options change according to the settings you select in the File Type. Choose the settings appropriately:

FileDate

  • EarlierThan

  • LaterThan

  • EqualTo

  • Within: The last n number of days. Valid range is from 1 to 300.

FileExistence

  • Exists

  • DoesNotExist

The File Operator options change according to the settings you select in the File Type. Choose the settings appropriately:

FileDate

  • EarlierThan

  • LaterThan

  • EqualTo

  • Within: The last n number of days. Valid range is from 1 to 300.

FileExistence

  • Exists

  • DoesNotExist

File CRC Data

(Available only if you select CRC32 as the File Type) You can enter a checksum value, for example, 0x3c37fec3 to check file integrity. The checksum value should start with 0x, a hexadecimal integer.

(Available only if you select CRC32 as the File Type) You can enter a checksum value, for example, 0x3c37fec3 to check file integrity. The checksum value should start with 0x, a hexadecimal integer.

(Available only if you select CRC32 as the File Type) You can enter a checksum value, for example, 0x3c37fec3 to check file integrity. The checksum value should start with 0x, a hexadecimal integer.

File SHA-256 Data

(Available only if you select SHA-256 as the File Type) You can enter a 64-byte hexadecimal hash value to check file integrity.

(Available only if you select SHA-256 as the File Type) You can enter a 64-byte hexadecimal hash value to check file integrity.

(Available only if you select SHA-256 as the File Type) You can enter a 64-byte hexadecimal hash value to check file integrity.

Date and Time

(Available only if you select FileDate as the File Type) Enter the date and time of the client system in mm/dd/yyyy and hh:mm:ss format.

(Available only if you select FileDate as the File Type) Enter the date and time of the client system in mm/dd/yyyy and hh:mm:ss format.

(Available only if you select FileDate as the File Type) Enter the date and time of the client system in mm/dd/yyyy and hh:mm:ss format.

Firewall Condition Settings

The Firewall condition checks if a specific Firewall product is running on an endpoint. The list of supported Firewall products is based on the OPSWAT support charts. You can enforce policies during initial posture and Periodic Reassessment (PRA).

Cisco ISE provides default Firewall conditions for Windows and macOS. These conditions are disabled by default.

Field Name

Usage Guidelines

Name

Enter the name of the Firewall condition.

Description

Enter a description for the Firewall condition.

Compliance Module

Choose the required compliance module.

  • 4.x or later

  • 3.x or later

  • Any Version

Operating System

Checks If the required Firewall product is installed on an endpoint. You can select the Windows OS or macOS.

Vendor

Choose a vendor name from the drop-down list. The Firewall products of a vendor and their check type are retrieved and displayed in the Products for Selected Vendor table. The list in the table changes according to the selected operating system.

Check Type

Enabled: To check if a specific Firewall is running on an endpoint. Verify if the vendor's product supports the chosen check type by referring to the Products for Selected Vendor list.

Registry Condition Settings

The following table describes the fields in the Registry Conditions window. In the Cisco ISE GUI, click the Menu icon () and choose Policy > Policy Elements > Conditions > Posture > Registry Condition.

Table 7. Registry Condition Settings

Field Name

Usage Guidelines

Name

Enter the name of the registry condition.

Description

Enter a description for the registry condition.

Registry Type

Choose one of the predefined settings as the registry type.

Registry Root Key

Choose one of the predefined settings as the registry root key.

Sub Key

Enter the sub key without the backslash (“\”) to check the registry key in the path specified in the Registry Root Key.

For example, SOFTWARE\Symantec\Norton AntiVirus\version will check the key in the following path:

HKLM\SOFTWARE\Symantec\NortonAntiVirus\version

Value Name

(Available only if you select RegistryValue or RegistryValueDefault as the Registry Type) Enter the name of the registry key value to be checked for RegistryValue.

This is the default field for RegistryValueDefault.

Value Data Type

(Available only if you select RegistryValue or RegistryValueDefault as the Registry Type) Choose one of the following settings:

  • Unspecified: Checks whether the registry key value exists or not. This option is available only for RegistryValue.

  • Number: Checks the specified number in the registry key value

  • String: Checks the string in the registry key value

  • Version: Checks the version in the registry key value

Value Operator

Choose the settings appropriately.

Value Data

(Available only if you select RegistryValue or RegistryValueDefault as the Registry Type) Enter the value of the registry key according to the data type you have selected in Value Data Type.

Operating System

Select the operating system to which the registry condition should be applied.

Continuous Endpoint Attribute Monitoring

You can use the AnyConnect agent to continuously monitor different endpoint attributes to improve the overall visibility of an endpoint. The AnyConnect agent monitors applications that are installed and running on an endpoint. You can turn on and off the feature and configure how often the data should be monitored. By default, data is collected every 5 minutes and is stored in the database. During initial posture, AnyConnect reports a complete list of running and installed applications. After initial posture, the AnyConnect agent scans the applications every X minutes and sends the differences from the last scan to the server. The server displays the complete list of running and installed applications.

Application Condition Settings

The application condition queries for applications that are installed on an endpoint. This helps you to get an aggregate visibility of the software distributed on your endpoints.

The following table describes the fields in the Application Conditions window. To view this window, click the Menu icon () and choose Work Centers > Posture > Policy Elements > Application Condition > Add.

Field Name

Usage Guidelines

Name

Enter the name of the application condition.

Description

Enter the description for the application condition.

Operating System

Select the operating system to which the application condition should be applied. The following options are available:

  • Windows

  • Mac OSX

  • Linux

Compliance Module

Choose one of the following options:

  • 4.x or later

  • 3.x or earlier

  • Any Version

Check By

Choose one of the following options:
  • Process: Choose this option to check if a process is running on an endpoint.

  • Application: Choose this option to check if an application is running on an endpoint.

Note


Only the Process option is displayed for Linux OS.

Process Name

(Available only when you select Process as the Check By option) Enter the required process name.

Application Operator

(Available only when you select Process as the Check By option) Choose one of the following options:
  • Running: Choose this option to check if an application is running on an endpoint.

  • Not Running: Choose this option to check whether an application is not running on an endpoint.

Application State

(Available only when you select Application as the Check By option) Choose one of the following options:
  • Installed: Choose this option to check whether the clients have malicious applications installed. If a malicious application is found, the remediation action is triggered.

  • Running: Choose this option to check if an application is running on an endpoint.

Provision By

(Available only when you select Application as the Check By option) Choose one of the following options:
  • Everything: You can select all listed categories such as Browser, Patch Management, and so on.

  • Name: You should select at least one category. For example, if you choose the Browser category, it displays the corresponding vendors in the Vendor drop-down list.

  • Category: You can check one or more categories such as Anti-Malware, Backup, Browser, or Data Storage.

Note

 
Categories are dynamically updated from the OPSWAT library.

You can view the number of installed and running applications for each endpoint in the Context Visibility > Endpoints > Compliance window.

The Home > Summary > Compliance window displays the percentage of endpoints that are subject to posture assessment and are compliant.

Service Condition Settings

The following table describes the fields in the Service Conditions window. In the Cisco ISE GUI, click the Menu icon () and choose Policy > Policy Elements > Conditions > Posture > Service Condition.

Table 8. Service Conditions Settings

Field Name

Usage Guidelines

Name

Enter a name for the service condition.

Description

Enter a description of the service condition.

Operating Systems

Select the operating system to which the service condition should be applied. You can select different versions of the Windows OS or macOS.

Service Name

Enter the name of the Daemon or User Agent service, for example, com.apple.geod, running as root. The AnyConnect agent uses the command sudo launchctl list to validate the service condition.

Service Type

Choose the type of service that AnyConnect should check for to ensure client compliance:
  • Daemon: Checks if a specified service, such as scanning a client device for malware, is present in the specified list of Daemon services in the client.

  • User Agent: Checks if a specified service, such as a service that runs when malware is detected, is present in the specified list of User services in the client.

  • Daemon or User Agent: Checks if the specified services are present either in the Daemon or User Agent services list.

Service Operator

Choose the service status that you want to check in the client:
  • Windows OS: To check if a service is Running or Not Running.
  • Mac OSX: To check if a service is Loaded, Not Loaded, Loaded and Running, Loaded with Exit Code, and Loaded and running or with Exit code.

Posture Compound Condition Settings

The following table describes the fields in the Compound Conditions window. In the Cisco ISE GUI, click the Menu icon () and choose Policy > Policy Elements > Conditions > Posture > Compound Condition.

Table 9. Posture Compound Condition Settings

Field Name

Usage Guidelines

Name

Enter the name of the compound condition that you want to create.

Description

Enter the description of the compound condition that you want to create.

Operating System

Select one or more Windows operating systems. This allows you to associate Windows operating systems to which the condition is applied.

Parentheses ( )

Click the parentheses to combine two simple conditions from the following simple condition types: file, registry, application, and service conditions.

( & ): AND operator (use “&” for an AND operator, without the quotes)

You can use the AND operator (ampersand [ & ]) in a compound condition. For example, enter Condition1 & Condition2.

( | ): OR operator (use “|” for an OR operator, without the quotes)

You can use the OR operator (horizontal bar [  | ]) in a compound condition. For example, enter Condition1 & Condition2.

( ! ): NOT operator (use “!” for a NOT operator, without the quotes)

You can use the NOT operator (exclamation point [ ! ]) in a compound conditions. For example, enter Condition1 & Condition2.

Simple Conditions

Choose from a list of simple conditions of the following types: file, registry, application, and service conditions.

You can also create simple conditions of file, registry, application, and service conditions from the object selector.

Click the quick picker (down arrow) on the Action button to create simple conditions of file, registry, application, and service conditions.

AntiVirus Condition Settings

In the Cisco ISE GUI, click the Menu icon () and choose Policy > Policy Elements > Conditions > Posture > Anti-Virus Condition.

Field Name

Usage Guidelines

Name

Enter the name of the antivirus condition that you want to create.

Description

Enter the description of the antivirus condition that you want to create.

Operating System

Select an operating system to check the installation of an antivirus program on your client, or check the latest antivirus definition file updates to which the condition is applied.

Vendor

Choose a vendor from the drop-down list. The selection of Vendor retrieves their antivirus products and versions, which are displayed in the Products for Selected Vendor table.

Check Type

Choose whether to check an installation or check the latest definition file update on the client.

Installation

Choose to check only the installation of an antivirus program on the client.

Definition

Choose to check only the latest definition file update of an antivirus product on the client.

Products for Selected Vendor

Choose an antivirus product from the table. Based on the vendor that you select in the New Anti-virus Condition page, the table retrieves information on their antivirus products and their version, remediation support that they provide, latest definition file date and its version.

The selection of a product from the table allows you to check for the installation of an antivirus program, or check for the latest antivirus definition file date, and its latest version.


Note


Only one condition can be configured for each antivirus product from either Baseline Condition or Advance Condition.


Baseline Condition

Field Name

Guideline

Minimum Version

(Available only when you update the Operating System and Vendor) Choose minimum version of the antivirus from the drop down list.

The check will enforce the network policy on all the endpoints on your network to comply with the mimimum version of antivirus.

Maximum Version

The maximum version for antivirus is revised automatically when you update the posture feed.

Minimum Compliance Module Version

The minimum compliance module version is updated from the AnyConnect.

Advance Condition

Field Name

Guidelines

Check against latest AV definition file version, if available

(Available only when you choose Definition check type) Choose to check the antivirus definition file version on the client against the latest antivirus definition file version, if available as a result of posture updates in Cisco ISE. Otherwise, this option allows you to check the definition file date on the client against the latest definition file date in Cisco ISE.

Allow virus definition file to be (Enabled)

(Available only when you choose Definition check type) Choose to check the antivirus definition file version and the latest antivirus definition file date on the client. The latest definition file date cannot be older than that you define in the next field (days older than field) from the latest antivirus definition file date of the product or the current system date.

If unchecked, Cisco ISE allows you to check only the version of the antivirus definition file using the Check against latest AV definition file version, if available option.

Days Older than

Define the number of days that the latest antivirus definition file date on the client can be older from the latest antivirus definition file date of the product or the current system date. The default value is zero (0).

Latest File Date

Choose to check the antivirus definition file date on the client, which can be older by the number of days that you define in the days older than field.

If you set the number of days to the default value (0), then the antivirus definition file date on the client should not be older than the latest antivirus definition file date of the product.

Current System Date

Choose to check the antivirus definition file date on the client, which can be older by the number of days that you define in the days older than field.

If you set the number of days to the default value (0), then the antivirus definition file date on the client should not be older than the current system date.

Antispyware Compound Condition Settings

The following table describes the fields in the AS Compound Conditions window. In the Cisco ISE GUI, click the Menu icon () and choose Policy > Policy Elements > Conditions > AS Compound Condition.

Table 10. Antispyware Compound Condition Settings

Field Name

Usage Guidelines

Name

Enter the name of the antispyware compound condition that you want to create.

Description

Enter the description of the antispyware compound condition that you want to create.

Operating System

Selecting an operating system allows you to check the installation of an antispyware program on your client, or check the latest antispyware definition file updates to which the condition is applied.

Vendor

Choose a vendor from the drop-down list. The selection of Vendor retrieves their antispyware products and versions, which are displayed in the Products for Selected Vendor table.

Check Type

Choose if you want to choose a type whether to check an installation, or check the latest definition file update on the client.

Installation

Choose if you want to check only the installation of an antispyware program on the client.

Definition

Choose if you want to check only the latest definition file update of an antispyware product on the client.

Allow Virus Definition File to be (Enabled)

Check this check box when you are creating antispyware definition check types, and disabled when creating antispyware installation check types.

If checked, the selection allows you to check antispyware definition file version and the latest antispyware definition file date on the client. The latest definition file date cannot be older than that you define in the days older than field from the current system date.

If unchecked, the selection allows you to check only the version of the antispyware definition file as the Allow virus definition file to be check box is not checked.

Days Older than

Define the number of days that the latest antispyware definition file date on the client can be older from the current system date. The default value is zero (0).

Current System Date

Choose to check the antispyware definition file date on the client, which can be older by the number of days that you define in the days older than field.

If you set the number of days to the default value (0), then the antispyware definition file date on the client should not be older than the current system date.

Products for Selected Vendor

Choose an antispyware product from the table. Based on the vendor that you select in the New Anti-spyware Compound Condition page, the table retrieves information on their antispyware products and their version, remediation support that they provide, latest definition file date and its version.

The selection of a product from the table allows you to check for the installation of an antispyware program, or check for the latest antispyware definition file date, and its latest version.

Antimalware Condition Settings

The antimalware condition is a combination of the antispyware and antivirus conditions and is supported by OESIS version 4.x or later compliance module.

To view this window, click the Menu icon () and choose Policy > Policy Elements > Conditions > Posture > Antimalware Condition.


Note


It is recommended that you manually update the installed Antimalware products to have the latest definitions at least once. Otherwise, the posture checks using AnyConnect for Antimalware definitions might fail.


Field Name

Usage Guidelines

Name

Enter a name for the antimalware condition.

Description

Enter a description for the antimalware condition.

Operating System

Choose an operating system to check the installation of antimalware programs on your client, or check the latest antimalware definition file updates to which the condition is applied. It supports Windows, macOS, and Linux operating systems.

Vendor

Choose a vendor from the drop-down list. The selected vendor's antimalware products, versions, latest definition dates, latest definition versions, and minimum compliance module versions are displayed in the Products for Selected Vendor table.

Check Type

Choose one of the following options:

  • Installation: Choose this option to check only the installation of an antimalware program on the client.

  • Definition: Choose this option to check only the latest definition file update of an antimalware product on the client.

Check Against Latest AV Definition File Version, if Available

(Available only when you choose Definition check type) Choose this option to check the antimalware definition file version on the client against the latest antimalware definition file version, if available as a result of posture updates in Cisco ISE. Otherwise, this option allows you to check the definition file date on the client against the latest definition file date in Cisco ISE.

This check will only work if there is a value listed in Cisco ISE for the Latest Definition Date or Latest Definition Version field for the selected product. Otherwise, the Current System Date field must be used.

Allow Virus Definition File to be

(Available only when you choose Definition check type) Choose this option to check the antimalware definition file version and the latest antimalware definition file date on the client. The latest definition file date cannot be older than that you define in the Days Older Than field.

If unchecked, Cisco ISE allows you to check only the version of the antimalware definition file using the Check against latest AV definition file version option.

Days Older Than

Define the number of days that the latest antimalware definition file date on the client can be older than the latest antimalware definition file date of the product or the current system date. The default value is zero.

Latest File Date

Choose this option to define the number of days that the latest antimalware definition file date on the client can be older than the latest antimalware definition file date of the product.

If you set the number of days to the default value, then the antimalware definition file date on the client should not be older than the latest antimalware definition file date of the product.

This check works only if there is a value listed in Cisco ISE for the Latest Definition Date field for the selected product. Otherwise, the Current System Date field must be used.

Current System Date

Choose this option to define the number of days that the latest antimalware definition file date on the client can be older than the current system date.

If you set the number of days to the default value, then the antimalware definition file date on the client should not be older than the current system date.

For an antimalware condition for Carbon Black Cloud 3.x on Mac OS to be successful, the condition must meet the following requirements:

  • The compliance module must be greater than 4.3.2741.

  • The condition must be associated with the vendor VMware, Inc.

When you upgrade from one Cisco ISE release to another with a preconfigured Carbon Black Cloud 3.x condition, after a posture feed update, two Carbon Black Cloud 3.x conditions are listed in the Advanced Conditions area of the Anti-Malware Condition windows.

You must delete the Carbon Black Cloud 3.x condition associated with the vendor Carbon Black, Inc. You must reconfigure any existing antimalware conditions that use the Carbon Black Cloud 3.x from Carbon Black, Inc. to use the condition from the vendor VMware, Inc.

Dictionary Simple Condition Settings

The following table describes the fields in the Dictionary Simple Conditions window. In the Cisco ISE GUI, click the Menu icon () and choose Policy > Policy Elements > Conditions > Posture > Dictionary Simple Condition.

Table 11. Dictionary Simple Condition Settings

Field Name

Usage Guidelines

Name

Enter the name of the dictionary simple condition that you want to create.

Description

Enter the description of the dictionary simple condition that you want to create.

Attribute

Choose an attribute from the dictionary.

Operator

Choose an operator to associate a value to the attribute that you have selected.

Value

Enter a value that you want to associate to the dictionary attribute, or choose a predefined value from the drop-down list.

Dictionary Compound Condition Settings

Table 12. Dictionary Compound Condition Settings

Field Name

Usage Guidelines

Name

Enter the name of the dictionary compound condition that you want to create.

Description

Enter the description of the dictionary compound condition that you want to create.

Select Existing Condition from Library

Define an expression by selecting pre-defined conditions from the policy elements library or add ad-hoc attribute/value pairs to your expression in the subsequent steps.

Condition Name

Choose dictionary simple conditions that you have already created from the policy elements library.

Expression

The Expression is updated based on your selection from the Condition Name drop-down list.

AND or OR operator

Choose an AND, or an OR operator to logically combine dictionary simple conditions, which can be added from the library.

Click the Action icon to do the following:

  • Add Attribute/Value

  • Add Condition from Library

  • Delete

Cisco ISE will process each OR condition in a compound condition sequentially. For example, if a compound condition checks for A OR B, Cisco ISE first checks A and then B. If either condition A or B is passed, the overall result is marked as passed.

If condition A fails and condition B succeeds, then the overall result is marked as passed. In this case, condition A is marked as failed and condition B as passed in the posture reports.

If condition A succeeds, Cisco ISE skips condition B and marks the overall result as passed. In the posture reports, condition A is marked as passed, condition B as skipped, and the overall result as passed.

Create New Condition (Advance Option)

Select attributes from various system or user-defined dictionaries.

You can also add predefined conditions from the policy elements library in the subsequent steps.

Condition Name

Choose a dictionary simple condition that you have already created.

Expression

From the Expression drop-down list, you can create a dictionary simple condition.

Operator

Choose an operator to associate a value to an attribute.

Value

Enter a value that you want to associate to the dictionary attribute, or choose a value from the drop-down list.

Patch Management Condition Settings

The following table describes the fields in the Patch Management Conditions window. To view this window, click the Menu icon () and choose Policy > Policy Elements > Conditions > Posture > Patch Management Condition.

Table 13. Patch Management Condition

Field Name

Usage Guidelines

Name

Enter the name of the patch management condition.

Description

Enter a description for the patch management condition.

Operating System

Choose an operating system to check the installation of a patch management software on the endpoint, or check the latest patch management definition file updates to which the condition is applied. You can select Windows, macOS, or Linux OS. You can also select more than one version of an operating system to create the patch management condition.

Vendor Name

Choose a vendor from the Vendor Name drop-down list. Based on your selection, the patch management products and their supported versions, check type, and minimum compliant module support details are displayed in the Products for Selected Vendor table. The list in the table changes according to the selected operating system.

Check Type

Choose one of the following options:
  • Installation: To check if the selected product is installed on the endpoint. This check type is supported by all vendors.

    Note

     
    For the Cisco Temporal Agent, you can only view the Patch Management conditions containing the Installation check type in the Requirements window.
  • Enabled: To check if the selected product is enabled on the endpoint. Verify if the vendor's product supports the chosen check type by referring to the Products for Selected Vendor list.

  • Up to Date: To check if the selected product does not have missing patches. Verify if the vendor's product supports the chosen check type by referring to the Products for Selected Vendor list.

Click the Products for Selected Vendor drop-down list to view the list of products that the vendor you have specified in the Vendor Name field supports. For example, if you have selected Vendor A that has two products, namely Product 1 and Product 2. Product 1 may support the Enabled option, whereas Product 2 might not. Or, if Product 1 does not support any of the check types, it is grayed out.

Note

 
(Applicable for Cisco ISE 2.3 and above, and AnyConnect 4.5 and above) If you select the Up to Date Check Type in the Patch Management condition with SCCM, then Cisco ISE:
  1. Uses the Microsoft API to check the current security patch for the specified severity level.

  2. Triggers the Patch Management remediation for that missing security patch.

Check Patches Installed

(Available only when you select the Up To Date check type) You can configure severity levels for missing patches, which are then deployed based on the severity. Choose one of the following options:
  • Critical Only: To check if critical software patches are installed on the endpoints in your deployment.

  • Important and Critical: To check if important and critical software patches are installed on the endpoints in your deployment.

  • Moderate, Important, and Critical: To check if moderate, important, and critical software patches are installed on the endpoints in your deployment.

  • Low To Critical: To check if low, moderate, important, and critical software patches are installed on the endpoints in your deployment.

  • All: To install the missing patches for all severity levels.

Disk Encryption Condition Settings

The following table describes the fields in the Disk Encryption Condition window. In the Cisco ISE GUI, click the Menu icon () and choose Policy > Policy Elements > Conditions > Posture > Disk Encryption Condition.

Table 14. Disk Encryption Condition Settings

Field Name

Usage Guidelines

Name

Enter the name of the disk encryption condition that you want to create.

Description

Enter a description for the disk encryption condition.

Operating System

Select an operating system of the end point, whose disk is to be checked for encryption. You can select the Windows OS or macOS. You can also select more than one version of an operating system to create the disk encryption condition.

Vendor Name

Choose a vendor name from the drop-down list. The data encryption products of a vendor, and their supported version, the encryption state check, and the minimum compliant module support are retrieved and displayed in the Products for Selected Vendor table. The list in the table changes according to the selected operating system.

Location

Enabled only when an option is checked in the Products for Selected Vendor section. Select any one of the following options:

  • Specific Location: To check if the specified disk drive is encrypted in the end point, (for example, C: for Windows OS) or a specified volume label is encrypted, (for example, Mackintosh HD for macOS).

  • System Location: To check if the default Windows OS system drive or macOS hard drive is encrypted in the end point.

  • All Internal Drives: To check the internal drives. Includes all hard disks that are mounted and encrypted, and all internal partitions. Excludes read only drives, system recovery disk/partition, boot partition, network partitions, and the different physical disk drives that are external to the endpoint (including but not limited to disk drives connected via USB and Thunderbolt). Encryption software products that are validated include:

    • Bit-locker-6.x/10.x

    • Checkpoint 80.x on Windows 7

Encryption State

The Encryption State checkbox is disabled when the selected product does not support encryption state check. The repeater is displayed only when the checkbox is checked. You can select the Fully Encrypted option to check if the client's disk drive is wholly encrypted.

If you create a condition, for example for TrendMicro, and select two vendors—one with the Encryption State "Yes" and another with the Encryption State "No", then the Encryption State will be disabled because one of the Vendor Encryption States is "No".

Note


You can click the repeater to add more Locations and the relationship between each location is the logical AND operator.

USB Condition Settings

The following table describes the fields in the USB Condition window. In the Cisco ISE GUI, click the Menu icon () and choose Work Centers > Posture > Policy Elements > USB. In the Cisco ISE GUI, click the Menu icon () and choose Policy > Policy Elements > Conditions > Posture > USB Condition

The USB check is a predefined condition and supports only Windows OS.

Table 15. USB Condition Settings

Field Name

Usage Guidelines

Name

USB_Check

Description

Cisco predefined check

Operating System

Windows

Compliance Module

A display-only field for ISE posture compliance module support for version 4.x (and later).

Hardware Attributes Condition Settings

In the Cisco ISE GUI, click the Menu icon () and choose Policy > Policy Elements > Hardware Attributes Condition to access the Hardware Attributes Condition window. The following table describes the fields in the Hardware Attributes Condition window.

Field Name

Usage Guidelines

Name

Hardware_Attributes_Check: The default name assigned to the condition.

Description

Cisco predefined check that collects hardware attributes from clients.

Operating System

Windows All or Mac OS

Compliance Module

4.x or later

Posture External DataSource Condition

You can configure conditions to match an endpoints UDID with an external datasource. Currently, only Active Directory is supported. The scripts required on the posture agent to send UDID to Active Directory are not included with ISE.

Configure Posture Policies

A posture policy is a collection of posture requirements that are associated with one or more identity groups and operating systems. The Dictionary Attributes are optional conditions that can be used along with the identity groups and the operating systems to define different policies for the devices.

Cisco ISE provides an option to configure the grace time for the devices that are noncompliant. If a device is found to be noncompliant, Cisco ISE looks for the previously known good state in the posture assessment result cache and provides grace time for the device accordingly. The device is granted access to the network during the grace period. You can configure the grace time period in minutes, hours, or days (up to a maximum of 30 days).

See the section "Posture Policy" in ISE Posture Prescriptive Deployment Guide for more information.


Note


Profiler policy evaluation will not work if both 'Endpoint policies' and 'Logical Profiles' are configured under Other Conditions in Policy > Posture.


Note


  • When the grace period is extended or reduced, if the device goes through the posture flow again (for example, if the Delayed Notification option is enabled, Re-Scan option is selected, device disconnects or reconnects to a network), the new grace period and delayed notification will be applied.

  • Grace period is not applicable for the temporal agent.

  • Grace period is not supported for Linux agent.

  • When a device matches multiple posture policies, with each policy having a different grace period, the device gets the maximum grace period configured among the different policies.

  • The Acceptable Use Policy (AUP) is not displayed when the device is in the grace period.


Before you begin

  • You must understand the Acceptable Use Policy (AUP).

  • You must understand periodic reassessments (PRA).

  • You must use AnyConnect agent 4.7 or higher to see compliance-related notifications. For more information about configuring the AnyConnect agent, see Create AnyConnect Configuration.

Procedure


Step 1

In the Cisco ISE GUI, click the Menu icon () and choose Policy > Posture or Work Centers > Posture > Posture Policy.

Step 2

Use the drop-down arrow to add a new policy.

Step 3

To edit the profile, either double-click a policy or click Edit at the end of the row.

Step 4

From the Rule Status drop-down list, choose Enabled or Disabled.

Step 5

Choose the drop-down under Policy Options, and specify the Grace Period Settings in minutes, hours, or days.

The valid values are:

  • 1 to 90 days

  • 1 to 2,160 hours

  • 1 to 129,600 minutes

By default, this setting is disabled.

Note


Even if the posture assessment result is noncompliant, if the device is found to be previously compliant and the cache is not yet expired, the device is granted access for the amount of time specified in the Grace Period Settings.

Step 6

(Optional) Drag the slider named Delayed Notification to delay the grace period prompt from being displayed to the user until a specific percentage of grace period has elapsed. For example, if the notification delay period is set to 50% and the configured grace period is 10 minutes, Cisco ISE checks the posture status after 5 minutes and displays the grace period notification if the endpoint is found to be noncompliant. Grace period notification is not displayed if the endpoint status is compliant. If the notification delay period is set to 0%, the user is prompted immediately at the beginning of the grace period to remediate the problem. However, the endpoint is granted access until the grace period expires. The default value for this field is 0%. The valid range is from 0 to 95%.

Step 7

In the Rule Name field, enter the name of the policy.

Note


It is a best practice to configure a posture policy with each requirement as a separate rule in order to avoid unexpected results.

Step 8

From the Identity Groups column, select the desired identity group.

You can create posture policies based on user or end-point identity groups.

Step 9

From the Operating Systems column, select the operating system.

Step 10

From the Compliance Module column, select the required compliance module:

  • 4.x or Later: Supports antimalware, disk encryption, patch management, and USB conditions.

  • 3.x or Earlier: Supports antivirus, antispyware, disk encryption, and patch management conditions

  • Any Version—: upports file, service, registry, application, and compound conditions.

Step 11

From the Posture Type column, select the Posture Type.

  • AnyConnect—Deploys the AnyConnect agent to monitor and enforce Cisco ISE policies that require client interaction.

  • AnyConnect Stealth—Deploys the AnyConnect agent to monitor and enforce Cisco ISE posture policies without any client interaction.

  • Temporal Agent—A temporary executable file that is run on the client to check the compliance status.

Step 12

In Other Conditions, you can add one or more dictionary attributes and save them as simple or compound conditions to a dictionary.

Note


The dictionary simple conditions and compound conditions that you create in the Posture Policy window are not displayed while configuring an authorization policy.

Step 13

Specify the requirements in the Requirements field.

Step 14

Click Save.


Configure AnyConnect Workflow

To configure the AnyConnect agent, perform the following steps in Cisco ISE:

Before you begin

In the following Cisco ISE releases, the bug CSCvs39880 results in garbage collection processes that impacted memory space and file replication from a primary PSN to secondary PSNs. Because of this bug, in the following Cisco ISE releases, uploading an agent package in a large Cisco ISE deployment can take about 7 hours and about 40 minutes in a small deployment.

The following are the affected Cisco ISE releases:

3.1 Patch 4 and earlier

3.0 Patch 6 and earlier

2.7 Patch 7 and earlier

In the later Cisco ISE releases, this bug has been fixed resulting in an agent package upload time of about 5 minutes.

Procedure


Step 1

Create an AnyConnect agent profile.

Step 2

Create an AnyConnect configuration for AnyConnect packages.

Step 3

Create a client provisioning policy.

Step 4

(Optional) Create custom posture condition.

Step 5

(Optional) Create custom remediation action.

Step 6

(Optional) Create custom posture requirements.

Step 7

Create a posture policy.

Step 8

Configure the client provisioning policy.

Step 9

Create an authorization profile.

Step 10

Configure the authorization policies.

Step 11

Download and launch AnyConnect.

  1. Connect to the SSID.

  2. Launch a Browser and you will be redirected to the Client Provisioning Portal.

  3. Click Start. This checks if the AnyConnect agent is installed and running.

  4. Click This Is My First Time Here.

  5. Choose Click Here to Download and Launch AnyConnect.

  6. Save the Cisco Anyconnect .exe or .dmg file for Windows or macOS respectively. For Windows, run the .exe file and for macOS, double-click the .dmg file and run the app.


Note


Cisco ISE does not support ARM64 version of AnyConnect for AnyConnect posture flow. Ensure that you do not use the ARM64 version of AnyConnect in the client provisioning policy, otherwise it might cause failure on the client side. Restart the client if AnyConnect is not working properly because of this issue.


Prerequisite for Certificate-Based Conditions

Client Provisioning and Posture Policy rules may include conditions based on certificate attributes. A prerequisite for certificate-based conditions in either the Client Provisioning or Posture Policy is to ensure that there is s a matching Authorization Policy rule based on the same certificate attribute.

For example, you should use the same attribute as shown in the figures, the Issuer – Common Name attribute is used in both Client Provisioning or posture and authorization policies.

Figure 1. Cisco Provisioning Policy
Figure 2. Conditions Studio

Note


ISE server certificate must be trusted in the System Certificate store for AnyConnect 4.6 MR2 and above. Any posture check or remediation that requires elevated privileges will not work if the server is untrusted.

  • Windows OS: The server certificate must be added to the System Certificate store.

  • MAC OS: The server certificate must be added to the System Keychain. It is recommended that you use the command-line utility to trust the certificate. Adding the certificate to the System Keychain using the Keychain Access app might not work if it is already present in the Login Keychain.


Default Posture Policies

The Cisco ISE software comes with a number of pre-configured posture policies that make it easier for you to create the posture policies and profiles. These policies are disabled by default. You can enable these policies based on your requirements. Following are some of the default posture policies.

Rule Name

Description

Requirements

Default_Antimalware_Policy_Mac

Checks if endpoints have any of the supported vendor’s antimalware software (that is recognized by AnyConnect) installed and running in their devices.

Any_AM_Installation

Default_Antimalware_Policy_Win

Checks if endpoints have any of the supported vendor’s antimalware software (that is recognized by AnyConnect) installed and running in their devices.

Any_AM_Installation_Win

Default_AppVis_Policy_Mac

Gathers information and reports all the applications that are installed on a given endpoint.

Default_AppVis_Requirement_Mac

Default_AppVis_Policy_Win

Gathers information and reports all the applications that are installed on a given endpoint.

Default_AppVis_Requirement_Win

Default_Firewall_Policy_Mac

Checks if endpoints have any of the supported vendor’s Firewall program (that is recognized by AnyConnect) installed.

Default_Firewall_Requirement_Mac

Default_Firewall_Policy_Win

Checks if endpoints have any of the supported vendor’s Firewall program (that is recognized by AnyConnect) installed.

Default_Firewall_Requirement_Win

Default_USB_Block_Win

Ensures that the endpoint device does not have any USB storage devices connected.

USB_Block

Client Posture Assessment

To ensure that the imposed network security measures remain relevant and effective, Cisco ISE enables you to validate and maintain security capabilities on any client machine that accesses the protected network. By employing posture policies that are designed to ensure that up-to-date security settings or applications are available on client machines, the Cisco ISE administrator can ensure that any client machine that accesses the network meets, and continues to meet, the defined security standards for enterprise network access. Posture compliance reports provide Cisco ISE with a snapshot of the compliance level of the client machine at the time of user login, as well as any time a periodic reassessment occurs.

Posture assessment and compliance occurs using one of the following agent types available in Cisco ISE:

  • AnyConnect ISE Agent: A persistent agent that can be installed on Windows or Mac OS X client to perform posture compliance functions.

  • Cisco Temporal Agent: A temporary executable file that is run on the client to check the compliance status. The agent is removed from the client machine after the login session is terminated. By default, the agent resides in the Cisco ISE ISO image, and is uploaded to Cisco ISE during installation.

Posture Assessment Options

The following table provides a list of posture assessment (posture conditions) options that are supported by the Cisco ISE Posture Agents for Windows and MacOS, and the Web Agent for Windows.

Table 16. Posture Assessment Options

ISE Posture Agent for Windows

Cisco Temporal Agent for Windows

ISE Posture Agent for MacOS

Cisco Temporal Agent for MacOS

Operating System/Service Packs/Hotfixes

Service Check

Service Check (Temporal agent 4.5)

Service Check

Daemon checks are not supported

Registry Check

Registry Check (Temporal agent 4.5)

File Check

File Check (Temporal agent 4.5)

File Check

File Check (Temporal agent 4.5)

Application Check

Application Check (Temporal agent 4.5)

Application Check

Application Check (Temporal agent 4.5)

Antivirus Installation

Antimalware Installation

Antivirus Installation

Antimalware Installation

Antivirus Version/ Antivirus Definition Date

OPSWAT version 4 is used, hence no Antivirus/Antispyware support; only Antimalware is supported

Antivirus Version/ Antivirus Definition Date

OPSWAT version 4 is used, hence no Antivirus/Antispyware support; only Antimalware is supported

Antispyware Installation

OPSWAT version 4 is used, hence no Antivirus/Antispyware support; only Antimalware is supported

Antispyware Installation

OPSWAT version 4 is used, hence no Antivirus/Antispyware support; only Antimalware is supported

Antispyware Version/ Antispyware Definition Date

OPSWAT version 4 is used, hence no Antivirus/Antispyware support; only Antimalware is supported

Antispyware Version/ Antispyware Definition Date

OPSWAT version 4 is used, hence no Antivirus/Antispyware support; only Antimalware is supported

Patch Management Check

Only Patch Management installation check

Patch Management Check

Windows Update Running

Windows Update Configuration

WSUS Compliance Settings

Posture Remediation Options

The following table provides a list of posture remediation options that are supported by the Cisco ISE Posture Agents for Windows and MacOS, and the Web Agent for Windows.

Table 17. Posture Remediation Options

ISE Posture Agent for

Windows

ISE Posture Agent for

MacOS

Message Text (Local Check)

Message Text (Local Check)

URL Link (Link Distribution)

URL Link (Link Distribution)

File Distribution

Launch Program

Antivirus Definition Update

Antivirus Live Update

Antispyware Definition Update

Antispyware Live Update

Patch Management Remediation

Windows Update

WSUS

ISE Community Resource

Cisco ISE and SCCM Integration Workflow

Custom Conditions for Posture

A posture condition can be any one of the following simple conditions: a file, a registry, an application, a service, or a dictionary condition. One or more conditions from these simple conditions form a compound condition, which can be associated with a posture requirement.

After an initial posture update, Cisco ISE also creates Cisco-defined simple and compound conditions. Cisco-defined simple conditions use the pc_ as and compound conditions use pr_ as.

A user-defined condition or a Cisco-defined condition includes both simple and compound conditions.

Posture service makes use of internal checks based on antivirus and antispyware (AV/AS) compound conditions. Hence, posture reports do not reflect the exact AV/AS compound-condition names that you have created. The reports display only the internal check names of AV/AS compound conditions.

For example, if you have created an AV compound condition named "MyCondition_AV_Check" to check any Vendor and any Product, the posture reports will display the internal check, that is “av_def_ANY”, as the condition name, instead of "MyCondition_AV_Check".

Posture Endpoint Custom Attributes

You can use the posture endpoint custom attributes to create client provisioning and posture policies. You can create a maximum of 100 endpoint custom attributes. The following types of endpoint custom attributes are supported: Int, String, Long, Boolean, Float, IP, and Date.

Endpoint custom attributes can be used to allow or block devices based on certain attributes or to assign certain privileges based on the posture or client provisioning policies.

Create Posture Policy Using Endpoint Custom Attributes

To create a posture policy using endpoint custom attributes:

Procedure


Step 1

Create the endpoint custom attributes.

  1. In the Cisco ISE GUI, click the Menu icon () and choose Administration > Identity Management > Settings > Endpoint Custom Attributes.

  2. Enter the Attribute Name (for example, deviceType) and Data Type (for example, String) in the Endpoint Custom Attributes area.

  3. Click Save.

Step 2

Assign values to the custom attributes.

  1. In the Cisco ISE GUI, click the Menu icon () and choose Context Visibility > Endpoints.

  2. Assign the custom attribute values.

    • Check the required MAC address check box, and then click Edit.

    • Or, click the required MAC address, and then click Edit in the Endpoints page.

  3. Ensure that the custom attribute that you created is displayed in the Custom Attributes area in the Edit Endpoint dialog box.

  4. Click Edit and enter the required attribute value (for example, deviceType = Apple-iPhone).

  5. Click Save.

Step 3

Create a posture policy using the custom attributes and values.

  1. In the Cisco ISE GUI, click the Menu icon () and choose Work Centers > Posture > Posture Policy.

  2. Create the required policy. Choose the custom attributes by clicking Other Conditions and select the required dictionary (for example, choose Endpoints > deviceType, the custom attribute that you created in Step 1). For more information, see the Configure Cisco Temporal Agent Workflow.

  3. Click Save.


To create a client provisioning policy using endpoint custom attributes:

  1. In the Cisco ISE GUI, click the Menu icon () and choose Work Centers > Posture > Client Provisioning > Client Provisioning Policy.

  2. Create the required policy.

    • Create the required rule (for example, Rule Name=WindowsAll, if Identity Groups=Any and Operating Systems=Windows All and Other Conditions=Conditions, then Results=AC_Win_44117).

    • Choose the custom attributes by clicking Other Conditions and selecting the required dictionary.

Custom Posture Remediation Actions

A custom posture remediation action is a file, a link, an antivirus or antispyware definition updates, launching programs, Windows updates, or Windows Server Update Services (WSUS) remediation types.

Add an Antispyware Remediation

You can create an antispyware remediation, which updates clients with up-to-date file definitions for compliance after remediation.

The AS Remediations window displays all the antivirus remediations along with their name and description and their modes of remediation.

Procedure


Step 1

In the Cisco ISE GUI, click the Menu icon () and choose Policy > Policy Elements > Results > Posture.

Step 2

Click Remediation Actions.

Step 3

Click AS Remediation.

Step 4

Click Add.

Step 5

Modify the values in the New AS Remediations window.

Step 6

Click Submit.


Add an Antivirus Remediation

You can create an antivirus remediation, which updates clients with up-to-date file definitions for compliance after remediation.

The AV Remediations window displays all the antivirus remediations along with their name and description and their modes of remediation.

Procedure


Step 1

In the Cisco ISE GUI, click the Menu icon () and choose Policy > Policy Elements > Results > Posture.

Step 2

Click Remediation Actions.

Step 3

Click AV Remediation.

Step 4

Click Add.

Step 5

Modify the values in the New AV Remediation window.

Step 6

Click Submit.


Add a File Remediation

A file remediation allows clients to download the required file version for compliance. The client agent remediates an endpoint with a file that is required by the client for compliance.

You can filter, view, add, or delete file remediations in the File Remediations window, but you cannot edit file remediations. The File Remediations window displays all the file remediations along with their name and description and the files that are required for remediation.

Procedure


Step 1

In the Cisco ISE GUI, click the Menu icon () and choose Policy > Policy Elements > Results > Posture.

Step 2

Click Remediation Actions.

Step 3

Click File Remediation.

Step 4

Click Add.

Step 5

Enter the name and description of the file remediation in the Name and Description fields.

Step 6

Modify the values in the New File Remediation window.

Step 7

Click Submit.


Add a Script Remediation

You can create and upload posture remediation scripts into Cisco ISE to solve non-compliance issues in endpoints.

Before you begin

Procedure


Step 1

In the Cisco ISE GUI, click the Menu icon () and choose Policy > Policy Elements > Results > Posture.

Step 2

Click Remediation Actions.

Step 3

Click Script Remediations.

Step 4

Click Add.

Step 5

Enter the Name and Description of the script.

Step 6

Choose the Operating System and Remediation Type from the corresponding drop-down lists.

If you choose the Windows operating system, the Script Type and Windows PowerShell Execution policy fields are displayed. Choose the required script type and execution policy by clicking the corresponding radio buttons.

Step 7

From the Remediation Type drop-down list, choose Automatic or Manual.

Note

 
  • Only automatic remediation is supported for Linux agent. Manual remediation is not supported.

  • Only shell scripts are supported for Linux agent.

Step 8

Enter the Interval and Retry Count. The valid range is 0 to 999.

Step 9

Click Choose File, next to File To Upload and select the script that you want to upload from your local system.

Step 10

To run the script as an administrator, click the Administrator/ Root radio button. To run the script as a logged-in user, click the Logged-in User radio button.

Step 11

Click Submit.

Step 12

In the Cisco ISE GUI, click the Menu icon () and choose Operations > Reports > Endpoints and Users > Posture Script Remediation to check the status of the remediation script execution.

One of the following statuses is displayed: :

  • Remediation script execution was successful.

  • Remediation was attempted, and the script exited with failure.

  • Remediation was not attempted (default).

  • Remediation attempt failed. The script failed an integrity check as the policy included might have been tampered with.

  • Remediation attempt failed. Client failed to download the script.

  • Remediation attempt failed. The script failed an integrity test as the script might be corrupt or has been tampered with.

  • Remediation attempt failed. The script was executed but did not exit in time (timeout).

  • Remediation attempt failed. A generic internal system failure occurred.

  • Remediation attempt failed. The script type is not supported.

  • Remediation attempt failed. Failure with launching the script.

  • Certificate verification failure. Client could not verify the server certificate presented by Cisco ISE.


Establish Trust to Execute Script Condition

You must establish trust to be able to execute the scripts on endpoints and make sure that the Cisco ISE server is not compromised. A Cisco ISE environment can have one or more PSNs configured. Every PSN has a valid certificate chain. The certificate chain starts with any certificate, followed by an intermediate certificate or a root CA certificate. You can use any certificate in the certificate chain for fingerprint verification.

You can configure the SHA-256 fingerprint of any certificate in the certificate chain in the AnyConnectLocalPolicy’s profile editor. For example, the following command generates the SHA-256 fingerprint of a certificate with the name input.cer:

openssl x509 -inform DER -in <input.cer> -out <output.crt>
openssl x509 -in <output.crt> -fingerprint -noout -sha256

The following is an example of the output:

openssl x509 -in 535-pos.crt -fingerprint -noout -sha256
SHA256 Fingerprint=B9:42:7F:85:09:18:30:40:06:0B:DB:9C:48:36:F0:60:90:75:AB:D3:E9:83:AB:1A:BF:01:8F:6E:F0:11:9A:B5

The following example shows the new tag in AnyConnectLocalPolicy.xml:

<TrustedISECertFingerprints>
<fingerprint>
<algorithm>SHA-256</algorithm>
<hash>B9:42:7F:85:09:18:30:40:06:0B:DB:9C:48:36:F0:60:90:75:AB:D3:E9:83:AB:1A:BF:01:8F:6E:F0:11:9A:B5</hash>
</fingerprint>
</TrustedISECertFingerprints>

Note


An SHA-256 fingerprint can be added with or without a colon. You can add the fingerprint in either of the following formats: B9:42:7F:85:09:18:30:40:06:0B:DB:9C:48:36:F0:60:90:75:AB:D3:E9:83:AB:1A:BF:01:8F:6E:F0:11:9A:B5 or B9427F8509183040060BDB9C4836F0609075ABD3E983AB1ABF018F6EF0119AB5. Fingerprints are not case-sensitive.


The agent matches the Cisco ISE certificate fingerprint with the trusted certificate fingerprint (present in AnyConnectLocalPolicy.xml) while fetching the script. If an endpoint does not have a valid certificate fingerprint, the script is not executed on the endpoint.


Note


If fingerprints are configured in AnyConnectLocalPolicy.xml, they are used to validate Cisco ISE trust for all flows. If the certificate is not trusted or if there is a fingerprint mismatch, no error messages are displayed. However, the following error message is included in the Posture Script Condition report (Operations > Reports > Endpoints and Users):

Condition Script certificate verification failed. Client could not verify the server certificate presented by Cisco ISE.


Script Download

When a posture check fails and when the relevant remediation action is triggered, AnyConnect downloads the script from the HTTPS URL configured in the posture policy. The following conditions must be met for the script to get downloaded:

  • Trusted fingerprints should exist in AnyConnectLocalPolicy.xml.

  • The fingerprint presented by the HTTPS URL should match the trusted certificate fingerprint present in AnyConnectLocalPolicy.xml.

Add a Launch Program Remediation

You can create a launch program remediation, where the client agent remediates clients by launching one or more applications for compliance.

The Launch Program Remediations page displays all the launch program remediations along with their name and description and their modes of remediation.

Procedure


Step 1

In the Cisco ISE GUI, click the Menu icon () and choose Policy > Policy Elements > Results > Posture.

Step 2

Click Remediation Actions.

Step 3

Click Launch Program Remediation.

Step 4

Click Add.

Step 5

Modify the values in the New Launch Program Remediation page.

Step 6

Click Submit.


Troubleshoot Launch Program Remediation

Problem

When an application is launched as a remediation using Launch Program Remediation, the application is successfully launched (observed in the Windows Task Manager), however, the application UI is not visible.

Solution

The Launch program UI application runs with system privileges, and is visible in the Interactive Service Detection (ISD) window. To view the Launch program UI application, ISD should be enabled for the following OS:

  • Windows Vista: ISD is in stop state by default. Enable ISD by starting ISD service in services.msc.

  • Windows 7: ISD service is enabled by default.

  • Windows 8/8.1: Enable ISD by changing "NoInteractiveServices" from 1 to 0 in the registry: \HKEY_LOCAL_MACHINE \ SYSTEM \ CurrentControlSet \ Control \ Windows.

Add a Link Remediation

A link remediation allows clients to click a URL to access a remediation window or resource. The client agent opens a browser with the link and allow the clients to remediate themselves for compliance.

The Link Remediation window displays all the link remediations along with their name and description and their modes of remediation.

Procedure


Step 1

In the Cisco ISE GUI, click the Menu icon () and choose Policy > Policy Elements > Results > Posture.

Step 2

Click Remediation Actions.

Step 3

Click Link Remediation.

Step 4

Click Add.

Step 5

Modify the values in the New Link Remediation window.

Step 6

Click Submit.


Add a Patch Management Remediation

You can create a patch management remediation, which updates clients with up-to-date file definitions for compliance after remediation.

The Patch Management Remediation window displays the remediation type, patch management vendor names, and various remediation options.

Procedure


Step 1

In the Cisco ISE GUI, click the Menu icon () and choose Policy > Policy Elements > Results > Posture.

Step 2

Click Remediation Actions.

Step 3

Click Patch Mangement Remediation.

Step 4

Click Add.

Step 5

Modify the values in the Patch Management Remediation window.

Step 6

Click Submit to add the remediation action to the Patch Management Remediations window.


Add a Windows Server Update Services Remediation

You can configure Windows clients to receive the latest WSUS updates from a locally administered or a Microsoft-managed WSUS server for compliance. A Windows Server Update Services (WSUS) remediation installs latest Windows service packs, hotfixes, and patches from a locally managed WSUS server or a Microsoft-managed WSUS server.

You can create a WSUS remediation where the client agent integrates with the local WSUS Agent to check whether the endpoint is up-to-date for WSUS updates.

Procedure


Step 1

In the Cisco ISE GUI, click the Menu icon () and choose Policy > Policy Elements > Results > Posture.

Step 2

Click Remediation Actions.

Step 3

Click Windows Server Update Services Remediation.

Step 4

Click Add.

Step 5

Modify the values in the New Windows Server Update Services Remediation window.

Step 6

Click Submit.


Add a Windows Update Remediation

The Windows Update Remediations page displays all the Windows update remediations along with their name and description and their modes of remediation.

Procedure


Step 1

In the Cisco ISE GUI, click the Menu icon () and choose Policy > Policy Elements > Results > > Posture..

Step 2

Click Remediation Actions.

Step 3

Click Windows Update Remediation.

Step 4

Click Add.

Step 5

Modify the values in the New Windows Update Remediation window.

Step 6

Click Submit.


Posture Assessment Requirements

A posture requirement is a set of compound conditions with an associated remediation action that can be linked with a role and an operating system. All the clients connecting to your network must meet mandatory requirements during posture evaluation to become compliant on the network.

Posture-policy requirements can be set to mandatory, optional, or audit types in posture policies. If requirements are optional and clients fail these requirements, then the clients have an option to continue during posture evaluation of endpoints.

Figure 3. Posture Policy Requirement Types

Mandatory Requirements

During policy evaluation, the agent provides remediation options to clients who fail to meet the mandatory requirements defined in the posture policy. End users must remediate to meet the requirements within the time specified in the remediation timer settings.

For example, you have specified a mandatory requirement with a user-defined condition to check the existence of C:\temp\text.file in the absolute path. If the file does not exist, the mandatory requirement fails and the user will be moved to Non-Compliant state.

Optional Requirements

During policy evaluation, the agent provides an option to clients to continue, when they fail to meet the optional requirements specified in the posture policy. End users are allowed to skip the specified optional requirements.

For example, you have specified an optional requirement with a user-defined condition to check for an application running on the client machine, such as Calc.exe. Although, the client fails to meet the condition, the agent prompts an option to continue further so that the optional requirement is skipped and the end user is moved to Compliant state.

Audit Requirements

Audit requirements are specified for internal purposes and the agent does not prompt any message or input from end users, regardless of the pass or fail status during policy evaluation.

For example, you are in the process of creating a mandatory policy condition to check if end users have the latest version of the antivirus program. If you want to find out the non-compliant end users before actually enforcing it as a policy condition, you can specify it as an audit requirement.

Visibility Requirements

During policy evaluation, the agent reports compliance data for visibility requirements, every five to ten minutes.

Client System Stuck in Noncompliant State

If a client machine is unable to remediate a mandatory requirement, the posture status changes to “noncompliant” and the agent session is quarantined. To get the client machine past this “noncompliant” state, you need to restart the posture session so that the agent starts posture assessment on the client machine again. You can restart the posture session as follows:

  • In wired and wireless Change of Authorization (CoA) in an 802.1X environment:

    • You can configure the Reauthentication timer for a specific authorization policy when you create a new authorization profile in the New Authorization Profiles window.

    • Wired users can get out of the quarantine state once they disconnect and reconnect to the network. In a wireless environment, the user must disconnect from the wireless lan controller (WLC) and wait until the user idle timeout period has expired before attempting to reconnect to the network.

  • In a VPN environment—Disconnect and reconnect the VPN tunnel.

Create Client Posture Requirements

You can create a requirement in the Requirements window where you can associate user-defined conditions and Cisco defined conditions, and remediation actions. Once created and saved in the Requirements window, user-defined conditions and remediation actions can be viewed from their respective list windows.


Note


To create a Posture Requirement to validate all Windows 10 hotfixes in the environment, you must configure the Conditions area of your Requirement to include both pr_Win10_32_Hotfixes and pr_Win10_64_Hotfixes. At the top of the conditions, ensure All selected conditions succeed is selected. If the configuration is successful, pr_Win10_32_Hotfixes & pr_Win10_64_Hotfixes will be displayed. To view the details of the validated conditions for an endpoint, from the main menu, choose Operations > Reports > Reports > Endpoints and Users > Posture Assessment by Endpoints. Click the endpoint to view the corresponding posture details.

Figure 4. Validating Posture Requirements in Windows 10

Before you begin

  • You must have an understanding of acceptable use policies (AUPs) for a posture.

Procedure


Step 1

In the Cisco ISE GUI, click the Menu icon () and choose Policy > Policy Elements > Results > Posture > Requirements.

Step 2

Enter the values in the Requirements window.

Step 3

Click Done to save the posture requirement in read-only mode.

Step 4

Click Save.


Posture Reassessment Configuration Settings

The following table describes the fields in the Posture Reassessment Configurations window, which you can use to configure posture reassessment. To view this window, click the Menu icon () and choose Administration > System > Settings > Posture > Reassessments.

Table 18. Posture Reassessment Configuration Settings

Field Name

Usage Guidelines

Configuration Name

Enter the name of PRA configuration.

Configuration Description

Enter a description for PRA configuration.

Use Reassessment Enforcement?

Check the check box to apply the PRA configurations for the user identity groups.

Enforcement Type

Choose the action to be enforced:

  • Continue: The user continues to have the privileged access without any user intervention to remediate the client irrespective of the posture requirement.

  • Logoff: If the client is not compliant, the user is forced to logoff from the network. When the client logs in again, the compliance status is unknown.

  • Remediate: If the client is not compliant, the agent waits for a specified time for the remediation to happen. Once the client has remediated, the agent sends the PRA report to the policy service node. If the remediation is ignored on the client, then the agent sends a logoff request to the policy service node to force the client to logoff from the network.

    If the posture requirement is set to mandatory, then the RADIUS session will be cleared as a result of the PRA failure action and a new RADIUS session has to start for the client to be postured again.

    If the posture requirement is set to optional, then the agent on the client allows the user to click the continue option from the agent. The user can continue to stay in the current network without any restriction.

Interval

Enter a time interval in minutes to initiate PRA on the clients after the first successful login.

The default value is 240 minutes. Minimum value is 60 minutes and maximum is 1440 minutes.

Grace time

Enter a time interval in minutes to allow the client to complete remediation. The grace time cannot be zero, and should be greater than the PRA interval. It can range between the default minimum interval (5 minutes) and the minimum PRA interval.

The minimum value is 5 minutes and the maximum value is 60 minutes.

Note


The grace time is enabled only when the enforcement type is set to remediate action after the client fails the posture reassessment.

Select User Identity Groups

Choose a unique group or a unique combination of groups for your PRA configuration.

PRA configurations

Displays existing PRA configurations and user identity groups associated to PRA configurations.

Custom Permissions for Posture

A custom permission is a standard authorization profile that you define in Cisco ISE. Standard authorization profiles set access privileges based on the matching compliance status of the endpoints. The posture service broadly classifies the posture into unknown, compliant, and noncompliant profiles. The posture policies and the posture requirements determine the compliance status of the endpoint.

You must create three different authorization profiles for an unknown, compliant, and noncompliant posture status of endpoints that can have different set of VLANs, DACLs, and other attribute value pairs. These profiles can be associated with three different authorization policies. To differentiate these authorization policies, you can use the Session:PostureStatus attribute along with other conditions.

Unknown Profile

If no matching posture policy is defined for an endpoint, then the posture compliance status of the endpoint may be set to unknown. A posture compliance status of unknown can also apply to an endpoint where a matching posture policy is enabled but posture assessment has not yet occurred for that endpoint and, therefore no compliance report has been provided by the client agent.


Note


We recommend you to use posture with redirection for all Cisco network access devices.


Compliant Profile

If a matching posture policy is defined for an endpoint, then the posture compliance status of the endpoint is set to compliant. When the posture assessment occurs, the endpoint meets all the mandatory requirements that are defined in the matching posture policy. For an endpoint that is postured compliant, it can be granted privileged network access on your network.

Noncompliant Profile

The posture compliance status of an endpoint is set to noncompliant when a matching posture policy is defined for that endpoint but it fails to meet all the mandatory requirements during posture assessment. An endpoint that is postured noncompliant matches a posture requirement with a remediation action, and it should be granted limited network access to remediation resources in order to remediate itself.

Configure Standard Authorization Policies

You can define two types of authorization policies on the Authorization Policy window, standard exceptions authorization policies. The standard authorization policies that are specific to posture are used to make policy decisions based on the compliance status of endpoints.

Procedure


Step 1

In the Cisco ISE GUI, click the Menu icon () and choose Policy > Policy Sets.

Step 2

In the View column, click the arrow icon adjacent the corresponding Default Policy.

Step 3

In the Actions column, click the cog icon, and then from the dropdown list, choose a new authorization policy.

A new row appears in the Policy Sets table.

Step 4

Enter a rule name.

Step 5

From the Conditions column, click the (+) symbol.

Step 6

Create the required conditions on the Conditions Studio Page. In the Editor section, click the Click To Add an Attribute text box, and select the required Dictionary and Attribute.

You can drag and drop a Library condition to the Click To Add An Attribute text box.

Step 7

Click Use to create a new standard authorization policy in read-only mode.

Step 8

Click Save.


Best Practices for Network Drive Mapping with Posture

During posture assessment of a Windows endpoint, the endpoint user may encounter a delay in accessing the desktop. This may be due to Windows trying to restore the file server drive letter mappings before providing the user access to the desktop. The best practices to avoid the delay during posture are:

  • Endpoints should be able to reach the Active Directory server because the file server drive letter cannot be mapped without reaching the AD. When posture (with AnyConnect ISE posture agent) triggers, it blocks access to AD, causing delay in login. Use Posture Remediation ACLs to provide access to AD servers before posture is completed.

  • You should set a delay for the login script until posture completes and then you have to set the Persistence attribute to NO. Windows tries to reconnect all the network drives during login and this cannot be done until AnyConnect ISE posture agent gains full network access.

Configure AnyConnect Stealth Mode Workflow

The process of configuring AnyConnect in the stealth mode involves a series of steps. You should perform the following steps in Cisco ISE.

Procedure


Step 1

Create an AnyConnect agent profile, see Create an AnyConnect agent profile.

Step 2

Create an AnyConnect configuration for AnyConnect packages, see Create the AnyConnect configuration.

Step 3

Upload a Open DNS Profile in Cisco ISE, see Upload a Open DNS profile in Cisco ISE.

Step 4

Create a Client Provisioning Policy, see Create a client provisioning policy.

Step 5

Create a Posture Condition, see Create the posture condition.

Step 6

Create Posture Remediation, see Create the posture remediation.

Step 7

Create Posture Requirement in Clientless Mode, see Create the posture requirement in Clientless mode.

Step 8

Create Posture Policy, see Create the posture policy.

Step 9

Configure authorization profile.

  1. In the Cisco ISE GUI, click the Menu icon () and choose Policy > Policy Elements > Results > Authorization > Authorization Profiles.

  2. Click Add and enter the Name of the profile.

  3. In Common Tasks, enable Web Redirection (CWA, MDM, NSP, CPP) and choose Client provisioning (Posture) from the drop-down list, enter the redirect ACL name and choose the Client Provisioning Portal Value. You can edit or create a new Client Provisioning Portal in Work Centers > Posture > Client Provisioning > Client Provisioning Portal.

Step 10

Configure authorization policies.

  1. In the Cisco ISE GUI, click the Menu icon () and choose Policy > Policy Sets

  2. Click > and choose Authorization Policy and click on + icon to create a new authorization rule that features Session:Posture Status EQUALS Unknown condition and the authorization profiled configured previously.

  3. Above the previous rule, create a new authorization rule that features Session:Posture Status EQUALS NonCompliant condition and another one that features Session:Posture Status EQUALS Compliant condition.


Create an AnyConnect Agent Profile

Before you begin

You must upload the AnyConnect packages for MAC and Windows OS and the AnyConnect compliance modules.

Procedure


Step 1

In the Cisco ISE GUI, click the Menu icon () and choose Policy > Policy Elements > Results > Client Provisioning > Resources.

Step 2

From the Add drop-down list, choose AnyConnect Posture Profile.

Step 3

From the Posture Agent Profile Settings drop-down list, choose AnyConnect.

Step 4

In the Name field, type the required name (for example, AC_Agent_Profile).

Step 5

In the Agent Behavior section, select the Stealth Mode parameter as Enabled.

Step 6

Click Save.


What to do next

You should create the AnyConnect configuration for the AnyConnect packages.

Create an AnyConnect Configuration for AnyConnect Packages

Procedure


Step 1

In the Cisco ISE GUI, click the Menu icon () and choose Policy > Policy Elements > Results > Client Provisioning > Resources.

Step 2

From the Add drop-down list, choose AnyConnect Configuration.

Step 3

From the Select AnyConnect Package drop-down list, choose the required AnyConnect package.

Step 4

In the Configuration Name text box, type the required Name.

Step 5

In the Compliance Module drop-down list, choose the required compliance module.

Step 6

In the AnyConnect Module Selection section, check the ISE Posture and Network Access Manager check boxes.

Step 7

In the Profile Selection section, from the ISE Posture drop-down list, choose the AnyConnect agent profile.

Step 8

From the Network Access Manager drop-down list, choose the required AnyConnect agent profile.


What to do next

You should upload the Open DNS profile to be pushed to the client.

Upload an Open DNS Profile in Cisco ISE

The Open DNS profile is pushed to the client.

Procedure


Step 1

In the Cisco ISE GUI, click the Menu icon () and choose Policy > Policy Elements > Results > Client Provisioning > Resources.

Step 2

From the Add drop-down list, choose Agent Resources From Local Disk.

Step 3

From the Category drop-down list, choose Customer Created Packages.

Step 4

From the Type drop-down list, choose AnyConnect Profile .

Step 5

In the Name text box, type the required name (for example, OpenDNS).

Step 6

Click Browse and locate the JSON file from the local disk.

Step 7

Click Submit.


What to do next

You should create the client provisioning policy.

Create a Client Provisioning Policy

Procedure


Step 1

In the Cisco ISE GUI, click the Menu icon () and choose Policy > Client Provisioning.

Step 2

Create the required rule (for example, Rule Name=WindowsAll, if Identity Groups=Any and Operating Systems=Windows All and Other Conditions=Conditions, then Results=AC_Win_44117).


What to do next

You should create the posture condition.

Create a Posture Condition

Procedure


Step 1

In the Cisco ISE GUI, click the Menu icon () and choose Policy > Policy Elements > Conditions > Posture > File Condition.

Step 2

Enter the required name (for example, filechk).

Step 3

From the Operating Systems drop-down list, choose Windows 7 (All).

Step 4