Deploy the Firewall Threat Defense Virtual Auto Scale Solution on GCP

Auto Scale Solution

The following sections describe how the components of the Auto Scale solution work for the Firewall Threat Defense Virtual on GCP.

Overview

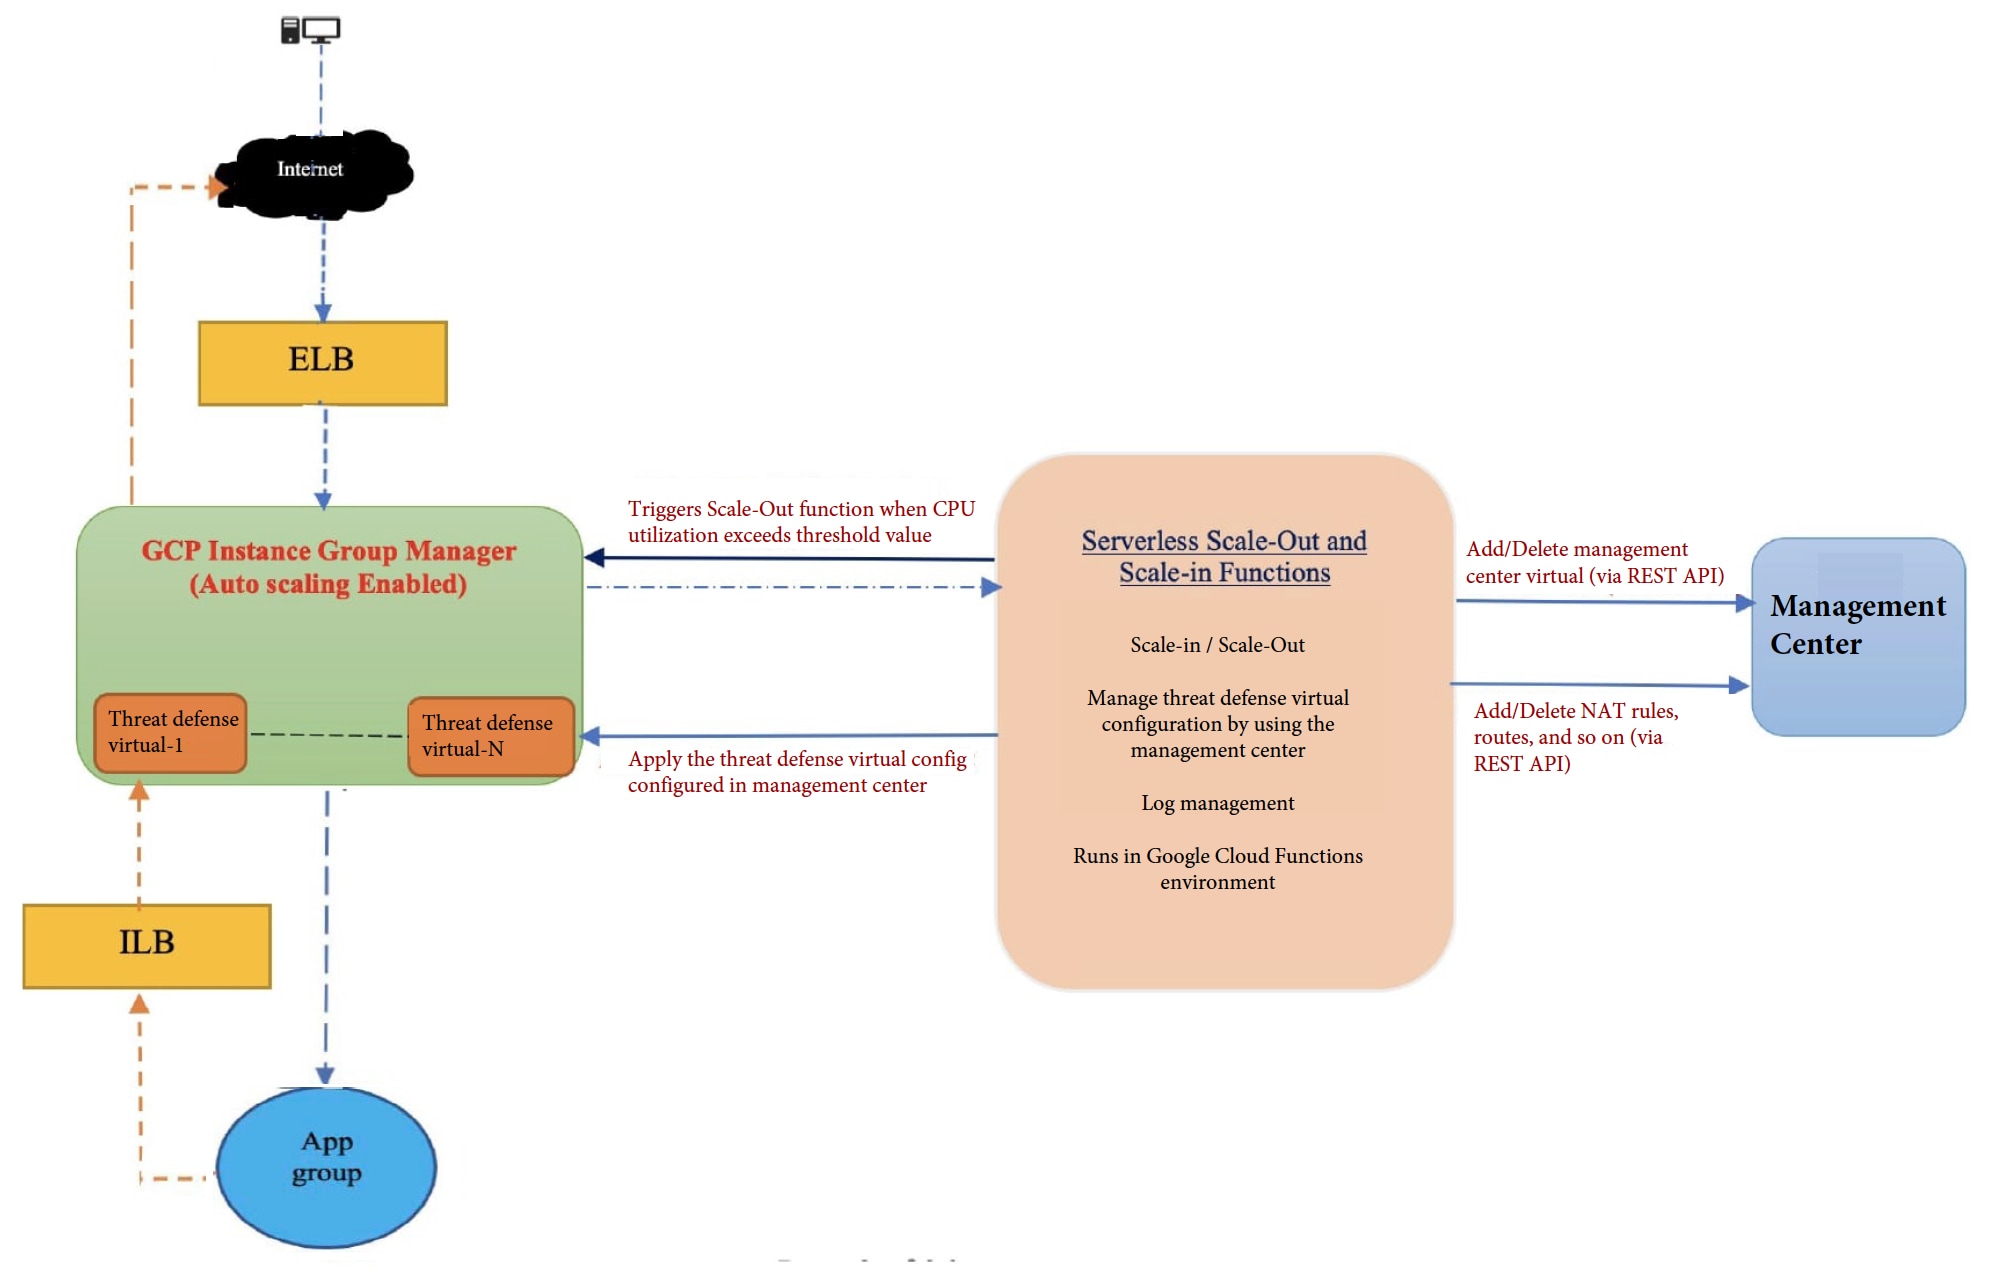
Firewall Threat Defense Virtual Auto Scale for GCP is a complete serverless implementation that makes use of serverless infrastructure provided by GCP (Cloud Functions, Load Balancers, Pub/Sub, Instance Groups, etc.).

Some of the key features of the Firewall Threat Defense Virtual Auto Scale for GCP implementation include:

  • GCP Deployment Manager template-based deployment.

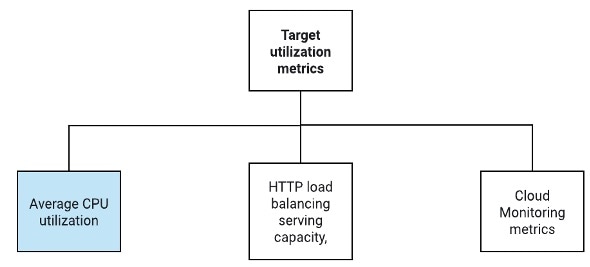
  • Support for scaling metrics based on CPU utilization..

  • Support for Firewall Threat Defense Virtual deployment and multi-availability zones.

  • Support for automatic registration and de-registration of Firewall Threat Defense Virtual.

  • Completely automated configuration automatically applied to scaled-out Firewall Threat Defense Virtual instances.

  • Support for automatic application of NAT policy, access policy, and routes, to Firewall Threat Defense Virtual.

  • Support for Load Balancers and multi-availability zones.

  • Support for Firewall Management Center Virtual on other platforms.

  • Cisco provides an Auto Scale for GCP deployment package to facilitate the deployment.

  • Threat Defense Virtual instances responds to health probes with loopback interface.

Guidelines and Limitations

  • Only IPv4 is supported.

  • Licensing - Only BYOL is supported. PAYG licensing is not supported.

  • Device functionality errors are not displayed in the logs.

  • The maximum number of devices supported is 25. This is the maximum limit in a Firewall Management Center Virtual instance.

  • On all Secure Firewall versions, you can use the provided templates to deploy the Threat Defense Virtual auto scale solution. The Threat Defense Virtual instances are deployed with a minimum of 4 interfaces - 1 management, 1 diagnostic, and 2 data interfaces.

    From Secure Firewall version 7.4.1, you can also deploy the Threat Defense Virtual without the diagnostic interface. In this scenario also, the deployment is done with a minimum of 4 interfaces - 1 management, and 3 data interfaces. To do this, modify the template parameters - diagFirewallRule, diagSubnetworkName, diagVpcName, and withDiagnostic, as per the description given in Input Parameters.

  • Cold standby or Snapshot methods to reduce scale-out time are not supported.

  • Schedule based scaling is not supported.

  • Auto Scaling based on Average Memory Utilization is not supported.

  • Scale-In/Scale-Out may decrease/increase the number of instances by more than 1. However, the Firewall Threat Defense Virtual instances will only deregister/register on the Firewall Management Center Virtual sequentially, that is, one by one.

  • During scale-in, there is a connection draining time of 300s. You can also manually configure the draining time to a required period.

  • The external Load Balancer is created by the template that is provided. Customizing DNS requirements of the Load Balancer’s public IP is not supported.

  • Users have to fit their existing infrastructure into the sandwich model of implementation.

  • For details on errors faced during the scale-out and scale-in process, analyze the logs of the Cloud Functions.

  • NAT, security policies attached to device group, and static routes, are applied to the newly created Firewall Threat Defense.

  • If you are deploying the solution for more than 1 Firewall Threat Defense Virtual, then the deployment time will increase as the Firewall Management Center Virtual can handle only one registration request at a time. Deployment time also increases when scaling out adds more than one Firewall Threat Defense Virtual instance. Currently, all registrations and de-registrations are sequential.

  • Device Group, NAT rules, and network objects, have to be created in Firewall Management Center Virtual before Auto Scaling is initiated. Note that the ILB and ELB IPs are only available after deploying the solution. So, you can create dummy objects and update the objects after the actual IPs are obtained.

Auto Scale Use Case

The Firewall Threat Defense Virtual Auto Scale for GCP is an automated horizontal scaling solution that positions a Firewall Threat Defense Virtual instance group sandwiched between a GCP Internal load balancer (ILB) and a GCP External load balancer (ELB).

  • The ELB distributes traffic from the Internet to Firewall Threat Defense Virtual instances in the instance group; the Firewall Threat Defense Virtual then forwards traffic to the application.

  • The ILB distributes outbound Internet traffic from an application to Firewall Threat Defense Virtual instances in the instance group; the Firewall Threat Defense Virtual then forwards traffic to the Internet.

  • A network packet will never pass through both (internal & external) load balancers in a single connection.

  • The number of Firewall Threat Defense Virtual instances in the scale set will be scaled and configured automatically based on load conditions.

Figure 1. Firewall Threat Defense Virtual Auto Scale Use Case

On all Secure Firewall versions, you can use the provided templates to deploy the Threat Defense Virtual auto scale solution. The Threat Defense Virtual instances are deployed with a minimum of 4 interfaces - 1 management, 1 diagnostic, and 2 data interfaces.

From Secure Firewall version 7.4.1, you can also deploy the Threat Defense Virtual without the diagnostic interface. In this scenario also, the deployment is done with a minimum of 4 interfaces - 1 management, and 3 data interfaces. To do this, modify the template parameters - diagFirewallRule, diagSubnetworkName, diagVpcName, and withDiagnostic, as per the description given in Input Parameters.

Scope

This document covers the detailed procedures to deploy the serverless components for the Firewall Threat Defense Virtual Auto Scale for GCP solution.


Important


  • Read the entire document before you begin your deployment.

  • Make sure the prerequisites are met before you start deployment.

  • Make sure you follow the steps and order of execution as described herein.


Download the Deployment Package

The Firewall Threat Defense Virtual Auto Scale for GCP solution is a GCP Deployment Manager template-based deployment that makes use of the serverless infrastructure provided by GCP (Cloud Functions, Load Balancers, Pub/Sub, Instance Groups, etc.).

Download the files required to launch the Firewall Threat Defense Virtual auto scale for GCP solution. Deployment scripts and templates for your Firewall Threat Defense Virtual version are available in the GitHub repository.


Attention


Note that Cisco-provided deployment scripts and templates for auto scale are provided as open source examples, and are not covered within the regular Cisco TAC support scope.


System Requirements

The following components make up the Firewall Threat Defense Virtual Auto Scale for GCP solution.

Deployment Manager

  • Treat your configuration as code and perform repeatable deployments. Google Cloud Deployment Manager allows you to specify all the resources needed for your application in a declarative format using YAML. You can also use Jinja2 templates to parameterize the configuration and allow the reuse of common deployment paradigms.

  • Create configuration files that define the resources. The process of creating those resources can be repeated over and over with consistent results. See https://cloud.google.com/deployment-manager/docs for more information.

Figure 2. Deployment Manager View

Managed Instance Group in GCP

A Managed Instance Group (MIG) creates each of its managed instances based on the instance template and optional stateful configuration that you specify. See https://cloud.google.com/compute/docs/instance-groups for more information.

Figure 3. Instance Group Features

Target Utilization Metrics

  • The following diagram alongside shows the target utilization metrics. Only average CPU utilization metrics are used in making autoscaling decisions.

  • The autoscaler continuously collects usage information based on the selected utilization metric, compares actual utilization to your desired target utilization, and uses this information to determine whether the group needs to remove instances (Scale In) or add instances (Scale Out).

  • The target utilization level is the level at which you want to maintain your virtual machine (VM) instances. For example, if you scale based on CPU utilization, you can set your target utilization level at 75% and the autoscaler will maintain the CPU utilization of the specified group of instances at or close to 75%. The utilization level for each metric is interpreted differently based on the autoscaling policy. See https://cloud.google.com/compute/docs/autoscaler for more information.

Serverless Cloud Functions

You use serverless Google Cloud functions for tasks such as changing the SSH Password, configure manager, registering Firewall Threat Defense Virtual on Firewall Management Center Virtual, deregistering Firewall Threat Defense Virtual from Firewall Management Center Virtual, and so on.

  • When a new Firewall Threat Defense Virtual instance comes up in the instance group during Scale Out, you need to performs tasks such as changing the SSH Password, configure manager, registering Firewall Threat Defense Virtual on Firewall Management Center Virtual, deregistering Firewall Threat Defense Virtual from Firewall Management Center Virtual, and so on.

  • Cloud functions are triggered through a Cloud Pub/Sub Topic during the Scale Out process. You also have a Log Sink with a filter that is exclusive to the addition of instances during Scale Out.

Serverless License Deregistering using Cloud Functions

  • While the instances are getting deleted during Scale In, you need to deregister the license from the Firewall Threat Defense Virtual instance and deregsister Firewall Threat Defense Virtual from Firewall Management Center Virtual.

  • Cloud functions are triggered through a Cloud Pub/Sub Topic. Particularly for the deletion process, you have a Log Sink with a filter that is exclusive to the deletion of instances during Scale In.

  • Cloud Function, when triggered, will SSH into the deleting Firewall Threat Defense Virtual instance and run the command for license deregistration.

High-Level Overview of Auto Scale Solution

Figure 4. Auto Scale Solution Overview

Prerequisites

GCP Resources

GCP Project

An existing or newly created project is required to deploy all the components of this solution.

VPC Networks

Make sure four VPCs are available/created. An Auto Scale deployment will not create, alter, or manage any networking resources.

In addition to the existing subnetworks, create a new VPC connector in the management VPC network with a /28 subnetwork. The Cloud Function uses the VPC connector to access the Firewall Threat Defense Virtual with private IP addresses.

The Firewall Threat Defense Virtual requires 4 network interfaces, thus your virtual network requires 4 subnets for:

  • Outside traffic

  • Inside traffic

  • Management traffic

  • Diagnostic traffic

Firewall

Firewall rules that allow inter VPC communication and also allow health probes are required to be created.

Create 4 firewall rules for the Inside, Outside, Management, and Diagnostic interfaces. Also, create a Firewall rule to allow the health check probes.

The IP addresses for the health check probes are given below:

  • 35.191.0.0/16

  • 130.211.0.0/22

  • 209.85.152.0/22

  • 209.85.204.0/22

You must note the firewall tags which are used later in the deployment manager template.

The following ports should be open in the Network Security Group to which the subnets are connected:

  • SSH(TCP/22) — Required for the health probe between the Load Balancer and Firewall Threat Defense Virtual. Required for communication between the serverless functions and Firewall Threat Defense Virtual.

  • Application-specific protocol/ports — Required for any user applications (for example, TCP/80, etc.).

Build the GCP Cloud Function Package

The Firewall Threat Defense Virtual GCP Auto Scale solution requires that you build two archive files that deliver the cloud functions in the form of a compressed ZIP package.

  • ftdv_scalein.zip

  • ftdv_scaleout.zip

See the Auto Scale deployment instructions for information on how to build the ftdv_scalein.zip and ftdv_scaleout.zip packages.

These functions are as discrete as possible to carry out specific tasks and can be upgraded as needed for enhancements and new release support.

Input Parameters

The following table defines the template parameters and provides an example. Once you decide on these values, you can use these parameters to create the Firewall Threat Defense Virtual device when you deploy the GCP Deployment Manager template into your GCP project.

Table 1. Template Parameters

Parameter Name

Allowed Values/Type

Description

resourceNamePrefix

String

All the resources are created with name containing this prefix.

Example: demo-test

region

Valid regions supported by GCP

[String]

Name of the region where project will be deployed.

Example: us-central1

serviceAccountMailId

String [ Email Id]

Email address that identifies the service account.

vpcConnectorName

String

Name of the connector that handles the traffic between your serverless environment and your VPC network.

Example: demo-test-vpc-connector

adminPassword

String

Initial password for the threat defense virtual instance. Later, this parameter is changed to 'newFtdPasswordSecret'.

bucketName

String

Name of the GCP storage bucket where the cloud function ZIP package will be uploaded.

Example: demo-test-bkt

coolDownPeriodSec

Integer

Number of seconds that the autoscaler should wait before it starts collecting information from a new instance.

Example: 30

cpuUtilizationTarget

Decimal (0,1]

The average CPU utilization of the VMs in the instance group the autoscaler should maintain.

Example: 0.5

deployUsingExternalIP

Boolean

Decides whether the Threat Defense Virtual management should have a public IP address.

Example: true

If set as true, the Threat Defense Virtual should have a public IP address. If set as false, a public IP address is not required.

diagFirewallRule

String

Name of the firewall rule that is created for the diagnostic VPC.

Example: cisco-ftdv-diag-firewall-rule

If you are deploying the Firewall Threat Defense Virtual without the diagnostic interface, leave this parameter blank or enter a dummy string.

diagSubnetworkName

String

Name of the VPC subnet that is used for the diagnostic interface.

Example: cisco-ftdv-diag-subnet

If you are deploying the Firewall Threat Defense Virtual without the diagnostic interface, leave this parameter blank or enter a dummy string.

diagVpcName

String

Name of the VPC that is used for the diagnostic interface.

Example: custom-ftdv-diag-vpc

If you are deploying the Firewall Threat Defense Virtual without the diagnostic interface, leave this parameter blank or enter a dummy string.

elbFePorts

Integer

ELB Fast ethernet ports.

Example: 80,22

elbIpProtocol

String

ELB IP protocol used.

Example: TCP

elbPort

Integer

ELB port number.

Example: 80

elbPortName

String

Name of the ELB port.

Example: tcp

elbPortRange

Integer

Range of ELB ports.

Example: 80-80

elbProtocol

String

ELB protocol used.

Example: TCP

elbProtocolName

String

Name of the ELB protocol.

Example: TCP

elbTimeoutSec

Integer

ELB timeout period in seconds.

Example: 5

elbUnhealthyThreshold

Integer

Threshold number for failed health checks.

Example: 2

fmcIP

String

IP address of the Firewall Management Center

Example: 10.61.1.2

fmcPasswordSecret and new FtdPasswordSecret

String

Names of the secrets created.

fmcUsername

String

Firewall Management Center Virtual username.

ftdvCheckIntervalSec

Integer

Interval between health checks.

Example: 300

ftdvHealthCheckPort

Integer

Port number for the Firewall Threat Defense Virtual health check.

Example: 22

ftdvHealthCheckProtocolName

String

Protocol used for the health check.

Example: TCP

ftdvPassword

String

Firewall Threat Defense Virtual password.

ftdvTimeoutSec

Integer

Timeout for Firewall Threat Defense Virtual connection.

Example: 300

ftdvUnhealthyThreshold

Integer

Threshold number for failed health checks.

Example: 3

grpID

String

Name of the device group created in Firewall Management Center.

Example: auto-group

healthCheckFirewallRule

String

Name of the firewall rule that allows packets from health check probe IP ranges.

Example: custom-ftdv-hc-firewall-rule

healthCheckFirewallRuleName

String

Tag of the firewall rule that allows packets from health check probe IP ranges.

Example: demo-test-health-allow-all

ilbCheckIntervalSec

Integer

Interval period for checking the ILB connection.

Example: 10

ilbDrainingTimeoutSec

Integer

Connection draining timeout period.

Example: 60

ilbPort

Integer

ILB port number.

Example: 80

ilbProtocol

String

ILB protocol used.

Example: TCP

ilbProtocolName

String

ILB protocol name.

Example: TCP

ilbTimeoutSec

Integer

ILB timeout period.

Example: 5

ilbUnhealthyThreshold

Integer

Threshold number for failed health checks.

Example: 3

insideFirewallRule

String

Name of the inside firewall rule.

Example: custom-ftdv-in-firewall-rule

insideFirewallRuleName

String

Tag of the firewall rules that allows communication in Inside VPC.

Example: demo-test-inside-allowall

insideGwName

String

Name of the inside gateway.

Example: inside-gateway

insideSecZone

String

Name of the inside security zone.

Example: inside-zone

insideSubnetworkName

String

Name of the inside subnet.

Example: custom-ftdv-inside-subnet

insideVPCName

String

Name of Inside VPC.

Example: demo-test-inside

insideVPCSubnet

String

Name of Inside subnet.

Example: demo-test-inside-subnet

licenseCAPS

String

Names of the licenses used.

Example: BASE,MALWARE,URL Filter,THREAT

machineType

String

Machine type for the Firewall Threat Defense Virtual VM.

Example: n1-standard-4

maxFTDCount

Integer

The maximum number of Firewall Threat Defense Virtual instances allowed in the instance group.

Example: 3

maxFTDReplicas

Integer

Maximum number of Firewall Threat Defense Virtual instances in the auto scaling group.

Example: 2

mgmtFirewallRule

String

Name of the management firewall rule.

Example: cisco-ftdv-mgmt-firewall-rule

mgmtFirewallRuleName

String

Tag of the firewall rules which allows communication in Management VPC.

Example: demo-test-mgmt-allowall

mgmtSubnetworkName

String

Name of the management subnet.

Example: custom-ftdv-mgmt-subnet

mgmtVPCName

String

Name of Management VPC.

Example: demo-test-mgmt

mgmtVPCSubnet

String

Name of Management Subnet.

Example: demo-test-mgmt-subnt

minFTDCount

Integer

The minimum number of Firewall Threat Defense Virtual instances available in the Instance Group at any given time.

Example: 1

minFTDReplicas

Integer

The minimum number of Firewall Threat Defense Virtual instances in the auto scaling group.

Example: 2

natID

String

Unique NAT ID required while registering Firewall Management Center on Firewall Threat Defense.

outsideFirewallRule

String

Name of the outside firewall rule.

Example: cisco-ftdv-out-firewall-rule

outsideFirewallRuleName

String

Tag of the firewall rules which allows communication in outside VPC.

Example: demo-test-outside-allowall

outsideGwName

String

Name of the outside gateway.

Example: outside-gateway

outsideSecZone

String

Name of the outside security zone.

Example: outside-zone

outsideSubnetworkName

String

Name of the outside subnet.

Example: custom-ftdv-outside-subnet

outsideVPCName

String

Name of Outside VPC.

Example: demo-test-outside

outsideVPCSubnet

String

Name of Outside Subnet.

Example: demo-test-outside-subnt

policyID

String

Name of the ACL policy.

publicKey

String

SSH key of the Firewall Threat Defense Virtual VM.

sourceImageURL

String

URL of the Firewall Threat Defense Virtual image which is to be used in the project.

sshUsingExternalIP

Boolean

Decides whether the Google functions use a public IP address or a private IP address.

Example: true

If set as true, the Google functions use a public IP address. If set as false, the Google functions use a private IP address.

withDiagnostic

Boolean

Decides whether the Firewall Threat Defense Virtual is deployed with the diagnostic interface or without the diagnostic interface.

Example: true

If set as true, the Firewall Threat Defense Virtual is deployed with the diagnostic interface. If set as false, the Firewall Threat Defense Virtual is deployed without the diagnostic interface.

Deploy the Auto Scale Solution

Procedure


Step 1

Clone the Git repository to a local folder.

git clone git_url -b branch_name 

Step 2

Create the bucket in gcloud CLI.

gsutil mb -c nearline gs://bucket_name

Note


Run any gsutil or gcloud commands in this procedure in the Google cloud shell or the Google cloud SDK installed on your system.

Step 3

Build compressed Zip packages:

  1. Create compressed Zip packages consisting of the following files from the folders ftdv_scaleout and ftdv_scalein.

    • main.py

    • basic_functions.py

    • fmc_functions.py

    • requirements.txt

    Note


    In the main.py file, use the ssh_ip = response[‘networkInterfaces’] [2] [‘networkIP’] command if an internal IP address is used. If an external IP address is used, enter the ssh_ip = response[‘networkInterfaces’] [2] [‘accessConfigs’] [0] [‘natIP’] command. Also, two static routes are added in this function. You can modify the static routes using the fmc.create_static_network_route (vm_name, ‘outside’, ‘any_ipv4’, os.getenv(“OUTSIDE_GW_NAME”), metric=1) and fmc.create_static_network_route (vm_name, ‘inside’, ‘any_ipv4’, os.getenv(“INSIDE_GW_NAME”), metric=2) commands.

  2. Rename the compressed Zip packages to ftdv_scaleout.zip and ftdv_scalein.zip.

    Note


    Navigate inside the folder, select the files, right-click, and select ‘compress | archive’ to make a .zip that GCP can read.

Step 4

Upload the compressed Zip packages (ftdv_scaleout.zip and ftdv_scalein.zip) to the Cloud Editor workspace.

Step 5

Upload the following files from the deployment manager template to the Cloud Editor workspace.

  • ftdv_predeployment.yaml

  • ftdv_predeployment.jinja

  • ftdv_parameters.yaml

  • ftdv_template.jinja

Step 6

Copy the compressed Zip packages to the Bucket Storage.

  • gsutil cp ftdv_scaleout.zip gs://bucket_name
  • gsutil cp ftdv_scalein.zip gs://bucket_name

Step 7

Create VPC and Subnet for inside, outside, management, and diagnostic interfaces.

In the management VPC, you need to have /28 subnet, for example, 10.8.2.0/28.

Step 8

You need four firewall rules for the inside, outside, management, and diagnostic interfaces. Also, you should have a firewall rule to allow the health check probes.

Step 9

Create two secrets for the following using the Secret Manager GUI. See https://console.cloud.google.com/security/secret-manager.

  • fmc-password

  • ftdv-new-password

Step 10

Create the VPC connector.

gcloud beta compute networks vpc-access connectors create <vpc-connector-name> 
--region <region> --subnet=</28 subnet name>

Example:

gcloud beta compute networks vpc-access connectors create demo-vpc-connector 
--region us-central1 --subnet=outside-connect-28
Create request issued for: [demo-vpc-connector]
Waiting for operation [projects/asavgcp-poc-4krn/locations/us-central1/operations/
10595de7-837f-4c19-9396-0c22943ecf15] to complete...done.
Created connector [demo-vpc-connector].

Step 11

Deploy the Firewall Management Center Virtual on any public cloud platform with a public IP. See Cisco Secure Firewall Management Center Virtual Getting Started Guide for more information on how to deploy Firewall Management Center Virtual on various public cloud platforms.

Note


Perform Steps 12 to 16 on the deployed Firewall Management Center Virtual instance.

Step 12

On the Firewall Management Center Virtual instance - Create a user restapi for Firewall Management Center Virtual and use the same password that is saved in the fmcpassword secret. See Users for more information.

Step 13

On the Firewall Management Center Virtual instance - Create a Device Group, Access Control Policy, and an Access Control Rule. See Add a Device Group, Creating a Basic Access Control Policy, and Create and Edit Access Control Rules for more information.

Step 14

On the Firewall Management Center Virtual instance - Create the objects given below. See Object Management for more information on how to create objects on Firewall Management Center Virtual.

  • ELB-IP

  • ILB-IP

  • Application-IP

  • Health Check IP ranges (4)

  • Metadata


object network hc1
  subnet 35.191.0.0 255.255.0.0
object network metadata
  host 169.254.169.254
object network ilb-ip
  host 10.52.1.218
object network hc2
  subnet 130.211.0.0 255.255.252.0
object network elb-ip
  host 34.85.214.40
object network hc3
  subnet 209.85.152.0 255.255.252.0
object network hc4
  subnet 209.85.204.0 255.255.252.0
object network inside-linux
  host 10.52.1.217
object network outside-gateway
  host <>
object network inside-gateway
  host <>

Step 15

On the Firewall Management Center Virtual instance - Create Security Zones (Interface Objects). See Creating Security Zone and Interface Group Objects for more information.

  • inside-security-zone

  • outside-security-zone

Step 16

On the Firewall Management Center Virtual instance - Create NAT Policy and NAT Rules. See Network Address Translation for more information.


nat (inside,outside) source dynamic hc1 interface destination static ilb-ip metadata service
SVC_4294968559 SVC_4294968559
nat (inside,outside) source dynamic hc2 interface destination static ilb-ip metadata service
SVC_4294968559 SVC_4294968559
nat (inside,outside) source dynamic any interface
nat (outside,inside) source dynamic hc1 interface destination static elb-ip metadata service
SVC_4294968559 SVC_4294968559
nat (outside,inside) source dynamic hc2 interface destination static elb-ip metadata service
SVC_4294968559 SVC_4294968559
nat (outside,inside) source dynamic hc3 interface destination static elb-ip metadata service
SVC_4294968559 SVC_4294968559
nat (outside,inside) source dynamic hc4 interface destination static elb-ip metadata service
SVC_4294968559 SVC_4294968559
nat (outside,inside) source dynamic any interface destination static elb-ip inside-linux

Step 17

Update the parameters in the Jinja and YAML files for the Pre-Deployment and Firewall Threat Defense Virtual Autoscale deployment.

  1. Open the ftdv_predeployment.yaml file and update the following parameters:

    • resourceNamePrefix: <resourceNamePrefix>

    • region: <region>

    • serviceAccountMailId: <serviceAccountMailId>

    • vpcConnectorName: <VPC-Connector-Name>

    • bucketName: <bucketName>

    • fmcIP: <Firewall Management Center-IP-address>

    • regID: <registration-ID>

    • natID: <unique-NAT-ID>

    • grpID: <device-group-name>

    • policyID: <acl-policy-name>

    • licenseCAPS: <licenses>

    • fmcPasswordSecret: <Firewall Management Center-password>

    • newFtdPasswordSecret: <new-Firewall Threat Defense Virtual-password>

    • fmcUsername: <username>

    • ftdvPassword: <password>

    • outsideGwName: <outside-gateway-name>

    • insideGwName: <inside-gateway-name>

    • outsideSecZone: <outside-security-zone>

    • insideSecZone: <inside-security-zone>

    • sshUsingExternalIP: <true/false>

  2. The ftdv_predeployment.jinja file takes parameters from the ftdv_predeployment.yaml file.

  3. Open the ftdv_parameters.yaml file and update the following parameters.

    VPC and Firewall Parameters
    • mgmtVpcName: <mgmt-vpc-name>

    • diagVpcName: <diagnostic-vpc-name>

    • outsideVpcName: <outside-vpc-name>

    • insideVpcName: <inside-vpc-name>

    • mgmtSubnetworkName: <mgmt-subnet-name>

    • diagSubnetworkName: <diagnostic-subnet-name>

    • outsideSubnetworkName: <outside-subnet-name>

    • insideSubnetworkName: <inside-subnet-name>

    • mgmtFirewallRule: <mgmt-firewall-rule>

    • diagFirewallRule: <diagnostic-firewall-rule>

    • outsideFirewallRule: <outside-firewall-rule>

    • insideFirewallRule: <inside-firewall-rule>

    • healthCheckFirewallRule: <healthcheck-firewall-rule>

    • adminPassword: <initial-Firewall Threat Defense Virtual-password>

    • deployUsingExternalIP: <true/false>

    Instance Template parameters
    • machineType: <machine-type>

    • sourceImageURL: <source-image-URL>

    FTDv Health Check
    • ftdvHealthCheckPort: <port-number>

    • ftdvCheckIntervalSec: <interval-in-seconds>

    • ftdvTimeoutSec: <timeout-in-seconds>

    • ftdvHealthCheckProtocolName: <protocol-name>

    • ftdvUnhealthyThreshold: <threshold-count>

    FTDv Autoscaler
    • cpuUtilizationTarget: <percentage-in-decimals (for example, 0.7)>

    • coolDownPeriodSec: <cooldown-period-in-seconds>

    • minFTDReplicas: <min-number-of-FTDv-instances>

    • maxFTDReplicas: <max-number-of-FTDv-instances>

    ELB Services
    • elbPort: <port-number>

    • elbPortName: <port-name>

    • elbProtocol: <protocol-name>

    • elbTimeoutSec: <timeout-in-seconds>

    • elbProtocolName: <protocol-name>

    • elbUnhealthyThreshold: <threshold-number-for-failed-health-checks>

    • elbIpProtocol: <IP-Protocol>

    • elbPortRange: <port-range>

    • elbFePorts: <fast-ethernet-ports>

    ILB Services
    • ilbProtocol: <protocol-name>

    • ilbDrainingTimeoutSec: <timeout-in-seconds>

    • ilbPort: <port-number>

    • ilbCheckIntervalSec: <interval-in seconds>

    • ilbTimeoutSec: <timeout-in-seconds>

    • ilbProtocolName: <protocol-name>

    • ilbUnhealthyThreshold: <threshold-number-for-failed-health-checks>

    Note


    For the Firewall Threat Defense Virtual Auto Scale, the cpuUtilizationTarget: 0.5 parameter is set and you can edit it according to your requirements. This value signifies 50% CPU usage of all the Firewall Threat Defense Virtual Instance Groups.

  4. The ftdv_template.jinja file takes parameters from the ftdv_parameters.yaml file.

Step 18

Deploy the pre-deployment YAML configuration.

gcloud deployment-manager deployments create <pre-deployment-name> 
--config ftdv_predeployment.yaml

Example:

gcloud deployment-manager deployments create demo-predeployment 
--config ftdv_predeployment.yaml                                                                      
The fingerprint of the deployment is b'9NOy0gsTPgg16SqUEVsBjA=='
Waiting for create [operation-1624383045917-5c55e266e596d-4979c5b6-66d1025c]...done.
Create operation operation-1624383045917-5c55e266e596d-4979c5b6-66d1025c 
completed successfully

Step 19

Create the Firewall Threat Defense Virtual Auto Scale deployment.

gcloud deployment-manager deployments create <deployment-name> 
--config ftdv_parameters.yaml

Example:

gcloud deployment-manager deployments create demo-asav-autoscale 
--config ftdv_parameters.yaml
The fingerprint of the deployment is b'1JCQi7Il-laWOY7vOLza0g=='
Waiting for create [operation-1624383774235-5c55e51d79d01-1a3acf92-4f3daf16]...done.
Create operation operation-1624383774235-5c55e51d79d01-1a3acf92-4f3daf16 
completed successfully.

Step 20

Create a route for ILB to forward the packets from the inside application to the Internet.

gcloud beta compute routes create <ilb-route-name> 
--network=<inside-vpc-name> --priority=1000 --destination-range=0.0.0.0/0 
--next-hop-ilb=<ilb-forwarding-rule-name> --next-hop-ilb-region=<region>

Example:

gcloud beta compute routes create demo-ilb --network=sdt-test-asav-inside 
--priority=1000 --destination-range=0.0.0.0/0 --next-hop-ilb=demo-asav-fr-ilb 
--next-hop-ilb-region=us-central1
Created [https://www.googleapis.com/compute/beta/projects/asavgcp-poc-4krn/global
/routes/demo-ilb].

Auto Scale Logic

  • The autoscaler treats the target CPU utilization level as a fraction of the average use of all vCPUs over time in the instance group.

  • If the average utilization of your total vCPUs exceeds the target utilization, the autoscaler adds more VM instances. If the average utilization of your total vCPUs is less than the target utilization, the autoscaler removes instances.

  • For example, setting a 0.75 target utilization tells the autoscaler to maintain an average utilization of 75% among all vCPUs in the instance group.

  • Only CPU utilization metrics are used in scaling decisions.

  • This logic is based on the assumption that load balancer will try to equally distribute connections across all Firewall Threat Defense Virtuals, and on average, all Firewall Threat Defense Virtuals should be loaded equally.

Logging and Debugging

Logs of cloud functions can be viewed as follows.

  • Scale Out function logs

    Figure 5. Scale Out Function Logs

    In the scale out function logs given above, the Function execution started and the Function execution took 346329 ms, finish with status: ‘ok’ entries indicate the start and the end of the function logs respectively. You can also track other operations such as the first function run, Firewall Threat Defense Virtual login, policy deployment, and so on.

  • Scale In function logs

    In the scale out function logs given above, the Function execution started and the Function execution took 50852 ms, finish with status: ‘ok’ entries indicate the start and the end of the function logs respectively. You can also track other operations such as initiation of the deregistration process, status of deregistration, obtaining a new authToken, and so on.

Troubleshooting

The following are common error scenarios and debugging tips for Firewall Threat Defense Virtual Auto Scale for GCP:

  • main.py not found—Ensure that the Zip package is made only from the files. You can go to cloud functions and check the file tree. There should not be any folder.

  • Error while deploying the template—Ensure that all the parameter values within “<>” are filled in jinja and yaml, or check if a deployment by the same name already exists.

  • Google Function cannot reach Firewall Threat Defense Virtual—Ensure that the VPC connector is created and the same name is mentioned in the YAML parameter file.

  • Authentication Failed while SSH-ing Firewall Threat Defense Virtual—Ensure that the Public and Private key pair is correct.

  • Auth-token not found—Ensure that the Firewall Management Center Virtual password in Secret is correct.

  • Unhealthy Firewall Threat Defense Virtual and traffic issues—Ensure that there are no issues in the firewall rules and routes.

  • Unable to manually log in to Firewall Threat Defense Virtual—Ensure that you are using the new password. The old password is changed by the scale-out function.

  • Unable to register device on Firewall Management Center Virtual—Ensure that Firewall Threat Defense Virtual is reachable from Firewall Management Center Virtual. The management interface of Firewall Threat Defense Virtual and Firewall Management Center Virtual should be in the same subnet.

  • Preserved connections forming a loop between ILB and Firewall Threat Defense Virtual cause high CPU usage due to the initiation of health probe requests. To reduce high CPU usage, you can use one of the following options:

    Option 1 - On the Firewall Management Center Virtual, disable data interface, configure health probe NAT rules, and enable data interface. For more information on data interfaces and NAT, refer Interface Overview and Network Address Translation.

    Option 2 - After applying health probe NAT rules from Firewall Management Center Virtual, log in to the Firewall Threat Defense Virtual console, and use the clear conn command. If you have set up clustering, use the cluster exec clear conn command.

    Verify CPU usage using the show cpu command on the Firewall Threat Defense Virtual console.

  • Loopback interface error - Run the following command to verify whether the health probe port on the loopback interface is enabled:

    show running-config http
    ciscoftdv(config)# show running-config http
    http server enable 8080
    http 209.85.204.0 255.255.252.0 loopback_interface
    http 35.191.0.0 255.255.0.0 loopback_interface 
    http 130.211.0.0 255.255.252.0 loopback_interface
    http 209.85.152.0 255.255.252.0 loopback_interface
    ciscoftdv(config)#