Deploy the Threat Defense Virtual on the Alibaba Cloud

Overview

Alibaba Cloud is a public cloud environment. The Threat Defense Virtual runs as a guest in the Alibaba Cloud environment.

Alibaba Supported Instance Types

Threat Defense Virtual on Alibaba can use the following instance types:

Network Enhanced Machine Types

Configuration

No of vCPUs

Memory (GB)

Maximum Interfaces Supported

ecs.g5ne.xlarge

4

16

4

ecs.g5ne.2xlarge

8

32

6

ecs.g5ne.4xlarge

16

64

8


Note


Threat Defense Virtual needs a minimum of four interfaces (ENIs) to support the instance.


Note


We do not support resizing the instance type and deploying the Threat Defense Virtual. You can only deploy a Threat Defense Virtual with a different instance size through a new deployment.
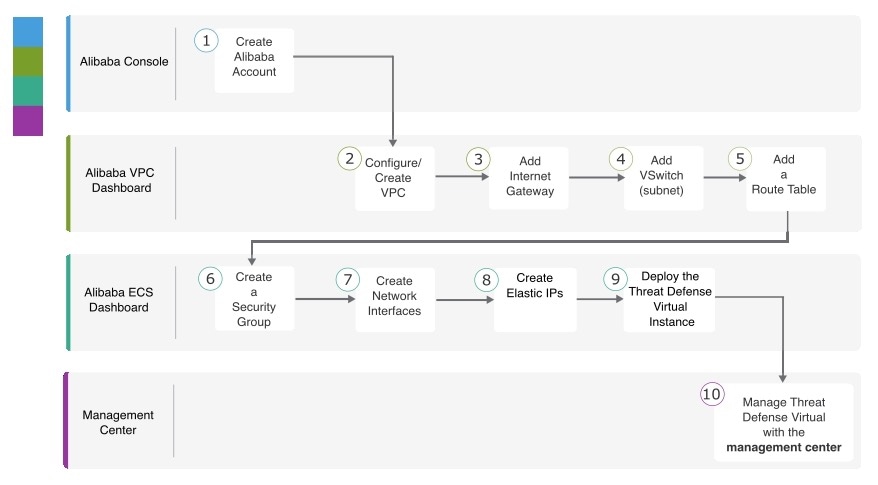

Network Requirement

  • You can create one VPC with four Vswitch (Subnet) for basic Threat Defense Virtual support.

  • Management Vswitch must be available in the same zone in which instance is being deployed, otherwise, you have to create it.

Related Documentation

For more information on instance types and their configuration, see Alibaba Cloud

End-to-End Procedure

See the following tasks to deploy the Threat Defense Virtual on your Alibaba.

Workspace

Steps

Alibaba Console

https://marketplace.alibabacloud.com/.Create a user account in Alibaba console.

Alibaba VPC Dashboard

Creating the VPC: Create and configure a VPC that is dedicated to your Alibaba account.

Alibaba VPC Dashboard

Adding the Internet Gateway: Add an Internet gateway to connect your VPC to the Internet.

Alibaba VPC Dashboard

Adding vSwitch: Add VSwitch (subnets) to your VPC.

Alibaba VPC Dashboard

Adding a Route Table: Attach a route table to the gateway you configured for your VPC.

Alibaba ECS Dashboard

Creating a Security Group: Create a security group with rules specifying allowed protocols, ports and source IP ranges.

Alibaba ECS Dashboard

Creating Network Interfaces: Create network interfaces for the threat defense virtual using static IP addresses.

Alibaba ECS Dashboard

Creating Elastic IP Address: Elastic IPs are reserved public IPs that are used for remote access to the threat defense virtual as well as other instances.

Management Center or Device Manager

Deploy the Threat Defense Virtual: Deploy the threat defense virtual from the Alibaba portal.

Management Center

Manage threat defense virtual:

Prerequisites

  • An Alibaba account. You can create one at https://www.alibaba.com/.

  • An SSH client (for example, PuTTY on Windows or Terminal on Macintosh) is required to access the Threat Defense Virtual console.

  • A Cisco Smart Account. You can create one at Cisco Software Central https://software.cisco.com/.

  • License the Threat Defense Virtual.

    • Configure all license entitlements for the security services from the Management Center Virtual.

    • See “Licensing the Secure Firewall System” in the Secure Firewall Management Center Configuration Guide for more information about how to manage licenses.

  • Threat Defense Virtual interface requirements:

    • Management interfaces (1)—Used to connect the Threat Defense Virtual to the Management Center Virtual,

    • Second Interface is used for diagnostics; can’t be used for through traffic.

      In version 6.7 and later, you can optionally configure a data interface for FMC management instead of the Management interface. The Management interface is a prerequisite for data interface management, so you still need to configure it in your initial setup. FMC access from a data interface isn’t supported in High Availability deployments.

      For more information about configuring a data interface for FMC access, see the configure network management-data-interface command in the FTD command reference.

    • Traffic interfaces (2)—Used to connect the Threat Defense Virtual to inside hosts and to the public network.

  • Communication Paths:

    • Public and elastic IPs for access into the Threat Defense Virtual.

Supported Software Platforms

The Threat Defense Virtual Auto Scale solution is a software version agnostic and it is applicable to the threat defense virtual devices managed by the management center. For information about Cisco software and hardware compatibility, including operating system and hosting environment requirements, see Cisco Secure Firewall Threat Defense Compatibility Guide.

Guidelines and Limitations

Supported Features

  • Basic Product Bringup

  • Day-0 Configuration

  • SSH using Public Key or Password.

  • Alibaba UI Console to access Threat Defense Virtual for any debugging purpose.

  • Alibaba UI Stop/Restart

  • Instance Type Supported: ecs.g5ne.xlarge, ecs.g5ne.2xlarge, and ecs.g5ne.4xlarge.

  • Hyperthreading

  • Bring Your Own License (BYOL) License Support.

Performance Tiers for Threat Defense Virtual Smart Licensing

The supports performance-tiered licensing that provides different throughput levels and VPN connection limits based on deployment requirements.

Table 1. Licensed Feature Limits Based on Entitlement

Performance Tier

Device Specifications (Core/RAM)

Rate Limit

RA VPN Session Limit

FTDv5, 100Mbps

4 core/8 GB

100Mbps

50

FTDv10, 1Gbps

4 core/8 GB

1Gbps

250

FTDv20, 3Gbps

4 core/8 GB

3Gbps

250

FTDv30, 5Gbps

8 core/16 GB

5Gbps

250

FTDv50, 10Gbps

12 core/24 GB

10Gbps

750

FTDv, 16Gbps

16 core/34 GB

16Gbps

10,000

  • BYOL (Bring Your Own License) using a Cisco Smart License Account.

See the "Licensing the Threat Defense Virtual System" chapter in the Threat Defense Virtual Management Center Configuration for guidelines when licensing your Threat Defense Virtual device.

Performance Optimizations

To achieve the best performance out of the Threat Defense Virtual, you can make adjustments to the both the VM and the host. See Virtualization Tuning and Optimization on Alibaba Cloud for more information.

Receive Side Scaling—The Threat Defense Virtual supports Receive Side Scaling (RSS), which is a technology utilized by network adapters to distribute network receive traffic to multiple processor cores. Supported on Version 7.0 and later. See Multiple RX Queues for Receive Side Scaling (RSS) for more information.

Unsupported Features

  • FDM

  • High Availability Functionality

  • Autoscale

  • IPv6

  • SR-IOV

Limitations

  • Transparent, inline, and passive modes are not supported in version 7.2 release.

  • East-West Traffic is not supported in Alibaba.

  • Jumbo Frames is not supported as its availability is limited to a few instance types from Alibaba. For more information, see Alibaba Cloud.


Note


Threat Defense Virtual must have four interfaces to launch.

Licensing

  • BYOL (Bring Your Own License) using a Cisco Smart License Account is supported.

Configuring Policies and Device Settings

After you install Threat Defense Virtual and add the device to a Management Center Virtual, you can use the management center virtual user interface to configure device management settings for Threat Defense Virtual running on Alibaba. You can configure and apply access control policies and other related policies to manage traffic using your Threat Defense Virtual instance.

The security policy controls the services provided by the Threat Defense Virtual, such as Next Generation IPS filtering and application filtering. You configure the security policy on the Threat Defense Virtual using the Management Center Virtual. For information about how to configure the security policy, see the Secure Firewall Configuration Guide or the online help in Management Center Virtual.

Creating the VPC

A virtual private cloud (VPC) is a virtual network dedicated to your Alibaba account. It is logically isolated from other virtual networks in the Alibaba cloud. You can launch your Alibaba Cloud resources, such as the Management Center Virtual and the Threat Defense Virtual instances, into your VPC. You can configure your VPC; you can select its IP address range, create VSwitches (subnets), and configure route tables, network gateways, and security settings.

Procedure


Step 1

Log into https://www.alibabacloud.com and choose your region.

Alibaba Cloud is divided into multiple regions that are isolated from each other. The region is displayed in the upper right corner of your screen. Resources in one region do not appear in another region. Check periodically to make sure you are in the intended region.

Step 2

Click Products > VPC.

Step 3

Click VPC Dashboard > Your VPCs.

Step 4

Click Create VPC.

Step 5

Enter the following in the Create VPC dialog box:

  1. A user-defined Name tag to identify the VPC.

  2. An IPv4 CIDR block of IP addresses. CIDR (Classless Inter-Domain Routing) notation is a compact representation of an IP address and its associated routing prefix. For example, 10.0.0.0/24.

  3. Select the IPv4 CIDR block as Alibaba Cloud-provided IPv4 CIDR block to enable IPv4 in the Virtual Private Cloud.

  4. A Tenancy setting of default to ensure that instances launched in this VPC use the tenancy attribute specified at launch.

Step 6

Click OK to create your VPC.


What to do next

Add an Internet gateway to your VPC as described in the next section.

Adding the Internet Gateway

You can add an Internet gateway (NAT Gateway) to connect your VPC to the Internet. You can route traffic for IP addresses outside your VPC to the Internet gateway.

Before You Begin

  • Create a VPC for your Threat Defense Virtual instances.

Procedure


Step 1

Click Products > VPC.

Step 2

Click VPC Dashboard > Internet Gateways, and then click Create Internet Gateway.

Step 3

Enter a user-defined Name tag to identify the gateway and click OK to create the gateway.

Step 4

Select the gateway created in the previous step.

Step 5

Click Bind to VPCand select the VPC you created previously.

Step 6

Click OK to bind the gateway to your VPC.

By default, the instances launched in the VPC cannot communicate with the Internet until a NAT Gateway is created and bound to the VPC.


What to do next

Add VSwitch (subnets) to your VPC as described in the next section.

Adding vSwitch

You can segment the IP address range of your VPC that the Threat Defense Virtual instances can be attached to. You can create vSwitch (subnets) to group instances according to security and operational needs. For the Threat Defense Virtual you need to create a vSwitch for management as well as VSwitches for traffic.

Before You Begin

  • Create four VPCs for your Threat Defense Virtual instances. As mentioned in creating VPC section.

  • Add one vSwitch (subnet) for each VPC.

Procedure


Step 1

Click Products > VPC.

Step 2

Click VPC Dashboard > VSwitches, and then click Click vSwitch.

Step 3

Enter the following in the Create vSwitch dialog box:

  1. A user-defined Name tag to identify the vSwitch.

  2. A VPC to use for this vSwitch.

  3. The Zone where this vSwitch will reside. Select No Preference to let Alibaba Cloud select the zone.

  4. A CIDR block of IP addresses (IPv4). The range of IP addresses in the vSwitch must be a subset of the range of IP addresses in the VPC. Block sizes must be between a /16 network mask and a /28 network mask. The size of the vSwitch can equal the size of the VPC.

Step 4

Click OK to create your vSwitch.

Step 5

Repeat for as many vSwitchs' required. Create a separate vSwitch for management traffic and create as many vSwitchs' as needed for data traffic.


What to do next

Add a route table to your VPC as described in the next section.

Adding a Route Table

You can attach a route table to the gateway you configured for your VPC. You can also associate multiple subnets with a single route table, but a subnet can be associated with only one route table at a time.

Procedure


Step 1

Click Products > VPC.

Step 2

Click VPC Dashboard > Route Tables, and then click Create Route.

Step 3

Enter a user-defined Name tag to identify the route table.

Step 4

Select the VPC from the drop-down list that will use this route table.

Step 5

Click OK to create your route table.

Step 6

Select the route table that you created.

Step 7

Click the Routes tab to display the route information in the details pane.

Step 8

Click Edit, then click Add another route.

  1. In the Destination column, enter 0.0.0.0/0for all IPv4 traffic.

  2. In the Target column, select your gateway.

Step 9

Click Save.


What to do next

Create a security group as described in the next section.

Creating a Security Group

You can create a security group with rules specifying allowed protocols, ports and source IP ranges. Multiple security groups can be created with different rules which you can assign to each instance.

Procedure


Step 1

Click Products > ECS.

Step 2

Click ECS Dashboard > Security Groups.

Step 3

Click Create Security Group.

Step 4

Enter the following in the Create Security Group dialog box:

  1. A user-defined Security Group Name to identify the security group.

  2. A Description for this security group.

  3. The VPC associated with this security group.

Step 5

Configure Security Group Rules:

  1. Click the Inbound Rules tab, then click Add Rule.

    Note


    HTTPS and SSH access is required to manage the Management Center Virtual from outside Alibaba. You should specify the Source IP addresses accordingly. Also, if you are configuring both the Management Center Virtual and Threat Defense Virtual within the Alibaba VPC, you should allow the private IP management subnet access.

  2. Click the Outbound Rules tab, then click Add Rule to add a rule for outbound traffic, or leave the defaults of All traffic (for Type) and Anywhere (for Destination).

Step 6

Click Create to create your security group.


What to do next

Create network interfaces as described in the next section.

Creating Network Interfaces

You can create network interfaces for the Threat Defense Virtual using static IP addresses (IPv4) or DHCP. Create network interfaces (external and internal) as needed for your particular deployment.

Procedure


Step 1

Click Services > Elastic Network Interface.

Step 2

Click Network Interfaces.

Step 3

Click Create Network Interface.

Step 4

Enter the following in the Create Network Interface dialog box:

  1. A optional user-defined Description for the network interface.

  2. Select a vSwitch from the drop-down list. Make sure to select the vSwitch of the VPC where you want to create the Threat Defense Virtual instance.

  3. Enter a Private IP address. You can use a static IP address (IPv4) or Auto-generate (DHCP).

  4. Select one or more Security groups. Make sure the security group has all the required ports open.

Step 5

Click Create network interface to create your network interface.

Step 6

Select the network interface that you just created.

Step 7

Right-click and select Modify Source/Dest. Check.

Step 8

Uncheck the Enable check box under Source/destination check and click Save.


What to do next

Create elastic IP addresses as described in the next section.

Creating Elastic IP Address

When an instance is created, a public IP address is associated with the instance. That public IP address (IPv4) changes automatically when you STOP and START the instance. To resolve this issue, assign a persistent public IP address to the instance using Elastic IP addressing. Elastic IP address is a reserved public IP address that are used for remotely accessing the Threat Defense Virtual as well as other instances.

Procedure


Step 1

Click Products > Elastic Compute Service.

Step 2

In the Elastic Compute Service dashboard, click Elastic IP from the left-hand menu.

Step 3

Click Allocate Elastic IP Address.

Step 4

Configure EIP settings:

  1. Choose the Region where you want to allocate the EIP.

  2. Select the desired bandwidth plan for the EIP. For example, BYOL or Subscription.

  3. Specify the bandwidth amount required.

  4. Review your selections and click OK to allocate the EIP.

Step 5

Associate the EIP with an instance:

  1. After EIP allocation, go to the Elastic IP section in the Elastic Compute Service dashboard.

  2. Find the EIP you created and click Associate.

  3. Choose the ECS instance you want to associate with the EIP and click OK.

Step 6

Ensure that the EIP is now listed under the associated ECS instance and verify its connectivity.


What to do next

Deploy the Threat Defense Virtual as described in the next section.

Configuring Alibaba Environment

To deploy the Threat Defense Virtual on Alibaba you need to configure an Alibaba VPC with your deployment-specific requirements and settings. In most situations a setup wizard can guide you through your setup. Alibaba provides online documentation where you can find useful information about the services ranging from introductions to advanced features. For more information, see Alibaba Cloud Documentation.

The Threat Defense Virtual deployment requires four network virtual private cloud (VPC) which you must create prior to deploying the Threat Defense Virtual.

The four networks VPCs are:

  • Management VPC for the management subnet.

  • Diagnostic VPC for the diagnostic subnet.

  • Inside VPC for the inside subnet.

  • Outside VPC for the outside subnet.

For greater control over your Alibaba setup, the following sections offer a guide to your VPC and EC2 configurations prior to launching the Threat Defense Virtual instances:

Before You Begin

  • Create your Alibaba Cloud account.

Deploy the Threat Defense Virtual

Procedure


Step 1

Go to https://marketplace.alibabacloud.com/ and search for Cisco Firepower NGFW Virtual (NGFWv) - BYOL offering to deploy the Threat Defense Virtual.

Note


Alibaba is divided into multiple regions that are isolated from each other. The region is displayed in the upper right corner of your window. Resources in one region do not appear in another region. Check periodically to make sure you are in the intended region.

Step 2

Click the offering link to open Cisco Firepower NGFW Virtual (NGFWv) - BYOL page.

Step 3

Click Choose Your Plan. You will be redirected to the Elastic Compute Service page.

Step 4

Enter the following details in the Custom Launch section.

  • Billing Method: As per requirement.

    Note


    The billing method is for infrastructure on the Alibaba Cloud, which you can select according to your requirement.

  • Region: As per requirement.

  • Network and Zone: Select a VPC and management vSwitch, which you have previously created, from the drop-down list or use the Create VPC and Create vSwitch links to create newly.

Step 5

Move to the Instances and Images page.

Under the All Instance Types section, perform the following:
  • Instance: Select any of the following supported instance type - ecs.g5ne.xlarge, ecs.g5ne.2xlarge, or ecs.g5ne.4xlarge.

  • Image: The latest Threat Defense Virtual marketplace version is displayed in the Marketplace Image REC section.

    1. Click Reselect Image. The Alibaba Cloud Marketplace Image dialog box is displayed with Threat Defense Virtual image details you are deploying.

    2. Choose the Threat Defense Virtual version from the drop-down list and click Select.

Step 6

Move to the Storage section. Retain the default values and proceed.

Step 7

Move to the Bandwidth and Security Groups section and perform the following:

  • ENI

    • Security Group: Choose the appropriate security group.

    • Primary ENI: Enter the primary interface, which is the management vSwitch, as selected in the Network and Zone field.

    • Secondary ENI: Choose the secondary interface from the Existing Secondary Interface drop-down list or create a new secondary interface by selecting the required vSwitch.

      Note


      During instance launch phase, an instance can be deployed with two interfaces and the other two interfaces can be attached after deployment from ECS console.

    • Key Pair: Select an existing key pair from the drop-down list or create a new key pair.

Step 8

Move to the Advance Settings and perform the following:

  • Instance Name: Name of the instance as suitable.

  • User Data: Provide the Day-0 configuration as per the requirement (Do not choose the Enter Base64 Encoded iInformation check box).

    Sample Day-0 Configuration to manage Threat Defense Virtual using the Management Center:

    {
    "AdminPassword": "<your_password>",
    "Hostname": "<your_hostname>",
    "ManageLocally": "No",
    "FmcIp":  "<IP address of FMC>",
    "FmcRegKey":"<registration_passkey>",
    "FmcNatId":"<NAT_ID_if_required>"
    }
    

    Note


    If you do not provide any password in the Day-0 configuration, the default password will be the instance ID of the Threat Defense Virtual as seen on Alibaba Console or CLI.

Step 9

Accept the ECS Terms of Service and click Create Order.

Threat Defense Virtual is launched with two interfaces and you can view them on ECS console.

Note


To complete the boot process, you must configure the Threat Defense Virtual with four interfaces.

Step 10

To configure the Threat Defense Virtual with two other interfaces, perform the following:

  1. On the Alibaba Cloud, go to Elastic Compute Service.

  2. Click Elastic Network Interface under Network & Security on the left pane.

  3. Search for the traffic interface that is previously created.

  4. Select the check box corresponding to a traffic interface, and click Bind to Instance. The Bind to Instance dialog box is displayed.

  5. Enter the Threat Defense Virtual name in the Instance field.

  6. Click Confirm to configure it as eth2 interface for your instance.

  7. Repeat Step c through Step f to configure eth3 interface for your Threat Defense Virtual.

Step 11

Click ECS Dashboard > Instances.

Step 12

You should be able to register your Threat Defense Virtual to the Management Center Virtual after it finishes booting up.