Appendix

This section contains the following topics:

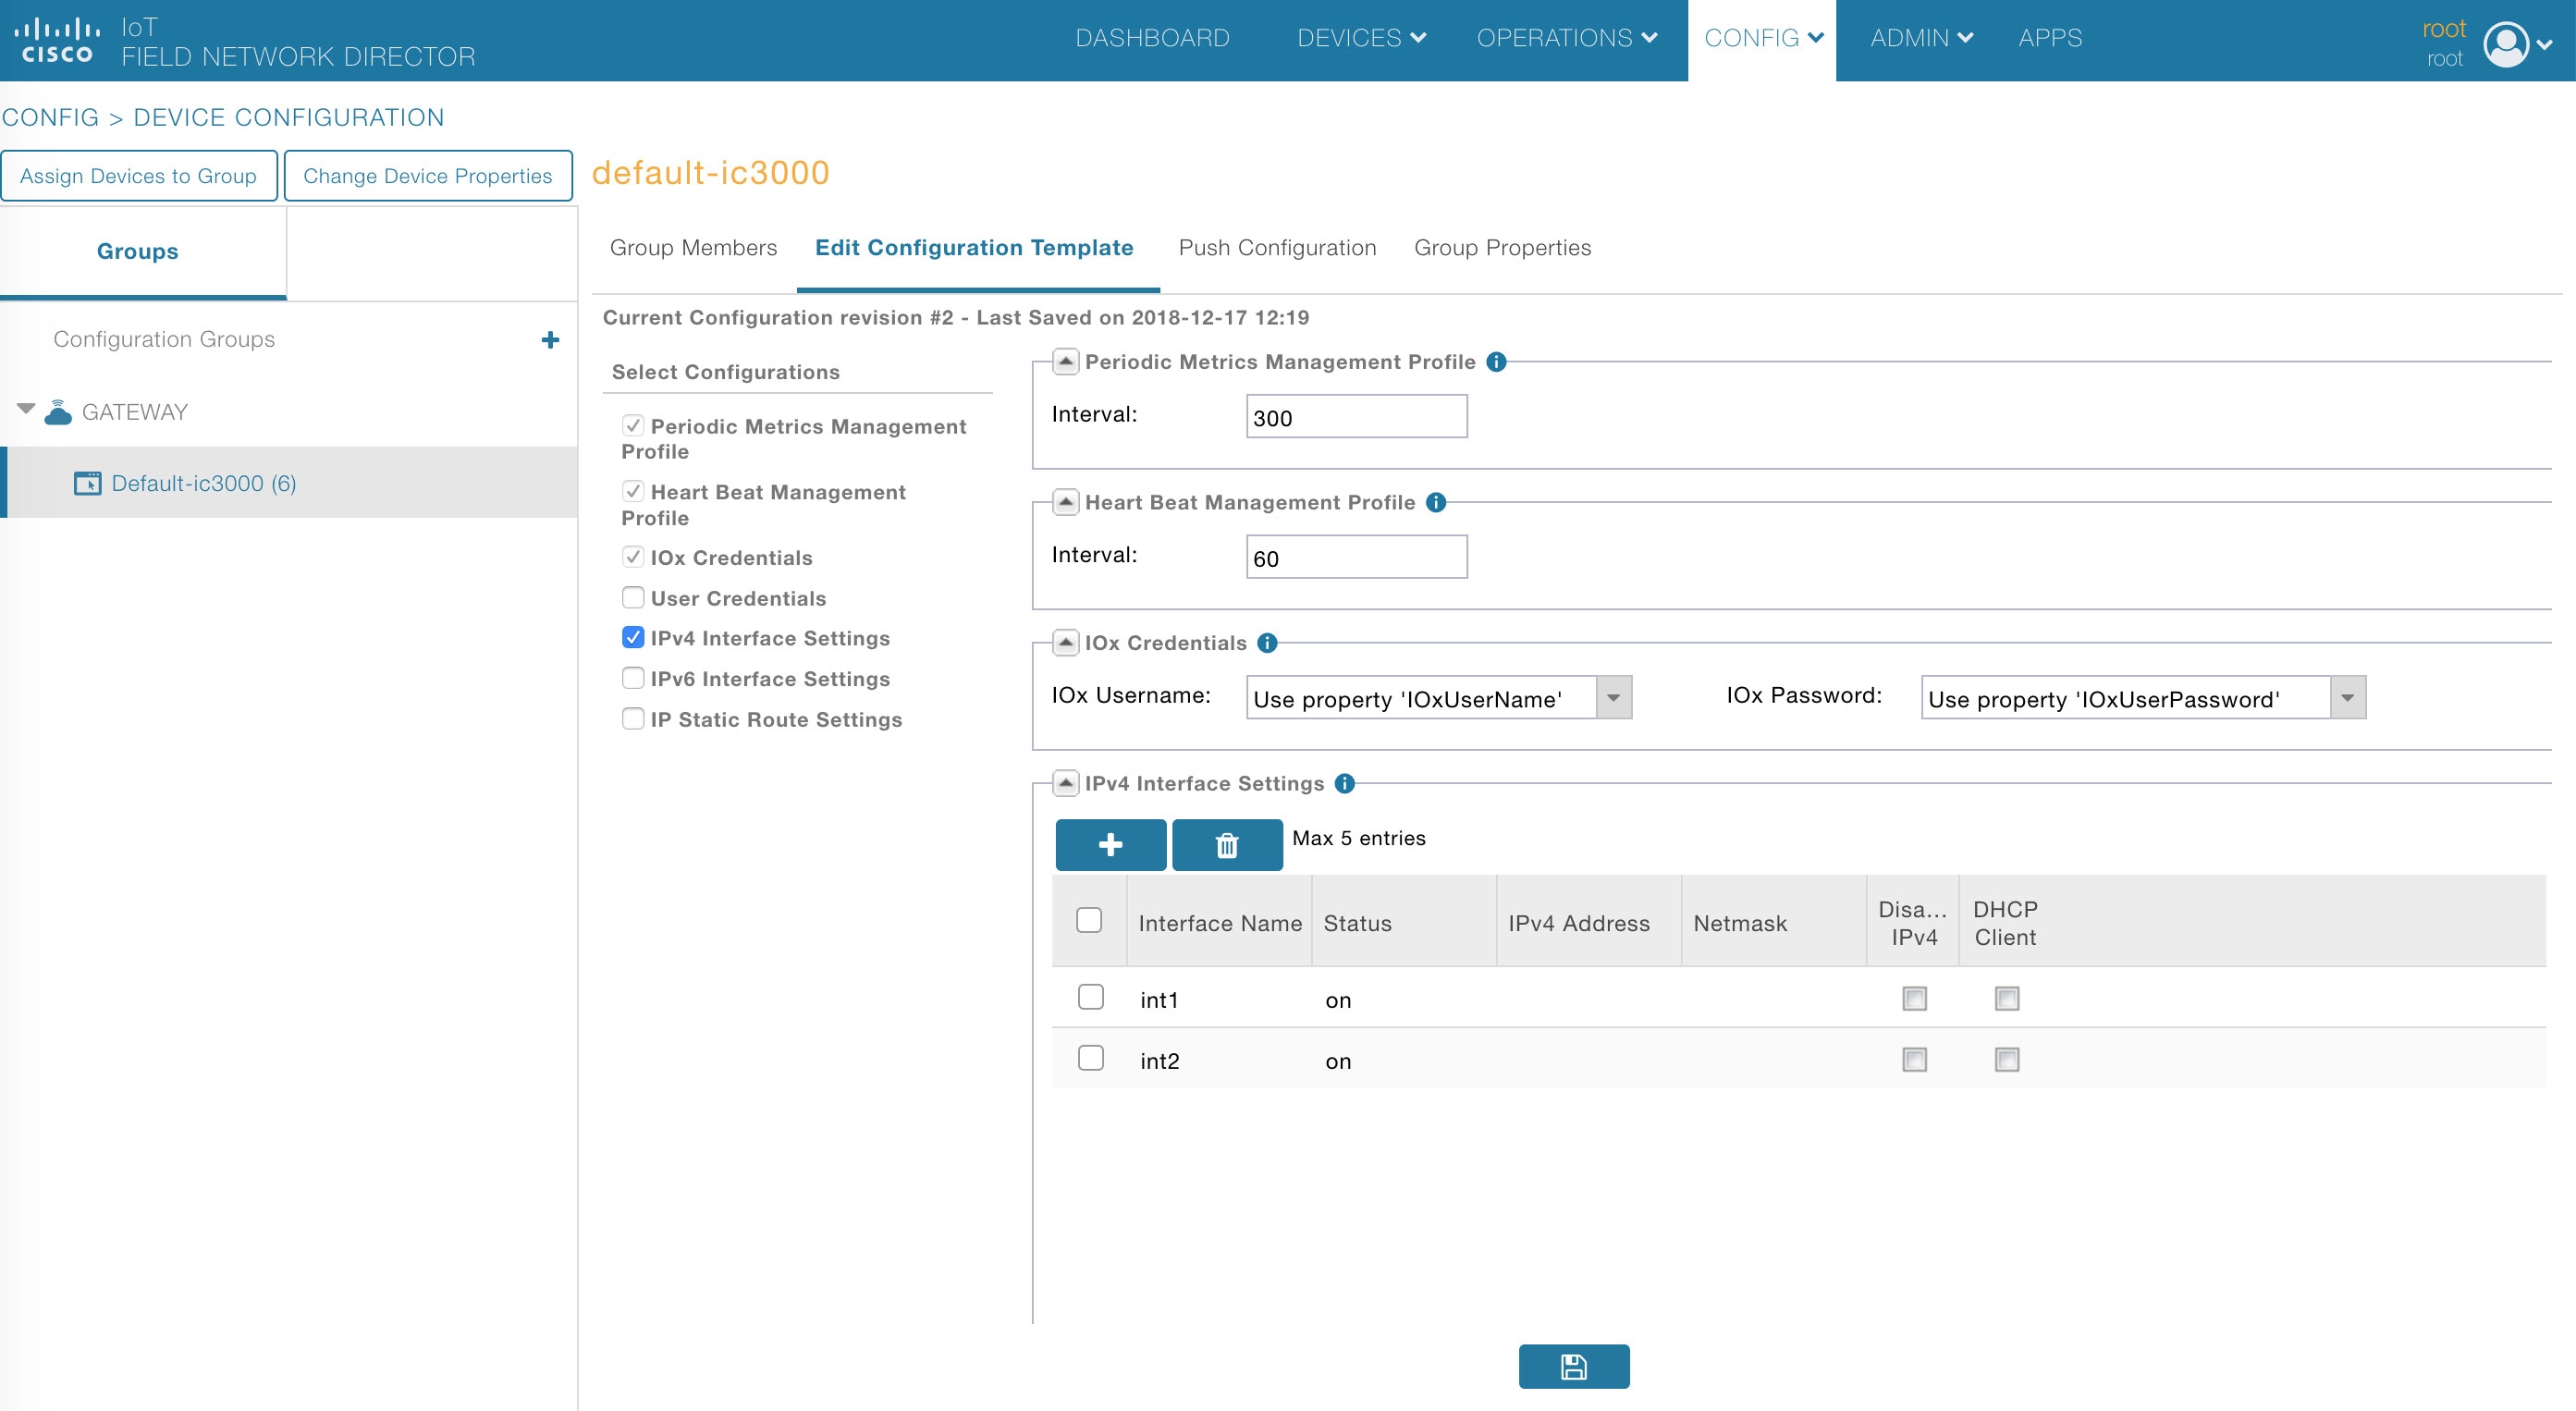
FND 4.3 device-configuration templates

Understand the default values and select the other parameters as required and save the template. Use the (i) button to understand the optional and mandatory parameters.

Once complete, push the configurations to the devices using the Push Configuration tab on the top of the window.

Figure 1. Edit Configuration Template

For the FND 4.3.1 release and greater, the JSON formats for editing a particular IC3000 device are as follows:


Bring up interface:
"{
"name": "InterfaceSettings",
"value": {
"ifName": "int1",
"status": 1
}
}
Bring down interface:
{
"name": "InterfaceSettings",
"value": {
"ifName": "int2",
"status": 0
}
}
Setting DHCP:
{
"name": "InterfaceSettings",
"value": {
"ifName": "int3",
"dhcpClient": 1
}
}
Setting static IP:
{
"name": "InterfaceSettings",
"value": {
"ifName": "int4",
"status": 1,
"ipv4": "12.23.34.45",
"netmask": "255.255.255.0"
}
}
Create user:
{
"name": "UserMgmt",
"value": {
"userName": "user1",
"newPassword": "passwd4user1!"
}
}
Delete user:
{
"name": "UserMgmt",
"value": {
"userName": "user1",
"delUser": "True"
}
}
Change user password:
{
"name": "UserMgmt",
"value": {
"userName": "user1",
"oldPassword": "passwd4user1!",
"newPassword": "user1passwd!"
}
}

To download a text file with clean JSON entries, go here:

https://www.cisco.com/c/dam/en/us/td/docs/routers/ic3000/deployment/guide/IC3000-JSON.txt


Note

Make sure your JSON is validated properly before pushing the configuration to device. It is highly recommended to use a JSON validator such as this one: https://jsonlint.com/

Copy and paste your entire device configuration template and see if its set appropriately. Anything that’s commented has to be removed before validation.

A typical comment section in json is between the following characters.

<#--

Comment text here

-->

As an example, a working JSON entry for bringing all the interfaces up on an IC3000 is as follows.


[{
		"name": "MgmtProfile",
		"value": {
			"id": 2,
			"name": "PeriodicMetrics",
			"interval": 300,
			"dataIds": ["5", "18", "23", "24", "25"]
		}
	}, {
		"name": "UserMgmt",
		"value": {
			"userName": "${device.IOxUserName}",
			"newPassword": "${device.IOxUserPassword}"
		}
	},
	{
		"name": "MgmtProfile",
		"value": {
			"id": 1,
			"name": "Heartbeat",
			"interval": 60,
			"dataIds": ["4"]
		}
	}, {
		"name": "InterfaceSettings",
		"value": {
			"ifName": "int1",
			"status": 1
		}
	}, {
		"name": "InterfaceSettings",
		"value": {
			"ifName": "int2",
			"status": 1
		}
	}, {
		"name": "InterfaceSettings",
		"value": {
			"ifName": "int3",
			"status": 1
		}
	}, {
		"name": "InterfaceSettings",
		"value": {
			"ifName": "int4",
			"status": 1
		}
	}
]

Installing Cisco IoT Field Network Director (Cisco IoT FND)

This section provides the steps required to install the Cisco IoT Field Network Director (Cisco IoT FND) Release 4.3.1 and greater application with Integrated Application Management (Fog Director) on an Open Virtual Appliance (OVA), VMware ESXi 5.5 or 6.0. You use the same instructions to install both VMware versions.

Note: For information about installing Cisco IoT FND 4.3 and Oracle on an OVA for Release 4.3 and greater, refer to the following guides:

Cisco IoT FND Deployment on an Open Virtual Appliance, VMware ESXi 5.5/6.0

Cisco IoT Field Network Director Installation Guide-Oracle Deployment, Releases 4.3.x, 4.4.x and 4.5.x

For an overview of the features and functionality of the IoT FND application and details on how to configure features and manage Cisco IoT FND after its installation, refer to the Cisco IoT Field Network Director User Guide for your current FND release.

Prerequisites

  • Access to the VMware ESXi server.
    • Contact your IT administrator to obtain the IP address to the VMware ESXi server.
    • OR
    • If you are installing the VMware ESXi server software yourself, go to the VMware ESXi site to download the software: https://www.vmware.com/products/esxi-and-esx.html
  • Install the VMware vSphere Client for the ESXi 5.5 or 6.0 server.
  • Locate the VMware credentials to create virtual machines in ESXi 5.5. or 6.0, respectively.
  • Ensure that you meet the VMware server machine requirements. Listed below are the VM CPU and memory requirements for a small scale deployment:

NMS OVA

    • 16 GB memory
    • 1 core and 4 virtual sockets
    • 150 GB of virtual storage
  • Download the OVA from Cisco.com.

Installing the OVA

Procedure


Step 1

Use VMware Fusion or VMware vSphere client to deploy OVA on ESXi Server. Do not change the defaults for the installation.

  1. Under File, choose Deploy OVF template.

  2. Keep the default location and click Next.

  3. Click Next.

  4. Enter a name of the deployed template.

  5. Choose the format that you want virtual disks to be stored.

    Note 
    Thick provisions require 600 GB of disk space on the ESXi server.
  6. Click Next.

  7. Review and click Finish.

    The template starts downloading. When it is completed, the template is listed on the left pane.

Step 2

Power on the VM. Right click on the iot-fnd template name. Select Power and Power On.

Step 3

Assign a static IP address. Or, setup a DHCP server in the network, so an IP address gets assigned.

Setup a valid, reachable working DNS server on the Host VM. (mandatory)

Use this IP address to access the FND GUI.

Step 4

Click on Console and login with root/cisco123 once the OS is up.

  1. Once logged in, go to Applications -> System Tools -> Settings -> Network .

  2. Click the plus sign (+).

Step 5

From a web browser, access FND URL and change the password for the root user. Default username/password is root/root123.

Step 6

Open a terminal window, and setup Health Monitoring for the Fog Director Container from FND.

[root@iot-fnd ~]# cd /opt/monitor/

After completing these steps, FND starts monitoring Fog Director container on the ADMIN → SERVERS page.


Using a Custom cgms_keystore in the FND Container

Enter the following information to provide a secure connection to devices within this OVA deployment.

Use these steps to have FND use your custom keystore.

  1. Put your cgms_keystore file in /opt/fnd/data/ on the Host.
  2. Run the following command to encrypt the password for the new cgms_keystore:

docker exec -it fnd-container /opt/cgms/bin/encryption_util.sh encrypt <keystore password >


[root@iot-fnd ~]# docker exec -it fnd-container /opt/cgms/bin/encryption_util.sh encrypt cisco123
2bVvZsq+vsq94YxuAKdaag==
  1. Modify the cgms.properties file in the /opt/fnd/data folder, and edit the following line to set the new encrypted cgms_keystore password:

cgms-keystore-password-hidden=encrypted new cgms_keystore password


Note

With OVA 4.3.1 and above you can leave the cgms_keystore.selfsigned default bundled keystore untouched.

If both the files (cgms_keystore and cgms_keystore.selfsigned) are present, the cgms_keystore will be used by the container.

Configuring FND for IPv6 Tunnel Provisioning and Registration

FND OVA supports only IPv4 tunnels and Registration out of the box.

To setup an IPv6 network for tunnel provisioning and registration, follow these steps:

Procedure


Step 1

Ensure you have one interface with a valid IPv6 network which has a IPv6 prefix length less than125.

See the following example of the ens32 interface:

Example:


[root@iot-fnd ~]# ifconfig ens224
ens224: flags=4163[UP,BROADCAST,RUNNING,MULTICAST] mtu 1500
inet 2.2.56.117 netmask 255.255.0.0 broadcast 2.2.255.255
inet6 fe80::54f0:5d24:d320:8e38 prefixlen 64 scopeid 0x20[ink]
inet6 2001:420:7bf:5f::1522 prefixlen 64 scopeid 0x0[global]
ether 00:0c:29:18:1b:3a txqueuelen 1000 (Ethernet)
RX packets 97618 bytes 12391774 (11.8 MiB)
RX errors 1001 dropped 1011 overruns 0 frame 0
TX packets 3004 bytes 568097 (554.7 KiB)
TX errors 0 dropped 0 overruns 0 carrier 0 collisions 0
[root@iot-fnd ~]
#
Step 2

Run the ./setup-IPv6-network.sh script in the /opt/fnd/scripts directory to obtain the FND IPv6 address on the router for tunnel provisioning and registration.

Note 
While specifying the IPv6 address for the network-mgmt-bridge, provide an Interface Name and a valid IPv6 address (and IP address prefix length) that is in the subnet of the provided host interface. If IPv6 address is in a different subnet, the IPv6 tunnel provisioning and registration will not be successful.

Installing Custom CA Certificates on FND

By default the FND container comes bundled with cgms_keystore.

  • Keystore Location in the FND Container: /opt/cgms/server/cgms/conf/
  • Keystore Name: cgms_keystore
  • Default Password: Public123!
  • Default Trusted Certification Entry in Keystore: cisco_sudi, jmarconi

To use a custom CA certificate on the router, add a CA certificate to the trusted certificate entries in the cgms_keystore.

Procedure


Step 1

Place the certificate file in the following location on the host machine.

/opt/fnd/data/

Step 2

Enter into FND container

docker exec -i -t fnd-container /bin/bash

Step 3

Change into the conf directory.

cd /opt/cgms/server/cgms/conf/

Step 4

Import a root or intermediate CA certificate to cgms_keystore.

/opt/cgms/jre/bin/keytool -import -trustcacerts -alias alias-name -file /tmp/fnd-data/ca.crt -keystore cgms_keystore

Use a preferred alias name

Step 5

Restart FND.

/etc/init.d/cgms restart

Step 6

Verify that the certificate was added to the trusted entry.

/opt/cgms/jre/bin/keytool -list -v -keystore cgms_keystore

Enter keystore password.


Upgrading FND

To update FND, you must have access to dockerhub.cisco.com.

Run the upgrade-fnd.sh script from the following directory:

cd /opt/fnd/scripts/

Starting and Stopping FND

Use the fnd-container.sh {start|stop|status|restart} script in the following directory to start, stop, obtain status, and restart FND:

cd /opt/fnd/scripts/

Upgrading Fog Director

To update Fog Director, you must have access to dockerhub.cisco.com.

Run the upgrade-fogd.sh script from the following directory:

cd /opt/fogd/scripts

Starting and Stopping Fog Director

Use the fogd-container.sh {start|stop|status|restart} script in the following directory to start, stop, obtain status, and restart Fog Director:

cd /opt/fogd/scripts

Obtaining Status of All Services Running on the Host

Use the status.sh script in the following directory to show the status of all services running on the host.

cd /opt/scripts

Upgrading Both Fog Director and FND

Use the upgrade.sh script in the following directory to fully upgrade both Fog Director and FND.

opt/fnd/scripts/


Note

Since this performs a full FND upgrade, you must provide the paths to cgms-postgres.rpm and cgms-influx.rpm

Backup and Restore

You can export the entire OVA image file as backup, port it to different deployment or restore from an older image file.

  1. Power down the OVA in vSphere Client.
  2. Select the OVA, and then select File -> Export -> Export OVF Template .

Setting the Time and Timezone Using NTP Service

Use the timedatectl command on the Host VM to perform following operations to sync the time between the host and the docker:

  • Displaying the Current Date and Time: timedatectl
  • Changing the Current Time: timedatectl set-time HH:MM:SS
  • Changing the Current Date: timedatectl set-time YYYY-MM-DD
  • Listing the Time Zone: timedatectl list -timezones
  • Changing the Time Zone: timedatectl set-timezone time_zone
  • Enabling NTP Service: timedatectl set-ntp yes

Please refer to the following link for more info on usage of timedatectl command

https://access.redhat.com/documentation/en-us/red_hat_enterprise_linux/7/html/system_administrators_guide/chap-configuring_the_date_and_time