The documentation set for this product strives to use bias-free language. For the purposes of this documentation set, bias-free is defined as language that does not imply discrimination based on age, disability, gender, racial identity, ethnic identity, sexual orientation, socioeconomic status, and intersectionality. Exceptions may be present in the documentation due to language that is hardcoded in the user interfaces of the product software, language used based on RFP documentation, or language that is used by a referenced third-party product. Learn more about how Cisco is using Inclusive Language.
Standalone Mode: Testing IOx Applications Via Local Manager
This section contains the following topics:
Understanding Standalone Mode
Typically, when connected to the IC3000 through a laptop, you are in standalone mode. This mode is suitable for developers,
system integrators or engineers who want to test or build an application, which is specific to their choice of use case, before
deploying in large scale via FND. It is assumed that the IOX client utility can be used to package the application as a container
or Docker.
This mode is typically when the IC3000 has been deployed in field, and actively performing in the field hosting apps that
were prebuilt and designed to run. This mode must be managed by FND. The device management ports learn the DHCP address and
gradually registers with FND. Please refer to Step 7: IC3000 Registration.
Standalone Mode Connectivity
Consider the following points in order to connect to the IC3000 in standalone mode:
Brand new devices (fresh from Cisco factory) have the capability of determining the mode autonomously depending on the networking
configurations.
Standalone mode enables the Cisco IOx Local Manager interface which can be accessed via the browser on the computer connected
to the gateway.
Standalone mode is activated ONLY over the management Ethernet port of the device.
Standalone mode CANNOT be turned ON via FND.
An IC3000 deployed in managed mode can be re-configured to operate in standalone mode by pressing the "Config-Reset" button
on the device. Refer to reset button options in IC3000 Related for details.
Standalone mode operates only over a predetermined IPv4 link local address for the first time. To extend the standalone mode
to use a LAN/WAN address, please follow the steps in Remote Device Management. The Remote management feature is turned on by default from release 1.2.1 and greater, so that the local manager access is
available on all the time.
Steps to Connect to the Management Port:
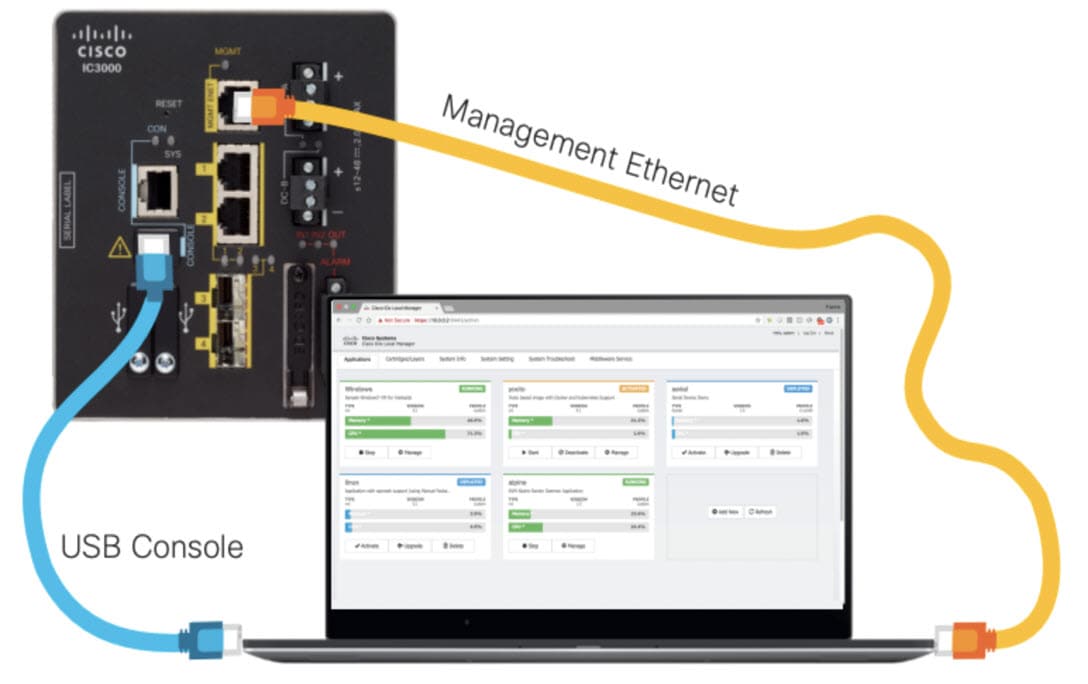
The following graphic shows a laptop connected to the management interface via a standard Ethernet cable.
Figure 1. PC Connected to Management Interface
(Management Interface Configuration)
(Laptop Configuration)
IP address 169.254.128.2Netmask 255.255.0.0
IP address 169.254.128.4Netmask 255.255.0.0
IDA maintains a service which monitors the management interface every 30 seconds. If IDA detects the IP address is not available,
IDA will assign the link local IP address of 169.254.128.2 to the management interface.
If the device is in managed mode, IDA will enable the device configuration page as well. Once the WebSocket connection is
established, IDA will disable the device configuration page.
Note
This is new with release 1.3.1. This enhancement will only be effective when the management interface is using a DHCP configuration.
Connect the Management interface on the IC3000 and your laptop with a console cable.
Step 3
Do not power on the IC3000 yet.
Step 4
Assign the IP address of 169.254.128.4 with a netmask of 255.255.0.0 to the network interface on your computer.
Note
It is critical you assign this specific IPv4 link-local address.
Step 5
Now, power-on the IC3000.
Step 6
The device will be in discovery state for the first 30 seconds to learn its dhcp address. After 30 seconds the device will
assign an LLA address.
Step 7
The IC3000 will be ready to operate in standalone mode in 30 seconds (The delay of 30 seconds only occurs the first time a
device is booted up. All subsequent reloads will immediately take the device to standalone mode without delay).
Step 8
Open a browser on your laptop and enter https://169.254.128.2:8443 as a URL. The Local Manager opens. Enter admin/cisco123 as your username/password, and then update the default password.
Note
admin/cisco123 is the default account credentials from release 1.2.1 release and greater.
Password Rules:
The following password rules must be adhered to:
Minimum length = 6
Must not be based upon a dictionary word
Must not be a combination of dictionary words
Must not be composed of common string patterns like “qwerty”, “asdfgh” etc...
Must not be a combination of common string patterns and dictionary words
Currently not supporting Unicode
Step 9
For devices running 1.2.1, use the default credentials (admin/cisco123) for logging in the first time. The user is required
to change the password when logging in the first time. The IC3000 devices running 1.1.1 and 1.0.1 may need to create or use
developer credentials to login via local manager.
Upgrading the IC3000 Firmware with Local Manager
The following steps are used to upgrade the device firmware through the Local Manager GUI in Standalone Mode.
Procedure
Step 1
Login to LM GUI using the LLA address
Step 2
Use the default or newly created password (default is admin/cisco123).
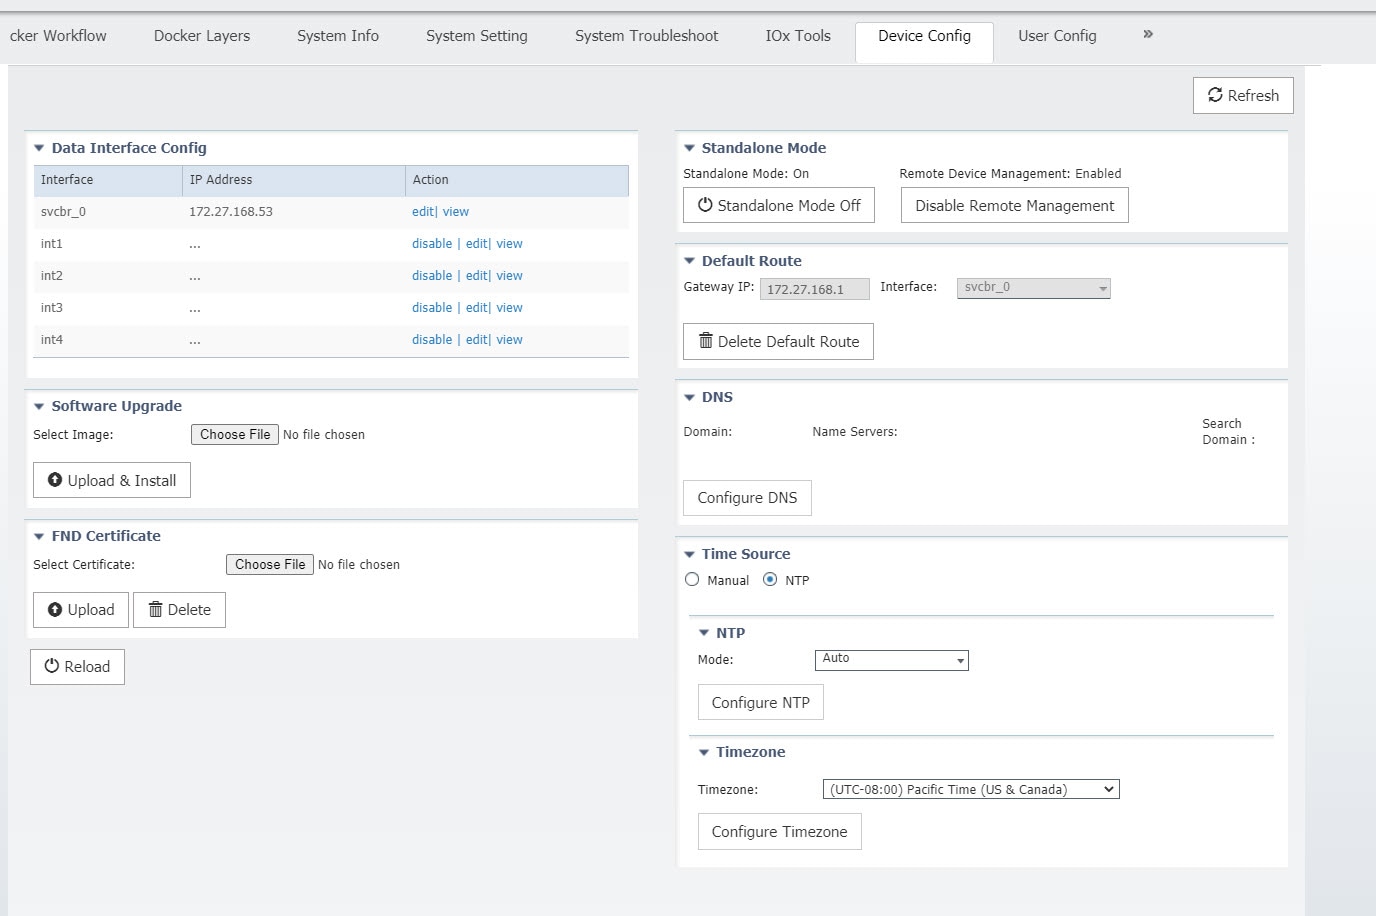
Step 3
Once you are logged into the GUI, click on the DeviceConfig tab, then select the SoftwareUpgrade. (See Figure 1).
Step 4
Select the image file and then click Upload&Install.
Step 5
If you receive any pop-up messages click OK.
Step 6
The image is pushed to the IC3000 and it is rebooted with the new firmware.

 Feedback