About Local Manager
Cisco IOx Local Manager provides a web-based user interface that you can use to manage, administer, monitor, and troubleshoot applications on a device, and to perform a variety of related activities.
The documentation set for this product strives to use bias-free language. For the purposes of this documentation set, bias-free is defined as language that does not imply discrimination based on age, disability, gender, racial identity, ethnic identity, sexual orientation, socioeconomic status, and intersectionality. Exceptions may be present in the documentation due to language that is hardcoded in the user interfaces of the product software, language used based on RFP documentation, or language that is used by a referenced third-party product. Learn more about how Cisco is using Inclusive Language.
This section contains the following topics:
Cisco IOx Local Manager provides a web-based user interface that you can use to manage, administer, monitor, and troubleshoot applications on a device, and to perform a variety of related activities.
Find the Management port address to access the IC3000 via a web browser. After connecting the IC3000 to a laptop, gather the svcbr_0 address whether you are in managed mode, or standalone mode. Use the show interfaces command to determine the IP address, or if you are managing the device via FND, get the device IP address. Use the ioxusername and ioxpassword to login via Local Manager, or you can create users on the IC3000 from the device configuration tab. Use the json commands to create users and passwords that Local Manger can use.
ic3k>show interfaces

svcbr_0   Link encap:Ethernet  HWaddr f8:b7:e2:b5:26:80
          inet addr:172.27.127.174
          Bcast:172.27.127.255 Mask:255.255.255.0
          inet6 addr: fe80::fab7:e2ff:feb5:2680/64 Scope:Link
          UP BROADCAST RUNNING MULTICAST  MTU:1500  Metric:1
          RX packets:396 errors:0 dropped:0 overruns:0 frame:0
          TX packets:25 errors:0 dropped:0 overruns:0 carrier:0
          collisions:0 txqueuelen:1000
          RX bytes:29614 (28.9 KiB)  TX bytes:3373 (3.2 KiB)
 Note |
If the IC3000 is in standalone mode, you will be using an IPv4 LLA address of 169.254.128.x. The rest of the following work flow is the same. |
| Step 1 |
Open a web browser and enter https://169.254.128.2:8443 in the address bar. |
| Step 2 |
Login by using the default credentials admin/cisco123 for the first time if you are running release 1.2.1. For older devices running 1.1.1 or 1.0.1, use developer/< your-password> . This is the password that was created by the developer set-password or developer change-password command. You should have various tabs that Local Manager supports, since you are accessing the device via Local Manager. You should be familiar with the standalone mode options like Device Config tab. If a security exception message appears in your browser, confirm the exception to continue to the Cisco IOx Local Manager Login screen. If you see the message "For best results use a supported browser" near the top of this screen, your browser may have compatibility issues with this version of Cisco IOx Local Manager. In this case, we recommend that you load a compatible browser. Hover your mouse pointer over the down-arrow next to this message to see a list of compatible browsers as shown in Figure 1. 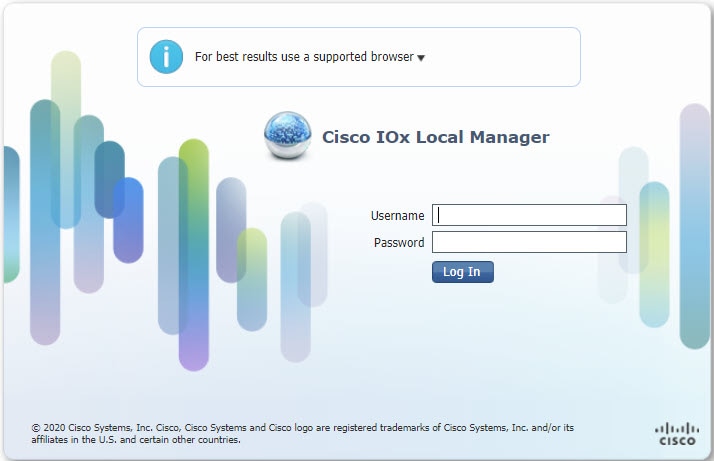 |
| Step 3 |
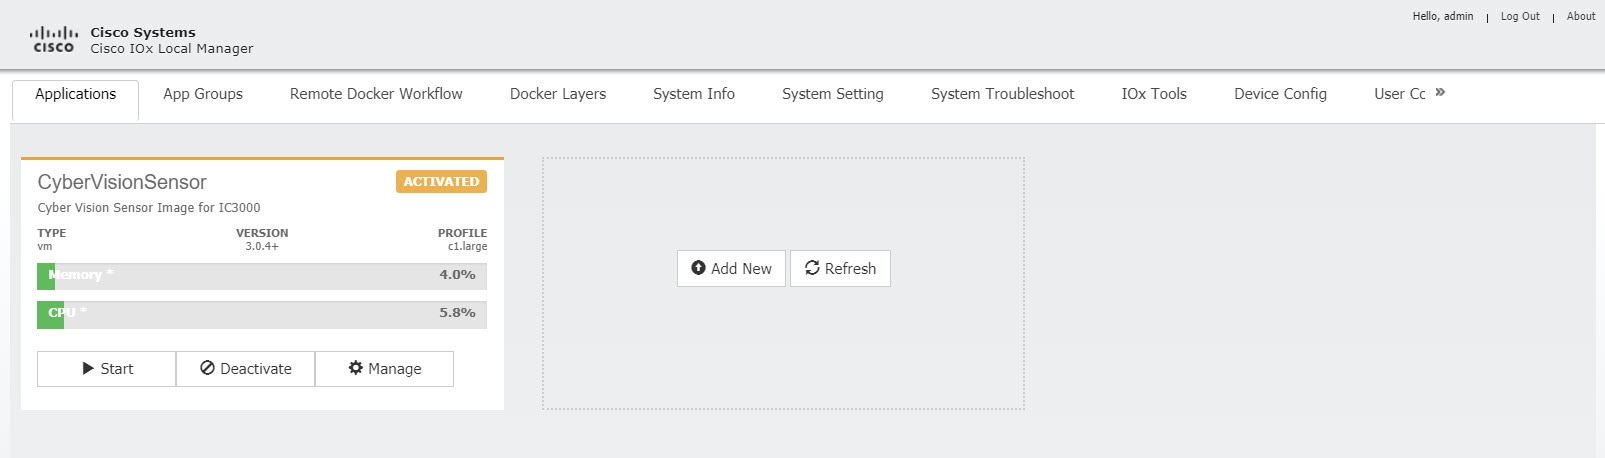
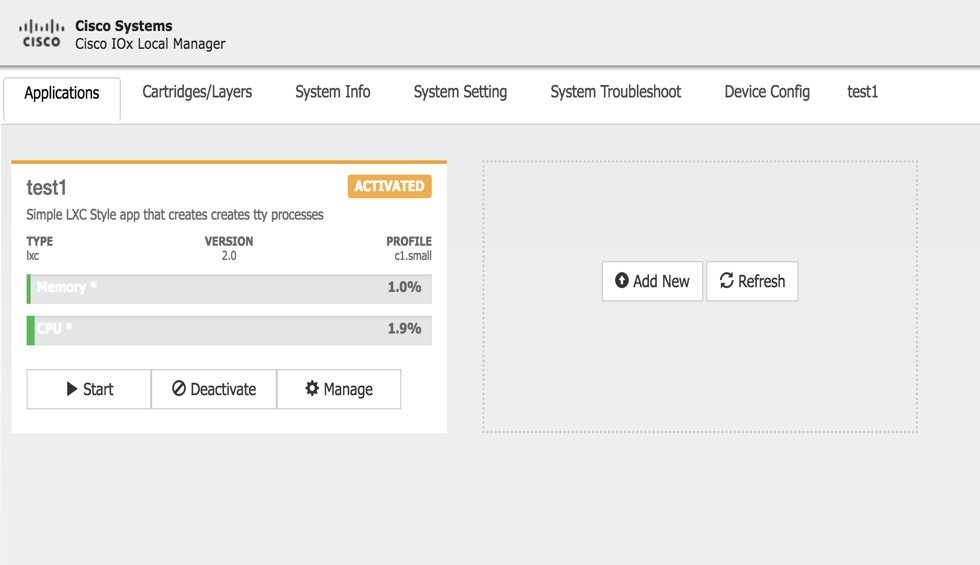
Click Log In . The Local Manager Applications Tab appears. See Figure 2. |
The time feature in Local Manager provides the user with the ability to change the system time, date and time zone on an IC3000. Although this feature is available, it is still recommended to provide access to an NTP server to avoid any issues.
Release 1.3.1 provides enhanced capabilities. The user can now select the time source between manual date and time or NTP. When using NTP, the user can provide information about NTP servers manually, or get that information from a DHCP Server.
The following are options that the user can select from the Device Configuration page of the User Interface (UI):
Note |
Either Manual or NTP date and time options can be selected. |
Some of the feature caveats are:
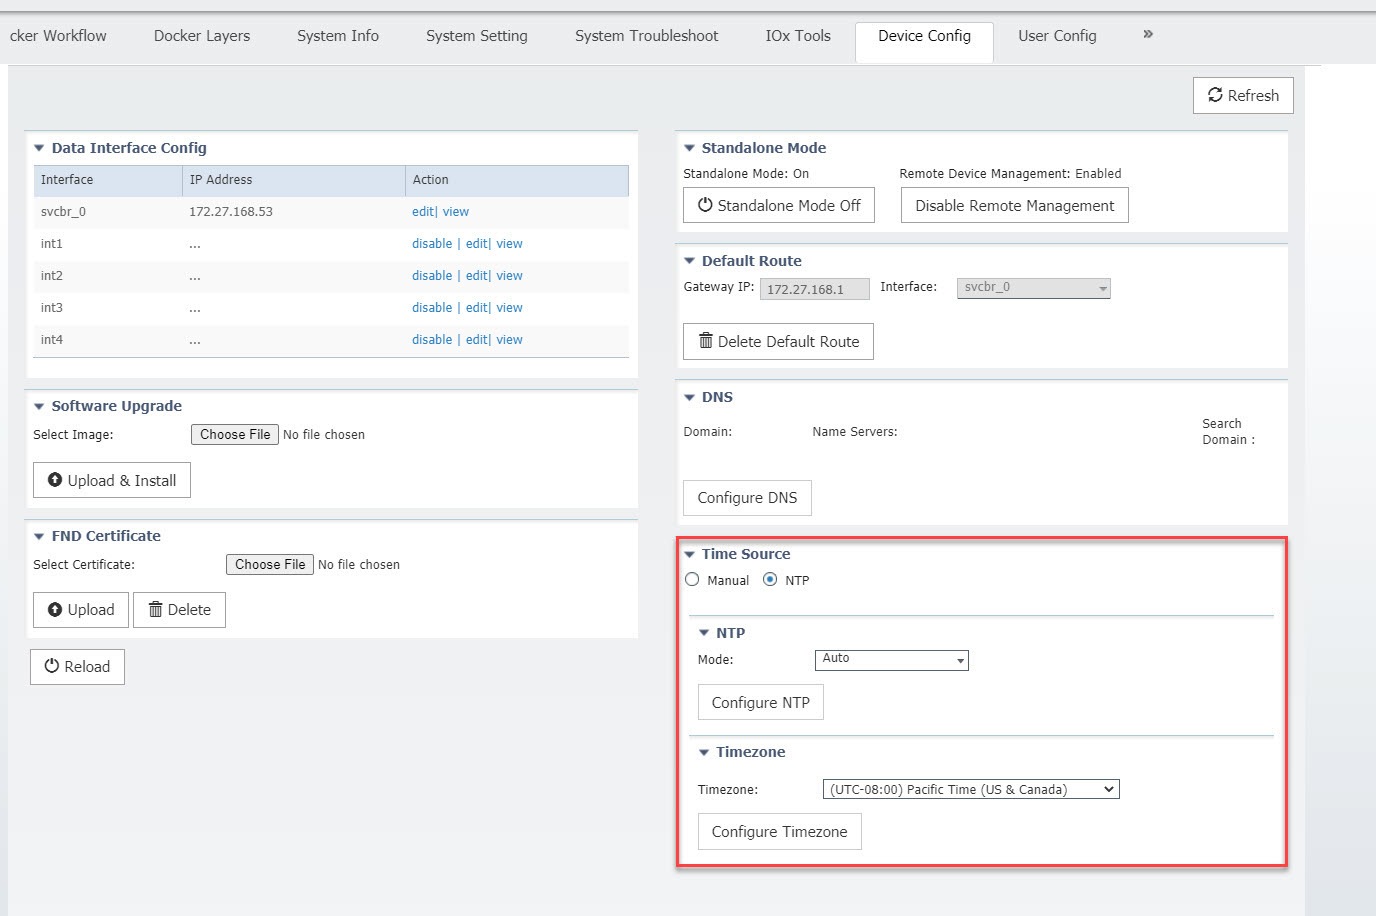
From the Local Manager GUI, click on the Device Config Tab. The following shows the Time Source section highlighted.
From this section, you can click on Manuel or NTP as your time source. Choosing NTP defaults to Auto. Click Configure NTP and the settings are updated.
To configure your Date and Time manually, select the Manual button. The Time Source window appears as the following:
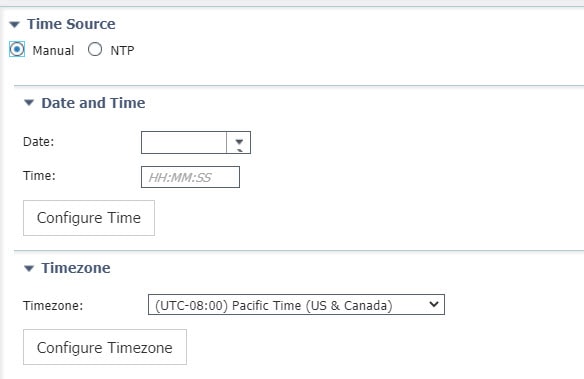
Fill in the date and time you wish and then click Configure Time .
To configure NTP manually, move on to the next section.
The NTP feature in Local Manager provides the user with the ability to set Network Time Protocol (NTP) manually on an IC3000.
| Step 1 |
From the Local Manager GUI, click on the Device Config Tab. |
||||
| Step 2 |
Under the Time Source section, click on NTP . Refer to the following: |
||||
| Step 3 |
Beside the Mode, select the pulldown and click Manual . Refer to the following graphic. 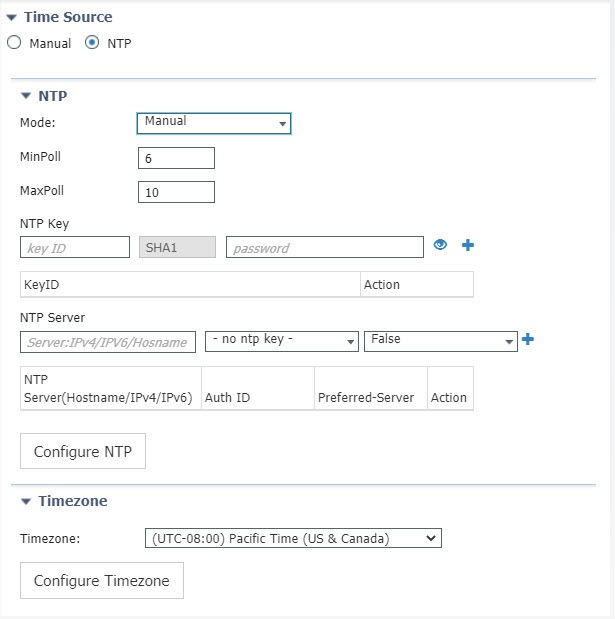
|
||||
| Step 4 |
Fill out the NTP entries, then click the plus sign (+)
|
||||
| Step 5 |
Click Configure NTP . |
Note |
To check if the device has synchronized to the NTP server, run the command show ntp status on the IC3000. If the NTP server is reachable, it will show a message stating the clock is synchronized: |
IC3000> show ntp status
Clock is synchronized, stratum 3, reference is <your ip address>
The DNS feature in Local Manager provides the user with the ability to push a DNS configuration on an IC3000 device that's in standalone mode.
To push DNS configuration via LM perform the following:
| Step 1 |
From the Local Manager GUI, click on the Device Config Tab. |
| Step 2 |
Under the DNS section, click on Configure DNS . Refer to Figure 1. 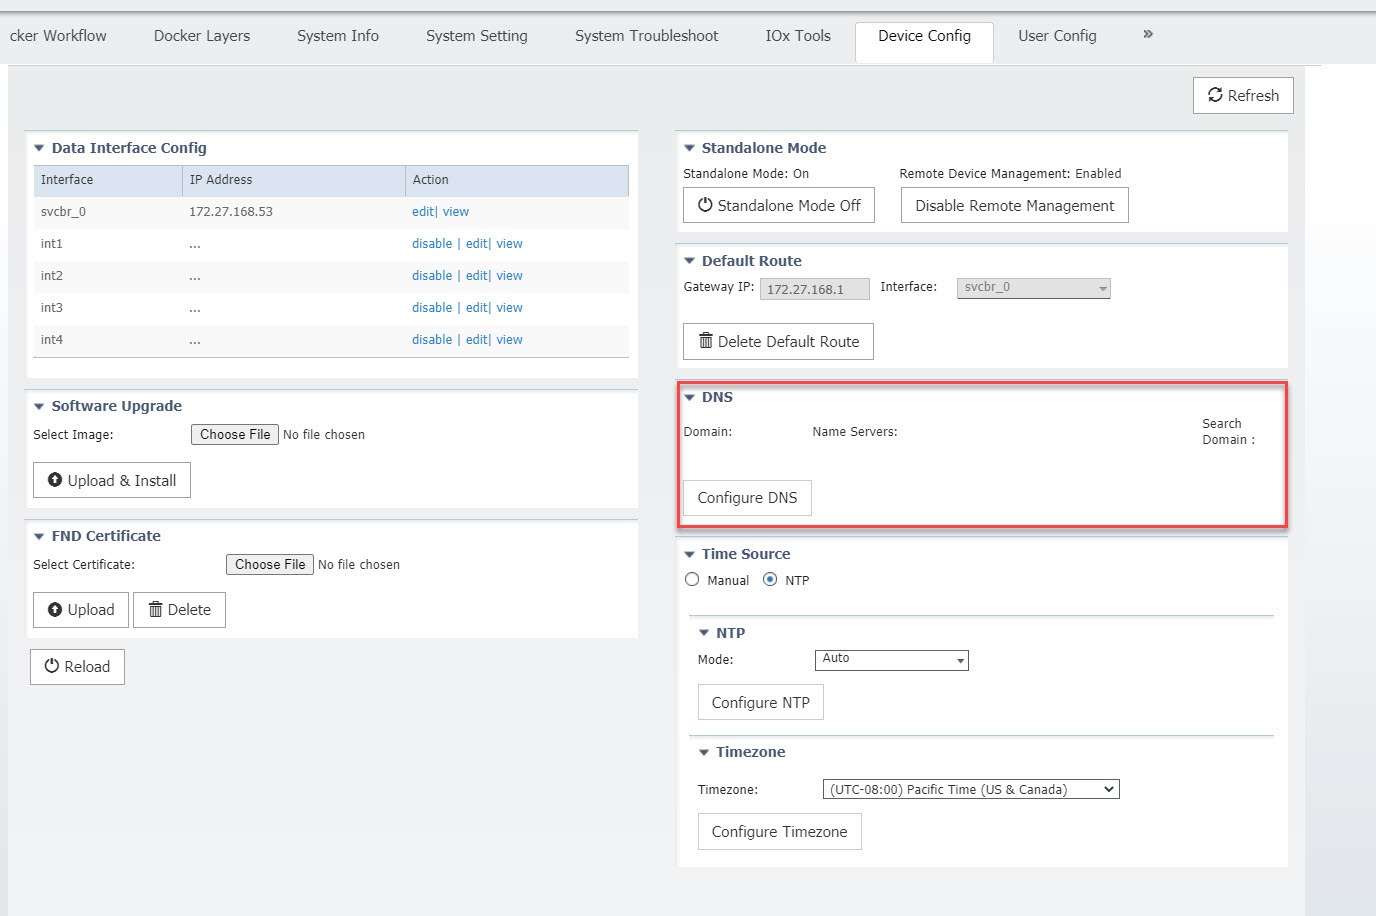
|
| Step 3 |
After clicking on Configure DNS, the DNS Config window opens. Refer to Figure 2. 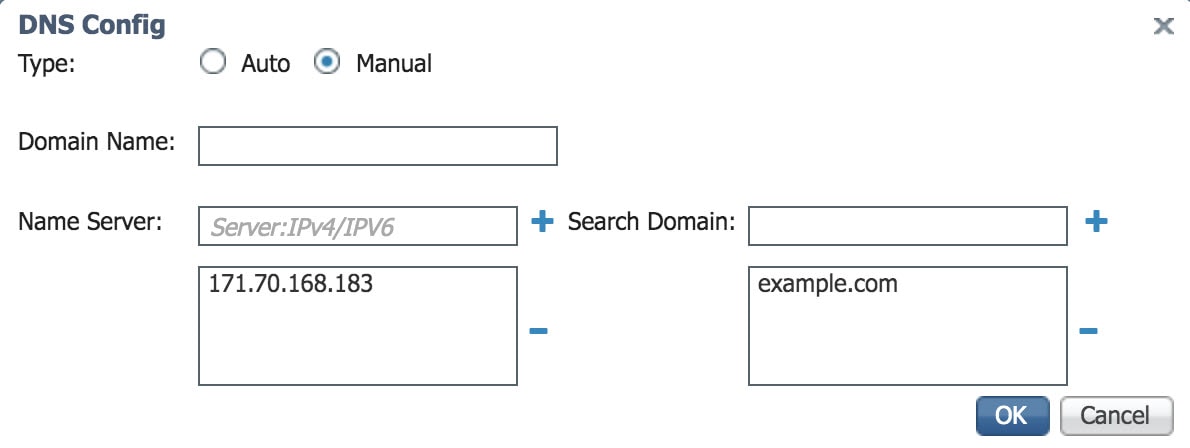
|
| Step 4 |
Add a DNS entry or search domain, then click the plus sign (+ ) |
| Step 5 |
Click on OK . |
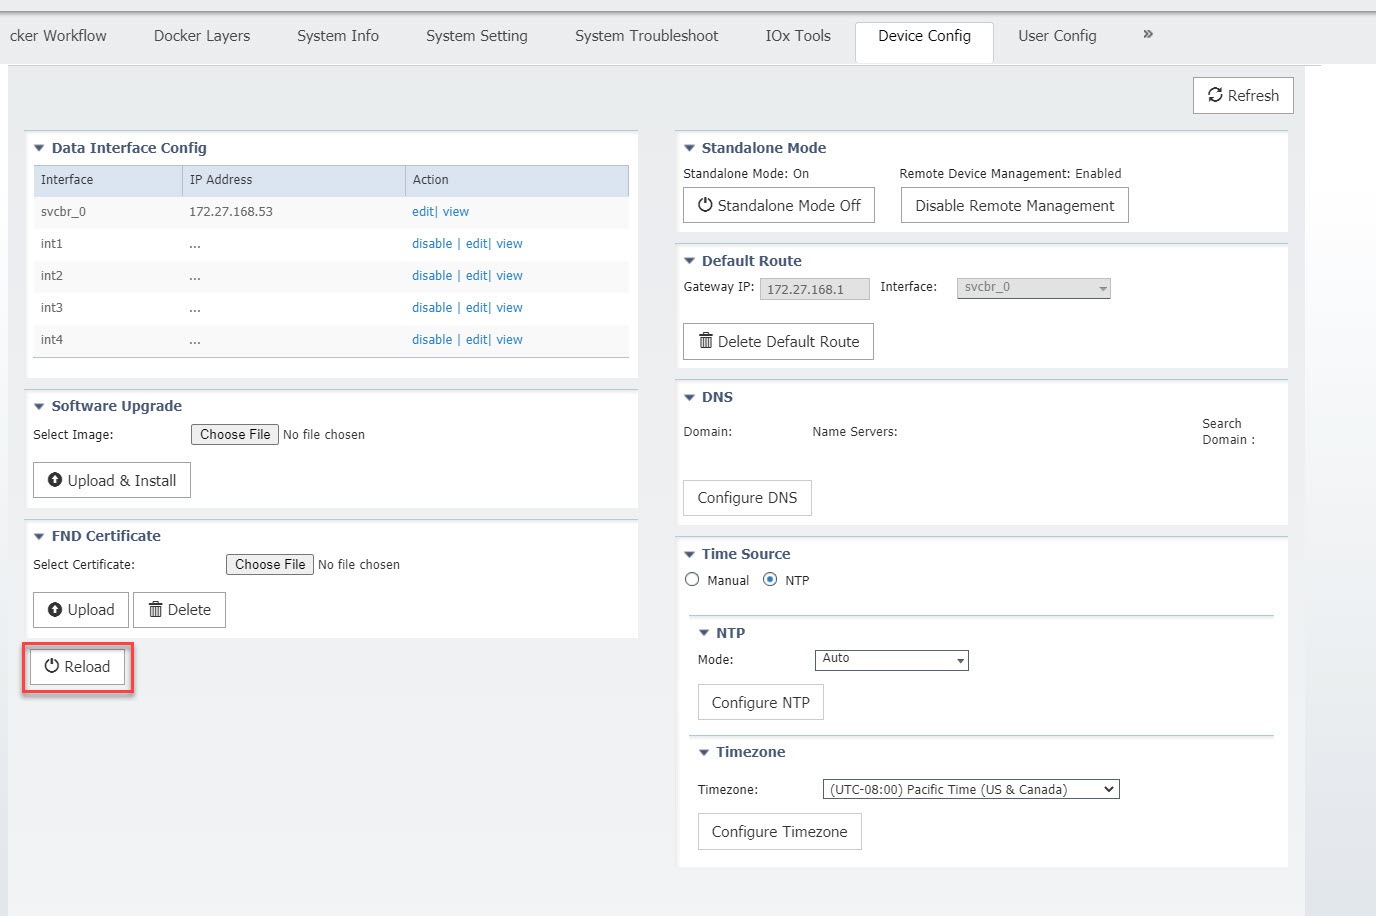
When managing the IC3000 in standalone mode, and the device is not functioning as expected, a software reboot button is provided under the Device Config tab. Refer to Figure 1.
Note |
After pressing the Reload button, you will temporarily lose access to the LM GUI for approximately 2 to 3 minutes until the device comes back up. |
Your IC3000 is now ready for Cisco IOx application development.
This section shows you how to use Cisco IOx Local Manager to load a sample EFM application and how to run the application
| Step 1 |
Download the Docker application on to your desktop. Go to the following link: https://software.cisco.com/download/home/286316104/type/286312892/release/1.5.0 |
||
| Step 2 |
In the Cisco IOx Local Manager Applications Tab, click Add New. The Deploy application dialog box appears. 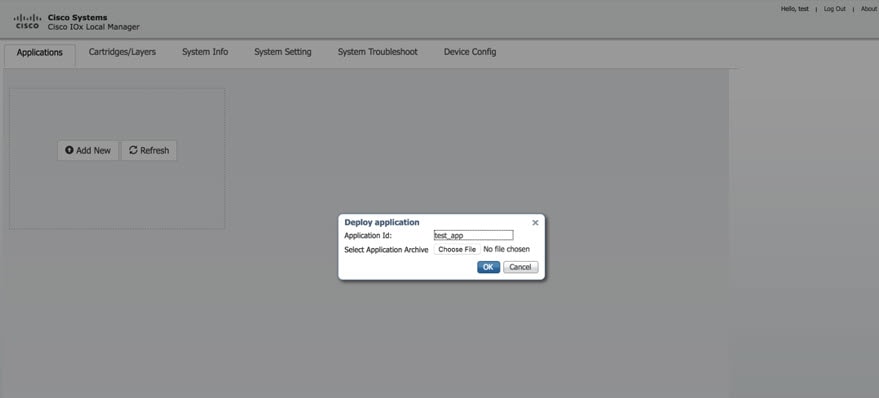 |
||
| Step 3 |
In the Deploy Application dialog box, take these actions:
|
||
| Step 4 |
The application file uploads to Cisco IOx. 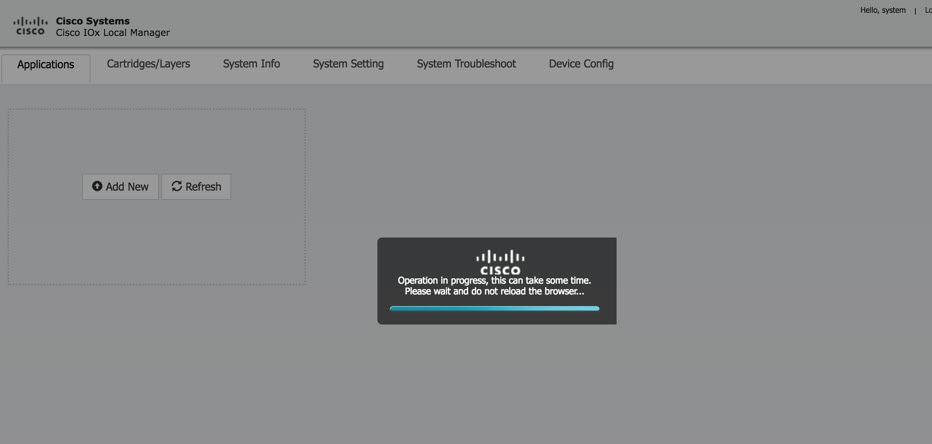
|
||
| Step 5 |
When you see the pop-up message "Successfully Deployed”, click OK. 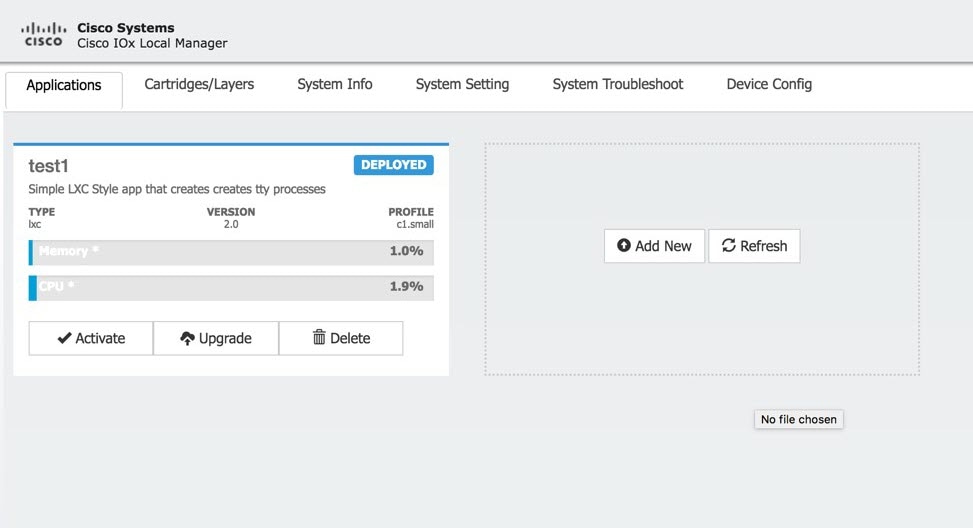
|
||
| Step 6 |
In the test1/APP area, click the Activate button. The Applications > Resources tab displays, see #__. 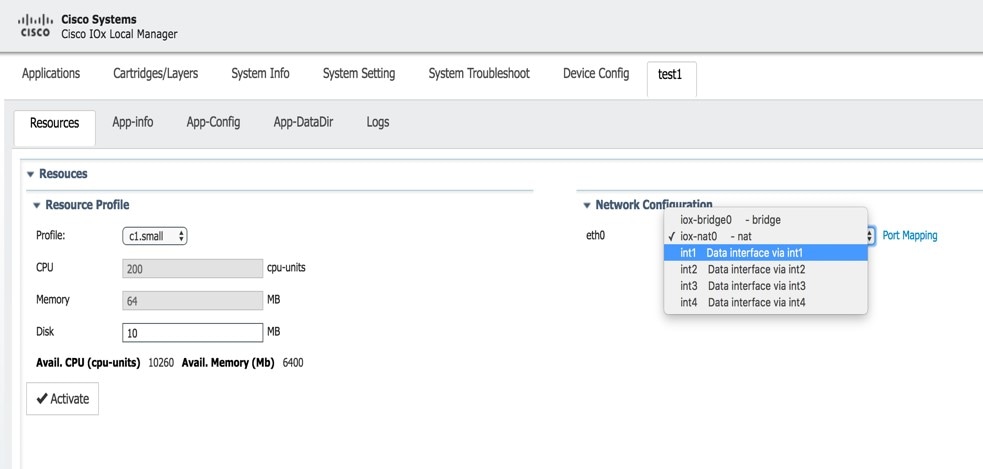 |
||
| Step 7 |
In the Network Configuration area of the Applications > Resources tab, perform the following: |
||
| Step 8 |
While still in the Applications > Resources tab, click the Activate button to activate the application. |
||
| Step 9 |
Click the Applications tab. |
||
| Step 10 |
In the EFM area, click the Start button.
 |
||
| Step 11 |
Click the App-info tab and make sure that data ports int1 and int2 are up. Then, once the application is started check the dhcp obtained address in the App-info tab. 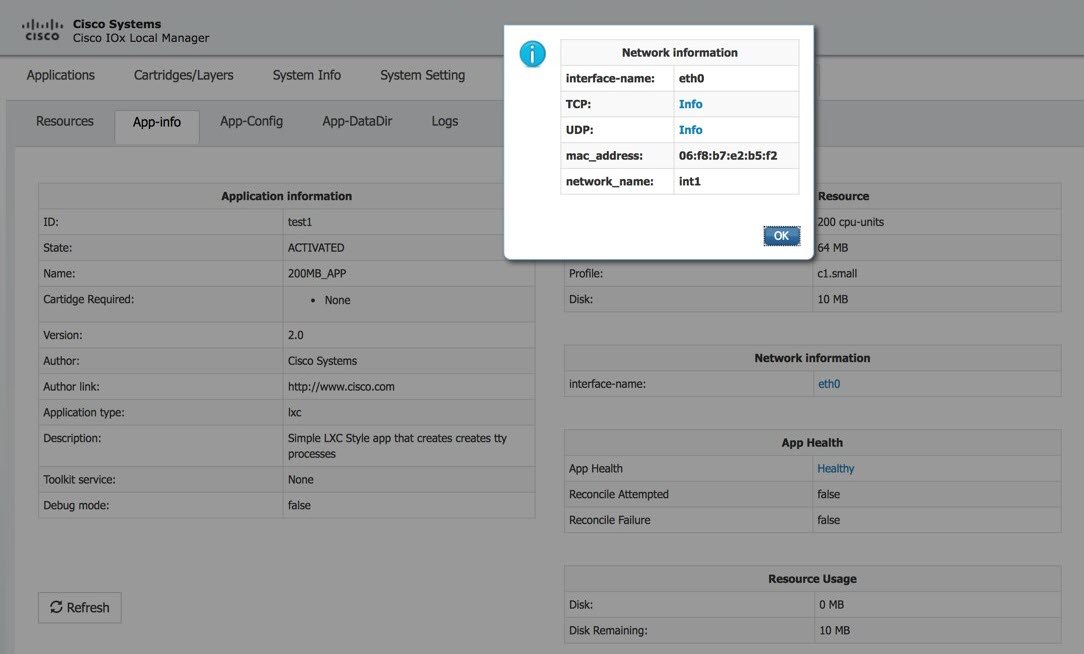 |
There are a number of applications that can be loaded onto the IC3000. Developers can package any application as long as it is in a container or VM. Additional information and examples are located on DevNet documentation on IOx. Provides an overview as well as details by scrolling down the left hand side:
The remote device management feature provides the user with the ability to enable or disable the remote access to the device configuration page from Cisco IOx Local Manager over a non-link local address. This is turned ON or enabled by default thus allowing for local and remote access of the local manager GUI. The below steps are valid for older release, for example 1.1.1, where the user needs remote management.
Note |
Remote Device Management is new with Local Manager version 1.8. If your device is still running version 1.7, you will need to upload the new image. See Step 1 below. |
The procedure to bring the IC3000 up into Standalone Mode remains exactly same as previously described in Phase 3: Standalone Mode: Testing IOx Applications via Local Manager, page 1. Use the pre-defined link-local address169.254.128.2 to get the device up in standalone mode.
Next, follow these additional steps to enable remote device management:
| Step 1 |
If required, upload the new Image from the Device Config tab and it will reload the device with the latest image. |
||
| Step 2 |
Open a NEW browser and login again with the 169.254.128.2 address to the Local Manager using default credentials. (admin/cisco123) or the new password if the credentials are changed.
|
||
| Step 3 |
In the Device Config tab there is a new section on the right side called “Remote Device Management”. See the highlighted area in the following graphic. 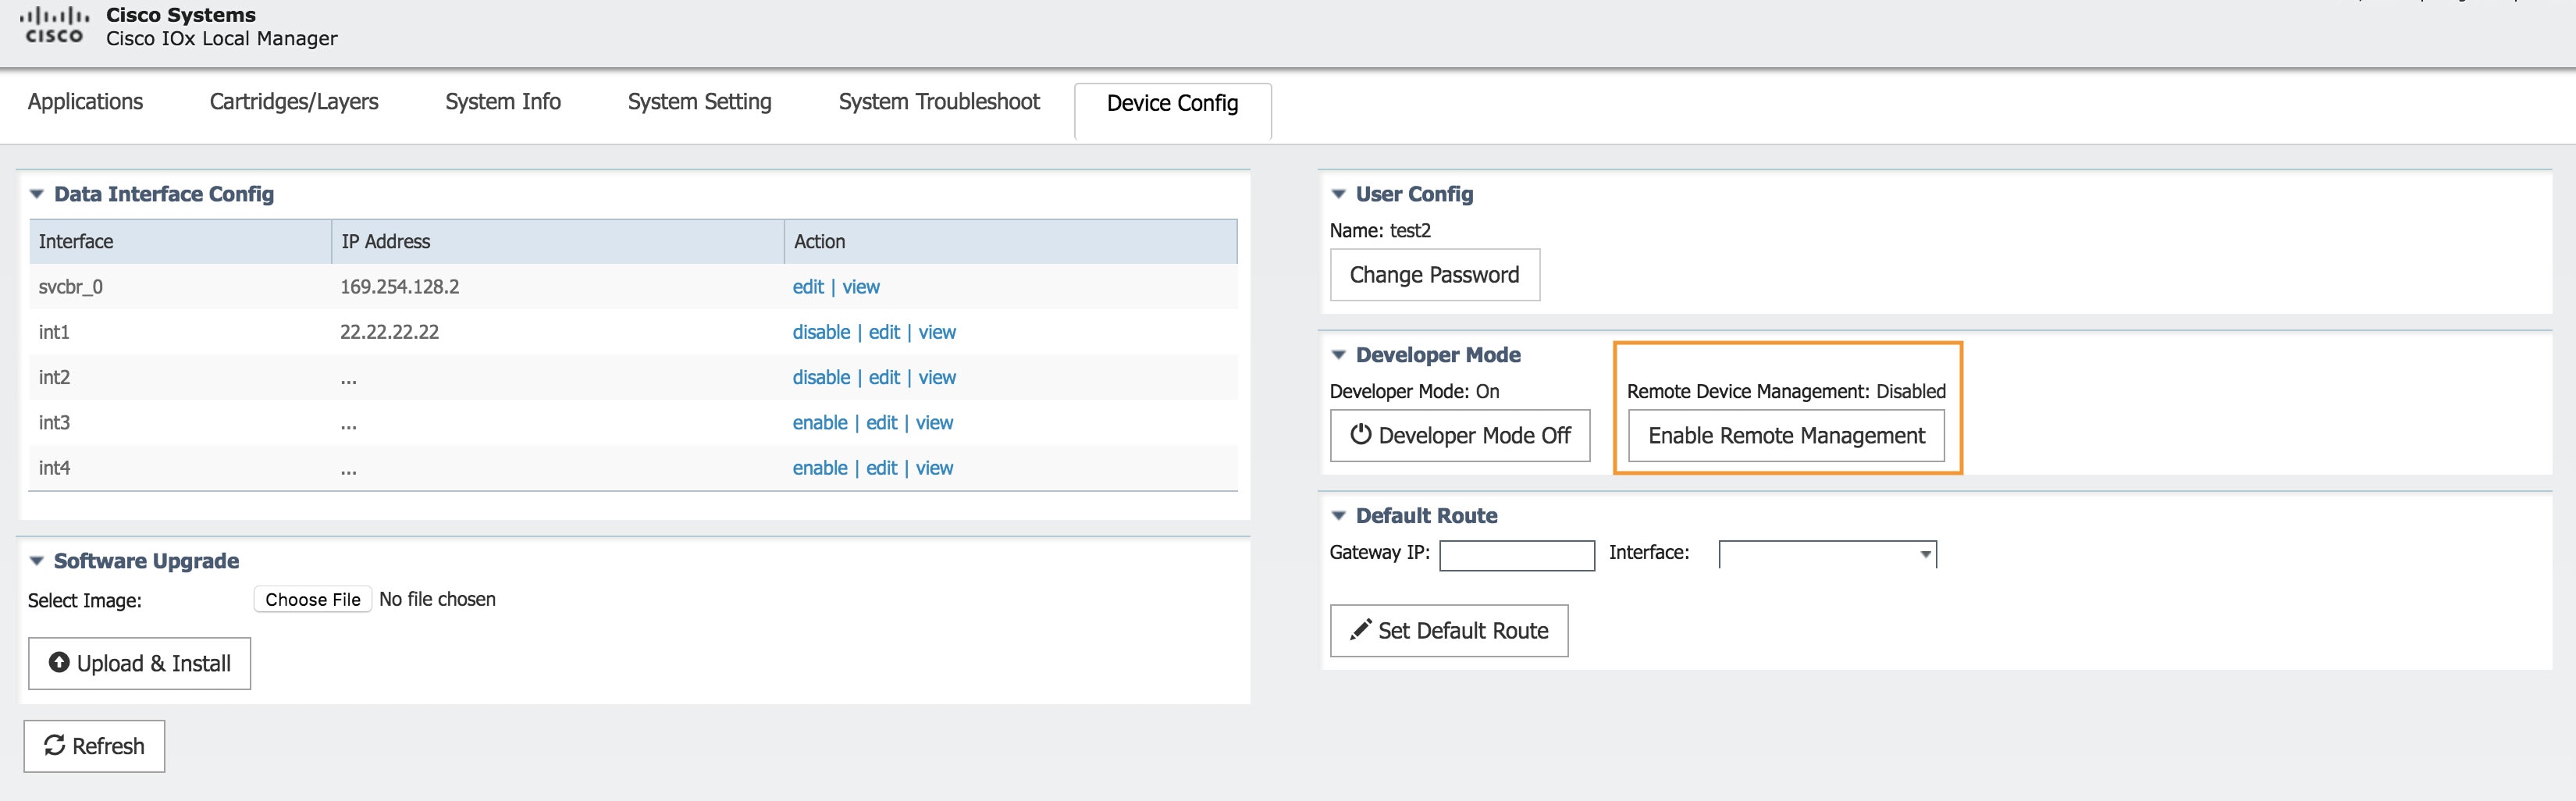 |
||
| Step 4 |
Click Enable Remote Management , and then respond with Yes/Okay for any pop-ups. After enabling remote device management, the user can access the device configuration page from any IP address other than the link local address.
|
||
| Step 5 |
Use the https://<new address> :8443 in a new browser window to login to Local Manager using developer credentials. See Figure 2 for guidance for these steps. |
||
| Step 6 |
Make sure you are aware of your network topology (static ip address or DHCP) for the management interface svcbr_0. If the address is non link local address other than 169.x.x.x
|
||
| Step 7 |
Obtain the default-route details and add the Gateway IP route details to the svcbr_0 interface below Default Route . |
||
| Step 8 |
On the left side of the Device Config screen, edit the svcbr_0 interface with chosen IP address and mask. Click Ok |
||
| Step 9 |
See Figure 2 for guidance for these steps. 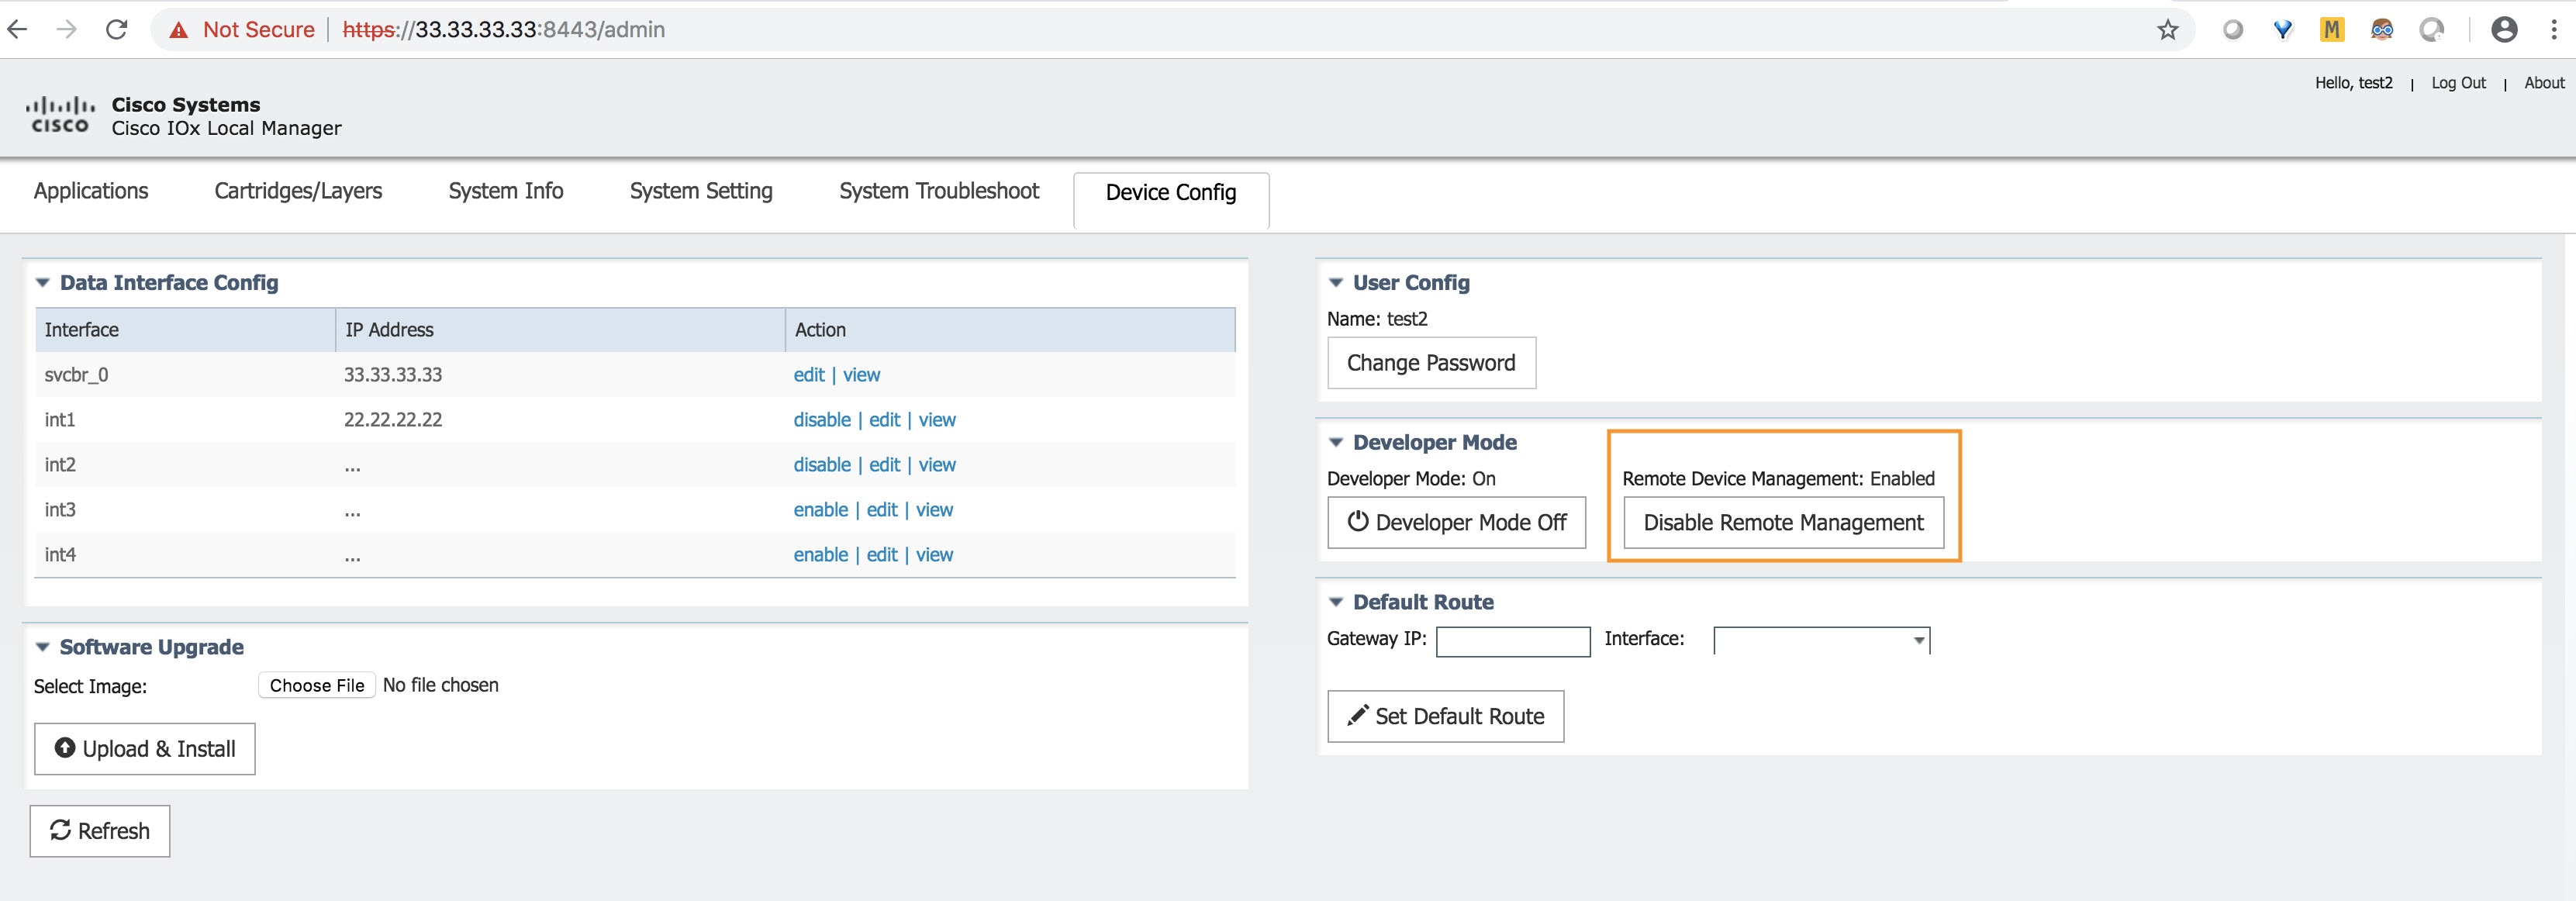 |
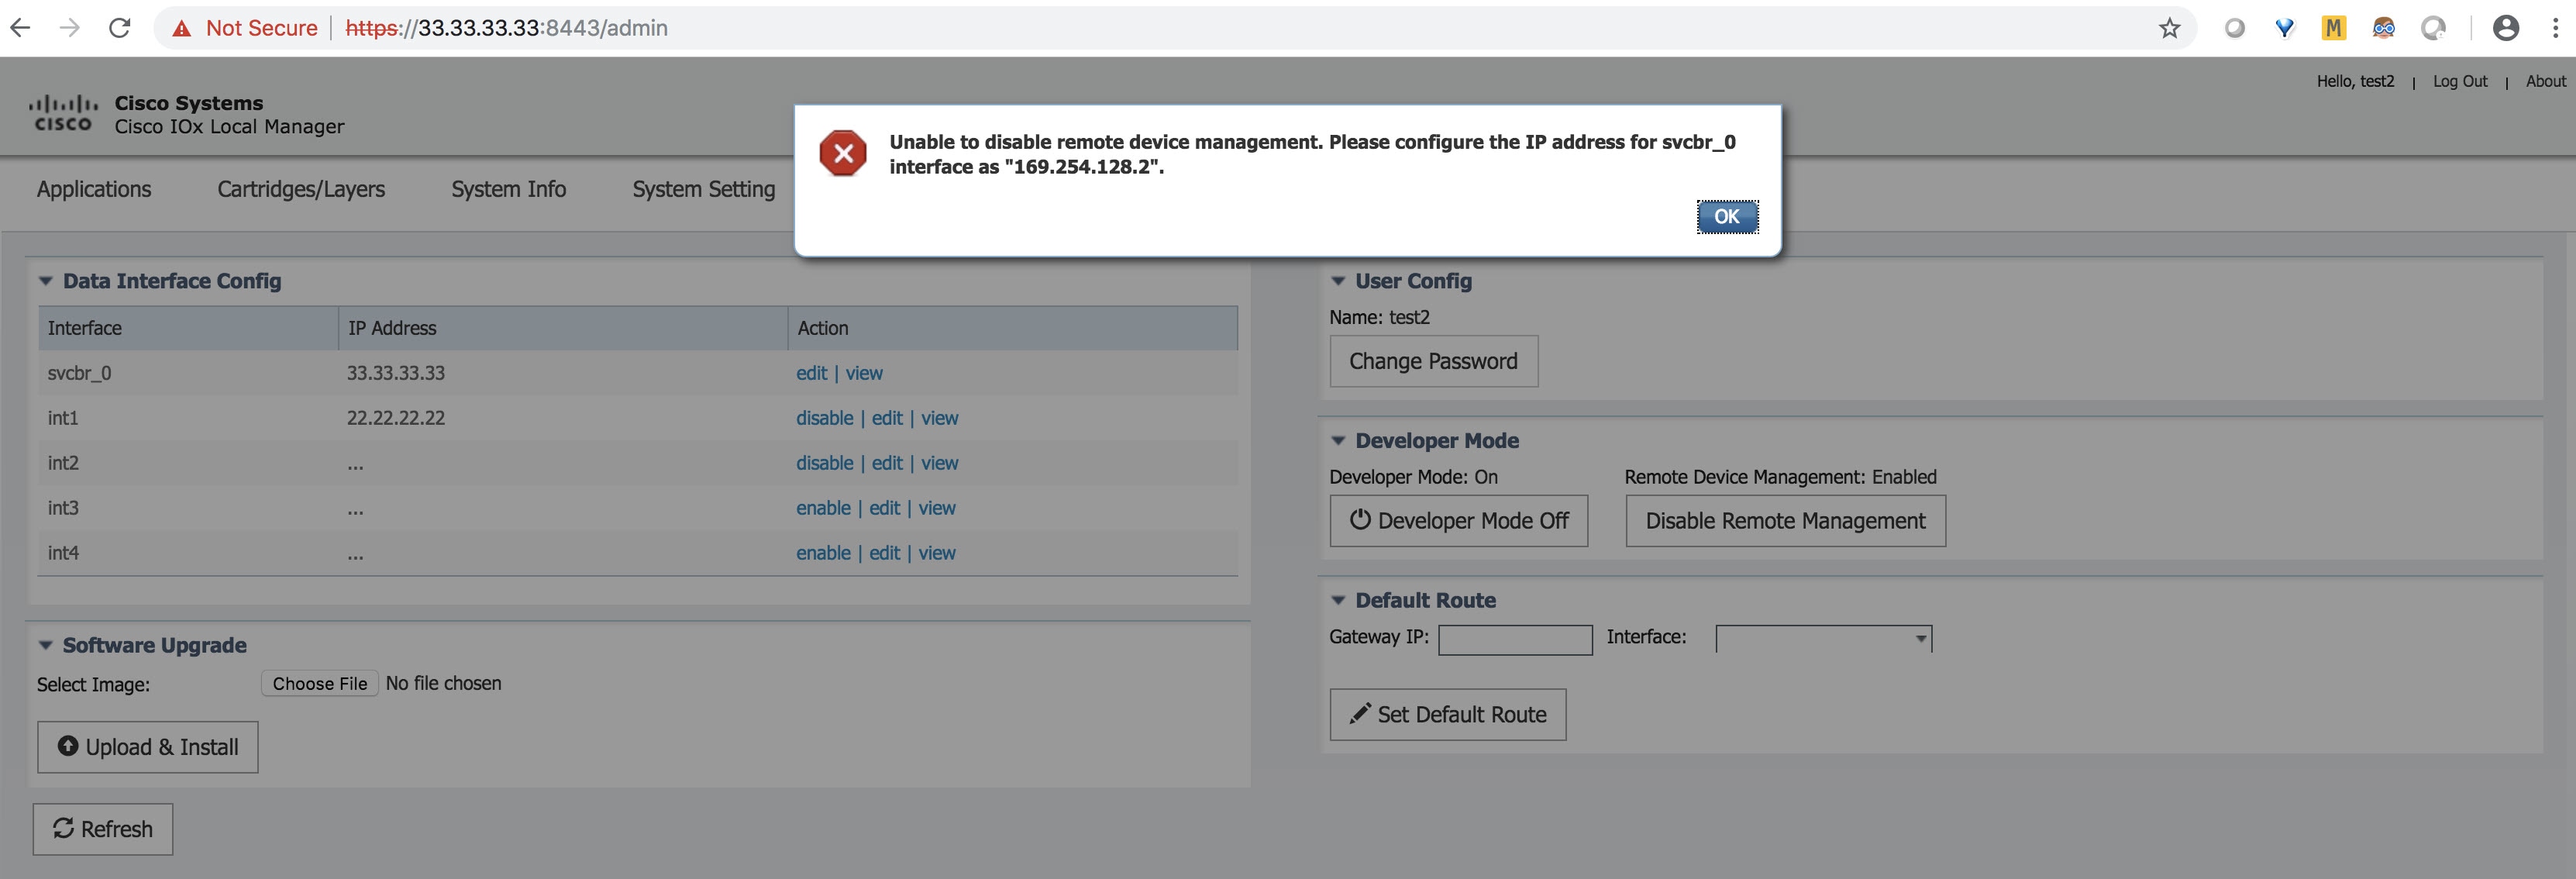
From the same Device Config tab window, you can see the Remote Device Management section status has toggled to “Enabled”. To disable the feature, click Disable Remote Management.
Disabling the remote device management feature will bind the server back to the 169.254.128.2 address of the link local manager. The user will not be allowed to disable the remote device management unless they change the IP address for "svcbr_0" back to 169.254.128.2.
 Feedback