Managing the IC3000 with Field Network Director (FND)

The following steps show how to install and manage your device with FND.

Step 1: Installing FND

If this is your first time setting up the FND OVA infrastructure, go to Appendix for complete information.

Download the IoT Field Network Director software from this location:

https://software.cisco.com/download/home/286287993/type

Visit FND URL https://<IP address from step 4>/ and change the password for root user. Default username/password is root/root123


Note

Change the ADMIN > SYSTEM MANAGEMENT > PROVISIONING SETTINGS > IOT FND URL with the FND IP address as shown below. Otherwise, registration may fail.
Figure 1. Provisioning Settings

This image 429480.jpg is not available in preview/cisco.com
Step 2: DHCP Options

If the IC3000 gateway gets an IP address from the DHCP server, Option 43 is used to advertise the FND IP address and Option 42 is used to advertise the NTP server IP address via DHCP.

The management interface sends a DHCP option 60, also known as vendor-class-identifier, in its request. The device identification is sent as the string cisco-ic3000. Upon receiving the vendor-class-identifier, the DHCP server can take actions as required.

Example of DHCP Option 42 and 43

Configure the following on an IR8x9:


ip dhcp pool ic3000_pool2 
network 172.27.88.0 255.255.255.128
dns-server 173.36.131.10
option 43 ascii 5A;K4;B2;I172.27.88.63;J9125
option 42 ip 171.70.168.183 
default-router 172.27.88.1
lease 0 0 2

Please make note of Option 43 usage:


  • If you have a DHCP server, use the “same” PNP discovery option string that we use for regular IOS routers Option 43 ascii “5A;K4;B2;I172.27.88.63;J9125" (IGMA will use port 9121 as default. IoT FND IP is 172.27.88.63)
  • If you wish to use a different port provide the following configuration:

option 43 ascii “5A;K4;B2;I192.168.10.6;J9125;W9128"

On a regular Linux server running DHCP, use the following instructions:


cat /etc/dhcp/dhcpd.conf
subnet 10.10.100.0 netmask 255.255.255.0 {
 
option routers 10.10.100.1;
range 10.10.10.100 10.10.10.199;
option domain-name-servers 10.10.100.1;
option domain-name "test1.dom";
option vendor-encapsulated-options "5A;K4;B2;I10.48.43.227;J9125";
}

In the above example for option 43, the following describes the options:

  • 5A;K4;B2;I172.27.88.63;J9125
    • 5 – DHCP type code 5
    • A – Active feature operation code
    • ; - Delimiter
    • K4 – HTTP transport protocol
    • B2 – PnP server /FND IP address type is IPv4
    • J9125 - port number

Option 42 Usage

The system time may not be synchronized when receiving the device from the factory. It is important to provide ntp server information to get the device clock to current time. This will avoid any issues when establishing a connection to FND and make sure the timestamp on data packets from apps are up to date.

On a regular Linux server running DHCP, use the following instructions:


cat /etc/ntp.conf
subnet 10.10.100.0 netmask 255.255.255.0 {
max-lease-time 604800;
default-lease-time 86400;
option ntp-servers 10.10.100.112;
}

Step 3: Understanding the Device Configuration Template

There is a default template within the FND for IC3000. It is located under CONFIG >Device Configuration tab > default-IC3000 > Edit Configuration template . See Step 6: Adding the IC3000 Gateway(s) to FND.

Edit the interface configuration or add interface settings as required by your use case. Once edited, use the Push Configuration tab to push the new configuration to the active or registered devices.


Note

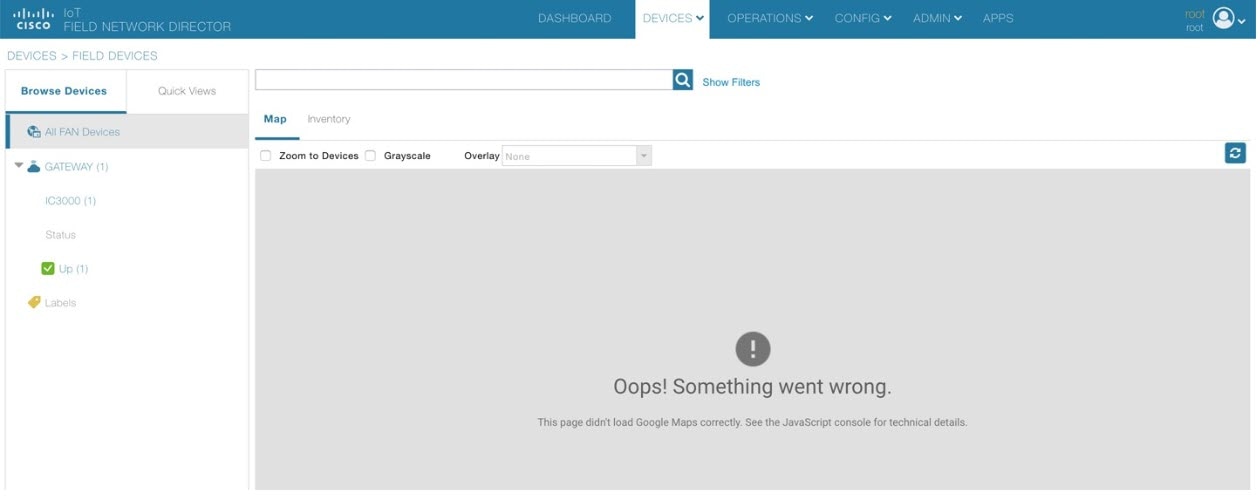
It is important to make sure the map is correctly configured. If valid entries do not exist, you will get an error message like the on shown in the following image. This error does not impact the operation of the device, you can still continue.
Figure 2. Map Error

Step 4: NTP Configuration

To push the NTP configuration via FND, perform the following:

Procedure


Step 1

Go to FND GUI > Config > Device Configuration > Edit Configuration Template .

Step 2

Select both the NTP Server Configuration and the NTP Configuration checkbox.

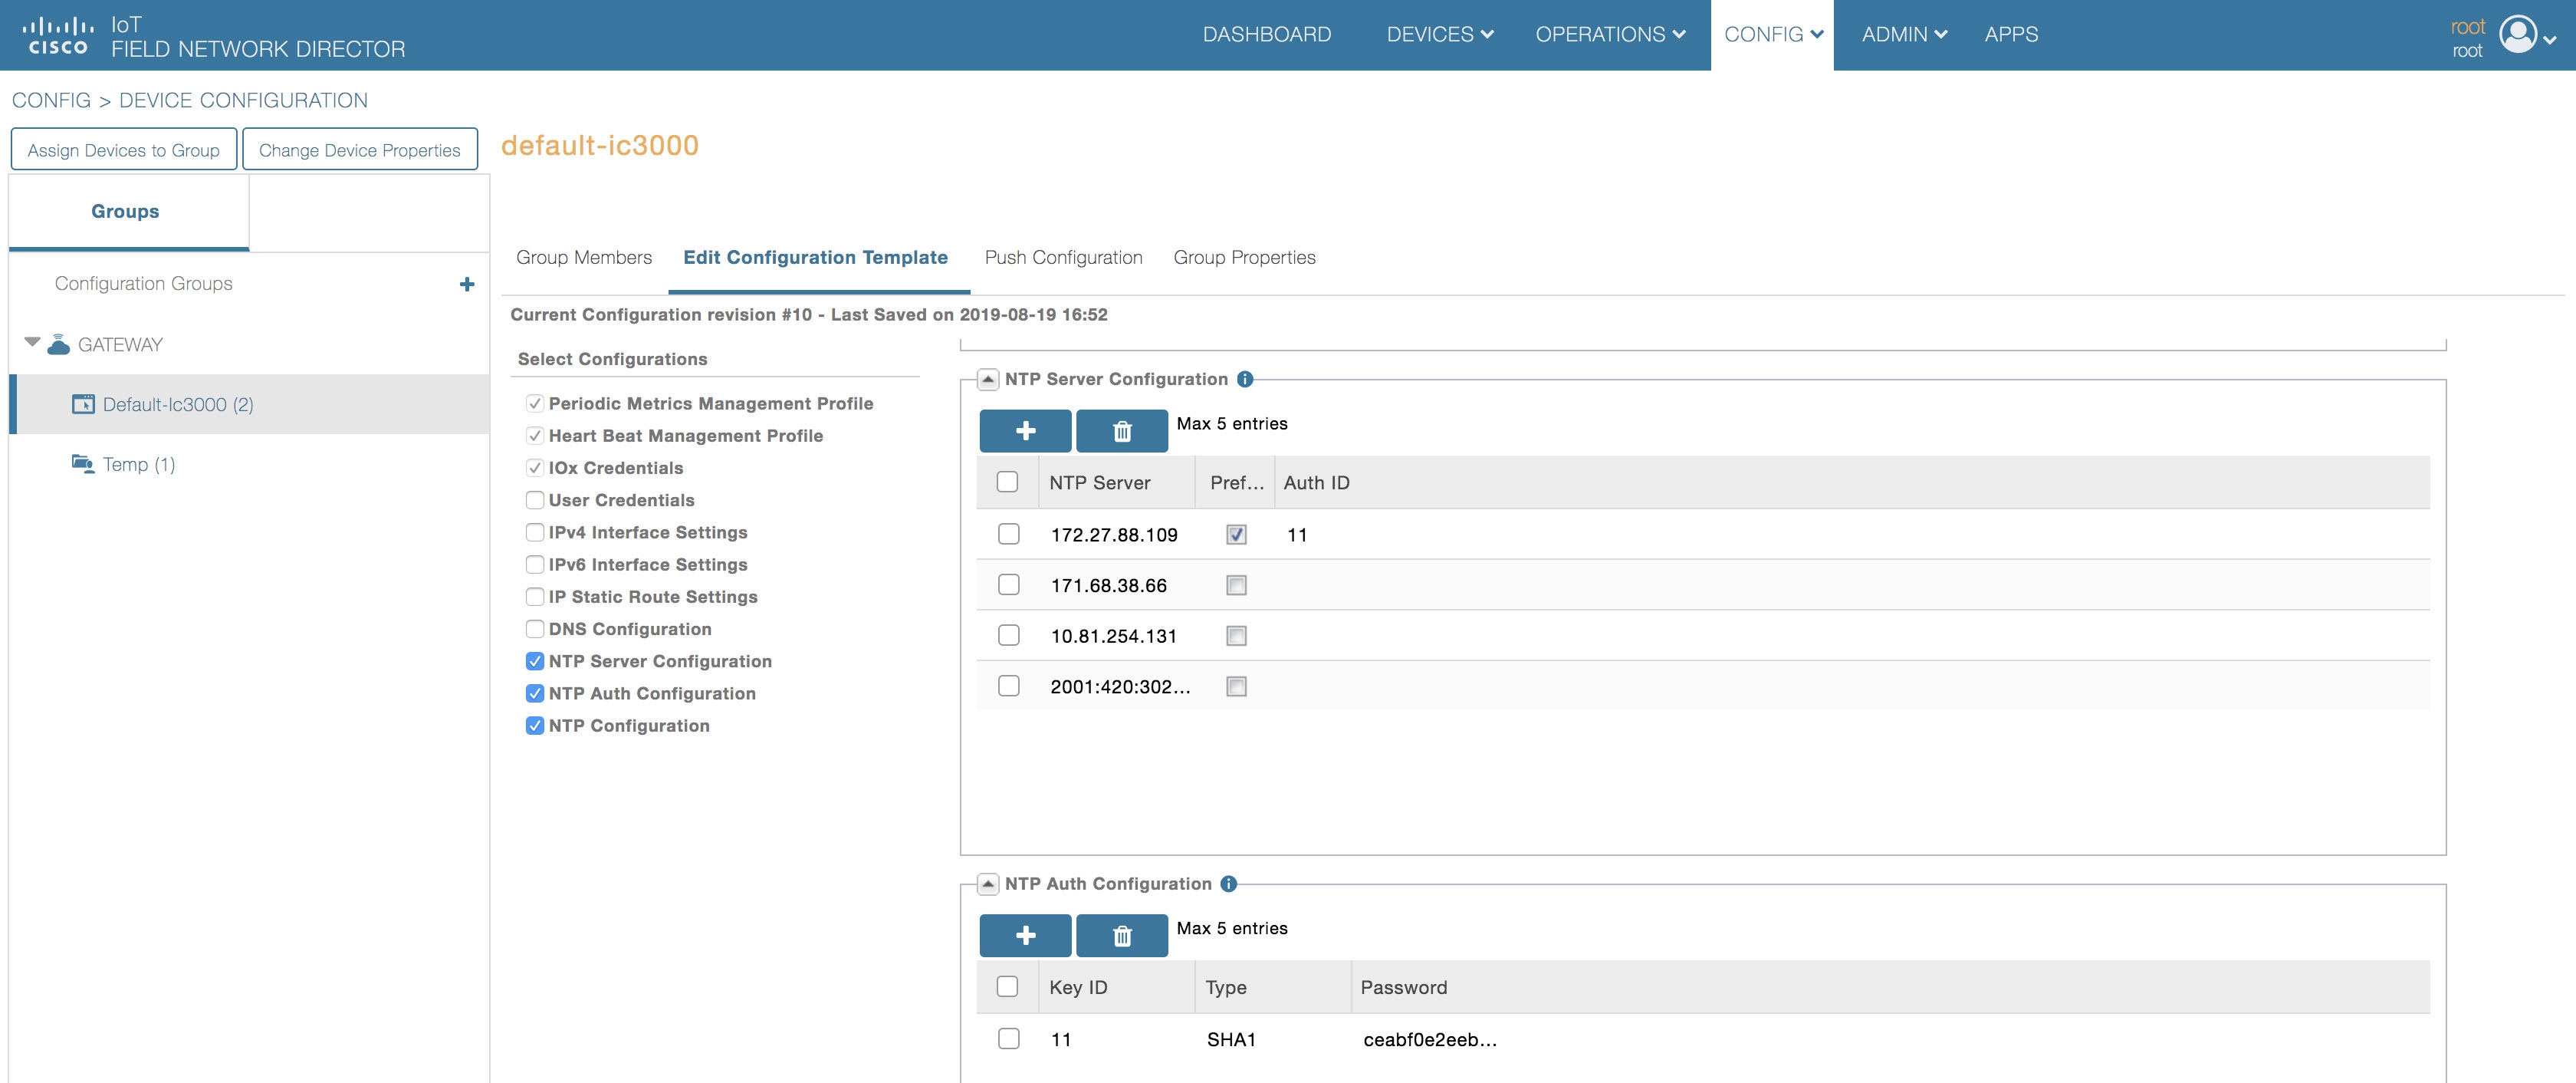
  1. Optional: Select the NTP Auth Configuration checkbox if the NTP server has been configured with authentication. Add the Key ID and corresponding SHA1 key as the password. Refer to Figure 1. Note: NTP Authentication is only offered for NTP servers that support SHA1.

  2. Optional: Select the Auto Get checkbox under NTP Configuration to delete the NTP configuration that has been manually pushed onto the device from FND

Figure 3. Add NTP Authentication
Step 3

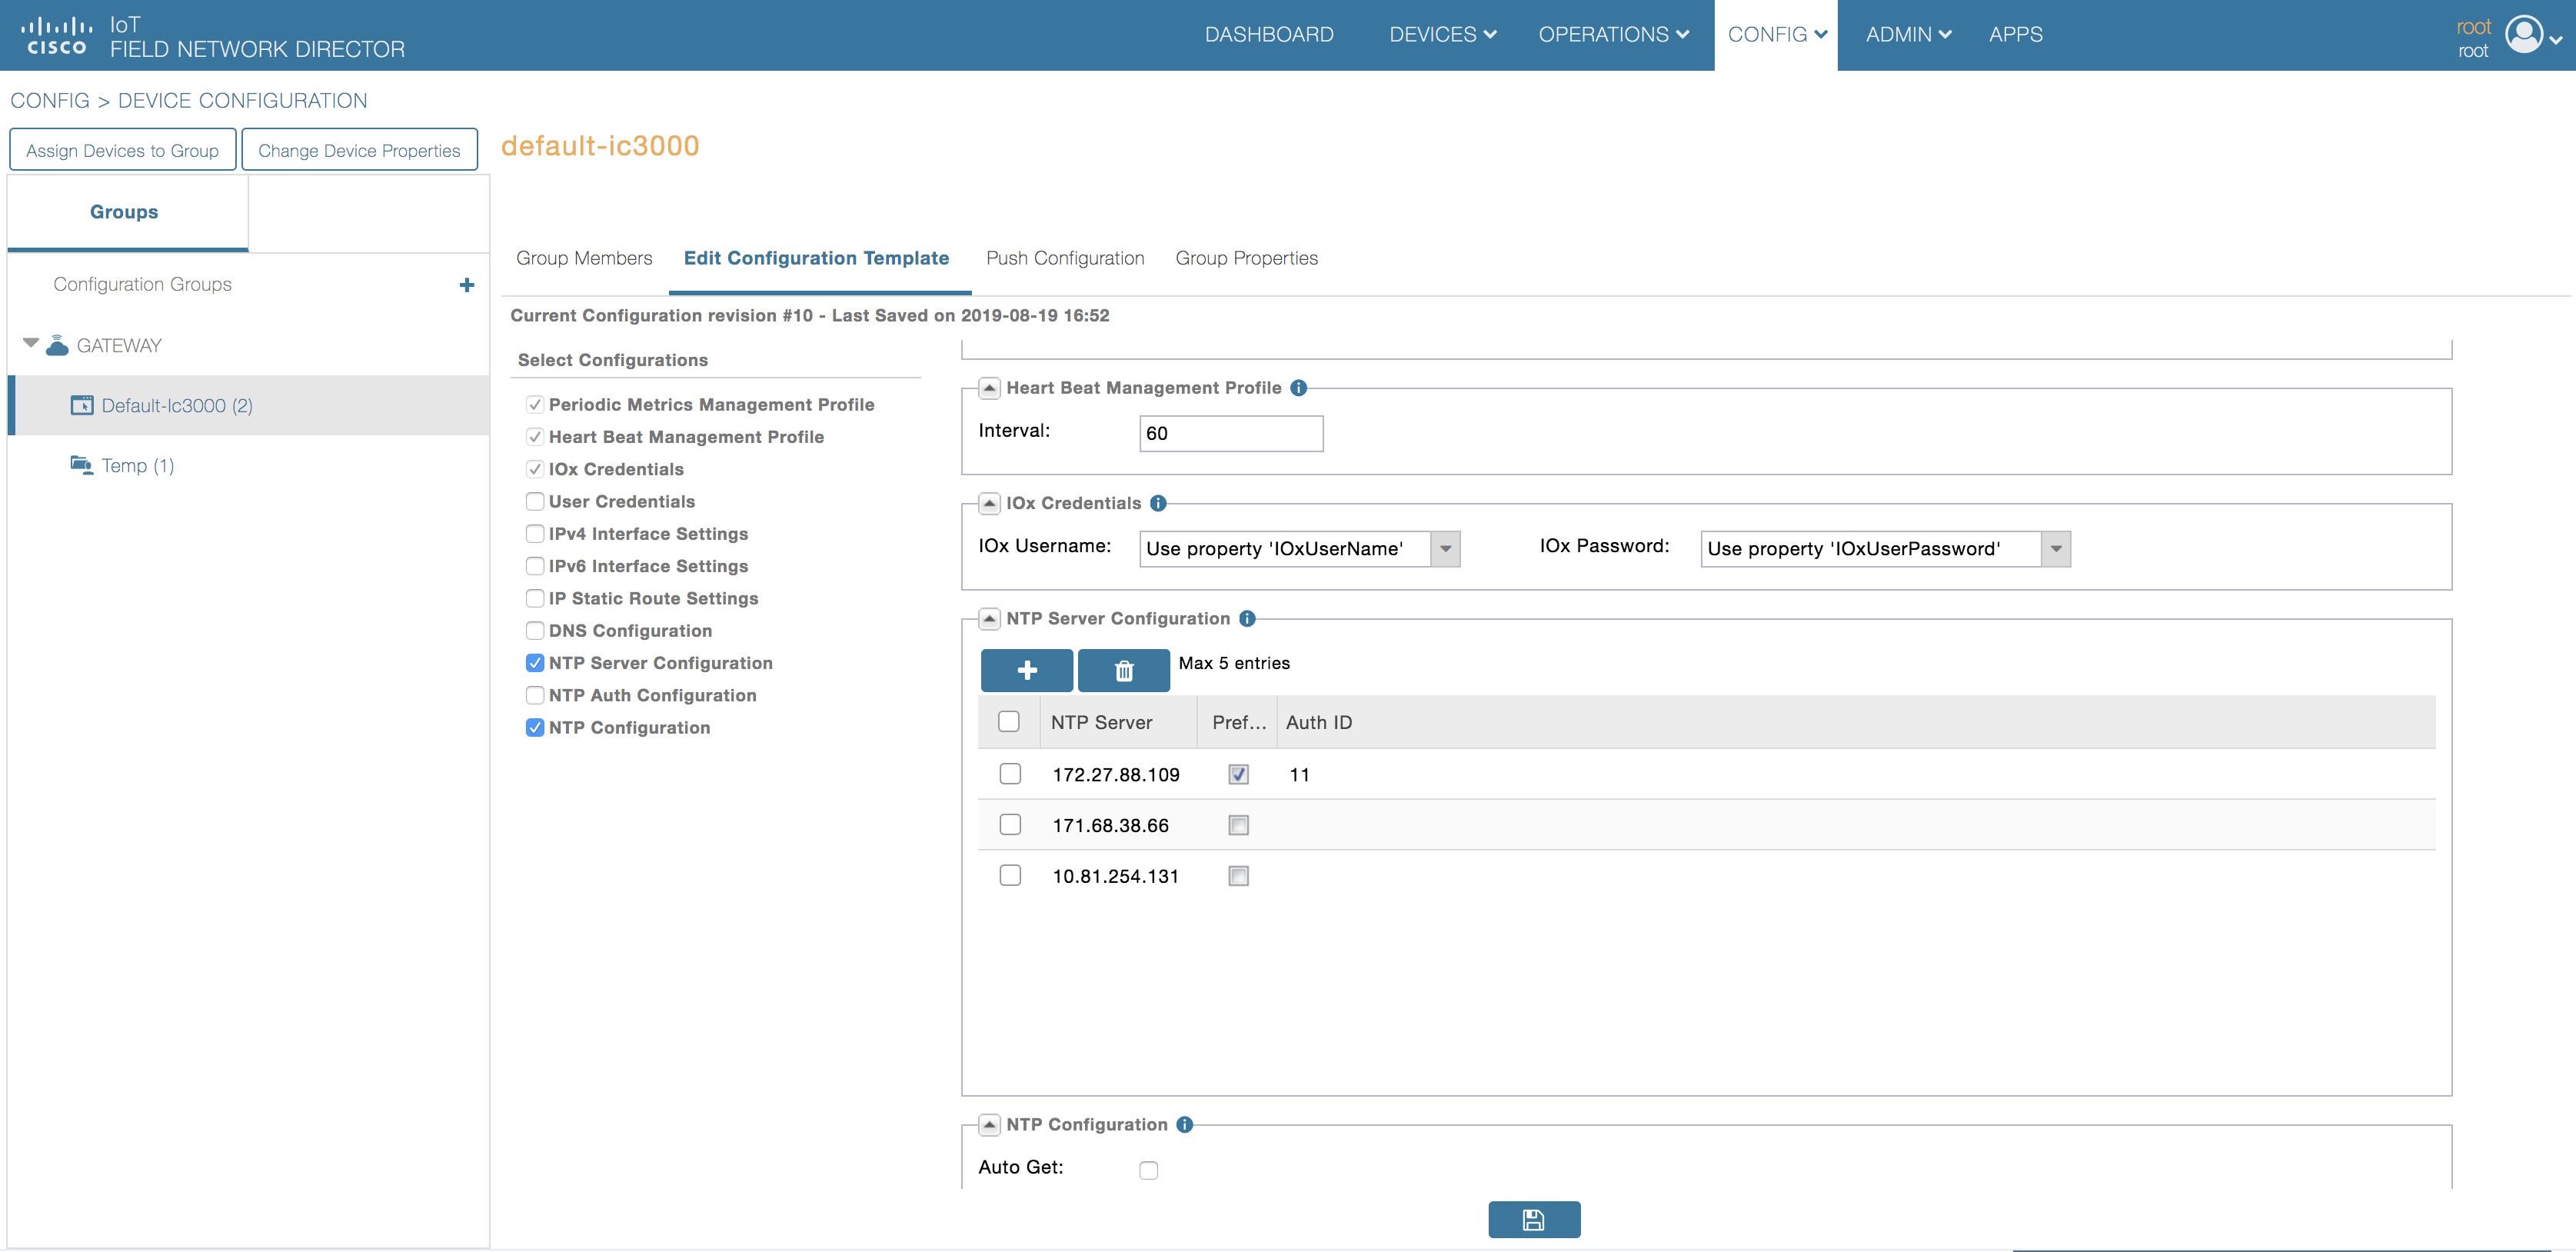
Add the NTP server entry. Click the + symbol under NTP Server Configuration. Refer to Figure 2.

  1. To prioritize a certain NTP server for clock synchronization, click the Preferred checkbox

  2. If NTP authentication is to be configured, add the Key ID set in the NTP Auth Configuration as the Auth ID.

Figure 4. Add NTP Configuration
Step 4

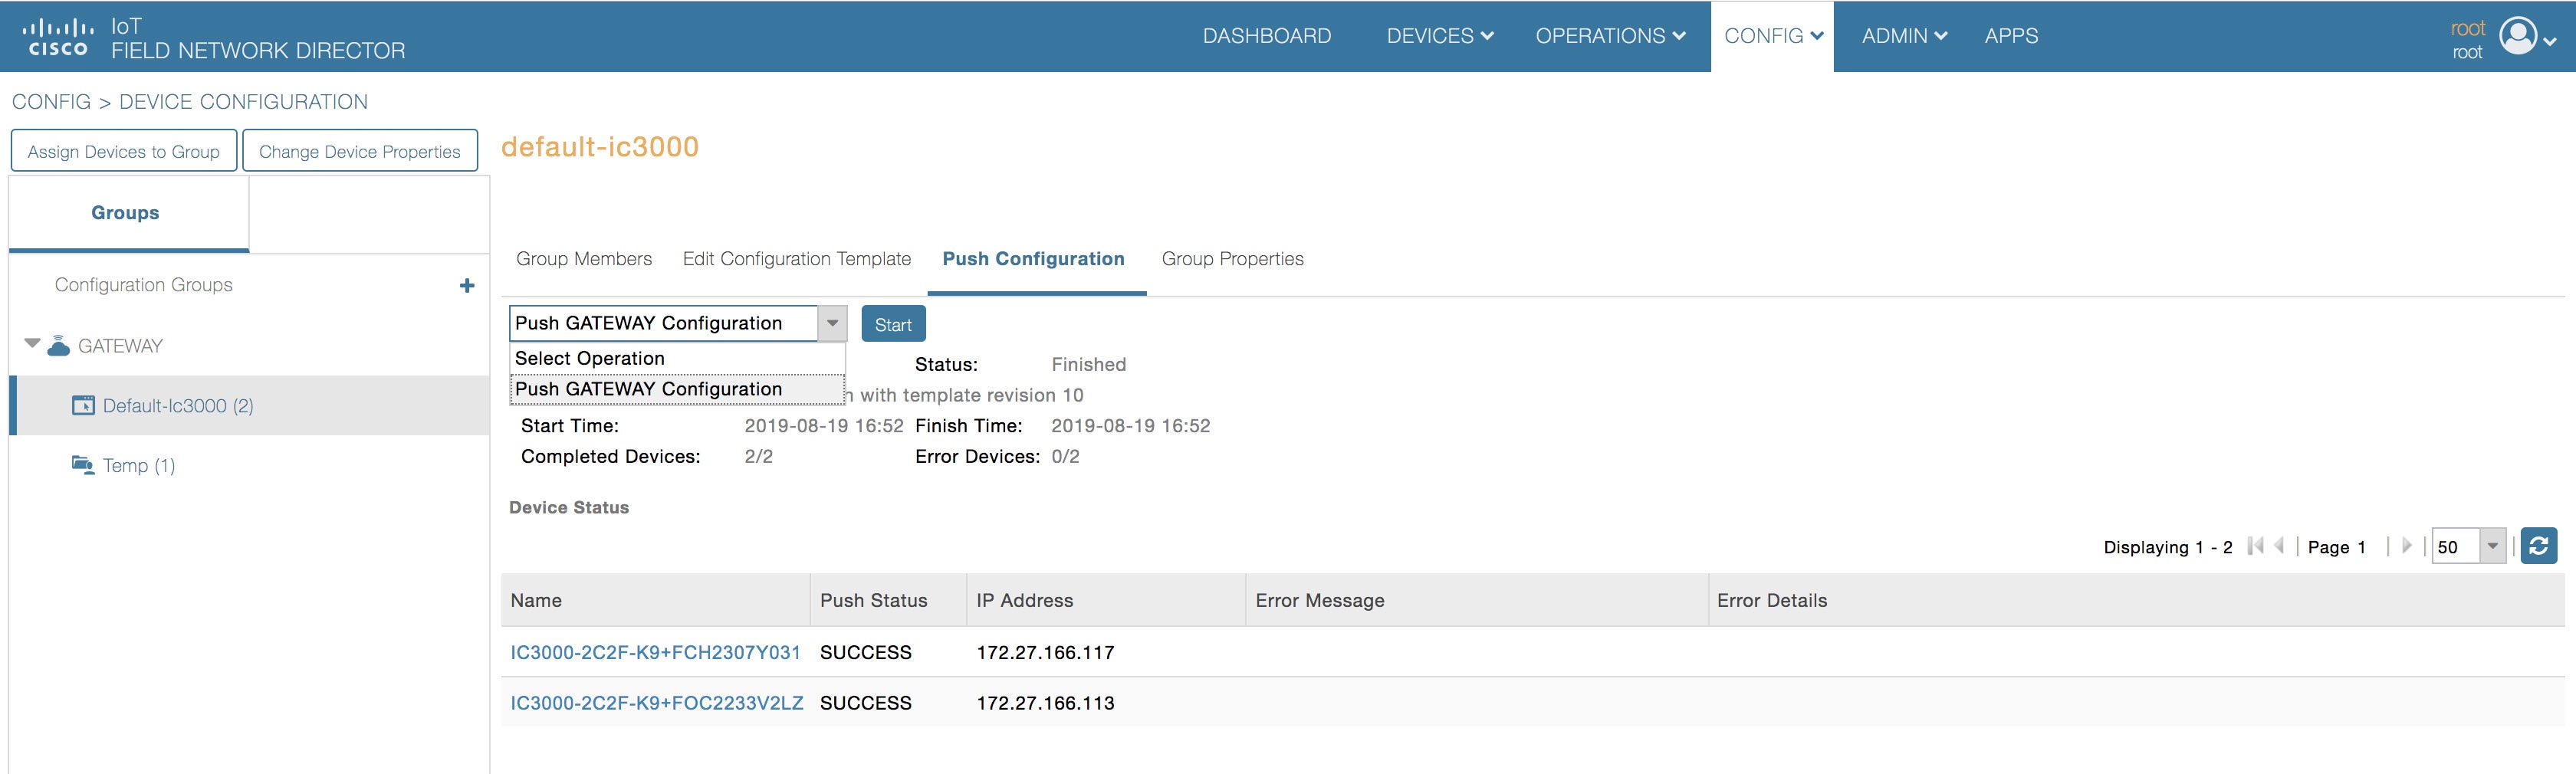
Push NTP configuration by going to Push Configuration > Select Operation Scroll down > Push GATEWAY Configuration > Start . Refer to Figure 3.

Figure 5. Push NTP Configuration
Step 5

The NTP Configuration is now complete.


Step 5: DNS Configuration

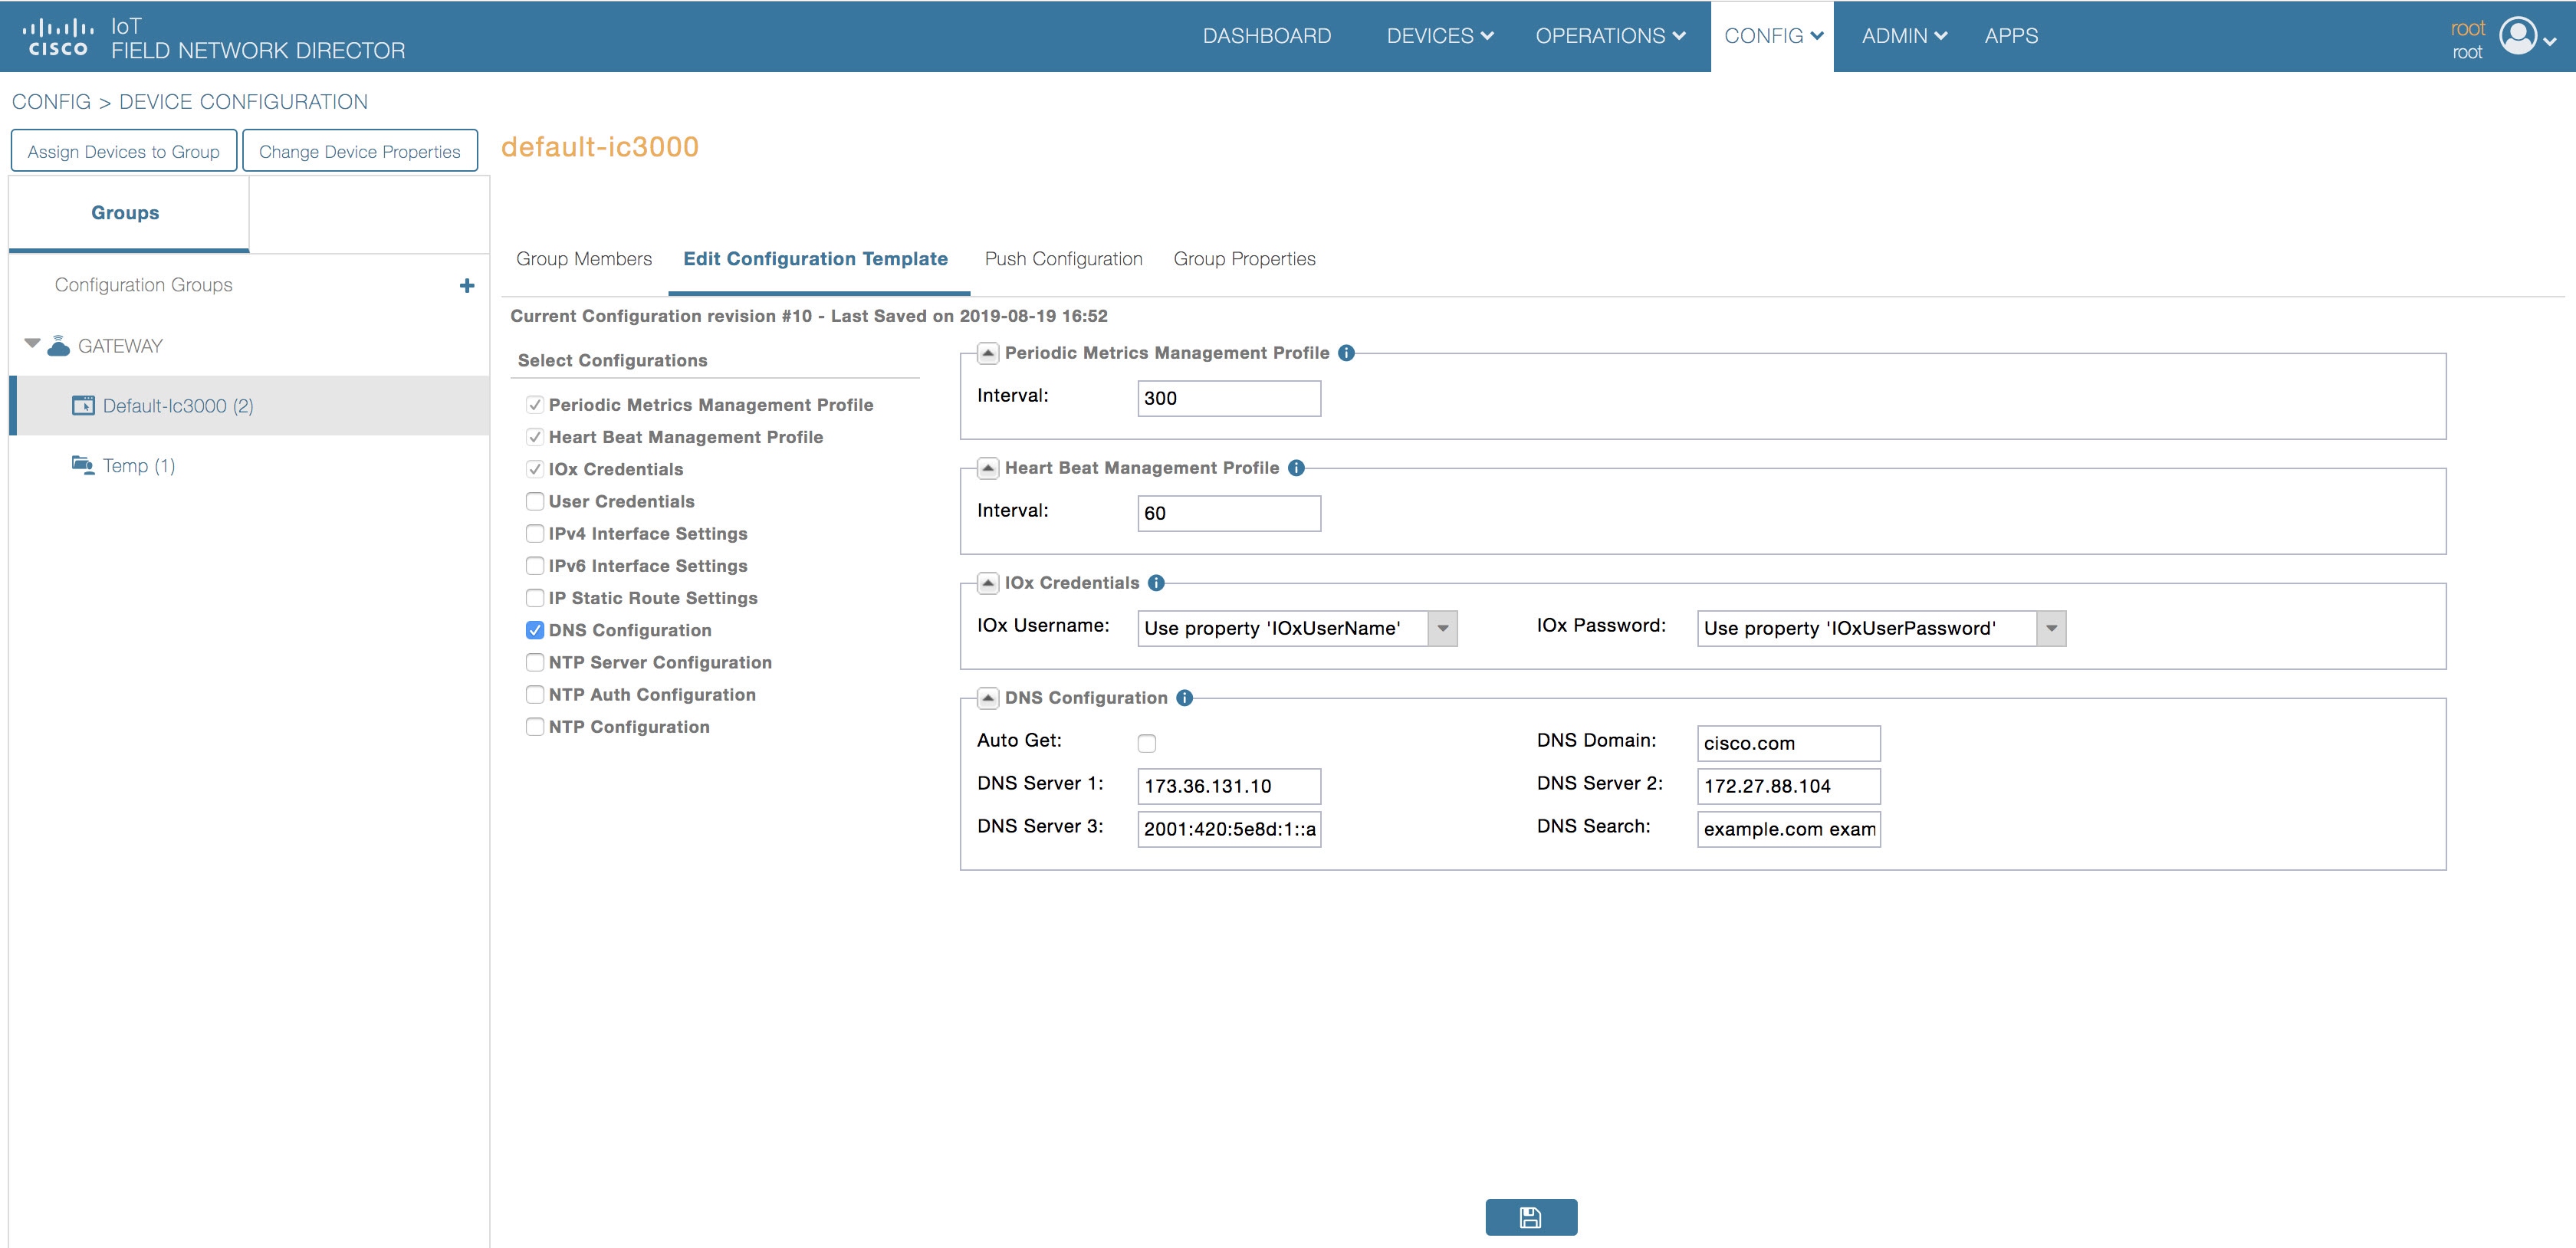
To push DNS configuration via FND perform the following steps, referring to Figure 1 for guidance.

Procedure


Step 1

Go to FND GUI > Config > Device Configuration > Edit Configuration Template .

Step 2

Select the DNS configuration checkbox.

Step 3

Add DNS search, domain, or server entries.

  1. Optional: Select the Auto Get checkbox within the DNS Configuration tab to delete the DNS configuration that has been manually pushed onto the device from FND.

Step 4

Push the DNS configuration by navigating to Push Configuration > Select Operation Scroll down > Push GATEWAY Configuration > Start .

Figure 6. Add DNS Configuration

Step 6: Adding the IC3000 Gateway(s) to FND

Follow these steps to add your device to FND.

Procedure


Step 1

Prepare a spreadsheet with the list of devices to add. This must be completed before adding devices to avoid additional steps. The default template is in .csv format, and can be downloaded from the FND - import Inventory -> Add device tab.

Your spreadsheet will need the fields as shown in the following example:

Example:


eid	                         deviceType	  lat	         lng          IOxUserName  IOxUserPassword
IC3000-2C2F-K9+FOC2227Y2ZC   IC3000      	37.414639  -121.936836  	 sampleadmin	   IC3000password
Note 
The eid is a combination of the PlatformID+HardwareID. The platform id for the IC3000 is always IC3000-2C2F-K9 and the HardwareID or Serial number is unique for each platform. The serial number can be read from the label on the box, or if you have access to the console of the device run the show version command and the hardware id /serial number will be displayed.
Note 
The latitude (lat) and Longitude (lng) entries in the spreadsheet will need to represent actual values, complete with decimal notation. For latitude, a positive number represents North and a negative number represents South. For longitude, a positive number represents East and a negative number represents West. Failure to specify an actual value will result in an error being displayed from Google Maps.
Note 
The following password rules for the IOxUserPassword must be adhered to:
  • Minimum length = 6
  • Must not be based upon a dictionary word
  • Must not be a combination of dictionary words
  • Must not be composed of common string patterns like “qwerty”, “asdfgh” etc...
  • Must not be a combination of common string patterns and dictionary words
  • Currently not supporting Unicode

To download a sample spreadsheet go to FND -> Inventory -> Add devices. Then click IC3000.

Step 2

Get the Serial number and Model number and use system as the ioxusername and admin as the password. The serial number is located on the device label and is something like "FOC2227Y304". The serial number can also be found through the show version command output:

Example:


ic3k>show version
 
Version: 1.2.1
Platform ID: IC3000-2C2F-K9
Hardware ID: FOC2227Y304
ic3k>
Step 3

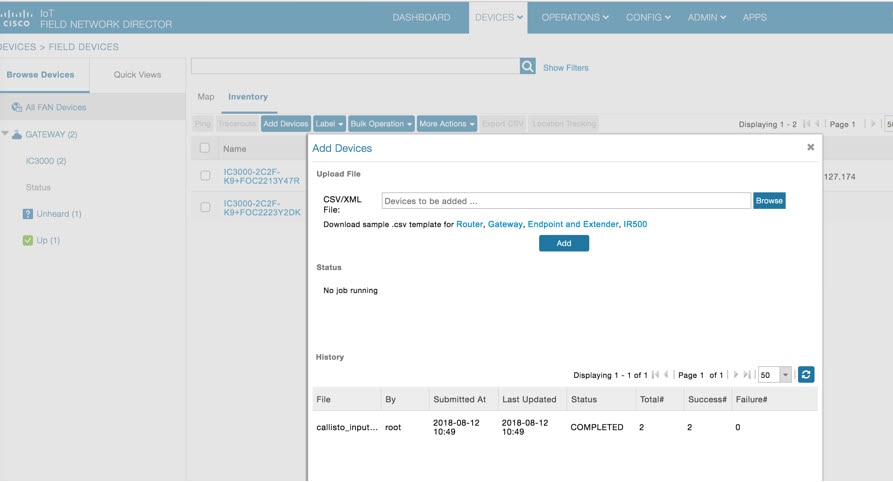
Click DEVICES > FIELD DEVICES > Inventory > Add Devices . Browse to the location of your excel spreadsheet and click Add . See Figure 1.

Figure 7. Add Devices
Note 
The IC3000 belongs under the gateway category when adding devices.

Step 7: IC3000 Registration

After you add devices to the IoT FND (FND) Network Management application, wait for a few minutes for the IC3000 devices to learn the option 43 settings from the DHCP server, and then register with FND. Once the IC3000 gets an ip address from DHCP server, the option 43 issues an FND IP address for the device to register to FND.


Note

Make sure the DHCP server settings are set properly with FND IP in option 43 string.

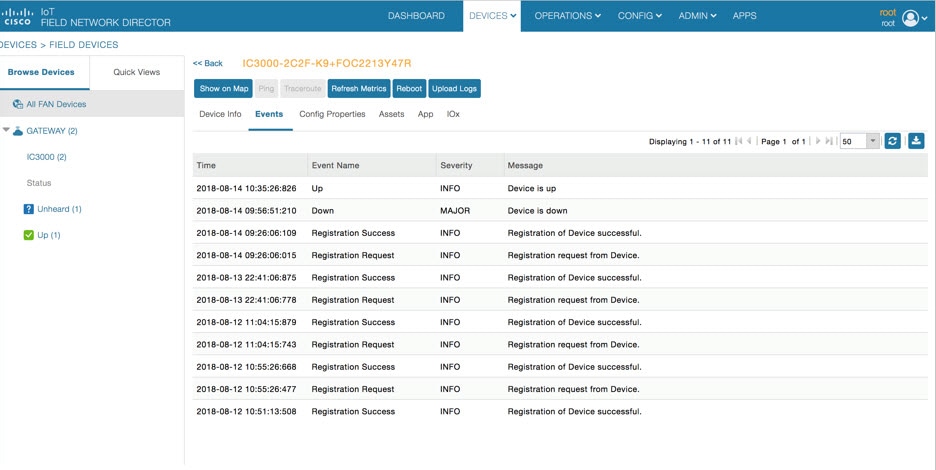
Once the device is registered you should see the registration events listed for each IC3000 unit as shown in the example on Figure 1.

Figure 8. Device Registration

The refresh metric should work and should be able to refresh the device related details.

Step 8: Uploading the Firmware to FND

In order to upgrade the firmware of the IC3000, you must download the required firmware from Cisco.com to upload the firmware to FND.

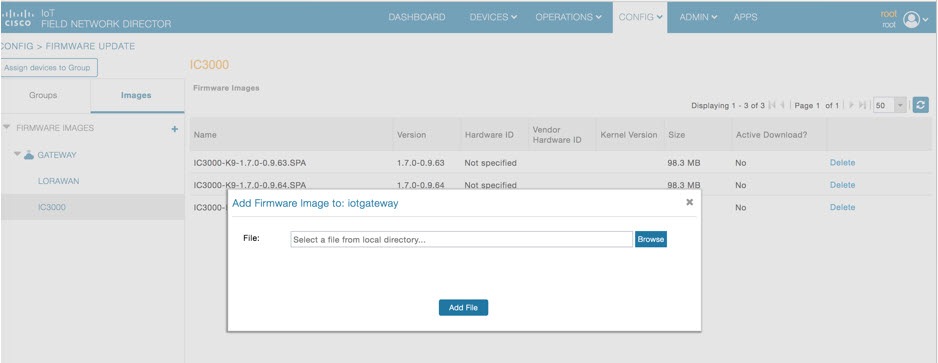
Select CONFIG > Firmware Update > Images . A list of the IC3000 images is presented. Click + - and upload the required image. See Figure 1.

Figure 9. Firmware Upload

Step 9: Upgrading Firmware with FND

Once Step 5: DNS Configuration is complete, you may now upgrade the firmware against the registered Units that require the update.

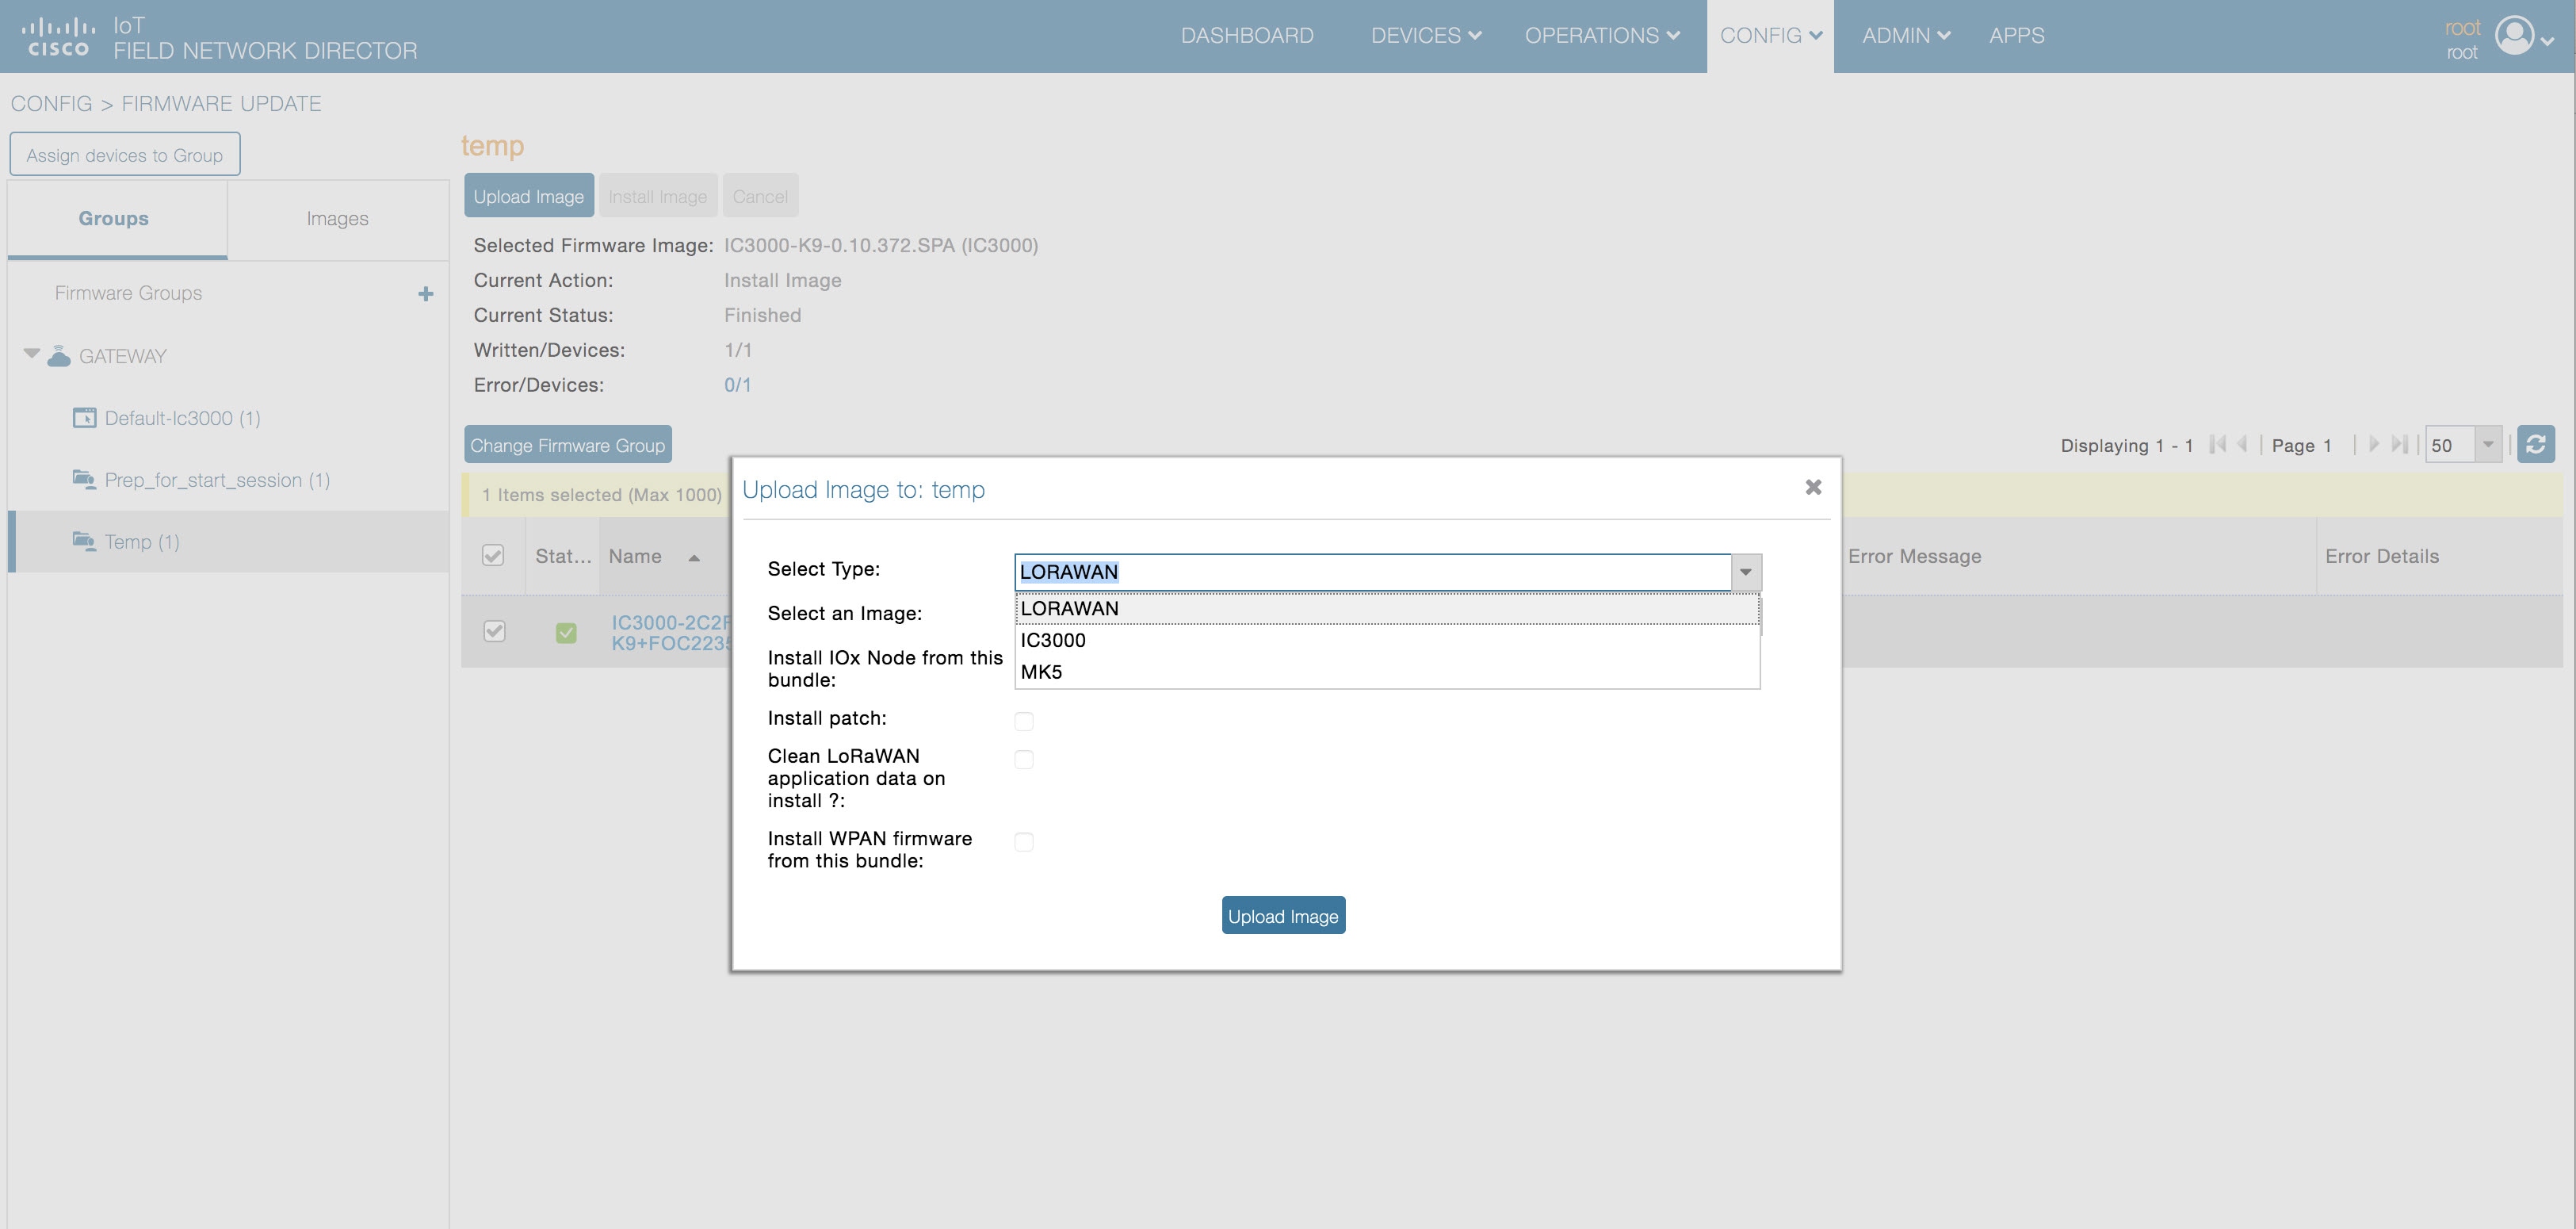
Select CONFIG > Firmware update > Select the device group > Upload Image

Once the Image upload is complete, select the Install Image tab and proceed with upgrading the firmware.

Figure 10. Firmware Update

Step 10: Deploying IOx Applications via FND

To deploy an IOx application perform the following:

Procedure


Step 1

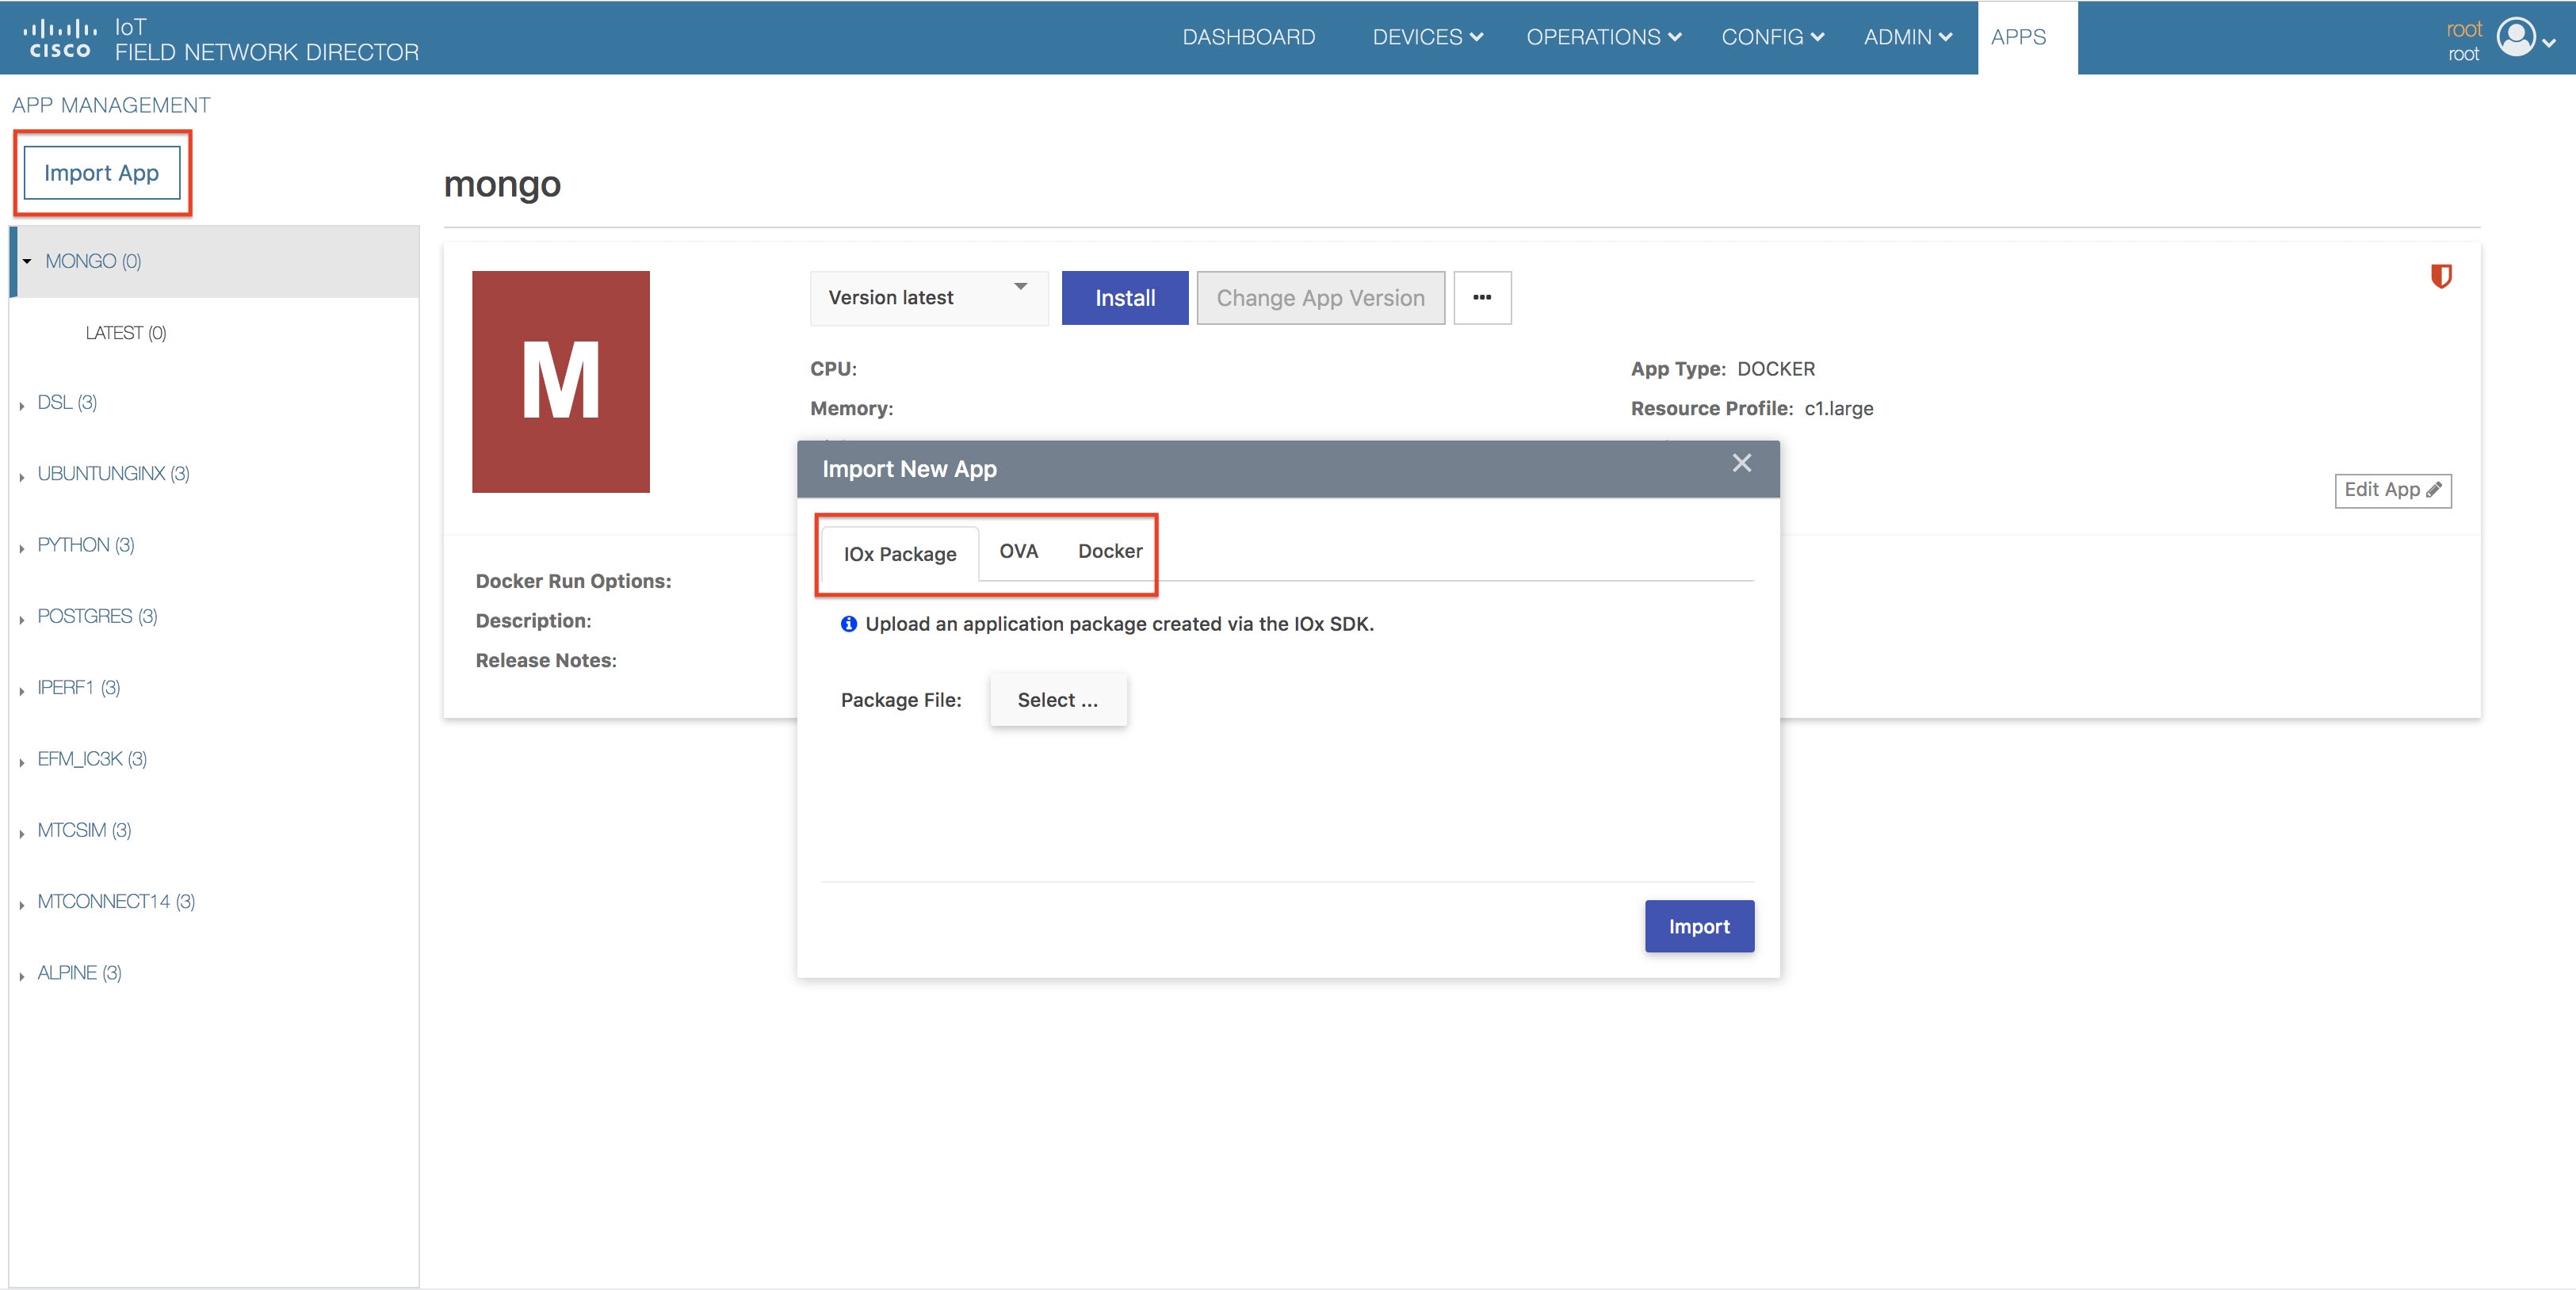
From the Main page select APP > Import Apps and select the required application to install.

Figure 11. Application Upload

Once imported, you will find the list of applications imported in the left column.

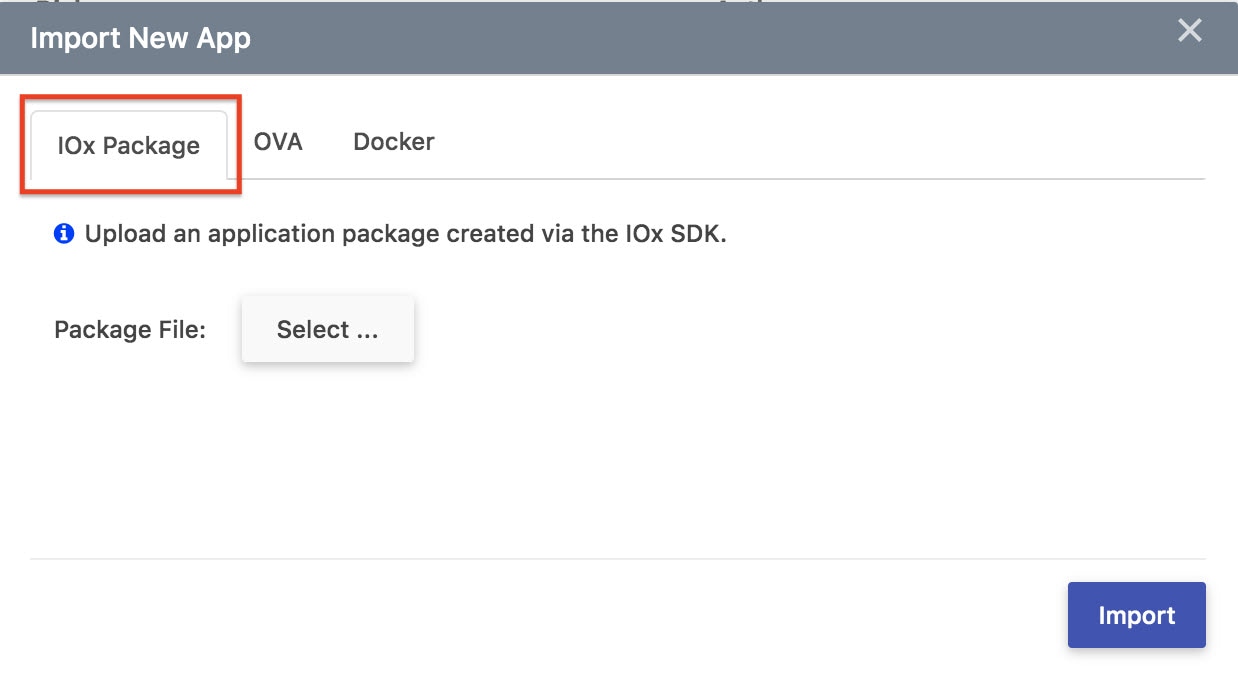
  1. To upload an application from your local machine that has been packaged using IOx client, use the IOx Package option as shown in Figure 2

    Figure 12. Import New App (IOx Package Option)
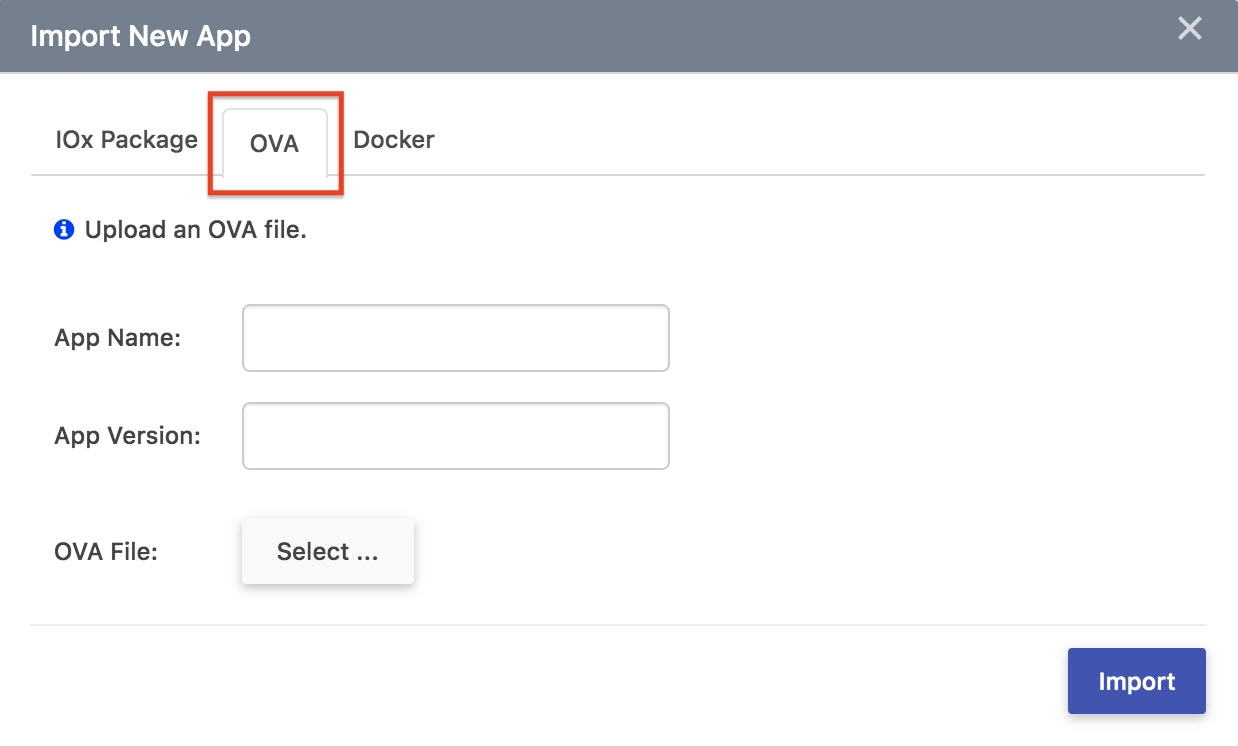
  2. To upload an OVA VM application use the OVA option as shown in Figure 3.

    Figure 13. Import New App (OVA Option)
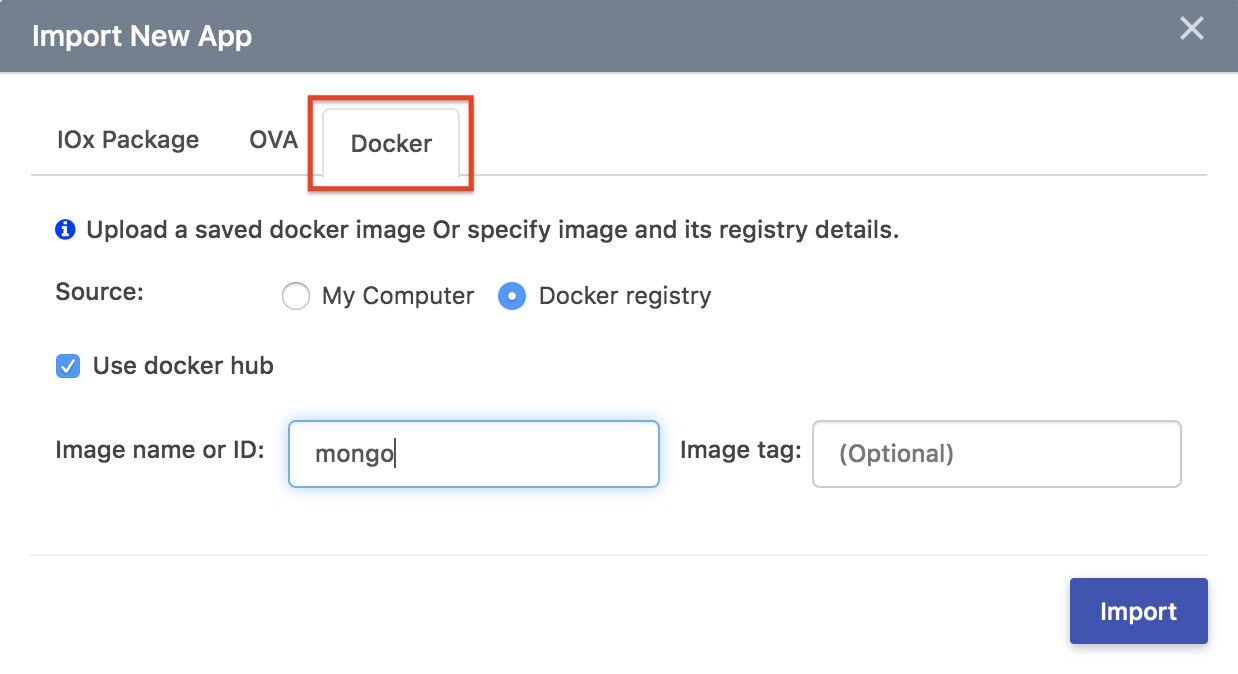
  3. To upload a native docker app from the docker hub/registry or from your local machine use the Docker option as shown in Figure 4.

Note 
To upload a native docker application using the docker hub option just pass the docker image name exactly as shown from the docker hub.
Figure 14. Import New App (Docker Option)
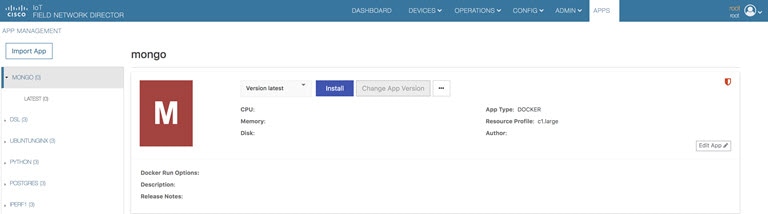
Step 2

Select the application that needs to be installed and click Install .

Note 
You can now import multiple versions of the same application (IoT FND 4.5 and greater).
Figure 15. Application Install
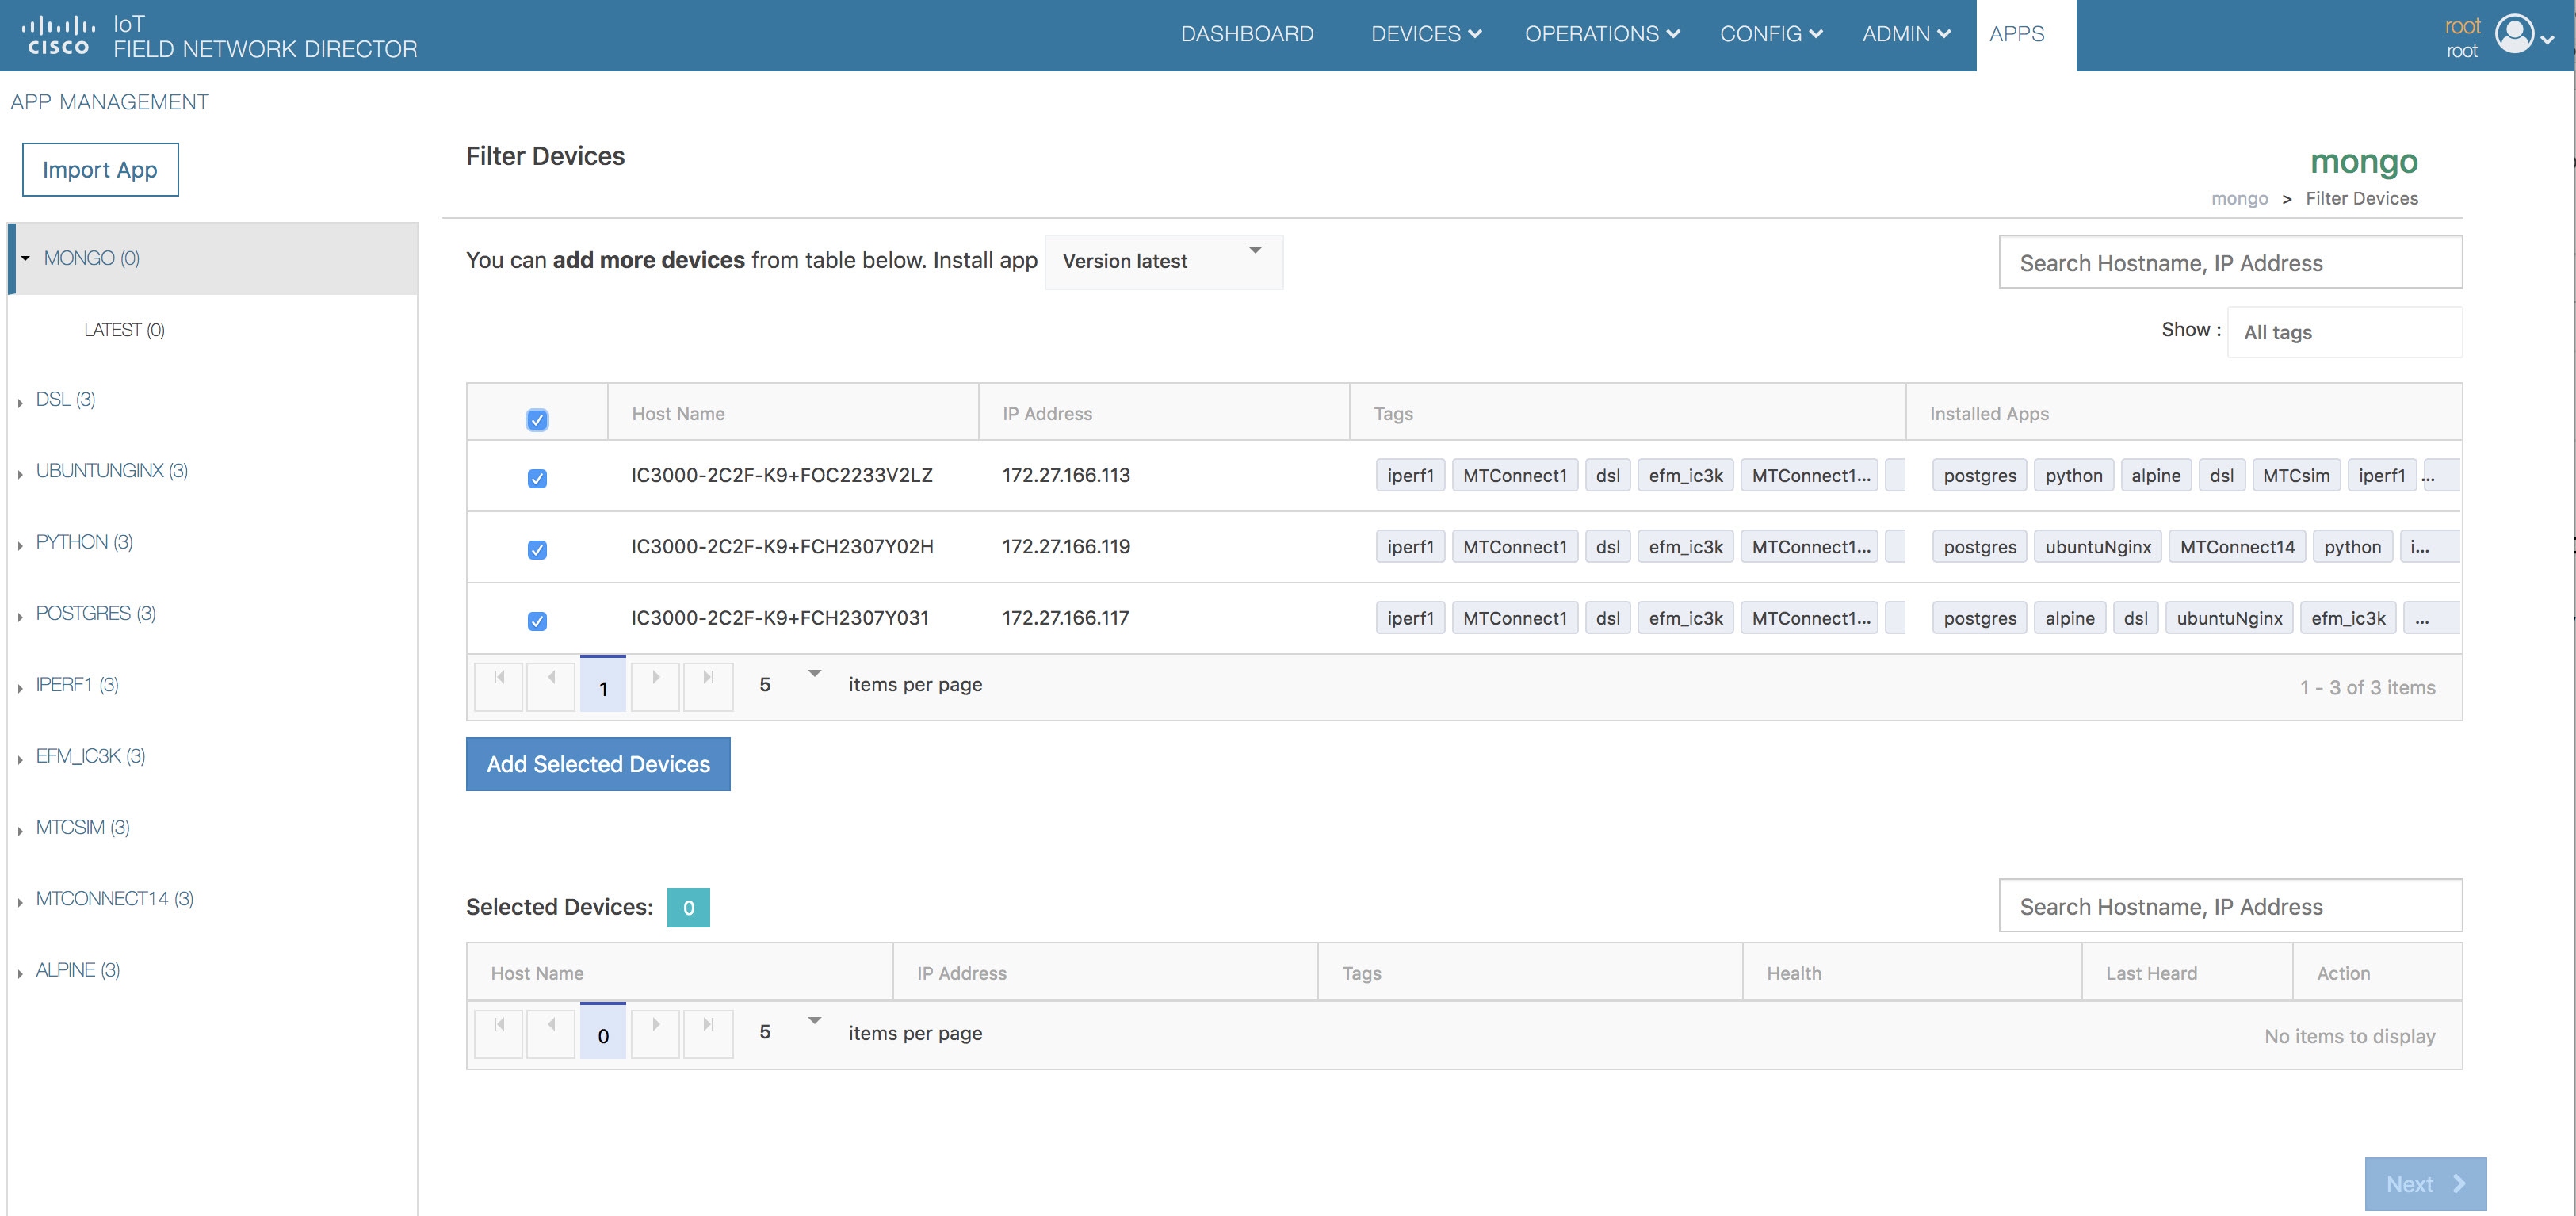
Step 3

Select the Devices > Add Selected Devices . With your device present, click Next

Figure 16. Add Devices

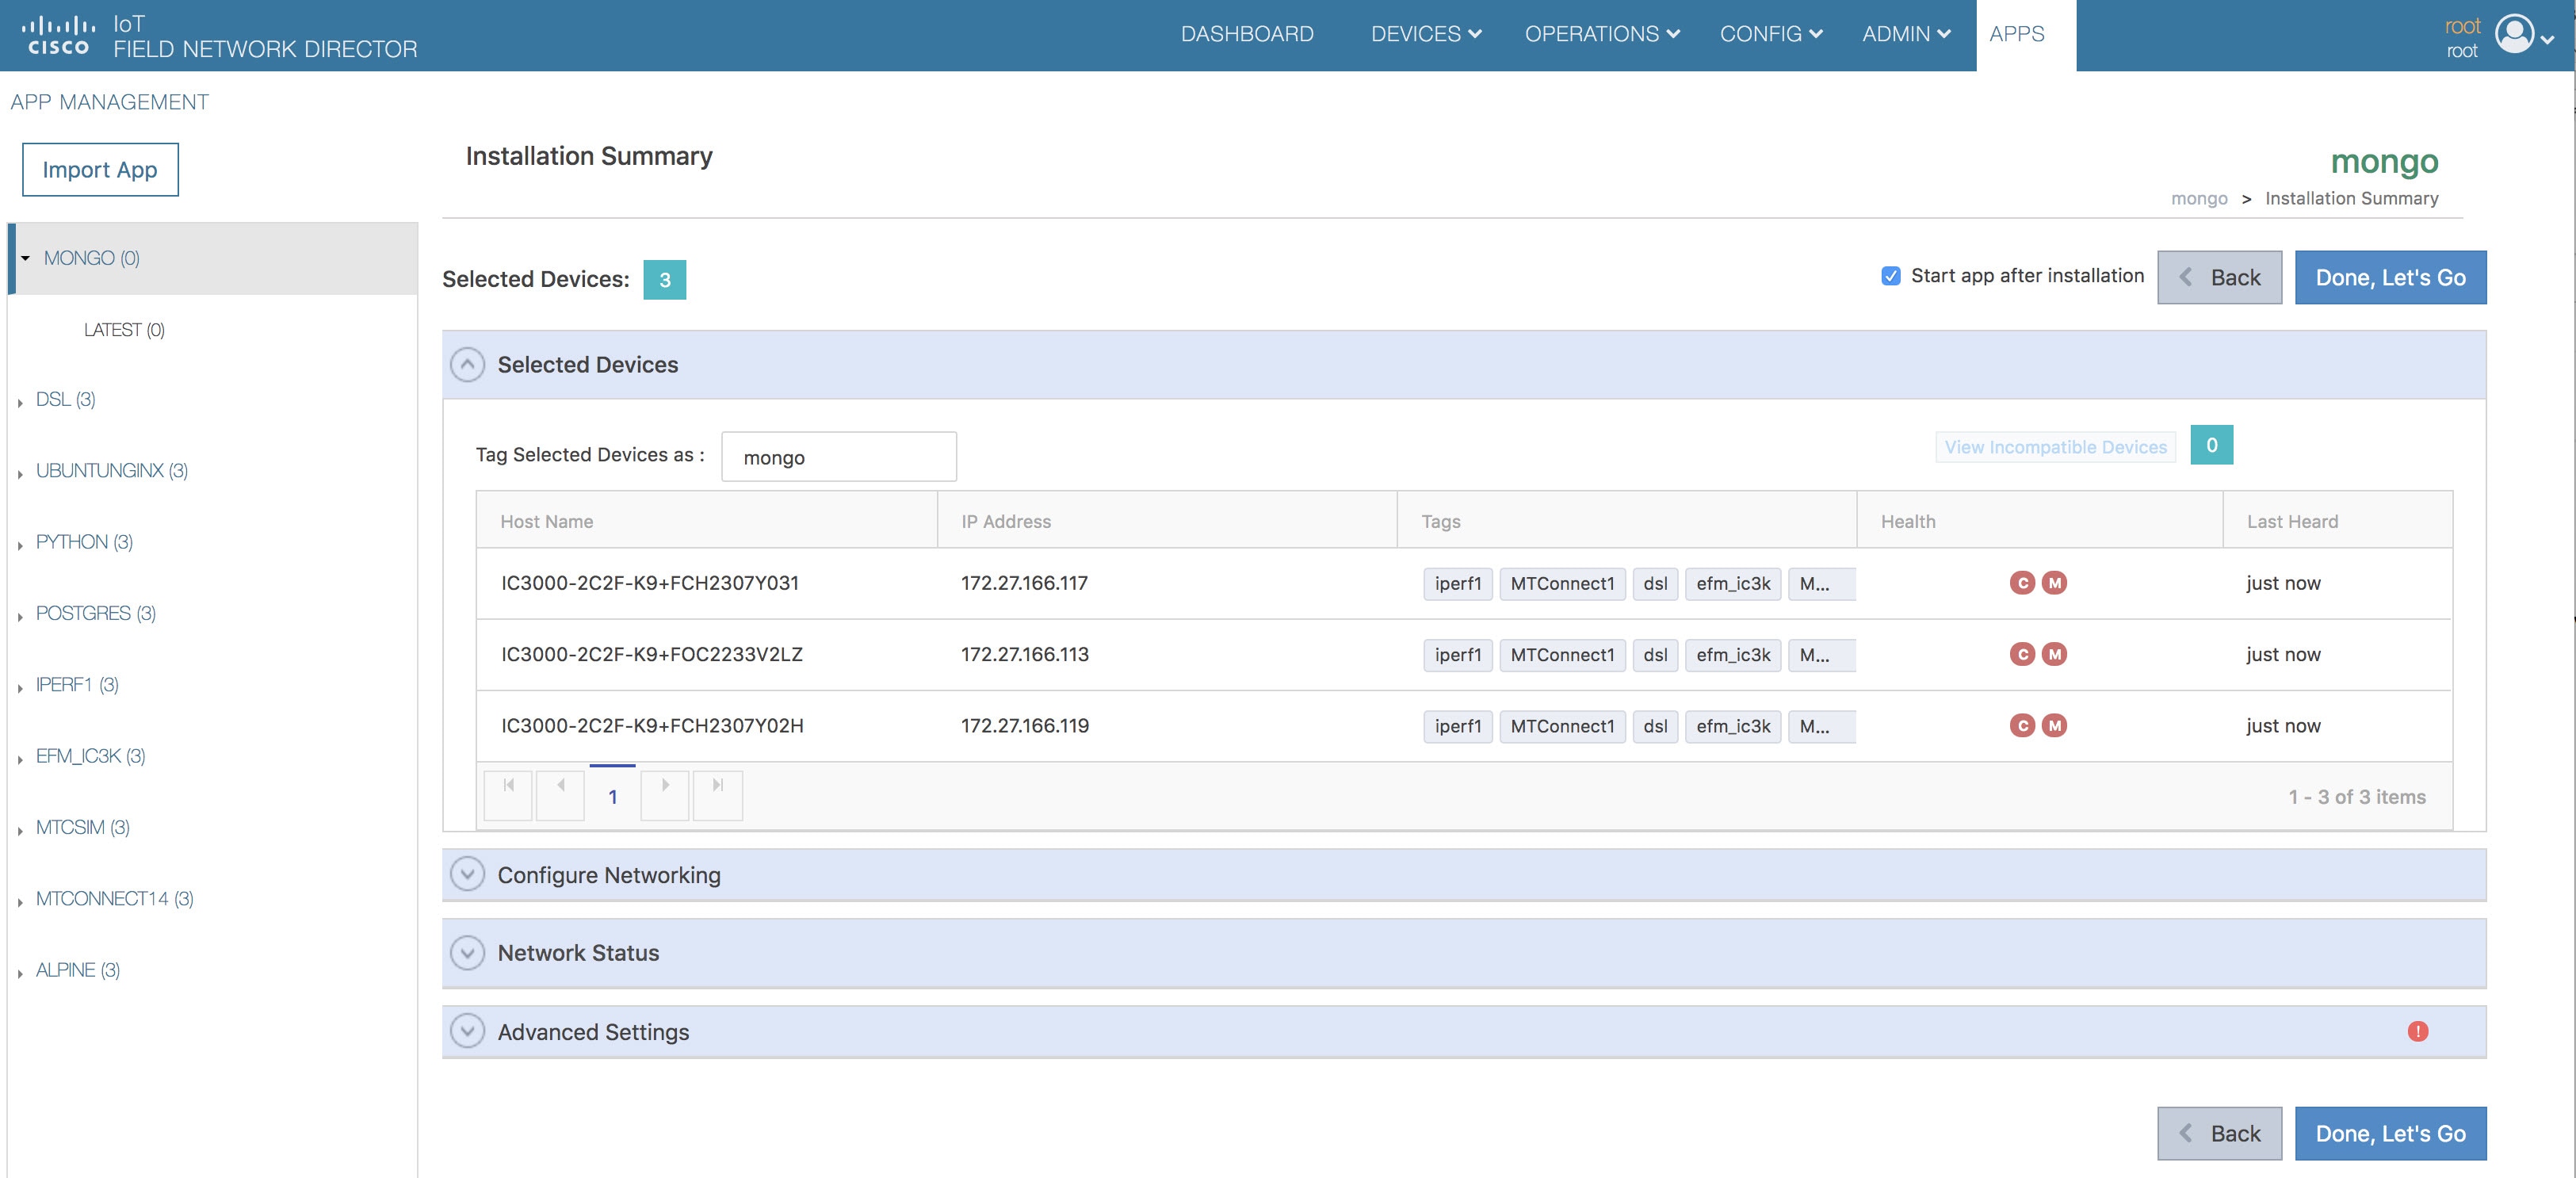
Select the appropriate actions and tabs and provide details as required. See Figure 7

Figure 17. Selected Device Action Tabs
Step 4

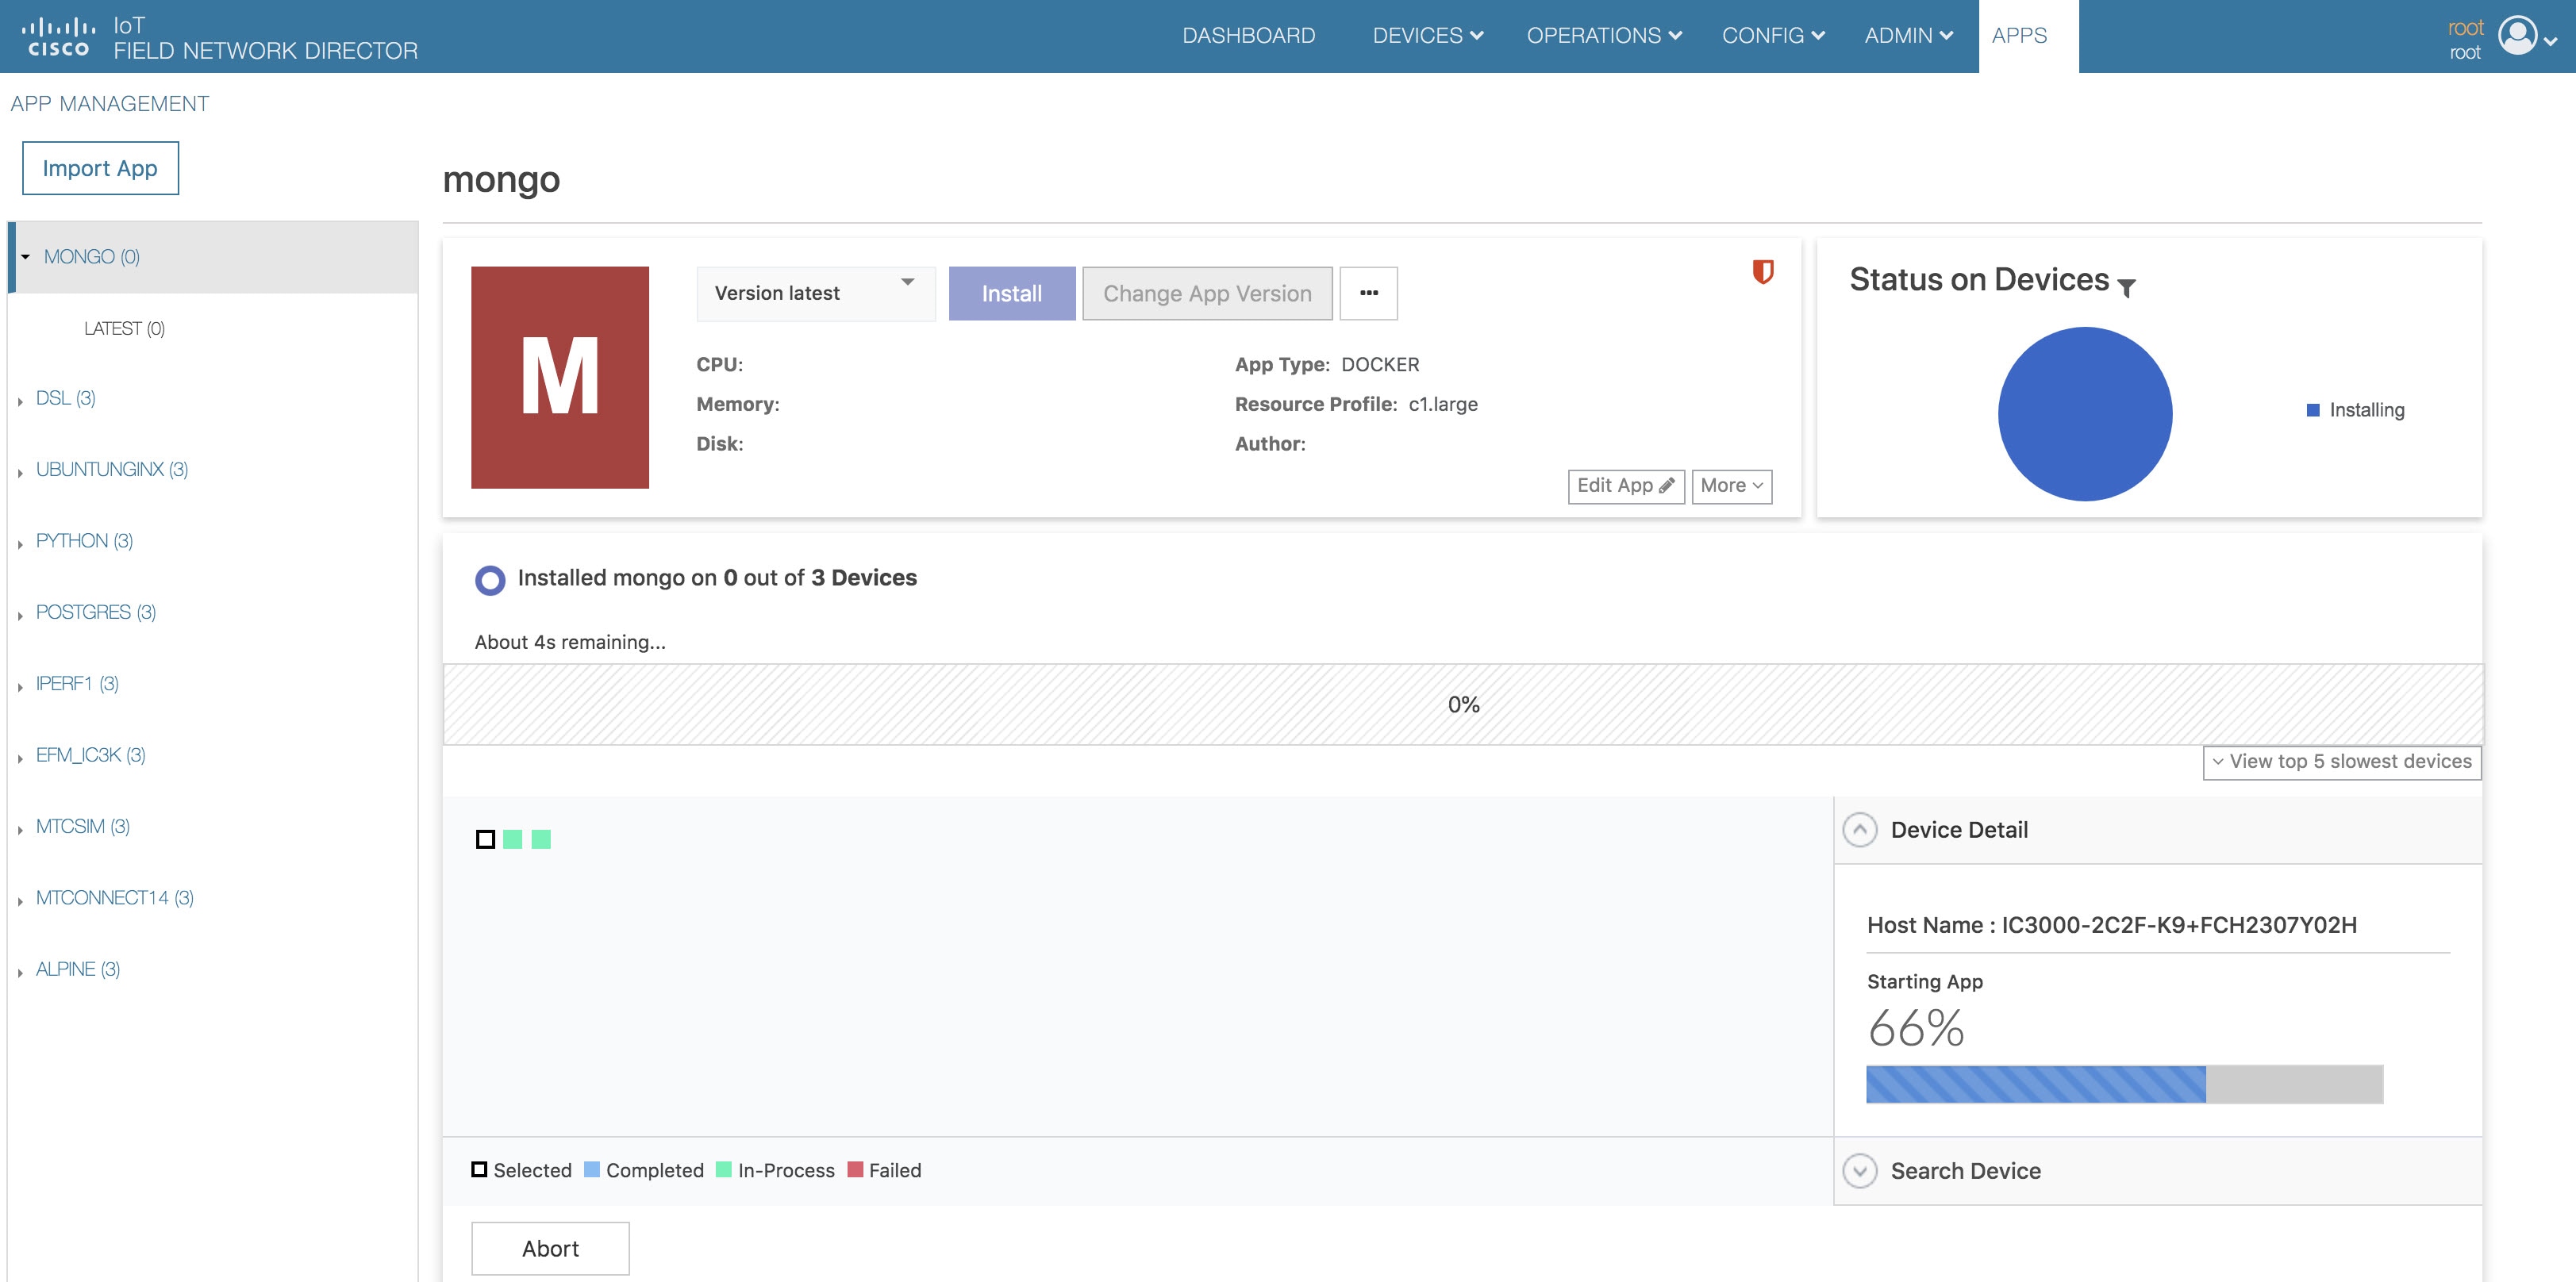
Then click Done, Let’s Go . The Installation progress window appears. See Figure 8.

Figure 18. Installation Progress

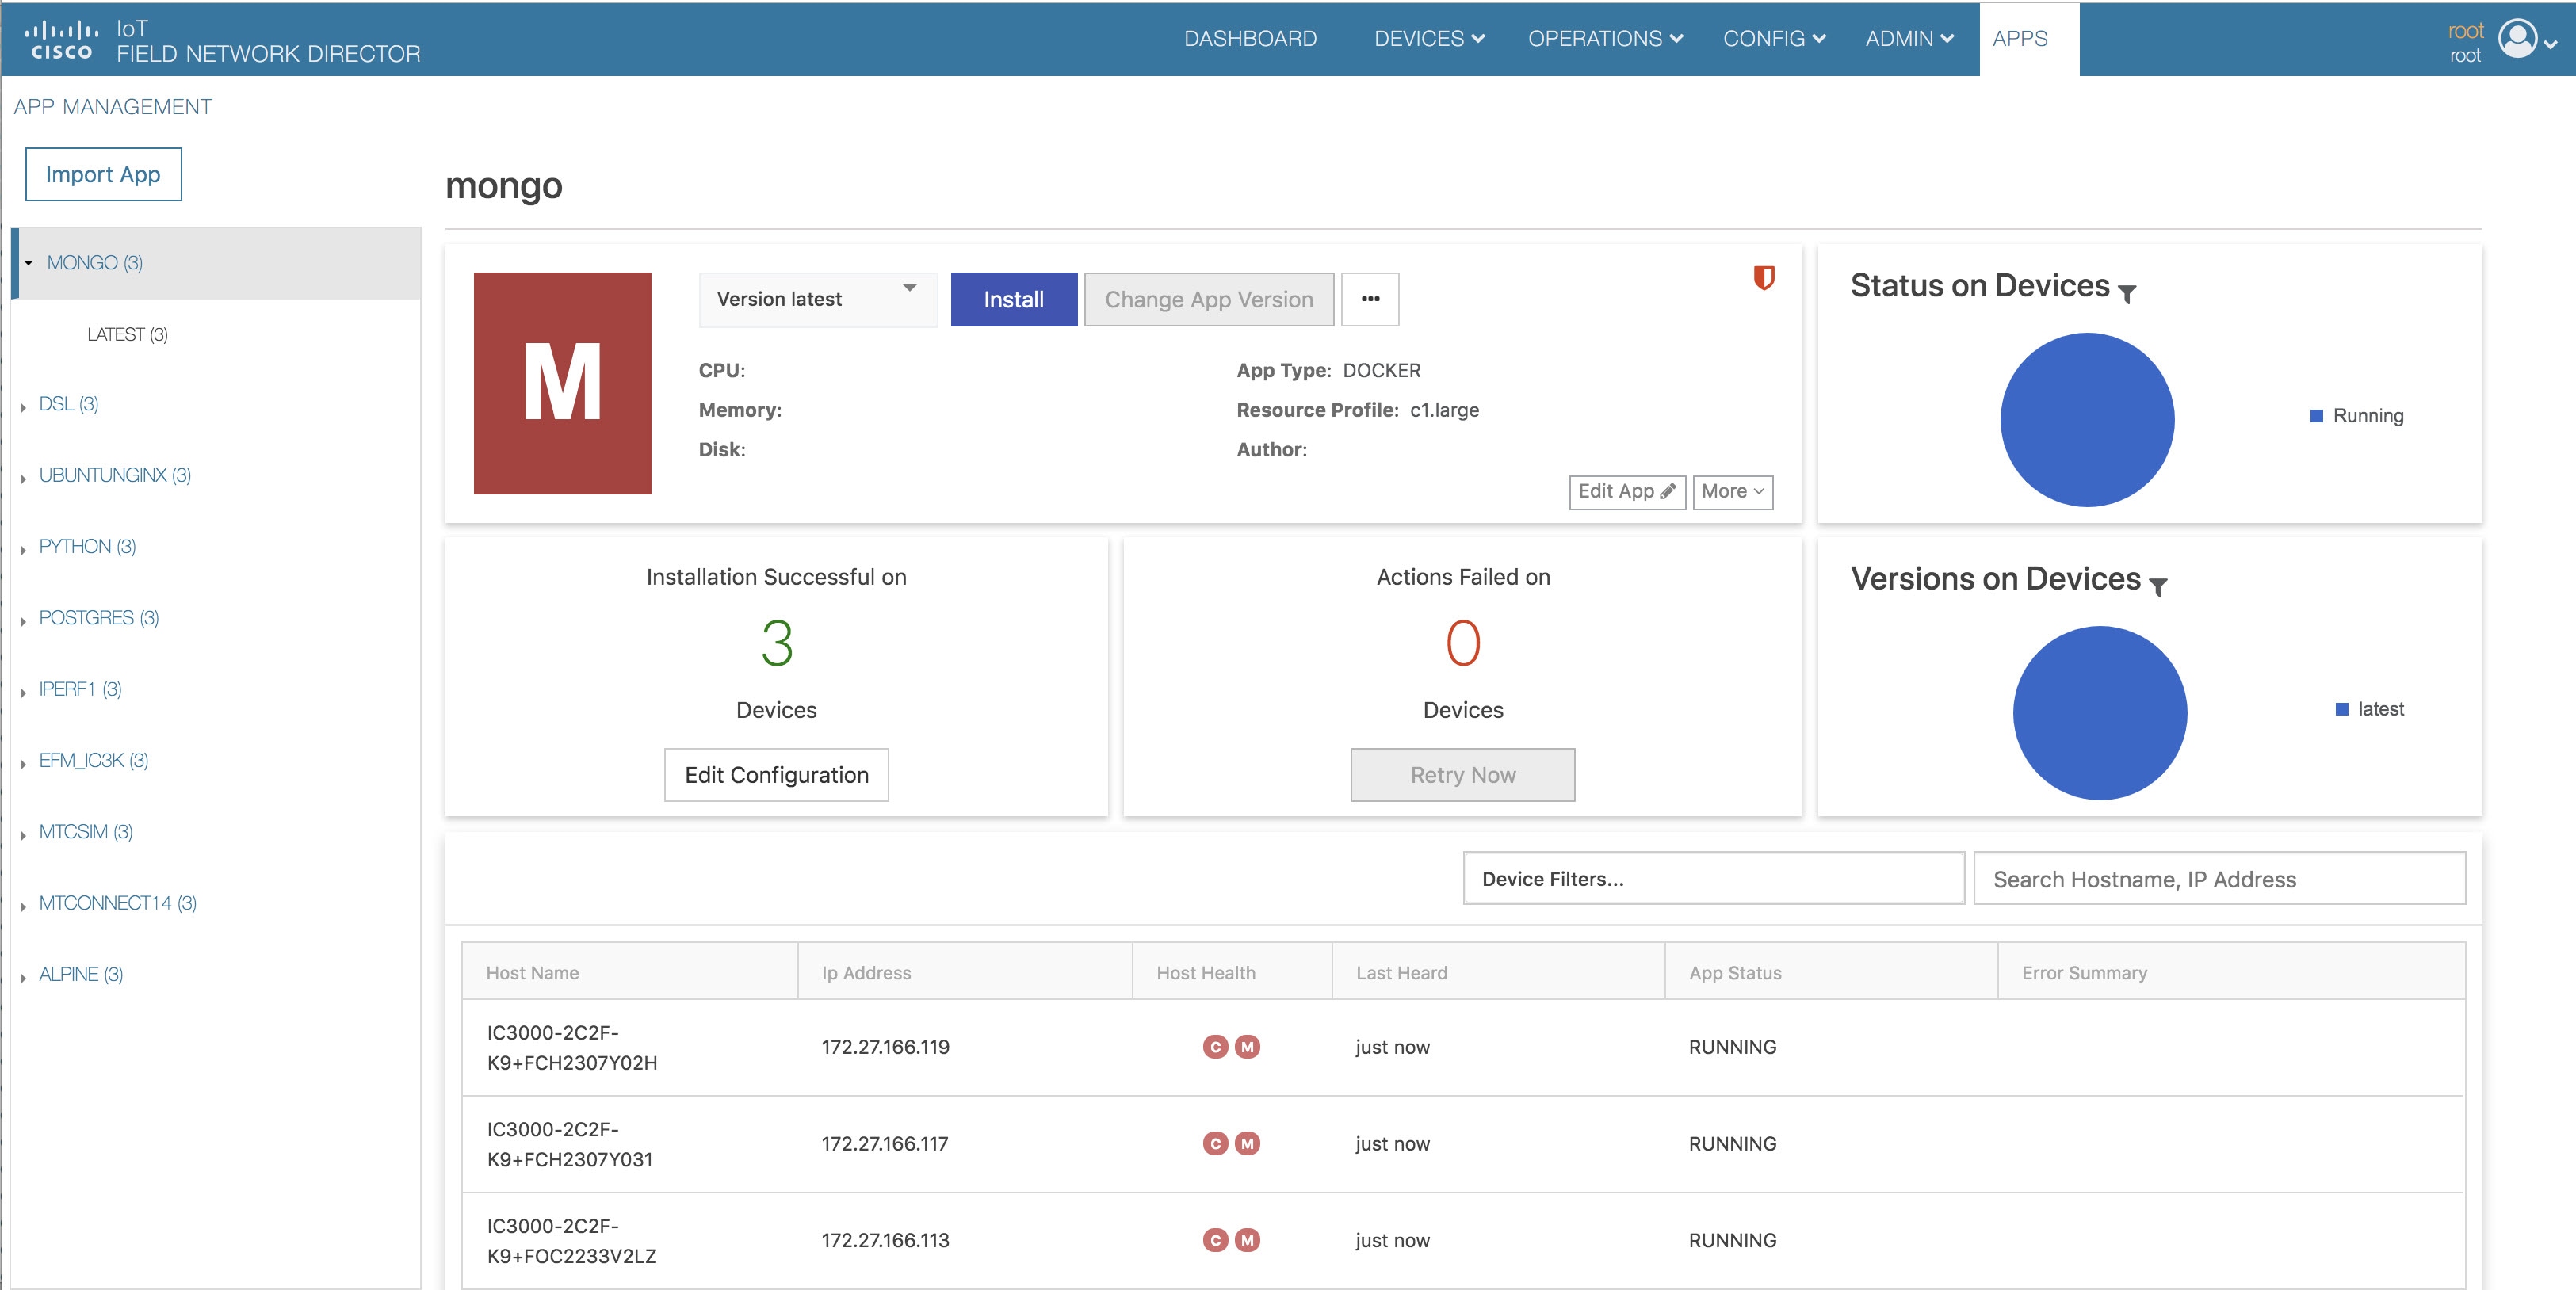
If installation is successful, you should be able to see the installed count increasing. See Figure 9.

Figure 19. Installation Successful