- Overview of Prime Network GUI clients
- Setting Up the Prime Network Clients
- Setting Up Change and Configuration Management
- Setting Up Vision Client Maps
- Setting Up Native Reports
- Setting Up Fault Management and the Events Client Default Settings
- Viewing Devices, Links, and Services in Maps
- Drilling Down into an NE’s Physical and Logical Inventories and Changing Basic NE Properties
- Manage Device Configurations and Software Images
- How Prime Network Handles Incoming Events
- Managing Tickets with the Vision Client
- Viewing All Event Types in Prime Network
- Cisco Path Tracer
- Managing IP Address Pools
- Monitoring AAA Configurations
- Managing DWDM Networks
- Managing MPLS Networks
- Managing Carrier Ethernet Configurations
- Managing Ethernet Networks Using Operations, Administration, and Maintenance Tools
- Monitoring Carrier Grade NAT Configurations
- Monitoring Quality of Service
- Managing IP Service Level Agreement (IP SLA) Configurations
- Monitoring IP and MPLS Multicast Configurations
- Managing Session Border Controllers
- Monitoring BNG Configurations
- Managing Mobile Transport Over Pseudowire (MToP) Networks
- Managing Mobile Networks
- Managing Data Center Networks
- Monitoring Cable Technologies
- Monitoring ADSL2+ and VDSL2 Technologies
- Monitoring Quantum Virtualized Packet Core
- VSS Redundancy System
- Icon Reference
- Permissions Required to Perform Tasks Using the Prime Network Clients
- Correlation Examples
- Managing certificates
Setting Up Change and Configuration Management
Cisco Prime Network Change and Configuration Management (CCM) allows you to manage the device configurations and software images used by the devices in your network. These topics explain how to use CCM:
- Workflow for Setting Up CCM
- Setting Up Prime Network to Work With CCM
- Setting Up Devices to Work With CCM
- Setting Up Configuration Management
- Setting Up Image Management
- Setting Up CCM Device Groups
- Setting Up Image Distribution Servers
- Enabling SSH Resync on VNE and CCM
Whether you can perform these setup tasks depends on your account privileges. See Permissions Required to Perform Tasks Using the Prime Network Clients for more information.

Note![]() After installing or upgrading Prime Network, we recommend you to clear the browser cache before using CCM.
After installing or upgrading Prime Network, we recommend you to clear the browser cache before using CCM.
If Prime Network is installed on the Standalone mode and Suite mode with Prime Central client, and if you launch the NCCM from Prime Network, and allows the Prime Network session to expire, the Prime Network will close and prompts you to login again while the NCCM will not close automatically. The session will remain active until you log out of the NCCM.
Workflow for Setting Up CCM
The following table provides the basic workflow for setting up CCM.
Setting Up Prime Network to Work With CCM
These topics describe how to set up Prime Network to use the CCM features:
Configuring Prime Network for CCM
Check these settings to ensure Prime Network components are properly configured for CCM operations.
- Verify the gateway port to be used. 8043 is the secure HTTP port enabled by default for CCM, but you can use port 8080 instead using this command:
To disable port 8080, perform the same operation but use the disable argument.
- For Image Management, verify that the gateway has sufficient space for the storing and staging directories (see Reference: Image Management Global Settings).
- For file transfers using TFTP, verify that the TFTP directory is set up and available in the Prime Network gateway and/or unit. To modify and verify the TFTP directory, log in as network-user and run the following commands from NETWORKHOME (the Prime Network installation directory, which is export/home/ network-user by default). In the following, IP-address is the IP address of the unit or gateway.
–![]() To check the TFTP directory:
To check the TFTP directory:
–![]() To change the TFTP directory (optional):
To change the TFTP directory (optional):
Supported TFTP Directory Name Format
The TFTP directory name (tftp-dir-name) must be a single word and should not include any absolute path from the root directory.
The following example represents the supported TFTP directory formats:
TFTP Directory Name Formats that are not Supported
Follow these restrictions while specifying the TFTP directory name (tftp-dir-name) in the registry settings:
Do not use the forward slash (/) at the beginning and the end of the TFTP directory name.
Specify the directory name without using the sub directories.
The following example represents that the sub directories tftpnew/tftpinner are used and this naming format is not supported:
Specify the same TFTP directory name in the registry settings for both the read directory avm83/services/tftp/write-dir and write directory avm83/services/tftp/read-dir:
The following example represents that the TFTP directory name tftpnew1 is used for both the read and the write directories:
Note![]() Do not block the port number 1069. Prime Network uses this port to listen the TFTP traffic flow.
Do not block the port number 1069. Prime Network uses this port to listen the TFTP traffic flow.
- If the gateway is behind a firewall, you must open special ports for CCM. This is not required for units that are located behind firewalls and use Network Address Translation (NAT) because the unit will not require a publicly-available IP address in order for the gateway to contact it.
- For IPv6, CCM functions run smoothly when the network and devices have IPv6 addresses.
- Prime Network’s information must be consistent with the device configuration.
–![]() The SCP port configured on the device VNE (Prime Network's model of the device) must match the SCP port used by the device. If a device is not using the default SCP port, the VNE must also be configured with the non-default port. VNE properties are controlled from the Administration client. See the Cisco Prime Network 5.1 Administration Guide for more information.
The SCP port configured on the device VNE (Prime Network's model of the device) must match the SCP port used by the device. If a device is not using the default SCP port, the VNE must also be configured with the non-default port. VNE properties are controlled from the Administration client. See the Cisco Prime Network 5.1 Administration Guide for more information.
–![]() The SNMP read-write community configured on the device VNE must match the read-write community configured on the device.
The SNMP read-write community configured on the device VNE must match the read-write community configured on the device.
- You can configure timeout for the Command-line interface used for Image distribution jobs. In Prime Network Administration, click Tools > Registry Controller > Image Management Settings > Image Distribution to configure timeout for image distribution. The default timeout value is 5400000 ms. You can enter a timeout value between 3600000 ms and 7200000 ms.
Checking Prime Network Global Settings for CCM Operations
The following default CCM behavior is controlled from the Administration client.
- The CCM actions that you can perform, and the devices you can view and manage. When a user account is created the administrator assigns a user access level to the user account.
–![]() The user access level controls what actions the user can perform using CCM.
The user access level controls what actions the user can perform using CCM.
–![]() The device scope determines which devices a user has permission to access, and what the user is allowed to do on those devices.
The device scope determines which devices a user has permission to access, and what the user is allowed to do on those devices.
For a matrix of actions users can perform depending on their user access level and device scope assignments, see Permissions Required to Perform Tasks Using the Prime Network Clients.
- Whether users have permission to run CCM jobs. If global per-user authorization is enabled, a user can only run CCM jobs if they have been granted this permission in their user account settings. Global per-user authorization is disabled by default.
- Whether users are required to enter their credentials when they run CCM operations. This is disabled by default.
Note![]() If Prime Network is being used with Prime Central, both, job authorization and credential requirements are enabled.
If Prime Network is being used with Prime Central, both, job authorization and credential requirements are enabled.
Users with Administrator privileges can change these settings. They can also configure Prime Network to generate a warning message whenever a user executes a command script. For more information, see the Cisco Prime Network 5.1 Administrator Guide.
Setting Up Devices to Work With CCM
Check these device settings to ensure your devices can communicate with Prime Network:
- Verify that the device is supported. See Cisco Prime Network 5.1 Supported Cisco VNEs.
- Make sure you have performed all of the CCM-specific device configuration prerequisites for adding VNEs. These commands are described in the Cisco Prime Network 5.1 Administrator Guide. For device configuration files, verify that devices are configured to forward configuration change notifications to Prime Network. If you will be using event-triggered archiving, make sure the logging gateway-IP command is configured on all devices. For CPT devices, the TL1 protocol must be enabled in the VNE Properties, and the default TL1 port is 3082.
- The SNMP read-write community configured on the device must match the SNMP read-write community on the device VNE.
- Verify the reachability between devices and their hosting units.
- Verify the FTP settings. CCM supports FTP for all file and image transfers. Although you can configure a username and password on the device using the ip ftp command, this may not be safe if the network is not secure. Before using FTP, do the following:
–![]() Configure the network device to add the Prime Network unit user credentials of the unit that manages the device. (You do not need to add Prime Network unit server super-user credentials of the to the device configuration.)
Configure the network device to add the Prime Network unit user credentials of the unit that manages the device. (You do not need to add Prime Network unit server super-user credentials of the to the device configuration.)
–![]() Restrict the FTP configuration such that the Prime Network unit user has read-write access only to the NETWORKHOME /tftp directory and therefore does not have access to unwanted files outside the home directory.
Restrict the FTP configuration such that the Prime Network unit user has read-write access only to the NETWORKHOME /tftp directory and therefore does not have access to unwanted files outside the home directory.
Setting Up Configuration Management
These topics provide information on how to set up the Configuration Management feature:
- Steps for Setting Up Configuration Management
- Reference: Global Settings for Configuration Management
- Notes on Exclude Commands
Note CCM does not support the following special characters on its Settings pages:
- For Password fields—>, <, ', /, \, !, :, ;, and "
- For all other fields—`, ~, @, #, $, %, ^, &, *, (,), +, =, |, {, }, [, ], ', ?, >, <, /, \, !, :, ;, and "
Steps for Setting Up Configuration Management
Many Configuration Management features are disabled by default so that you do not encounter unexpected processing loads on your server—for example, how often CCM checks devices and backs up their configurations to the archive. The following steps explain what you must do to set up Configuration Management. All of these items are configured from the Configuration Management Settings page (Configurations > Settings). Many of these settings can be overridden when you create specific jobs.
1.![]() Configure the transport protocol that Prime Network will use between the device and the gateway. These are controlled from the Transport Protocol area. The options are TFTP, SFTP/SCP, and FTP (TFTP is the default). To use FTP as the transfer protocol, you must install FTP on the gateway and the unit servers that manage the VNEs. Note the following:
Configure the transport protocol that Prime Network will use between the device and the gateway. These are controlled from the Transport Protocol area. The options are TFTP, SFTP/SCP, and FTP (TFTP is the default). To use FTP as the transfer protocol, you must install FTP on the gateway and the unit servers that manage the VNEs. Note the following:
Note![]() FTP is not a secure mode of transfer. Use SCP/SFTP instead, for secure config and image transfers.
FTP is not a secure mode of transfer. Use SCP/SFTP instead, for secure config and image transfers.
–![]() The TFTP source interface on the devices must be able to reach the unit. Otherwise, the configuration management jobs that require TFTP may fail.
The TFTP source interface on the devices must be able to reach the unit. Otherwise, the configuration management jobs that require TFTP may fail.
–![]() To use SFTP/SCP for configuration file transfers from a device to a unit, ensure that an SSH server is configured and running on the device (so that during the transfer, the device acts as a server and the unit as a client).
To use SFTP/SCP for configuration file transfers from a device to a unit, ensure that an SSH server is configured and running on the device (so that during the transfer, the device acts as a server and the unit as a client).
–![]() For Cisco IOS, Cisco IOS XR, and Cisco IOS-XE devices, configure the device with K9-security-enabled images so that the SSH server is up and running on the device.
For Cisco IOS, Cisco IOS XR, and Cisco IOS-XE devices, configure the device with K9-security-enabled images so that the SSH server is up and running on the device.
–![]() To use SCP as the protocol to retrieve configuration files, execute the following command on the device:
To use SCP as the protocol to retrieve configuration files, execute the following command on the device:
2.![]() Enable the initial synchronization of the archive files with the configurations that are running on the network devices. Whenever the gateway is restarted, CCM will perform this synchronization. By default, synchronization is disabled. To enable it, activate Enable Initial Config Syncup.
Enable the initial synchronization of the archive files with the configurations that are running on the network devices. Whenever the gateway is restarted, CCM will perform this synchronization. By default, synchronization is disabled. To enable it, activate Enable Initial Config Syncup.
3.![]() Configure the policies that control how often CCM retrieves information from devices and copies (backs up) configuration files to the archive. By default, all of these settings are disabled. Consider these questions when configuring your settings:
Configure the policies that control how often CCM retrieves information from devices and copies (backs up) configuration files to the archive. By default, all of these settings are disabled. Consider these questions when configuring your settings:
a.![]() How much disk space is available? Smaller space may require more frequent purging.
How much disk space is available? Smaller space may require more frequent purging.
b.![]() Should new configuration files be copied (backed up) to the archive on a periodic basis or on an event-driven basis?
Should new configuration files be copied (backed up) to the archive on a periodic basis or on an event-driven basis?
If configurations are changing frequently and the changes are not of immediate importance, use periodic backups by selecting Enable Period Config Backup. This will minimize server workload.
Note The periodic setting is recommended.
If every change is considered significant, use event-driven backups (Enable Event-Triggered Config Archive).
c.![]() For event-driven archiving, should information be copied to the archive immediately upon receiving a change (Sync archive on each configuration change)? Or should changes be queued and then copied at a certain interval (Sync archives with changed configurations every ___ hours and ___ minutes)? If information needs to be copied to the archive immediately, synchronize the archive on each configuration change. Otherwise, you can synchronize the archive at regular intervals (every 1-24 hours).
For event-driven archiving, should information be copied to the archive immediately upon receiving a change (Sync archive on each configuration change)? Or should changes be queued and then copied at a certain interval (Sync archives with changed configurations every ___ hours and ___ minutes)? If information needs to be copied to the archive immediately, synchronize the archive on each configuration change. Otherwise, you can synchronize the archive at regular intervals (every 1-24 hours).
While scheduling automatic backup operations, you might be prompted to enter your device access credentials. The device credentials are taken from the Configuration Settings. (See Setting Up Prime Network to Work With CCM.).
In Prime Network 5.1, as part of Prime Network CCM configurations, to prevent a backup failure you can permit backup configuration operations as a text format commit label in IOS XR devices instead of auto generated numeric value commit label.
4.![]() Configure CCM to perform periodic synchronization of out-of-sync devices by selecting Enable Periodic Sync for Out of Sync Devices (24Hours). The configmgmt-synchronize-sysjob system job is scheduled. You can view the scheduled job in the Configuration Management Jobs (Configurations > Jobs) page.
Configure CCM to perform periodic synchronization of out-of-sync devices by selecting Enable Periodic Sync for Out of Sync Devices (24Hours). The configmgmt-synchronize-sysjob system job is scheduled. You can view the scheduled job in the Configuration Management Jobs (Configurations > Jobs) page.
5.![]() Configure CCM to export archived configuration to an export server on a periodic basis by selecting Enable Periodic Config Export and Export Settings. This allows you to free up disk space while keeping a permanent record of historical archives.
Configure CCM to export archived configuration to an export server on a periodic basis by selecting Enable Periodic Config Export and Export Settings. This allows you to free up disk space while keeping a permanent record of historical archives.
6.![]() Configure when files should be purged from the archive using the Archive Purge Settings. Consider these questions when configuring the purge settings:
Configure when files should be purged from the archive using the Archive Purge Settings. Consider these questions when configuring the purge settings:
–![]() How big are the configuration files?
How big are the configuration files?
–![]() How often are changes made to devices?
How often are changes made to devices?
7.![]() Specify the default mode of restoring configuration files to the devices using Restore Mode.
Specify the default mode of restoring configuration files to the devices using Restore Mode.
8.![]() Configure the SMTP server and e-mail IDs so that regular configuration management job status e-mails are sent. (You can also specify e-mail settings when you create a job.)
Configure the SMTP server and e-mail IDs so that regular configuration management job status e-mails are sent. (You can also specify e-mail settings when you create a job.)
9.![]() Specify the commands that should be excluded when CCM compares device configuration files. A set of common exclude commands is provided by default (for example, ntp-clock-period). These are controlled in the Exclude Commands area (see Notes on Exclude Commands).
Specify the commands that should be excluded when CCM compares device configuration files. A set of common exclude commands is provided by default (for example, ntp-clock-period). These are controlled in the Exclude Commands area (see Notes on Exclude Commands).
Note![]() Configuring exclude commands is especially important if you are using event-driven archiving. Doing so avoids unnecessary file backups to the archive.
Configuring exclude commands is especially important if you are using event-driven archiving. Doing so avoids unnecessary file backups to the archive.
Reference: Global Settings for Configuration Management
Note In the Configuration Management and Image Management Settings pages, CCM does not support the following special characters:
- For Password fields—>, <, ', /, \, !, :, ;, and "
- For all other fields—`, ~, @, #, $, %, ^, &, *, (,), +, =, |, {, }, [, ], ', ?, >, <, /, \, !, :, ;, and "
The following table describes all of the settings in the Configurations global settings page. To open the page, choose Configurations > Settings.
The backup settings you enter here do not affect the manual backups you can perform by choosing Configurations > Backup. The backups you perform from that page and the backups you configure on this Settings page are completely independent of each other.
|
|
|
|
|---|---|---|
|
|
||
| The full pathname of the directory to which Prime Network should copy the file on the server specified in the Server Name field. |
||
| The login username that Prime Network should use when connecting to the server specified in the Server Name field. |
||
| The login password that Prime Network should use when connecting to the server specified in the Server Name field. |
||
| Default export protocol that Prime Network should use when exporting configuration files to another server. The choices are FTP and SFTP. The default is FTP. You can override this protocol while scheduling an export job, if required. |
||
|
When you set the Archive Purge Settings, the configmgmt-archivepurge-sysjob system job is scheduled. You can view the scheduled job in the Configuration Management Jobs (Configurations > Jobs) page. |
||
| Minimum number of versions of each configuration that should be retained in the archive (default is 2). |
||
| Maximum number of versions of each configuration that Prime Network should retain (default is 5). The oldest configuration is purged when the maximum number is reached. Configurations marked do not purge are not included when calculating this number. The minimum number of versions to be retained is 5. The maximum number of versions that can be retained is 2147483647. |
||
| Age (in days) at which configurations should be purged (between 5-360). |
||
|
|
||
| Age (in days) at which to purge Change Logs. (Change Logs contain configuration change notifications from devices.) The default is 30 days and the range is 5-360. When you set the Configuration Change Purge Settings, the configmgmt-changeadtprg-sysjob system job is scheduled. You can view the scheduled job in the Configuration Management Jobs (Configurations > Jobs) page. |
||
|
|
||
| Default transport protocol that Prime Network should use when copying configuration files to and from a device. The options are TFTP, SFTP/SCP, and FTP. The default is TFTP. To use FTP as the transfer protocol, you must install FTP on the gateway and the unit servers that manage the VNEs. Note the following:
For information on the transfer protocol that CCM supports for each device, see the Cisco Prime Network 5.1 Supported VNEs - Addendum. For its Supported Protocols see the Support for Change and Configuration Management in 5.1 tables. |
||
| Detect ongoing configuration changes by performing a periodic collection of device information. Use this method if configurations change frequently but those changes are not important to you. CCM compares the timestamp for the last configuration change on the version in the archive with the timestamp on the newer version. If they are different, CCM backs the new file to the archive immediately. By default, this is not enabled. The start time and repeat interval are configurable (4-100 hours). The default start time is 12:00 AM and the default repeat interval is 72 hours. Note This CCM collection is independent of the Prime Network inventory collection. When you enable this option, the Configmgmt-backup-sysjob system job is scheduled. You can view the scheduled job in the Configuration Management Jobs (Configurations > Jobs) page. |
||
| (For Cisco IOS only) Enables automatic synchronization of the out-of-sync devices on a periodic basis. Prime Network adds a device to the list of out-of-sync devices whenever the latest version of the startup configuration is not in sync with the latest version of the running configuration file on the device. The start time and repeat interval are configurable (4-100 hours). The default start time is 12:00 AM and the default repeat interval is 72 hours. When you enable this option, the configmgmt-synchronize-sysjob system job is scheduled. You can view the scheduled job in the Configuration Management Jobs (Configurations > Jobs) page. |
||
|
|
||
| Allows CCM to periodically export configurations from the archive to the export server. You can set up an interval in the range of 4-100 hours. The default value for export interval is 24 hours. You can also specify the start time for the periodic export operation. Choose one of the following to specify how the export job should be performed when a copy of an archived configuration already exists on the export server:
Refer to Copying the Device Files to the Archive (Backups), to learn more about the type of configuration files exported for different devices. When you enable this option, the configmgmt-export-sysjob system job is scheduled. You can view the scheduled job in the Configuration Management Jobs (Configurations > Jobs) page. – – Figure 3-1 Enable Periodic Options 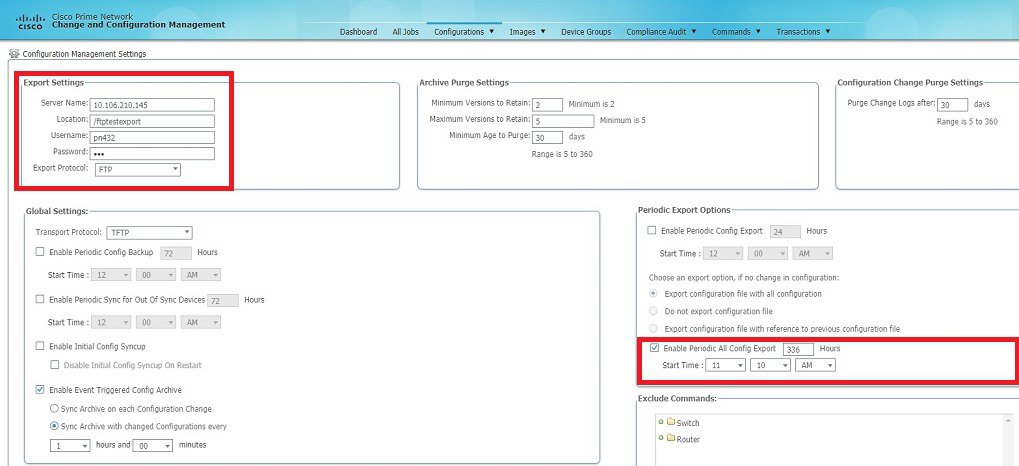
When you enable this option, the devices information are exported based on the specified interval, irrespective of the last modification on the Archive. You can view the newly created “configmagmt-exportall- system job” in the Configuration Management Jobs page and the job details by clicking the Lastrun Results link. |
||
| Allows CCM to fetch the configuration files from the network devices and archive it whenever a new device is added to Prime Network. This populates the Configuration Sync Status dashlet on the dashboard. If this setting is enabled, CCM will not perform a syncup when the gateway is restarted (to protect performance), and the Disable Initial Config Syncup on Restart is checked by default. If you do want CCM to fetch the configuration files when the gateway restarts, uncheck the Disable Initial Config Syncup on Restart check box. Note The “sync up” described here pertains to making sure the archive correctly reflects the network device configurations. This is different from the Synchronize operation, where devices are checked to make sure their running and startup configurations are the same. |
||
| Detect ongoing configuration changes by monitoring device configuration change notifications. This setting also controls whether Prime Network populates the Configuration Changes in the Last Week and the Most Recent Configuration Changes dashlets (on the dashboard). When you enable this option, the configmgmt-chngprdcsync-sys job system job is scheduled. You can view the scheduled job in the Configuration Management Jobs (Configurations > Jobs) page. Use this method if you consider every configuration file change to be significant. When a notification is received, CCM backs up the new running configuration file to the archive using one of the following methods:
Following are the scenarios when the version ID is not updated in the Configuration Change Logs page:
Note Make sure that the configuration change detection schedule does not conflict with purging, since both processes are database-intensive. Note If you are using event-triggered archiving, you should also make sure that exclude commands are properly configured. Exclude commands are commands that Prime Network ignores when comparing configurations, and they are controlled from the Settings page. Using this mechanism eliminates unnecessary file backups to the archive. When a configuration change occurs for Cisco ASR 5000, Cisco ASR5500, and Cisco OLT devices, the relevant trap does not include the information about the user who initiated the configuration change. Therefore, the User column in the Configuration Change Logs page displays “N/A”. |
||
| Enabling the Enable Event-Triggered Config Archive will start the CCM TFS registration and disabling this option will stop the CCM TFS registration. If you stop the CCM TFS registration in the Event Notification Services page of Prime Network Administration, when the Enable Event-Triggered Config Archive option is enabled, CCM will not receive any change notifications. Similarly, if you start the CCM TFS registration in the Event Notification Services page of Prime Network Administration, when the Enable Event-Triggered Config Archive option is disabled, the count of notifications will increase in the Event Notification Service page, but CCM will not receive any change notifications. Hence, change logs will not be created. |
||
| For enhanced security, and to prevent unauthorized access to devices, you might be asked to enter device credentials. This option is enabled if, from the Administration client , Global Settings > Security Settings > User Account Settings > Execution of Configuration Operations, you checked the option Ask for user credentials when running configuration operations. By default, the device credentials field is populated with the default VNE credentials. You must change the credentials to the device credentials before you save the settings. System jobs will fail, if the credentials entered are incorrect. If you checked the option Ask for user credentials when running configuration operations from the Administration client , and did not change the settings from the Settings page after making the change, all system jobs that are scheduled to run will fail. If the option Ask for user credentials when running configuration operations (from the Administration client ) is not enabled, the default VNE credentials are used. Also, if device credentials are entered in the Settings page, and the option Ask for user credentials when running configuration operations is not enabled from the Prime Network Administration client (the Administration client), the device credentials you have entered in the Settings page are ignored and the default VNE credentials are used. |
||
|
|
||
| Mode for restoring configuration files to a device:
|
||
|
|
||
| SMTP server to use for sending e-mail notifications on the status of configuration management jobs to users. If an SMTP host is configured in the Image Management Settings page, the same value will be displayed here by default. You can modify it, if required. |
||
| E-mail addresses of users to send a notification to after the scheduled job is complete. For two or more users, enter a comma-separated list of e-mail IDs. For example: The e-mail IDs configured here will appear by default while scheduling the configuration management jobs. However, you can add or modify the e-mail IDs then. |
||
| SMTP port ID to connect to the host server. The default port is 25. |
||
| Send an e-mail notification for Configuration Management jobs:
The selected option will appear by default while scheduling Configuration Management jobs. However, you can modify the option then. |
||
|
|
||
| Devices to which the exclude commands should be applied (meaning the exclude commands will not be considered when comparing device configuration files). The current selection is highlighted in green. All exclude commands applied to that selection will be listed below the device selector. See Notes on Exclude Commands. |
||
| Comma-separated list of commands to be excluded when comparing device configurations for any devices in this category (for example, all Cisco routers). |
||
| Comma-separated list of commands to be excluded when comparing device configurations for any devices in this series (for example, all Cisco 7200 series routers). |
||
| Comma-separated list of commands to be excluded when comparing device configurations for any devices of this same device type (for example, all Cisco 7201 routers). |
||
Notes on Exclude Commands
Exclude commands are inherited; in other words, if three exclude commands are specified for Cisco routers, all devices is any of the Cisco router families will exclude those three commands when comparing configuration files.

When you are working in the Exclude Commands page, your current selection will be highlighted in green. All exclude commands applied to that selection will be listed below the device selector. When Prime Network compares the router configuration files, it will exclude all of the commands listed in the Device Commands field. If a series is selected (example, Cisco 7200 Series), the commands listed in the Series Commands field will be excluded and so on.
The following procedure describes how to configure exclude commands.
Step 1![]() Choose Configurations > Settings.
Choose Configurations > Settings.
Step 2![]() In the Exclude Commands area, navigate and choose one of the following (your selection is highlighted in green):
In the Exclude Commands area, navigate and choose one of the following (your selection is highlighted in green):
Step 3![]() Enter a comma-separated list of commands you want to exclude when comparing configuration files for that device category, series, or type. You can also edit an existing list of commands.
Enter a comma-separated list of commands you want to exclude when comparing configuration files for that device category, series, or type. You can also edit an existing list of commands.
Your entries change to red until they are saved, and all affected device types, series, or categories are indicated in bold font.
Step 4![]() If you want a device type to ignore the parent commands (that is, the series and category commands), check the Ignore Above check box.
If you want a device type to ignore the parent commands (that is, the series and category commands), check the Ignore Above check box.
Step 5![]() Click Save to save your changes.
Click Save to save your changes.
Setting Up Image Management
These topics provide information on how to set up the Configuration Management feature:
Note In the Configuration Management and Image Management Settings pages, Change and Configuration Management does not support the following special characters:
- For Password fields—>, <, ', /, \, !, :, ;, and "
- For all other fields—`, ~, @, #, $, %, ^, &, *, (,), +, =, |, {, }, [, ], ', ?, >, <, /, \, !, :, ;, and "
Steps for Setting Up Image Management
The following prerequisites are controlled by the Image Management Settings page (Images > Settings). All of the fields in the settings page are described in xxxx.
Many of these settings can be overridden when you create specific jobs.
1.![]() Configure the transport protocol that Prime Network will use between the device and the gateway/unit that manages the device; these are controlled from the Transport Protocol area. The options are TFTP, SFTP/SCP, and FTP. The default is TFTP. Note the following:
Configure the transport protocol that Prime Network will use between the device and the gateway/unit that manages the device; these are controlled from the Transport Protocol area. The options are TFTP, SFTP/SCP, and FTP. The default is TFTP. Note the following:
–![]() The TFTP source interface on the devices must be able to reach the unit. Otherwise, the configuration management jobs that require TFTP may fail.
The TFTP source interface on the devices must be able to reach the unit. Otherwise, the configuration management jobs that require TFTP may fail.
–![]() To use SFTP/SCP for image file transfers from a device to a unit, ensure that an SSH server is configured and running on the device (so that during the transfer, the device acts as a server and the unit as a client). For Cisco IOS, Cisco IOS XR, and Cisco IOS-XE devices, configure the device with K9-security-enabled images so that the SSH server is up and running on the device.
To use SFTP/SCP for image file transfers from a device to a unit, ensure that an SSH server is configured and running on the device (so that during the transfer, the device acts as a server and the unit as a client). For Cisco IOS, Cisco IOS XR, and Cisco IOS-XE devices, configure the device with K9-security-enabled images so that the SSH server is up and running on the device.
2.![]() Configure the gateway staging directory to use when transferring images from Prime Network out to devices in the File Locations area. The default is NETWORKHOME/NCCMComponents/NEIM/staging/.
Configure the gateway staging directory to use when transferring images from Prime Network out to devices in the File Locations area. The default is NETWORKHOME/NCCMComponents/NEIM/staging/.
3.![]() Configure the gateway storing directory to use when transferring images from an outside source into the image repository (from Cisco.com or from another file system). This is controlled from the File Locations area. The default is NETWORKHOME/NCCMComponents/NEIM/images/.
Configure the gateway storing directory to use when transferring images from an outside source into the image repository (from Cisco.com or from another file system). This is controlled from the File Locations area. The default is NETWORKHOME/NCCMComponents/NEIM/images/.
4.![]() In case of insufficient memory, use the Clear Flash option (under Flash Properties). This deletes any one file (other than the running image) and recovers the disk space occupied by the file. This procedure is repeated until adequate space is available in the selected flash.
In case of insufficient memory, use the Clear Flash option (under Flash Properties). This deletes any one file (other than the running image) and recovers the disk space occupied by the file. This procedure is repeated until adequate space is available in the selected flash.
5.![]() Enable the warm upgrade facility to reduce the downtime of a device during planned Cisco IOS software upgrades or downgrades (in the Warm Upgrade area).
Enable the warm upgrade facility to reduce the downtime of a device during planned Cisco IOS software upgrades or downgrades (in the Warm Upgrade area).
6.![]() Configure the SMTP server and e-mail IDs so that regular software image management job status e-mails are sent. (You can also specify e-mail settings when you create a job.) This is controlled in the E-Mail Settings area.
Configure the SMTP server and e-mail IDs so that regular software image management job status e-mails are sent. (You can also specify e-mail settings when you create a job.) This is controlled in the E-Mail Settings area.
7.![]() If you plan to download files from Cisco.com, configure the necessary vendor credentials to connect to Cisco.com. These are set in the Vendor Credentials area. If you do not have login privileges, follow the procedure in Reference: Image Management Global Settings.
If you plan to download files from Cisco.com, configure the necessary vendor credentials to connect to Cisco.com. These are set in the Vendor Credentials area. If you do not have login privileges, follow the procedure in Reference: Image Management Global Settings.
8.![]() Configure the proxy server details to use while importing images to the repository from Cisco.com (in the Proxy Settings field).
Configure the proxy server details to use while importing images to the repository from Cisco.com (in the Proxy Settings field).
9.![]() If you plan to download images from an external repository, set up the details of the external server to import images to the Prime Network image repository (in the External Server Details area).
If you plan to download images from an external repository, set up the details of the external server to import images to the Prime Network image repository (in the External Server Details area).
Reference: Image Management Global Settings
Note In the Configuration Management and Image Management Settings pages, CCM does not support the following special characters:
- For Password fields—>, <, ', /, \, !, :, ;, and "
- For all other fields—`, ~, @, #, $, %, ^, &, *, (,), +, =, |, {, }, [, ], ', ?, >, <, /, \, !, :, ;, and "
The following table describes all of the settings in the Image Management global settings page. To open the page, choose Images > Settings.
|
|
|
||
|---|---|---|---|
| Default transfer protocol to use when copying images to and from a device. This setting can be overridden when creating a distribution job (for example, if you know that a device does not support the default protocol), FTP and TFTP are unsecured. The TFTP source interface on the devices must be able to reach the unit. Otherwise, the image management jobs that require TFTP may fail. To use SFTP/SCP for image transfers from a device to a unit, you need to ensure that an SSH server is configured and running on the device, such that the device acts as a server and the unit as a client during the transfer. For Cisco IOS, Cisco IOS XR, and Cisco IOS-XE devices, configure the device with K9-security-enabled images so that the SSH server is up and running on the device. |
|||
| In case of insufficient memory, use the Clear Flash option (under Flash Properties). This deletes any one file (other than the running image) and recovers the disk space occupied by the file. This procedure is repeated until adequate space is available in the selected flash. |
|||
| If checked, a Cisco IOS image can read in and decompress another Cisco IOS image and transfer control to this new image. This functionality reduces the downtime of a device during planned Cisco IOS software upgrades or downgrades. This can be overridden when creating the job.
Note |
|||
| Full pathname of directories where images are stored when they are being imported into the Prime Network image repository, or when they are being transferred out of the repository to devices. New directories must be empty and have the proper permissions (read, write, and execute permissions for users). The entries must be full pathnames. In the following default locations, NETWORKHOME is the Prime Network installation directory. |
|||
| Location where images from the Prime Network image repository are placed before transferring them out to devices. The default is NETWORKHOME /NCCMComponents/NEIM/staging/. |
|||
| Location where images from an outside source are placed before importing them into the Prime Network image repository (from Cisco.com, from existing devices, or from file system). The default is NETWORKHOME /NCCMComponents/NEIM/images/. |
|||
| Details about external server from which images can be imported into repository. |
|||
| IP address of the external server (IPv4 or IPv6 addresses supported). |
|||
| Settings for automatic e-mail notifications about the status of jobs. |
|||
| SMTP server to use for sending e-mail notifications on the status of image management jobs to users. If an SMTP host is configured in the Configuration Management Settings page, the same value will be displayed here by default. You can modify it, if required. |
|||
| E-mail address of the user to send a notification to after the scheduled job is complete. For two or more users, enter a comma-separated list of e-mail addresses. For example: The e-mail IDs configured here will appear by default while scheduling the image management jobs. However, you can add/modify the e-mail IDs then. |
|||
| SMTP port ID to connect to the host server. The default port is 25. |
|||
| Controls when e-mail notifications for Imange Management jobs are sent (can be overridden when creating the job): |
|||
| Details about proxy server to use when importing images from Cisco.com |
|||
| HTTP proxy server to use for downloading images from Cisco.com. |
|||
| Usernames and passwords that can be used to download images from Cisco.com. (See the procedure described in Reference: Image Management Global Settings.) |
|||
Obtaining Cisco.com Login Privileges for Image Management
Login privileges are required for all images operations that access Cisco.com. To get access, you must have a Cisco.com account. If you do not have a user account and password on Cisco.com, contact your channel partner or enter a request on the main Cisco website.
You can register by going to the following URL:
http://tools.cisco.com/RPF/register/register.do
To download cryptographic images from Cisco.com, you must have a Cisco.com account with cryptographic access.
To obtain the eligibility for downloading strong encryption software images:
Step 1![]() Go to the following URL:
Go to the following URL:
http://tools.cisco.com/legal/k9/controller/do/k9Check.x?eind=Y&return_url=http://www.cisco.com
Step 2![]() Enter your Cisco.com username and password, and click Log In.
Enter your Cisco.com username and password, and click Log In.
Step 3![]() Follow the instructions provided on the page and update the user details.
Follow the instructions provided on the page and update the user details.
Step 4![]() Click Accept to submit the form.
Click Accept to submit the form.
Step 5![]() To verify whether you have obtained the eligibility to download encrypted software:
To verify whether you have obtained the eligibility to download encrypted software:
http://tools.cisco.com/legal/k9/controller/do/k9Check.x?eind=Y&return_url=http://www.cisco
.com
b.![]() Enter your username and password, and click Log In.
Enter your username and password, and click Log In.
The following confirmation message is displayed:
You have been registered for download of Encrypted Software.
Setting Up CCM Device Groups
User-defined device groups allow you to apply changes to devices in bulk. You can choose specific devices as you perform CCM operations, but having predefined device groups can save you time. There are two types of device groups:
|
|
|
|---|---|
Devices are never automatically added to these groups; new devices must be added manually. |
|
Devices are automatically added to a group if they match membership rules. |
If a device group’s members changes during a CCM operation, the CCM operation is applied to the devices that belong to the group at the time of execution.
To view the existing device groups and create new user-defined device groups:
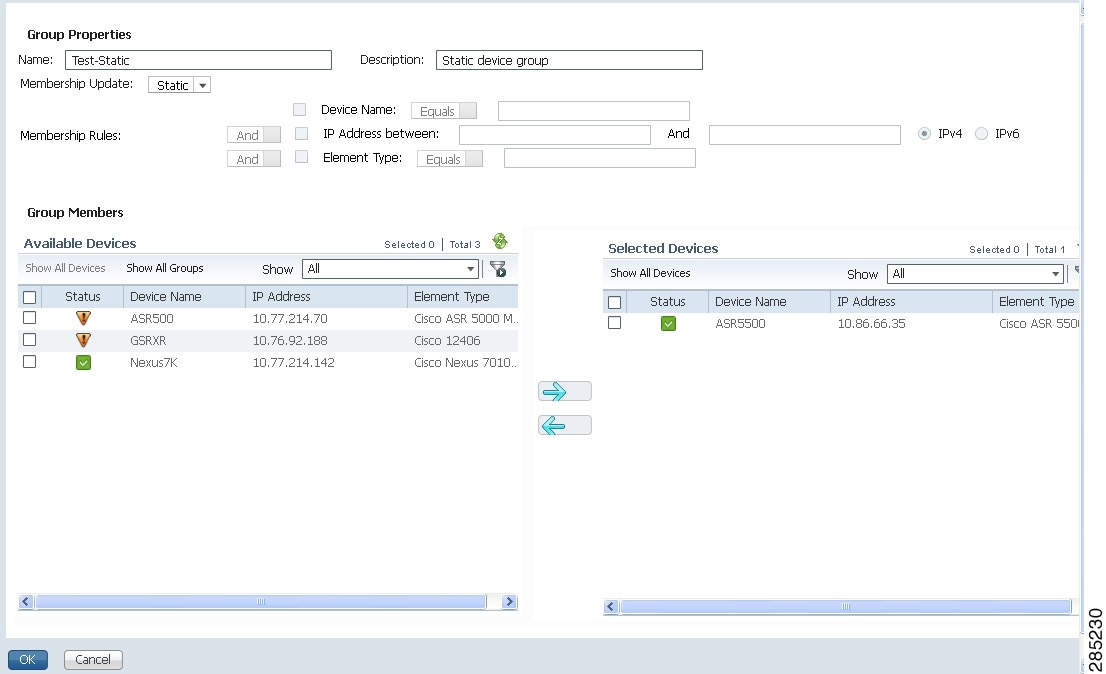
Step 1![]() Click the Device Groups tab. The Device Groups page appears as shown in Figure 3-2.
Click the Device Groups tab. The Device Groups page appears as shown in Figure 3-2.

The Device Groups page displays the name, description, and whether the membership is static or dynamic. To delete a group, click the red X next to the group name.
To view the devices in a group, click the hyperlinked group name. The Group Members page displays the device status, IP address, and element type. To display additional device properties, click the Device Name hyperlink. The status icons are illustrated in the following.


Step 2![]() To create a new group, click Create and enter the required information. Names must be unique. Do not use the reserved names adminGroup and ROOT-DOMAIN.
To create a new group, click Create and enter the required information. Names must be unique. Do not use the reserved names adminGroup and ROOT-DOMAIN.
Step 3![]() In the Membership Update drop-down list box, choose Static or Dynamic.
In the Membership Update drop-down list box, choose Static or Dynamic.
Note![]() You can choose a combination of parameters by using the And/Or operator. You can also use a comma-separated list to provide multiple values for the Device Name and Element Type parameters.
You can choose a combination of parameters by using the And/Or operator. You can also use a comma-separated list to provide multiple values for the Device Name and Element Type parameters.
Setting Up Image Distribution Servers
Cisco Prime Network provides solution for distributing software images in a network based on the network architecture that contains CCM GUI, gateways, units, and direct network elements with distribution servers placed between the units and network elements. Using the distribution servers for storing software images facilitates efficient bandwidth utilization within a network. The distribution server works with the secure protocol, for example, SCP or SFTP.
In the distribution server, you can copy the software image to the network element.
Note![]() Using Distribution servers you can perform only the Distribution operation. Install Add operation must be performed as a separate operation.
Using Distribution servers you can perform only the Distribution operation. Install Add operation must be performed as a separate operation.
Prerequisites for Using Distribution Server
- Distribution server is a Linux server with minimal installation of RHEL with expect, PERL, and OpenSSL packages (to provide SSH, SCP, SFTP, and rsync functionalities). The Prime Network software must not be installed on it.
- Distribution server should be ready with a user account created to be used as a part of this solution.
- Distribution server credential configuration file should be created, at the time of solution installation, using a script provided as a part of the solution.
- Location of the directory where the images are stored on the distribution server should be identified and added to the mapping file.
- Initial configuration of tool or solution after installation includes executing the script to fetch distribution server username, SSH keys of the unit, and creating or saving it to a configuration file. You can test connectivity to distribution server at this time using a utility which is a part of the solution.
Required Settings for Using Distribution Server
- VNE device to distribution servers mapping in Units—External file, for example file in CSV format must be available in the units. The CSV file contains information that describes about the mapping between the VNE devices and corresponding distribution servers, for example, distro_scp.csv and distro_sftp.csv. This file is maintained as a part of the new device add process to ensure that it is in sync with the Prime Network inventory.
- Certified Software Image on the Gateway—A certified image is made available in a predefined directory on the gateway. The image is imported into the Prime Network repository. Then, the image is copied to the distribution servers using rsync mechanism.
- SSH connection between unit and distribution server—Login as a Prime Network user and execute the following commands to setup SSH keys between the unit server and distribution server:
- Execute image distribution configuration script—Execute the image distribution configuration script (imagedistributionconfig.pl) on units to provide the distribution server access credentials username and SSH keys. After which, a configuration file (.distroCreds.conf) is created.
- Copy the software image to the distribution server—Copy the image to be copied to the distribution server and configure the image directory and distribution mappings in the CSV file on unit.
- Copy the Bulkstat file along with the images to StarOS devices during distribution operation.
- Test the connectivity to distribution server—Execute the script (testDistroSSHaccess.pl) to test the connectivity. The script is available in the following location: $ANAHOME/Main/scripts/configuration/cisco/NEIM.
Note![]() The required PERL modules should be installed.
The required PERL modules should be installed.
Setting Up Distribution Servers
To set up distribution servers:
Step 1![]() Choose Tools > Registry Controller > Image Management Settings > Image Distribution.
Choose Tools > Registry Controller > Image Management Settings > Image Distribution.
Step 2![]() In the Image Distribution window, select the True option to use distribution server.
In the Image Distribution window, select the True option to use distribution server.
Note![]() You can also copy the software image without using the distribution server. Choose the False option in the Image Distribution window. The False option is the default value in the Image Distribution window.
You can also copy the software image without using the distribution server. Choose the False option in the Image Distribution window. The False option is the default value in the Image Distribution window.
Enabling SSH Resync on VNE and CCM
SSH key is the common way to securely connect to remote machines. It is used to identify trusted computers, without using passwords. SSH enables connecting to a virtual private server in a highly secured manner than using a password.
In Cisco Prime Network, the SSH key synchronization is created to handle device disconnections due to SSH key mismatch. Prime network uses SSH keys to communicate with the devices.
Synchronization of SSH Key with VNE
Based on user configuration, when the device reboots, a new SSH key is generated to serve the internal security purposes. Prime Network tries to connect to a device with the key which was used at the first communication. In case of any key mismatch, the VNE synchronizes with the device automatically, fetches the new SSH key from the device, updates in Prime Network, and re-connects to the device using the updated key. The new SSH key synchronization happens only if the server authentication is enabled as 'save-first-auth' and automatic key synchronization feature is enabled via the registry controller.
Synchronization of SSH Key in CCM
When communicating with the device, Cisco Prime Network CCM operations use the SSH keys that are stored in the known_hosts file. This file is available in the <Prime Network HOME>/.ssh/known_hosts directory. If there is a mismatch in the SSH key and if the automatic key synchronization feature is enabled, then the Cisco Prime Network CCM script synchronizes with the device automatically. After which, the CCM script connects without server-side authentication, learns the new SSH keys, and updates the new keys in the known_hosts file for further communication. If there is a mismatch, then the automatic key synchronization feature should be enabled to synchronize with the SSH keys.
Common Settings for Key Resync for SSH-VNE and CCM
Follow the prerequisites to enable key resync for SSH VNE and CCM:
Enabling Server Authentication Settings
To enable SSH settings, follow the steps provided below:
Step 1![]() Log on to the Administration client.
Log on to the Administration client.
Step 2![]() Click New to open the New VNE window.
Click New to open the New VNE window.
Step 3![]() Click the Telnet/SSH tab and check the Enable check box.
Click the Telnet/SSH tab and check the Enable check box.
In the Telnet/SSH window, once the Enable option is checked, the other options such as Protocol, Port, Prompt, and Mask are also enabled.
Step 4![]() From the Protocol drop-down list, choose the SSHv2 option to open the SSHv2 pane.
From the Protocol drop-down list, choose the SSHv2 option to open the SSHv2 pane.
Step 5![]() In the Server Authentication drop-down list of the SSHv2 pane, choose save-first-auth mode.
In the Server Authentication drop-down list of the SSHv2 pane, choose save-first-auth mode.
Enabling SSH key synchronization
SSH key synchronization is defined in device protocol reachable settings.
To enable the SSH key synchronization, follow the steps provided below:
Step 1![]() Log on to the Administration client.
Log on to the Administration client.
Step 2![]() From the Tools menu, choose Registry Controller to open the Registry Controller window.
From the Tools menu, choose Registry Controller to open the Registry Controller window.
Step 3![]() In the Registry Controller window, expand the Device Protocol Reachability node.
In the Registry Controller window, expand the Device Protocol Reachability node.
Step 4![]() Click Telnet to open the Telnet pane.
Click Telnet to open the Telnet pane.
Step 5![]() Choose True from the Enable Re-Sync SSH Keys drop-down list. The SSH key synchronization is enabled.
Choose True from the Enable Re-Sync SSH Keys drop-down list. The SSH key synchronization is enabled.
By default, the Enable Re-Sync SSH Keys option is set to False.
Verifying SSH key Resync on VNE
To verify SSH key resync on VNE, follow the steps provided below:
Step 1![]() Model the VNE using SSHv2. Refer Enabling Server Authentication Settings.
Model the VNE using SSHv2. Refer Enabling Server Authentication Settings.
Step 2![]() Enable resync on the device. Refer Enabling SSH key synchronization.
Enable resync on the device. Refer Enabling SSH key synchronization.
Step 3![]() Log into the device, and change the key in the device.
Log into the device, and change the key in the device.
Note![]() For VNE, a DSA key change is to be performed by using the crypto key generate dsa command. Refer the Configuring SSH topic (Steps 5 and 6 under the Detailed Steps section) of the Cisco ASR 9000 Series Aggregation Services Router System Security Configuration Guide.
For VNE, a DSA key change is to be performed by using the crypto key generate dsa command. Refer the Configuring SSH topic (Steps 5 and 6 under the Detailed Steps section) of the Cisco ASR 9000 Series Aggregation Services Router System Security Configuration Guide.
Step 4![]() In the PN Admin/Vision client, right-click the VNE and restart by selecting Stop VNE followed by Start VNE options to reflect the actual state of the VNE.
In the PN Admin/Vision client, right-click the VNE and restart by selecting Stop VNE followed by Start VNE options to reflect the actual state of the VNE.
To ensure the key resync on VNE
- If the device key is changed and the resync is set to true, after restart-In the VNE status tab, the Investigation State would be Operational and the CLI state under Telnet/SSH Connectivity also would be Operational.
- If the key is changed and resync is set to the default value of false, after restart-The VNE status tab would update the Investigation State to Currently Unsychronized, and the Telnet/SSH Connectivity CLI State to Down and Description as 'Protocol failed to connect to host'.
Verifying SSH key Resync on CCM
To verify SSH key resync on CCM, follow the steps provided below:
Step 1![]() Model the VNE using SSHv2. Refer Enabling Server Authentication Settings.
Model the VNE using SSHv2. Refer Enabling Server Authentication Settings.
Step 2![]() Enable resync on the device. Refer Enabling SSH key synchronization.
Enable resync on the device. Refer Enabling SSH key synchronization.
Step 3![]() Login to the device, and change the key in the device.
Login to the device, and change the key in the device.
Note![]() For CCM, an RSA key change is to be performed using the crypto key generate rsa command. On setting the resync value to true, the RSA key entries sync with the device and are updated in the known_host file so that the CCM operations become successful. On setting the resync value to false, the CCM operations would fail.
For CCM, an RSA key change is to be performed using the crypto key generate rsa command. On setting the resync value to true, the RSA key entries sync with the device and are updated in the known_host file so that the CCM operations become successful. On setting the resync value to false, the CCM operations would fail.
Step 4![]() Login to the CCM Dashboard, navigate to the CCM page, and choose any CCM operation such as Backup/Restore.
Login to the CCM Dashboard, navigate to the CCM page, and choose any CCM operation such as Backup/Restore.
Step 5![]() From the VNEs listed, select the required VNE on which the operation needs to be performed.
From the VNEs listed, select the required VNE on which the operation needs to be performed.
To ensure the key resync on CCM
- If the resync value is set to false, then any CCM operation performed would fail.
- If the resync value is set to true, then any CCM operation performed would succeed.
On performing a DSA key change, the DSA key entries are not updated in the known_host files. However, this does not impact any CCM operation. In other words, irrespective of the resync value (true or false), the CCM operations are always successful.
 Feedback