Managing Blueprints

The following topics tell you how to manage Cisco NFVI Blueprints.

Blueprints

Blueprints contain the configuration metadata required to deploy an OpenStack system through a Cisco VIM pod in Cisco VIM Uinfied Management. You can create a blueprint in Cisco UM or you can upload a yaml file that contains the metadata for a blueprint. You can also create a blueprint from an existing OpenStack system that you are configuring as a Cisco VIM pod.

The configuration in the blueprint is specific to the type of Cisco UCS server that is in the OpenStack system. A blueprint for a C-Series server-based OpenStack system cannot be used to configure a B-Series server-based OpenStack system. Cisco UM displays an error if the blueprint does not match the configuration of the OpenStack system.

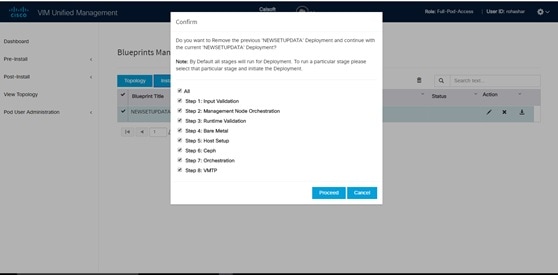
The blueprint enables you to quickly change the configuration of an OpenStack system. While only one blueprint can be active, you can create or upload multiple blueprints for a Cisco VIM pod. If you change the active blueprint for a pod, you have to update the configuration of the OpenStack system to match the new blueprint.


Note

You can modify and validate an existing blueprint, or delete a blueprint. However, you cannot modify any of the configuration metadata in the active blueprint for a Cisco VIM pod.


Blueprint Activation

A blueprint becomes active when you use it in a successful installation for a Cisco VIM pod. Other blueprints that you created or uploaded to that pod are in nonactive state.

Uploading or creating a blueprint does not activate that blueprint for the pod. Install a blueprint through the Cisco VIM Suite wizard. If the installation is successful, the selected blueprint becomes active.


Note

If you want to activate a new blueprint in an existing pod, you have to delete certain accounts and the credential policies for that pod before you activate the blueprint. See Activating a Blueprint in an Existing Pod with OpenStack Installed.


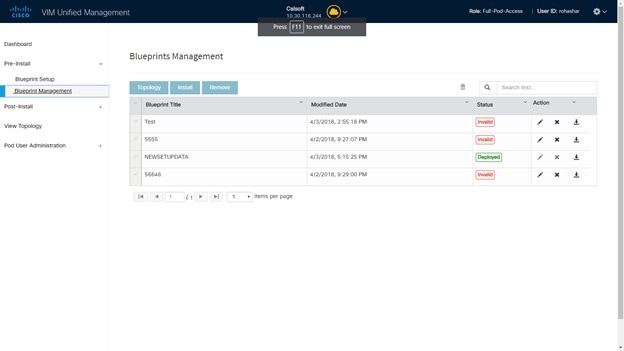
Viewing Blueprint Details

To view blueprint details:

Procedure


Step 1

Log in to Cisco VIM Insight as pod user.

Step 2

Choose the Cisco VIM pod with the blueprint that you want to view.

Step 3

Click Menu at the top left corner to expand the navigation pane.

Step 4

Choose Pre-Install > Blueprint Management.

Step 5

Choose a blueprint from the list.

Step 6

Click Preview and Download YAML.


Creating a Blueprint Using Upload Functionality

Before you begin

  • You must have a YAML file (B series or C Series) on your system.

  • Only one blueprint can be uploaded at a time. To create a blueprint off-line, refer to the setup_data.yaml.B_Series_EXAMPLE or setup_data.yaml.C_Series_EXAMPLE.

  • The respective keys in the sample YAML have to match or the corresponding pane does not get populated during the upload.

Procedure


Step 1

Log in to Cisco VIM UM.

Step 2

In the navigation pane, expand thePre-Install section and click Blueprint setup.

Step 3

Click theBrowse in the Blueprint Initial Setup.

Step 4

ClickSelect.

Step 5

ClickLoad in the Insight UI Application.

All the fields present in the YAML file is uploaded to the respective fields in the UI.
Step 6

Provide a Name for the Blueprint.

While saving the blueprint name has to be unique.

Step 7

Click Offline Validation.

  • If all the mandatory fields in the UI are populated, then Offline Validation of the Blueprint commences, or else a pop up message indicating the section of Blueprint creation that has missing information error shows up.

Step 8

On Offline Blueprint Validation being successful, Save Blueprint and Cancel is enabled.

Note 

If the Blueprint Validation Fails, only the Cancel button is enabled.


Activating a Blueprint in an Existing Pod with OpenStack Installed

Before you begin

You must have a POD which has an active Installation of OpenStack. If the OpenStack installation is in Failed State, then UM UI will not be able to fetch the Blueprint.

Procedure


Step 1

Go to the Landing page of the UM Log in.

Step 2

Click Register Management Node.

Step 3

Enter the following details:

  • Management Node IP Address.

  • Management Node Name (Any friendly Name).

  • REST API Password ( /opt/cisco/ui_config.json).

  • Description about the Management Node.

  • POD Admin's Email ID.

A notification email is sent to the email id entered during registration.
Step 4

Log in using the same email id and password.

Step 5

In the navigation pane, click Pre-Install > Blueprint Management.

Choose the NEWSETUPDATA from the Blueprint Management pane.

This is the same setup data which was used by ciscovimclient, to run the installation on the Management Node.

Blueprint Management


Note

You must have at least one blueprint (In any state Active or In-Active or In-progress), in the Blueprint Management Pane.


Blueprint Management grid contains the list of all the blueprints that are saved. You can save the blueprint even if it is failed in the Blueprint Setup. However, you will not be allowed to deploy those Blueprints.

Blueprint Management table provides the following information:

  • Blueprint Name

  • Modified Date

  • Edit, Remove, and Download Blueprint

  • Search Blueprint

Blueprint Name: It shows the name of the Blueprint. You cannot edit this field. It shows the name of the blueprint that is saved after Offline Validation.


Note

No two blueprints can have the same Blueprint name.


Modified Date:This shows when blueprint was last modified.

Blueprint Status: There are 6 total status for the Blueprint.

  • Valid: Blueprint that is saved after offline validation success.

  • Invalid: Blueprint that is saved after Offline Validation failure.

  • Inprogress: Blueprint that is saved without running Offline Validation.

  • Deployed: Blueprint that is used to bring up cloud without failures.

  • Installing: Blueprint that is used to initiate the cloud deployment.

  • Failed: Blueprint that is used to deploy the cloud which eventually failed.

With every blueprint record, there are some operations associated that you can perform by using the buttons – Topology, Install, and Remove.

Topology

Topology allows you to view graphical representation of the control, compute, and storage node that is associated with the various network segments.

Install Button

Click Install, a confirmation message is generated requesting to initiate the deployment with the stages you wants to run. By default all stages are selected but you can also do an incremented install. In case of Incremented Install, you have to choose stages in the order. For Example: If you choose Validation Stage then the 2nd stage Management Node Orchestration is enabled. You cannot skip stages and run a deployment. Once you click Proceed, the Cloud Deployment is initiated and the progress can be viewed from the Dashboard.

Remove Button

Choose the blueprint and click Remove to remove the blueprint. A confirmation message appears. If you clickProceed, the blueprint removal operation is initiated.

Edit, Remove, and Download Blueprint

You can edit or delete a Blueprint which is not in Deployed State. If you want to take a backup of the Blueprint locally, click Download icon which generates the preview to download the Blueprint.

Following are the ways to deploy a Blueprint:

  • If there is no Blueprint in Deployed state, then you can choose any Valid Blueprint from the list.

  • If there is a Blueprint in a Failed state, then you can choose another Valid Blueprint but Insight asks you to remove the previous deployment before proceeding.

  • If there is a Blueprint in Deployed state, then you can choose another Valid Blueprint but Insight asks you to remove the previous deployment before proceeding.

The deployment of Blueprint occurs stepwise and if any one step fails for some reason, a Play button is displayed on that particular step. You can click aPlay button and begin the installation for that particular state.


Note

There is always one blueprint in Deployed state. You cannot deploy multiple blueprints in the cloud.


Search Blueprint: Search box is displayed on top-right of the table which facilitates you to lookup for Blueprint by their name or status. Navigate to Topology and choose a Blueprint which redirects you to the default blueprint, the one which is selected in the Blueprint Management pane.


Note

During the various operations across the application the cloud icon in the center of the header changes its color which is based on the following table.


Table 1.

POD Operation

Status

Icon or Color

Management Node Registered, No Active Deployment

Pending

Gray

Cloud Up And Running, No Failure

Active

Green

Cloud Installation/ Any Operation In Progress

In-Progress

Blue

Cloudpulse Failed

Critical Warnings

Red

Pod Operation Failed

Warning

Amber

Software Update (Auto) Rollback Failed

Critical Warnings

Red

Uncommitted Software Update

Warning

Amber

Reconfigure Openstack Password

Critical Warning

Red

Reconfigure CIMC Password

Warning

Amber

Reconfigure Optional Features/ OS

Critical Warning

Red

Power Management Operation Fails

Warning

Amber

Management Not-Reachable

Not-Reachable

Red

Downloading Blueprint

Before you begin

You must have atleast one blueprint (In any state Active/In-Active or In-progress), in the Blueprint Management Page.

Procedure


Step 1

Log in to CISCO VIM Insight.

Step 2

In the navigation pane, expand the Pre-Install Section.

Step 3

Click Blueprint Management.

Step 4

Go-to Download for any Blueprint under Action title. (Download Button > Downward Arrow (with tooltip Preview & Download YAML).

Step 5

Click the Download icon.

A pop to view the Blueprint in the YAML format is displayed.
Step 6

Click the Download button at the bottom left of the pop-up window.

YAML is saved locally with the same name of the Blueprint.

Validating Blueprint

Procedure


Step 1

Log in to CISCO VIM Insight.

Step 2

In the Navigation pane, expand the Pre-Install Section.

Step 3

Click Blueprint Creation.

Step 4

Upload an existing YAML, or create a New Blueprint.

Fill all the mandatory fields so that all Red Cross changes to Green Tick.

Step 5

Enter the name of the Blueprint.

Step 6

ClickOffline Validation.

Only, if the Validation is successful, the Insight allows you to save the blueprint.

What to do next

If you see any errors, a hyperlink is created for those errors. Click the link to be navigated to the page where error has been encountered.

Managing Post Install Features

Cisco VIM provides an orchestration that helps in lifecycle management of a cloud. VIM is responsible for pod management activities which includes fixing both hardware and software issues with one-touch automation. VIM Insight provides the visualization of the stated goal. As a result, it integrates with POST install features that Cisco VIM offers through its Rest API. These features are enabled only if there is an active Blueprint deployment on the pod.

Monitoring the Pod

Cisco VIM uses EFK (Elasticsearch, Fluentd, and Kibana) to monitor the OpenStack services, by cross-launching the Kibana dashboard.

To cross launch Kibana, complete the following instructions:

Procedure


Step 1

In the navigation pane, click Post-Install > Logging.

Step 2

Click Click here to view Kibana in new tab.

Step 3

Enter the Username as Admin.

Step 4

Enter the Kibana_PASSWORD password that is obtained from /root/installer-<tagid>/openstack-configs/secrets.yaml in the management node.


Cross Launching Horizon

Horizon is the canonical implementation of OpenStack's Dashboard, which provides a web-based user interface to OpenStack services including Nova, Swift and, Keystone.

Procedure

Step 1

In the navigation pane, click Post-Install > Horizon.

Step 2

Click the link Click here to view Horizon logs in new tab. You will be redirected to Horizon landing page in a new tab.

Step 3

Enter the ADMIN_USER_PASSWORD obtained from /root/installer-<tagid>/openstack-configs/secrets.yaml in the management node.


NFVI Monitoring

NFVI monitoring is the Cross launch browser same as Horizon. NFVI monitoring link is available in the post install only if the setupdata has NFVI Monitoring configuration during the cloud deployment. NFVI Monitoring checks the status of Collector VM1 Info and Collector VM2 Info .

Procedure

Step 1

In the navigation pane, click Post-Install > NFVI Monitoring.

Step 2

Click the link Click here to view NFVI monitoring.

You will be redirected to NFVI Monitoring page.


Run VMTP

Run VMTP is divided in two sections:

  • Results for Auto Run: This shows the results of VMTP which was run during the cloud deployment (Blueprint Installation).

  • Results for Manual Run: Run the VMTP on demand. To run VMTP on demand, click Run VMTP.


    Note

    If VMTP stage was skipped or has not-run during Blueprint Installation, this section of POST Install would be disabled for the user.


Run CloudPulse

In VIM 2.0 and later, we provide an integrated tool, called Cloud Pulse, that periodically checks the cloud services endpoint. The results of these tests are reflected under the Cloud Pulse link. Also, you can run these API endpoint tests on demand, and fetch the result of these tests by refreshing the table.

OpenStack CloudPulse tool is used to verify Cisco NFVI health. CloudPulse servers are installed in containers on all Cisco NFVI control nodes and CloudPulse clients are installed on the management node.

CloudPulse has two test sets: endpoint scenario (runs as a cron or manually) and operator test (run manually).

Following are the tests which are supported in CloudPulse:

Endpoint tests include

  • cinder_endpoint

  • glace_endpoint

  • keystone_endpoint

  • nova_endpoint

  • neutron_endpoint

Operator tests include

  • ceph_check

  • docker_check

  • galera_check

  • node_check

  • rabbitmq_check

To run a cloud pulse test, choose a particular test from the dropdown and click Run Test. Once the test is in progress, Click (Spin/refresh) icon to fetch the latest result. This grid does not fetch the latest result automatically.

Run Cloud Sanity Test

You can use the cloud sanity tool to test the Cisco NFVI pod and cloud infrastructure (host connectivity, basic mraiadb, rabbit, ceph cluster check, and RAID disks).

Following are the test available to run from insight.

  • Control

  • Compute

  • Cephmon

  • Cephosd

  • Management

  • All

Procedure

Step 1

To run a Cloud sanity test choose a particular test from the dropdown.

Step 2

Click Run Test to proceed with the operation. Once the test is completed, clickSee Details for more details.


Run NFV Bench

You can Run NFV Bench for B and C series Pod, through Cisco VIM Insight. On a pod running with CVIM, choose a NFVbench link on the NAV-Menu.

You can run either fixed rate test or NDR/PDR test. As the settings and results for the test types differ, the options to run these tests are presented in two tabs, with its own settings and results.

NDR/PDR Test

Procedure

Step 1

Log in to CISCO VIM Insight.

Step 2

In the Navigation pane, click Post-Install >Run NFV Bench.

Step 3

Click NDR/PDR test and complete the following fields

Name

Description

Iteration Duration

Choose duration from 10 to 60 sec. Default is 20 sec.

Frame Size

Choose the correct frame size to run.

Run NDR/PDR test

Click Run NDR/PDR test. After, completion it displays each type of test with its own settings and results.


Reconfiguring CIMC Password Through Unified Management

Update the cimc_password in the CIMC-COMMON section, or the individual cimc_password for each server and then run the update password option.

To update a password, you have to follow the password rules:

  • Must contain at least one lower-case letter.

  • Must contain at least one upper-case letter.

  • Must contain at least one digit between 0 to 9.

  • One of these special characters !$#@%^-_+=*&

  • Your password has to be 8 to 14 characters long.

Before you begin

You must have a C-series pod up and running with Cisco VIM to reconfigure CIMC password.

Note

Reconfigure CIMC password section is disabled if the pod is in failed state as indicated by ciscovim install-status.


Procedure


Step 1

Log in to CISCO VIM Insight.

Step 2

In the navigation pane, choose Post-Install

Step 3

Click Reconfigure CIMC Password.

Step 4

On the Reconfigure CIMC Password page of the Cisco VIM UM, complete the following fields:

Name

Description

CIMC_COMMON old Password

CIMC_COMMON old password field cannot be edited.

CIMC-COMMON new Password

Enter the CIMC-COMMON password. Password has to be alphanumeric according to the password rule.

Click Update

Old CIMC-COMMON password can be updated with new CIMC-COMMON password.