Managing Hardware
Management of your Cisco VIM pods includes adding, removing, or replacing the nodes.
In a pod, multiple nodes cannot be changed at the same time. For example, if you want to replace two control nodes, you must successfully complete the replacement of the first node before you begin to replace the second node. Same restriction applies for addition and removal of storage nodes. Only, in case of Compute Nodes you can add or remove multiple nodes together.However, there must always be one active compute node in the pod at any given point. VNF manager stays active and monitors the compute nodes so that moving the VNFs accordingly as compute node management happens.
 Note |
When you change a control, storage, or compute node in a Cisco VIM pod using Insight, it automatically updates the server and role in the active blueprint, as a result, your OpenStack deployment changes. When a node is removed from Cisco VIM, sensitive data may remain on the drives of the server. Administrator advice you to use Linux tools to wipe the storage server before using the same server for another purpose. The drives that are used by other application server must be wiped out before adding to Cisco VIM. |
Searching Compute and Storage Nodes
This functionality allows you to search the Compute and Storage nodes by server names only. The search result is generated or shows an empty grid if there are no results.
POD Management
Cisco VIM allows the admin to perform pod life-cycle management from a hardware and software perspective. VIM provides the ability to power on/off compute node, add, remove or replace nodes based on the respective roles when the nodes of a given pod corrupts at times.
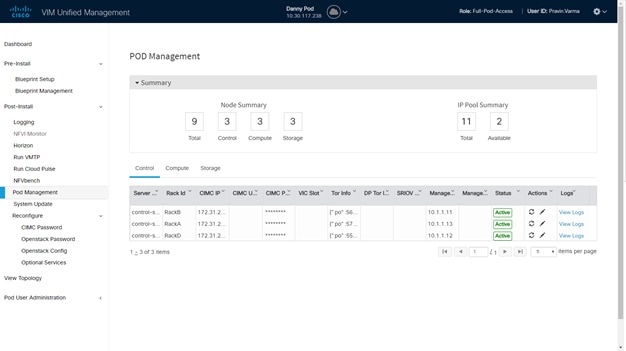
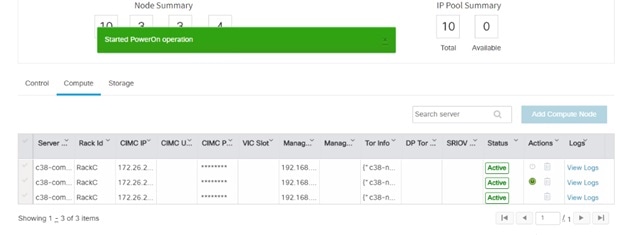
Pod Management page has two sections–
-
Node Summary: Node Summary section shows how many nodes are available and the detailed count of Control, Compute and Storage type.
-
IP Pool Summary: IP Pool Summary section shows the Total Pool Summary and the current available pool count.
The opeartions performed on the running pod are:
Replace Control Nodes: We do not support double fault scenarios, replacement of one controller at a time is supported.
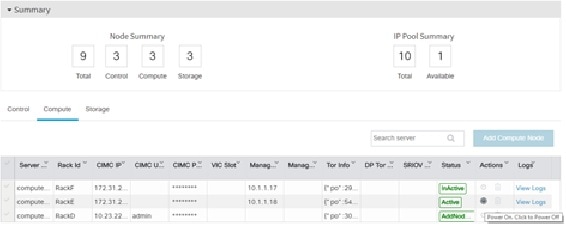
Add Computes/Storage Nodes: N-computes nodes can be replaced simultaneously; however at any given point, at least one compute node ahs to be active.
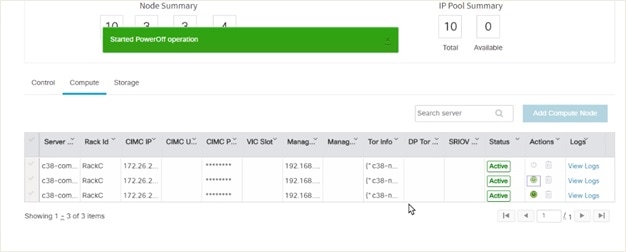
Power On/ Off compute Nodes: You can Power On or Power Off compute node. At least one compute node must be powered on.
Remove Compute/Storage Nodes: You can add one node at a time, given that we run Ceph as a distributed storage offering.
Add Pool: You can increase pool size at any time.
Managing Storage Nodes
Before you add or remove a storage node, review the following guidelines for Managing Storage Nodes.
-
Required Number of Storage Nodes: A Cisco VIM pod must have a minimum of three and a maximum of 20 storage nodes. If your pod has only two storage nodes, you cannot delete a storage node until you add another storage node. If you have fewer than three storage nodes, you can add one node at a time until you get to 20 storage nodes.
-
Validation of Nodes: When you add a storage node to a pod, Cisco VIM Insight validates that all the nodes in the pod meet the minimum requirements and are in active state. If you have a control or compute node in a faulty state, you must either correct, delete or replace that node before you can add a storage node.
-
Update Blueprint: When you add or delete a storage node, Insight updates the blueprint for the Cisco VIM pod.
-
Storage Node Logs: You can access the logs for each storage node from the link in the Log column on the Storage Nodes tab.
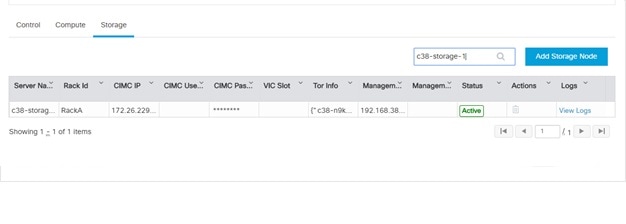
Adding Storage Node
Complete the following instructions to add a storage node:
Note |
You cannot add more than one storage node at a time. |
Before you begin
-
Remove the non-functional storage node from the pod. You can have maximum 20 storage nodes in a Cisco VIM pod.
-
Ensure that the server for the new storage node is in powered state in OpenStack for C Series.
Procedure
| Step 1 |
In the navigation pane, choose . |
||
| Step 2 |
Click on Add Storage node button on the Storage tab. A popup will open where you can provide information about the new Storage node. |
||
| Step 3 |
For C Series, add the following details:
|
||
| Step 4 |
For B Series, add the following details:
If all mandatory fields are filled in correctly then Add Storage button will be enabled. |
||
| Step 5 |
Click Initiate Add Storage. Add node initialized message will be displayed. |
||
| Step 6 |
To view logs, click View logs under Logs column. |
||
| Step 7 |
Two kinds of failure may occur:
You can view the logs for this operation under Logs column. |
Deleting Storage Node
You cannot delete more than one storage node at a time.
Procedure
| Step 1 |
In the Navigation pane, choose . |
| Step 2 |
Click X adjacent to the storage node you want to delete. |
| Step 3 |
Node Removal Initiated successfully message will be displayed. To view logs, click View logs under logs column.
|
Managing Compute Nodes
Before you add or remove a compute node, review the following guidelines:
-
Required Number of Compute Nodes: Cisco VIM pod must have a minimum of one compute node and a maximum of 61 compute nodes (with 3 ceph nodes). If your pod has only one compute node, you cannot delete that node until you add another compute node.
-
Update Blueprint: When you add or remove a compute node, Insight updates the blueprint for the Cisco VIM pod.
-
Compute Node Logs: You can access the Logs for each compute node from the link in the Log column on the Compute Nodes table.
Adding Compute Node
Add IP Pool
If all the existing pool size is already used, then you need to increase the pool size. On the Add compute or Add storage
popup, Click Expand Management IP pool to add a new Pool. 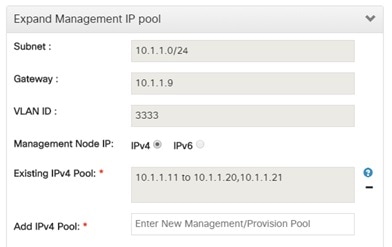
Complete the instructions, to add a compute node:
Before you begin
Ensure that the server for the new compute node is in powered state in OpenStack. You can add more than one compute node at a time.
Procedure
| Step 1 |
In the navigation pane, click . |
||
| Step 2 |
Click Add Compute Node on the Compute tab a popup opens . Add the required information in the popup. To add another node clcik Add Another Node if you planned to add another compute node OR hit Initiate Add Compute if you so not plan to add any more compute node. If you hit “Add Another Node” button, the existing form will be emptied. You will have to fill the information for the new compute node and then repeat step 1. You may use Previous and Next button to navigate among different added node information. |
||
| Step 3 |
For C Series, add the following details:
|
||
| Step 4 |
For B Series, add the following details:
|
||
| Step 5 |
You may perform one among these steps mentioned below:
|
||
| Step 6 |
To view logs, click View logs under Logs column. The status of the POD will change to Active. |
||
| Step 7 |
Two kinds of failure may occur:
You can view the logs for this operation under Logs column. |
Deleting Compute Node
Note |
If your pod has only one compute node, you cannot delete that node until you add another compute node. |
Procedure
| Step 1 |
In the navigation pane, choose . |
| Step 2 |
Click X for the compute node to be deleted. To remove multiple compute nodes, choose the target compute nodes which is on the extreme left column, then click Trash Icon to remove multiple computes. |
| Step 3 |
To view the Logs, click View logs under Logs column.
|
| Step 4 |
Click Clear Failed Nodes to remove the node form Cloud and Blueprint. |
Managing Control Nodes
Before you replace a control node, review the following guidelines:
-
Required Number of Control Nodes: A Cisco VIM pod must have three control nodes and you can only replace one node at a time.
-
Validation of Nodes: When you replace a control node, Cisco VIM Insight validates if all the other nodes in the pod meet the minimum requirements and are in active state. If you have a storage or a compute node in a faulty state, you must correct the faulty state or delete or replace that node before you can replace the control node.
-
Update Blueprint: When you replace a control node, Insight updates the Active blueprint for the Cisco VIM pod.
-
Control Node Logs: You can access the logs for each control node from the link in the Logs column of Control Nodes table.
Replacing Control Node
You can replace only one control node at a time.
Procedure
| Step 1 |
In the navigation pane, click . |
| Step 2 |
Click (Spin) icon. A confirmation pop-up appears, Click proceed to continue. |
| Step 3 |
If you want to edit a specific control node before replace, click Edit to update the changes. |
| Step 4 |
On success, Replace Node Initiated successfully message is displayed. |
| Step 5 |
You can view the logs in the Logs column on the Control Nodes table. |
What to do next
If the replacement of the control node fails, do the following:
-
Click the link in the Logs column.
-
Check the logs to determine the cause of the failure.
-
Correct the issue and attempt to replace the control node again.


 Feedback