Managing Backup and Restore Operations
The management node hosts critical services such as Cisco VIM REST API, Cobbler for PXE, ELK for Logging/Kibana dashboard, and VMTP for the cloud validation in Cisco VIM.
The management node is not redundant during the initial Cisco VIM offering, hence it is recommended to take backup of the management node. Using the saved management node information, you can restore the management node if you are facing any issues with the platform.
Backing Up the Management Node
An administrator must maintain the number of backup snapshots on the management node. The backup of the management node is possible only after complete deployment of at least one Cisco VIM. Two copies of backup folders are maintained at the management node itself and the older copy will be overwritten when a next backup is performed.
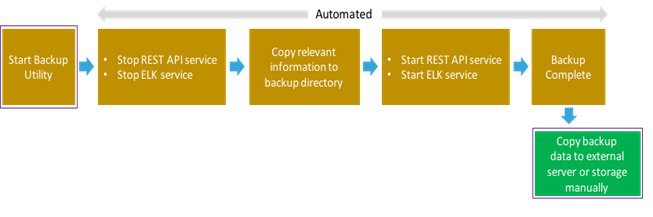
During the backup operation, activities such as pod management, software update or upgrade, and addition or deletion or replacement of nodes cannot be performed.
The REST API and ELK services are stopped during the backup operation, the OpenStack Logs are cached on the control, compute, and storage nodes until the restoration of the management node is completed.
As part of the backup operation, two files are created: .backup_files and .backup_hash. .backup_files is a list of files that are backed up, while the second one is the hash. These two files are placed under the backup folder /var/cisco/backup_<tag>_<date-time> at the management node and also at the /var/cisco/ folder of all three controllers. These two files are used during the restore validation. When you attempt to restore from a particular backup, these two files within this backup are compared to the files that are kept in the controllers. If there is any discrepancy, the restore validation fails and you are prompted to either terminate the restore operation or continue despite the validation failure. Only one copy of the .backup_files and .backup_hash are kept at the controllers, that is every time a new backup is created, these two files are overwritten with the most recent ones. Hence the restore validation passes only when the latest backup is used for restore.
Before you begin
-
Save the management node information (for example, IP address of the management node) for use during the restore operation.
-
Ensure that you have the br_mgmt and br_api IP addresses and respective network information.
Procedure
| Step 1 |
Launch a SSH session to the Cisco NFVI management node. |
| Step 2 |
Navigate to the <installer-ws>/tools/mgmt/ directory. |
| Step 3 |
Execute mgmt_node_backup.py. |
What to do next
The backup operation takes approximately 30 minutes and creates the backup_<tag>_<date-time> directory in the /var/cisco/ path.
Copy the directory to a remote server to recover the management node using rsync.
For example, to copy the backup directory to the remote server 20.0.0.5 /var/cisco/directory , execute the following command sequence:
rsync -e ssh -go-rtvpX --numeric-ids/var/cisco/backup_2017-01-09_14-04-38 root@20.0.0.5:/var/cisco/ Note |
On the remote server, protect the backup directory for any unauthorized access as the backup files may contain sensitive information |
At the remote server, change directory to where the backup directory is copied to; in this example /var/cisco/backup_<tag>_<date-time>/.
To verify if the backup is not corrupted or modified, execute ./check_integrity.
Check_integrity depends on the following packages, the packages are installed on the server where check_integrity is executed.
python-prettytable
python-jinja2
python-babel
python-markupsafe
python-setuptools
pytz
Backup with Forwarding ELK Logs to External Syslog Server
When the feature Forwarding ELK Logs to External Syslog Server is enabled, during the backup process, in both the autobackup and manual backup, the ELK Logs are not collected. For manual backups, you can override by appending the -a or --add-elk option to the backup command. The -s or --skip-elk option is to skip the ELK Logs collection regardless of the forwarding feature is enabled or not.
# cd installer/tools/mgmt
# ./mgmt_node_backup.py --help
Usage:  ./mgmt_node_backup.py [options]
Options:
    -h, --help      show this help message and exit
    -s, --skip-elk  do not collect ELK logs during backup
    -a, --add-elk   force to also collect ELK logs on backup
Backing Up VIM UM
Administrator maintains the backup for Insight on the management node. The backup of the Insight is done only after the complete deployment of the Insight bootstrap. Only two copies of backup directory are maintained at the management node. The older copy is overwritten when a next Insight backup or autobackup takes place.
Insight backup is stored at the default backup location /var/cisco/insight_backup/insight_backup_<release_tag>_<date>_<time>. If you want to take a backup of Insight at a different location use -backupdir/-b option from bootstrap_insight; details of which are provided later in this section.
Insight UI triggers an autobackup whenever it detects an operation relating to MySQL database entry to preserve the latest state of Insight.
Note |
Insight backup is not allowed after an update. Update is an intermediate stage between rollback and commit. Any change that is made relating to MySQL database entry after an update from UM UI is not backed up. |
Autobackup Insight
If there is a change, Insight Installation automatically run a daemon process to take the autobackup.
Live status of the process is determined by checking the log located at "/var/log/insight/insight_autobackup/insight_autobackup.logs" or systemctl status insight-autobackup.
Note |
Max of 10-log files of size 1024*1024 are maintained in the directory. |
Following are the scenarios where autobackup is initiated:
|
Insight Operation |
Auto-backup Performed |
|---|---|
|
Adding or Deleting POD |
Yes |
|
Changing POD REST Password and Certificate |
Yes |
|
Add/Edit/Delete all types of users |
Yes |
|
Add/Edit/Delete Roles |
Yes |
|
Modify User and Role association |
Yes |
|
Revoking or Adding user permission |
Yes |
|
Log in or Logout |
No |
|
Context Switching |
No |
|
Change User Password |
Yes |
Procedure
| Step 1 |
To check the status of the Insight perform the following steps: |
| Step 2 |
To stop Insight autobackup do the following: |
| Step 3 |
The following are the steps to start Insight autobackup: |
| Step 4 |
The way Insight works is as follows:
|
Back Up Insight at Default Back Up Location
Procedure
| Step 1 |
Launch an SSH session to Cisco Insight management node and follow steps: |
| Step 2 |
Run the bootstrap command to view the Cisco VIM Insight backup details: |
Backup Insight at user defined backup location
Procedure
| Step 1 |
Launch a SSH session to Cisco Insight management node and follow the below steps: |
| Step 2 |
Run the following command to view the Cisco VIM Insight backup details: |
What to do next
Copy the backup directory to a remote server using rsync to recover the Insight later. We recommend you to copy backup dir using rsync as it preserves the permissions of the files.
For example, to copy the backup directory to the remote server 20.0.0.5 /var/cisco/insight_backup/directory , execute the following command sequence: .
rsync -e ssh -rtvpX --numeric-ids /var/cisco/insight_backup/insight_backup_2.1.5_2017-01-09_14-04-38 root@20.0.0.5:/var/cisco/insight_backup/
On the remote server, protect the backup directory for any unauthorized access, as the backup files may contain sensitive information

 Feedback