- Preface
- Scheduler Concepts
- Understanding Offset Concepts
- Creating Your First Job
- Setting Up a Unix Job Dependency
- Scheduling Jobs in a Group
- Creating a Unix File Dependency
- Detecting Job Event Conditions
- Creating Variable Dependencies
- Managing Jobs in the Production Schedule
- Managing Command Parameters
- Setting Up Queues
- Using Scheduler Agents
- Using Scheduler Calendars
Overview
This chapter explains how to set up queues so that your jobs run efficiently on your network. Jobs enter queues when their dependencies are met and are released from a queue by the master. In the previous chapters, the jobs you created ran from the default queues.
Queues are most effective when more jobs are scheduled than you have resources to handle them. Each queue has a job limit and a priority that helps to determine from which queue jobs are launched. When a queue’s limit is reached, Enteprise Scheduler selects the next queue to run jobs on according to queue priorities. Within a queue, a job’s individual priority determines which job in the queue is launched first.
Queues are defined in a hierarchy, with the System Queue at the top.
To view TES’s predefined job queues, select Scheduling>Queues in the Navigator pane.

Each queue contains a set of queue filters. Queue filters are designed to accept or reject jobs based on their properties.
In order for a job to match a queue, all categories defined in a queue must be met, and each one must be met at least once. All parent queue categories will also have to be met, and no queue with a higher priority must match the job at all.
For example, a queue defined as jobs starting with TEST* on agent Example Agent will match a job named TEST JOB run on Example Agent, but will not match job TEST JOB 1 run on Example Agent 2. Also, all parent queues must also be matched before this queue can be considered for a match.
Besides prioritizing the execution of large quantities of jobs, queues can be used for a number of other purposes:
- To limit the number of jobs of a particular type or group running concurrently
- To control the flow of jobs executed, overall or by an individual queue, so that system resources are used more evenly and peak demands are reduced
- To single-thread jobs requiring a particular resource, such as exclusive access to a database
- To restrict the hours when jobs run to a time window defined by the queue, for example, to allow batch processing to occur overnight
- To launch jobs immediately for special cases where it is required
- Setting up the Inventory Weekly job group
- Creating three jobs for the Inventory Weekly job group
- Setting up a queue
- Adding the Inventory Weekly job group to production
- Monitoring the job group in production
- Changing the queue limit
- Re-submitting the Inventory Weekly job group

Note To complete the exercises in this tutorial, you need to:
Install Enteprise Scheduler in the default directory Scheduler (or the examples in this tutorial will not work properly)
Setting Up the Inventory Weekly Job Group
In this example, we will design a queue to accept jobs of a particular job group. Otherwise, there will be no job group to choose from when the queue is created.
To set up the Inventory Weekly job group:
Step 1![]() From the
Navigator
pane, select
Definitions>Jobs
to display the
Jobs
pane.
From the
Navigator
pane, select
Definitions>Jobs
to display the
Jobs
pane.
Step 2![]() Right-click in the
Jobs
pane and select
Add Job Group
from the context menu.
Right-click in the
Jobs
pane and select
Add Job Group
from the context menu.
Step 3![]() In the
Job Group Name
field, enter
Inventory Weekly
. Make sure the
Parent Group
field is empty.
In the
Job Group Name
field, enter
Inventory Weekly
. Make sure the
Parent Group
field is empty.
Step 4![]() Click the
Schedule
tab, if not selected.
Click the
Schedule
tab, if not selected.
Step 5![]() In the
Calendar Name
list, select the
work day
calendar.
In the
Calendar Name
list, select the
work day
calendar.
Step 7![]() Select the
Require operator release
option.
Select the
Require operator release
option.
Step 9![]() Click
Cancel
at the
Effective Date
dialog. (The job group should not enter the schedule yet.)
Click
Cancel
at the
Effective Date
dialog. (The job group should not enter the schedule yet.)
Creating Jobs for the Inventory Weekly Job Group
Now, we will create three jobs ( Inventory_10 , Inventory_11 and Inventory_12 ) that belong to the Inventory Weekly job group, with no dependencies.
To create jobs for the Inventory Weekly job group:
Step 1![]() In the
Jobs
pane, select the
Inventory Weekly
job group
.
In the
Jobs
pane, select the
Inventory Weekly
job group
.
Step 2![]() Click the
Add Job
button or right-click and select
Add Job
from the context menu to display the
Job Definition
dialog.
Click the
Add Job
button or right-click and select
Add Job
from the context menu to display the
Job Definition
dialog.
Step 3![]() In the
Job Name
field, enter
Inventory_10
.
In the
Job Name
field, enter
Inventory_10
.
Step 4![]() Verify that
Inventory Weekly
is displayed in the
Parent Group
list. If not, select it.
Verify that
Inventory Weekly
is displayed in the
Parent Group
list. If not, select it.
Step 5![]() In the
Command
field, enter the full path to the file:
In the
Command
field, enter the full path to the file:
Step 7![]() Click the
Notes
tab. We will use the
Notes
tab to enter a short description of the job.
Click the
Notes
tab. We will use the
Notes
tab to enter a short description of the job.
Step 8![]() The
Notes
tab is a good place to add special instructions or explanatory comments without affecting the job’s execution.
The
Notes
tab is a good place to add special instructions or explanatory comments without affecting the job’s execution.
Step 9![]() In the
Other Notes
field, enter
Inventory Processing Program
.
In the
Other Notes
field, enter
Inventory Processing Program
.
Step 11![]() Click
Cancel
at the
Effective Date
dialog.
Click
Cancel
at the
Effective Date
dialog.
Duplicating a Job Definition
To duplicate a job definition:
Step 1![]() Select the
Inventory_10
job in the
Jobs
pane if not already selected, and either click the
Copy Job/Group
button or right-click and select
Copy Job/Group
from the context menu.
Select the
Inventory_10
job in the
Jobs
pane if not already selected, and either click the
Copy Job/Group
button or right-click and select
Copy Job/Group
from the context menu.
A job displays in the Jobs pane named Copy of Inventory_10 .
Step 2![]() Double-click
Copy of Inventory_10
and rename it to
Inventory_11
.
Double-click
Copy of Inventory_10
and rename it to
Inventory_11
.
Step 3![]() In the
Command
field, change
/UNIX_TEST_5.sh
to
/UNIX_TEST_4.sh
.
In the
Command
field, change
/UNIX_TEST_5.sh
to
/UNIX_TEST_4.sh
.
Step 5![]() Click
Cancel
to prevent the job from being scheduled.
Click
Cancel
to prevent the job from being scheduled.
Step 6![]() Repeat the steps above to create a third job called
Inventory 12
and enter
Repeat the steps above to create a third job called
Inventory 12
and enter
/UNIX_TEST_3.sh
in the
Command
field.
Setting Up a Queue
We will set up a queue named Inv_Weekly and give it a queue limit of three. The jobs in the Inventory Weekly group will run in this queue. The queue configuration parameters will single-thread (run one at a time) the jobs in the group.
Step 1![]() From the
Navigator
pane, select
Scheduling>Queues
to display the
Queues
pane.
From the
Navigator
pane, select
Scheduling>Queues
to display the
Queues
pane.
Step 2![]() Right-click the
System
Right-click the
System![]() Queue
and select
Add Queue
from the context menu to display the
Queue Definition
dialog.
Queue
and select
Add Queue
from the context menu to display the
Queue Definition
dialog.
Figure 11-2 Queue Definition Dialog
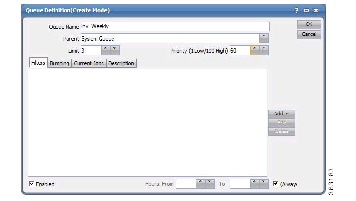
Step 3![]() In the
Queue Name
field, enter the name
Inv_Weekly
.
In the
Queue Name
field, enter the name
Inv_Weekly
.
Step 4![]() Leave
System
Leave
System![]() Queue
in the
Parent
field.
Queue
in the
Parent
field.
We defined Inv_Weekly as a direct sub-queue of the system queue in the queue hierarchy. This means there are no intermediate queues to impose their own restrictions and affect job execution.
Step 5![]() Change the
Limit
value to
3
.
This allows a maximum of three jobs from this queue to run concurrently.
Change the
Limit
value to
3
.
This allows a maximum of three jobs from this queue to run concurrently.
Step 6![]() Change the
Priority
value to
60
.
Change the
Priority
value to
60
.
Default queues have a priority setting of 50 . Since default queues can accept the jobs that you created, this higher priority value will ensure that the jobs enter this queue. When the queue manager sees two or more queues that can accept a job, it always assigns the job to the queue with the highest priority.
Step 7![]() On the
Filters
tab, click the
Add
button
to display a list and select
Job Group
.
On the
Filters
tab, click the
Add
button
to display a list and select
Job Group
.
The Queue Filter Condition dialog displays.
Step 8![]() Select the
Inventory Weekly
job group.
Select the
Inventory Weekly
job group.
Step 9![]() Click
OK
. The filter is entered into the
Filters
tab.
Click
OK
. The filter is entered into the
Filters
tab.
The Always option in the Hours Available section should be selected by default. This means that the Inv_Weekly queue can run at any time. If you de-select the Always option, you can restrict the queue to operate within a specific time window. Jobs assigned to the queue would then run only if the current time were within that time window.
Step 10![]() Click
OK
.
Inv_Weekly
is added to the list of queues on your system
Click
OK
.
Inv_Weekly
is added to the list of queues on your system![]() .
.
Adding the Inventory Weekly Job Group to Production
Now, submit the group Inventory Weekly into the production schedule.
To submit the group into the production schedule:
Step 1![]() In the
Jobs
pane, right-click the
Inventory Weekly
job group and select
Insert into Schedule
from the context menu.
In the
Jobs
pane, right-click the
Inventory Weekly
job group and select
Insert into Schedule
from the context menu.
Step 2![]() Click
OK
in the
Insert Job Into Schedule
dialog.
Click
OK
in the
Insert Job Into Schedule
dialog.
Step 3![]() Click
OK
in the
Information
dialog.
Click
OK
in the
Information
dialog.
Monitoring the Job Group in Production
To monitor the job group in production:
Step 1![]() From the
Navigator
pane, select
Operations>Job Activity
to display the
Job Activity
pane.
From the
Navigator
pane, select
Operations>Job Activity
to display the
Job Activity
pane.
Your job group is listed in bold showing the Waiting On Operator status.
Step 2![]() Right-click the
Inventory Weekly
job group and from the
Job Control
submenu
select
Release/Resume
to start the job group.
Right-click the
Inventory Weekly
job group and from the
Job Control
submenu
select
Release/Resume
to start the job group.
Step 3![]() Click
Yes
in the
Confirm
dialog.
Click
Yes
in the
Confirm
dialog.
Step 4![]() Click
OK
in the
Information
dialog.
Click
OK
in the
Information
dialog.
The Inventory Weekly job group goes active, along with the three jobs: Inventory_10 , Inventory_11 , and Inventory_12 . Because the limit on the Inv_ Weekly queue is set to 3 , all three jobs in the group Inventory Weekly are launched at once, and now run to completion.
Step 5![]() Scroll to the right in the
Jobs
pane to view the
Queue
column.
Scroll to the right in the
Jobs
pane to view the
Queue
column.
Note that the Inventory_10 , Inventory_11 and Inventory_12 jobs are running from the Inv_Weekly queue.
Changing the Queue Limit
Changing the queue limit from any number to 1 changes the queue from multiple to single-threaded processing.
Step 1![]() From the
Navigator
pane, select
Definitions>Queues
to display the
Queues
pane.
From the
Navigator
pane, select
Definitions>Queues
to display the
Queues
pane.
Step 2![]() Double-click the
Inv_Weekly
queue to display its definition dialog.
Double-click the
Inv_Weekly
queue to display its definition dialog.
Step 3![]() Lower the
Limit
from
3
to
1
.
Lower the
Limit
from
3
to
1
.
Step 4![]() Click
OK
to save the changes.
Click
OK
to save the changes.
The limit change is displayed in the Queues pane.
 Feedback