- Preface
- Scheduler Concepts
- Understanding Offset Concepts
- Creating Your First Job
- Setting Up a Unix Job Dependency
- Scheduling Jobs in a Group
- Creating a Unix File Dependency
- Detecting Job Event Conditions
- Creating Variable Dependencies
- Managing Jobs in the Production Schedule
- Managing Command Parameters
- Setting Up Queues
- Using Scheduler Agents
- Using Scheduler Calendars
Overview
In this chapter you learn to use job control, typically performed by an operator, to manage the current production schedule. Job control consists of releasing, stopping, restarting and aborting jobs. You can also rerun jobs, override their dependencies and change their completion status.
This chapter describes how to:
- Cancel a job
- Remove a job
- Release a job group in the Waiting on Operator status
- Place a job on Hold
- Override a job dependency
- Rerun a job that fails

Note To complete the exercises in this tutorial, you need to:
Install Enteprise Scheduler in the default directory Scheduler (or the examples in this tutorial will not work properly)
Select the Super User option in your User Definition
Configure a default agent
Create and have available the work day calendar
Creating the Parent Job Group
To create the parent job group:
Step 1![]() From the
Navigator
pane, select
Definitions>Jobs
to display the
Jobs
pane.
From the
Navigator
pane, select
Definitions>Jobs
to display the
Jobs
pane.
Step 2![]() Right-click in the
Jobs
pane and select
Add Job Group
from the context menu to display the
Job Group Definition
dialog.
Right-click in the
Jobs
pane and select
Add Job Group
from the context menu to display the
Job Group Definition
dialog.
Step 3![]() In the
Job Group Name
field, enter
Production Jobs
. The
Parent Group
field should be empty.
In the
Job Group Name
field, enter
Production Jobs
. The
Parent Group
field should be empty.
Step 4![]() In the
Calendar Name
list, select
work day
.
In the
Calendar Name
list, select
work day
.
Step 5![]() Click the
Run
tab and in the
Runtime Users
list, select a user who can access the Unix agent.
Click the
Run
tab and in the
Runtime Users
list, select a user who can access the Unix agent.
Step 7![]() Click
OK
in the
Effective Date
dialog.
Click
OK
in the
Effective Date
dialog.
Creating Three Child Jobs
Step 1![]() To create a child job of a job group, select the
Production Jobs
job group on the
Jobs
pane.
To create a child job of a job group, select the
Production Jobs
job group on the
Jobs
pane.
Step 2![]() Click the
Add Job
button or right-click and select
Add Job
from the context menu to display a
Job Definition
dialog.
Click the
Add Job
button or right-click and select
Add Job
from the context menu to display a
Job Definition
dialog.
Step 3![]() In the
Job Name
field, type
Unix Prod Job 1
.
In the
Job Name
field, type
Unix Prod Job 1
.
Step 4![]() In the
Command
field, enter the full path to the file:
In the
Command
field, enter the full path to the file:
/UNIX_TEST_1.sh
Step 6![]() Select the
Require operator release
option.
Select the
Require operator release
option.
Step 7![]() Click
OK
to save the job definition and then click
OK
again in the
Effective Date
dialog and the first job has been created.
Click
OK
to save the job definition and then click
OK
again in the
Effective Date
dialog and the first job has been created.
Step 8![]() In the
Jobs
pane, select the
Unix Prod Job 1
job if not selected.
In the
Jobs
pane, select the
Unix Prod Job 1
job if not selected.
Step 9![]() Click the
Copy Job/Group
button on the Enteprise Scheduler toolbar or right-click
Unix Prod Job 1
and select
Copy Job/Group
from the context menu.
Click the
Copy Job/Group
button on the Enteprise Scheduler toolbar or right-click
Unix Prod Job 1
and select
Copy Job/Group
from the context menu.
A confirmation message displays.
A job called Copy of Unix Prod Job 1 displays in the Jobs pane.
Step 11![]() While
Copy of Unix Prod Job 1
is selected, click the
Edit Job\Group
button or right-click and select
Edit Job\Group
from the context menu.
While
Copy of Unix Prod Job 1
is selected, click the
Edit Job\Group
button or right-click and select
Edit Job\Group
from the context menu.
Step 12![]() Change the
Job Name
field to
Unix Prod Job 2
.
Change the
Job Name
field to
Unix Prod Job 2
.
Step 13![]() Click
OK
to save the job definition and then click
OK
again in the
Effective Date
dialog.
Click
OK
to save the job definition and then click
OK
again in the
Effective Date
dialog.
The second job has been created.
Step 14![]() Create a third job, called
Unix Prod Job 3
, the same way we created
Unix Prod Job 2
.
Create a third job, called
Unix Prod Job 3
, the same way we created
Unix Prod Job 2
.
For this job, though we will add an unreasonable time dependency to show how we can override this dependency in the Job Activity pane.
Step 15![]() Double-click
Unix Prod Job 3
.
Double-click
Unix Prod Job 3
.
Step 16![]() Click the
Schedule
tab of the
Unix Prod Job 3
definition.
Click the
Schedule
tab of the
Unix Prod Job 3
definition.
Step 17![]() eselect the
Inherited
option in the
Time Window
section.
eselect the
Inherited
option in the
Time Window
section.
Step 18![]() Enter a time window of
11:45 PM
to
12:00 AM
Enter a time window of
11:45 PM
to
12:00 AM
Note .If you set a time window that is before the present time, e.g., 12:00 AM to 12:15AM, the job will enter today’s schedule with a Timed Out status.
Step 19![]() Click the
Options
tab.
Click the
Options
tab.
Step 20![]() Verify the
Require operator release
option is cleared. This job will wait based on its time window. (We are assuming that you are not running this tutorial at midnight.)
Verify the
Require operator release
option is cleared. This job will wait based on its time window. (We are assuming that you are not running this tutorial at midnight.)
Step 21![]() Click
OK
to close the
Job Definition
dialog and then click
OK
again in the
Effective Date
dialog.
Click
OK
to close the
Job Definition
dialog and then click
OK
again in the
Effective Date
dialog.
Step 22![]() Right-click the new job group that you defined and then select
Insert Job into Schedule
and click
OK
in the resulting dialog.
Right-click the new job group that you defined and then select
Insert Job into Schedule
and click
OK
in the resulting dialog.
Step 23![]() Click
OK
in the
Information
dialog.
Click
OK
in the
Information
dialog.
Job Sorting
Jobs can be sorted and filtered by most columns in the Job Activity pane. In this exercise, we will set the default sort column to be the Estimated Start Time .
Click the Current Est Start column header. The jobs are sorted by the estimated start time.
Removing a Job from the Production Schedule
If a job has not launched, you can remove it from the production schedule.
To remove a job from the Production Schedule:
Step 1![]() On the
Job Activity
pane, right-click the
Unix Prod Job 1
job.
On the
Job Activity
pane, right-click the
Unix Prod Job 1
job.
Step 2![]() Select
Remove Job(s) from Schedule
from the context menu.
Select
Remove Job(s) from Schedule
from the context menu.
Step 3![]() Click
Yes
in the
Information
dialog.
Click
Yes
in the
Information
dialog.
Note You can also remove a job by clearing the Enabled options in the job definition, or by deleting the job from the Jobs pane. You can only remove a job from the production schedule if it is not currently running or has not yet run.
Inserting a Job Into the Production Schedule
To insert a job into the production schedule:
Step 1![]() From the
Activities
main menu, select
Insert Job into Schedule
to display the
Insert Job Into Schedule
dialog.
From the
Activities
main menu, select
Insert Job into Schedule
to display the
Insert Job Into Schedule
dialog.
There are several ways to enter a job in this dialog. For this exercise, we will use Enteprise Scheduler’s sophisticated search function.
Step 2![]() Click the ellipsis button to display the
Job Search
dialog.
Click the ellipsis button to display the
Job Search
dialog.
Step 3![]() In the
Name
field, type
Unix*
. Leave the other options blank.
In the
Name
field, type
Unix*
. Leave the other options blank.
The asterisk ( * ) is a wildcard character, so this search will match all jobs that start with Unix . (The asterisk matches any character or combination of characters.)
Step 4![]() Click the
Find
button
.
Click the
Find
button
.
The Job Search Results field should include the three Unix Prod Jobs .
Step 5![]() Select
Unix Prod Job 1
.
Select
Unix Prod Job 1
.
Step 6![]() Click
OK
in the
Job Search
dialog.
Click
OK
in the
Job Search
dialog.
Step 7![]() Click
OK
in the
Insert Job Into Schedule
dialog.
Click
OK
in the
Insert Job Into Schedule
dialog.
The job is added to the schedule outside its job group. Note that jobs outside of a job group are not indented under the group.
Step 8![]() Select the
Unix Prod Job 1 (1)
job.
Select the
Unix Prod Job 1 (1)
job.
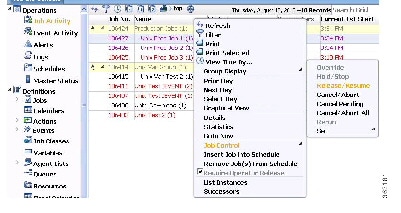
Step 9![]() Right-click the
Unix Prod Job 1 (1)
and select the
Job Control
submenu and then select the
Release/Resume
option.
Right-click the
Unix Prod Job 1 (1)
and select the
Job Control
submenu and then select the
Release/Resume
option.
Cancelling a Job in the Production Schedule
You can cancel a job using the Cancel/Abort command when it is in the Held state. You can abort a job using the Cancel/Abort command when it is in the Active state. In the next procedure, we will cancel a job that is in the Held state.
To cancel a job in the production schedule:
Step 1![]() From the
Navigator
pane, select
Operations>Job Activity
to display the
Job Activity
pane.
From the
Navigator
pane, select
Operations>Job Activity
to display the
Job Activity
pane.
Step 2![]() Select the
Unix Prod Job 2
job.
Select the
Unix Prod Job 2
job.
Step 3![]() Right-click the
Unix Prod Job 2
,
select the
Job Control
submenu and then select the
Cancel/Abort
option.
Right-click the
Unix Prod Job 2
,
select the
Job Control
submenu and then select the
Cancel/Abort
option.
Step 4![]() Click
Yes
at the
Confirmation
dialog.
Click
Yes
at the
Confirmation
dialog.
The status of the job changes to Cancelled .
Putting a Job on Hold
You can put any job that is waiting on dependencies on hold. Even if the dependencies are met, the job will not run.
Step 1![]() In the
Job Activity
pane, select the
Unix Prod Job 3
job.
In the
Job Activity
pane, select the
Unix Prod Job 3
job.
Step 2![]() Right-click the
Unix Prod Job 3
job, select the
Job Control
submenu and then select the
Hold/Stop
option.
Right-click the
Unix Prod Job 3
job, select the
Job Control
submenu and then select the
Hold/Stop
option.
Step 3![]() Click
Yes
in the
Confirmation
dialog.
Click
Yes
in the
Confirmation
dialog.
Step 4![]() Click
OK
in the
Information
dialog.
Click
OK
in the
Information
dialog.
Taking the Job Out of Held Status
To take the job out of Held status:
Step 1![]() Right-click the
Unix Prod Job 3
job, select the
Job Control
submenu and then select the
Release/Resume
option.
Right-click the
Unix Prod Job 3
job, select the
Job Control
submenu and then select the
Release/Resume
option.
Step 2![]() Click
Yes
in the
Confirmation
dialog and then click
OK
at the
Information
dialog.
Click
Yes
in the
Confirmation
dialog and then click
OK
at the
Information
dialog.
The job re-enters the Waiting On Dependencies status. If the job’s dependencies were met, the job would launch.
Overriding a Dependency
You can also override job, file, time and variable dependencies with the Override command. For this exercise, we will override the time dependency.
Step 1![]() Right-click the
Unix Prod Job 3
job, select the
Job Control
submenu and select the
Override
option.
Right-click the
Unix Prod Job 3
job, select the
Job Control
submenu and select the
Override
option.
Step 2![]() Click
Yes
in the
Confirmation
dialog and then click
OK
at the
Information
dialog.
Click
Yes
in the
Confirmation
dialog and then click
OK
at the
Information
dialog.
The job launches even though the dependencies have not been met.
Note When a dependency is overridden, the Job Detail dialog for the job whose definition includes the dependency will show which dependency was overridden.
Estimated and Excessive Durations
Two of the most common questions asked of system operators and schedulers are “How long is this job going to run?” and “Which job is going to run next?” To help answer these questions, Enteprise Scheduler provides the Estimated Duration feature.
When a job enters the production schedule for the first time, if an estimated duration time is specified in the Job Definition dialog, that time will be displayed in the Job Activity pane. The Estimated Duration Time value is automatically updated after each job occurrence runs, creating a historical average that is used for subsequent submissions. Of course, you can override this value in the job definition at any time.
For unattended operations, you might want a job to terminate if it runs over its maximum time, notify an operator if it completes under its minimum time, or performs other actions automatically.
 Feedback