- Preface
- Scheduler Concepts
- Understanding Offset Concepts
- Creating Your First Job
- Setting Up a Unix Job Dependency
- Scheduling Jobs in a Group
- Creating a Unix File Dependency
- Detecting Job Event Conditions
- Creating Variable Dependencies
- Managing Jobs in the Production Schedule
- Managing Command Parameters
- Setting Up Queues
- Using Scheduler Agents
- Using Scheduler Calendars
Cisco Tidal Enterprise Scheduler 6.2 Tutorial Guide for Unix
Bias-Free Language
The documentation set for this product strives to use bias-free language. For the purposes of this documentation set, bias-free is defined as language that does not imply discrimination based on age, disability, gender, racial identity, ethnic identity, sexual orientation, socioeconomic status, and intersectionality. Exceptions may be present in the documentation due to language that is hardcoded in the user interfaces of the product software, language used based on RFP documentation, or language that is used by a referenced third-party product. Learn more about how Cisco is using Inclusive Language.
- Updated:
- June 6, 2014
Chapter: Creating Variable Dependencies
Overview
In the previous chapter, we created an alert message that used system variables. In this chapter, we will create a job that depends on the value of a user-defined variable. A user-defined variable is a variable you create manually. A job can change the value of a variable you have assigned to it by using a variable update action. A job can be dependent upon the value of a variable. Using user-defined variables, you are given unlimited control over the conditional structuring of jobs.
For example, a job can run, and set a variable to a specific date. Another job can be triggered to run based on that variable’s date. When the specific date arises, the second job runs.
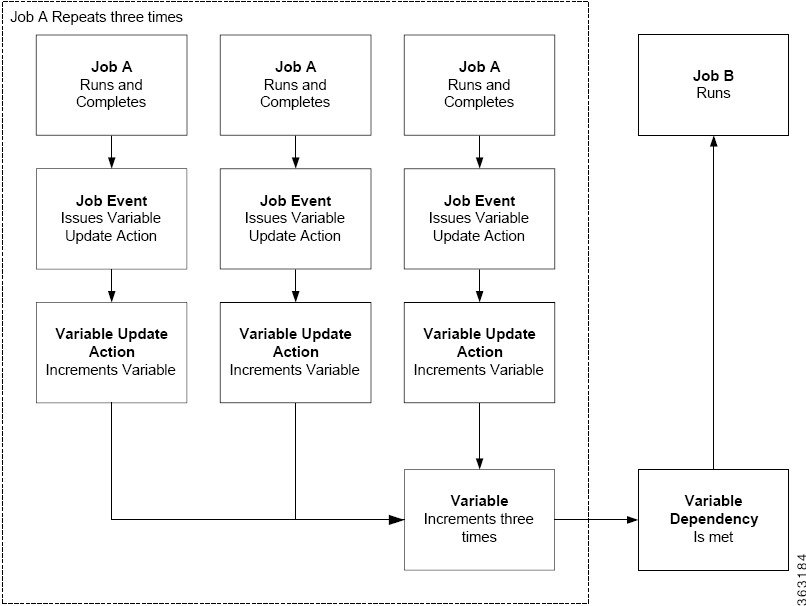
In this chapter, you will increment a variable with the action of “Job A” and make “Job B” dependent on that variable reaching a specific value. The variable will start with a value of 0 and increment by 1 each time Job A runs. Job B will depend on the variable equalling 3. After Job A repeats 3 times, Job B will start. You could set up a job to start after any defined number of previous dependency jobs complete.
The following figure illustrates how this process works:

Caution To complete the exercises in this tutorial, you need to:
Install Enteprise Scheduler in the default directory Scheduler (or the examples in this tutorial will not work properly)
Select the Super User option in your User definition
Configure a default agent
Create and have available the work day calendar
Install Enteprise Scheduler in the default directory Scheduler (or the examples in this tutorial will not work properly)
Select the Super User option in your User definition
Configure a default agent
Create and have available the work day calendar
Creating a Variable
Step 1![]() In the
Navigator
pane, select
Definitions>Variables
to display the
Variables
pane
.
In the
Navigator
pane, select
Definitions>Variables
to display the
Variables
pane
.
Step 2![]() Display the
Variable Definition
dialog by either clicking the
Add Variable
button or by right-clicking in the
Variable
pane and selecting
Add Variable
from the context menu.
Display the
Variable Definition
dialog by either clicking the
Add Variable
button or by right-clicking in the
Variable
pane and selecting
Add Variable
from the context menu.
Step 3![]() In the
Name
field, enter
Gather Orders Var
.
In the
Name
field, enter
Gather Orders Var
.
Step 4![]() From the
Type
list, select
Number
.
From the
Type
list, select
Number
.
Step 5![]() In the
Value
field, enter the number
0
.
In the
Value
field, enter the number
0
.
Step 6![]() In the
Description
field, enter
The value will be incremented by 1 for each successful run of the Gather Job
.
In the
Description
field, enter
The value will be incremented by 1 for each successful run of the Gather Job
.
Step 7![]() Select the
Public
field, if it is not already selected.
Select the
Public
field, if it is not already selected.
The newly-created variable now appears in the Variables pane.
Creating the Variable Update Action
To create the variable update action:
Step 1![]() From the
Navigator
pane select
Definitions>Actions>Variable
to display the
Variable Actions
pane
.
From the
Navigator
pane select
Definitions>Actions>Variable
to display the
Variable Actions
pane
.
Step 2![]() Select the
Add Action
button or right-click the
Variable Actions
pane and select
Add Action
from the context menu to display the
Action Definition: Variable
dialog.
Select the
Add Action
button or right-click the
Variable Actions
pane and select
Add Action
from the context menu to display the
Action Definition: Variable
dialog.
Step 3![]() In the
Action Name
field, enter
Set Gather Var
.
In the
Action Name
field, enter
Set Gather Var
.
Step 4![]() From the
Variable Name
list, select
Gather Orders Var: Number
.
From the
Variable Name
list, select
Gather Orders Var: Number
.
Step 5![]() In the
Type of Update
list, select
Increment variable value by
.
In the
Type of Update
list, select
Increment variable value by
.
Step 6![]() In the
Value
field, enter
1
if it is not already set at
1
by default.
In the
Value
field, enter
1
if it is not already set at
1
by default.
The Set Gather Var action now displays in the Variable Actions pane.
Creating a Job Event for the Unix Variable Test Job
To create a job event for the Unix Variable Test job:
Step 1![]() From the
Navigator
pane, select
Actions>Job Events
to display the
Job Events
pane.
From the
Navigator
pane, select
Actions>Job Events
to display the
Job Events
pane.
Step 2![]() Click the
Add Event
button or right-click in the
Job Events
pane and choose
Add Event
from the context menu
to display the
Job Event Definition
dialog.
Click the
Add Event
button or right-click in the
Job Events
pane and choose
Add Event
from the context menu
to display the
Job Event Definition
dialog.
Step 3![]() In the
Job Event Name
field, type
Event Action Gather
.
In the
Job Event Name
field, type
Event Action Gather
.
Step 4![]() In the
Event Trigger
list, select
Job completed normally
.
In the
Event Trigger
list, select
Job completed normally
.
Step 5![]() On the
Associated Action(s)
tab, highlight
Set Gather Var
and click the left arrow button to move it to the
Selected Action(s)
section.
On the
Associated Action(s)
tab, highlight
Set Gather Var
and click the left arrow button to move it to the
Selected Action(s)
section.
Step 6![]() Click
OK
to save the job event and close the dialog.
Click
OK
to save the job event and close the dialog.
Creating the Unix Variable Test Job Group
To create the Unix Variable Test Job Group:
Step 1![]() From the
Navigator
pane, select
Definitions>Jobs
to display the
Jobs
pane.
From the
Navigator
pane, select
Definitions>Jobs
to display the
Jobs
pane.
Step 2![]() Click the
Add Job Group
button on the Enteprise Scheduler toolbar or right-click in the
Jobs
pane and select
Add Job Group
from the context menu to display the
Job Group Definition
dialog.
Click the
Add Job Group
button on the Enteprise Scheduler toolbar or right-click in the
Jobs
pane and select
Add Job Group
from the context menu to display the
Job Group Definition
dialog.
Step 3![]() In the
Job Group Name
field, enter
Unix Var Group
.
In the
Job Group Name
field, enter
Unix Var Group
.
Step 4![]() From the
Calendar Name
list, select the
work day
calendar.
From the
Calendar Name
list, select the
work day
calendar.
Step 5![]() Click the
Run
tab and from the
Runtime User
list, select a user with access to the Unix agent.
Click the
Run
tab and from the
Runtime User
list, select a user with access to the Unix agent.
Step 7![]() Click
OK
at the
Effective Date
dialog.
Click
OK
at the
Effective Date
dialog.

Note When you click OK at this dialog, the job group enters the production schedule, but nothing will run because there are no jobs associated with the job group yet. Since you can manually add the job group to the schedule later, clicking Cancel at this dialog is also acceptable.
Creating a Repeating Job and Associating the Job Event
To create a repeating job and associating the Job event:
Step 1![]() In the
Jobs
pane, select the job group
Unix Var Group
and click the
Add Job
button or right-click in the
Jobs
pane and choose
Add Job
from the context menu to display the
Job Definition
dialog.
In the
Jobs
pane, select the job group
Unix Var Group
and click the
Add Job
button or right-click in the
Jobs
pane and choose
Add Job
from the context menu to display the
Job Definition
dialog.
Step 2![]() In the
Job Name
field, enter
Unix Var Test 1
.
In the
Job Name
field, enter
Unix Var Test 1
.
Step 3![]() In the
Command
field, enter the full path to the file:
In the
Command
field, enter the full path to the file:
/UNIX_TEST_1.sh
Step 4![]() Click the
Schedule
tab.
Click the
Schedule
tab.
Step 5![]() In the
Repeats
section, select the
Run new occurrence
option. Use the up and down arrows to select values or click in the
minutes
field and enter
2
, and click in the
up to ___ times
field and enter
5
.
In the
Repeats
section, select the
Run new occurrence
option. Use the up and down arrows to select values or click in the
minutes
field and enter
2
, and click in the
up to ___ times
field and enter
5
.
Step 7![]() Click
Cancel
in the
Effective Date
dialog.
Click
Cancel
in the
Effective Date
dialog.
If the
Unix Var Test 1
job is not visible in the
Jobs
pane, expand the
Unix Var Group
job group by clicking the plus sign ( ) to its left.
When scheduled the Unix Var Test 1 job will run every two minutes, five times, activating the Event Action Gather job event each time. Set Gather Var is tied to Event Action Gather , and so will increment by 1 each time Unix Var Test 1 runs. When Set Gather Var reaches 3 , it will have fulfilled the conditions necessary to trigger the next job, which we will define as Unix Var Test 2 in Creating a Job Dependent on the Gather Orders Variable.
The Overview for this chapter explains in general terms the interdependence of Unix Var Test 1 (Job A), Set Gather Var (a user-defined variable) and Unix Var Test 2 (Job B).
Step 8![]() Right-click
Unix Var Test 1
and from the context menu, select
Edit Job/Group
to display the job’s definition dialog.
Right-click
Unix Var Test 1
and from the context menu, select
Edit Job/Group
to display the job’s definition dialog.
Step 9![]() Click the
Job Events
tab.
Click the
Job Events
tab.
Step 10![]() Click
Insert
to display the
Select Job Event
dialog.
Click
Insert
to display the
Select Job Event
dialog.
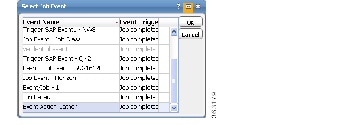
Figure 8-2 Select Job Event Dialog
Step 11![]() Select the
Event Action Gather
event.
Select the
Event Action Gather
event.
Step 12![]() Click
OK
to close the
Select Job Event
dialog and to add the job event to the
Events
field.
Click
OK
to close the
Select Job Event
dialog and to add the job event to the
Events
field.
Step 13![]() Click
OK
to close the
Job Definition
dialog.
Click
OK
to close the
Job Definition
dialog.
Step 14![]() Click
Cancel
in the
Effective Date
dialog.
Click
Cancel
in the
Effective Date
dialog.
Every time the Unix Var Test 1 job completes normally, the variable Gather Orders will be incremented by 1 .
Creating a Job Dependent on the Gather Orders Variable
To create a job dependent on the Gather Orders variable:
Step 1![]() Select the job group
Unix Var Group
and click the
Add Job
button or right-click and select
Add Job
from the context menu to display the
Job Definition
dialog.
Select the job group
Unix Var Group
and click the
Add Job
button or right-click and select
Add Job
from the context menu to display the
Job Definition
dialog.
Step 2![]() In the
Job Name
field, enter
Unix Var Test 2
.
In the
Job Name
field, enter
Unix Var Test 2
.
Step 3![]() In the
Command
field, enter the full path to the file:
In the
Command
field, enter the full path to the file:
/UNIX_TEST_5.sh
Step 4![]() Click the
Dependencies
tab.
Click the
Dependencies
tab.
Step 5![]() Click the
Add
button and select
Add Variable Dependency
to display the
Variable Dependency Definition
dialog.
Click the
Add
button and select
Add Variable Dependency
to display the
Variable Dependency Definition
dialog.
Step 6![]() In the
Variable Name
list, select
Gather Orders Var: Number
.
In the
Variable Name
list, select
Gather Orders Var: Number
.
Step 7![]() In the
Operator
list, if
Equals (=)
is not already displayed, select it.
In the
Operator
list, if
Equals (=)
is not already displayed, select it.
Step 8![]() In the
Variable Value
field, enter the number
3
.
In the
Variable Value
field, enter the number
3
.
Step 9![]() Click
OK
to accept the variable dependency.
Click
OK
to accept the variable dependency.
The Job Definition dialog now displays the new dependency.
Step 11![]() Click
Cancel
in the
Effective Date
dialog.
Click
Cancel
in the
Effective Date
dialog.
Scheduling and Monitoring the Gather Orders Jobs
Now that all the components are defined and configured, we will run the jobs and monitor them in the Job Activity pane.
To schedule and monitor the Gather Orders jobs:
Step 1![]() On the
Jobs
pane, double-click the
Unix Var Test 1
job to display its
Job Definition
dialog.
On the
Jobs
pane, double-click the
Unix Var Test 1
job to display its
Job Definition
dialog.
Step 2![]() Click the
Schedule
tab to display the
Schedule
tab.
Click the
Schedule
tab to display the
Schedule
tab.
Step 3![]() In the
Repeats
section, change the frequency in minutes that the job will run from
2
to
1
.
In the
Repeats
section, change the frequency in minutes that the job will run from
2
to
1
.
Step 4![]() Click
OK
to save the change to the job.
Click
OK
to save the change to the job.
Step 5![]() In the
Jobs
pane, right-click the
Unix Var Test 2
job, select
Insert Job into Schedule
from the context menu and click
OK
.
In the
Jobs
pane, right-click the
Unix Var Test 2
job, select
Insert Job into Schedule
from the context menu and click
OK
.
Step 6![]() Click
OK
in the
Information
dialog.
Click
OK
in the
Information
dialog.
Step 7![]() From the
Navigator
pane, select
Operations> Job Activity
to display the
Job Activity
pane.
From the
Navigator
pane, select
Operations> Job Activity
to display the
Job Activity
pane.
Step 8![]() Double-click the
Unix Var Test 2
job occurrence.
Double-click the
Unix Var Test 2
job occurrence.
 Feedback