- Cisco netManager Overview
- Managing Devices
- Understanding Workspaces and Workspace Content
- Using Topology Views
- Polling
- Using Actions
- Using Notifications
- Using Active Monitors
- Using Passive Monitors
- Using Performance Monitors
- Using Reports
- Using SNMP
- Administrative Tasks
- Events Processed
- Processed SNMP Traps and Corresponding Events
- Open Source Acknowledgements
- Device Services
- About the Devices Tab
- Adding a New Device
- Using the Device Discovery Wizard
- Importing Devices from a File
- Configuring Network Interfaces on a Device
- Configuring Credentials
- Editing SNMP Timeout and Retries
- Adding Attributes to a Device
- Adding Notes to a Device
- Changing a Device IP Address
- Changing a Device Name
- Rediscovering Devices
- Suspending and Resuming Single Device Polling
- Understanding Device Groups
- General Device Properties
- Device Property Performance Monitors
- Active Monitor Device Properties
- Passive Monitor Device Properties
- Device Property Actions
- Device Property Credentials
- Device Property Polling
- Device Property Notes
- Device Property Custom Links
- Device Property Attributes
- Changing Device Types
Managing Devices
Before Cisco netManager can monitor devices, you need to add devices. To add devices to Cisco netManager, see one of the following:
•![]() Using the Device Discovery Wizard
Using the Device Discovery Wizard
•![]() Importing Devices from a File
Importing Devices from a File
Devices are organized through device groups. By default, all of the devices on your network are placed into a Dynamic Group named All devices. For more information on device groups, see Understanding Device Groups.
Device Services
Cisco netManager associates active monitors with devices on your network. Active monitors query the network services active on a device and then wait for a response. These monitors query the services running on a network resource, checking to make sure that the FTP server, web server, e-mail server, etc., are up and responding. Active monitors include DNS, SNMP, Telnet, Ping, TCPIP, and NT Service. If a response is either not received or is not what is expected, the service is considered down. If the query is returned as expected, the service is considered up. If any one service on a device is down, then the device as a whole is considered down.
For a more information about service monitors, see Chapter 8, "Using Active Monitors."
About the Devices Tab
This view provides an overview of all the devices in your network.
With a look and feel similar to Windows Explorer, the My Network tree helps you keep your complex network organized and performing properly. Devices are automatically organized by device group, and appear in the list in alphabetical order based on the name of the folder or the display name of the device. For more information on the type of information displayed, see "Device List" section.
During discovery, device groups are also created for each subnetwork that is found on the network that was scanned. At the top level of the My Network tree, all devices of the entire scan are contained in the All devices folder. The second folder is the All routers folder and contains all devices that can function as a router. The folders below All devices and All routers are specific device groups that are categorized by associated device rules. You can also define and create your own device groups. For more information on these groups, see "Understanding Device Groups" section.
Device List
Each device on the list provides information about its device type, capabilities, and status. The Capabilities column indicates the different roles that the device is capable of. For example, if a device has the capability of being a router and an H323 gateway, the column would list both router and H323 gateway. The Status column describes any faults or events on the device. For a description of each event listed in the Status column, see Appendix A, "Events Processed.".

Note ![]() If you right-click a device in the device list to acknowledges its events, all the events for that device are marked as acknowledged. For more information, see Using Acknowledgements.
If you right-click a device in the device list to acknowledges its events, all the events for that device are marked as acknowledged. For more information, see Using Acknowledgements.
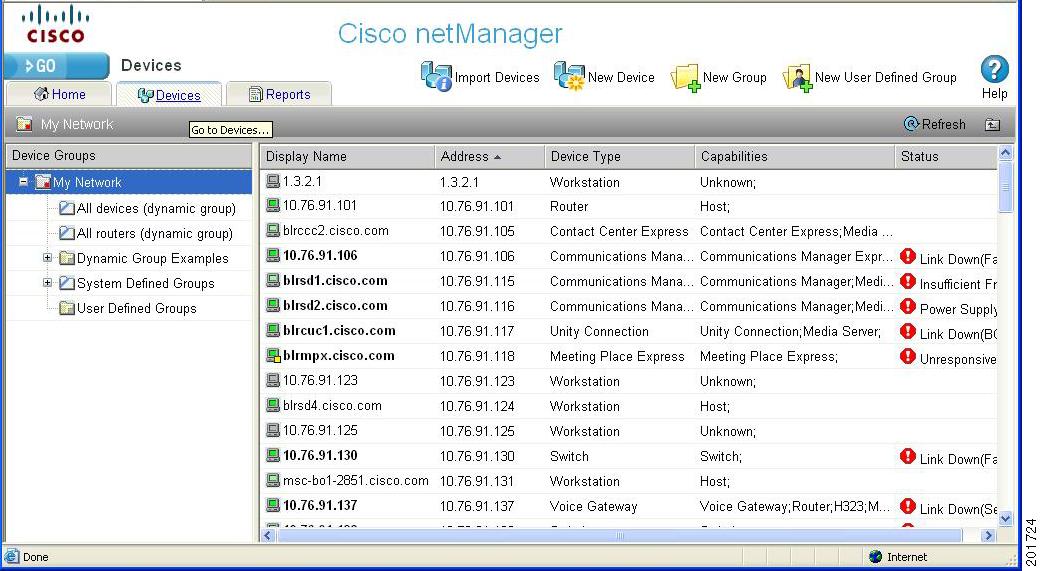
Figure 2-1 shows an example of a device list.
Figure 2-1 Device List
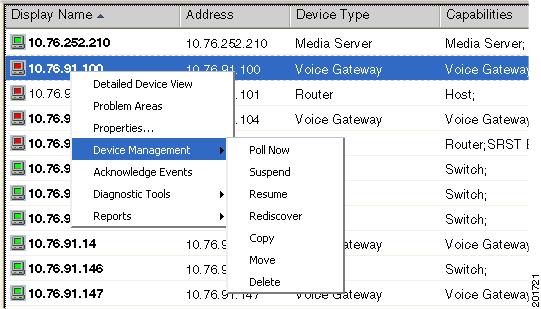
Context-Sensitive Menu
A context-sensitive menu is available on the web interface of the Devices tab. The context-sensitive menu comes up when you right-click a device or device group. This menu contains a list of tools that can be used on the device or device group. The type of tools that are available depends on the type of device you have selected. For more information on the standard network tools available, see Launching Network Tools, page 4-13.
Figure 2-2 shows an example of the context-sensitive Menu.
Figure 2-2 Context-Sensitive Menu
Device Toolbar
The Device Toolbar provides ways for you to add devices and groups.
Figure 2-2 shows an example of the Device Toolbar.
Figure 2-3 Device Toolbar

The Devic Toolbar contains the follwoing:
•![]() Import Devices. Imports devices from a file.
Import Devices. Imports devices from a file.
•![]() New Device. Adds a new device to your list of monitored devices.
New Device. Adds a new device to your list of monitored devices.
•![]() New Group. Adds a new device group to your list of monitored devices.
New Group. Adds a new device group to your list of monitored devices.
•![]() New User Defined Group. Adds a new user-defined group to your list of monitored devices.
New User Defined Group. Adds a new user-defined group to your list of monitored devices.
Device States and Icons
Each folder in the My Network tree has a device state indicator on the folder icon. This indicator shows the worst state across all of the devices contained in that folder.
The following icons appear in the device list when viewing the contents of a device group.
Adding a New Device
Note![]() •
•![]() You cannot add new devices to dynamic groups. A device is automatically categorized in Cisco netManager.
You cannot add new devices to dynamic groups. A device is automatically categorized in Cisco netManager.
•![]() The device will not be added if you have reached the device count limit of your license. If this happens, an appropriate error message will appear when you try to add the device.
The device will not be added if you have reached the device count limit of your license. If this happens, an appropriate error message will appear when you try to add the device.
•![]() Cisco Discovery Protocol (CDP) must be enabled on a device in order for its network connections to display in the Physical Connectivity View. CDP is a media- and protocol-independent device-discovery protocol that runs on all Cisco-manufactured equipment, including routers, access servers, bridges, and switches. Using CDP, a device can advertise its existence to other devices and receive information about other devices on the same LAN or on the remote side of a WAN. CDP is enabled by default on Cisco routers. For more information, see http://www.cisco.com/en/US/tech/tk962/technologies_tech_note09186a00801aa000.shtml.
Cisco Discovery Protocol (CDP) must be enabled on a device in order for its network connections to display in the Physical Connectivity View. CDP is a media- and protocol-independent device-discovery protocol that runs on all Cisco-manufactured equipment, including routers, access servers, bridges, and switches. Using CDP, a device can advertise its existence to other devices and receive information about other devices on the same LAN or on the remote side of a WAN. CDP is enabled by default on Cisco routers. For more information, see http://www.cisco.com/en/US/tech/tk962/technologies_tech_note09186a00801aa000.shtml.
•![]() When a wireless LAN controller is added, not all the lightweight access points registered to it will be shown if you have reached the device count limit of your license. In this situation, an error message will not appear. The log file will indicate this if the trace was enabled.
When a wireless LAN controller is added, not all the lightweight access points registered to it will be shown if you have reached the device count limit of your license. In this situation, an error message will not appear. The log file will indicate this if the trace was enabled.
•![]() Do not cancel while a device scan is in progress. This may add duplicate devices to the system. If duplicate devices are added, manually delete the duplicate device from the Device tab (right-click device and select Device Management > Delete).
Do not cancel while a device scan is in progress. This may add duplicate devices to the system. If duplicate devices are added, manually delete the duplicate device from the Device tab (right-click device and select Device Management > Delete).
To manually add a new device, use the following procedure. To add multiple devices using a file, see Importing Devices from a File. To use auto discovery, see Using the Device Discovery Wizard.
Step 1 ![]() Do one of the following:
Do one of the following:
•![]() From the Devices tab, right-click the My Network folder, and select New Device. The Add New Device dialog box opens.
From the Devices tab, right-click the My Network folder, and select New Device. The Add New Device dialog box opens.
•![]() From the GO menu, select Device > New Device....
From the GO menu, select Device > New Device....
Step 2 ![]() Enter the IP address or hostname for the device you want to add.
Enter the IP address or hostname for the device you want to add.
Step 3 ![]() Click Advanced to select a number of additional options for which to scan the device. For more information on the options available from this dialog box, see Active/Performance Monitors Scan Properties.
Click Advanced to select a number of additional options for which to scan the device. For more information on the options available from this dialog box, see Active/Performance Monitors Scan Properties.
Step 4 ![]() To add a device without scanning, select Add device immediately without scanning. This immediately adds a bare-bones device, generically categorized as a workstation.
To add a device without scanning, select Add device immediately without scanning. This immediately adds a bare-bones device, generically categorized as a workstation.
Step 5 ![]() Click OK to save changes. Cisco netManager attempts to resolve the IP address or hostname, then scans that device for active monitors. When the scan is complete, the Device Properties dialog box opens, allowing you to further configure the device as needed.
Click OK to save changes. Cisco netManager attempts to resolve the IP address or hostname, then scans that device for active monitors. When the scan is complete, the Device Properties dialog box opens, allowing you to further configure the device as needed.
Note ![]() If you have entered SNMP credentials and the device does not respond to SNMP within the number of retries and timeout as configured globally in GO > Configure > Default SNMP Timeout settings, then the credentials have not been associated with the device. To correct this, right-click the device from the Device List and select Properties. Select Credentials and enter the correct credentials in the fields provided. Then try to rediscover the device; see Rediscovering Devices.
If you have entered SNMP credentials and the device does not respond to SNMP within the number of retries and timeout as configured globally in GO > Configure > Default SNMP Timeout settings, then the credentials have not been associated with the device. To correct this, right-click the device from the Device List and select Properties. Select Credentials and enter the correct credentials in the fields provided. Then try to rediscover the device; see Rediscovering Devices.
Active/Performance Monitors Scan Properties
This dialog box appears when you add devices.
Select the active and performance monitors that you want Cisco netManager to scan for during discovery. After they are discovered, Cisco netManager will configure the new devices with the monitors found.
The top list displays active monitors that have been defined in the Active Monitor Library with the Use in Discovery option selected. The bottom list displays all performance monitors defined in the Performance Monitor Library. For more information about performance monitors, see Chapter 9, "Using Passive Monitors." The following options are displayed:
•![]() Use comprehensive discovery—By default, Cisco netManager sends a ping command to each viable IP address in the range configured in the first section of this wizard. If the device responds, Cisco netManager then scans for the monitors listed on this dialog box. If no device responds, discovery moves on to the next IP address. Select this option to have device discovery scan each IP address for all of the selected monitors without first sending the ping command to the device. Discovery will take longer if this option is selected.
Use comprehensive discovery—By default, Cisco netManager sends a ping command to each viable IP address in the range configured in the first section of this wizard. If the device responds, Cisco netManager then scans for the monitors listed on this dialog box. If no device responds, discovery moves on to the next IP address. Select this option to have device discovery scan each IP address for all of the selected monitors without first sending the ping command to the device. Discovery will take longer if this option is selected.
Note ![]() If you want a ping monitor created for the devices found in discovery, you must select Ping as an 'active monitor to scan' even if you have cleared the Use comprehensive discovery option.
If you want a ping monitor created for the devices found in discovery, you must select Ping as an 'active monitor to scan' even if you have cleared the Use comprehensive discovery option.
During discovery, interface monitors are added after the scan, only if a device has multiple physical interfaces. If a device has only one interface, then no interface monitors are added, even if the interface monitor is selected to be scanned. Loopback interface does not count.
•![]() Resolve host names. Select this option to have Cisco netManager attempt to populate the list of discovered devices with hostnames, instead of IP addresses. Clear this option to have the list show only IP addresses of discovered devices.
Resolve host names. Select this option to have Cisco netManager attempt to populate the list of discovered devices with hostnames, instead of IP addresses. Clear this option to have the list show only IP addresses of discovered devices.
•![]() Identify device via SNMP. Select this option to have Cisco netManager read the SNMP information on the device.
Identify device via SNMP. Select this option to have Cisco netManager read the SNMP information on the device.
•![]() SNMP read communities. Enter one or more community strings, separated by commas, that the device will respond to. If the read community string is incorrect, or none is provided, Cisco netManager determines device type based on the monitors discovered during the scan.
SNMP read communities. Enter one or more community strings, separated by commas, that the device will respond to. If the read community string is incorrect, or none is provided, Cisco netManager determines device type based on the monitors discovered during the scan.
Note ![]() This option is only available when adding a single device.
This option is only available when adding a single device.
•![]() Windows credentials. Select a Windows credential to use when attempting to discover devices where you have to provide a Windows username or password when connecting. Credentials are configured in the Credentials Library. When a device is discovered using a credential, that credential is then associated to that device. You can change this on Device Properties > Credentials. If you select All, discovery uses all configured credentials in the Credentials Library. The credential that is successful is then associated with the device.
Windows credentials. Select a Windows credential to use when attempting to discover devices where you have to provide a Windows username or password when connecting. Credentials are configured in the Credentials Library. When a device is discovered using a credential, that credential is then associated to that device. You can change this on Device Properties > Credentials. If you select All, discovery uses all configured credentials in the Credentials Library. The credential that is successful is then associated with the device.
Using the Device Discovery Wizard
The Device Discovery wizard scans your network for devices, using the protocols and settings you choose. After devices and monitors are discovered, you select the ones you want to monitor and Cisco netManager creates devices in the database for each item you choose.
The wizard begins when the console is launched and there are no devices on the system.
Note ![]() The console is only available from the server where Cisco netManager is installed (Start > All Programs > Cisco netManager 1.1 > Cisco netManager 1.1 Discovery).
The console is only available from the server where Cisco netManager is installed (Start > All Programs > Cisco netManager 1.1 > Cisco netManager 1.1 Discovery).
Device groups are created based on subnetworks discovered during the scan. You may notice that some group folders may be empty. This is because a subnet was discovered, but the devices in that subnet were not scannable or you chose not to monitor them.
Device Discovery Scan Types
There are four options for device discovery. They are:
•![]() SNMP SmartScan: SmartScan discovers devices by reading SNMP information on your network. This scan type uses an SNMP-enabled router to identify both network devices and subnetworks. We recommend using SmartScan as your primary Discovery method.
SNMP SmartScan: SmartScan discovers devices by reading SNMP information on your network. This scan type uses an SNMP-enabled router to identify both network devices and subnetworks. We recommend using SmartScan as your primary Discovery method.
•![]() IP Range Scan: Cisco netManager scans a range of IP addresses and finds the devices that respond to one or more of the chosen services. The Discover Devices wizard prompts you to enter a range of the IP addresses in your network. You should use IP Range Scan if SNMP is either unavailable or does not meet your needs.
IP Range Scan: Cisco netManager scans a range of IP addresses and finds the devices that respond to one or more of the chosen services. The Discover Devices wizard prompts you to enter a range of the IP addresses in your network. You should use IP Range Scan if SNMP is either unavailable or does not meet your needs.
•![]() Network Neighborhood: Scanning a Network Neighborhood creates a list of devices by scanning the Windows network to which your computer is connected, and finding the other systems on the network. Use this type of scan if you only want to discover Windows devices.
Network Neighborhood: Scanning a Network Neighborhood creates a list of devices by scanning the Windows network to which your computer is connected, and finding the other systems on the network. Use this type of scan if you only want to discover Windows devices.
•![]() Hosts File Import: Cisco netManager imports devices from the system's Hosts file, which is a text file that lists hostnamess and their IP addresses on a network. For small networks, the Hosts file is an alternative to DNS. The Hosts file may also be called a host table by some TCP/IP vendors.
Hosts File Import: Cisco netManager imports devices from the system's Hosts file, which is a text file that lists hostnamess and their IP addresses on a network. For small networks, the Hosts file is an alternative to DNS. The Hosts file may also be called a host table by some TCP/IP vendors.
Device Discovery Example
This example describes how to use the Device Discovery wizard with the SNMP SmartScan option to discover devices.
In this example, you want to discover all of the devices attached to a specific SNMP-enabled router on your network. To accomplish this, you need to:
•![]() Know the IP address of the SNMP-enabled router whose network you want to discover.
Know the IP address of the SNMP-enabled router whose network you want to discover.
•![]() Know the Read Community name assigned to the devices on the network.
Know the Read Community name assigned to the devices on the network.
To discover devices:
Step 1 ![]() The Device Discovery Wizard is only available from the Cisco netManager console. The console is only available from the server where Cisco netManager is installed (Start > All Programs > Cisco netManager 1.1 > Cisco netManager 1.1 Discovery).
The Device Discovery Wizard is only available from the Cisco netManager console. The console is only available from the server where Cisco netManager is installed (Start > All Programs > Cisco netManager 1.1 > Cisco netManager 1.1 Discovery).
Step 2 ![]() From the console, select File > Discover Devices. The New Device Discovery Wizard appears.
From the console, select File > Discover Devices. The New Device Discovery Wizard appears.
Step 3 ![]() Select SNMP SmartScan as the method for scanning your network, then click Next. The SNMP SmartScan settings dialog boxopens.
Select SNMP SmartScan as the method for scanning your network, then click Next. The SNMP SmartScan settings dialog boxopens.
Step 4 ![]() In the SNMP enabled router box, enter the IP address of the SNMP-enabled router you want to use for this scan.
In the SNMP enabled router box, enter the IP address of the SNMP-enabled router you want to use for this scan.
Step 5 ![]() In the SNMP read communities box, enter the proper read community string for that router. If an incorrect string is entered, Cisco netManager will be unable to scan the network. Additional community strings may be entered, separated by commas, if there are multiple SNMP-enabled devices on your network that use different strings.
In the SNMP read communities box, enter the proper read community string for that router. If an incorrect string is entered, Cisco netManager will be unable to scan the network. Additional community strings may be entered, separated by commas, if there are multiple SNMP-enabled devices on your network that use different strings.
Optionally, select the Windows credentials that you want to use during discovery. These credentials are configured in the Credentials Library, and store Windows authentication information (username and password) for those devices that require a login for discovery or monitoring. Click the Browse (...) button next to this box to access the Credentials Library. You can select a specific credential, select All to try all credentials that are configured or select None to ignore those devices that require you to log on. The credential that is successful is associated with each device.
Step 6 ![]() Click the Advanced button if you want to change the scan's default timeouts in milliseconds, retry counts, and scan depth.
Click the Advanced button if you want to change the scan's default timeouts in milliseconds, retry counts, and scan depth.
•![]() Click the Limit scan to IP class of root device option if you want to limit the scan to the network class (A, B, or C) defined by the IP address of the root device. If the IP address is within the network class of the root device, the scan proceeds. Otherwise, the scan skips to the next IP address.
Click the Limit scan to IP class of root device option if you want to limit the scan to the network class (A, B, or C) defined by the IP address of the root device. If the IP address is within the network class of the root device, the scan proceeds. Otherwise, the scan skips to the next IP address.
•![]() Click the Resolve host names option if you want to populate the list of discovered devices with hostnames in addition to IP addresses.
Click the Resolve host names option if you want to populate the list of discovered devices with hostnames in addition to IP addresses.
•![]() Click OK to save changes and return to the SNMP SmartScan settings dialog box.
Click OK to save changes and return to the SNMP SmartScan settings dialog box.
Step 7 ![]() Click Next. The Active/Performance Monitors to Scan dialog box opens. Select the type of active and performance monitors you want to use in this scan process. For this example, let's select Ping and HTTP as the active monitors and Disk Utilization as the performance monitor to be used in the scan process.
Click Next. The Active/Performance Monitors to Scan dialog box opens. Select the type of active and performance monitors you want to use in this scan process. For this example, let's select Ping and HTTP as the active monitors and Disk Utilization as the performance monitor to be used in the scan process.
•![]() The Ping monitor polls the device on a regular basis to establish whether it is up or down. By default, Cisco netManager sends a ping command to each viable IP address in the range configured during the first section of this wizard. If the device responds, Cisco netManager scans for the monitors listed on this dialog box. If the device does not respond, discovery moves on to the next IP address. You can select Use comprehensive discovery to have device discovery scan each IP address for all of the selected monitors without first sending the ping command to the device. Discovery takes longer if this option is selected.
The Ping monitor polls the device on a regular basis to establish whether it is up or down. By default, Cisco netManager sends a ping command to each viable IP address in the range configured during the first section of this wizard. If the device responds, Cisco netManager scans for the monitors listed on this dialog box. If the device does not respond, discovery moves on to the next IP address. You can select Use comprehensive discovery to have device discovery scan each IP address for all of the selected monitors without first sending the ping command to the device. Discovery takes longer if this option is selected.
Note ![]() If you want a Ping monitor created for the devices found in discovery, you must select Ping as an active monitor to scan even if you have cleared the Use comprehensive discovery option.
If you want a Ping monitor created for the devices found in discovery, you must select Ping as an active monitor to scan even if you have cleared the Use comprehensive discovery option.
Note ![]() If a device only has one interface, Cisco netManager intentionally does not add the Interface Active Monitor during discovery. Doing so with the Ping Active monitor would be redundant.
If a device only has one interface, Cisco netManager intentionally does not add the Interface Active Monitor during discovery. Doing so with the Ping Active monitor would be redundant.
•![]() The HTTP monitor polls a web server (if one is discovered) on the device on a regular basis to establish if it is up or down.
The HTTP monitor polls a web server (if one is discovered) on the device on a regular basis to establish if it is up or down.

Tip ![]() To see how a monitor is configured, you can go to the Active Monitor Library (Configure > Active Monitors), select a monitor, and click Edit.
To see how a monitor is configured, you can go to the Active Monitor Library (Configure > Active Monitors), select a monitor, and click Edit.
•![]() The Disk Utilization monitor monitors and reports on the available disk space for the selected device. Data collected is displayed in the Disk Utilization Report.
The Disk Utilization monitor monitors and reports on the available disk space for the selected device. Data collected is displayed in the Disk Utilization Report.
Step 8 ![]() Click Next. The Device Discovery window displays the estimated remaining scan time and the scan's progress. To cancel device discovery, click Stop.
Click Next. The Device Discovery window displays the estimated remaining scan time and the scan's progress. To cancel device discovery, click Stop.
Step 9 ![]() When the discovery is complete, the Devices to Monitor window opens, listing all of the devices just discovered. Note that if any of the devices have already been entered into the database, a shortcut to the device will be created in the device list. To add all of the devices to the database, click Next. To remove specific devices to be monitored from this list, clear the check box next to the device you want to remove.
When the discovery is complete, the Devices to Monitor window opens, listing all of the devices just discovered. Note that if any of the devices have already been entered into the database, a shortcut to the device will be created in the device list. To add all of the devices to the database, click Next. To remove specific devices to be monitored from this list, clear the check box next to the device you want to remove.
Note ![]() Not all discovered devices that appear in the list will be added to the database if you have reached the device count limit of your license. To verify which devices have been added, go to the device list.
Not all discovered devices that appear in the list will be added to the database if you have reached the device count limit of your license. To verify which devices have been added, go to the device list.
Note ![]() Additional active monitors and performance monitors that are already in the database will not be added to devices.
Additional active monitors and performance monitors that are already in the database will not be added to devices.
Step 10 ![]() Click Next. The Action Policy Selection dialog box opens. For more information about action policies, see the About Action Policies, page 6-21.
Click Next. The Action Policy Selection dialog box opens. For more information about action policies, see the About Action Policies, page 6-21.
Step 11 ![]() Complete the remaining screens in the wizard.
Complete the remaining screens in the wizard.
The Results summary shows the number of selected new devices, number of active and performance monitors, whether or not an Action Policy is applied, and the number of selected device shortcuts.
Step 12 ![]() Click Finish to begin monitoring the devices. A progress bar appears while devices are being added to the database, then the Device View opens.
Click Finish to begin monitoring the devices. A progress bar appears while devices are being added to the database, then the Device View opens.
Note ![]() If some device group folders are empty, it is because although a subnet was found, either the devices in the subnet were either not scannable, or you chose not to monitor them.
If some device group folders are empty, it is because although a subnet was found, either the devices in the subnet were either not scannable, or you chose not to monitor them.
About IP Phone Discovery
Cisco netManager performs an auto-discovery on all IP phones every four hours to detect if SIP and SCCP IP Phone are associated with a managed Cisco Unified Communications Manager or Cisco Unified Communications Manager Express. Cisco netManager also verifies registration status of all detected IP phones with Cisco Unified Communications Manager or Cisco Unified Communications Manager Express.
Note ![]() The ability to view and monitor Unified Communication devices depends upon the type of licensing you have.
The ability to view and monitor Unified Communication devices depends upon the type of licensing you have.
Importing Devices from a File
Step 1 ![]() Do one of the following:
Do one of the following:
•![]() From the Device tab, click the Import Device icon located in the Device Toolbar.
From the Device tab, click the Import Device icon located in the Device Toolbar.
•![]() From the GO menu, select Device > Import Devices....
From the GO menu, select Device > Import Devices....
Step 2 ![]() Select either Server or Local.
Select either Server or Local.
If you select Server, you only need to enter the filename; for example, seed.csv. The file is assumed to be present in the <CNM_Install_Dir>\importFiles directory.
If you select Local, enter the full path of where the file can be found, or browse the file system and select the file using the Browse button.
Step 3 ![]() Enter the filename or browse the file system and select the file using the Browse button.
Enter the filename or browse the file system and select the file using the Browse button.
Note ![]() Only CSV2.0 and CSV3.0 file formats are supported. XML files are not supported. For more information on file format, see "Sample CSV Files" section.
Only CSV2.0 and CSV3.0 file formats are supported. XML files are not supported. For more information on file format, see "Sample CSV Files" section.
Step 4 ![]() Click Advanced to select a number of additional options for which to scan the device. For more information on the options available from this dialog box, see "Active/Performance Monitors Scan Properties" section.
Click Advanced to select a number of additional options for which to scan the device. For more information on the options available from this dialog box, see "Active/Performance Monitors Scan Properties" section.
Step 5 ![]() Click OK to save changes. Cisco netManager attempts to resolve the IP address or hostname, then scans that device for active monitors. When the scan is complete, the Device Properties dialog box opens, allowing you to further configure the device as needed.
Click OK to save changes. Cisco netManager attempts to resolve the IP address or hostname, then scans that device for active monitors. When the scan is complete, the Device Properties dialog box opens, allowing you to further configure the device as needed.
Note ![]() When a device cannot be added because the device count limit has been reached (due to the type of license purchased), the progress bar will indicate the number of devices not added. The Import Status window will also have this information.
When a device cannot be added because the device count limit has been reached (due to the type of license purchased), the progress bar will indicate the number of devices not added. The Import Status window will also have this information.
Sample CSV Files
Sample CSV 2.0 File
;
; This file is generated by the export utility
; If you edit this file, be sure you know what you are doing
;
Cisco Systems NM data import, source = export utility; Version = 2.0;
Type = Csv
;
; Here are the columns of the table.
; Columns 1 and 2 are required.
; Columns 3 through 19 are optional.
; Col# = 1: Name (including domain or simply an IP)
; Col# = 2: RO community string
; Col# = 3: RW community string
; Col# = 4: Serial Number
; Col# = 5: User Field 1
; Col# = 6: User Field 2
; Col# = 7: User Field 3
; Col# = 8: User Field 4
; Col# = 9; Name = Telnet password
; Col# = 10; Name = Enable password
; Col# = 11; Name = Enable secret
; Col# = 12; Name = Tacacs user
; Col# = 13; Name = Tacacs password
; Col# = 14; Name = Tacacs enable user
; Col# = 15; Name = Tacacs enable password
; Col# = 16; Name = Local user
; Col# = 17; Name = Local password
; Col# = 18; Name = Rcp user
; Col# = 19; Name = Rcp password
;
; Here are the rows of data.
;
123.45.118.156,public,,FHH080600dg,,,,,,,,,,,,,,,
123.45.118.150,public,,FHH0743W022,,,,,,,,,,,,,,,
10.88.13.18,public,,,,,,,,
10.88.13.65,public,,,,,,,,
10.88.11.175,public,,,,,,
10.88.11.124,public,,,,,,
10.88.11.153,public
Sample CSV 3.0 File
; This file is generated by DCR Export utility
Cisco Systems NM Data import, Source=DCR Export; Type=DCRCSV; Version=3.0
;
;Start of section 0 - Basic Credentials
;
;HEADER:
management_ip_address,host_name,domain_name,device_identity,display_name,sysObjectID,dcr_d
evice_type,mdf_type,snmp_v2_ro_comm_string,snmp_v2_rw_comm_string,rxboot_mode_username,rxb
oot_mode_password,primary_username,primary_password,primary_enable_password,http_username,
http_password,http_mode,http_port,https_port,cert_common_name
;
123.10.118.84,,,,123.10.118.84,unknown,0,999980341,public,,,,,,,,,,,administrator,cisco,ht
tp,80,,
10.16.83.82,10.76.93.82,,,srst-sw,unknown,0,279568149,public,private,,,,,,,,,,,,,,,
10.16.81.71,10.76.91.71,,,10.16.91.71,unknown,0,268437969,public,,,,,,,,,,,,,,,,
10.16.81.183,10.76.91.183,,,10.76.81.183,1.3.6.1.4.1.9.1.26,0,268437597,public,,,,,,,,,,,,
,,,,
10.16.83.75,,,,ipif-skate.cisco.com,unknown,,999990341,public,,,,,none,,,Administrator,voi
ce,,Administrator,voice,,,,
10.16.81.30,10.76.91.30,,,10.16.81.30,unknown,0,268437960,public,,,,,,,,,,,,,,,,
10.16.81.146,10.76.91.146,,,10.16.81.146,unknown,0,278546113,,,ipcom,ipcom,,MD5,,,,,,,,,,,
10.16.81.72,10.76.91.72,,,10.16.81.72,unknown,0,268437990,public,,,,,,,,,,,,,,,,
123.20.118.3,,,,172.20.118.3,unknown,0,268437990,public,,,,,,,,,,,,,,,,
10.16.81.149,10.16.81.149,,,10.16.81.149,unknown,0,999990341,public,private,,,,none,,,
Administrator,cisco,,Administrator,cisco,,,,
Sample of a List of IP Addresses
10.16.83.18,
10.16.83.65,
10.16.81.175,
10.16.81.124,
10.16.81.153,
10.16.81.130,
10.16.81.151,
10.16.81.67,
10.16.81.83
Configuring Network Interfaces on a Device
The Network Interface dialog box displays all network interfaces currently configured for the device.
Cisco netManager monitors all interfaces listed here, displaying the worst state of the interfaces as the device status.
Step 1 ![]() From the device list, right-click a device, then click Properties. The Device Properties dialog box opens.
From the device list, right-click a device, then click Properties. The Device Properties dialog box opens.
Step 2 ![]() Click General. The General dialog box opens.
Click General. The General dialog box opens.
Step 3 ![]() Click Additional Network Interfaces. The Add Network Interfaces dialog box opens.
Click Additional Network Interfaces. The Add Network Interfaces dialog box opens.
Step 4 ![]() Do one of the following:
Do one of the following:
•![]() Click Add to add a network interface. Enter the network information for the new interface.
Click Add to add a network interface. Enter the network information for the new interface.
•![]() Click Set Default to change the default network interface on a device. Select the interface you want to make the default.
Click Set Default to change the default network interface on a device. Select the interface you want to make the default.
•![]() Click Edit to modify the interface details.
Click Edit to modify the interface details.
•![]() Click Remove to remove the interface.
Click Remove to remove the interface.
Step 5 ![]() Click OK to return to the General section.
Click OK to return to the General section.
Configuring Credentials
The Credentials system stores login or community string information for Windows (WMI active monitors and WMI performance monitors) and SNMP devices in the Cisco netManager database. The system supports SNMPv1 and SNMPv2.
Credentials are configured in the Credentials Library (found on the web interface menu at GO > Configure > Credentials Library) and used in several places throughout the application. They can be associated to devices from Device Properties > Credentials or through the Credentials Bulk Field Change option.
A device needs SNMP credentials applied to it before SNMP-based active monitors will work. Similarly, NT Service Checks must have Windows credentials applied.
Editing SNMP Timeout and Retries
If an SNMP query does not respond in time, Cisco netManager will time out. It will then retry contacting the device for as many times as listed under the snmpretries attribute in the configuration file. The timeout period is doubled for every subsequent retry. For example, if the timeout value is 4 seconds and the retries value is 3, Cisco netManager waits for 4 seconds before the first retry, 8 seconds before the second retry, and 16 seconds before the third retry. The SNMP timeout and retries are global settings.
Step 1 ![]() Select GO > Configure > Default SNMP Timeout.
Select GO > Configure > Default SNMP Timeout.
Step 2 ![]() Enter the following:
Enter the following:
•![]() Timeout (milliseconds)—Enter the timeout in milliseconds (ms). If a device does not respond to the scan within this time, the scan continues to the next IP address. The timeout should be set to 300 ms or greater.
Timeout (milliseconds)—Enter the timeout in milliseconds (ms). If a device does not respond to the scan within this time, the scan continues to the next IP address. The timeout should be set to 300 ms or greater.
•![]() Retry count—This is the number of times to try to discover a device at a given IP address, before continuing to the next device.
Retry count—This is the number of times to try to discover a device at a given IP address, before continuing to the next device.
Adding Attributes to a Device
Step 1 ![]() From the device list, right-click a device, then click Properties. The Device Properties dialog box opens.
From the device list, right-click a device, then click Properties. The Device Properties dialog box opens.
Step 2 ![]() Click Attributes. The Attributes dialog box opens.
Click Attributes. The Attributes dialog box opens.
Step 3 ![]() Do one of the following:
Do one of the following:
•![]() Click Add to add a new device attribute. The Add Attribute dialog box opens.
Click Add to add a new device attribute. The Add Attribute dialog box opens.
•![]() Select a device attribute in the list, then click Edit to change the settings.
Select a device attribute in the list, then click Edit to change the settings.
•![]() Select a device attribute in the list, then click Remove to remove it from the list.
Select a device attribute in the list, then click Remove to remove it from the list.
Step 4 ![]() Enter information in the Attribute name and Attribute value boxes.
Enter information in the Attribute name and Attribute value boxes.
Step 5 ![]() Click OK to save changes.
Click OK to save changes.
Adding Notes to a Device
Step 1 ![]() From the device list, right-click a device, then click Properties. The Device Properties dialog box opens.
From the device list, right-click a device, then click Properties. The Device Properties dialog box opens.
Step 2 ![]() Click Notes. The Notes dialog box opens.
Click Notes. The Notes dialog box opens.
Step 3 ![]() Enter the note in the Notes dialog box.
Enter the note in the Notes dialog box.
The first line of the Notes box displays information about when the device was added to the database. If viewing the notes on a shortcut, the date and time the device was added to the database are displayed.
You can customize the notes with any information you want to include about the device. For example, you may want to record historical information about a device, physical location information, or notes relating to the actions configured for the device.
Note ![]() There is no automatic word wrap. Add a return to display information in the dialog box without requiring scrolling to view it.
There is no automatic word wrap. Add a return to display information in the dialog box without requiring scrolling to view it.
Step 4 ![]() Click OK to save changes.
Click OK to save changes.
Changing a Device IP Address
Step 1 ![]() From the device list, right-click a device, then select Properties > General.
From the device list, right-click a device, then select Properties > General.
Step 2 ![]() Enter the new IP address in the Address box.
Enter the new IP address in the Address box.
Step 3 ![]() Click OK to save changes.
Click OK to save changes.
Changing a Device Name
Changing the name of a device changes how it appears in the list views.
Step 1 ![]() From the device list, right-click a device. From the context menu, click Properties > General.
From the device list, right-click a device. From the context menu, click Properties > General.
Step 2 ![]() In the General section of Device Properties, enter the new name in the Display Name box.
In the General section of Device Properties, enter the new name in the Display Name box.
Step 3 ![]() Click OK to save changes.
Click OK to save changes.
Rediscovering Devices
This task rediscovers all the devices in the network. You would want to perform this task if device credentials, capabilities, etc., are changed. During rediscovery, if device capabilities have changed, associated monitors and data inventory are updated. If a device is unreachable, the device status will be updated accordingly. This can be a time-consuming task that will allow you navigate the web interface, but not perform any operations.
To rediscover devices:
Step 1 ![]() From the GO menu, select Device > Rediscover Devices...
From the GO menu, select Device > Rediscover Devices...
Step 2 ![]() Click OK.
Click OK.
Note ![]() If you cannot rediscover a device's new capabilities because you have reached the device count limit of your license, an appropriate error message will appear.
If you cannot rediscover a device's new capabilities because you have reached the device count limit of your license, an appropriate error message will appear.
Suspending and Resuming Single Device Polling
This task permanently suspends or resumes polling on a specific device.
Step 1 ![]() From the device list, right-click a device. From the context menu, click Device Management > Suspend or Device Management > Resume.
From the device list, right-click a device. From the context menu, click Device Management > Suspend or Device Management > Resume.
Step 2 ![]() Click OK.
Click OK.
Understanding Device Groups
A group consists of objects, where objects refer to devices. Each group has a set of properties (such as a name, description, permission, and so on), but what define a group are its associated rules. Rules determine the membership of a group, which may change whenever the rule is evaluated.
The following types of groups are supported:
•![]() System-Defined groups—The default grouping of devices that cannot be deleted or edited. For a description of each system-defined group, see the Working with System-Defined Groups.
System-Defined groups—The default grouping of devices that cannot be deleted or edited. For a description of each system-defined group, see the Working with System-Defined Groups.
•![]() Dynamic groups—A dynamic group that you can create by defining an SQL query. Dynamic groups act as SQL queries that run on the Cisco netManager database, and can display real-time data if viewed through a report that is set to automatically refresh. For more information on dynamic groups, see the "Using Dynamic Groups" section.
Dynamic groups—A dynamic group that you can create by defining an SQL query. Dynamic groups act as SQL queries that run on the Cisco netManager database, and can display real-time data if viewed through a report that is set to automatically refresh. For more information on dynamic groups, see the "Using Dynamic Groups" section.
•![]() User-Defined groups—A dynamic group where the user can group devices using one of the following criteria: location, description, contact or IP address. To create a user-defined group, see "Creating a User-Defined Group" section.
User-Defined groups—A dynamic group where the user can group devices using one of the following criteria: location, description, contact or IP address. To create a user-defined group, see "Creating a User-Defined Group" section.
Note ![]() The supported format for an IP address is a set of four octets (*.*.*.*). An asterisk (*) denotes the octet range of 1-255. You can filter IP addresses using the octets in a sequential order. For example, if you filter devices with IP addresses containing 10.76.91, your results may include 10.76.91.151 or 172.10.76.91. You cannot use an IP range or wildcards, for example 10.*.91.
The supported format for an IP address is a set of four octets (*.*.*.*). An asterisk (*) denotes the octet range of 1-255. You can filter IP addresses using the octets in a sequential order. For example, if you filter devices with IP addresses containing 10.76.91, your results may include 10.76.91.151 or 172.10.76.91. You cannot use an IP range or wildcards, for example 10.*.91.
•![]() Static groups—Groups that you edit or create to reflect the way you manage the network. You can edit or create device groups and determine whether they can be viewed by other users. To create a static group, see "Creating a Device Group" section.
Static groups—Groups that you edit or create to reflect the way you manage the network. You can edit or create device groups and determine whether they can be viewed by other users. To create a static group, see "Creating a Device Group" section.
Working with System-Defined Groups
The system-defined groups are visible to all users, and are the default groups that are administered by Cisco netManager. If a device has multiple capabilities, the device will be listed under all appropriate groups. For example, if a device can function as a router, H323 gateway and a MGCP gateway, it will be listed in all those groups.
Note ![]() System-defined groups cannot be modified or deleted.
System-defined groups cannot be modified or deleted.
Note ![]() The ability to view and monitor Unified Communication devices depends upon the type of licensing you have.
The ability to view and monitor Unified Communication devices depends upon the type of licensing you have.
The following system-defined groups come preconfigured:
•![]() Routers
Routers
•![]() Switches
Switches
•![]() Hosts
Hosts
•![]() Servers
Servers
•![]() Cisco Media Server
Cisco Media Server
•![]() Cisco Unified Communications Manager
Cisco Unified Communications Manager
•![]() Cisco Unified Communications Manager Cluster. Lists subgroups of the Cisco Unified Communications Manager cluster group and contains all of the devices associated with the corresponding instance of the Cisco Unified Communications Manager cluster.
Cisco Unified Communications Manager Cluster. Lists subgroups of the Cisco Unified Communications Manager cluster group and contains all of the devices associated with the corresponding instance of the Cisco Unified Communications Manager cluster.
•![]() Cisco Unity
Cisco Unity
•![]() Cisco Unity Connection
Cisco Unity Connection
•![]() Cisco Unity Express
Cisco Unity Express
•![]() Cisco Unified Communications Manager Express
Cisco Unified Communications Manager Express
•![]() Cisco Unified Conferencing for TelePresence
Cisco Unified Conferencing for TelePresence
•![]() Cisco Unified Contact Center Express
Cisco Unified Contact Center Express
•![]() Cisco Unified Communications Manager Business Edition
Cisco Unified Communications Manager Business Edition
•![]() H323 Gateways
H323 Gateways
•![]() MGCP Gateways
MGCP Gateways
•![]() SRST Devices
SRST Devices
•![]() Wireless LAN Controllers
Wireless LAN Controllers
•![]() Autonomous Access Points
Autonomous Access Points
•![]() Security Devices
Security Devices
Creating a Device Group
To create a static device group:
Step 1 ![]() Do one of the following:
Do one of the following:
•![]() From the My Network tree in the Device tab, right-click a folder, and select New Group....
From the My Network tree in the Device tab, right-click a folder, and select New Group....
•![]() Click the New Group icon located on the top right of the Device tab.
Click the New Group icon located on the top right of the Device tab.
Step 2 ![]() Enter the name of the new group you are creating.
Enter the name of the new group you are creating.
Step 3 ![]() Enter the description for the new group.
Enter the description for the new group.
Step 4 ![]() Click OK.
Click OK.
Modifying Group Properties
Step 1 ![]() Do one of the following:
Do one of the following:
•![]() From the My Network tree in the Device tab, right-click a folder, and select New Group....
From the My Network tree in the Device tab, right-click a folder, and select New Group....
•![]() Click the New Group icon located on the top right of the Device tab.
Click the New Group icon located on the top right of the Device tab.
Step 2 ![]() Modify the name of the group.
Modify the name of the group.
Step 3 ![]() Modify the description of the group.
Modify the description of the group.
Step 4 ![]() If you are modifying a dynamic group, select appropriate user access privileges for that group.
If you are modifying a dynamic group, select appropriate user access privileges for that group.
Step 5 ![]() Click OK.
Click OK.
Creating a User-Defined Group
Step 1 ![]() From the My Network tree in the Device tab, right-click User Defined Group folder, and select New User Defined Group....
From the My Network tree in the Device tab, right-click User Defined Group folder, and select New User Defined Group....
Step 2 ![]() Enter the name of the new group you are creating.
Enter the name of the new group you are creating.
Step 3 ![]() Enter a description for the new group.
Enter a description for the new group.
Step 4 ![]() Select the attribute that will be used to filter devices for the group; for example, location.
Select the attribute that will be used to filter devices for the group; for example, location.
Step 5 ![]() Enter the attribute value; for example, California.
Enter the attribute value; for example, California.
Step 6 ![]() Click OK.
Click OK.
Modifying Group Access Rights for a User
Step 1 ![]() From the My Network tree in the Device tab, right-click User Defined Group folder, and select Properties.
From the My Network tree in the Device tab, right-click User Defined Group folder, and select Properties.
Step 2 ![]() Check the appropriate Read/Write access rights.
Check the appropriate Read/Write access rights.
Step 3 ![]() Click OK.
Click OK.
Renaming a Device Group
To rename a device group, right-click the group in the My Network tree, click Properties, then change the name in the Group Name box.
Using Dynamic Groups
This feature provides the ability to create device groups based on whatever criteria users choose, without having to create device shortcuts. Dynamic groups can be created for specific device types, device attributes, active monitors, or anything else that is stored for individual devices in the database. Dynamic groups act as SQL queries that run on the Cisco netManager database, and can display real-time data if viewed through a report that is set to automatically refresh.
Cisco netManager is preconfigured with dynamic group examples. You can view these examples from the Dynamic Group Examples folder, under the My Network tree in the Devices tab.
All of the Dynamic Group Examples are active, so if you have devices that meet the criteria, you will see the device displayed within the group. In the web interface, the dynamic group display is refreshed every 2 minutes. A group is also refreshed when you select it.
To view or edit the criteria for a dynamic group, right-click the group name, then select Properties.
Note ![]() Dynamic groups on the web interface do not follow group access rights. Anyone with the ability to view the device group that a dynamic group is in can access that dynamic group. However, only devices that the user has the permission to view appear in the group.
Dynamic groups on the web interface do not follow group access rights. Anyone with the ability to view the device group that a dynamic group is in can access that dynamic group. However, only devices that the user has the permission to view appear in the group.
Creating Dynamic Groups
To configure dynamic groups:
Step 1 ![]() From the My Network tree in the Device tab, right-click a folder, then select New Dynamic Group. The Dynamic Group dialog box opens.
From the My Network tree in the Device tab, right-click a folder, then select New Dynamic Group. The Dynamic Group dialog box opens.
Step 2 ![]() Select a method for configuring the new Dynamic Group. You can use either the Dynamic Group Builder, or the SQL dialog. If you are an advanced SQL user, you should choose the second option. Otherwise, we recommend selecting the Dynamic Group Builder.
Select a method for configuring the new Dynamic Group. You can use either the Dynamic Group Builder, or the SQL dialog. If you are an advanced SQL user, you should choose the second option. Otherwise, we recommend selecting the Dynamic Group Builder.
Step 3 ![]() Enter the appropriate information into the following fields:
Enter the appropriate information into the following fields:
•![]() Group Name—Enter a name for the dynamic group as it will appear in the Device List.
Group Name—Enter a name for the dynamic group as it will appear in the Device List.
•![]() (Optional) Description—Enter a short description for the new dynamic group.
(Optional) Description—Enter a short description for the new dynamic group.
In the second part of the dialog box, you will create and edit rules to form an SQL filter for the dynamic group.
Step 4 ![]() Click Add. The Dynamic Group Rule Editor appears.
Click Add. The Dynamic Group Rule Editor appears.
In the Dynamic Group Rule Editor, enter the appropriate information. As you create rules, they are added to the Dynamic Group Builder dialog box where you can add more rules, or edit or delete existing rules by clicking the Add, Edit, or Delete buttons.
Parentheses (single, double, triple, and quadruple) are available for use in your filter code. Add them by selecting them from the lists before and after your rules.
You can move existing rules up or down within your filter code by selecting a rule and then clicking on the Up and Down buttons.
Step 5 ![]() Click OK to add the group to the device list. SQL validation occurs as soon as you click OK. If the filter fails, an error message appears.
Click OK to add the group to the device list. SQL validation occurs as soon as you click OK. If the filter fails, an error message appears.
In addition to the preconfigured dynamic groups, there are several sample filters available to you to create some dynamic groups.
Tip ![]() If you do not know how to formulate SQL queries, you can cut and paste filter entries from existing dynamic groups, then edit them to read data from other tables.
If you do not know how to formulate SQL queries, you can cut and paste filter entries from existing dynamic groups, then edit them to read data from other tables.
Validating Your Filter Code
Keep in mind that as you configure your rules, the SQL filter is displayed at the bottom of the Dynamic Group Builder dialog box. When you are satisfied with the filter code that is displayed, click the Validate button to test the filter. If it runs as you expect, click OK to save the configured SQL filter and to add the new dynamic group to your device list. If the code does not run as you expect, but you would still like to save the filter code so that you may edit it at a later time, click OK. You can then select the Dynamic Group from the device list and right-click, then select Properties to edit the group filter code.
Converting Your Filter Code
You can convert a dynamic group created with the Dynamic Group Builder to the SQL dialog box by clicking the Convert button. It is important to note that once you convert the dynamic group to the SQL dialog box, you will not be able to edit the group in the Dynamic Group Builder again - you will only be able to make changes to the group from the SQL dialog box. If you aren't an advanced SQL user, we recommend that you make a copy of thedynamic group so that you can keep a copy available for editing in the Dynamic Group Builder.
To use the SQL Dynamic Group dialog box:
Step 1 ![]() Enter a Display name for the group, enter the group Description, and enter an SQL query in the Filter box that identifies the devices you want to appear in that group.
Enter a Display name for the group, enter the group Description, and enter an SQL query in the Filter box that identifies the devices you want to appear in that group.
Step 2 ![]() Click OK to add the group to the device list. SQL validation occurs as soon as you click OK. If the filter fails, an error message appears.
Click OK to add the group to the device list. SQL validation occurs as soon as you click OK. If the filter fails, an error message appears.
Dynamic Group Rule Editor
This is the second dialog box of the Dynamic Group Builder. Use this dialog box to create or edit rules for use in the new group's SQL filter.
Step 1 ![]() Select the desired rule components from the list and enter a variable in the empty field.
Select the desired rule components from the list and enter a variable in the empty field.
Step 2 ![]() Click OK to add the rule to the Dynamic Group Builder dialog box.
Click OK to add the rule to the Dynamic Group Builder dialog box.
Dynamic Group Examples
The following table lists several dynamic group filters that you can use to create dynamic groups for your devices. To use these examples, select the text of the filter, and then copy and paste the text into the Filter box of the Dynamic Group dialog box.
Note ![]() If the copyright information appears in the text that you copied and pasted from the filter, you should delete it.
If the copyright information appears in the text that you copied and pasted from the filter, you should delete it.
Creating Access Rights for a Device Group
An important part of creating a device group is configuring the appropriate access rights for that group. Group access rights ensure that only those users with specific rights are allowed to view and modify a device group.
Step 1 ![]() From the My Network tree in the Device tab, right-click a group, and select Properties.
From the My Network tree in the Device tab, right-click a group, and select Properties.
Step 2 ![]() From the Group Properties dialog box, you can add and edit the access rights for the selected group. For more information on the types of tasks associated with each access right, see User Access Rights for a Device Group.
From the Group Properties dialog box, you can add and edit the access rights for the selected group. For more information on the types of tasks associated with each access right, see User Access Rights for a Device Group.
Note ![]() You must enable group access rights for a user account before a user can add or edit access rights for a device group. To do this, the Cisco netManager administrator will have to enable group access rights for a user in the Manage Users dialog box (Configure > Manage Users).
You must enable group access rights for a user account before a user can add or edit access rights for a device group. To do this, the Cisco netManager administrator will have to enable group access rights for a user in the Manage Users dialog box (Configure > Manage Users).
User Access Rights for a Device Group
Device Group Access Rights lets the administrator determine which device groups certain web users are allowed to view or edit.
The following is a list of operations and the group access rights that must be assigned for the user to perform those operations:
•![]() List, Map, and Group reports in the Group Views menu require Group Read access.
List, Map, and Group reports in the Group Views menu require Group Read access.
•![]() Create Group and Group Properties in the Group Operations menu require Group Read Write access.
Create Group and Group Properties in the Group Operations menu require Group Read Write access.
•![]() Copy Group requires Group Read in the source group, and Group Read Write in the destination group. (Permissions to groups and subgroups are copied, not inherited from the new parent).
Copy Group requires Group Read in the source group, and Group Read Write in the destination group. (Permissions to groups and subgroups are copied, not inherited from the new parent).
•![]() Move Group requires Group Read Write in both the source and the destination groups. (Permissions of the group and subgroups remain the same.)
Move Group requires Group Read Write in both the source and the destination groups. (Permissions of the group and subgroups remain the same.)
•![]() Delete Group requires Group Read Write, Device Read Write recursively. (Device Read Write may not be required if the group is empty).
Delete Group requires Group Read Write, Device Read Write recursively. (Device Read Write may not be required if the group is empty).
•![]() Create Device requires Group Read Write and Device Read Write. If the device already exists in other groups, you must also have Group Read Write and Device Read Write in one or more of those groups.
Create Device requires Group Read Write and Device Read Write. If the device already exists in other groups, you must also have Group Read Write and Device Read Write in one or more of those groups.
•![]() Copy Device requires Group Read in the source group and Group Read Write in the destination group. The level of device permissions must be the same in both groups. Downgrade from Device Read Write to Device Read is also permitted.
Copy Device requires Group Read in the source group and Group Read Write in the destination group. The level of device permissions must be the same in both groups. Downgrade from Device Read Write to Device Read is also permitted.
•![]() Move Device requires Group Read Write in both the source and the destination groups. The level of device permissions must be the same in both groups. Downgrade from Device Read Write to Device Read is also permitted.
Move Device requires Group Read Write in both the source and the destination groups. The level of device permissions must be the same in both groups. Downgrade from Device Read Write to Device Read is also permitted.
•![]() View Device Properties and Device Reports requires Device Read.
View Device Properties and Device Reports requires Device Read.
•![]() Modify Device Properties, Bulk Field Change, and Acknowledgement require Device Read Write.
Modify Device Properties, Bulk Field Change, and Acknowledgement require Device Read Write.
Understanding Device Properties
You can modify individual device properties by right-clicking a device in the Device List, then selecting Properties.
The Device Summary page displays basic information about a device, including:
•![]() Display Name—Displays the identifying name for the current device. This name is populated during discovery, but can be changed by the user at any time in the Device Properties - General page. Changing the name will not change how the device is polled; it affects only how it is displayed in Cisco netManager.
Display Name—Displays the identifying name for the current device. This name is populated during discovery, but can be changed by the user at any time in the Device Properties - General page. Changing the name will not change how the device is polled; it affects only how it is displayed in Cisco netManager.
•![]() Device Type—Displays the type of device (printer, workstation or router, for example). The device type can be changed on the Device Properties - General page.
Device Type—Displays the type of device (printer, workstation or router, for example). The device type can be changed on the Device Properties - General page.
•![]() Host name—Displays the DNS name of the device.
Host name—Displays the DNS name of the device.
•![]() Address—Displays the IP address of the device.
Address—Displays the IP address of the device.
The icon associated with the device, over a colored shape that indicates the worst state of any of the active monitors on the device, is displayed to the left of Device Name. The icon can be changed on the Device Properties - General page.
Additional attributes associated with the device (Location, Contact and Description as well as any custom attributes) are displayed below the device icon. Attributes can be added, modified or removed from the Device Properties - Attributes page.
Notes display any additional information associated with the device. Notes are managed on the Device Properties - Notes page.
The following topics give an overview of the device properties available to use and modify:
•![]() Device Property Performance Monitors
Device Property Performance Monitors
•![]() Active Monitor Device Properties
Active Monitor Device Properties
•![]() Passive Monitor Device Properties
Passive Monitor Device Properties
General Device Properties
The General section of the Device Properties dialog box provides, and lets you modify, basic information for the selected device.
•![]() Display name—An identifying name for the current device. This name is populated during discovery, but can be changed by the user at any time. Changing the name will not change how the device is polled, only how it is displayed in Cisco netManager.
Display name—An identifying name for the current device. This name is populated during discovery, but can be changed by the user at any time. Changing the name will not change how the device is polled, only how it is displayed in Cisco netManager.
•![]() Polling type—Select the type of polling you want Cisco netManager to use for this device.
Polling type—Select the type of polling you want Cisco netManager to use for this device.
–![]() ICMP (TCP/UDP)
ICMP (TCP/UDP)
–![]() IPX
IPX
–![]() NetBIOS
NetBIOS
Note ![]() If NetBIOS is selected, the Host Name box must contain a valid NetBIOS name. If IPX is selected, the Address box must contain a valid IPX address. If NetBIOS or IPX is selected, you cannot monitor TCP/IP services on this device.
If NetBIOS is selected, the Host Name box must contain a valid NetBIOS name. If IPX is selected, the Address box must contain a valid IPX address. If NetBIOS or IPX is selected, you cannot monitor TCP/IP services on this device.
•![]() Poll using—Select if you want Cisco netManager to use the IP address or the hostname (DNS) of the device for polling.
Poll using—Select if you want Cisco netManager to use the IP address or the hostname (DNS) of the device for polling.
•![]() Host name (DNS)—This should be the official network name of the device if the polling method is ICMP. The network name must be a name that can be resolved to an IP address. If the polling method is NetBIOS or IPX, this must be the NetBIOS or IPX name.
Host name (DNS)—This should be the official network name of the device if the polling method is ICMP. The network name must be a name that can be resolved to an IP address. If the polling method is NetBIOS or IPX, this must be the NetBIOS or IPX name.
•![]() Address—Enter an IP or IPX address.
Address—Enter an IP or IPX address.
•![]() Additional Network Interfaces—Click this button to configure an additional Network Interface for the current device.
Additional Network Interfaces—Click this button to configure an additional Network Interface for the current device.
•![]() Device Type—Select the appropriate device type from the pull-down menu. The icon displayed will represent the device in all views.
Device Type—Select the appropriate device type from the pull-down menu. The icon displayed will represent the device in all views.
Device Property Performance Monitors
The Performance Monitors section of the Device Properties dialog box lets you configure and manage performance monitors for the selected device. To get to this dialog box, right-click a device from the device list, and select Properties > Performance Monitor. For more information, see Chapter 10, "Using Performance Monitors."
Note ![]() For some performance monitors, the SNMP credential on the device must be configured. For Windows Management Instrumentation (WMI) performance monitors, the NT credential is required.
For some performance monitors, the SNMP credential on the device must be configured. For Windows Management Instrumentation (WMI) performance monitors, the NT credential is required.
If you select a specific performance monitor without configuring the monitor manually, the default collection type is automatically selected. The collection type refers to the item on the current device that is being monitored (this does not pertain to the custom WMI and SNMP monitors that may appear). For Cisco devices all performance monitors, except Interface Utilization and Ping Latency and Availability, will be enabled by default.
The Performance Monitors section of the Device Properties dialog box displays the following options:
•![]() Enable/Disable Performance Monitors—check the monitors you want to enable and uncheck monitors you want disabled. Performance monitors will be associated with the device based on its capabilities.
Enable/Disable Performance Monitors—check the monitors you want to enable and uncheck monitors you want disabled. Performance monitors will be associated with the device based on its capabilities.
Note ![]() The ability to view and monitor Unified Communication devices depends upon the type of licensing you have.
The ability to view and monitor Unified Communication devices depends upon the type of licensing you have.
For all other devices, the following performance monitors will be associated:
•![]() CPU Utilization
CPU Utilization
•![]() Memory Utilization
Memory Utilization
•![]() Disk Utilization
Disk Utilization
•![]() Interface Utilization
Interface Utilization
•![]() Ping Latency and Availability
Ping Latency and Availability
•![]() Configure—Click to configure collection interval (in minutes).
Configure—Click to configure collection interval (in minutes).
Note ![]() If an error occurs, a warning message appears directing you to the problem. If it is a timeout error, you are prompted to open the Advanced dialog box to change the timeout value. For any other error, you are returned to this dialog box.
If an error occurs, a warning message appears directing you to the problem. If it is a timeout error, you are prompted to open the Advanced dialog box to change the timeout value. For any other error, you are returned to this dialog box.
•![]() Library—Click for options to create (New), edit, copy, or delete Performance Monitor Library items to use on all devices.
Library—Click for options to create (New), edit, copy, or delete Performance Monitor Library items to use on all devices.
•![]() Enable Custom Performance Monitors (for this device only)—Use this section of the dialog box to add customized Active Script, SNMP, or WMI performance monitors on this device only. The monitors added here do not appear in the Performance Monitor Library, and cannot be used on other devices unless they are manually created for that device.
Enable Custom Performance Monitors (for this device only)—Use this section of the dialog box to add customized Active Script, SNMP, or WMI performance monitors on this device only. The monitors added here do not appear in the Performance Monitor Library, and cannot be used on other devices unless they are manually created for that device.
–![]() Click New to configure a new monitor.
Click New to configure a new monitor.
–![]() Select an existing monitor, then click Edit to change the current monitor configuration or double-click an existing monitor to change the configuration.
Select an existing monitor, then click Edit to change the current monitor configuration or double-click an existing monitor to change the configuration.
–![]() Select a performance monitor type, then click Delete to remove it from the list.
Select a performance monitor type, then click Delete to remove it from the list.
For information on the Active Script Performance Monitor, please see Adding Custom Performance Monitors to the Performance Monitor Library, page 10-6.
Active Monitor Device Properties
Use the Active Monitors dialog box to display and manage active monitors for a device. To get to this dialog box, right-click a device from the device list, and select Properties > Active Monitor. Monitors may have been added during initial discovery, when Cisco netManager first added the device to the database
You can do the following from this dialog box:
•![]() Click Add to configure a new active monitor.
Click Add to configure a new active monitor.
•![]() Select an active monitor and click Edit to change the configuration.
Select an active monitor and click Edit to change the configuration.
•![]() Select an active monitor and click Remove to remove the monitor from the device.
Select an active monitor and click Remove to remove the monitor from the device.
For more information, see Chapter 8, "Using Active Monitors."
Passive Monitor Device Properties
Instead of polling a device, a passive monitor listens for messages and events, then notifies Cisco netManager when they occur.
To configure the passive monitor for a device, right-click a device from the device list, and select Properties > Passive Monitor. This dialog box displays all passive monitors configured for this device.
You can do the following from this dialog box:
•![]() Click Add to configure a new passive monitor.
Click Add to configure a new passive monitor.
•![]() Select a passive monitor, then click Edit to change the configuration.
Select a passive monitor, then click Edit to change the configuration.
•![]() Double-click a passive monitor to edit the configuration.
Double-click a passive monitor to edit the configuration.
•![]() Select a passive monitor, then click Remove to remove the monitor from the device.
Select a passive monitor, then click Remove to remove the monitor from the device.
For more information, see Chapter 9, "Using Passive Monitors."
Device Property Actions
You can select an action policy to use on a device or configure alerts specifically for this device. To get to this dialog box, right-click a device from the device list, and select Properties > Actions.
Select a policy from the Apply this Action Policy pull-down menu. You can also create a new policy or edit an existing action policy by clicking the Browse button next to the pull-down menu box.
Configured alerts appear in the Apply individual actions list, displaying the action type that is to be fired and the state change that will trigger the action. You may have multiple actions on a single device.
This dialog box displays all actions configured for this device. You can do the following:
•![]() Click Add to configure a new action.
Click Add to configure a new action.
•![]() Select an action, then click Edit to change the configuration.
Select an action, then click Edit to change the configuration.
•![]() Double-click an action to edit the configuration.
Double-click an action to edit the configuration.
•![]() Select an action, then click Remove to remove the action from the device. Removing the action from the list also deletes all records for this action (on this device) from the action log.
Select an action, then click Remove to remove the action from the device. Removing the action from the list also deletes all records for this action (on this device) from the action log.
For more information, see Chapter 6, "Using Actions."
Device Property Credentials
The Credentials dialog box displays Windows and SNMP credentials information for the current device. To get to this dialog box, right-click a device from the device list, and select Properties > Credentials.
Devices that are SNMP-manageable devices appear on the map view with an icon with a white star in the top right corner.
•![]() Windows credentials—Select the Windows credential to connect to this device. Click the Browse (...) button to browse the credentials library.
Windows credentials—Select the Windows credential to connect to this device. Click the Browse (...) button to browse the credentials library.
•![]() SNMPv1/SNMPv2 credentials—If the Identify devices via SNMP option was selected during discovery or if an SNMP discovery was performed, the correct SNMP credential was used during the discovery process, and if the device is SNMP manageable, then the correct credential is selected automatically. If any of these conditions are not met, None is selected.
SNMPv1/SNMPv2 credentials—If the Identify devices via SNMP option was selected during discovery or if an SNMP discovery was performed, the correct SNMP credential was used during the discovery process, and if the device is SNMP manageable, then the correct credential is selected automatically. If any of these conditions are not met, None is selected.
•![]() Device Object ID (OID)—The SNMP object identifier for the device. This identifier is used to access a device and read other SNMP data.
Device Object ID (OID)—The SNMP object identifier for the device. This identifier is used to access a device and read other SNMP data.
For more information, see the "Configuring Credentials" section.
Device Property Polling
Polling is the term used for monitoring discovered devices in Cisco netManager. The Polling dialog box lets you configure polling options and schedule maintenance times for the selected device. To get to this dialog box, right-click a device from the device list, and select Properties > Polling.
•![]() Poll interval—This number determines how often Cisco netManager will poll the selected device. Enter the number of seconds you want to pass between polls.
Poll interval—This number determines how often Cisco netManager will poll the selected device. Enter the number of seconds you want to pass between polls.
•![]() Up dependency—Click to configure additional options, based on when another device is operational, that determine when the selected device is polled.
Up dependency—Click to configure additional options, based on when another device is operational, that determine when the selected device is polled.
•![]() Down dependency—Click to configure additional options, based on when the selected device is operational, that determine when other devices are polled.
Down dependency—Click to configure additional options, based on when the selected device is operational, that determine when other devices are polled.
•![]() Maintenance—Use this section of the dialog box to manually set the device Maintenance state, or schedule the maintenance state for a certain time period. Any device placed in Maintenance state will not be polled, but it remains in the device list with an identifying icon. By default, the maintenance state is represented by an orange background color.
Maintenance—Use this section of the dialog box to manually set the device Maintenance state, or schedule the maintenance state for a certain time period. Any device placed in Maintenance state will not be polled, but it remains in the device list with an identifying icon. By default, the maintenance state is represented by an orange background color.
•![]() Force this device into maintenance mode now—Select this option to put the selected device in maintenance mode. Clear the option to resume polling the device.
Force this device into maintenance mode now—Select this option to put the selected device in maintenance mode. Clear the option to resume polling the device.
•![]() Recurring maintenance times—This box displays all scheduled maintenance times for the device.
Recurring maintenance times—This box displays all scheduled maintenance times for the device.
–![]() Click Add to schedule a new maintenance time for the device.
Click Add to schedule a new maintenance time for the device.
–![]() Select an entry, then click Edit to change a scheduled time.
Select an entry, then click Edit to change a scheduled time.
–![]() Select an entry, then click Remove to delete a scheduled time.
Select an entry, then click Remove to delete a scheduled time.
For more information, see Chapter 5, "Polling."
Device Property Notes
The Notes dialog box provides an option to enter free-form messages into the device database. To get to this dialog box, right-click a device from the device list, and select Properties > Notes.
The first line of the notes box displays information about when the device was added to the database. If viewing the notes on a shortcut, the date and time the device was added to the database are displayed.
You can customize the notes with any information you want to include about the device. For example, you may want to record historical information about a device, physical location information, or perhaps notes relating to the actions configured for the device.
Device Property Custom Links
In the Cisco netManager web interface, you can use this dialog box to create a custom link for a device.
After a custom link has been configured and added to the Device Status workspace page, it appears in the Device Custom Links report on the Device Status page for the selected device.
You can do the following from this dialog box:
•![]() Click Add to add a new custom link.
Click Add to add a new custom link.
•![]() Select a custom link in the list, then click Edit to change the settings.
Select a custom link in the list, then click Edit to change the settings.
•![]() Select a custom link in the list, then click Remove to remove it from the list.
Select a custom link in the list, then click Remove to remove it from the list.
Note ![]() Custom links created in the web interface are not visible in the console. Menu items configured in the console are not visible in the web interface.
Custom links created in the web interface are not visible in the console. Menu items configured in the console are not visible in the web interface.
Device Property Attributes
The Attributes dialog box lists attributes that are associated with a device, such as contact person, location, serial number, etc. To get to this dialog box, right-click a device from the device list, and select Properties > Attributes. The first attributes in the list are added by Cisco netManager when the device is added to the database, either by the Device Discovery wizard, or through another means.
You can do the following from this dialog box:
•![]() Click Add to add a new device attribute. The Add Attribute dialog box opens.
Click Add to add a new device attribute. The Add Attribute dialog box opens.
•![]() Select a device attribute in the list, then click Edit to change the settings.
Select a device attribute in the list, then click Edit to change the settings.
•![]() Select a device attribute in the list, then click Remove to remove it from the list.
Select a device attribute in the list, then click Remove to remove it from the list.
Changing Device Types
Device Types act like templates for new devices, containing device properties (such as active and passive monitors, menu items, etc.) and represented by different icons in Device Properties.
When you change a device type on an existing device, you are only changing the icon that represents the device, and not adding additional information and settings to the device. If you rediscover the device, the icon will change back to the original device type. All other changes will have to be done manually.
To change a device type icon on an existing device:
Step 1 ![]() In Device view, right-click a device. In the context menu, click Properties > General.
In Device view, right-click a device. In the context menu, click Properties > General.
Step 2 ![]() In the Device type list, select a new device type.
In the Device type list, select a new device type.
Step 3 ![]() Click OK to save changes.
Click OK to save changes.
Editing Multiple Devices with Bulk Field Change
The Bulk Field Change feature gives you the ability to make changes to multiple devices and device groups. You must have administrative privileges to the devices or device groups that you want to make changes to.
Step 1 ![]() Select the devices or device groups you want to change, then right-click and select Bulk Field Change. The Bulk Field Change context menu opens.
Select the devices or device groups you want to change, then right-click and select Bulk Field Change. The Bulk Field Change context menu opens.
Note ![]() When you select a device group, every device in the group, and any subgroup of the group, will reflect the bulk field change.
When you select a device group, every device in the group, and any subgroup of the group, will reflect the bulk field change.
Step 2 ![]() Select the field you want to change. The following items can be modified through Bulk Field Change:
Select the field you want to change. The following items can be modified through Bulk Field Change:
•![]() Credentials
Credentials
•![]() Polling Interval
Polling Interval
•![]() Maintenance Mode
Maintenance Mode
•![]() Maintenance Schedule (web interface only)
Maintenance Schedule (web interface only)
•![]() Device Type
Device Type
•![]() Action Policy
Action Policy
•![]() Up Dependency
Up Dependency
•![]() Down Dependency
Down Dependency
•![]() Notes
Notes
•![]() Attribute
Attribute
•![]() Performance Monitors
Performance Monitors
•![]() Active Monitor
Active Monitor
•![]() Active Monitor Properties
Active Monitor Properties
•![]() Passive Monitor (web interface only)
Passive Monitor (web interface only)
•![]() Passive Monitor Properties (web interface only)
Passive Monitor Properties (web interface only)
Step 3 ![]() Enter the configuration information that you want to set.
Enter the configuration information that you want to set.
Step 4 ![]() Click OK to save changes.
Click OK to save changes.
Using Acknowledgements
When a device state changes, regardless of any action that has been placed on the device, Cisco netManager uses the Acknowledgement feature to make you aware that the state change occurred. The device name appears in bold in the Device List.
After the device is in Acknowledgement mode, it will remain so until you actively acknowledge it.
Note ![]() Acknowledging a device state change does not keep that device from firing actions. To stop a device from firing actions, you must put the device into Maintenance state.
Acknowledging a device state change does not keep that device from firing actions. To stop a device from firing actions, you must put the device into Maintenance state.
To acknowledge a state change, select the device or devices you want to acknowledge, right-click, then click Acknowledge Events. For a list of events, see Appendix A, "Events Processed."
 Feedback