- Securing User Services Overview
- Autosecure
-
-
-
- Configuring RADIUS
- AAA Dead-Server Detection
- ACL Default Direction
- Attribute Screening for Access Requests
- Enable Multilink PPP via RADIUS for Preauthentication User
- Enhanced Test Command
- Framed-Route in RADIUS Accounting
- Offload Server Accounting Enhancement
- Per VRF AAA
- RFC-2867 RADIUS Tunnel Accounting
- RADIUS Attribute Screening
- RADIUS Centralized Filter Management
- RADIUS Debug Enhancements
- RADIUS Logical Line ID
- RADIUS NAS-IP-Address Attribute Configurability
- RADIUS Route Download
- RADIUS Support of 56-Bit Acct Session-Id
- RADIUS Tunnel Preference for Load Balancing and Fail-Over
- RADIUS Server Reorder on Failure
- Tunnel Authentication via RADIUS on Tunnel Terminator
-
-
-
- RADIUS Attributes Overview and RADIUS IETF Attributes
- RADIUS Vendor-Proprietary Attributes
- Vendor-Specific Attributes (VSA) and RADIUS Disconnect-Cause Attribute Values
- Connect-Info RADIUS Attribute 77
- Encrypted Vendor Specific Attributes
- Local AAA Server
- Per-User QoS via AAA Policy Name
- RADIUS Attribute 5 (NAS-Port) Format Specified on a Per-Server Group Level
- RADIUS Attribute 8 (Framed-IP-Address) in Access Requests
- RADIUS Attribute 82: Tunnel Assignment ID
- RADIUS Attribute 104
- RADIUS Progress Codes
- RADIUS Timeout Set During Pre-Authentication
- RADIUS Tunnel Attribute Extensions
- V.92 Reporting Using RADIUS Attribute v.92-info
-
- Cisco IOS Login Enhancements (Login Block)
- Cisco IOS Resilient Configuration
- Image Verification
- IP Source Tracker
- Role-Based CLI Access
- Finding Feature Information
- Contents
- Restrictions for Firewall Authentication Proxy for FTP and Telnet Sessions
- Information About Firewall Authentication Proxy for FTP and Telnet Sessions
- How to Configure FTP or Telnet Authentication Proxy
- Configuration Examples for FTP and Telnet Authentication Proxy
Firewall Authentication Proxy for FTP and Telnet Sessions
Before the introduction of the Firewall Authentication Proxy for FTP and Telnet Sessions feature, users could enable only HTTP when configuring authentication proxy. This feature introduces support for FTP and Telnet, providing users with three protocol options when configuring authentication proxy.
Finding Feature Information
Your software release may not support all the features documented in this module. For the latest feature information and caveats, see the release notes for your platform and software release. To find information about the features documented in this module, and to see a list of the releases in which each feature is supported, see the "Feature Information for Firewall Authentication Proxy for FTP and Telnet Session" section.
Use Cisco Feature Navigator to find information about platform support and Cisco IOS and Catalyst OS software image support. To access Cisco Feature Navigator, go to http://tools.cisco.com/ITDIT/CFN/jsp/index.jsp. An account on Cisco.com is not required.
Contents
•![]() Restrictions for Firewall Authentication Proxy for FTP and Telnet Sessions
Restrictions for Firewall Authentication Proxy for FTP and Telnet Sessions
•![]() Information About Firewall Authentication Proxy for FTP and Telnet Sessions
Information About Firewall Authentication Proxy for FTP and Telnet Sessions
•![]() How to Configure FTP or Telnet Authentication Proxy
How to Configure FTP or Telnet Authentication Proxy
•![]() Configuration Examples for FTP and Telnet Authentication Proxy
Configuration Examples for FTP and Telnet Authentication Proxy
•![]() Feature Information for Firewall Authentication Proxy for FTP and Telnet Session
Feature Information for Firewall Authentication Proxy for FTP and Telnet Session
Restrictions for Firewall Authentication Proxy for FTP and Telnet Sessions
•![]() Authentication proxy is an IP-only feature; thus, it comes with only -o3 images.
Authentication proxy is an IP-only feature; thus, it comes with only -o3 images.
•![]() "proxyacl#<n>" is the only supported attribute in the authentication, authorization, and accounting (AAA) server's user configuration.
"proxyacl#<n>" is the only supported attribute in the authentication, authorization, and accounting (AAA) server's user configuration.
•![]() Authentication proxy is subjected only to the traffic that passes through the router; traffic that is destined for the router continues to be authenticated by the existing authentication methods that are provided by Cisco IOS.
Authentication proxy is subjected only to the traffic that passes through the router; traffic that is destined for the router continues to be authenticated by the existing authentication methods that are provided by Cisco IOS.
Information About Firewall Authentication Proxy for FTP and Telnet Sessions
To configure the Authentication Proxy for FTP and Telnet Sessions feature, you must understand the following concepts:
•![]() Feature Design for FTP and Telnet Authentication Proxy
Feature Design for FTP and Telnet Authentication Proxy
Feature Design for FTP and Telnet Authentication Proxy
Authentication proxy for FTP and Telnet Sessions functions like authentication proxy for HTTP; that is, FTP and Telnet are independent components in the Cisco IOS software and can be enabled or disabled on the interface of an unauthenticated host.
Many of the authentication proxy for FTP or Telnet functions are similar to those used with HTTP, such as the interaction between the authentication proxy router and the AAA server during authentication. However, because of protocol differences, FTP and Telnet login methods are different from HTTP.
FTP and Telnet Login Methods
Figure 1 displays a typical authentication proxy topology.
Figure 1 Typical Authentication Proxy Topology
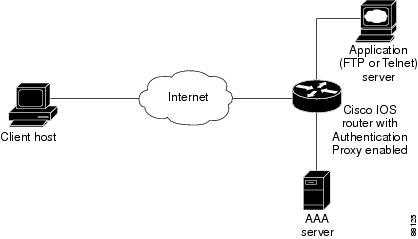
Just as with HTTP, the authentication proxy router intercepts traffic that is sent from the client host. Upon receiving a FTP or Telnet packet, the router will look into its authentication cache to check whether the client host has already been authenticated. If it has been authenticated, the router will forward the client host's traffic to the FTP or Telnet server for additional authentication. If the IP address of the client host is not in the cache of the router, the router will try to authenticate the client host with the AAA server using the username and password of the router.
FTP Login
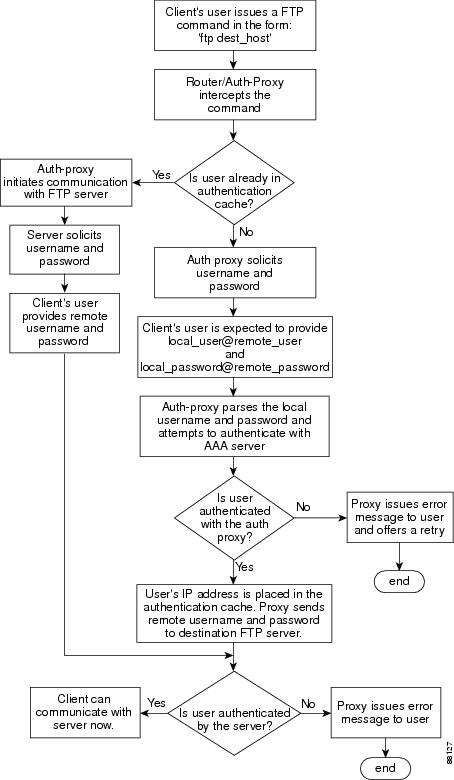
For FTP login, the client host will be prompted (by the authentication proxy router) for the username and password of the router; the client must respond with the username and password in the following format: "login: proxy_username@ftp_username" and "password: proxy_passwd@ftp_passwd:". The authentication proxy will use the proxy username and password to verify the client's profile against the AAA server's user database. After the client is successfully authenticated with the AAA server, the authentication proxy will pass the FTP (remote) username and password to the FTP server (destination server) for the application server authentication.
A flow chart that depicts an overview of the FTP authentication proxy process is shown in Figure 2.
Figure 2 FTP Authentication Proxy Overview
Telnet Login
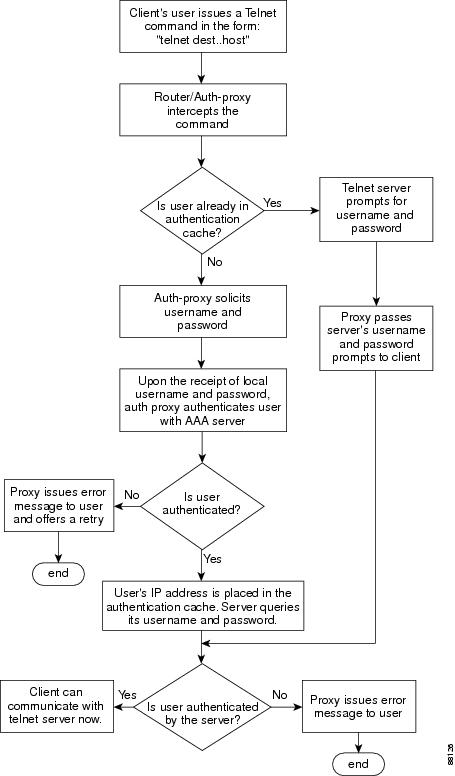
For Telnet login, the client host will be prompted (by the authentication proxy router) for the username, followed by the password; the client must respond with the username and password in the following format: "login: proxy_username:" and "password: proxy_passwd):". The username and password will be verified against the AAA server's user database. After the client is successfully authenticated with the AAA server, the Telnet server (destination server) will prompt the client for the username and password of the Telnet server.
A flow chart that depicts an overview of the Telnet authentication proxy process is shown in Figure 3.
Figure 3 Telnet Authentication Proxy Overview
If authentication with the AAA server fails, the proxy will inform the client accordingly. With Telnet, the proxy does not have any interest in the Telnet server's username and password. If the client is authenticated with the AAA server but fails with the Telnet server, the client will not have to authenticate with the AAA server the next time he or she logs into the network; the client's IP address will be stored in the authentication cache. The client will have to authenticate only with the Telnet server.

Note ![]() With FTP, the client must always reenter the local and remote username and password combination every time he or she tries to log into the network—regardless of a successful AAA server authentication.
With FTP, the client must always reenter the local and remote username and password combination every time he or she tries to log into the network—regardless of a successful AAA server authentication.
Absolute Timeout
An absolute timeout value has been added to allow users to configure a window during which the authentication proxy on the enabled interface is active. After the absolute timer expires, the authentication proxy will be disabled regardless of any activity. The absolute timeout value can be configured per protocol (through the ip auth-proxy name command) or globally (through the ip auth-proxy command). The default value of the absolute timeout is zero; that is, the absolute timer is turned off by default, and the authentication proxy is enabled indefinitely and is subject only to the timeout specified by the inactivity-timer keyword.
Note ![]() The inactivity-timer keyword deprecates the auth-cache-time keyword in the ip auth-proxy name and the ip auth-proxy commands.
The inactivity-timer keyword deprecates the auth-cache-time keyword in the ip auth-proxy name and the ip auth-proxy commands.
How to Configure FTP or Telnet Authentication Proxy
To enable FTP or Telnet authentication proxy, you must enable AAA services, configure the FTP or Telnet server, and enable authentication proxy. This section contains the following procedures:
•![]() Configuring the Authentication Proxy
Configuring the Authentication Proxy
•![]() Verifying FTP or Telnet Authentication Proxy
Verifying FTP or Telnet Authentication Proxy
•![]() Monitoring and Maintaining FTP or Telnet Authentication Proxy Sessions
Monitoring and Maintaining FTP or Telnet Authentication Proxy Sessions
Configuring AAA
To use authentication proxy, you must configure a AAA server for authentication. The authentication proxy service of the AAA server must also be configured for authorization. To configure these tasks, perform the following steps:
SUMMARY STEPS
1. ![]() enable
enable
2. ![]() configure terminal
configure terminal
3. ![]() aaa new-model
aaa new-model
4. ![]() aaa authentication login default group tacacs+ group radius
aaa authentication login default group tacacs+ group radius
5. ![]() aaa authorization auth-proxy default [[group tacacs+] [group radius]]
aaa authorization auth-proxy default [[group tacacs+] [group radius]]
6. ![]() aaa authorization exec default [group tacacs+] [group radius]
aaa authorization exec default [group tacacs+] [group radius]
7. ![]() aaa accounting auth-proxy default stop-only [group tacacs+] [group radius]
aaa accounting auth-proxy default stop-only [group tacacs+] [group radius]
8. ![]() access-list access-list-number {permit | deny} {tcp | ip | icmp} host source eq tacacs host destination
access-list access-list-number {permit | deny} {tcp | ip | icmp} host source eq tacacs host destination
DETAILED STEPS
What to Do Next
Ensure that your FTP or Telnet server is enabled and that the user credentials of the client (the username and password) are stored in the server's database.
Configuring the Authentication Proxy
To configure the authentication proxy, perform the following steps:
SUMMARY STEPS
1. ![]() enable
enable
2. ![]() configure terminal
configure terminal
3. ![]() ip auth-proxy {inactivity-timer min | absolute-timer min}
ip auth-proxy {inactivity-timer min | absolute-timer min}
4. ![]() ip auth-proxy auth-proxy-banner {ftp | http | telnet} [banner-text]
ip auth-proxy auth-proxy-banner {ftp | http | telnet} [banner-text]
5. ![]() ip auth-proxy name auth-proxy-name {ftp | http | telnet} [inactivity-timer min | absolute-timer min] [list {acl | acl-name}]
ip auth-proxy name auth-proxy-name {ftp | http | telnet} [inactivity-timer min | absolute-timer min] [list {acl | acl-name}]
6. ![]() interface type
interface type
7. ![]() ip auth-proxy auth-proxy-name
ip auth-proxy auth-proxy-name
DETAILED STEPS
Verifying FTP or Telnet Authentication Proxy
To verify your FTP or Telnet authentication proxy configuration, perform the following optional steps:
SUMMARY STEPS
1. ![]() enable
enable
2. ![]() show ip auth-proxy configuration
show ip auth-proxy configuration
3. ![]() show ip auth-proxy cache
show ip auth-proxy cache
DETAILED STEPS
Monitoring and Maintaining FTP or Telnet Authentication Proxy Sessions
To monitor FTP or Telnet authentication proxy sessions, perform the following optional steps:
SUMMARY STEPS
1. ![]() enable
enable
2. ![]() debug ip auth-proxy {detailed | ftp | function-trace | object-creation | object-deletion | telnet | timers}
debug ip auth-proxy {detailed | ftp |
function-trace | object-creation |
object-deletion | telnet | timers}
DETAILED STEPS
Configuration Examples for FTP and Telnet Authentication Proxy
This section provides the following configuration examples:
•![]() Authentication Proxy Configuration Example
Authentication Proxy Configuration Example
•![]() AAA Server User Profile Examples
AAA Server User Profile Examples
Authentication Proxy Configuration Example
The following example shows how to configure your router for authentication proxy:
aaa new-model
aaa authentication login default group tacacs+
aaa authorization exec default group tacacs+
aaa authorization auth-proxy default group tacacs+
enable password lab
!
ip inspect name pxy_test ftp
ip auth-proxy name pxy auth-cache-time 1
!
interface Ethernet0/0
ip address 209.165.200.225 255.255.255.224
ip access-group 105 in
no ip directed-broadcast
ip inspect pxy_test in
ip auth-proxy pxy
no shut
!
interface Ethernet0/1
ip address 209.165.200.225 255.255.255.224
ip access-group 102 in
no ip directed-broadcast
no shut
!
ip http authentication aaa
!
access-list 102 permit any
access-list 102 permit tcp host 209.165.200.234 eq tacacs any
access-list 102 deny tcp any any
access-list 102 deny udp any any
access-list 102 permit ip any any
access-list 105 permit tcp any any eq www
access-list 105 permit ip any any
access-list 105 deny tcp any any
access-list 105 deny udp any any
dialer-list 1 protocol ip permit
dialer-list 1 protocol ipx permit
!
tacacs-server host 209.165.200.234
tacacs-server key cisco
!
line con 0
transport input none
login authentication special
line aux 0
line vty 0 4
password lab
AAA Server User Profile Examples
This section includes examples of the authentication proxy user profile entries on the AAA servers. The "proxyacl" entries define the user access privileges. After the user has successfully used the authentication proxy to log in, these entries are transferred to the firewall router. Each entry in the profile must specify "permit" access for the service or application. The source address in each entry is set to "any", which is replaced with the IP address of the authenticating host when the profile is downloaded to the firewall. The privilege level must be set to 15 for all AAA users.
This section contains the following examples:
•![]() TACACS+ User Profiles: Example
TACACS+ User Profiles: Example
•![]() Livingston RADIUS User Profiles: Example
Livingston RADIUS User Profiles: Example
•![]() Ascend RADIUS User Profiles: Example
Ascend RADIUS User Profiles: Example
TACACS+ User Profiles: Example
The following example are sample TACACS+ user profiles:
default authorization = permit
key = cisco
user = http_1 {
default service = permit
login = cleartext test
service = exec
{
priv-lvl = 15
inacl#4="permit tcp any host 209.165.200.234 eq 23"
inacl#5="permit tcp any host 209.165.200.234 eq 20"
inacl#6="permit tcp any host 209.165.200.234 eq 21"
inacl#3="deny -1"
}
service = auth-proxy
{
priv-lvl=15
proxyacl#4="permit tcp any host 209.165.201.1 eq 23"
proxyacl#5="permit tcp any host 209.165.201.1 eq 20"
proxyacl#6="permit tcp any host 209.165.201.1 eq 21"
proxyacl#7="permit tcp any host 209.165.201.1 eq 25"
}
}
user = http {
login = cleartext test
service = auth-proxy
{
priv-lvl=15
proxyacl#4="permit tcp any host 209.165.201.1 eq 23"
proxyacl#5="permit tcp any host 209.165.201.1 eq 20"
proxyacl#6="permit tcp any host 209.165.201.1 eq 21"
}
}
user = proxy_1 {
login = cleartext test
service = auth-proxy
{
priv-lvl=14
}
}
user = proxy_3 {
login = cleartext test
service = auth-proxy
{
priv-lvl=15
}
}
Livingston RADIUS User Profiles: Example
The following examples are sample user profiles for the Livingston RADIUS server:
#--------------- Proxy user ---------------------------------
http Password = "test" User-Service-Type=Outbound-User
cisco-avpair = "auth-proxy:priv-lvl=15",
cisco-avpair = "auth-proxy:proxyacl#3=permit tcp any any eq 23"
http_1 Password = "test"
User-Service-Type = Shell-User,
User-Service-Type=Dialout-Framed-User,
cisco-avpair = "shell:priv-lvl=15",
cisco-avpair = "shell:inacl#4=permit tcp any host 209.165.200.234
eq 23
cisco-avpair = "auth-proxy:priv-lvl=15",
cisco-avpair = "auth-proxy:proxyacl#3=permit tcp any any eq 23"
http_fail Password = "test" User-Service-Type=Outbound-User
cisco-avpair = "auth-proxy:priv-lvl=14",
cisco-avpair = "auth-proxy:proxyacl#3=permit tcp any any eq 23"
proxy  Password = "cisco" User-Service-Type=Outbound-User       cisco-avpair =
"auth-proxy:proxyacl#4=permit tcp any any eq 20"
Ascend RADIUS User Profiles: Example
The following examples are sample user profiles for the Ascend RADIUS server:
#--------------- Proxy user ---------------------------------
http Password = "test" User-Service=Dialout-Framed-User
cisco-avpair = "auth-proxy:priv-lvl=15",
cisco-avpair = "auth-proxy:proxyacl#3=permit tcp any any eq 23"
http_2 Password = "test"
User-Service=Dialout-Framed-User
cisco-avpair = "auth-proxy:priv-lvl=15",
cisco-avpair = "auth-proxy:proxyacl#3=permit tcp any any eq 23",
cisco-avpair = "shell:inacl#4=permit tcp any host 209.165.200.234 eq 25"
http_1 Password = "test"
User-Service=Dialout-Framed-User,
cisco-avpair = "shell:inacl#4=permit tcp any host 209.165.200.234 eq 23",
cisco-avpair = "auth-proxy:priv-lvl=15",
cisco-avpair = "auth-proxy:proxyacl#3=permit tcp any any eq 23"
http_fail Password = "test" User-Service=Dialout-Framed-User
cisco-avpair = "auth-proxy:priv-lvl=14",
cisco-avpair = "auth-proxy:proxyacl#3=permit tcp any any eq 23"
cisco-avpair = "auth-proxy:proxyacl#1=permit tcp any any eq 23",
cisco-avpair = "auth-proxy:proxyacl#3=permit tcp any any eq ftp",
cisco-avpair = "auth-proxy:proxyacl#4=permit tcp any any eq 20"
#------------------------------------------------------------
proxy Password = "cisco" User-Service = Dialout-Framed-User
cisco-avpair = "auth-proxy:priv-lvl=15",
cisco-avpair = "auth-proxy:priv-lvl=15",
cisco-avpair = "auth-proxy:proxyacl#1=permit tcp any any eq 26",
cisco-avpair = "auth-proxy:proxyacl#3=permit tcp any any eq ftp",
Additional References
The following sections provide references related to the Firewall Authentication Proxy for FTP and Telnet Sessions feature.
Related Documents
|
|
|
|---|---|
Additional authentication proxy configuration tasks |
|
Additional authentication proxy commands |
|
RADIUS and TACACS+ configuration information |
"Configuring RADIUS" and "Configuring TACACS+" |
RADIUS and TACACS+ attribute information |
"RADIUS Attributes Overview and RADIUS IETF Attributes" and "TACACS+ Attribute-Value Pairs" |
Additional authentication proxy information |
Standards
|
|
|
|---|---|
None |
— |
MIBs
|
|
|
|---|---|
None |
To locate and download MIBs for selected platforms, Cisco IOS releases, and feature sets, use Cisco MIB Locator found at the following URL: |
RFCs
|
|
|
|---|---|
None |
— |
Technical Assistance
Feature Information for Firewall Authentication Proxy for FTP and Telnet Session
Table 1 lists the release history for this feature.
Not all commands may be available in your Cisco IOS software release. For release information about a specific command, see the command reference documentation.
Use Cisco Feature Navigator to find information about platform support and software image support. Cisco Feature Navigator enables you to determine which Cisco IOS and Catalyst OS software images support a specific software release, feature set, or platform. To access Cisco Feature Navigator, go to http://tools.cisco.com/ITDIT/CFN/jsp/index.jsp. An account on Cisco.com is not required.
Note ![]() Table 1 lists only the Cisco IOS software release that introduced support for a given feature in a given Cisco IOS software release train. Unless noted otherwise, subsequent releases of that Cisco IOS software release train also support that feature.
Table 1 lists only the Cisco IOS software release that introduced support for a given feature in a given Cisco IOS software release train. Unless noted otherwise, subsequent releases of that Cisco IOS software release train also support that feature.
 Feedback